
Don't wanna be here? Send us removal request.
Statistics
We looked inside some of the posts by wionconnect and here's what we found interesting.
Average Info
Notes Per Post
0
Likes Per Post
0
Reblog Per Post
0
Reply Per Post
0
Time Between Posts
27 days
Number of Posts By Type
Text
17
Last Seen Tumblr Blogs


Fun Fact
Hackers stole 65M passwords from Tumblr in 2013.
Text
Wion Alexa Setup for Smart Control
The Wion Alexa Setup lets you automate smart plugs and lights with simple voice commands. Just connect your device through the Wion app, enable the Wion skill in Alexa, and link both accounts. Once synced, control becomes effortless. Need assistance pairing or managing devices? Our chat support is always ready to guide you through every step with ease!
0 notes
Text
Woods Wion To Eco Plugs: Everything You Need to Know!
You can use the Eco Plugs App to configure, control, and manage the smart plugs and other devices. To access your devices, first, download the Eco Plugs app on your phone. Next, open the app and tap on Create an Account or register using the email. Once signed in, visit the dashboard and follow the steps. To know more, visit us!
0 notes
Text
Accessing the Wion Eco plugs without the app!
The eco plugs wion are one of the smartest plugs that regulate the electrical gadgets in your home. Additionally, to access and manage these plugs you need to have the Eco Plugs app on your smartphone. If you want to know the complete login or setup process to use your smart plugs completely, reach out to us!
0 notes
Text
For the Wion wireless switch setup, first, plug the switch into the wall outlet. Now, plug the control device into the Wion outlet. Ensure the outlet you plugged in the switch is powered on. Afterward, follow the on-screen instructions. For the complete information drop us a line!
0 notes
Text
Accessing the Wion Eco plugs without the app
The eco plugs wion are one of the latest gadgets that regulate your smart home. You can access these plugs using the Wion app or without it. If you want to know the methods to access them without the app or the steps for the app, then stay tuned to us!
0 notes
Text
Setup of Woods Timers Instructions
The Woods Timers Instructions are, to charge the battery, clean the memory, program the timer, review on/off settings, remove or restore the settings, override the timer, countdown settings, daylight saving time feature, and more. To know more related information, get in touch with us!
0 notes
Text
What is Wion outdoor smart plug?
To perform the wion smart wifi plug Setup, plug the Wion indoor into the wall outlet, and ensure you have an updated Wion app. Login to your Wion account, then create a new account. After logging in, you reach the smart setup wizard, here visit Settings and go ahead with the upcoming guidelines. For the entire setup process, visit us!
0 notes
Text
How do I set up Woods Timers?
Before installing the timer device, it is necessary to understand the Woods Timers Instructions. First, charge the battery, clean the memory, program the timer, review the on/off settings, operate/connect the timer, override the timer random setting security feature, and more. For more information regarding the same, stay tuned!
0 notes
Text
How to Complete the Setup of Your Wion Outdoor WiFi Outlet with Ease?
For easy Wion outdoor wifi outlet setup, first, ensure to have an updated version of the Woods Wion App on your smartphone. Now, open the app and then access the admin account of the Wion Wi-Fi outlet by entering the login details. Hereon, visit the smartphone WiFi settings and connect with the ECO network. For more detailed information, reach out to us!
0 notes
Text
Is your Wion app not working? Then this issue occurs when there are browser issues, a low internet connection, an outdated app, or entering the wrong admin username and password on the app login page. To resolve it, fix the web browser issues, ensure a stable internet connection, update the app, and enter the correct admin details. For more info, approach us!
0 notes
Text
To begin with the Wion smart wifi plug setup, you need to have the updated smart Wion app on your smartphone. For this, access the admin account on the app, and then you reach the smart dashboard of the Wion plug. Here, follow the instructions to connect your Wion outdoor plug to the WiFi, or get in touch with us!
0 notes
Text
For easy Wion outlet reset, plug out your device first. Now, locate and press the Reset button on your Wion outlet. Hold the reset button by plugging back the device into the power outlet, and till the WiFi indicator LED turns off. Now, release the button and your Wion switch reset itself. Want to know more? Get in touch with us!
0 notes
Text
You can easily carry out the Woods Wion switch setup process to improve network efficiency. For that, you simply need to connect all the ports, log into the “Woods Wion” app, and follow the on-screen instructions. But if you come across any issues during the setup process, get in touch with our team anytime.
0 notes
Text
To proceed with the TP-Link AX3000 router login process, you will require the default IP address & login credentials. Using the default IP address, you’ll access the login page where you should use the login credentials to access the router’s user interface. For the complete TP-Link router login process, visit our website right away.
0 notes
Text
A brief tutorial to Tp-link wifi extender setup
Tp-Link extenders are one of the top-mentioned range boosters that increase the network coverage of your router and eliminate dead zones in your living space. Similarly, if you buy a new extender, it is necessary to access the repeater's admin panel and perform the Tp-link wifi extender setup to utilize all of its functions.
In addition, the primary methods to set a repeater up are through the web address or the app. Likewise, both methods are convenient to use but you need to follow the steps carefully. In this brief tutorial, we explore the TP-Link repeater setup using the web address and also explain the suitable troubleshooting methods to fix the configuration errors.
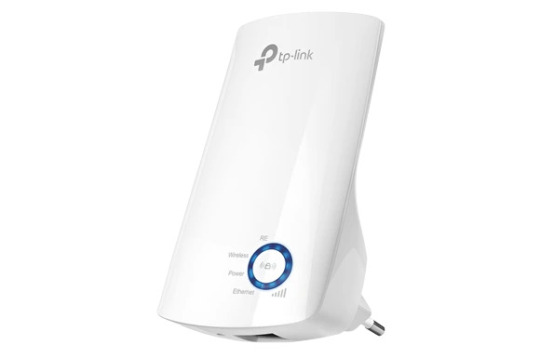
Prerequisites for the Tp-link wifi extender setup
While you begin with the process of extender setup ensure you have all the necessary equipment, such as:
TP-Link WiFi extender
Stable network connection
Ethernet cable
Web address
Admin credentials
Computer/Laptop
Steps to setup the TP-Link extender
In this section, we briefly explore the steps to begin and complete the setup procedure. All you need is a stable internet connection, for this, you can also opt for a wired connection using an Ethernet cable. Now, let’s move towards the steps to configure your range extender:
First and foremost, plug your range extender and power it on.
Now, ensure that your computer is connected to the extender network.
Next, open the web browser and type the tplinkextender.net web address or 192.168.1.1 IP address.
Hereon, a login window appears to you on the screen.
Further, mention the username and password here.
After that, click on Quick Set Up> Next> Select your Region> Next.
Here, your extender scans for the available networks, so wait patiently.
After scanning, you have to check the list of available networks and select the one you want to go ahead with.
After that, tap on Next and another window displays the password of your selected network.
After typing the password, click on the Copy from the main router to continue with the single network or click on Customize to create a different network.
Further, tap on Next> Finish.
Lastly, you have completed the TP-link extender setup successfully, now continue error-free browsing.
How to troubleshoot the TP-Link extender setup issues?
Additionally, the setup issues are common when a non-tech person configures his repeater for the first time. These can be due to incorrect IP addresses, login details, unstable networks, or faulty hardware. So, the primary thing is to fix these issues but how? No worries! We explain here:
Check the admin details you enter to access the web interface of the extender.
Also, enter the correct web or IP address to continue with the setup process.
Examine the network cables you use for a wired connection. Replace if there is any damaged cable preset.
Ensure your internet connection is stable.
Look at the extender network that is connected to your smart device is active properly.
Fix the browser issues and update if needed.
Ensure an adequate power supply on your range booster.
All in all, the information we share with you will assist you in carrying out the Tp-link wifi extender setup process easily. Similarly, if you have issues with the configuration process of your range booster, then walk through our troubleshooting section. If need more info, then stay tuned to our website.
#Tp-link wifi extender setup#Troubleshooting tp-link setup issues#tp-link extender setup#tplinkextender
0 notes
Text
The http //tplinkrepeater.net web address is the easiest way to log in to your extender page and configure it. For this, connect the repeater network to the computer and then enter the given web address into the web browser’s URL bar. Next, enter your admin details and follow the instructions mentioned on your screen. Still, seeking assistance? Drop us a line here!
0 notes
Text
The TP-Link extender comes with several LED lights that convey the status of the extender. By seeing the extender’s LED lights, you can find out if there’s any issue with the extender. So, if you face the TP-Link extender’s blinking light issue, you need to notice the color. You must know what each color and behavior indicates, as different color and behavior means something different. If the Issue with the extender persists, check out our website for the complete troubleshooting guide.
0 notes