witheredlilies
Withered Lilies
Made for Stalking Following.
1089 posts
Don't wanna be here? Send us removal request.
Last Seen Blogs

jessrollarart-blog
Art by Jess Rollar


team-kaze-hunters
Team KAZE SEMI HAITUS

goodyankeedeadyankee
Kiubo, soy Jack!
Photo


Maxis Infant Face Templates 1-28
Yes those are babies not toddlers.
After many weeks of nearly smashing my computer they are finally complete.
If you don’t want to hear my ramble about how it works, skip down to the bottom for the disclaimers (PLEASE READ THEM VERY IMPORTANT) and links lol
Ramble:
After Marticore mentioned in her video about Aliens in TS2, that the infant alien face had it’s own template that could mix, I had the sudden realisation that infants were defaulting to face 2 (base). Just like how the broken face templates did before Argon made their fix.
With some reverse enginering of the 2 non default face template tutorials (Argon’s arch fix and templates were also extremly helpful and supplied the BINX file I needed) and cloning the infant face 2 files, I finally figured out how to add the files back for each template. I then needed to figure out how to modify the facial structures.
DeeDee had managed to add infant faces to their non default template but used Milkshape to edit the faces. But I didn’t have the attention span or reflexes to do that so I wanted to see if I could do it in bodyshop. After 5 days of fighting with my pc and game files I worked out that if you replace the toddler face and scalp mesh with the infant one, it shrinks the head down and sliders work perfectly. Then I discovered if you saved the facial structure you wanted to shrink down as a toddler, then exited and added the toddler to infant face files, it shrunk those down with minimal distortion.
Many disclaimers:
1. What these can do: Add infant faces to new sims. Face templates can mix by right clicking or using the face section buttons (nose eyes eyebrows etc). Babies will actually look like their other age groups.
You can however add them to existing sims (somewhat). This works well on maxis townies as they use full face templates with no changes. (You can have all the Komei Tellerman babies you want) Tutorial here
2. What these can’t do: These will not add faces to existing sims (Same as broken face template fix or default face replacements). Sliders do not work on them. Any changes made will not be reflected on children. They will only show the base templates you used.
I am currently working on sliders for infants, however I am taking a day break so I don’t lose my mind
3. How to make your own: If you want to make faces to match your own custom templates, the simpe part is the same as this tutorial just substitute the template files with mine. To make the infant faces, I explained this in my non default post here and just use the default tutorial instead of the non default ones linked there.
4. Final note: These are techcially still in testing. I have played with them in my game and made cute babies but only one generation. If you have any issues using them or trouble creating your own, feel free to leave a comment or send a dm :D
5. Wait no 1 more note: You might notice the alien face isn’t the default face, this is the aged down version of the toddler which resembles the rest of the ages. If you want the original ones, you can leave out the alien one
Download /Alternate
Recommended: Argon Arch fix for faces 21&25
Credits: Argon: For their original tutorial on non default faces and and files
Dominiquex: For their later tutorial with added photos and infomation
Special thanks to Marticore for inspiring me on this insane project :D
730 notes
·
View notes
Note
apologies for the old af wcif, but i must ask or i'll never let myself forget! do you happen to recall what the corn plant in the last pic is? i'm obsessed with it! post/172284167310
It's not a problem. Don't worry. ^^;
The plant is from Stylist Sims' Paris set. You should be able to find it at the booty.
6 notes
·
View notes
Text

Want to merge your fences? You can! New tutorial showing you how to merge fences. Especially handy if you have any repo'd fences, either by GMDC or TXTR.
tutorial for merging fences
230 notes
·
View notes
Photo

Rabbit pen - a default replacement (yet another collab with @episims ❤)
Put your hand up if you ever used this toy dog pen! 🙋♀️ No one? Yeah, thought so XD
Originally I wanted to make this a custom pen, but then we decided that the toy dog pen wouldn’t be missed, so we made a default! And also, because the animations needed to be edited, and it was easier this way! (we’re not going to create a custom verison)
The bunny comes from sims 4 (many thanks to @tvickiesims for extracting it!), but it got adjusted to the pen. It has all the original 8 color variations (4 as defaults, and 4 recolors)! The animations are not accurate (that’s not how bunnies move!), and there’s also some clipping as well, but that was the best we could do. The weirdest animations got removed though, so the bunnies don’t bark at least. The sounds also got removed, bunbun is a silent creature!

The bunny has its own pet treat, and its own food box texture. The pen also got a little facelift, featuring some hay, a chewing stick, and a wooden bunny house! (that they never use, but whatever, it’s part of the ~aesthetic~) Despite this, all the existing recolors should work fine with this default!
The toy dog-related wants (and fears) also got adjusted, so now sims roll wants and fears about the bunnies instead of the dogs! Important! The Wants file in the download shouldn’t be renamed, because it’ll stop working!
The description and interaction texts were changed and got translated to Finnish and Hungarian as well. If you wish to provide a translation to other languages, please contact Epi!
Update 08/12/22: Polish translation by @jellymeduza added!
Update 08/17/22: More translations added! Russian by @summer-choi-simblr, French by @tvickiesims, and Brazilian Portuguese by @itsyuna! Thank you all!
Update 08/18/22: Even more translations added, woo! Spanish by @nevernerdenough, and Swedish by @namelessperson98! Thank you so much!
Mesh, texture, and font credits go to Eaxis, Freepik, Julsfels, Veranka, Eddysims, Franzillasims
Oh and it’s advisable to delete your thumbnails to see the changes in the pet selection window!
Have fun, and tell us if you find any problems! 🐇
Download - Alternate
1K notes
·
View notes
Text
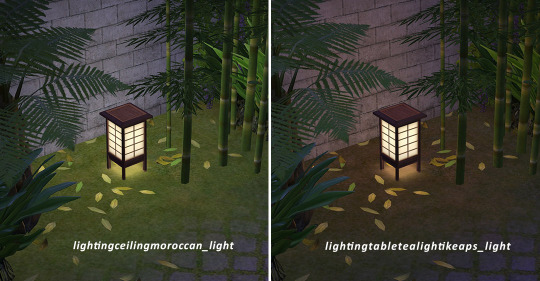
Mini-tutorial: How to change light settings / light colour for custom TS2 lamp using SimPe.
It’s very easy. You replace the name inside Light Names and cLightRefNode with another TS2 light name. You’ll find the light names inside custom lamps you have in your game (those that work properly, ofc) OR you can clone a TS2 lamp and inspect the light name. Use the light name found in CRES / cLightRefNode, NOT in STR Light Names.
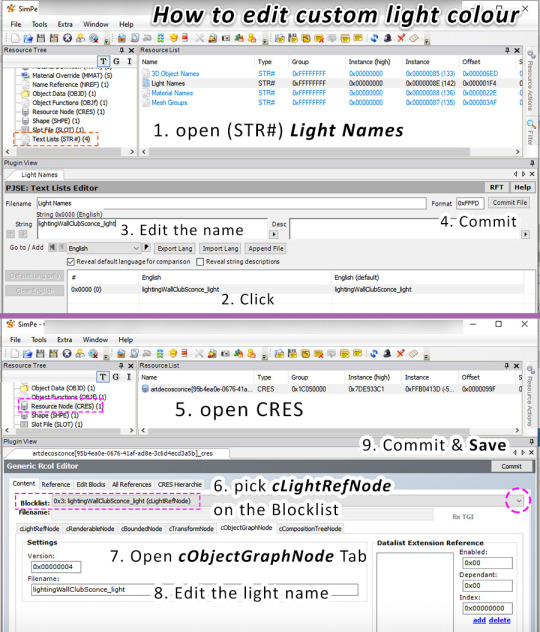
In most cases replacing the name inside CRES / cLightRefNode is enough to make it work - that’s the most important bit. Buuut.. it’s good practice to fill out the STR# Light Names as well.
More info, Light names and sample pics below the cut!
Keep reading
325 notes
·
View notes
Text
Buy <unnamed wantable object category #####> fix
(by the way, has anyone else noticed that it actually says unnammed, not unnamed?)
So, here’s an issue that you might have, at least if you have an edited version of WantTuning.package that is not updated for your latest EP/SP. Usually, that is M&G and the specific numbers you see are 10112 and 10113.

The way to fix this, which I want to credit someone else with but I don’t remember who and the reason I’m making this tutorial is because I keep forgetting how to fix this and I want to be able to explain it when people ask and, is to simply add the text strings for those categories.
Open up your edited copy of WantTuning.package in SimPE and open UI Data. If you scroll down a little less than a third of the way, you will find a categories section, and at the bottom of that you will probably see a line saying 10111 and Playground Equipment. You need to add two lines after that:
<category id=“10112” name=“Ceiling Fan” primaryIcon=“0xff179002” secondaryIcon=“0x00000000”/>
<category id=“10113” name=“Green Energy Source” primaryIcon=“0xff179002” secondaryIcon=“0x00000000”/>
Commit your changes (there’s a tiny commit button in the bottom right) and save!
420 notes
·
View notes
Text
It took me the entire day to reinstall the game on my new computer, to make all the adjustements for it to work on Windows 11, find the right settings with the Graphic Rules Maker, and… my game loads twice faster from Windows to neighborhood view, then it loads at least TEN TIMES faster to enter a lot, everything runs so smoothly, even in very heavy CC lots and neighborhoods, with all settings at high, Origin downloading the Sims 4 at the same time, talking to my best friend on Discord, recording a video… like… IS THIS HEAVEN ?! I’m about to cry. Tears of joy of course. But still !
I think the next week (or maybe even the next month) will be about enjoying my game and nothing else. I’m so, so, so happy, you can’t even imagine !
847 notes
·
View notes
Text
Permanent Quarter-Tile Placement On!
Just wanted to share a tip I know about how to make the Quarter Tile Placement Cheat on all the time so you just have to press Ctrl + F when you want to use it without having to type in a cheat each time.
Many of you may know that adding “setquartertileplacement on” to your userStartup.cheat doesn’t work, so I’m going to tell you where you can put it that does work, in case you didn’t already know!
So, head to Origin Games\The Sims 2 Ultimate Collection\Fun with Pets\SP9\TSData\Res\Config and open up the file called “globalProps.xml” with a text editor, I recommend Notepad++. You should probably make a backup of this file first before making any changes, just in case.
In this file, scroll to the bottom and you should see a line that says:
<AnyBoolean key=“quarterTilePlacementEnabled” type=“0xcba908e1”>false</AnyBoolean>
Simply change the false to true and save the file and that’s it! The Quarter Tile Placement cheat will always be on without you having to type it in ever again! Simply toggle it on and off with Ctrl + F!
Hope that helps at least someone! I was telling my friend @morepopcorn about this trick and I couldn’t find the website where I initially read about how to do this anymore so she suggested I should make this post as it might not be common knowledge.

1K notes
·
View notes
Text
Fixing old mediafire links
If you’ve stumbled upon a mediafire link recently which gives you a white page and “File5“ (or just a white page) message, then this is a mini-tutorial on how to fix that :-) I’ll be using simlishcreations’ “Trapping’s Short Spike TS3 to TS2′s download link as an example.
The mediafire link should look something like this:
https://www.mediafire.com/?cw4cdfjozodd3et
Notice how there’s a ? between / and cw4cdfjozodd3et? Delete that questionmark and write download/ or file/ (don’t forget to add the / after! Otherwise it won’t work). Now your link should look like this:
https://www.mediafire.com/download/cw4cdfjozodd3et
or this:
https://www.mediafire.com/file/cw4cdfjozodd3et
And you’re done! Click enter, and the link will automatically update to the “newest version”. For this link, it will update itself to this:
http://www.mediafire.com/file/vb1cbbik32fkh88/Trapping_Small_Spike_Simgaroop.rar/file
I’m not sure why mediafire can’t seem to re-direct/update old mediafire links like this? I’m also not sure if this is a temporarily thing or not, but oh well. Now you know how to fix it if you ever need to! :-)
Let me know if anything is unclear or if I should word myself better. Happy simming!
414 notes
·
View notes
Photo


I can’t believe it myself, but I’m happy to say that Feverfew is now available!
It would be crazy to put all the information directly here, so I’ve made a dedicated page accessible directly from my simblr top menu.

TAKE ME TO FEVERFEW
— The train is departing. Don’t forget your ticket!

1K notes
·
View notes
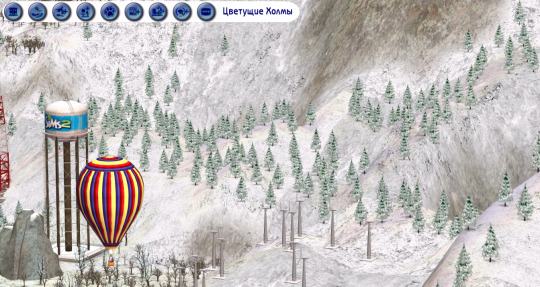
Photo

TS:CS SEASONAL PINES as base game nhood pines default replacement
Not so long ago @shastakiss reminded me about defaulted version of pines from The Sims Castaway Stories, that I made once upon a time, when we worked on the seasoned maxis flora together. Shasta make her custom version of seasoned CS pines and upload it while I was prepearing the default replacement version with another texture, rendered in maxis-like way. I don’t remember, why I don’t publish it in that blog, but now I should fill this gap.
So, how is the default replacement version different from the custom one?
1. First of all, the default replacement is more optimized: the DR version not only saves the game memory by replacing game resources, but also takes up less space (1.6 MB vs 642.1 kB). The earlier versions uses separate butch of textures for each pine from the set (there are three shapes of pine, each in three colorations). My DR version uses repository technique. To be honest, this set should be named “semi-default replacements”, because I defaulted only three basegame pines - the textures and other 6 pines is custom itself (basegame neighborhood pine texture isn’t replaced for some reasons), but all of the models uses the 9 texture resources, not 27.

2. In addition, the default replacement allows you not to replace Maxis trees manually in neighborhoods such as Riverblossom Hills or the Three Lakes: the DR version will be placed automatically, and therefore the neighborhood view will immediately transform to this look:

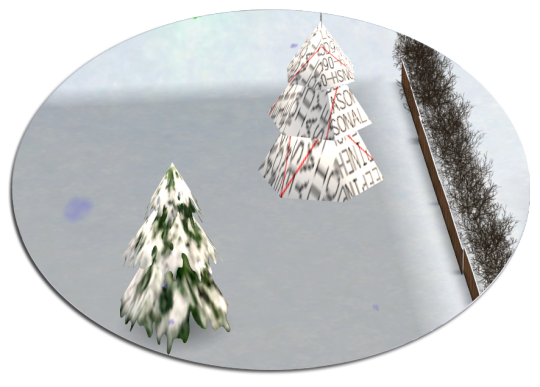
3. Finally, I used seasonal maxis’ lot pine textures for rendering in 3d-max, so the snowy versions of neighborhood pines matched in style with lot pines.
DOWNLOAD THE DR NHOOD PINES PACK
So, if the lot pine has matched now with the nhood pines, how about the pines on another, not played lots, or lot pines from neighborhood view? They uses the simplifed imposter known as lod90, that still… ugly. So, there is a
TS:CS SEASONAL PINES as base game lot pines imposter (LOD90) default replacement

As I remember I try to include the CEP-addon for a lot pine with recolors that match CS coloration, and add the own lod90 textures for each color, but at this moment I have no idea where that version is, sooo there is only default color for imposter of lot pine.
DOWNLOAD THE DR IMPOSTER OF THE LOT PINE
Well, there is another maxis pine for lot in Happy Holliday SP, and it still have the perfect imposter ever:
…what the hell, Maxis? Oh, I shouldn’t be surprised after so many years. But now we have
FIX of HHSP outdoor christmas lot pine imposter (LOD90)

It uses the parts of model and textures of maxis’ small decorated christmas tree. It isn’t so funny to render the spirals into the planes, or maybe I was too lazy for it, but I think now it looks pretty… Anyway much better than the cringy slices of notex LOL
DOWNLOAD FIX of HHSP outdoor christmas lot pine imposter (LOD90)
IMHO there is no sense to separate default replacements above because my new imposters are repositored to common textures. But maybe some of simmers aren’t have HHSP, and optionality always iz gud mmmokay? But you can
DOWNLOAD THE FULL PACK OF LOWEDEUS’ TS:CS SEASONAL PINES
MIRROR LINK (yandex disk)
I wish you a Merry Christmas and a Happy New Year!
602 notes
·
View notes
Photo

Important!!!
For the secret lots to funtion like secret lots, there’s some special requirements that need to be fullfilled. (Taken from this tutorial)
Far East Secret Lot: Has to have a Tea Time Table
Tropical Secret Lot: Has to have a microwave, cheap dishwasher and Feel the Breeze Hammock
Mountain: Has to be built on a medium sized lot, have a residential mailbox and the cheap stereo.
Let’s begin!
Step 1: In Game
1. Create a community lot (residential lot for the Mountain lot) and place it in a throwaway vacation hood.
2. Make the changes you want to make, don’t forget to save.
3. Open cheat bar and type “changelotzoning secretvacationlot” without the “”. If you’re making a Mountain lot, before making it a secret lot first type “changelotzoning community” and buy a community phone.
4. The save button should now be greyed out. Exit to the vacation hood (if you just exit to the desktop right away the lot zoning might revert back to community).
5. I would place the lot in the lot catalogue and then place it down again, so that I have a copy.
5. Exit the game and open SimPe.
Step 2: SimPe
I’m unsure if SimPe looks different to people depending on what version of SimPe they have, but this is how it looks for me.

1. Open SimPe, select Tools -> Neighborhood
2. Select Neighborhood Browser…

3. In Neighborhood Browser select the Main hood that has the vacation hood attached to it it.
4. In the Options box scroll through the list and select the vacation hood. Click Open.

5. In the Resource Tree to the left you’ll find the Lot Description. Click on it.
6. Select your secret lot from the Resource List. This opens the Lot Description Editor.

7. Make sure that the Hidden box is checked. This will make your lot invisible in hood view.
8. Make sure the Lot Type is set to SecretHoliday. If you didn’t change the lot type while in game you can change it now in SimPe.
9. Save.
10. Go back into game. Have a sim visit the secret lot to make sure it spawns it’s unique NPC character.
10. If everything works, put the unplayed copy (from your lot catalogue) in your real vacation hood, follow the steps above to turn it into a secret lot and hide it in hood view.
465 notes
·
View notes
Note
Hi, did you ever put the full produce display default? You replaced the display with Shasta's textures but the actual replacements for the produce are not uploaded?
Hi, no I never put up the full default (because I only replaced the produce bags, not the loose fruits on top, so it would be pretty much useless to anybody else). I’m sorry.
I did, at one point, give the textures to Shasta to integrate into a project of hers. But I don’t know whether she is still working on this/ something similar.
That said, I made those a really long time ago, so you probably are not missing much. ^^;
6 notes
·
View notes
Photo


Hey guys, same old. Just worked quite a bit during the past two weeks, so S2 kept me company during breaks, and I’ve made some default replacements for my game (yes, I still don’t like making them.... but). One of them has already been created once before, by Tangsims, but that one has disappeared, so I made a new one.
The colours are a mixture of shades by Io, Pooklet, Digital Angels. Feel free to swap them out. All retextures are by BoldandBeautifulSims and use Io’s textures. Mesh conversions by Trapping, fixes by RentedSpace.
DOWNLOAD (AcornTuck with 3t2CurlyBedHead).
DOWNLOAD (BowlTwist with 3t2Zoe’sDo).
DOWNLOAD (CurlsUp with 3t2PertPixieCut).
Credits: S3; Trapping, RentedSpace; BoldandBeautifulSims, Io; Pooklet, DigitalAngels
55 notes
·
View notes
Note
Hi! Could you maybe tell me where to find the shirt that the sim holding the binoculars in this post /post/618300866129248256/hey-guys-i-hope-youve-been-well-in-these-stange wears? And I think the TS4 clothes rack replacements look really nice!
Sure, it’s by Misomoso, here: https://misomoso-no.tumblr.com/post/107012126617/my-old-cc-reupload-part-3-am-and-tm-clothes
And thank you. :)
2 notes
·
View notes
Text
Sims 2 Ultimate Collection & Happy Holidays Clothing
Imagine my dismay to find all Happy Holidays pak’s outfits, hair and accessories missing from The Sims 2 Ultimate Collection! Bad EA!!!
So I set out to see why it was missing. It turns out both packages for Happy Holiday Stuff is found here
Origin Games\The Sims 2 Ultimate Collection\Double Deluxe\Base\TSData\Res\Catalog\Bins
H05.bundle & H06.bundle. I open them up and saw everything was there all the funny elf’s clothing, kimonos, hats..etc but none of it was showing up in game.
I did some further investigation and found the culprit here
Origin Games\The Sims 2 Ultimate Collection\Double Deluxe\Base\TSData\Res\Catalog\Skins
skins.package file is the wrong one. It’s only base game! *head desk*
So I grabbed my Happy Holidays disc off the shelf and loaded it up on my desktop because my laptop does not have a DVD drive. I opened Windows explorer and copy the setup.exe to my desktop then transfer it over to the laptop. It wouldn’t install and told me I already had Happy Holidays installed. *sigh*
Light bulb moment!
I removed H05.bundle & H06.bundle from the bin folder then tried again. This time it did installed. Once that was done I opened the skins.package it just installed and look inside and began comparing the files. It turns out the only difference is the Property Set files (GZPS) were added to unlock the outfits.
My outfits were now back! :D So I copy the new skins.package to desktop I then open Origin and use the evil updater which we all knows really just repairs the game each time. Once it finished I just swapped out the skins.package with the Happy Holiday one and everything still works!
So maybe someone who is more SimPE savvy and with better eye sight can come up with a fix.
If any of you would like to try to create a fix or just like to swap out the skins.package and see if that fixes it for you without having to install Happy Holidays pak. You can grab the one from Happy Holidays here @ Box
If the swap the files without installing the pak works please let me know! If not let me know too and I will poke around some more and see what other changes might be needed.
172 notes
·
View notes
Text

Quick Skylight Roof tutorial for @be-kind-and-peaceful and anyone interested ^^
I learned this trick from this cute cabin by @saturnfly-blog on MTS. Here’s the tutorial for houses on a foundation. Version for houses without foundations is under the cut. :)
Keep reading
576 notes
·
View notes