
Statistics
We looked inside some of the posts by worldbestdiy and here's what we found interesting.
Average Info
Notes Per Post
0
Likes Per Post
0
Reblog Per Post
0
Reply Per Post
0
Time Between Posts
14 hours
Number of Posts By Type
Text
17
Last Seen Tumblr Blogs


Fun Fact
After the announcement of the deal with Yahoo!, there were 170K signatures of unhappy Tumblr users petitioning to prevent the sale in 2013.
Text
DIY | DIY Shoe Rack Plans | DIY Projects for U
Shoe Rack Ideas to Help You Stay Organized!
DIY | DIY Shoe Rack Plans | DIY Projects for U Tools: Saw 2 1/2” screws (or Kreg Jig & 2 1/2″ self-tapping screws) 4″ screws (or Kreg Jig & 2 1/2″ self-tapping screws) Wood glue Wood filler 2×4 Cut List: (A) – 4 @ 13″ (legs) (B) – 4 @ 5″ (sides) (C) – 6 @ 33″ (shelves) Dimensions: 36″ wide x 13″ tall x 12″ deep DIY Project Details: worldbestdiy.com.blog
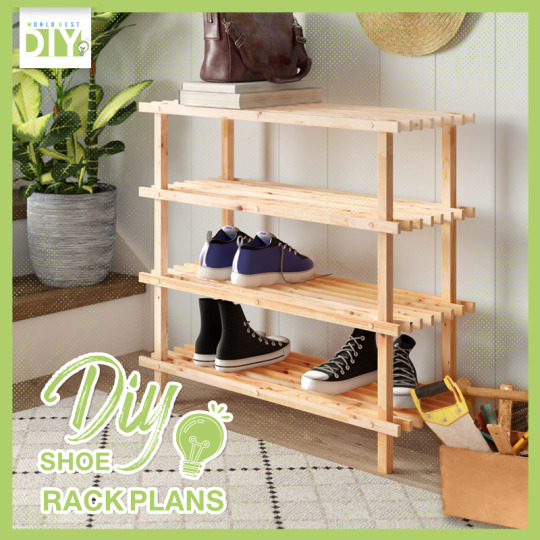
Please read all the directions before beginning, and cut your pieces as you go, measuring before each cut.
Use 2 1/2” screws or pocket holes with 2 1/2″ screws unless otherwise indicated.
Always use glue. Pre-drill and countersink your screws. I have not built from these exact plans, so measure lots to make sure things work out!
Build the sides…Use two side pieces (B) to connect two legs (A) as shown below.
The first side piece should be flush with the top of the legs, the second should be spaced down 4″.
You can attach the pieces using a Kreg Jig & pocket hole screws, or by drilling through the legs into the side with 4″ screws and glue.
The Bottom Shelf…Use three shelf pieces (C) to make the bottom shelf.
DIY Project Details: worldbestdiy.com.blog
All of these pieces will be installed 2″ off the ground. The front board should be flush with the front edge of the front legs, and the backboard should be flush with the bask edge of the back legs.
The centerboard will be centered between the other two with a 3/4″ gap on either side. Attach these with your Kreg Jig or with 2 1/2″ screws and glue.
DIY Project Details: worldbestdiy.com.blog
The Top Shelf…Attach the top shelf just like the bottom shelf, but with the top sides flush with the tops of the legs and side pieces. Again you’ll have a 3/4″ gap between the shelf boards.
Start by filling any nail holes and sanding everything down nice and smooth.
Then finish with whatever paint/stain/polyurethane you like. If you don’t want your shoe rack to drawer any unnecessary attention, try staining it the color of a nearby console, or painting it the same color as your walls.
On the other hand, if you want to add a bright pop of color to your entryway try painting your shoe rack a vibrant yellow or teal.

DIY Project Details: worldbestdiy.com.blog
0 notes
Text
DIY | How to Build a Dog House | DIY Projects for U
Pet Dog House!
DIY | How to Build a Dog House | DIY Projects for U
Here With DIY We Can Learn:
How do you make a dog house at home?
What materials do you need to build a dog house?
How do you make a simple dog kennel?
How can I make a dog house warm in the winter?
Whatever type of material you choose, make sure that the construction materials are free of toxins.
This is particularly important if you have a puppy that chews on everything.
DIY Project Details: worldbestdiy.com.blog
Tools and Supplies You Will Need:
(7) 1/2-inch exterior grade plywood sheets, every 4 feet by 4 feet
(6) two-by-fours, each 8 feet long
Circular saw
Jigsaw
Carpenter’s pencil
Carpenter’s square or a Speed Square
Straight edge
Hammer
1 1/2-inch long nails
Roofing nails
Roofing materials: either three-tab composite shingles or rolled roofing
Exterior latex paint
Caulk and caulking gun
Primer
Paintbrush
Eye and hearing protection
DIY Project Details: worldbestdiy.com.blog

Building a Dog House Even if you have rudimentary building skills, you can build your own dog house.
Depending upon the complexity, the project can take half a day to several days to complete and won’t break your bank.
To build a dog house for small- to medium-size dogs, which typically weigh around 50 pounds, you should buy a single sheet of ¾-inch-thick plywood, 2x4s, and 2x2s.
Decay-resistant woods, such as redwood and cedar, work best. Transfer the pattern to the plywood, and make sure to leave space between the pieces.
DIY Project Details: worldbestdiy.com.blog
Construct the Floor…A raised floor helps prevent water from seeping in when it rains.
Cut the 2×4 wood boards into four pieces for the base, with two at 22.5 inches long and two at 23 inches long.
Place the longer boards at the end and use wood screws to secure the smaller boards inside.
This forms a rectangle. Make sure the base is square, and fasten the bottom piece to the base with wood screws.
DIY Project Details: worldbestdiy.com.blog
Cut the walls…Cut out the rectangular walls from the plywood, with each side measuring 26 inches long and 16 inches wide.
The triangle section, which goes above the rectangle wall, has the two sides measuring 12 inches with the base 24 inches.
You need two pieces of each for the front and back. When cutting the door, leave a 3-inch lip at the bottom.
Use a round object, such as a mixing bowl, to trace around the arch for the door.
Use the 2×2, and cut eight pieces for the framing. Four corner framing pieces are 15 inches long while four roofing pieces are 13 inches.
DIY Project Details: worldbestdiy.com.blog
Screw the 15-inch framing pieces to the inside of each side frame. Screw the side panels to the base.
Use screws to attach the front and back panels to the floor.
Tip: Drill a few nickel-sized holes on the side of the house’s walls. That way the hot air in the summer can escape and the inside can dry out in the winter.
Attach the Roof…Cut the roof panels from the 2×2, with dimensions of 32 inches long and 30 inches wide.
Screw the 13-inch pieces you cut in the previous step. Place them on the inside of the front and back panels so they form a triangle.
Screw the roof panels to the framing pieces so the roof forms a peak.
Top It Off…Install shingles on the roof to finish off the traditional design.
DIY Project Details: worldbestdiy.com.blog
Don’t worry about roofing felt unless you believe the house isn’t complete without it.
Staple the paper to the roof in a single sheet and go up one side and down the other.
For the shingles, place the first-row upside-down along the bottom of the roof’s edges and secure them with short roofing nails.
Directly on top of the row, nail the shingles in place in the desired pattern.
If you don’t want to use shingles, use aluminum flashing where the two roof panels meet.
DIY Project Details: worldbestdiy.com.blog
Use roofing cement or silicone caulk along the bottom, and nail the flashing in place.
With either option, make sure the nails do not protrude into the interior of the dog house where they could hurt your pet.
DIY Project Details: worldbestdiy.com.blog
Personalize It…If your dog really is a member of the family, you can prime and paint his dog house to look just like yours.

DIY | How to Build a Dog House | DIY Projects for U
Use quality exterior latex house paint if you decide to paint. Otherwise, treat the wood with linseed oil if your dog likes to chew. Accessorize dog house…Make sure your pooch has enough padding inside. Use hay, straw, or cedar shavings for bedding. You can use blankets or pillows, but you must check them often. If they get wet, mildew can form. DIY Project Details: worldbestdiy.com.blog
0 notes
Text
Eliminating Ceiling Fan Noise DIY | DIY Projects | inspiring ideas DIY
Eliminating Ceiling Fan Noise DIY!
Eliminating Ceiling Fan Noise DIY | DIY Projects | inspiring ideas DIY Sometimes, the noise comes from loosened blades. Therefore, make sure that you tighten them properly using some screwdriver. Unsteady blades can wiggle from side-to-side to up-and-down. Screw them until blades are steady and fixed into the place. DIY Project Details: worldbestdiy.com.blog
In order to achieve the best results, check your blades every 6 months and make sure that they are tightened up.
If you don’t regularly maintain your ceiling fan, you’ll be able to notice clicking noise in a ceiling fan which is a clear indication that requires maintenance.
Make sure that the bulbs are screwed properly
Most ceiling fans have lightbulbs. Make sure that those bulbs are all steady and that they are not the reason for the noise.
If not properly fixed, bulbs can cause squeaking noise which is highly unpleasant. It comes from the screw thread that contacts wobble inside the base.

Fix them properly; tight those up with the screwdriver and you should not worry about the noise coming from this part of the ceiling fan.
Dirty blades can cause a fan to wobble and shake because they throw the blades out of balance.
DIY Project Details: worldbestdiy.com.blog
Clean both sides of the blades with a dust cloth or, if necessary, a slightly damp cloth or paper towel.
The topsides will much dirtier than the bottom sides. Dry any moisture from the blades right away.
Many are made from wood composite or particleboard materials that are easily damaged by water.
While you’re cleaning the blades, make sure that each blade is straight and not warped, damaged, or hanging lower than the other blades. If it’s hanging lower, try tightening it (see below) to correct the problem.
If this doesn’t work, or if the blade is warped or damaged, replace the blade with an exact match from the fan’s manufacturer.
Warped, damaged, or loose blades can cause a fan to wobble and can be very hard on the motor and the fan mount.
Tighten the Blades, Several different parts can become loose on a ceiling fan and make things noisy.
DIY Project Details: worldbestdiy.com.blog
The first parts to check are the blades—where they mount to their brackets and where the brackets mount to the rotating part of the fan’s motor assembly.
Blades may be fastened to the brackets with screws or with another type of fastening system, such as keyholes that fit over pins or studs on the bracket.
The brackets usually fasten to the motor unit with screws or bolts. Tighten screws or bolts with a screwdriver or wrench, as needed.
Tighten the Light Fixture Parts, If your fan has a light fixture, make sure all globes, shades, bulbs, and any other fixture parts are snug.
Most globes and shades are secured with thumbscrews and are easy to tighten by hand.
Don’t use tools on these, as you’re likely to overtighten the screws and possibly crack the glass.
DIY Project Details: worldbestdiy.com.blog
If tightening the fixture parts with their screws doesn’t get them snug, you can add a thick rubber band around the neck of the globe or shade, then reinstall it with the screws.
Fan manufacturers also sell sets of rubber “silencer” bands for the same purpose.
Tighten the Motor Cover, An intermittent noise or scraping noise may be caused by the fan’s blade brackets dragging on the fan shroud or motor housing cover.
Often you can remedy this by loosening the cover’s screws, slightly adjusting the position of the cover, and retightening the screws.
Also, make sure the blade brackets are tight (as described above) and not rubbing against the cover.
Assess a Wobbly Fan, Noisy ceiling fans are often wobbly ceiling fans, and wobbles can have a few different causes.
To diagnose your wobbly fan, first, make sure you’ve tightened everything up and have confirmed the blades are straight. Next, follow these steps to tighten the fan’s mounting screws.
DIY Project Details: worldbestdiy.com.blog
Turn off the power to the fan’s circuit by switching off the appropriate breaker in your home’s service panel (breaker box).
You’ll be working with a metal tool around wiring, so it’s not safe enough to simply turn off the wall switch.
Loosen the screw(s) on the fan’s canopy cover, and slide the canopy down from the ceiling.
Test for power in the fan’s wiring, using a non-contact voltage tester, to make sure the power is off.
DIY Project Details: worldbestdiy.com.blog
Tighten the screws securing the fan’s mounting bracket to the electrical box in the ceiling, using a screwdriver.
If the screws are loose at all, this is likely the source of your wobble woes.
Check the box by gripping the mounting bracket and trying to move it from side to side. The box should be rock-solid and allow no movement.
If the box moves, see if there’s a nut that tightens the box against its mounting brace (secured to the ceiling framing) or check for screws that fasten the box directly to the framing.
DIY Project Details: worldbestdiy.com.blog

If the box flexes (usually because it’s plastic and the wrong type of box) or if it’s not mounted to a brace or the ceiling framing, you’ll have to remove the fan and install a new ceiling-fan-rated box.
Chances are, an improperly installed box is not the right type of box, to begin with; better to start over.
Reinstall the canopy cover and restore power to the fan. Test the fan for wobble. If it still wobbles, try balancing the blades.
DIY Project Details: worldbestdiy.com.blog
0 notes
Text
How to Install a Pendant Light DIY | DIY Projects | inspiring ideas DIY
DIY Projects | inspiring ideas DIY
How to Install a Pendant Light DIY | DIY Projects | inspiring ideas DIY
DIY Project Details: worldbestdiy.com.blog
Lighting It’s the visual backbone of space and has the luxury of being either quiet or loud depending on the aesthetic and the utility desired.
Which brings us to one of the most common lighting questions we receive on a daily basis: What height should I hang my pendant or chandelier from the ceiling?
The quick answer is: It depends – mostly according to your own personal style.
DIY Project Details: worldbestdiy.com.blog

We have a few rules that we tend to follow when it comes to installing chandeliers and pendants that we thought we would layout for you below. First, you’ll need to determine the overall length that you want for your space.
To do this we recommend hanging a balloon with a string from your ceiling.
DIY Project Details: worldbestdiy.com.blog
This will allow you to step back and assess the height from multiple angles along with the visual impact.
Once you know the overall length you’d like your light to be then you need to determine if the pendant or chandelier you’ve chosen comes with a shade or if you need to purchase one separately.
DIY Project Details: worldbestdiy.com.blog
If the shade is included, then you can simply enter your desired overall length on the lights product page before you order.
If the shade is not included, you can figure out the length you need for the fixture by subtracting the height of the shade you’ve chosen from your overall length. This will give you the length you need for ordering your fixture.
Two common placements for pendants and chandeliers are in the dining room and/or over a kitchen island.
For hanging lights above a kitchen island, there are a few factors you’ll want to consider. Will your pendants serve as accent lights or will they provide the general light in the kitchen? How tall are the people in your household?
Ideally, the bottom of the shade won’t hang lower than the tallest person in your household.
DIY Project Details: worldbestdiy.com.blog
As a general rule, you’ll want at least 30″ to 36″ clearance between your surface and the bottom of your fixtures.
Small islands (4 to 5 feet long) usually do well with one large or two medium pendants, while larger islands can handle two larger or three medium-sized pendants.
For hanging multiple pendants we recommend spacing them about 24″ apart.
When it comes to your dining table, it’s all about your aesthetic and the level of formality you want for your dining room.
Traditionally, more formal dining rooms have lower hanging light fixtures.
DIY Project Details: worldbestdiy.com.blog
A general rule of thumb is to hang the fixture 3 feet (36 inches) above your table or 6 feet (72 inches) off the floor.
However, all rules are made to be broken and some people consider this too low for casual entertaining.
For a more modern or laid-back feel, you might want to bring them up a bit and hang your fixtures 6 ½ feet to 7 feet (78 to 84 inches) from the floor.
DIY Project Details: worldbestdiy.com.blog
There are so many different styles and types of light fixtures that work in a dining room, it really all boils down to personal preference.
Hung high or low, what looks and feels good to you will most likely work in the space.
Depending on the size of your dining table, you might want to consider a single chandelier or pendant, or if you’ve got room to play, we love the impact of multiple pendants above a table.
DIY Project Details: worldbestdiy.com.blog
0 notes
Text
How to Design a Rain Garden DIY | DIY Projects | inspiring ideas DIY
DIY Projects | inspiring ideas DIY
How to Design a Rain Garden DIY | DIY Projects | inspiring ideas DIY
What is a Rain Garden?
A rain garden is a planting that you install in a low spot in your landscape.
This may be a natural depression on your property, or it may be the result of a planned change in grade that you implement in your landscape.

How to Design a Rain Garden DIY | DIY Projects | inspiring ideas DIY
Homeowners may choose to direct their downspouts into rain gardens, where plants can absorb and filter even more water. DIY Project Details: worldbestdiy.com.blog Rather than water-hungry plants, the ideal plants for rain gardens are native plants, which are naturally adapted to a wide range of moisture conditions. Did you know that approximately 80% of a native plant’s mass is underground? That gives you an idea of the potential of native plantings to trap and filter runoff water. Benefits of Rain Gardens Rain gardens prevent pollution. Runoff water isn’t pure rainwater; it collects pollutants as it flows, especially excess nitrogen and phosphorus from lawn fertilizers. These pollutants can harm rivers and ponds by causing algae blooms and fish kill. The deep roots of native plants readily absorb these nutrients, protecting groundwater quality. Rain gardens can protect your home from floods. A mature stand of rain garden plants will take up excess water that might normally puddle in your yard, leading to water intrusion issues in your home. When you get rid of standing water, you also reduce mosquito breeding problems around your home. DIY Project Details: worldbestdiy.com.blog Rain gardens create habitats for wildlife. The monoculture that is a lawn does little to nurture wildlife, but a mixed planting of native flowers will draw butterflies, bees, beneficial insects, and birds. Rain gardens help conserve water. The native plants that thrive in the rain garden won’t need supplemental irrigation, as they are deep-rooted and have evolved to survive periods of drought between rains. The Right Site, Size, and Shape for the Rain Garden If you’re planning to divert your roof gutters into your rain garden, you won’t want to install the feature too far away from your home, but you must place it at least ten feet away from your home. Underground utilities and tree roots may also influence the placement of the rain garden. DIY Project Details: worldbestdiy.com.blog If your yard doesn’t have a natural depression, you will need to create one by digging: either by hand or with an excavator. It isn’t necessary to create a pit; a gentle basin no more than about five inches deep is sufficient. The basin should have a flat bottom and gently sloping sides, and you can use some of the fill dirt to create a berm to hold excess rainfall until the plants can absorb it. How big should a rain garden be? A small rain garden is better than nothing, but you should plan on a garden at least 150 square feet in order to include an interesting variety of plants that can process the runoff associated with your landscape. DIY Project Details: worldbestdiy.com.blog Choose a natural, rounded shape for your rain garden, like an oval, teardrop, or kidney shape. Outline the potential area with a hose or rope first, and view it from all angles, as well as from inside your home to envision the finished product. Plants for a Rain Garden Proper rain garden design dictates that only perennial plants be installed. This is due to the way a rain garden functions as a water abatement feature, which depends on the deep roots of perennial plants. Plants that you install in the center of the garden will experience longer periods of wet garden soil and will thrive in these moist conditions. DIY Project Details: worldbestdiy.com.blog Five hardy and long-blooming plants you can’t go wrong with here include false indigo, coneflower, hardy hibiscus, black-eyed Susan, and cranesbill. Include some hardy grasses as well, like fountain grass or corkscrew rush. Plants around the edge of the rain garden will rarely have wet feet, and won’t mind occasional periods of drought. Some attractive flowering choices with big wildlife appeal include gaura, coral bells, yarrow, butterfly weed, and catmint. Locating and Sizing a Rain Garden The rain garden should be at least 10 feet from the house so infiltrating water doesn’t seep into the foundation. Do not place the rain garden directly over a septic system or near wells and underground utilities. DIY Project Details: worldbestdiy.com.blog A rain garden is never deeper than 12 inches. Your garden depth will depend on the infiltration rate of your garden or personal preference. First, you need to find out how fast your rain garden location is infiltrating water. -Dig a hole about the size of a large coffee can and fill it with water. -Let it soak in for about an hour.
How to Design a Rain Garden DIY | DIY Projects | inspiring ideas DIY
-Next, fill the hole with water again but this time put a stick (popsicle sticks work great) into the side of the hole at the water level. -After one hour measure how many inches the water drops. (clay soils are slow while sandy soils infiltrate fast). -Take the drop in inches and multiply by 24. You now know how much water, in inches, your soil infiltrates in 1 day. DIY Project Details: worldbestdiy.com.blog Any number larger than 12 is not necessary because your rain garden will never be deeper than 12 inches. A simple formula is to measure how many square feet of roof or landscape will lead to your garden. Then divide that number by the infiltration number you got in the previous step (not larger than 12). This is roughly how big your rain garden needs to be to handle a typical Minnesota rain event. You are not bound to the size of the rain garden in the previous step or its depth. Feel free to make it bigger or smaller based on your landscape needs or wants. Some stormwater capture is better than none at all. Rain Garden Care and Maintenance, Although rain gardens are lower in maintenance than a typical flowerbed, they do benefit from some of the same good care practices. DIY Project Details: worldbestdiy.com.blog Rain gardens may require more care in their first year, as they establish their root systems. Water deeply but infrequently during times of drought to encourage healthy roots. Rain gardens need to be kept free of weeds, both for plant health and aesthetics. The best time to weed is after a rain when the soft soil allows weed roots to release their purchase easily. A three-inch layer of mulch will further suppress weeds. Use a fine hardwood mulch, as it’s less likely to float away after heavy rain.
How to Design a Rain Garden DIY | DIY Projects | inspiring ideas DIY
DIY Project Details: worldbestdiy.com.blog
0 notes
Text
How to Build a Detached Deck DIY | DIY Projects | inspiring ideas DIY
DIY Projects | inspiring ideas DIY
How to Build a Detached Deck DIY | DIY Projects | inspiring ideas DIY Decks are a great way to add defined space to an otherwise-empty yard and you can entertain in high style. Here’s the building plan: DIY Project Details: worldbestdiy.com.blog
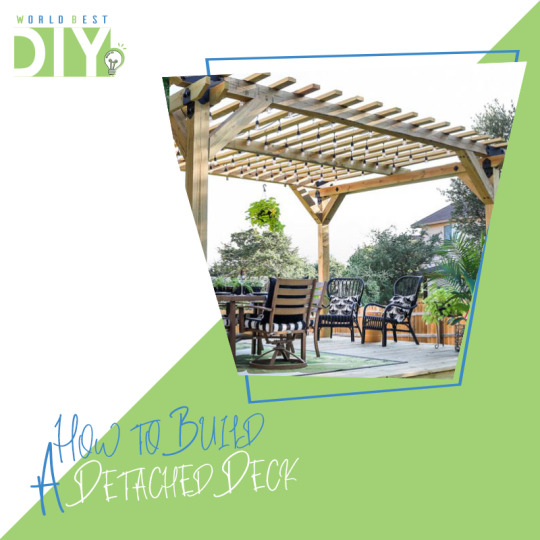
How to Build a Detached Deck DIY | DIY Projects | inspiring ideas DIY
Tools and Supplies You Will Need:
9 Concrete pier blocks with metal brackets
3 Pressure-treated four-by-fours, each 12 feet long
9 Bags of 0.8 cubic foot 7/8-inch drainage rock
Two-by-eight pressure treated boards for decking, each 8 feet long
*9 by 1 1/2-inch external hex flange hex-head connector screws
*8 x 2 1/2-inch coarse thread polymer-coated exterior screws or hidden deck fastener system
Marking paint
Tape measure
Wood stakes
Twine
Posthole digger
Spade
Wrench set
Bubble level
Electric miter saw
Oil-based wood preservative for cut ends
Drill, with driver and drill bits
Carpenter’s pencil
Circular saw
Hammer
DIY Project Details: worldbestdiy.com.blog
Measure and mark the outline of your deck. Measure and mark where your concrete piers will sit.
When laying each pier, make sure they’re no more than 6 feet apart. (Check local building codes; they may require that you use more than just piers.)
If you have a grass yard, cut out the sod so that the pier will sit easily on solid ground.
Wherever you’ll be placing a pier, use a tamper to compact the ground. This will make sure that the earth is solid enough to support the weight of the deck.
Once the piers are placed, lay the girders in the joist hangers on the concrete piers.
Set each end of a level on a separate girder to make sure they’re both the same level.
DIY Project Details: worldbestdiy.com.blog
If they aren’t, tamp down the soil of the higher pier until it’s level. If you can’t lower the pier, place shims under the girder to raise it to the appropriate level.
Make sure all the joists are even by placing the level between each joist. Nail the joists into place.
Lay the cross beams out 16 inches from the center over the girders.
Since the pictured deck has an angled side, the first four beams are 136 inches long, the fifth beam is 127½ inches, the sixth is 111½ inches, the seventh is 95½ inches, the eighth is 79½ inches and the last beam is 63½ inches.
Attach the cross beams to the 4-by-6 beams with joists hangers.
Man measuring wood for a deck. Place 2×4’s along the ends of the cross beams on each side of the deck and secure with framing nails.
Add joist hangers where the frame and the cross joist intersect.
Because the deck will have an angled side, miter the ends of the two frame beams that will sit on either side of the angle to 45 degrees.
DIY Project Details: worldbestdiy.com.blog

Place the beam that runs along the angled side, and attach with the framing nails.
Place 2×4’s along the ends of the cross beams on each side of the deck and secure with framing nails.
Add joist hangers where the frame and the cross joist intersect. Because the deck will have an angled side, miter the ends of the two frame beams that will sit on either side of the angle to 45 degrees.
Place the beam that runs along the angled side, and attach with the framing nails.
With a chain saw, cut the end of the girders that extend past the edge of the frame.
Start from the back of the deck and work your way to the front. Place your first beam 1½ inches over the frame.
DIY Project Details: worldbestdiy.com.blog
It’s usually recommended that you don’t leave more than an inch of the overlay, but we’ll be adding a ½-inch facing to the side of the deck.
Man using a deck guide to align holes for drilling. Use a deck guide when placing your decking.
This will assure that each piece is uniformly spaced. For the pictured project, the pieces are spaced ¼-inch apart. The deck guide will also allow you to align the spaces for pre-drilling holes.
With 2½-inch deck screws, attach the beams to the frame. As you near the end, you can adjust the deck spacing so you end up with a 1½-inch overhang on the opposite side.
DIY Project Details: worldbestdiy.com.blog
Use a deck guide when placing your decking. This will assure that each piece is uniformly spaced. For the pictured project, the pieces are spaced ¼-inch apart.
The deck guide will also allow you to align the spaces for pre-drilling holes.
With 2½-inch deck screws, attach the beams to the frame. As you near the end, you can adjust the deck spacing so you end up with a 1½-inch overhang on the opposite side.
Once your decking is placed, snap a chalk line across the outside ends of the boards.
Trim along the chalk line with a circular saw, making the jagged side of the deck straight.

For the stairs, use prefabricated risers. Cut a section big enough for the cross beam to fit, starting at the base of the third step. If the riser is too big, trim the bottom.
DIY Project Details: worldbestdiy.com.blog Make sure all the risers sit completely level. Once in place, drill 4-inch screws through the cross beam and into the portion of the riser behind it. For extra strength, add front and back 2x4s for each level of stairs. Attach the rear 2×4’s of the second step to the frame. Add the decking material to the stairs. Cut your 12-inch deck facing to size (if needed) for each side of the deck. Miter the ends of each piece so they form clean corners. Place the facing on the outer side of the frame so it skirts around the deck. Attach it with 3-inch galvanized framing nails. DIY Project Details: worldbestdiy.com.blog
0 notes
Text
How to Make Disinfectant Wipes DIY | DIY Projects | inspiring ideas DIY
DIY Projects | inspiring ideas DIY
DIY Cleaning Wipes | How to Make Disinfectant Wipes DIY Project Details: worldbestdiy.com.blog What You’ll Need: Air-tight container Measuring cup Cotton or microfiber cloths Materials Heavy-duty paper towels, napkins or guest towels Isopropyl alcohol or grain alcohol Essential oils (optional) Label or masking tape

DIY Project Details: worldbestdiy.com.blog
The container you select must be air-tight if you are making more wipes than you plan to use in the next hour or so. Alcohol evaporates very quickly and you’ll be left with dry wipes. A glass container like a wide-mouth jar, an old commercial disinfectant wipes container, or a plastic container with a lid works well. It should be large enough to hold 40 folded paper towels and 3 cups of liquid. DIY Project Details: worldbestdiy.com.blog Select the Towels, The paper products that you use to make the wipes should be strong enough to stand up to cleaning while they are wet. Heavy-duty paper towels, paper guest hand towels, and paper napkins work well. You can leave them full-size or cut them into smaller pieces if desired. If you would like to go green and create reusable wipes, 100 percent cotton, bamboo, or microfiber washcloths can also be used.

Reusable wipes should be machine-washed in hot water after every use.
Layer the Towels, Separate the towels into individual pieces and fold or roll to fit the container.
If you are reusing a pop-up wipe container, fold them with one layer interwoven with the next towel so they will pull up together.
If you have a round container, you may be able to cut a roll of paper towels in half and remove the inner cardboard core to create a “pull-from-the-center” roll of wipes.
DIY Project Details: worldbestdiy.com.blog
Measure the Disinfecting Solution, You need enough alcohol to cover and saturate the towels.
Three cups of alcohol will saturate about 40 folded paper towels.
Add Essential Oils, Essential oils add a pleasant scent and some oils do have antibacterial qualities.
You may mix and match to suit your sensibilities in the quantity that you desire.
Recommended oils with some antibacterial qualities are tea tree, lavender, geranium, lemon, orange, eucalyptus, rosemary, cinnamon, clove, thyme, or peppermint.
Saturate and Cover the Wipes, Pour about half of the alcohol (with essential oils, if desired) over the towels.
Wait until the liquid is absorbed and pour in the rest. You may need to add a bit more alcohol if the towels are not fully wet.
There should be some liquid visible in the container. Cover the container tightly and the wipes are ready to use.
DIY Project Details: worldbestdiy.com.blog
Label the Container, Use a paper label or a piece of masking tape to label the container. Place out of reach of children and pets.
How to Use a DIY Disinfecting Wipe, Now that you know how to make your own disinfecting wipes be sure to use them correctly to disinfect surfaces.
Remove Heavy Soil, While your disinfecting wipes will remove some grime from surfaces, they will be more effective if you clean away grease and heavy soil from surfaces first before disinfecting.
Check the Moisture Level, The wipes don’t need to be drippy, but they do need to be very moist. There must be enough of the alcohol left on the kitchen counter, doorknob, or television remote to kill bacteria.
Allow the Disinfectant Time to Work, To kill most bacteria, the surface you are cleaning should remain wet for at least four minutes. Do not wipe away the alcohol; allow it to air dry.
DIY Project Details: worldbestdiy.com.blog
Use More Than One Wipe, One wipe will not disinfect an entire kitchen or bathroom. One wipe will usually disinfect an area of around three-square-feet.
Dispose of the Wipe Properly, Paper products soaked in alcohol should not be added to a compost pile.
Dispose of the wipes in a trash can. If you are using cloth wipes, place them in a small hamper until it is time to wash a load of laundry.
Wash Your Hands, After cleaning and disinfecting any area, wash your hands properly to remove any cleaning products or lingering bacteria.
DIY Project Details: worldbestdiy.com.blog

How to Make Disinfectant Wipes DIY | DIY Projects | inspiring ideas DIY
Another RECIPE FOR DIY HAND SANITIZING WIPES
1 1/2 cups alcohol (99% rubbing alcohol is the best choice) or grain alcohol
2 ounces aloe vera gel
2 tsp vegetable glycerin
1 tsp of essential oils (you can use any combo to make 1 teaspoon. I like cinnamon, clove, rosemary, eucalyptus, lavender, and tea tree.)
Mix together in measuring cup and pour over wipes. Make sure the wipes are VERY well saturated. You want them to be even more “wet” than a regular wipe.
DIY Project Details: worldbestdiy.com.blog
0 notes
Text
How to Install a Ceiling Fan DIY | DIY Projects | inspiring ideas DIY
DIY Projects | inspiring ideas DIY How to Install a Ceiling Fan DIY | DIY Projects | inspiring ideas DIY
DIY Project Details: worldbestdiy.com.blog
There are a few components you need to get familiar with before beginning your ceiling fan installation.
The electric box is a metal housing in the ceiling that contains all the wiring for your ceiling fan.
If there was an existing ceiling fan in place prior to your current installation, it should also already be braced to hold the weight of your fan—though it’s important to verify this for safety.
The bracket is the metal piece that holds the ceiling fan in place. The electric box stays inside the ceiling, while the bracket is connected to it from below the ceiling line.
DIY Project Details: worldbestdiy.com.blog
The motor drives the fan and also serves as the hub for the light and fan on/off switches
The cowl is a metal covering that goes over the motor and bracket for aesthetics
The light kit contains the light bulb sockets and is connected to the motor via two or three simple wires
Things to Know Ahead of Your Ceiling Fan Installation
here must be at least 8-10 inches between the blades of the ceiling fan and the ceiling.
DIY Project Details: worldbestdiy.com.blog
You must also maintain an 18-inch clearance between the blades and the walls, or any other obstruction.
Ceiling fan blades must be hung at least 7 feet above the floor, and the fan does its best if hung at least 8-9 feet up.
If the ceiling is quite high, or if the fan is being installed on a sloped ceiling, a longer down-rod might be necessary so the blades don’t scrape the ceiling and the fan keeps its efficacy.
DIY Project Details: worldbestdiy.com.blog
How to install a ceiling fan step by step. First, before performing any electrical repair or installation, always shut the power off at the circuit breaker in order to avoid the risk of electric shock.
If you have an electrical tester, you can use it before beginning the installation to ensure that the power is definitely turned off at the breaker.
First, attach the bracket to the electric box via the two or more long screws.
Instead of tightening the screws all the way, make sure they are screwed in enough to hold the bracket securely but leave a couple of inches leeway so that you can connect the wiring in the following steps.
The motor should come pre-assembled, but if it does not, follow the manufacturer’s instructions to put it together before proceeding.
DIY Project Details: worldbestdiy.com.blog
So that you don’t have to support the fan motor yourself during the entire installation, the manufacturer likely included a hook or hanger in the design.
Attach the hanger to the bracket, and then hang the motor to it from one side.
The motor will hang down, making it close enough for you to attach the wiring, but also leaving the electric box and bracket partially exposed for the wiring to be attached.
Hang the motor from the hanging attachment, and begin connecting the wiring. Connect the wires from the motor to the corresponding wires in the electrical box.
The black wire goes with black, the white wire with white, and the green with green.

If there is a red wire coming from the electric housing, connect the blue wire to it.
DIY Project Details: worldbestdiy.com.blog
Otherwise, connect twist the blue and black wires that are coming from the motor together, and attach the two of them to the black wire in the electric box.
While you’re installing a ceiling fan, you’ll need to connect the wires.
The blue wire is for the light, the black wire for the fan, the white is the common wire, and the green is the grounding wire.
In older homes, there is just one wall switch for the light and fan, which is why there may only be one wire – the black wire – for both.
Newer homes may include a red wire so that the fan and light can be operated independently.
Once the wires are connected, push them all into the metal electrical box. This may take a bit of finagling.
Now, tighten those screws on the bracket to bring it up flush with the ceiling.
DIY Project Details: worldbestdiy.com.blog
Swing the motor up and hold it in place while screwing in the screws to secure it to the bracket.
Put the cowl on over the motor and bracket. The assembly below the motor, to which the light kit will soon be attached, will remain exposed.
Attach the fan blades to the bottom part of the motor, which will also be exposed inside the cowl. These are attached by simple screws.
Connect the light kit. It may look like there’s a whole mess of wiring coming out from the motor, but don’t panic.
A circular cardboard cover keeps most of that wiring in place above, with just two wires – blue and white – coming through the hole in the middle of the cover.
DIY Project Details: worldbestdiy.com.blog
Clip the wires from the light kit to the wires that come through the cardboard circle black goes to blue, and white goes to white.
Push all the wiring up below the cardboard circle as you did with the electric box, and attach the light kit to the motor.
Install your light bulbs and any lighting cover that may be included, and test your new ceiling fan.
DIY Project Details: worldbestdiy.com.blog
0 notes
Text
How to Build an Outdoor Pizza Oven DIY | DIY Projects | inspiring ideas DIY
DIY | DIY Projects | inspiring ideas DIY
How to Build an Outdoor Pizza Oven DIY | DIY Projects | inspiring ideas DIY
DIY Project Details: worldbestdiy.com.blog
Materials Needed:
concrete mix
cement mixer or large tubs for mixing
large and small cement trowels
grout bag
welder
circular saw
safety glasses and rubber work gloves
shovel
tape measure
8-inch cinderblocks
exterior grade plywood
angle iron
rebar
brick tile
DIY Project Details: worldbestdiy.com.blog

It’s important to remember that an outdoor oven will need a strong foundation and that skimping on concrete when constructing the base might mean foundational cracks due to weather fluctuation, or even the structure of the base being compromised due to insufficient mortar.
Rebar is also a great addition to a foundation, extending its life and mitigating cracks.
Laying the foundation, When it’s finally time to break ground, dig out a base for your foundation.
The depth of the pit will vary depending on the kind of soil that your home sits on; in general, a looser soil composition (like those of clay, peat, and sand) will require more depth.
DIY Project Details: worldbestdiy.com.blog
Once your pit is dug, make sure it’s squared off on its corners, and then lay down a shallow layer of gravel on the bottom.
If you’re building with rebar, this is where the grid would come in; if not, then just pour your concrete mix in and level it off at the top of the pit with a spirit level and a long, straight piece of wood.
Let this foundation cure for at least 72 hours.
Building to height, After the foundation is cured, it’s time to start building up!
When constructing the base itself, make sure to pay close attention to the width of each side, ensuring it is following your original plan and not expanding or shrinking as you add masonry.
DIY Project Details: worldbestdiy.com.blog
Using small amounts of concrete as a mortar, join the masonry together at important stress points, seams, and edges.
It’s up to you if you’d like to include more or less mortar for aesthetic purposes, but make sure that the amount used is sufficient to glue the brick together.
Bear in mind also that the weight of your oven dome may necessitate using stronger material or more mortar. Leave the front empty for now.
The final height of the base can also be adjusted, typically according to the primary chef’s own height.
Bases between 40″ – 45″ usually keep the oven’s door at a good height.
First do a dry installation of the unit, including the arch. Center the oven on the slab making an outline of the oven with pencil or chalk. Remove the oven elements.
Open the bucket of refractory grout. Save the water on top of it by pouring it into another container.
DIY Project Details: worldbestdiy.com.blog
Transfer the grout into a larger container for easy mixing (a trough or a 5-gallon bucket should do). Slowly add the liquid until the grout is the consistency of creamy peanut butter.
There will be water leftover, save it so that you can pour it back over the remaining grout before you store it.
All the bottom (floor) elements are installed with the smooth side up and should be level because this is your cooking surface.
Start with the small rectangular floor element in front of the oven. Put three individual globs of grout on the underside of each tile, set, and tap the piece level.
If the tile is not level, then pull it up and add more grout, tapping the tile until level.
Install the other tiles in the same manner. Let the tiles sit for an hour before continuing.
DIY Project Details: worldbestdiy.com.blog
This will allow the tiles firm up thus preventing any accidental shifting. Return the remaining grout to its bucket, adding the extra water that you saved on top, replace the lid and keep in a cool, dry place.
Put as much grout as you’re comfortable within a pastry bag and grout the tile, grouting only the seams between the tiles.
The grouted seams should be depressed enough so that when you will run a pizza peel or casserole across the oven floor it will not bump against the grout and possibly chip it.
The dome pieces interlock snugly and need only a minimal amount of grout.
Grout only the female groove on the dome elements with about a 3/8-inch bead of the grout.
Do not grout the dome elements to the floor elements or to the refractory pad.
DIY Project Details: worldbestdiy.com.blog

Start by placing the male dome element (support it) then the female element with the slightly grouted groove.
After the dome elements are set, look inside, you will notice a space all the way around where the floor meets the dome walls.
Do not fill this space; this space is needed for the expansion of the floor tiles when heated.
Apply a strip of refractory grout across the outside seams of the dome. Don’t grout the seams inside the oven.
Put a little dab of grout on the bottom and generous amounts on the backside of the arch that touches the oven, set, and hold in place.
You can face the arch with another material such as stone, granite, tile, or brick.
DIY Project Details: worldbestdiy.com.blog
0 notes
Text
How to Make Hand Sanitizer | DIY Projects | inspiring ideas DIY
Homemade Hand sanitizers DIY | DIY Projects!
How to Make Hand Sanitizer | DIY Projects | inspiring ideas DIY
DIY Project Details: worldbestdiy.com.blog
Keep your family safe from germs with this easy-to-make hand sanitizer! We’ve combined the moisturizing power of aloe vera with the germ-slaying might of alcohol for this cheap and easy homemade hand sanitizer.

It’s the perfect way to keep yourself and the people you love healthy and illness-free!
I made a hand sanitizer At My Home Easily and saved a lot of money For a while month… Its amazing experience I hope you enjoyed and benefited from my experience.
DIY Project Details: worldbestdiy.com.blog
What you’ll need:
1 part aloe vera gel or glycerin
2 part isopropyl alcohol (rubbing alcohol) with a concentration of 91%
Essential oil, such as lemon or lavender (this is an optional ingredient for scent)
Clean containers for mixing and an air-tight container for storage
Spoon or whisk for mixing
Steps:
Combine the aloe vera gel or glycerin with the isopropyl alcohol in a clean container. To get one cup of sanitizer, combine ⅓ cup of gel or glycerin with ⅔ cup of rubbing alcohol.
Mix thoroughly with your spoon or whisk to ensure that the alcohol is evenly distributed throughout the gel.
DIY Project Details: worldbestdiy.com.blog
Stir in five drops of essential oil, if you’re using it. This is entirely optional and is only meant to improve the scent of the sanitizer.
Store the sanitizer in an air-tight container. Alcohol evaporates with time, so an air-tight container will keep your sanitizer effective for longer.
A pump or squeeze bottle can minimize evaporation while keeping your sanitizer easily accessible — just make sure the container for your sanitizer is clean and air-tight.
The key ingredient in hand sanitizer is alcohol, so it’s possible to substitute for the aloe vera gel.
The purpose of the aloe gel is to protect hands against the drying effects of alcohol.
Basically, it’s a humectant. This means it helps lock in moisture. Other humectants which could be used in place of aloe include glycerin or hand lotion.
However, it’s still important to keep the alcohol in the final product at least 60%.
DIY Project Details: worldbestdiy.com.blog
If you can’t find alcohol, the best option is to wash your hands with soap and water rather than attempt a homemade hand sanitizer recipe.
Working with 70% Alcohol, Rubbing alcohol, and ethanol from a store tend to be either 90-99% alcohol or else 70% alcohol.
You can disinfect your hands with 70% alcohol, but there’s very little you can add to it (maybe a few drops of essential oil or jojoba oil, to improve scent or texture).
Mixing 70% alcohol with other ingredients dilutes the alcohol, so it’s easy to drop below the 60% alcohol recommended by the CDC.3
Protect Your Hands, Alcohol dries the skin and strips protective oils. Follow up a hand sanitizer (or handwashing) with a good lotion to keep skin in top shape.
Damaged skin has tiny cracks that trap bacteria and viruses and make them harder to remove.
If you have sensitive skin, try to keep the amount of alcohol in hand sanitizer around 60-70% (as in this recipe) because a higher concentration may cause irritation.

DIY Project Details: worldbestdiy.com.blog
0 notes
Text
DIY | How to Build a Table | DIY Projects for U
DIY | DIY Projects for U...
DIY Project Details: worldbestdiy.com.blog Building a table is a fairly straightforward project that even a beginner can handle. With the table now built, you can finish the table in any manner you choose. Because of the fine hardwood veneer top, likely you will want to lightly sand it, then apply stain and sealant. If you wish to paint the table, you can save money by purchasing lower-cost wood rather than hardwood veneer plywood. If you purchased hardwood 2×2 for the legs, these also can be stained and sealed. If you chose lesser grade dimensional lumber, you may wish to paint the legs. Consider using chalk or milk paint for the legs to contrast with the rich wood of the tabletop. For a solid-wood look, cover the tabletop’s layered side edges with veneer edge banding.

DIY Project Details: worldbestdiy.com.blog
Or choose plywood often called architecture-grade or euro style plywood. With more plies and few voids, this plywood’s edges are meant to be seen. What You’ll Need Equipment / Tools Tape measure Pencil Circular saw Miter saw Towel T-square Speed square Drill and bits Socket wrench Materials 4 x 4-foot sheet of 3/4-inch hardwood veneer plywood 2 2×2 boards, 8 feet long 3 1×3 boards, 8 feet long 4 surface-mount metal corner braces for table aprons (optional) 1-inch screws 8 5/16 x 1 1/2-inch lag screws with and washers 4 3-inch metal corner braces with screws Cut the Tabletop. Mark the plywood sheet for cutting at 48 by 30 inches. Mark the board so that the grain of the plywood runs lengthwise. Make the cut with a circular saw. You can save the remaining 18-inch strip for another project. Minimize the splintering of the plywood veneer by using a saw blade with 60 teeth (or more) per inch and cutting from the backside of the sheet. Set the blade depth so that only about 1/8 inch of the blade extends below the panel.
DIY Project Details: worldbestdiy.com.blog
Cut the four table legs from the 2×2 boards, using a miter saw. For a standard-height table, cut the legs at 29 inches, or make the legs longer or shorter as desired.
Shape the Table Legs. Each of the table legs needs a diagonal face cut into the top 3 to 4 inches to receive the lag bolts.
To make these cuts, adjust the bevel angle of the miter saw to 45 degrees.
Cut off a 45-degree slice, 1/2-inch wide and 3 to 4 inches long, from the top of each leg.
This is a tricky cut, so it is helpful to make several experimental cuts on scrap 2×2 boards.
Place the plywood tabletop face down on top of a clean towel. With the T-square and the pencil, mark four lines along each of the four edges, 1 inch in from the edges.
Place each of the table legs at the insides of the four corners of this marked rectangle.
DIY Project Details: worldbestdiy.com.blog
If you like this inset, keep it as it is. However, you can change the apron inset, ranging from flush at the edges all of the ways to about 4 inches inward.
Situating the table legs flush against the tabletop edges gives it a stockier, farmhouse-table appearance.
Insetting the legs adds shadow and depth, providing a more graceful look.
Cut the Table Apron Materials. The four-sided table apron will extend from the inner side of one leg to the inner side of an adjacent leg.
The apron serves to stabilize the table legs, hide fasteners, and provide visual appeal.
Cut the apron pieces from 1×3 boards, using the miter saw. Cut two pieces to length at 46 inches and two at 28 inches.
If you varied the inset, adjust these lengths accordingly.
DIY Project Details: worldbestdiy.com.blog
Mark and Cut the Corner Braces. This step applies if you opt for creating your own corner braces.
Dry-fit one of the table legs on the back of the tabletop, with an apron piece touching each side. Be careful to place each item precisely along with the pencil marks.
Lay another apron piece across the top of the 90-degree junction formed by the two table apron sides.
Use a speed square to make sure that the brace is at a 45-degree angle.
With the pencil, mark off the inner dimensions of the brace. Cut the piece at the mark, using the miter saw. Repeat for the other three braces.
DIY Project Details: worldbestdiy.com.blog
Attach the Corner Braces. Assemble the four legs with the four apron pieces between the legs.
Put each of the four corner braces in the corners. For wood braces, drill two pilot holes on each side then attach each brace with four 1-inch screws.
If using surface-mount metal corner braces, use the manufacturer-provided screws.
Anchor the Legs. Drill two 1/4-inch holes per leg, driving through the apron and into the leg.
DIY Project Details: worldbestdiy.com.blog
Be careful not to drill all of the ways through the table leg. Fit washers onto the lag bolts, then turn them into the pilot holes using a socket wrench.
Tighten the legs securely, but be careful not to overtighten and split the wood.
Attach the Leg-Apron Assembly. Place the leg-and-apron assembly on the bottom of the tabletop, and center it within the pencil lines on the top.
Attach the assembly to the tabletop with four corner braces, using the provided screws.
DIY Project Details: worldbestdiy.com.blog
0 notes
Text
DIY | Easy Homemade Garden Bench | DIY Projects for U
DIY | DIY Projects for UDIY | Easy Homemade Garden Bench | DIY Projects for U Wood’s worst enemy is moisture, so it’s important Dry Your Woodand. the bench is most vulnerable where the legs come in contact with the moist ground. To make the bench last longer, simply place a small paver under each of the legs. DIY Project Details: worldbestdiy.com.blog Where you’ll find the water Water occurs in wood in two places. First, there’s the free water that fills the inside of the wood’s cells. That’s like water in a bucket. Second, water also infiltrates the cell walls. That’s called bound water. Imagine squeezing a piece of cotton cheesecloth until all the free water has drained away. The cloth, through, remains damp because the material continues to contain moisture—the bound water. When wood only contains bound water, it’s said to be at its fiber saturation point. And the bound water can be eliminated completely (0% moisture content) only by drying it somewhere with no relative humidity. DIY Project Details: worldbestdiy.com.blog This classic little 4-foot-long bench is inexpensive and easy to construct with just a few basic tools. It costs less than $30 in materials and will take about an hour to build. Tools Tape measure Pencil Handsaw Circular saw (optional) Speed square Electric drill with a screwdriver bit Two 4-foot-long 1x6s Two 16-inch-long 2x12s Two 11¼-inch-long 2x2s Two 4-foot-long 2x8s Twelve 2½-inch-long stainless-steel decking screws Eight 1¾-inch-long stainless-steel decking screws For the tapered ends of the face boards, use a speed square to mark off 45-degree triangles on each end of the 1x6s.

To make the cutouts in the legs, mark a triangle in the center of the bottom edge of each 2×12. DIY Project Details: worldbestdiy.com.blog Using the speed square as a guide, cut out the triangles (photo); if you’re using a circular saw, you’ll need to finish cutting the leg notches with a handsaw. Attach the fastening bars. On one side of each leg, position a fastening bar flush with the top of the board and attach it with two 2½-inch-long screws, approximately 1½ inches from each end. Rest both leg boards on their sides on a flat work surface, with the fastening bars facing each other. Place a face board on the side of the legs, and adjust the leg spacing so that the shorter edge of the face board is flush with the outside of each leg. Attach the face board to the legs with 1¾-inch-long screws. Flip the legs over, and attach the second face board in the same fashion. DIY Project Details: worldbestdiy.com.blog Place the 2x8s side by side on your work surface, and use the edge of the speed square to create a gap between the boards. Make sure the ends of the boards line up perfectly. Lay the leg assembly on the seat boards, upside down, and center it. Attach the leg assembly to the seat boards by screwing through the fastening bars to the seat boards with four 2½-inch-long screws on each side. DIY Project Details: worldbestdiy.com.blog
0 notes
Text
DIY | Important Things to Do When Moving into a New Home | DIY Ideas
Creative DIY Project Ideas... DIY Project Details: worldbestdiy.com.blog After the last box is moved into your new home, you might think the hardest part of the move is over. Some post-relocation tasks will always be more urgent than others so it’s crucial that you are familiar with the first things to do after moving into a new home. Check Major Appliances such as a stove, dishwasher, washer, or dryer, check to make sure all appliances and electronics are working to ensure nothing was damaged during the move.

Take a closer look at your new home. Locate the main water valve and look for water leaks of any type.
Fix any leaks or have them fixed regardless of how small they may seem.
DIY Project Details: worldbestdiy.com.blog
Find the fuse box and make sure everything looks normal. If something looks suspicious to you, call a certified electrician.
Make sure you keep all receipts and documentation related to your move in one file and keep the file in a safe, secure place.
Make sure you have your Bill of Lading and payment receipt. You may be able to claim your move on your next tax return, and you’ll need all the necessary receipts to make your claim.
Once the utilities have been connected, the house has been inspected for problems and the emergency centers located.
DIY Project Details: worldbestdiy.com.blog
it’s time to secure your new home against unauthorized access or harmful acts of nature.
Change the locks on all outside doors to ensure that you and your family are the only persons who have access to your new home.
Double-check all windows and doors and make sure they close securely. Install smoke detectors in every room.
While finding a good school is something that can be done before you move.
DIY Project Details: worldbestdiy.com.blog

if you didn’t have the time or you moved to a new city far from your old home, you may need to research schools once you arrive in your new home.
The sooner you can register your children, the sooner they can establish a routine making it easier it will be for them to settle in.
Get Connected to Your New Neighborhood, Make Sure You’re Getting Your Mail.
Find New Services and Professionals, Get one for each member of the family.
Once you have a library card, you can consider yourself at home.
Check smoke and carbon monoxide detectors. To help ensure your family is safe in their new home, ensure that all of the home’s smoke and carbon monoxide detectors are in good working condition.
DIY Project Details: worldbestdiy.com.blog
0 notes
Text
DIY | How to Remove Paint From Concrete| Creative DIY Project Ideas
DIY | DIY Projects!
Start by gearing up. You will want to wear old shoes that you don’t care about, and gloves if you’re going to be handling the stripped paint. This stripper is no joke, it burns if you get it on your skin.
DIY Project Details: worldbestdiy.com.blog
you will need:
Scrub Brush (or Wire Brush).
Spirits, Turpentine, or Paint Stripper.
Hose.
Soft Cloths.
When you set out to remove paint from concrete, the first thing to do is clean the surface of the concrete thoroughly.
Prepare a solution of soap and water, or better yet, diluted trisodium phosphate (TSP)—in which case, be sure to wear gloves.
sweep or wipe off the concrete, removing as much loose dust, dirt, and debris as possible.

DIY Project Details: worldbestdiy.com.blog
Now proceed to work the soapy water or TSP into the concrete by means of a long-handled brush. Rinse the area afterward, allowing one to three hours for the surface to dry. If some of the paint has already begun to chip or peel, scrape it away with a putty knife. Not sure which type of paint is on the concrete? If you’re uncertain, your best bet is to opt for an oil-based paint stripper. Once you’ve covered the concrete with a generous layer of paint stripper, let it sit for six to eight hours. During that time, a chemical reaction will take place, the magical result of which is the removal of paint. Remember that if you’re working with paint stripper, it’s imperative that you wear the appropriate protective gear a respirator (or at minimum, a dust mask), long sleeves, and good pair of rubber gloves. Pour the stripper onto the ground and roll it out with a paint roller. The layer should be thick. If it’s too thin you’ll have to go back with a second layer. Let the stripper sit on the paint for 20-25 minutes. As it activates and loosens the paint.
DIY Project Details: worldbestdiy.com.blog
you will see it start to bubble and release itself from the concrete. If you’re lucky like we were, you might even discover hidden dinosaur tracks underneath a few of the layers.
Scrape. Use your floor scraper to scrape off the bubbled up paint. We found that it was best to scrape it all into a large pile and then shovel it into old boxes.
Once you’ve scraped all of the paint off of the concrete floors, use a bucket of soapy water and a large push broom to sweep up any remaining chunks of paint and to get the stripper residue off of the concrete.
Let the concrete dry for 24-48 hours before moving on to the next step of prep, or tile.
You need to mix the paint remover with the ground clay and try to make a thick paste.
DIY Project Details: worldbestdiy.com.blog
You will not need a lot of clay if the used stripper will be thick steadiness.
The porous stuff would be very helpful in soaking as well as paint lifting from the surface of concrete, which will make the stubborn paint very easy to be scraped off afterward.
Scrub The Affected Area. Now, you must take some scrubbing powder and apply it to the paint spot.
Now, take your hard brush and need to rub tough on the spot to remove the tough stains off.
You need to rinse off the scrubbing powder after some time and continue rubbing the area with the brush to take out the residual paint particles.
If the above method does not work for you, then repeat the whole process. If you can’t do it yourself then hire and professional blaster will be the best option for you.
DIY Project Details: worldbestdiy.com.blog
0 notes
Text
DIY | Refinish Your Wood Deck in Easy Steps | Creative DIY Project Ideas
DIY Projects | inspiring ideas DIY DIY | Refinish Your Wood Deck in Easy Steps | Creative DIY Project Ideas DIY Project Details: worldbestdiy.com.blog Refinishing your deck every year or two reduces cracks and splinters, keeping the surface of the wood attractive and friendly to tender feet. The first step to clean the deck with a broom or power blower and visually check for any severely cupped, split, or any rotting wood deck boards. If you find any, then these boards need to be replaced before the deck is refinished. If your deck is not painted but has a clear finish or transparent / semi-transparent wood stain, then you just need to clean it with a wood deck cleaner.
DIY Project Details: worldbestdiy.com.blog
The best cleaners are oxygen-based wood cleaners effective in removing mildew stains and ultra-violet caused bleaching of the wood deck.
If your deck needs a deeper cleaning than a surface brightener, then the next step is using a power washer.
Once the deck boards are power washed the wood fibers will raise as they expand with water.
After drying, wood fibers can often remain raised and may cause splinters. For a professional job, you need to plan on sanding your wood deck before staining and final finishing.
With the deck cleaned and sanded the pores of the wood are ready to receive their protective finish coat.
DIY Project Details: worldbestdiy.com.blog

This can be a stain and separate water repellent finish or a combination product.
We recommend the use of quality oil-based penetrating exterior semi-transparent stain such as Sikkens.
Make sure to confirm how the stain will look with your wood species before you buy since the actual color of the stain once applied may be different than the color product brochure or the can’s label.
You have sweated through the preparation and now can enjoy the satisfaction of seeing the deck take on new life as you apply the stain and finish. Some tips we can summarize here include:
DIY Project Details: worldbestdiy.com.blog
It is very important to make sure the deck is dry for about two days without any rain on it before you proceed to stain the deck.
Water in the pores of the wood will prevent proper absorption of the oil stain into the wood.
Select a quality penetrating oil-based semi-transparent stain if you want the grain of the wood to show through.
Buy a solid opaque stain if you want the finish to look like paint. Just don’t use paint.
DO NOT: Use clear finishes such as polyurethane or varnish as they will degrade under the sun’s UV rays.
DIY Project Details: worldbestdiy.com.blog
There are basically two types of deck cleaners:
One type (liquid oxalic acid or powdered hydrogen peroxide) removes a thin layer of gray, dead wood fibers from the surface and exposes the fresh wood beneath.
The other type has a bleach base that removes unsightly black and green stains on the surface such as mildew.
If you notice this condition, clean off the mildew first and rinse, then use a standard deck cleaner.
Scrubbing by hand or with a stiff-bristle push broom can be an effective way to prep a deck.
It may not scour tight corners or deep cracks the way a pressure washer can, but if you use trisodium phosphate or a commercial cleaner, scrubbing can be adequate for small jobs.
Some professionals actually prefer brush-scrubbing as a less-harsh alternative to power washing.
Removing old stain with a chemical stripper is relatively uncommon with decks, but we found that it did an excellent job, leaving wood noticeably cleaner than using a power washer alone.
Pressure washing, the standard in deck cleaning, efficiently removes dirt, old stain, and debris from wood.
DIY Project Details: worldbestdiy.com.blog
Most pressure washers can be used with trisodium phosphate or other deck cleaners for an even better result.
When you use a pressure washer, don’t let the spray linger in one spot too long, or it may gouge the wood.
Discoloration or stubborn stains are better removed with a stripper than with overly aggressive washing.
Once your deck is clean and dry, it’s time to apply the finish. Finishes come in clear, tinted, semitransparent, and solid colors.
Sprayers are excellent for applying stain because they allow you to cover large areas quickly and uniformly.
DIY Project Details: worldbestdiy.com.blog
0 notes
Text
DIY | How to Remove Water Stains From Wood | Creative DIY Project Ideas
DIY Projects | inspiring ideas DIY
DIY | How to Remove Water Stains From Wood | Creative DIY Project Ideas Removing water stains can be an imperfect science that requires patience, flexibility, and educated trial-and-error. To avoid ruining the wood with any potential fix, always experiment on a small area before continuing to clean the rest of the stain.
DIY Project Details: worldbestdiy.com.blog
Wood is an excellent building material for the outdoors.
Whether it is used for house siding, outdoor furniture, decks, fences, or outbuildings, wood holds up well against weathering, as long as it is maintained.
Whenever water and wood mix, there is the possibility of water stains.
Applying oil- and water-based wood sealers in advance and regularly sealing the wood is the best way to avoid water staining.
Painting or staining the wood are two ways to cover the stains. But if you would rather restore the wood to its former natural beauty.
DIY Project Details: worldbestdiy.com.blog
the cure is a collection of approaches that you tailor to your specific wood and type of stain.
Unpainted wood may have been previously treated with wood preservatives. Newer wood preservatives, while toxic, are far less toxic than older wood preservatives.
As all are fungicides and pesticides that may be harmful to your health, care should be taken when working with wood that you suspect may contain wood preservatives.
Additionally, household bleach is moderately caustic and oxalic acid is highly caustic, so always wear safety protection when working with these materials.
DIY Project Details: worldbestdiy.com.blog
Water-stained wood outdoors is best cleaned in the driest part of the year.
Many of these stain removal methods require drying time, so further rain would only complicate your efforts.
If any of the items can be moved into a garage, shop, or other dry, warm area, they can be cleaned at any time of the year, in any condition.
White or light rings on outdoor tables are usually caused by wet glasses that discolor the top protective sealant.
Drain all water from the iron.
Turn the iron to dry (or no steam) mode and let it heat up to its lowest level.

DIY Project Details: worldbestdiy.com.blog Lay a clean, dry, and white cotton cloth over the stained area. Dyed fabrics may transfer to the wood. Pass the warm iron over the cloth a few times. Periodically, lift the cloth to check on your progress. Use a new section of the cloth each time you put it back down. The iron must be absolutely dry before use. If the iron produces any steam, it may create stains on the wood. Water stains on wood siding are often caused by dirt that has wicked up from dirty water puddles or wet soil. A prime location for this type of staining is the bottom section of cedar or other wood house exterior siding that has come into contact with soil.
DIY Project Details: worldbestdiy.com.blog
Often, washing the wood clear of the embedded soil is enough to clean it.
With a spade or shovel, clear out about 12 inches of soil downward from the bottom lip of the siding.
With a garden hose and nozzle, spray one section of the stained wood siding from the top-down. If extra force is needed, gently spray the siding with a pressure washer.
If the cleaning is successful, continue with the rest of the siding.
If dark gray or black water runs off of the siding, this means that the stains were largely dirt-based.
However, this also means that your home has problems with water splashing on the ground.
Overflowing gutters are one cause of heavily stained wood siding. Clean or replace the gutters to fix the problem.
DIY Project Details: worldbestdiy.com.blog
Remove Dark Water Stains With a Bleach Solution
Dark water stains are difficult to remove from wood.
However, by gently bleaching the wood with a diluted household bleach solution, you may be able to erase troublesome stains. Be sure to wear waterproof gloves for this method since bleach is caustic.
Create a solution of 50 percent cool water and 50 percent bleach.
Lightly apply the solution to the wood stains with a dense sponge. Do not drench.
Allow the bleached wood to fully dry.
If the wood can be sanded and the stain has not penetrated too far, you may be able to sand it out.
DIY Project Details: worldbestdiy.com.blog
Fit the random orbital sander with a sanding disk.
Test sanding one side of the water stain to see if light sanding will remove it. If so, continue.
Move the random orbital sander in wide, sweeping passes. Do not press hard on the sander.
Occasionally sweep or vacuum off the wood dust to check on your progress.
Water down the deck by lightly spraying with the pressure washer on a wide spray.
Apply the deck cleaning solution to the deck stains.
Scrub the stained area and at least a couple of feet beyond with the synthetic brush.
Thoroughly wash off the cleaning solution and dirt with the pressure washer on a wide spray.
DIY Project Details: worldbestdiy.com.blog
0 notes
Text
DIY | How to Decorate With Metallics in the Bedroom | DIY | How to Decorate With Green
DIY Projects | How to Decorate With Green inspiring ideas DIY
DIY | How to Decorate With Metallics in the Bedroom | Creative DIY Project Ideas Are you ready to give your home a quick update? We are loving furniture and decor with metallic accents. Give your home a subtle Accessorize sparingly: too much metallic can be overwhelming so go for one stand out piece as the headlining embellishment in the room.
DIY Project Details: worldbestdiy.com.blog
It’s Time to Decorate With Metallics in the Bedroom
Almost every decorating style benefits from a little touch of bling — shiny metallics that add light, glamour, and a touch of luxe to the bedroom.
As with most strong decorative elements, however, a little bit of metallic goes a long way.
So whether you only want a hint of metal, or you want an entire wall of shine, these ten bedrooms will show you how to do metallic right.
If you’re going to use wallpaper on an accent wall, you might as well put the emphasis on “accent.” This gorgeous metallic wallpaper overlays a pale silver base with gold, bronze, and pewter leafy fronds.
DIY Project Details: worldbestdiy.com.blog
It’s dramatic, yet not overbearing. If you don’t like mixed metals, there are many single-metal wallpapers available that are equally lovely.
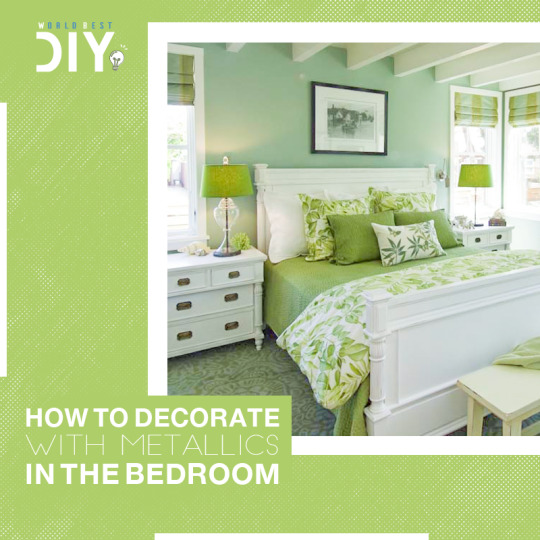
Wow! The design might be simple, but the bright copper of this bed is a showstopper.
The copper drawer pulls and the bedside lamp ties the space together and adds further shine to a room that is actually very simply furnished. The fuzzy white pendant lights add a touch of whimsy, while the gleaming comforter is a final touch of bling in a room that combines glamour and minimalism beautifully. This Moroccan-inspired bedroom has plenty of exotic charm, but it’s the metallic gold curtains framing the matte gold, ornately-carved screen at the head of the bed that make it look like the sleeping quarters of a Moroccan princess. Golden curtains might be a bit too much for most bedrooms, but neutral curtains with a metallic design would work in any room. One of the most traditional styles of bed, particularly in cottage, country or coastal décor, is a brass bed. Although this warm metal fell out of favor for a while after the shiny excesses of the 1980s, it’s back in a big way. If a brass bed isn’t your style, it’s still very easy to work this versatile metal into your bedroom — look for picture frames, curtain rods, or a sunburst mirror.
DIY Project Details: worldbestdiy.com.blog
Mixing contemporary style with retro glamour, this bedroom shows how to do silver right.
The oversize tufted headboard, with its pale silver upholstery that complements the bed, is luxurious enough on its own.
but by adding in the silver mirrored bedside tables, silver lamps, and silvery-gray wallpaper, this bedroom takes glamour to a whole new level.
With an unexpected palette of brown, black, and aqua, this bedroom is already lovely. But it’s the two golden poufs at the foot of the bed that really add the “Wow!” to space.
DIY Project Details: worldbestdiy.com.blog
Add a touch of bling to your own bedroom with a similar ottoman: gold or silver would work equally well.
Notice the gold dots on the wall at the head of the bed — there’s no need for a headboard when your wall is this dazzling.
Who said you have to have a white ceiling? Instead, do something entirely unexpected, and paint your ceiling a warm, gleaming copper. This stunning look is created with a base of red paint and an overcoat of metallic copper specialty paint.
The nightstand shown here might be a very traditional French style, but the silver metallic finish is anything but old-fashioned.
This bedroom shows how easy it is to liven up traditional style with a touch of metallic — and yet, nothing here is overdone or tacky. This is the elegant side of silver.
DIY Project Details: worldbestdiy.com.blog
You’ll feel like royalty sleeping in a bed outfitted with golden sheets and a gorgeous metallic gold floral-patterned comforter. But it doesn’t stop there — check out the gold bedside table and the gold lamp.
What keeps this room from looking garish are the simplicity of the palette — just gold and cream — and the simple lines of the furniture.
What a serene, soft, and simple bedroom. The cozy palette of soft blushing peach, silvery gray, and the lightest tint of sage green is very soothing and quiet.
When color is this muted, however, there is always a risk of monotony. Not a chance of that in this room.
However — not with the simple yet striking copper pendant light and the open-weave copper table by the bed. They provide just enough shine to create contrast without taking anything away from the overall tranquil feel of the room.
It’s Time to Decorate With Metallics in the Bedroom.
DIY Project Details: worldbestdiy.com.blog
Green is the color of life, of renewal, prosperity, and harmony. learn how to use it strategically and stylishly. Decorating in green has endless possibilities.
What Type of Color is Green?
Green is one of those colors that can be both trendy and traditional. An earthy hue that evokes images of lush grass and fresh air, green is a color that easily brings the outdoors in.
green belongs to the wood element and is a calming, balancing color that is all about fresh, new beginnings and renewal.
It can be both warm and cool, depending on the shade, but often lands more on the cooler spectrum.
You’ll often find other cool shades that derive the “coolness” from green undertones.
But while the majority of greens are cool, there’s a wide variety in green and will often feel vastly different depending on the room and natural light.
The Basics of Decorating With Green
Whether you want to paint your walls green or invest in an eye-catching piece of green furniture, the shade of green you should opt for depends entirely on the mood you want to set and the space you are trying to fill.
DIY Project Details: worldbestdiy.com.blog
Dark Green
Dark, jewel-toned green is the perfect backdrop for a moody living room or bedroom. It instantly creates a sense of elegance and class, no matter the size of the space.
will appear smokey and rich, it’s a great choice for a larger space that needs grounding or an accent wall behind a bed.
Muted Green
On the other hand, a lighter pastel or muted green will make a room appear light and airy. It’s a comfortable shade, perfect for guest bedrooms or office spaces.
will create a sense of tranquility and peace in a bedroom or bathroom and acts as an updated neutral.
This shade is also a great choice for bedding in a minimalistic room as a way to add a little color without taking away from the original palette.
Vintage landscapes will also often draw from muted greens and can be a great way to add the color into your Mid-century modern or eclectic style home.
DIY Project Details: worldbestdiy.com.blog
Warm Green
When it comes to decorating with warm greens, look for shades with a yellow or orange undertone.
It’s a great choice for any space you want to add a little more color without coming off too bold.
DIY Project Details: worldbestdiy.com.blog
Colors That Go With Green
The greatest thing about green is that pairing it with other colors is easy because there are so many shades of green.
Pair crisp, linen-like whites with a deep moody green is a great way to add contrast and visual interest in space while keeping the feel fresh and modern.
For a super jewel-toned room, mix rich earthy shades of green with deep navy blues and burgundies.
This palette is perfect for large living spaces with room to experiment. Look for vintage Turkish-style rugs that pull in rich, deep colors.
Using the color green in home decor can add an earthy, grounded feel to any space.
Plus, unlike some other bold colors, green can lend itself well to many different color palettes and appear both calming and energetic at the same time.
DIY Project Details: worldbestdiy.com.blog
0 notes