
Don't wanna be here? Send us removal request.
Statistics
We looked inside some of the posts by wscarcadeproject and here's what we found interesting.
Average Info
Notes Per Post
0
Likes Per Post
0
Reblog Per Post
0
Reply Per Post
0
Time Between Posts
3 days
Number of Posts By Type
Text
17
Last Seen Tumblr Blogs


Fun Fact
Tumblr’s reach among the 26-to-35-year-olds in the US is 11%.
Text
0 notes

Text
Thoughts So Far
I am proud of my spritework and the concepts I have both come up with and was able to make work in Unreal Engine.
I feel that my time management, though better than the 3D project, could still have been better.
Although Unreal Engine can make 2D games work surprisingly well, it is still quite clunky and unsuited for them. I have severely struggled with assigning the correct sprites to movement, and am currently unable to do the same for enemies.
Today, I seek to implement health, power-ups, and maybe get the enemies to move and damage the player properly. My current power-ups that I am aiming to implement include damage and score boosts for each of the three weapons, as well as an invincibility power-up.
0 notes
Text
Monday, 3rd February
Today I finished implementing a shooting mechanic.
First, I made an integer variable and set it to the face buttons: 0 for pistols, 1 for shotgun, 2 for rifle.

Then, with assistance from Sam, Jake, and Chris, I made this blueprint:

A problem I ran into during the coding sequence was that due to the previous function (see previous devlog post), the player never actually rotated, and so always fired straight down. The code above gets around this by linking the projectiles fired to one of four Arrows placed around the capsule component, using the one in the same direction as the player is moving to fire from.
0 notes
Text
Monday, 27th January
I imported the sprites I made into Unreal Engine, converting them into flipbooks so that they were ready to assign to the Actors and Widget Blueprint I would be creating.
Next was to program them so that they transitioned into each other. For reference, I looked at the code for the player in my 2D project:
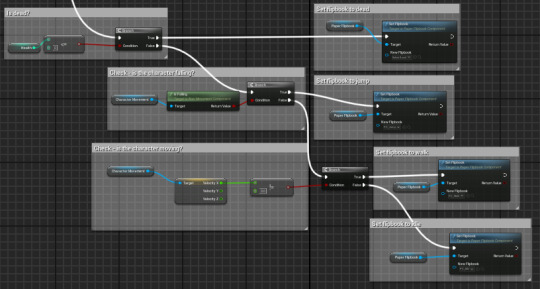
And began work on a chain of statements in an attempt to make it work:

However, I was going nowhere and remained stuck on this for much of the day. The problem was that the sprites did not change direction properly, and I could not figure out why.
I eventually got help from Jake, who helped me create a function to set the correct sprites for me:


0 notes
Text
Saturday and Sunday, 25th and 26th January
I created new sprites for the player to show them with a third weapon, an assault rifle, that I decided to add. The icons I drew for the weapon-swap mechanic helped me get the proportions down for the weapon, and the red body helped it to stand out from the other components such as the magazine, trigger, etc.
Additionally, I finished the HUD sprites:
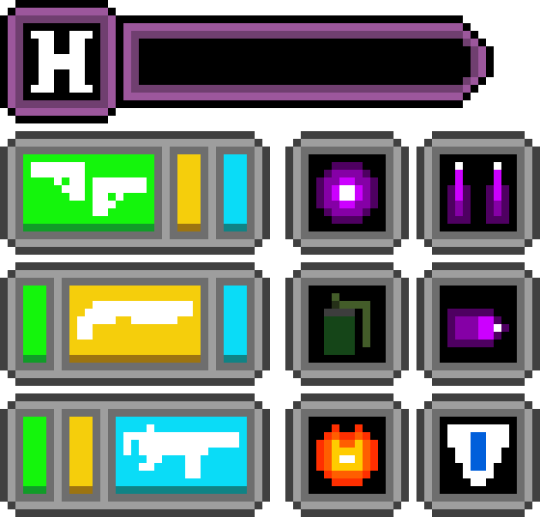
The icons in the small, dark grey boxes indicate power-ups, which rant the following effects (L-R, top to bottom):
Super Shotgun: The shotgun deals more damage and earns more points for a limited time.
Super Assault Rifle: The assault rifle deals more damage and earns more points for a limited time.
Grenade: Throw grenades that explode in a radius for high damage and bonus points to anything hit for a limited time.
Super Pistols: The pistols deal more damage and earn more points for a limited time.
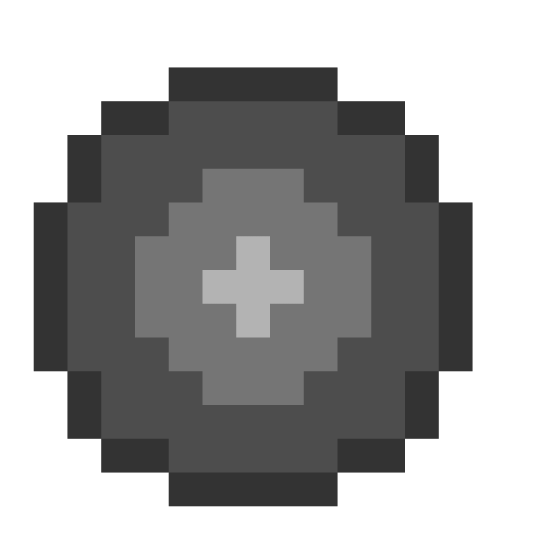
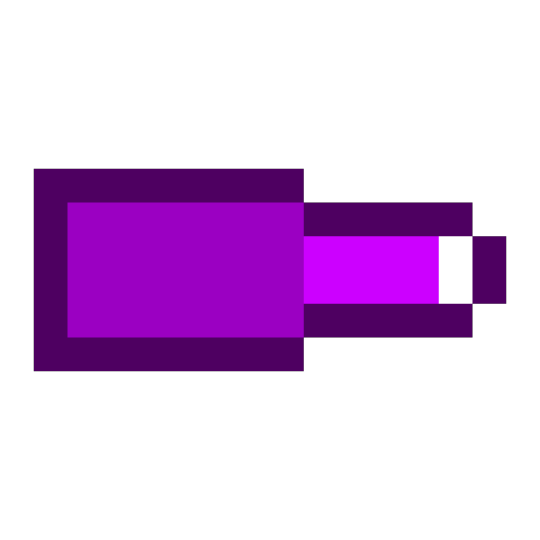
I also made some icons for the projectiles and power-ups, going off of the ones I had decided on:


0 notes
Text
Friday, 24th January
I began work on enemy and HUD tilesheets today.
For the HUD, I made a health bar which I can assign a bar to later, as well as icons to show which weapon the player currently has equipped.
Following advice given from Jake and my experience with creating the sprites, I had the idea to add a third weapon to my game: pistols. As the game goes on, the player will be able to pick up weapons as the enemies get tougher.
My ideas for differentiating the weapons is as follows:
The pistols fire two lines of bullets straight ahead, and have the ability to shoot behind the player with a separate button press.
The shotgun shoots pellets in a wide spread.
The submachine gun fires bullets in a straight line.


0 notes
Text
Wednesday, 22nd January

After a revision, I was successfully able to import my sprites to Unreal Engine.

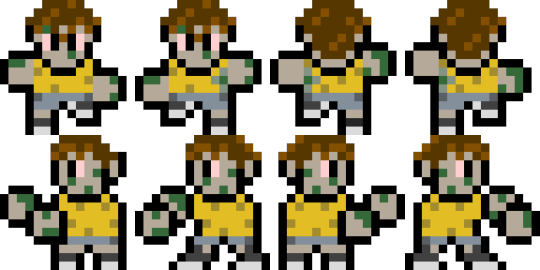
With the main spritesheet finished, I began converting the different animations to flipbooks. I had to start over multiple times after noticing errors in my art, e.g. the left and right animations not looking like walking, or the left and right shotgun sprites having the wrong colour for the pump.
0 notes
Text
Tuesday, 21st January
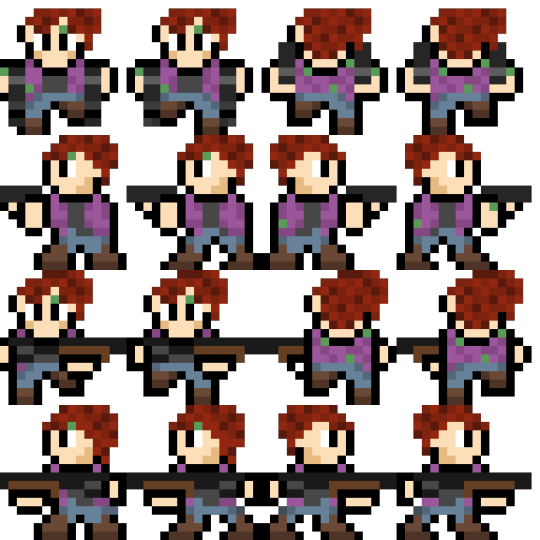
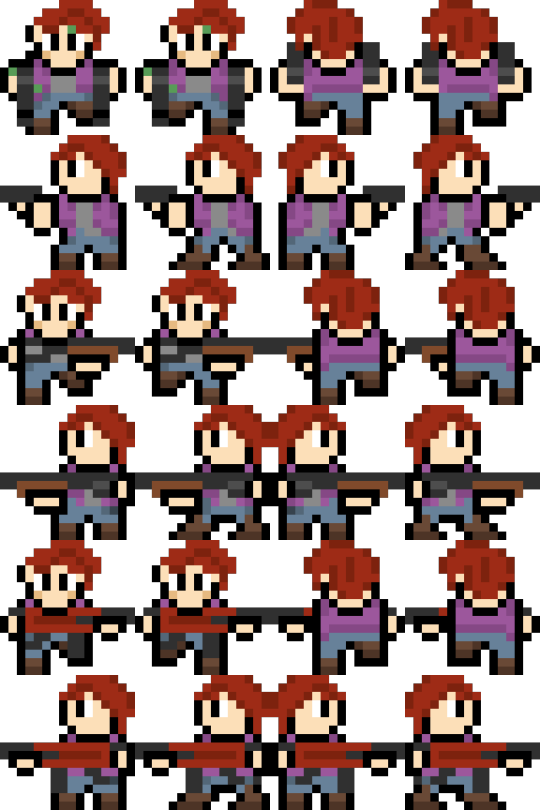
I finished the spritesheet for my player character. Yesterday, I had been experimenting with the character's proportions and was only able to finish her vertical-facing sprites (top row), but today I was able to do the horizontal-facing sprites, as well as a second spritesheet for when the player has the shotgun equipped.
I experienced technical difficulties when exporting the sprite, namely Pixilart not correctly saving it so that it used the correct thumbnail but an older version of the image in the editor, but I was able to figure it out eventually.
0 notes
Text
Monday, 20th January
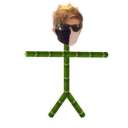
Today I began to refine the player sprite. I made the decision to compress the sprite I made beforehand from 32x32 into 16x16. The reason for this is that while 32x32 leaves more room on the canvas and thus enables greater detail, it can also be more difficult to design. Additionally, I decided that 16-bit would be a better pixel ratio for my game, as it would convey the top-down perspective better and stand out from my previous project.
It was tricky to position the head correctly, as the character's jaw structure made her head impossible to center. I didn't want to change it, so I ended up making the sprite 15x16 so that the body had a more consistent shape, leaving out a column of pixels. It should be fine, however, so long as the character's body remains in the same general position regardless of orientation.
0 notes
Text
Friday, 17th January
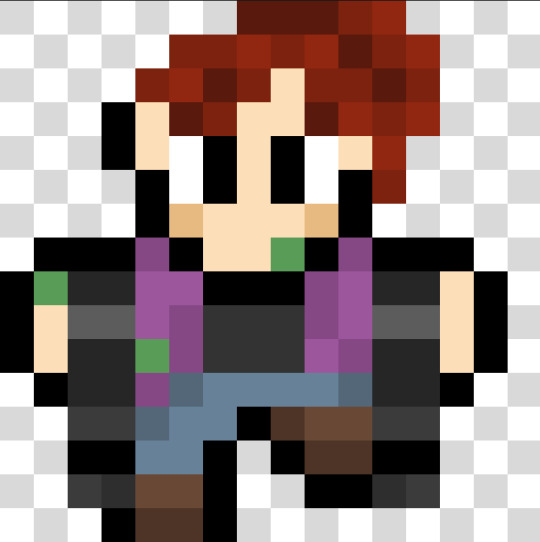
I started work on my project by creating a concept sprite for the player character.

When designing the character, one specific character came to mind: Claire Redfield of Resident Evil 2 fame.

I took the hairstyle and outfit for the design, but made sure to change several details, such as the colour scheme, hair style, and filth on the outfit.
0 notes
Text
Attract Modes
An attract mode is a feature of arcade games and some other games which plays a demo gameplay on-screen for as long as no inputs are made on the title screen.
0 notes

Text
Creating a Simple Arcade Game in Unreal Engine: Part 2
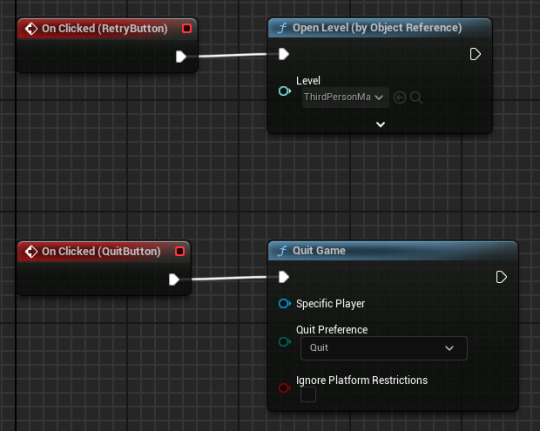
34. In the Score Screen widget, add an On Clicked event to the retry button and attach an Open Level (by Object Reference) box linked to the ThirdPersonMap.
35. Do the same with the quit button, but attach a Quit Game box instead.
The arrays, the UI, and the high score system have all been finished. Now we are going to make a system for storing and saving high scores:
36. From the quit button, create the following code:

37. Create a new SaveGame blueprint and name it HighScoreSave. Open it and create a new integer variable named HighScore.
38. From the quit button and game instance, create the following code (note that you must promote High Score Save to a variable by dragging off from the Create Save Game Object box):

39. Open the ThirdPersonCharacter's construction script and create the following code:
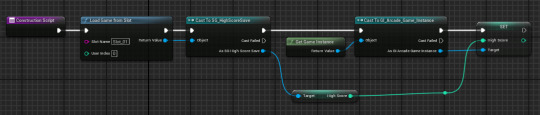
To finish off, I made uniquely animated UI.
40. Create a new Widget Blueprint for the title screen, and name it StartScreen.
0 notes
Text
Creating a Simple Arcade Game in Unreal Engine: Part 1
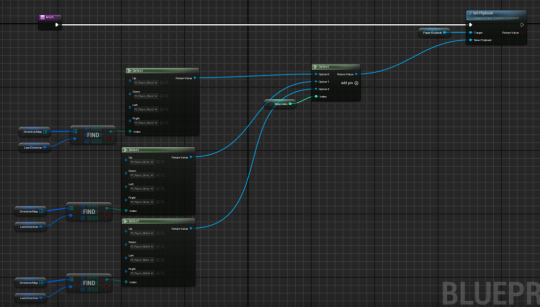
Today I created my own arcade game using arrays to created randomized gameplay.
Arrays are a group of variables ordered in a list, numbered 0, 1, 2, 3, etc. By sorting them and selecting specific values, it is possible to output data from them, and use this to change the look, feel, and even gameplay of your game.
1-2: Player Controls
3-7: Game Environment
8-9: Spawn System
10-12: Items
13-15: Game Instance
In a new Third Person project, open BP_ThirdPersonCharacter and delete everything except for the sections "Add Input Mapping" and "Movement Input". You should have removed the Look and Jump elements from the project.
2. Disconnect the "Forward/Backward" movement nodes. Save and close the blueprint.

3. Delete all elements inside the ThirdPersonMap, as well as the floor and the wall behind the player.
4. Add a Camera Actor and line it up where you want to view the level.

5. Open the Level Blueprint and set up the following blueprint:


6. To set the Player Start in the center of the field, set the Location to the shown coordinates:
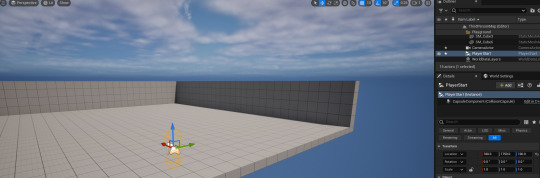
7. Create a new Actor, name it Floor, and add a Cube in the viewport. Add it to the level, scale it to where the old floor was, and give it the Actor Tag "Floor".
8. Create a new Actor and name it Spawner. Spawner is going to be the Game Manager, who controls the spawning inside the game.
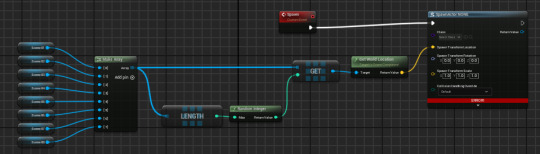
9. Inside the Event Graph for Spawner, create a new Custom Event and name it Spawn. Add as many Scene components as you want locations where items drop, and create the following code (don't mind the error if you compile, we will attend to it later):
10. Create a new Actor and name it Item_Parent. In the Viewport, add a Sphere Component and drag it up to make it the Scene Root.

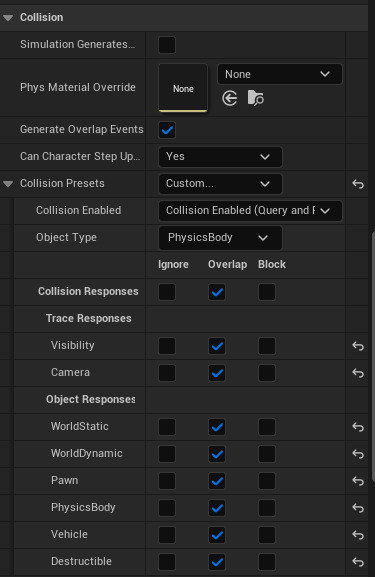
11. Select the Sphere and, in the Details panel, change the following settings:
Simulating Physics > True
Collision Presets > Custom..., Type > Physics Body, and all Responses > Overlap.
12. Create the following Blueprint in the Event Graph:

This makes the falling objects vanish upon hitting the floor, so they don't cluster up.
13. Create a Game Instance and name it Arcade_Game_Instance.

14. In the Game Instance, make two Integer variables named Score and HighScore, respectively.

15. Back in Item_Parent, make the following modifications to the Event Graph blueprint:

16. In the Content Browser, right-click Item_Parent and select Create Child Blueprint Class. Do this repeatedly to make different items worth different amounts of points, naming them Item_Child_01, etc.
17. Open the Child Actors and give them all different materials so that you can tell the difference between them.

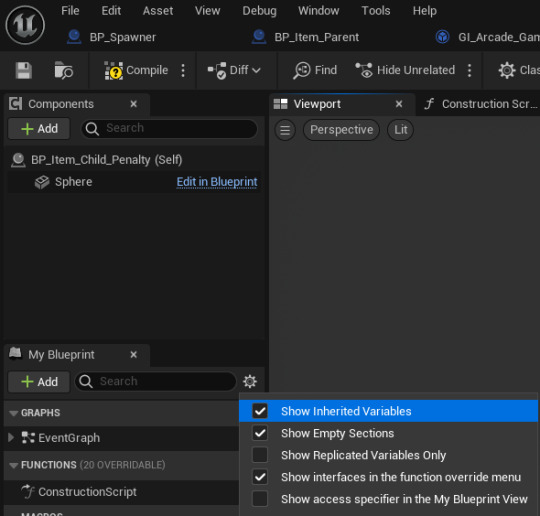
18. To alter their score value, click the cog icon in the My Blueprint menu and tick "Show Inherited Variables", which will allow you to see the Parent's variables. Select each variable and alter the Default Value at the bottom of the Details pane to set each object's score (including both positive and negative ones).

19. Back in BP_Spawner, add a new variable, and set it to Actor (Class Reference). Name it Items and make it an Array in the Details panel.
20. Adjust the event graph, making sure to add the dropped items to the Items variable:


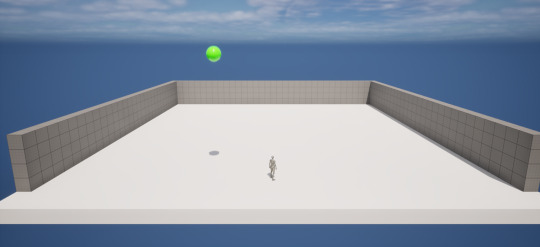
21. Add the Spawner actor in the game and align it with the player, then begin adding the Scene components where you want the items to fall from.

*Scene components completely invisible by default, they are present
21. Create a new Widget Blueprint and name it ScoreUI.
22. Add a Canvas Panel and a Text Block.

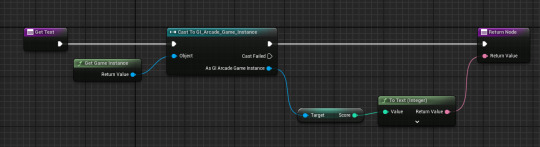
23. Create a Binding for the Text. In the binding, make the following code:

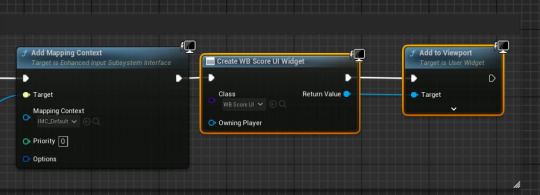
24. Open the ThirdPersonCharacter blueprint and add the following code to Event BeginPlay:
25. In Edit > Project Settings > Project: Maps & Modes, change the game instance to your Arcade_Game_Instance.
26. Create a new level and name it WinLose.
27. Create a new Actor and name it GameOver. Copy the code from the Child item actors, but remove the score mechanics and set Open Level from the Branch instead of Destroy Actor.

28. Set the Open Level mode to the Win/Lose level, and add GameOver to the Item array.
29. Create a new Widget Blueprint and name it ScoreScreenUI. Open it, and add a Canvas Panel and two Text Blocks (one for the achieved score, one for the high score).

30. Add two Buttons, each with Text Blocks, to be the Retry and Quit buttons. Make sure "Is Variable" is set to true in the Details panel for both of them.

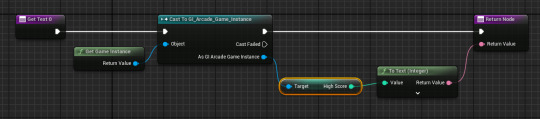
31. Create a new Binding and copy the code from ScoreUI. Apply it to both numbers (see above image), making sure to change the high score text to the appropriate box:
32. In the ThirdPersonCharacter, make a new Custom Event and name it HighScore. Create the following code:

33. Enter the WinLose level and open the Level Blueprint. Create the following code:

0 notes
Text
Creating Fixed Cameras that transition between each other in Unreal Engine
Add a Box Collision to the Camera. Scale it to the size of the view you want.

2. Alter the code of the Fixed Camera. Not that "Blend Time" affects the transition time, and "Blend Exponential" affects the smoothing time.

3. Place the cameras in the world, making sure each box is aligned correctly. If done correctly, the camera will transition as you move from room to room.

While this wouldn't be useful for the game I have in mind, since I wanted the camera to scroll smoothly and constantly as the player moved, it would be useful for games like top-down dungeon crawlers where you move from room to room.
0 notes