
xnarwhalrusx
This. That.
|Tristen|okay narwhal|
19710 posts
Don't wanna be here? Send us removal request.
Last Seen Blogs

slavarmada
spacesquat

fikeupdates
Dominic Fike Updates

apfe2020
a place for everything...

kf14wxbw-blog
Insurance

karenfordonte
Caring For Donte
Photo


Newwwwwww pride flags!!!!!!!! Happy to do more flags!
17K notes
·
View notes
Photo


I finally got around to working out a pattern for these mason jar covers. This is my first crochet pattern, so if you have any questions, feel free to ask and I’ll try to help as best I can. Also, I feel it necessary to point out that you should used caution when using them with real candles. Make sure that you make your ties long enough, so as not to burn doorknobs or your house down! If in doubt, I strongly suggest battery operated candles.
If this pattern proves too difficult, or you don’t crochet, I can make them to order (just send me a message)
Mason Jar Cover, Crochet Pattern
Using 4MM crochet hook and sport weight cotton yarn.
Round 1. Chain 4. Work 12 DC in 4th chain from hook. Sl St in top of beginning ch3 joining to beginning of round (12)
Round 2. Ch-3. 2 DC in each DC around Sl St on top of beginning Ch3. (24)
Round 3. Ch-3. 2 DC in each DC around Sl St on top of beginning Ch3. (48)
Round 4. 1SC in first DC, chain 5, skip 3 stitches, 1SC. Repeat to end. Sl St in last stitch.
Round 5. Ch3, DC in same stitch, Ch1, 2DC in same stitch (this creates the shell). SC in first CH5 loop. CH5, SC in next CH5 loop, work shell) continue until you reach the beginning of the first shell. On final SC going into the last CH5 loop, grab the corner of the first shell and combine it into that stitch. You should have a uniform circle of the same stitches all around.
Round 6. Sl St one over to get to center point of shell (the CH1 stitch in the middle). Ch5 then SC into first CH5 loop, Ch5 then SC into CH1 center of shell. Continue ending in the CH1 of the first shell.
Repeat Round 5 and Round 6 to desired height, ending on Round 5.
Add ties to sides. Enjoy!
79 notes
·
View notes
Text
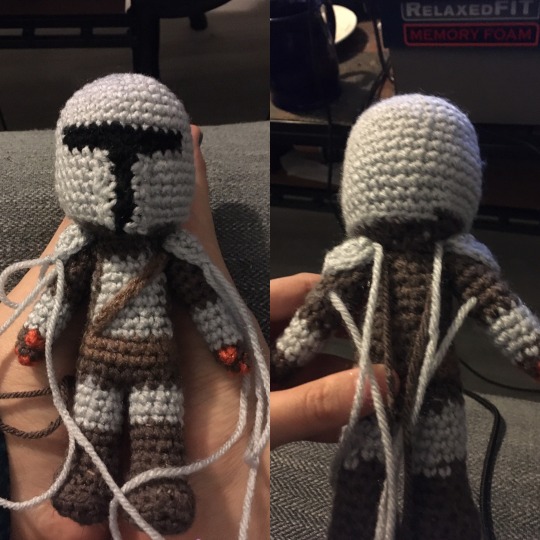
The Mandalorian Pattern
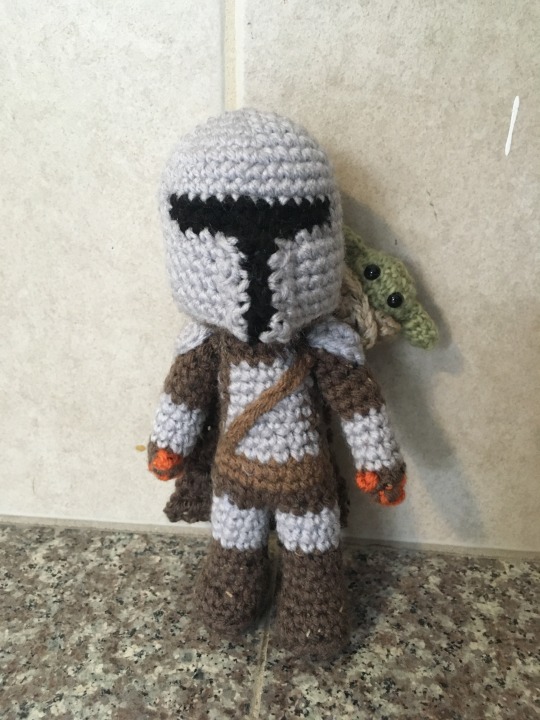
Ok! Here is my original crochet amigurumi pattern for the Mandalorian, to go with my other yarn creation, Baby Yoda. As before, if you use this pattern, please link back to my page, and tag me or send me a picture! I will slam that reblog button so fast!
Fun fact: this isn’t my first time around Mandalorian armor… In 2013 (!) I crocheted my friend a Boba Fett amigurumi, which you can see HERE and HERE. I improved the pattern a bit, but I did want to share because there are some in-progress pics which could potentially help, as I’m unfortunately not the best at taking them while I work!
Technical stuff: I used a 3.0 mm crochet hook and these yarns:
Loops and Threads Impeccable in Walnut Tweed (body and cape)
Red Heart Super Saver in Cafe Latte (belt and bandolier)
Red Heart Super Saver in Light Grey (armor)
Red Heart Super Saver in Black (visor)
Red Heart Super Saver in Carrot (gloves)
I was really happy with the brown color I found for the body (this project was the first time in YEARS I’ve actually opted to increase my stash and it was worth it!), but I think there is plenty of room to experiment with other colors!

^ Helmet
I think it was such a bold choice to go with uncolored metal for the Mandalorian’s armor! It’s very hard to simplify and not be evocative of medieval knights or Trojan/Spartan warriors… In this picture, you can see I made a short strip of grey yarn that I thought could be the seam down his helmet, but I decided it just didn’t work for my scale.
6 sc in a magic circle
inc 6x to make 12 stitches
(1 sc, inc) 6x to make 18 stitches
(2 sc, inc) 6x to make 24 stitches
(3 sc, inc) 6x to make 30 stitches
(4 sc, inc) 6x to make 36 stitches
2 rows of 36 stitches
1 row of 36 stitches, with 12 black stitches in the front
1 row of 36 stitches with 12 black stitches aligned with previous ones
4 rows of 36 stitches in grey
1 row of grey, add two increases at the front (38 stitches)
1 row of 38 stitches
I found it easiest to eyeball where I wanted to start the black yarn for the visor, rather than count out how many grey stitches before the color change. At the end, leave a tail but don’t pull the loop through, since changing to the brown yarn for the under helmet part will be a color change.
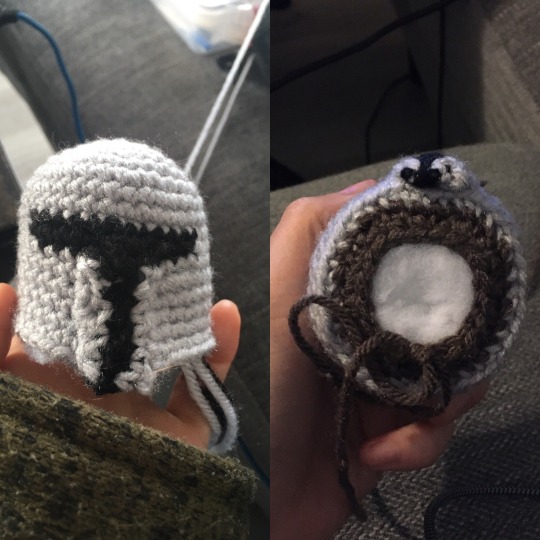
^ Front visor section and bottom of helmet:
Before closing off the helmet, I made the front separately and sewed it on - I think that’s much easier than trying to do color changes in each row and keeping them nicely lined up, plus, it gives the helmet just a bit of texture that I like to imagine gives the suggestion of some contours.
6 foundation single crochet in black
turn, 6 sc in grey, tie off leaving a tail
reattach grey yarn to other side of the black, 6 sc, tie off
sew onto helmet
To close off the helmet, change to the brown yarn, and for the first row crochet only in the back loops to make a sharper change between the helmet and the underside (neck?) area. I was not super precise with this part, as all I wanted was for the underside to be mostly flat.
(2sc, dec) ~9x in back loops to make ~29 stitches
(1sc 1 dec) until closed (stuff part way through)
tie off and weave in tail

^ Legs (make 2)
To make the feet look more boot-like, I did all the foot-to-leg decreases on one side, but most of the shape comes from just smooshing it with my hand. Also, I tried to evoke his one larger armor piece by having an extra row of grey on his right leg, but it ended up being a bit subtle. (I know his armor is only on the front of his legs, but I didn’t want to color change that often in such a small space, and the back of the leg is hidden enough by his cape that I don’t mind!)
6 sc in a magic circle
inc 6x to make 12 stitches
(1 sc, inc) 6x to make 18 stitches
1 row of 18 sc in back loops
(decrease 4x), 2 sc to make 10 stitches
6 rows (his left) or 5 rows (his right) of 10 stitches in brown
color change to grey in back
3 rows (his left) or 4 rows (his right) of 10 stitches in grey
For one leg, tie off the tail, for the second leg, make sure that the loop is still available to start the torso section. (I chose which leg to begin the body based on the direction I was crocheting, for me it ended up being HIS right leg). Make sure both legs are stuffed!

^ Torso:
The torso is made by connecting the two legs with a round of crochet. I started with the brown yarn, switched to a lighter brown for the belt section, then for the breast plate unfortunately it’s just a bunch of color changes! My best advice is to keep securing and tying off ends as you go, and stuffing as the body gets taller.
On right leg, color change from grey to dark brown, chain 1, slip stitch into left leg, sc around both legs (~20 stitches - if it ends up more, just decrease in back to that)
another row of 20 stitches in dark brown, color change to light brown
2 rows of 20 stitches in light brown
(1 dec in the back) 7 grey in front, 12 dark brown in back (19 stitches)
7 grey in front, 12 dark brown in back (19 stitches)
(1 dec in back), 6 grey in front, 12 dark brown in back (18 stitches)
6 grey in front, 12 dark brown in back (18 stitches)
(1 dec in back) 5 grey in front, 12 dark brown in back (17 stitches)
5 grey in front, 12 dark brown in back (17 stitches)
(1 dec in back) 4 grey in front, 12 dark brown in back (16 stitches)
(1 dec in back) all dark brown (15 stitches)
(1 dec in back) all dark brown (14 stitches)
Finish off and leave a tail to sew the head on.
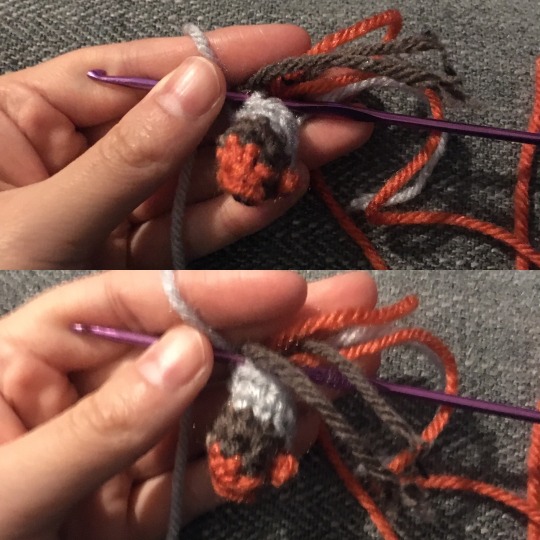
^ Arms (make two):
I was really happy with my decision to make his little orange mitts - for such a simple costume with very little ability to emote, those gloves really help to draw focus on small gestures!
6 sc in magic circle in orange, color change to brown
1 row of 6 stitches in brown
(inc, 2 sc) 2x to make 8 stitches
Take one tail of the orange yarn and thread it through to the second brown row, chain 3 and loop it over, securing it back into the brown yarn to make a thumb
Change to grey, 4 rows of 8 stitches
Change to brown, 5 rows of 8 stitches
Stuff and finish off leaving a tail.

^ Bandolier / Assembling body:
Sorry he looks a little dismembered here… but at this point you’re almost done!
For the bandolier, in light brown, chain ~9 (I just measured it across his chest plate from belt to shoulder)
Tie off the end and pull both tails through the body, making it snug against his chest, tie off and weave in ends
Sew head onto body using the tail from the neck, weave in ends
Sew arms on leaving a little room between them and the head (so his pauldrons will fit!), weave in ends
^ Pauldrons
These are simple! Make two!
6 sc in a magic circle
(sc, inc) 3x to make 9 stitches
To attach them, since I liked the look of the stitches sitting freely on the arms, I took the tail from the center and sewed it through the arm, then used just a single stitch on the upper arm and lower arm to hold them in place.
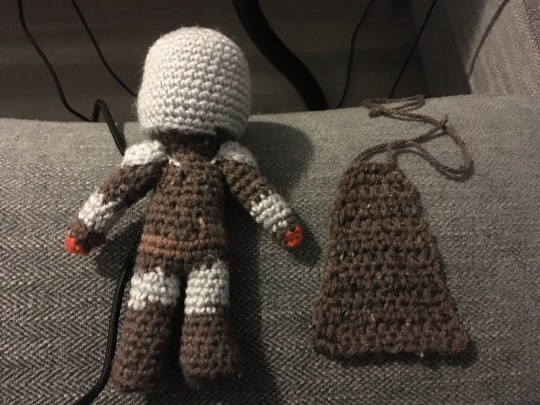
^ Cape:
A lot of the taper on this cape was because I was accidentally dropping stitches at the beginning of each row - I am terrible at crochet when it isn’t in the round! I used half double crochets since I like how they make a slightly looser texture than the body. You can also see here why I try to color change in the back - it doesn’t end up looking super even!
foundation single crochet 14, turn
1 row (14 hdc, turn)
9 rows of (1 dec, hdc across, turn)
This got me to approximately 5 stitches across, which looked like a good size to fit between the shoulders. I took the other tail and wove it up the side until both tails were coming from the top of the cape. Tie off the end and sew onto the back of his neck!

I know that was a lot! As always, feel free to ask me questions if you get stuck or something doesn’t make sense, since it’s very possible I made a mistake in my write up! Best of luck crocheting your very own Mandalorian! I hope to see him and his partner in crime Baby Yoda off on many adventures together!
1K notes
·
View notes
Photo

INCREDIBLE PHOTO <3
link below to see:
http://sh-meet.bigpixel.cn/?from=groupmessage&isappinstalled=0&fbclid=IwAR1CWHqrxwZ1OUHem0CjjLrTBDH2j2cS4zISRo_2a6coC-A_YkFRr6QzMls
credit to: ketul
399K notes
·
View notes

Text
if you firmly believe cowboy cats would say meowdy hit that mf reblog
363K notes
·
View notes
Photo


This is what a real, qualified OBGYN will tell you about what women feel when they get an abortion
Dr. Willie Parker, who is trained as a gynecologist and OBGYN, is a hero for the pro-choice movement because he’s honest about the undiscussed aspects of getting (or not getting) an abortion. Watch how he gives a consultation.
620K notes
·
View notes

Text


All Star translated into Aramaic translated back to English
113K notes
·
View notes
Text
When you see a spider by your foot:

When water gets into your ear:

When your mom tells you to take out the trash:

When your hair gets in front of your face:

When you’re too tired to walk up the stairs:

???:

939K notes
·
View notes


Text
Me to my anxiety : can u like calm down these people don’t even think about you
Depression : ever
Me: that’s not what I meant
231K notes
·
View notes


Text


I’ve had a shitty mental day but this is my butt at a good angle. Hello butt.
5 notes
·
View notes

Photo


Request:
Tom Holland defending his partner’s pronouns.
152K notes
·
View notes
Photo
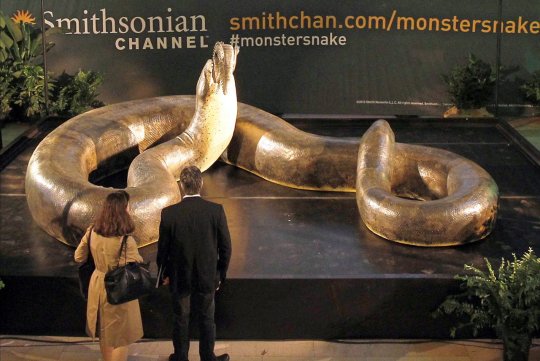
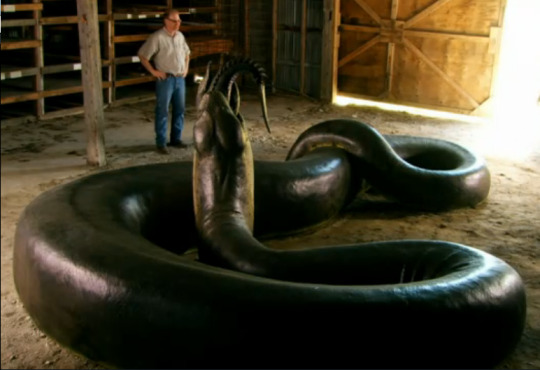
The Titanoboa, is a 48ft long snake dating from around 60-58million years ago. It had a rib cage 2ft wide, allowing it to eat whole crocodiles, and surrounding the ribcage were muscles so powerful that it could crush a rhino. Titanoboa was so big it couldn’t even spend long amounts of time on land, because the force of gravity acting on it would cause it to suffocate under its own weight.
825K notes
·
View notes