
Don't wanna be here? Send us removal request.
Statistics
We looked inside some of the posts by y2rapidideas and here's what we found interesting.
Average Info
Notes Per Post
1
Likes Per Post
1
Reblog Per Post
0
Reply Per Post
0
Time Between Posts
8 hours
Number of Posts By Type
Text
17
Last Seen Tumblr Blogs


Fun Fact
BuzzFeed published a report claiming that Tumblr was utilized as a distribution channel for Russian agents to influence American voting habits during the 2016 presidential election in Feb 2018.
Text
Working on a Microraptor model
Now that I had textures, I decided to subdivide my model more to add a smoother look. I used the modifier for this, then worked to join together the body, arms and legs smoothly.

I then finished the model by adding a sheen effect, like a real microraptor would have had. I made the sheen a blueish green, similar to the sheen of a magpie feather.
If I had the opportunity I would have played around with Thin Film, to add the multicoloured sheen.


Unfortunately I didnt have time to rig and animate this model like I was hoping to.
0 notes
Text
Working on a Microraptor model
Next, I made the textures. I started on the wings, creating a rouch sketch in the texture paint section of Blender, then taking the UV and importing it to Photoshop to refine.
I erased sections of the texture and made sure the background was transparent, allowing me to add the effect of individual feathers without having to model them. I then put the texture into an online NormalMap generator- https://cpetry.github.io/NormalMap-Online/ - and applied this too. This adds a 3d effect to the planes.


I repeated the same method for the leg feathers and the body.

0 notes
Text
Working on a Microraptor model
References:
I mostly used these when modelling to get a good shape of the raptor.


In a new blend, I added an image reference of the first image above. I then set the viewport camera to be fixed on a 2d plane, and with a mixture of the loop cut tool, the extrude tool, the move tool and th e scale tool, I shaped the basic cuble into the side view of thr microraptor, using the reference as a guide.

I then shaped the rest of the model to create a rounded shape. I followed the same logic to model the wings and legs, and shifted the wings to be in a T-pose rather than straight up. This makes it easier to animate.

1 note
·
View note
Text
Continuing a prototype
I decided to continue developing my endless runner prototype. I liked the idea of turning it into a predator/prey chase, and an endless runner has the perfect gameplay style for that.
I originally thought of following the idea that you are a prey animal being chased, like a rabbit.
However- I felt that it would be more interesting to play as a hunting predator. I have been playing several dinosaur games recently and so was inspired by these. However I wanted to use a less common dinosaur, and my personal favourite is the Microraptor.
A bonus to using this dinosaur is that they were known for being gliders, and this offers the opportunity to add a glide function into the game.
To bring this idea to life and include my 3D modelling skills, I decided to model a microraptor to add into the game as the player model.
0 notes
Text
Brick Breaker: next steps
I enjoyed designing the brick breaker prototype, though not as much as the endless runner. I did find it interesting to add small optimisation fixes through trial and error.
If I had the opportunity to continue the brick breaker, I would add more details to the visual aspect of the game. I would possibly theme this off of something aquatic.
I would also add extra effects, such as boosts that spawn randomly when breaking the bricks. This could include double balls, explosive balls or bricks, and possibly an extra life. I would also add a 'speed up time' function for when the ball takes too long to bounce back down to the paddle.
0 notes
Text
Step 5 - HUD
a) Hud b) Score c) Lives and high score d) Levels
0 notes
Text
Step 3 - Creating the ball
a) Arena
b) Ball actor
c) Death box
0 notes
Text
Step 2 - Creating the bat
a) Player pawn
b) Adding movement
c) Input setup
0 notes
Text
Endless Runner: next steps
I found making the endless runner fun, and found it interesting to learn new functions I didn't know of before. One of these new functions I learnt was how to procedurally generate tiles.
If I were to continue this endless runner, I would start by adding new assets and a new player character to bring the runner to life and add more originality. These would possibly be inspired by dinosaurs/prehistoric settings. I would also add new functions to add variation to each run, such as a dive, glide or double jump function.
0 notes
Text
Step 7 - UI

main ui
3 text block for score high score and cpllected coins

sme code for all 3 on text block s
death scren

score and collecyed coins
try againm restarts game, quit game exits
0 notes
Text
Step 6 - Spawning Tiles with Obstacles
To make randomly occuring obstacles for the track, i started by adding a child of the master tile. This was a key part of the process.

I make a few variations of tiles consisting of varying obstacles, and add them to an array, with each being assigned an integer. This means they'll be randomly selected by another node selecting a random integer. This then loops.


^ a few random tiles

Then replace spawn Master Tile with Spawn Rand Tile in the master tile nodes.
0 notes
Text
Step 5 - Increasing Speed.

The code above will increase the max walk speed of the player. The clamp is to prevent the player being too slow at the beginning, and to stop the player from speeding up too much.
I then add this function to the master tile code so that every new tile spawned will increase the player's speed.
0 notes
Text
Step 4 - Adding Score and Collectables

To create a score, I used an integer variable. The code above adds and sets the new score, and adds a score multiplier. This function is then added to the master tile so that whenever a new tile is spawned it adds one to the score.
To create collectables, I made a simple actor with a mesh as a placeholder.

This code is to create a score multiplier as you collect more collectables.
I then make an array with the same locations as the player's tracks, and add the code so that the collectables spawn randomly between those three locations per tile.
0 notes
Text
Step 3 - Lane Switching

To get the player to lock to lanes, we are setting three locations represented by integers, for the player to switch between. This works by adding and subtracting from the current integer. To stop the player from falling off of the track, there is a clamp added to stop the player going above or below the set integers for the three tracks.

To make the transition between lanes smooth rather than teleporting to each, I used a timeline and a lerp to smoothly transition between lanes.


This all works as intended. This feels like the bare bones of an endless runner.
0 notes
Text
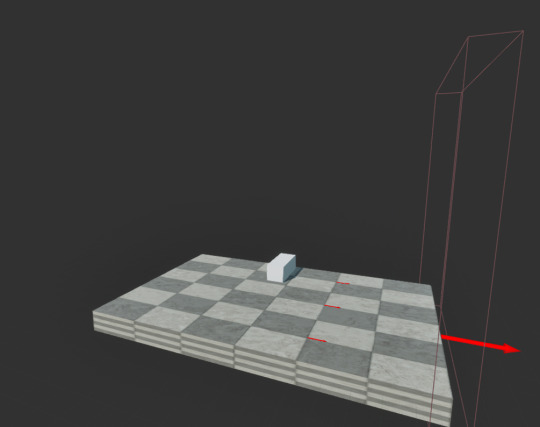
Step 2 - Creating the Master Tile

To set up the tile, the key things are having a collision to trigger the spawning of the next tile (1), and the arrow to set the location of the next tile being spawned (2).

On begin play, this code spawns a few blank tiles for the player to load in on. This means that the player won't instantly die as soon as they spawn in.

This is the same code that has been modified to spawn random tiles from an array. This means that obstacles are spawned randomly to create an element of challenge and originality to each run.
0 notes