
YouLovePrint is a unique, easy, quality, affordable Web2Print Solution; making print available to everyone ... and this is their blog!
Don't wanna be here? Send us removal request.
Statistics
We looked inside some of the posts by youloveprint-blog and here's what we found interesting.
Average Info
Notes Per Post
1
Likes Per Post
1
Reblog Per Post
0
Reply Per Post
0
Time Between Posts
14 days
Number of Posts By Type
Text
8
Last Seen Tumblr Blogs


Fun Fact
In 2020, 27% of US Tumblr users had an annual household income of over $100,000.
Text
8 top tips for designing your brochure for print

A key tool to promote your business and engage with your audience is a printed brochure. Unlike digital communications, a printed brochure can engage in a tactile and permanent way. 84% of people actually say they retain information better when they are reading in print* so if you want your business or message to be remembered then produce it in print. Here are our top tips for when you are starting out producing your brochure.
1. Understand what the aim of the brochure is before you start
Make sure when you are designing a brochure for you or a client that you identify what the objectives are first. Make sure you work out what the brochure needs to do, what the key messages are and the totality of the content to feature.
2. Don’t have too many fonts
Stick to a corporate identity font if there is one and if you don’t have one then make sure you choose no more than 3 fonts for the body copy, sub heading and heading. Do a bit of research online at different fonts and what they evoke to get the right font for your brochure.
3. It’s all in the words
Getting your copy right is so important from the headline to the body text. Sometimes less is more and never underestimate the importance of proof reading. Once it’s in print you can’t change it. If it’s your own project make sure you get someone else to read through it before you finalise the artwork, it’s amazing how much you miss when you read something over and over. If you have the budget then a copywriter who is given a really clear brief is a great investment.
4. Choose the right cover message and image
The cover of your brochure is your shop window the chance to make a first impression. So make sure you spend time on it and don’t overcomplicate it with too many words or too many images. You need to make sure that the cover says straight away to the audience what is inside without overcomplicated wording.
5. Choosing the right imagery
Imagery is such an important factor for your brochure – choosing the right imagery to convey your brand or message, making sure the imagery ties in nicely together with the copy and the right resolution for print. Our pre-flight tool will tell you if this isn’t the case so you have a chance to change it and get it right. There are so many stock photo libraries including some free ones like unsplash.com but nothing beats good quality original imagery where possible.
6. Choose your paper wisely
There are multiple types of paper finishes – on our site silk, gloss and uncoated and obviously differing weights. The right paper choice makes a big difference to the finish of your brochure. An uncoated material creates a natural and creative feel, a gloss finish is great for photography and silk in between but really it’s a personal choice. The paperweight can convey an element of luxury with a heavier weight however the price does increase with a heavier paper. If you want to create standout, you can have your cover in a heavier weight.
7. A striking finish
You can choose to laminate your brochure – this gives it longevity, protection and a different feel. Matt, gloss, soft touch and then different UV finishes to highlight your content. Lamination does effect the recyclability of your product but if it’s makes your brochure last rather than a throwaway item it will give the product longevity and will mean you don’t need to produce so many.
8. Binding it all together
Choosing a binding that will suit your publication is another consideration. We offer various bindings from hardback (case bound), wire bound, perfect bound (PUR), loop binding and stapled. Your choice depends on your budget, how many pages you have, how you want it to open (some bindings open more easily than others) and if it’s part of a set – eg. loop binding allows the brochures to sit as a set together.
*Twosides/Toluna 2015
0 notes
Text
YouLovePrint - Your Print Guide - Lamination and UV Varnishing
Lamination is a finish applied to both protect and enhance the finished job, lamination is a very thin film of plastic which is glued to the flat printed sheet. Lamination can only be applied to the entire surface of the sheet (unlike spot UV varnishing).
A lamination can add longevity to a product, an element of luxury and a different tactility.
There are many types of lamination:
· Gloss
· Matt
· Silk
· Soft touch
· Anti-scratch

Photo above: Soft touch lamination
Matt lamination can look very stylish on a solid black print, but be aware it is less durable than a gloss finish, and more liable to scuffing.
The downside of a lamination is that it can render an otherwise environmentally sound print job non-recyclable, but there are films on the market which are more environmentally friendly. An easy way to check if a printed sheet has been laminated is to apply pressure to the edge of the paper - it will resist tearing due to the strength of the film.
Similar in look to gloss lamination is a UV varnish can be used as an overall finish, to protect and enhance print (e.g. consumer magazines). It is also commonly used as a spot varnish effect for creative purposes. For example, to highlight a small photograph on matt paper. Varnishing and laminating are often combined to good effect –e.g. matt lam and spot gloss UV.
0 notes
Text
YouLovePrint - Your Print Guide - Finishing - The Binding Process
Once the job has been printed, it then moves on to the next stage, which involves turning the flat sheets into the finished product.
This is a list of the most common binding processes:
1. Trimming
2. Folding
3. Saddle stitching
4. Perfect binding
5. Case binding
1. Trimming
Printed sheets leaving the press are cut to their open flat size to remove unwanted bleed and trims. Guillotines trim paper or board in up to 560mm stacks.
The guillotine only cuts one side of the material at a time, and can only cut in straight lines. Jobs requiring further operations will now be passed to another machine.

2. Folding
Flat trimmed sheets can be folded to their finished size on a range of specialist folding machines as well of course as hand folded items. The main folding techniques are below that we offer you at UouLovePrint.

3. Saddle stitching (stapled)
Saddle stitching is the process of binding folded sections (4, 8 or 16pp) over a saddle through the spine with a wire stitch. It has the appearance of a staple when finished, so can be mistakenly described as “stapling”. In the same process, three edges comprising top (head), bottom (foot) and side (foredge) are trimmed to the finished book size. For example, a 16pp A5 booklet could comprise of 2 pieces of A3, each folded in half twice, and then stitched through the spine. Silver wire is used but other coloured wires can also be used to create a creative effect.

4. Perfect binding
Identified by the square back (double crease) spine. Folded sections are laid one on top of the other. Spines are then ground off and the pages are glued into a separate creased cover. Useful when brochures have too many pages to be stitched or simply to give a different finish. Also perceived to have a higher value. (i.e. report and accounts or ‘art/ coffee table style’ brochures).
HINT: The minimum capacity (thickness) you need to perfect bind a brochure is 4mm and the maximum thickness is 65mm.
5. Case binding
Case binding or a hardback/hardcover book. This is the most traditional binding method and can be created by hand or machine. The book block (text pages) are glued together with the endpapers wrapped around and then attached to the hard back cover made of board covered with a printed sheet or book cloth. There are different finishes to a case bound book:


Image above: Case binding - the printed cover being attached to the board.
0 notes
Text
YouLovePrint - Your Print Guide CMYK

CMYK (process colour) is the basis for litho printing. 95% of the colour spectrum can be reproduced accurately using a combination of these 4 primary colours. For example, a photographic image containing millions of colours would be converted to a 4 colour image, with varying amounts of the basic 4 colours split into tiny dots. Each dot is 100% of one of the four colours, but the size of the dot varies. Four plates are then created, from which the litho image is produced.


Dot
Printing relies on the use of dots of different sizes to make an image. Let’s say we want to print a vignette in magenta, using the standard 4 colour process system (fig 1).
Since the printer’s dots are either ON or OFF, they cannot print shades of colours like pink - it is limited to red or white. In order to simulate shades of pink, the printer uses round dots of differing sizes that, when placed beside one another at high resolution, trick the eyes into assuming that the area is pink (fig 2).
At this stage, we can make some decisions about the resolution of the job.

Because the print process breaks the image into a series of very small dots, we can vary the size of these dots. The smaller the dot, the more “photo-realistic” the print will be.
Printers use a measurement of the number of dots in a 1” square area, or lines of dots per Inch (LPI). This is also called the dot screen (if the centre of the dot is connected with the next dot, and the next etc, this makes up a screen). Most general commercial print will print at 200 LPI, as this gives a good balance between speed, ease of printing process and quality.
Special Colours (available through our partner Pureprint)
Also called:
• PMS colour
• Spot colour
• Pantone colour
Brands can have a special colour as part of their corporate identity. Chosen from the Pantone Matching System (PMS) range (which also includes metallic colours), these colours are pre-formulated to ensure consistency.
When printing special colours, a printer needs to produce a specific printing plate for this colour, and set up the printing press to accommodate the special in addition to any other colours in the job.
Pantone also produce a swatch book which shows the nearest 4 colour process equivalent to the PMS colour.
Please remember if specifying a special colour, use the relevant Pantone book (coated and uncoated paper).
Digital proofing processes do not give a good indication of special colours and we would recommend wet proofs if colour is particularly important.

Quality
The final print quality depends on a number of factors, including:
• Quality of photography and artwork
• Appropriate proofing and approval process
• Surface and type of paper
• Quality and condition of printing press
• Skill of press operator (minder)
• Adherence to industry guidelines on colour management (ISO 12647 etc)
The next in our series we will look at binding and the finishing process.
0 notes
Text
YouLovePrint - Your Print Guide Digital Printing
Digital printing primarily uses an electrical charge to transfer toner or liquid ink to the substrate it is printed on. The digital process can be differentiated from litho printing in a variety of ways, including:
· Each impression, or copy, can be different, as opposed to making thousands of copies of the same image from one set of plates.
· The toner or ink does not absorb into the paper, but forms a layer on the surface which dries almost immediately.
· It generally requires less waste in terms of chemicals used and paper wasted, as the first copy is the same as the last.
· It makes printing small volumes affordable where litho would be cost prohibitive

Digital printing for proofs:
Another application for this process is the generation of high quality digital proofs for colour sign-off (see REPRO). Examples of these are; IRIS proof, Digital Cromalin, AGFA, Kodak and Epson proof (all versions of the digital process).
Unique properties:
No plates are required as the press images directly from file to paper. This means very quick set-up times, and therefore the digital process is usually considered for short-run print jobs.
Variable data print:
There is another key benefit of the digital process: Variable Data Print (also Variable Digital Print) because the digital process does not use plates, it is possible to make each output unique. So for instance, the press could print 1,000 leaflets with each leaflet carrying a different set of data/images.
This principle creates opportunities within the personalised communication, direct mail, and personalised books market, as the image which changes can be a name, address or the whole image.
On demand:
Rather than storing printed products which may never be used and creating waste many companies reduce stock levels to offer a “just in time” print system. The very short lead-times in the digital process enable this system. The same principle applies for on-demand book publishing.
Digital printing (large format):
There is another key market for digital printing. A high proportion of all the large format, outdoor posters, and general point of sale and signage is now produced digitally. The traditional method of production for these items was screen-printing, which is still used for special effects, glitters and metallic inks (see below for more information on this technique). The digital process commonly used for large format printing is ink-jet, which is based on tiny droplets of liquid ink being fired from a printing head onto the substrate.
Due to the nature of the application (i.e. banners, building wraps, outdoor billboards, bus shelter signs, etc) the printing machine needs to be large, and so they are referred to as wide format, or large format printers. They have a print width of between 17” and 125” and generally use a roll of material (either paper, canvas or PVC). Because the substrate is fed on a roll, these machines are capable of printing continuous lengths of 50m or more with CMYK plus white.

0 notes
Text
YouLovePrint - Your Print Guide Litho Printing
There are different types of printing and you can choose how your job is printed or your printer will choose the best way to print your job based on the jobs specification and on the volume you are printing. This week we look at litho printing.
Lithography works due to the basic principle of oil and water not mixing. It uses smooth plates.
The image to be printed is laser etched onto the surface of a thin metal plate. This process is known as Computer to Plate, or CTP. The un-processed plate contains an emulsion surface designed to accept water. When the image is burned onto the plate, this changes the emulsion surface, so the image will not become wet when dampening on the printing press.
The plate is affixed to a large cylinder on a printing press. Rollers apply water which sticks to the non-image area of the plate, but is repelled by the image area on the plate. This means that now, when the ink is brought into contact with the plate, it sticks to the dry areas, and is repelled (being oil based) by the wet area. If this image was directly transferred to paper it would create a positive image, but the paper would become too wet. Instead, the plate rolls against another roller covered in a rubber blanket, which squeezes away the water and picks up the ink.
The paper now rolls across the blanket drum and the image is transferred to the paper. Because the image is first transferred, or offset to the rubber blanket, this printing method is known as offset lithography. Each colour has it’s own plate, so a 4 colour image would use 4 plates, each printing one after the other, usually in the following sequence - Black, Cyan (blue), Magenta (red), Yellow.
Sheetfed litho:
Cut sheets of paper are fed one by one through the press. Suitable for short to medium quantities between say 1,000 and 1,000,000 copies. Presses have different maximum sheet size capacity, and number of printing units.
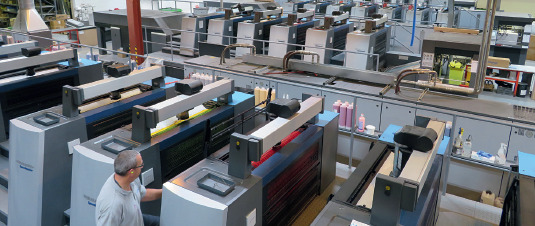
Heidelberg XL-106 sheetfed litho press at work
Web offset litho:
Continuous reels of paper are fed through the press. Suitable for medium to high runs, typically over 1,000,000 copies. Presses are different reel size capacity (diameter and width of one rotation of cylinder).
Typically, the majority of very high volume promotional and direct mail print is sheetfed process, whilst most consumer catalogues and newspapers use the web offset process. There are sheet and reel fed print machines capable of matching conventional print at low to medium volumes.
0 notes
Text
Youloveprint - Your Print Guide -Paper and the Environment
Paper is based on wood, a natural and renewable material. As young trees grow they absorb CO2 from the atmosphere. Furthermore, as a wood product, paper also continues to store carbon throughout its lifetime.
The paper industry has a number of respected certification schemes ensuring the paper you use has come from a sustainable forest source.
There are two choices for you to consider when choosing paper and considering the environment:
· Recycled paper
· FSC paper
What is recycled paper?
Whilst there is no official directive which defines recycled paper, it is common to classify papers which contain 50% or more recycled content as recycled paper. Recycled papers typically contain either 50%, 75% or 100% recycled content.

Why use recycled paper?
• It uses less energy and creates fewer emissions than paper derived from virgin pulp.
• It supports UK recycling companies and provides a market for UK paper waste.
• It reduces the amount of waste paper going to landfill. (PCW - Post-consumer waste).
• Bleaching is often required to achieve a whiter paper (as with virgin fibre). This is done using the relatively harmless hydrogen peroxide (also found in hair bleach and tooth whitening kits).
• As demand and supply increase, the difference in cost between recycled papers and non recycled papers is reducing.
What is FSC?
The best way to ensure that your paper is from a well managed source is to look for FSC* certified paper. This certification recognises well managed, sustainable and environmentally responsible production, from tree to finished product.

If a printer or your print management company is FSC certified then the end product can carry the FSC label ensuring that there has been no contamination between FSC and non FSC material. However, the chain of custody is broken if the manufacturing mill or print supplier is not FSC certified.
If recycled paper is specified, then it is much harder to prove the source of the recycled element is from FSC accredited sources.
The WWF provide a great resource on choosing sustainable paper called the Guide to Buying Paper and also a Check Your Paper global database of eco-rated paper products where you can check the environmental credentials of a paper.
*FSC: Forest Stewardship Council
For more information go to www.fsc.org
or www.twosides.info/sustainable-products/ where there is a wealth of information on paper and the environment
0 notes
Text
Youloveprint - Your Print Guide

This week we are starting with PAPER in our series from our ‘Your Print Guide’ helping you understand about the print process!
PAPER - How is it made?
Paper comes from trees! Trees are cut, bark is stripped off, and then the wood is broken into small chips. These chips are subjected to mechanical or chemical pulping to separate the fibres and remove the cellulose and other binders in the wood. The resulting wood pulp is mixed with a water based solution resulting in a thick porridge-like slurry. Chemicals and compounds are added to increase the whiteness and smoothness of the paper.
Once the water has been squeezed out, the paper is smoothed and dried. For coated papers a layer of fine powder (china clay) is applied to one or both sides of the paper. The paper then goes through large metal heated cylinders which polish the paper to increase smoothness and determine the final finish. The more intense the polishing, the shinier the paper.

There are two categories of papers:
Coated:
Coated papers are available in a range of finishes from matt coated (matt, velvet, satin, silk), gloss coated (shiny) to cast coated (very shiny and is normally a single sided material).
Gloss: Hard shiny coating ideal for sharp reproduction and images and the ink dries well on this stock.
Matt: A lighter coating, resulting in a smooth, nonglossy finish, which retains its suitability for sharp colour reproduction. Makes text easier to read due to it’s low reflection.
To prevent the ink from rubbing or marking a seal should be applied to matt papers during the printing process.
Uncoated:
Manufactured in the same way as coated papers, except they do not have a coating applied. They are bulkier than coated papers as the paper is not compressed as much during manufacture. Because uncoated paper is more absorbent, the inks sink into the paper fibres and spread slightly, this is known as dot gain.
This softer, more absorbent surface may cause dulling and darkening of natural ink colour during the litho process, however when digitally printing uncoated paper use has very little impact on colour reproduction. Typical uses include newspapers and general stationery or creatively. Uncoated papers are also referred to as offset papers and cartridge papers.
Paper Weights
Paper weight is specified as grammes per square metre (gsm) also written as gm2 or gm. So, 1m x 1m piece of 100gm paper will weigh 100 gms!
Typical material weights are:
80, 90, 100, 115, 130, 150, 170, 200, 220, 250, 270, 300, 350, 400gsm.
NB: Not all papers are available in all these weights.
Technically, any paper weight over 170gsm should be called board.
Paper sizes
Paper sizes are always referred to in millimetres. Always state height first, width second. UP the stairs....ALONG the corridor!
Example:
A4 portrait = 297mm x 210mm
A5 landscape = 148mm x 210mm

The term “pp” stands for “printed page”. For example, a letterhead is a 2pp. A common confusion is to refer to a folded A4 sheet as a 2pp, (or 2 pages) when in print terms, this is properly referred to as a 4pp.
Printers have to use oversize sheets for printing. This allows for bleed and trimming.
Example:
To print an A2 poster, a printer would use SRA2 size sheets and trim top, bottom and two sides.
SRA2 = 450mm x 640mm
A2 = 420mm x 594mm
There are a number of different paper ‘series’ which use the ISO system for determining sizes:
‘A’ sizes are intended to be the finished job sizes
‘RA’ sizes are to allow grip on the printing press
‘SRA’ sizes allow for both grip and bleed
‘B’ sizes allow for oversize formats
Standard paper sizes
The ‘A’ series of standard paper sizes is based on the following principles:
• Format A0 has an area of one square metre.
• The height divided by the width of all formats is equal to the square root of two (1.4142).
• Format A1 is A0 cut into two equal pieces (ie the height of A1 is equal to the width of A0).

Show-through
As well as deciding what type of paper to use (gloss, matt, uncoated, recycled) and what weight of paper to use (gsm) it is worth considering how the print will appear on the reverse of the paper.
For example, if we print a very dark image onto an 80gsm paper, and the reverse of the sheet is blank, there is likely to be a visual darkening on the non-printed side of the paper. This is not marking or ink transfer. It is simply an optical effect of light weight papers. The thicker/heavier the paper, the less noticeable the effect of show-through will be.
Digital papers
Whilst there are some restrictions on minimum and maximum thickness of paper when digitally printing there is still a wide range of different papers and colours which can be utilised some specialist to digital printing and some both litho and digital print compatible. We ensure the best paper is selected if your job is printed digitally.
The next in our series will be paper and the environment. So look out here or on our social media for our update!
E���
1 note
·
View note