
Don't wanna be here? Send us removal request.
Statistics
We looked inside some of the posts by yunhao5237419 and here's what we found interesting.
Average Info
Notes Per Post
26
Likes Per Post
13
Reblog Per Post
0
Reply Per Post
13
Time Between Posts
5 days
Number of Posts By Type
Text
12
Last Seen Tumblr Blogs


Fun Fact
There were a total of 171.5 billion posts on Tumblr in 2019.
Text
IDES1262 Week 10 - Completing the loop
I actually have numerous good experiences for the past 10 weeks. I learned a lot about methods of design communication from lectures, tutorials and external self studies.
We learned some basic sketching techniques for the first five weeks. I am not good at sketching since day one, but through these weekly practices given by professional tutors, I definitely improved a lot. Drawing perspective views from projections by hands was something I have never done before. Found it quite challenging in the start but conquered them as practices went on continuously.
The Photoshop exercise from the sixth week was rather interesting. I spent a lot of time aiming for a professional sketch style render graph. Through this practice, I also refreshed my Photoshop skills a bit with tons of additional knowledge newly learned.
The physical foam model making in Week 7 was the best part of the course for me. With the brief guided clearly, I've done the model in a good quality without any trouble. I haven't been handcrafting for a long time, this week's task was definitely a refresh for me to prevent my hands getting unfamiliar with the tools.
I'm afraid to say that I did not finish the last two weeks' tasks perfectly especially in Week 9. I need more time and training on 3DS MAX in order to catch the principles and logic. I spent at least triple times than previous weeks' tutorial exercises, but still, the result wasn't ideal.
In conclusion, communication in design is a skill that requires a large amount of time expenditure to get mastered. I really appreciate these weeks of hand sketching, physical modelling and software editing. This is an important class that improves my skills as a designer. What's more, thanks to my colleagues work and comments, they inspired me a lot in terms of pushing design to the next level. Lastly, thanks to Rob, Gonz and Sarah for being professional and kind, would absolutely hoping to work with you guys again in the future. I had so much fun through this course, but, I have to take steps further from hard workings from now on.
8 notes
·
View notes
Text
IDES1262 Week 9 - Preparing a 3d scan for printing
For this week's task, 3 software were applied. Unfortunately, the worst week of mine...

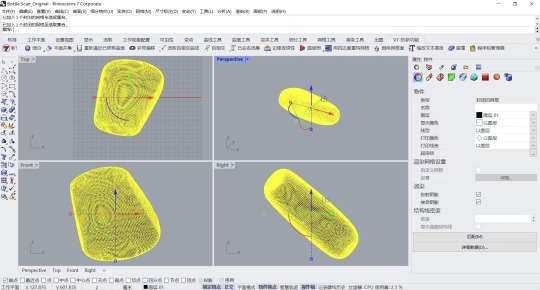
I started by downloading the file and exported to Rhino. By using the "Quad ReMesh" tool in Rhino 7, the original messy triangulated mesh became a clean quad. I've done this part successfully in fact, it was a good start indeed. However, upcoming steps were my nightmare I'm afraid to say...

For orientating the model correctly, I followed the steps as listed in the brief. Tried these steps over and over again for several hours didn't provide me a successful result. I guess I went wrong on the 3rd step, in which I have to position the gimbal at the base of the bottle, but I didn't know what to do in order to achieve a right solution.
I also employed "FFD 4x4x4", a boxed outline for scale references. I think I did this part ok, at least did not get myself a disappointing result.

In terms of fixing the dent, I also tried with several different ways. I started with vertexes and edges, which barely worked. I then used "Relax" tool to make it happened, roughly happened (at least better than the original dent).

Opened Cura with an incorrectly oriented bottle, sliced with a 10% infill (default) input to calculate the approximate printing time (I chose the 3D printer of UNSW as the reference). Due to Covid situations, I did not 3D print out the bottle:(


However, this doesn't mean I will learn nothing about 3D printings. Here's a throw back of a non-school project I did in 2019 in UNSW before the spread of the virus. The aim was to make some replacements of my bicycle's headset cover. Normal bicycle headset covers are aluminum, so I thought there is an opportunity for me to make some resin ones for achieving more "lightweight". So I immediately measured all the dimensions needed, came up with 3 different set of designs, and printed them out without any error, unexpectedly.


3D printed headset cover prototype fitment test, perfect! Can't post the video here on Tumblr so screenshots instead. Also tested the strength and rigidity of these for more than a year of high intensity BMX and MTBMX riding, no problem at all.
To summarize for this week, probably the worst week since I did not achieve the requirements of the brief properly even though I made numerous attempts. I need to understand the logic of 3DS MAX furthermore through fair amounts of practices to make everything less complicated for future projects by 3DS MAX. A very challenging week for me indeed.
4 notes
·
View notes
Text
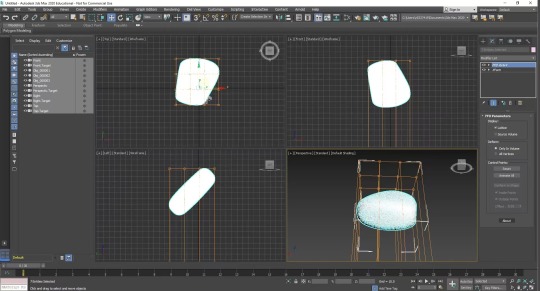
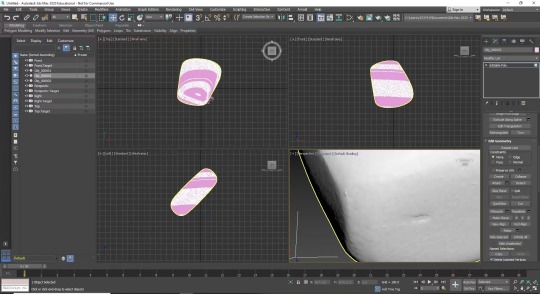
IDES1262 Week 8 - Digital Iteration
For this week's task, I stepped into 3DS MAX for some 3D modelling explorations. I actually used SolidWorks and Rhino before for numerous school and non-school projects, so it is interesting to find out the differences.


To initiate, I followed the brief and modeled a simple sphere. It was just an easy "one-click" operation. The 4 windows layout is similar to Rhino, showing three 2 dimensional views and one isometric view. This layout allows us to keep track our models to reduce mistakes in dimensions and what not.
At this stage, I was trying to get familiar with the commands, such as zooming in and out, rotating views, setting dimensions and so on. For the second working screenshot, I slightly adjusted the views, I also changed the color of the sphere from the default color to green. This demonstrates my understandings of the basics, ready for the following step.


I was then trying to take a step further for some real-life objects. I started with a rectangular box. The wooden table shown above was the first object I have chosen, through modeling this, I learned how "segment" works in 3DS MAX, that is, splitting a surface or a plane into pieces of blocks so you can play with each block that has been separated. The result is good.


I decided to try more difficult ones. The bottle (actually this is one of my concepts of OLAY bottles in Week 5/6) wasn't very difficult for me to model. I extruded the rectangular bottle body with preset fillets, and then place a cylindrical cap on the top with proper dimensions.
The donut was the most challenging one. It took me more than an hour to finish. I was actually doing this while watching a YouTube tutorial, checking and revising each step. Working on this piece of torus was rather fun I admit, with tons of details formed by numerous different commands. Commands such as "Vertex", "Edge", "Shell", "TurboSmooth", "Scattering" and so on are what I've learned.
To summarize for this week's task, I felt difficult to grasp the logic of 3DS MAX due to the fact that I've already get used to SolidWorks. Shifting my mind from what's habitual to an entire different set of principle isn't that easy. I actually started doing SolidWorks with unlimited problems and troubles but after a fair bit of practices I gradually understood it. I'm glad that I can make a 3D model of a donut with proper amount of details in 3DS MAX for the first day, thanks to my experiences in other 3D modelling programs (SolidWorks / Rhino). I believe more practices will bring me better results out of 3DS MAX.
2 notes
·
View notes
Text
IDES1262 Week 7(2) - Physical Model Making (Foam) (Part 4)


Part 4: Refine your bottle form (1)
Both the bottle body and the lid were briefly sanded, so I used the three negative templates I cut in advanced to double check the dimensions, they were perfect!

Part 4: Refine your bottle form (2)
I wanted to apply fillets to both my bottle body and bottle lid model, so I started with a 60 grit sand paper, then refined using a 180 grit sand paper, and finally refined by a 240 grit sand paper for smoothing edges. I also glued the lid to the body to make sure they're in one piece.


Part 4: Refine your bottle form (Done) + Week 7 Summary
Here is what the final model looks after several hours of work. This model is based on one of my concept from OLAY bottles digital rendering exercise in Week 6 (the left one from Week 6's work, attached above).
I think I've done this week's work really well, although there are still rooms to improve, such as polishing filleted edges, I could control them better and have them better polished with smoother sand papers such as 400 grit ones or even 650 grit ones. I enjoyed the exercise from this week very much!
2 notes
·
View notes
Text
IDES1262 Week 7(1) - Physical Model Making (Foam) (Part 1-3)


Part 1 Construct your profile templates:
I started this week's task by setting up the positive template of the front view and negative templates for all three sides. I then applied a cutting knife to cut them out smoothly. These are references for preventing errors of the foam model.

Part 2 Cut out foam blocks (blanks) from which to sculpt your bottle:
Found an used foam block and the size is close to my concept model that I'm going to make, so grabbing this as a perfect start.


Part 3 Rough-in an extruded front view (1):
A blue glue stick was applied. The front positive template is now attaching to the foam block. After that, I used a foam cutter and manipulated carefully to get an approximate shape that I want. I think I've done this step okay, just need some sanding works to do.


Part 3 Rough-in an extruded front view (2):
I chose a piece of 60 grit sand paper to polish first due to the fact that it is rough so it can cope with rugged edges and surfaces efficiently to get myself an even structure to start with. I also removed the front positive template.
0 notes
Text
IDES1262 Week 6 - Digital Render

This week's task was rather interesting. I carefully watched recorded tutorials over and over again to complete this task.
Sculpting rectangular boxes was challenging for me, especially coping with chamfers and fillets, hundreds of attempts were made.
Controlling the shadow was the upcoming tough task. I started from the right to the left. In the beginning, the right part was way darker than the rest, so I had to duplicate the layer and control the capacity percentage to make it right. I felt I've done the left one better than the rest, this makes sense because it was the last one I've done, this shows improvements through practices.
The sketch outline part was neatly done, I made it sketchy and freely to present a hand sketched style look.
I chose pudding yellow for the partial background to reach a harmonious visual effect, with pale blue words titled.
I think I've done a proper job for this week's exercise, although there are still rooms to improve, especially need to figure out how to form the drop shadows more realistic.
2 notes
·
View notes
Text
IDES1262 Week 5 - Sketching

Part 1 Pencil Version
Sorry for a late post on this week's task. I went for a short holiday trip for several days without bringing my drawing kit. This week was mainly about refining sketching I have acquired from the past weeks.
I started this part by drawing 12 rectangular boxes, skills including line projection were used. I also aligned my ruler with some masking tapes to make sure things won't go wrong. Overall it looks okay except for several corrections and blurry eraser marks.

Part 1 Pen Traced + Scanned Version
It looks very neat for me after pen tracing and software scanning, every piece of sketch is obvious and clear. I'm satisfied with the current stage.

Part 2.1 Scanned Version
Managed to make this task way better than what I've done for the previous week. It is important to note that I traced the projected isometric view with a pen to make it clearer.

Part 2.2 Pen Traced Version
I picked three designs from my thumbnail sketches above and sketched in three dimensional ways. Shadows were applied in pencil for all of these objects. I started from left to right then found it easier and made it more precise as the practice went on.

Part 2.2 Pen Traced + Scanned Version
The scanned version looks very neat to me, I think I've properly done this part.
Week 5 Summary
First thing first, I have to say I submitted this task late due to my short holiday trip and I apologized for that. However, the good thing is I think the quality of this week's task improved a lot than before. Better sketch quality including a more distinguished comparison of different types of line weights and more properly scaled objects. I also believe that I took these photos with better light source distribution that resulted in neater scanned sketches. I think Week 5 was better than all of the previous weeks (Week 1-4) except for a late submission which I'm feeling sorry for, but definitely there are still large amount of spaces for me to make further progressions.
0 notes
Text
IDES1262 Week 4 - Perspective Drawing

Part 1: Drawing the isometric view was a bit difficult for me to match the shape perfectly, but projecting lines help.

Part 2 Progress: It is also difficult for me to determine the perfection of the isometric view.

Part 2: Boxes were built by the original reference isometric view (shown above).

Part 3: The main challenge of this part was not only the isometric view but also drew two circles on two of the faces. I put 4 points as references for each circle and tried to connect the two points to achieve a realistic look. Finally I traced the chosen perfect line in a darker tone.
This week's exercise was complex for me. Making an isometric view look proper was a challenge for me. I attempted and modified back and forth to reach even just this level. I am not satisfying with what I've done for this week, there are loads of improvements to make for future tasks, but still, I tried, and the work looks neat overall...
2 notes
·
View notes
Text
IDES1262 Week 3 - Section and Auxiliary Views

The task of this week is interesting. We were asked to draw a top view, front view, section view and auxiliary view of a given object in its isometric view. I like how my progress is going but there are still improvements I need to make for upcoming tasks. A few long straight lines are not straight enough, that's probably due to the condition of the ruler or my method of applying a T square. In addition, I did not arrange the space properly for the auxiliary view, it is touching the top view now which makes the overall drawing crowded and messy.
Overall, I think I've done better than previous weeks but with several drawbacks to improve next time.
3 notes
·
View notes
Text
IDES1262 Week 2 Orthogonal Projection & AS1100 Standards

Part 1A: Scanned pencil sketch of the pre-cutting 5-sided box.

Part 1B: I selected an eraser made by Yokohama Tires, the box I made is slightly larger and able to contain the chosen object.

Part 2: I sketched a freehand layout with 5 views. Drawing straight lines curvy is a big drawback of mine, making the overall scale and dimension look terrible.

Part 3A: Pencil sketched eraser construction. I arranged my 3 views clearly and used projections for linking them in order to prevent dimension differences.

Part 3B: Retraced eraser construction in pen, a title block was added in this stage. Line weights of the eraser are more prominent.

Part 3C: Scanned pen traced eraser technical drawing.
Week 2 Reflection:
Overall, I pushed forward into hand-drawn technical drawing techniques. The result was satisfying when you sketch something that's looking nice and neat out of your hands. Using a ruler to project views of the eraser (Part 3B/3C) was the most fun section.
0 notes
Text
IDES1262 Week 1 Part 2 - Tessellating Pattern


Part 2 measurement + 4 x finished shape drawings Scanned.


Cutting mat ready, 4 pieces cut.

Final shape joint.
Part 2 Reflection:
I applied 4 different methods to draw the same shape, differences including center line positions, reference points and objects to be measured (actually applied the set of mathematical formula to calculate the height of an inner triangle for one of the four drawings). It was quite interesting and I enjoyed the process.
The result of combination of the 4 is expected, tiny uneven clearances were from cutting errors I believe, there are still plenty of improvements to make in the future.
2 notes
·
View notes
Text
IDES1262 Week 1 Part 1

Tools to get started for part 1 of Week 1 deliverables.


Process with different tools.


Part 1 Scanned
Part 1 Reflection:
I spent more than 40 minutes just to draw the two because I was not familiar with these tools, 4 years passed since the last time I was using a compass. For the first drawing, I think the inner dimension is a bit imprecise, probably because of the lack of accuracy during the stage of measuring.
The following one is the trickiest one. My eraser was over engaged that resulted in a slight mess on my paper. I found difficult in terms of setting up compass arm positions when drawing small circles, especially the inner center one. Coping with sketch fillets was also not an easy job, due to the fact that I did not use my eraser shield perfectly like a pro.
Through this practice, I'm more confident at using these tools, hopefully will do better next time.
1 note
·
View note