
Zach Barrance - Computer Games Design and Development Year 2 - Ual Extended Diploma in Creative Practice: Art, Design and Communication
Don't wanna be here? Send us removal request.
Statistics
We looked inside some of the posts by zachbarrancefmp-year2 and here's what we found interesting.
Average Info
Notes Per Post
0
Likes Per Post
0
Reblog Per Post
0
Reply Per Post
0
Time Between Posts
2 days
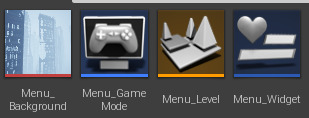
Number of Posts By Type
Text
17
Last Seen Tumblr Blogs


Fun Fact
China blocked Tumblr because of pornography and censorship problems in 2013.
Text
Project Evaluation
Now that I’m at the end of my final major project, it’s clear that I’ve learned an incredible amount about managing data along the way with Blueprints and Variables. This was my primary goal to accomplish from starting this project, therefore I’m very glad to say I was able to achieve that and far more with my inventory system. The new ways I learned I could have the player interact with their environment was also incredibly useful and is something I will most definitely use in my future work.
Research was vital in my path to learning everything I did. It’s what gave me the inspiration for countless elements of my work, as well as what taught me the basics about inventory systems that I needed to then engineer the rest of the Blueprints and functions myself. It’s helped me greatly in the past and I’m still using knowledge from research done on countless previous projects to this day.
With everything now packaged for Windows as an .exe and working perfectly, I’m able to say with one hundred percent confidence that I’ve met what was established I would learn and accomplish in my proposal. While catching Covid towards the end of my project meant I couldn’t quite get to every element I originally said I would try to, I’ve still made a massive achievement as this was an area of Unreal I had previously had no experience in, meaning I was learning everything for the first time in regards to the code behind the Inventory System.
While I attempted to stay as close to my proposal as possible, limitations with certain assets such as buildings for the city meant I was unable to visually create exactly what I had in-mind and described. This meant I frequently would have to do my best to work around these limitations by sourcing assets from other places online and making do with what I had access to in order to create the mood I had in-mind for the city level to give the player.
While this was a shame, it inevitably led me to creating a far more completed rural themed level first that I ended up really liking, and what became one of the central pieces of my project. I never planned for my project to have two levels of two different styles at first, but now that it does it’s ended up working really well and was not a decision I regretted making. While things definitely needed to change after my issues with assets, a similar problem I’ve had in previous projects, that change never ended up being a bad thing, and was only for the better.
I also had to unfortunately leave out the crafting system I planned to at least look into due to me catching covid and not being able to work over the time I planned to do so. This is okay however as it’s much better having a fully functional bug free project like I’ve ended up with rather than something I rushed to try and achieve after covid, leaving things unfinished and not in a state I would want them to be in.
Now that I’ve finished my work and I have an outcome to look over, I think I’ve outdone myself in terms of how far I thought I would get with the inventory system. Having never worked on anything even like an inventory in the past, or any other form of data management system, I was expecting a fair few bumps in the road to getting one fully functional. While there definitely were some bumps in the road, I was able to finish with my inventory system in a very advanced but completely bug free condition.
While as I said due to covid I wasn’t able to get as far as crafting, what I was able to make is all more or less exactly what I wanted to accomplish in my initial proposal of this project, so I personally consider this a great success as I’ve learned very valuable new things that I will no doubt use time and time again in the future.
I would much rather take the time after Covid like I did to polish and complete what I had already made, than to rush myself in a still fairly unwell state to try and get some form of crafting system, which would only have left the project looking unfinished, riddled with bugs and in a state that would be considered the opposite of user friendly.
I would say that all things considered this project has been a complete success. With an inventory that utilises a full slot assigning system when the player picks up an item, a stats displaying system when the player hovers their mouse over an item, and movable slots, this is a system functionally similar to that of countless highly successful games. Seeing myself being capable of programming something like this solo in Unreal with minimal use of tutorials so I could learn the basics is something I’m very proud of. I wasn’t sure how far I would get doing something so new that I knew nothing about when I started, so this shows that with the effort I put in I was able to learn something new that’s very valuable in regards to knowledge for my future projects.
This has been my most ambitious goal I’ve set myself throughout my entire time at College, so given how well this project has gone, I can’t wait to see what more I can do and program in the future.
I do think in regards to how I could improve my project, that if the game told the backstory I wrote to the player in some form, whether that’s via a cutscene or just text at the beginning, it would help set the mood I want. I took the time to write all the backstory etc and was never able to add it to the proof of concept in the end as I wanted to focus on polishing everything I already had after recovering from Covid.
In regards to everything new I’ve learned about managing data with variables and blueprints, it's not just useful for making inventory systems. This is knowledge I can repurpose and use in a very large number of other ways such as displaying and controlling data on Overlays and UI’s, as well as a random example like making any sort of puzzle via Widget Blueprints.
Something I definitely would do differently next time though, as successful as this project has ended up, is account for something going wrong like me catching Covid by giving myself more contingency time. While I mentioned on my blog that I was aware of the threat of data loss, I never mentioned Covid as I didn’t think it would ever be something that would get in my way, though it really took me by surprise with how much of an after effect it had, leaving me exhausted and unable to work on my project.
At the end of the day, this project has turned out really well though and I’m very pleased I was able to recover quickly enough to bring it into a polished, user friendly and bug free outcome. I’ve really enjoyed working on this project and it’s rewarded me with useful knowledge that I can now apply elsewhere, without the need for tutorials and much faster than before. It’s ambitious goals I set for myself like this project that result in me learning and making progress, so it’s very good to see all the effort I’ve put into this project paying off in that regard. I’m really looking forward to seeing what I’m able to accomplish in the future.
0 notes
Text
Recording of my Unreal Build (Video)
Now that my project is packaged, I thought it would be best to record of a video of the full packaged and ready to submit project. It’s now finished with it’s new soundtracks added as well as the user friendly notifiers of what everything does so that makes it worth getting the final recordings of to document.
youtube
0 notes
Text
Packaging my Project for Windows (64 Bit)
Now that my project is done it’s time to package it into a runnable .exe file for distribution. In order to do this I need to tweak a couple of settings so that it doesn’t rely on Unreal Engine to run the package and can function as a standalone game which is what I want.
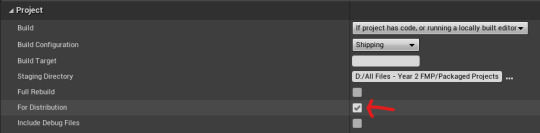
To begin I needed to set the packaging settings to Shipping, which I did so here:
After this is done, I can select Packaging Settings, which once inside I need to select For Distribution, at which point the project is ready to be packaged into the correct outcome of files.
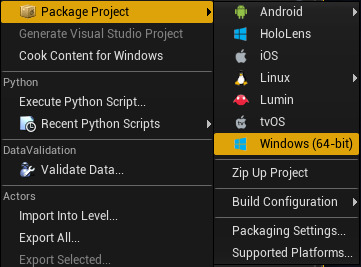
Now this is done all I need to do is run Package Project for Windows, and watch the Output Log to make sure that nothing is going wrong with the packaging and to keep an eye on its progress.
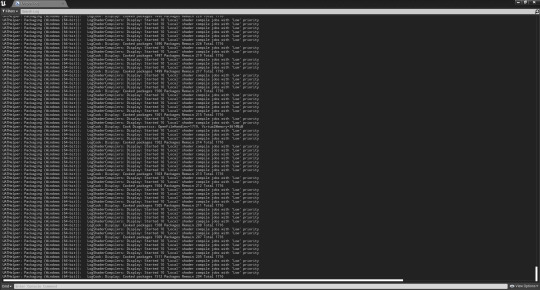
Once the Packaging was finished, I was left with all the files I needed to submit as my projects outcome, however first I needed to compress it into a .zip file so that it could be shared as a single file. At the end of it all, the project files were 9GB in file size, with the game files being 1.57GB. I presume the project had gone up in file size from having to compile new shaders etc when I started packaging the project.
Now this is all finished, I’ve successfully packaged my project into a distributable format that I can share on Itch.io as well as submit as my final outcome.
0 notes
Text
Adding controls to the bottom of the Screen to make the Demo User Friendly
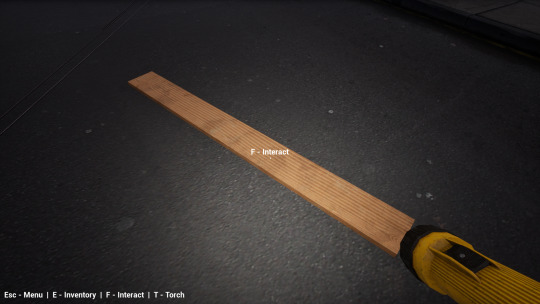
While the buttons and controls I’ve implemented are very universal, it’s still important to include a way for people to see how to control your game, therefore for the demo I’ve added a Widget Blueprint to tell the Player Character how to control the game.
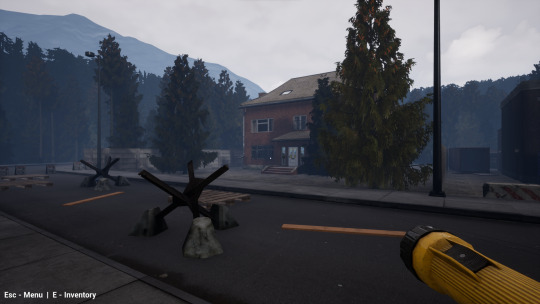
At first I just added the Menu and Inventory controls, before I realised I should also inform the player they can toggle their torch on and off as well as which button interacts.
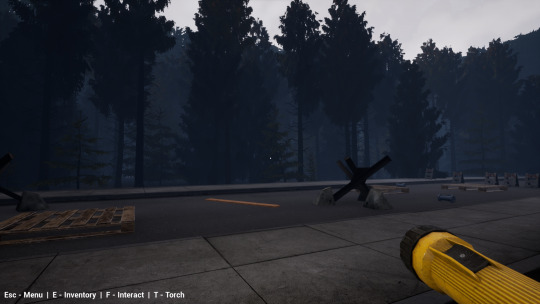
The only issue left I see here now if the player not knowing what to interact with, as there is no overlay brought up that tells the player they can interact with the items when they approach.
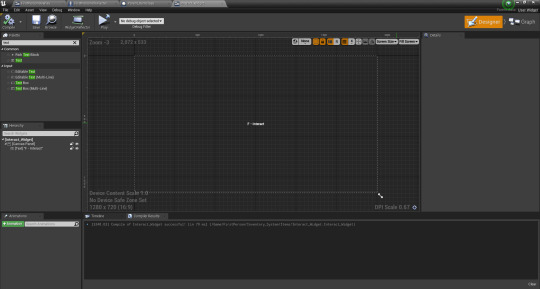
As this is a simple fix given my items are a universal Blueprint, I added a way of it telling the player they can interact when they overlap, which solves all the concerns I have for user friendliness. I simple made a Widget with text in the middle that appears and disappears as they player enters and leaves the hitboxes of interactable items.
This code in the parent item is what’s responsible for bringing up the interact prompt.
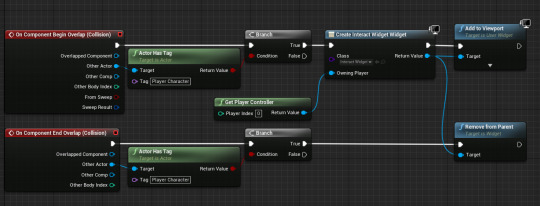
While I was expecting the chance for a bug where the text would stay if you interacted with it as it would delete itself afterwards rather than the player leaving the hitbox, that issue never presented itself leaving me without the need to add some code before it destroys iteself that removes it from parent.
Now the interact appears properly and that’s all sorted it means there won’t be any confusion for the user in regards to interacting with the demo.
This was the final thing I needed to do before I could package and submit my project, therefore I’m glad I was able to get this done given how much it will add to the users experience.
0 notes
Text
Cleaning up Assets Outcome + Fixing a Problem
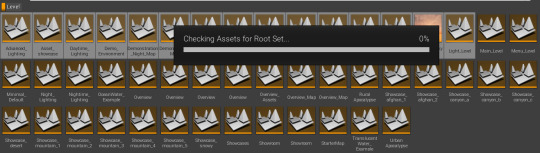
Cleaning up the Assets took far longer than I ever expected it to, actually ending up being hours for it to go through load and then delete all the files. When it was eventually done everything worked except for one thing, the spruce tree trunks had lost their textures.
I’m not sure how this happened given all other parts of the trees stayed and they were very clearly being used in a level, but maybe there was some sort of confusion on Unreals part which resulted in it messing thigns up for me.
Luckily my idea for a fix is very simple. I have old projects and older versions of this current project using the same asset pack and all the files are the same name for the assets between them, meaning if I can just grab the files from an older project and overwrite the ones in my new one, it theoretically should just repair the directory and appear as if there was never anything wrong. If this doesn’t work I can just manually set the textures back anyway as it would be quicker than going back and trimming down the whole project again.
First of all I made a backup to make sure that if anything went wrong I could go back to that and do it properly using the Marketplace instead, before then going into my backup before I did the asset clean and bringing the things the engine was missing back into the project manually.
It also complained at one point that the FX Variety Pack had missing files that were trying to be used, so I brought that back in as well.
Outcome
I booted the project back up after doing this and everything was repaired as if there was never anything wrong in the first place. I’m really glad I tried this manual fix, as it not only saved me loads of time, but also meant that my theory for that solution was correct and means it’s something I can use time and time again in the future.
The last thing I needed to do was go back again and remove the assets I’d added back that I didn’t need, and once I’d done that everything was working as I had orignally intended, which meant it was now time to package the project.
The reason I trimmed down all the files and the reason it was so important, is my game’s project files have now gone from 22GB to 5GB, which is a massive optimisation and is really important before distributing a game. The reason is because otherwise you’ll be packaging and sending off a game with a bunch of pointless files in it that will only make the games files take what in this case would have been over 5 times longer to download and take up over 5 times as much space for no reason.
0 notes
Text
Cleaning up my Assets
In order to reduce project file size, I decided to remove the files I’m not using, but given this always takes me so long I decided to see if there was a quicker way of doing this.
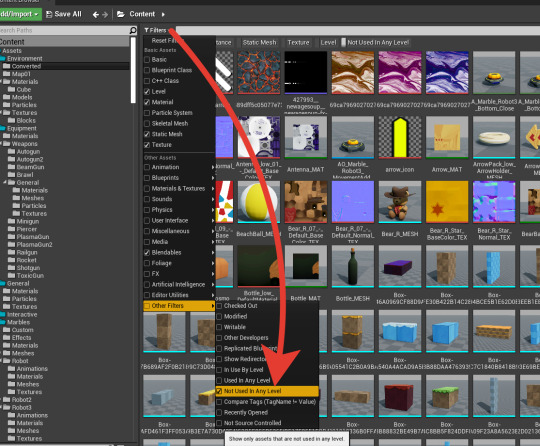
After googling it, apparently you can filter your files by not in use by any level, which means that if I delete all the example levels and leave only my three levels that I need, I should be able to delete all the files that show up in this filter and have perfectly trimmed down my project files.
This sounded simple but after I started I realised it wasn’t as easy as I thought. While it all works as I just explained, turns out highlighting all the files and pressing delete has to load all of them first for some reason, which managed to somehow max out all of my RAM and crash Unreal despite me having 32GB. I opted for highlighting them bit by bit, but it look ages to load them all and was a very slow annoying process.
It worked in the end however and it’s still the fastest way of doing it so there’s nothing to complain about, I just had to figure out the right way of doing it. At first I didn’t think about having to delete all my example maps first either which left a bunch of files I still didn’t need so it was just a process of trial and error. When I did eventually come to delete my example maps as well I crashed the engine again cause I presumed deleting this many levels would be fine but I was wrong.

0 notes
Text
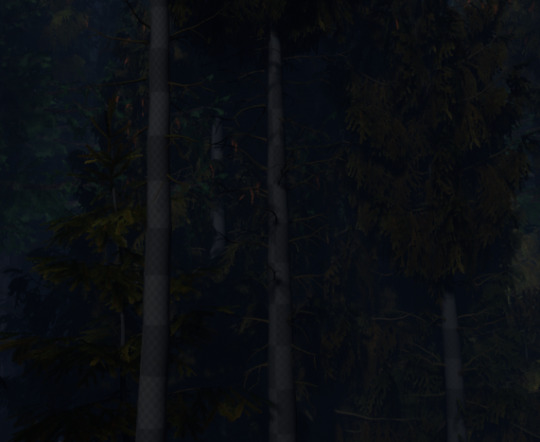
Update on Level Ambience
While I was working on getting the footsteps working in my game and balancing the sound etc, I started realising more and more that I just didn’t like the music for the rural area. It didn’t really fit as well as I orignally thought it did and therefore I feel it damaged what I wanted the level to present the player with when they join for the first time.
I went back online to look for some more ambience, as I thought it might even be better to just have some peaceful nature ambience and subtle music, so after searching for copyright free forest ambience I found something I really liked:
youtube
The problem with this ambience though is even though I searched for copyright free it’s not actually copyright free so I can’t use this. I still thought though this was worth adding into this blog post to mention as it’s a very nice ambience.
I ended up after searching for a while finding the first half of what I wanted the ambience there to be, which was something synthwave and calm like I originally intended

I also wanted some nature ambience as well though however, so I also found and chose this to go with it

Overall after putting this into the game it felt a lot better, so I’m glad I put the extra effort into sourcing the music for the rural level.
0 notes
Text
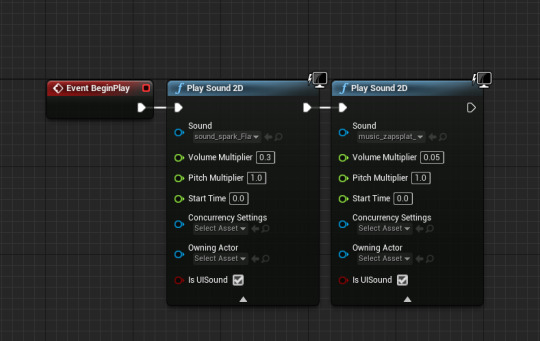
Adding Sound to my Game
One of the final things I want to do to wrap up my demo is add music and sound to the levels.
At the moment they’re completely silent so I thought with a bit of ambience and some simple sound effects it would help set the mood I want each level to bring out in whoever is play-testing.
First of all I wanted to find music, so after visiting YouTube and YouTube Audio Library I was able to find 2 really good tracks. The first track I got for the city which is copyright free and doesn’t require attribution is a dark synthwave style track. This suits the ‘I’m in danger’ mood I want the player to have whenever they’re in the city, as in the main game venturing into the city would be a dangerous thing but is necessary.
youtube
Secondly, I found a much more positive sounding track for the rural area, as I think at this point I’ve decided this is where you would return to store items you have a build a base for yourself in the full game, so it would be a sort of safe space in the mountains for the player that you can’t be found by anyone looking for you, but is still in a place where you can’t just leave the area completely and not be caught.
youtube
In regards to how the player would get to the city in the full game, I reckon it would be walking through the woods but with a fast travel option, so it would appear you’ve made a 10-20 minute walk away from the city everytime you get to an exit point and press the travel home button.
Footsteps
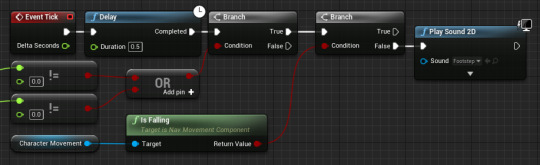
The last thing I want the game to have in regards to sound is footsteps. Given I’m focussing on programming for this project and therefore the sound isn’t extremely important, I don’t need to go into detail with it, however having music but no footsteps is weird because the player is just drifting around seemimgly.
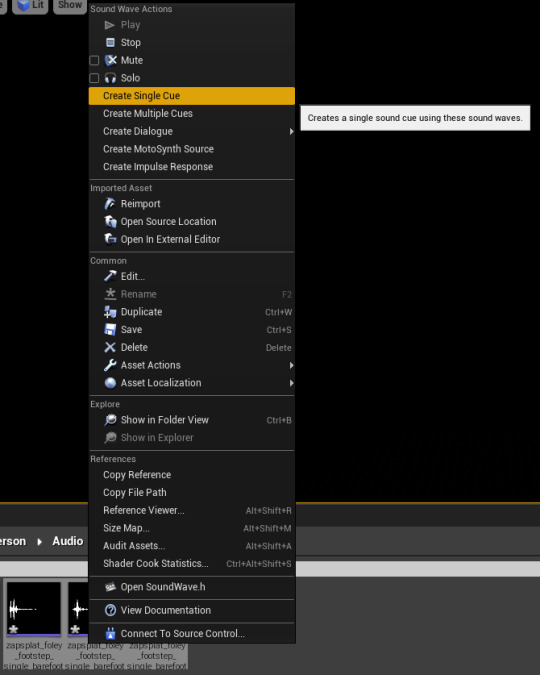
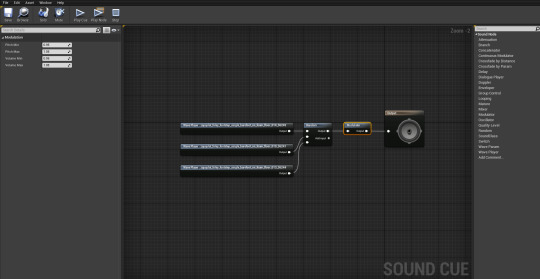
To fix this, I grabbed some sounds off of ZapSplat like I usually do and made a simple tick powered footstep system that just goes is the player moving, and if so says okay play footsteps.
I imported the footstep sound effects into Unreal, and then created a CUE with them so it would randomly select one of the three I had chosen, before then adding a very slight random pitch shift to randomise it further.
Then I added a very simple footstep system into the Player Character. This is not something I would use in a full game as it would need to be far more complicated than that, however for the sake of this demo it works just fine, as given I’m still suffering from COVID, this works just fine for what it needs to be and just adds a little but more to the level. Plus it removes the weird feeling that the player is just gliding around the map when there’s only music so that’s good as well.

I also realised I hadn’t accounted for the player being in the air with this system so I quickly added in another branch to make sure the sound doesn’t play when they’re not on the ground.
Now this was done it worked really well in-game so I’m glad I sourced the sounds to add this to the game.
0 notes
Text
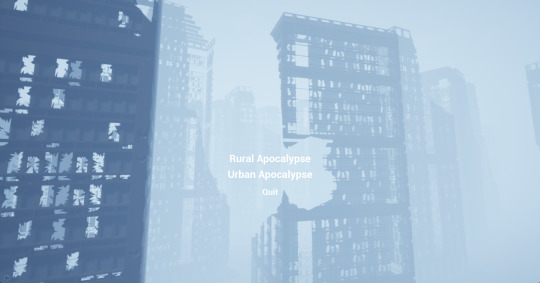
Adding in a simple Menu System to navigate my Project
Now that I’m getting very close to the time I need to wrap my project up, I decided now’s the time to get a menu/navigation system into my game that will allow the player to change between levels as well as quit the game.
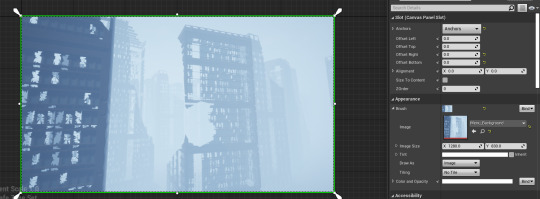
I began by importing a menu background that I can change for a better one in future if needed, before setting it to always scale up to fill the screen and then moving on to the buttons.
After this I then added the system I usually use of Buttons lay out in a vertical box with spacers and text, before setting the buttons to behave the same as how they do in my inventory, where they highlight a dark shade when you hover over them, before turning even darker when you click on them.
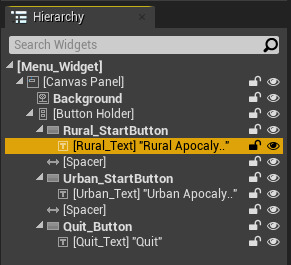
After I had done this I added in the code I needed for it to switch between levels and quit the game, leaving my simple navigation menu finished.
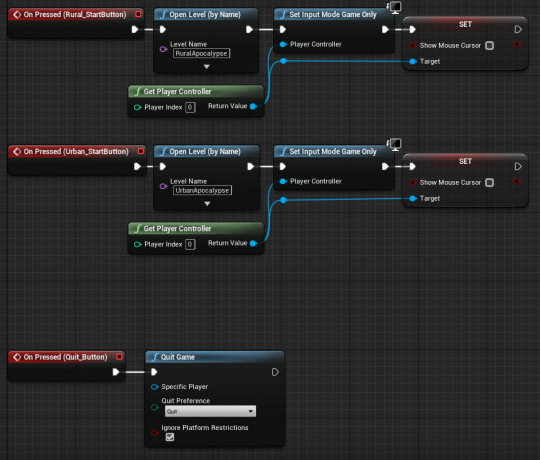
I then set the game to default to a dedicated menu level with its own gamemode when it starts to give the player the intial option of which level to start at. After this I then duplicating the players code to open their inventory and tweaked it to open the menu instead.
I then put in place a new variable and code etc in order to stop the player being able to open the inventory on top of the menu. As well as this I stopped the player from being able to open the menu whilst moving an item in the inventory because that could break things, otherwise it just closes the inventory.
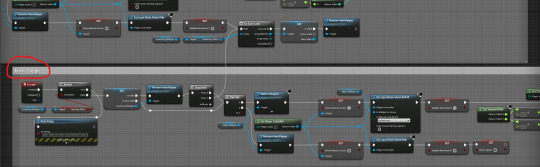
Now this is done the player can select a level to travel to when the game launches, and then by pressing escape can toggle that menu open and closed at any time to switch levels in the demo, or close the game.
Now the game is fully traversable on it’s own and no longer relies on manually changing levels in Unreal to travel around etc.
This pushes my game demo towards some of it’s last steps before it’s ready to be showcased. I do want to tweak the visuals just a little bit, as this menu system is bare bones at the moment, however now that the functionality is there that’s what matters given I’m focussing on programming on this project. I’m also still far from the best place in terms of being able to focus on complicated things due to currently suffering from covid. I haven’t added any graphics settings etc either because of this, as given it’s just a mechanic and inventory system demo and not a full game I don’t think it has the real need for anything like that. The levels aren’t extremely demanding to run so it’s absolutely fine.
0 notes
Text
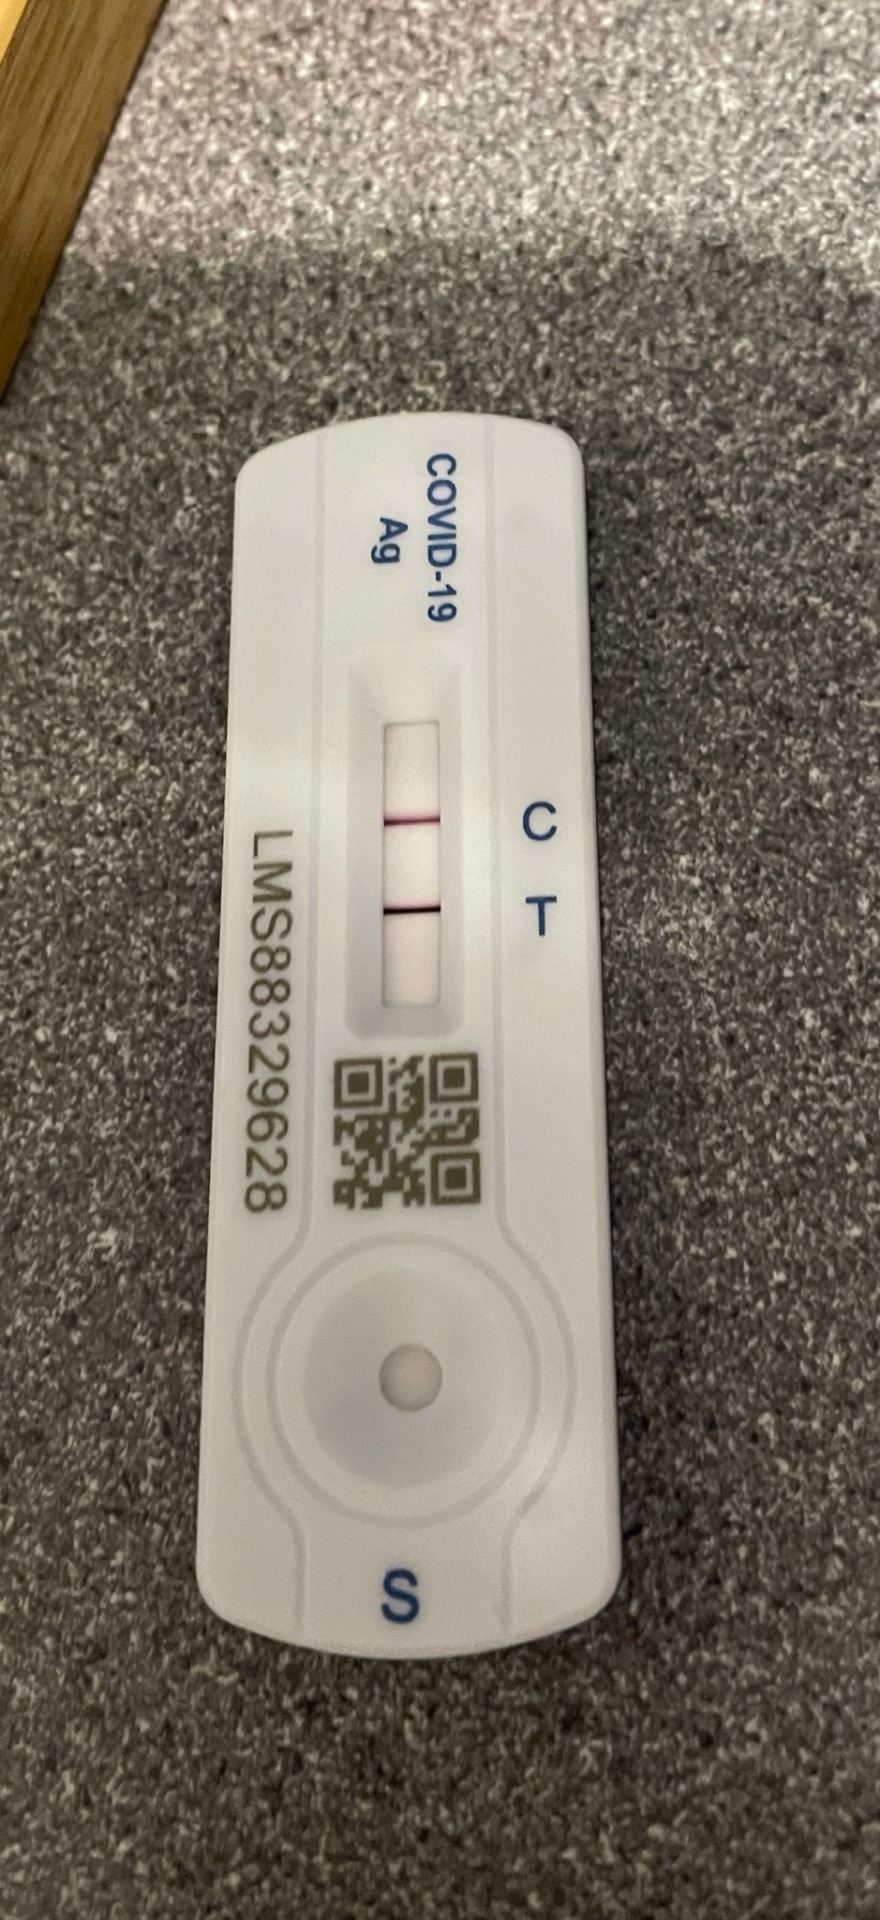
I've caught COVID - How it will impact my work
Well a pretty big derailing factor to the progression of my project is that I've just caught covid. After what I thought was a small cold turned into coughing, I took a test just to be sure and I'm glad I did as I was about to go and see family, including a grandparent.
As I feel rough and lightheaded most of the time I'm not in a place at the moment where I can properly work, though that's not going to stop me from trying after a few days of rest, obviously working from home though.
While I planned to be looking into simple crafting systems this sudden unexpected curve might prevent me from having the time to do that unfortunately, though I'm still very proud of everything I've already managed to do.
For now I will be focussing on getting better, however in the next few days I will hopefully be well enough to start wrapping up my project and getting everything else I need to do finished and in a good quality.
I'm very disappointed that now of all times right at the end of my FMP was the time I had to get COVID, but there's nothing I can do about this other than do my best to work around it and deal with it, so that's exactly what I'm going to do.
0 notes
Text
My Inventory System - Video Demo
Now that my inventory system is finished and I'm ready to move on to looking into other systems I may/may not have time for like crafting etc. I thought it would be good to show a video of the whole Inventory System in action so that you can get an idea of what everything I've done so far has come together to make.
Overall I'm really really pleased with this Inventory System and where I was able to take it. For a project where I've never worked on anything of the sort before, to have an outcome like this after watching a small tutorial for the frameworks to get me started, I'm overjoyed. As far as I'm concerned I've gotten the inventory system to a state where it's completely bug free and working flawlessly, so I'm overjoyed to be able to say that.
youtube
youtube
0 notes
Text
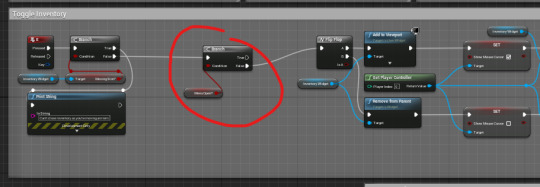
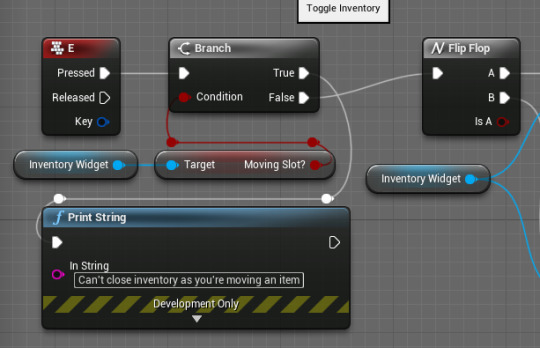
Looking for and fixing another bug - Closing Inventory whilst Moving Slot
After discovering that initial bug, I was briefly thinking about other things that could cause bugs in my code when I suddenly realised I hadn't accounted for the player trying to close the inventory while they're moving a slot.
My guess was that it would completely break but when testing it strangely wasn't as broken as I imagined it would have been, though definitely needed preventing as it was still a bug.
When closing the inventory, the item you're moving as I imagined freezes where your mouse last was, but interestingly when you open the inventory again, it snaps to where your mouse it and continues to follow. I then found out it can still then be assigned to a slot after opening the inventory again which surpised me a lot. I imagined it would have deleted the item or permenanly broken the item slot etc.
After a little more testing to see how it behaves it did in some cases reset the item quantity so it's not completely fine in terms of losing items etc but it was going to be fixed anyway.
The fix was very straightforward, and it was just making sure the inventory doesn't close itself if the player is currently moving a slot which fixed the bug and worked as I planned it to.
0 notes
Text
Discovering and Fixing a bug with Item Quantities
After I had finished with adding visual effects to the slots, I suddenly noticed that the quantities of items weren't going up when I was collecting them, they were just sitting at 1.
I looked through the Add Item To Self events code as I was suspicious that given the work I had done previously in which I heavily modified this event, that it was something to do with the logic going wrong.
After poking around and initially thinking it would be the something to do with the Moving Slot variable branch getting it wrong, I went into the Inventory to check and thought initially it might be because of the way round it was running the end slot move event, so I changed it temporarily to run in the order I've labelled below.
This broke it even more cause then the quantity went up every time I moved a slot, and as I thought about it I don't know why I thought this would be a fix.

After putting this back to how it was and going to re-look over the Inventory Slot code, I suddenly had another idea of what it would be. Where it begins the add item to self node, it immediately sets the quantity from its pass through input variable, but then I realised that sometimes it's not going to have a variable passed through, which picking up items doesn't do.
This meant I realised, that with this code below when picking up items as there was no variable to pass through, it would default to zero I guessed, and that meant this was why the slot was always showing up as one. It was adding to the quanity yes but it was always getting set to zero before.

To fix this, I intially tried using a branch to check if the quantity was great than or equal to 1, in which case meaning it would only set the slot quantity immediately if it was more than zero, if not leaving it to not be changed and skipping the set quantity.

This at first sight worked, as I picked up a bunch of items and the quantities all set accordingly, which I was pleased to see but was quickly not after when I moved a slot, the slot I moved it from kept it's quantity and seemed to stay set as occupied as it was bringing up blank stats and could be moved around duplicating into other blank slots.
I realised then the flaw, as given slots couldn't be set to 0 anymore, the branch for checking if slots were 0 to reset the slot wasn't working cause it would have just seen the slots old quantity that was never changed and only reset everything else that was passed through with it.
I thought I was on the right track to finding a fix though, so I decided to look for a place further in the code to set the item quantity, and then I realised exactly where I needed to set it.
When it checks to see if the slot is being moved or collected I would need to set the quantity only if the slot is being moved as that's where there's a pass through of quantity for it to read. After realising and doing this, it fixed all the bugs and issues I'd had and left the code running exactly how I intented.
I definitely understand now why this wasn't working. It was just something I overlooked intially and then didn't notice the issue it was producing as it was subtle.
Now that it only sets the quantity if it knows it's being moved to a new slot and needs to pass that data on it's fine as it leaves the quantity alone if it's just picking up an item and adding to its quantity by one, as then it doesn't need to be set to anything before-hand.
0 notes
Text
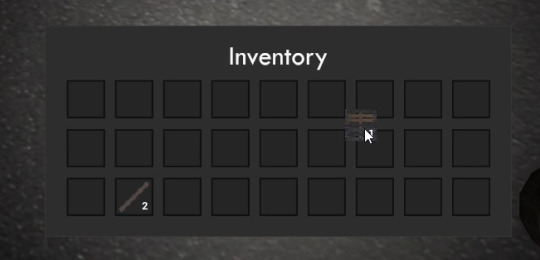
Adding a Visual Effect to Moving Items
Now that you can move items round in slots the Inventory system is more or less done. The only things I need now is the ability to drop items and to just polish some other parts of the inventory.
The first thing I did was I wanted to make the item follow the players mouse while they move it from the slot. I began by making it appear to disappear when you click on the slot to move it. I first just made the texture disappear but then realised I also needed the number to be gone as well cause it didn't look right with only the texture gone.
After this was done, I moved to to making the slot follow the mouse. The way I did this was with the Inventory System as it contains all the item data and a moving slot variable for me to use.
First I made a copy of the inventory slot and removed all the code and variables. I also removed the button so that it was literally just a texture and text which means I can make this follow the mouse.
After doing this, I added the code I need to the already existing code for setting the inventory slots etc in the Inventory Blueprint. This was some in a similar way to how I made the stats display but this time setting variables as well.
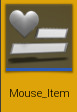
It just means as the slot runs its begin and end slot move events it also opens and closes a gate that lets a tick set the position of a widget. That widget is the Mouse_Item widget, which has its info set every time the slot move starts using all the info it's just been sent from the inventory slot, and then appears to the player as if it is the item they've just clicked following their mouse.
After first making this it all worked, however I had to go back into the Mouse_Item widget and set the alignment to 0.5 on both axis as it was appearing at the bottom right of the mouse.
Then after I couldn't click anything I realised I had the wrong visibilty setting on, and changed it to non hit-testable for self and all children instead of just self at the top.
Now that I've done this, it's added a really nice visual effect to moving items around the inventory, so I'm really pleased I was able to get this done.
0 notes
Text
Making my Inventory Slots Moveable
Now that I had all of my inventory slots in place and able to collect items, I wanted to see if I was able to move the slots around by copying the data from slots I've clicked, and then pasting them into another slot if it's empty.
I began by making a variable called being moved in the inventory slot Blueprint, setting that was true when the button is clicked and then removing the stats from parent. I had also added a branch to the logic that brings up the stats so that if being moved is true it won't show the stats while that was happening, but then I realised that was only going to work per slot as the others stats Variables would stay the same, which means I needed a global place to store this variable.
After making the Variable in the Inventory instead and thinking about how I would get the slots to access the inventory for reference, I set some variables to generate at the start grabbing all the variables they need through the Player Character.

Then when I realised that didn't work because I would need to cast every time I interacted with the item to update the variables, I added the code at the start of the on-clicked node to test if it would update that way and it did.
From that I then used a branch on clicked to determine if a slot was currently being moved with the variable I made in the Inventory, as it would need to do two different things in the Inventory from that point.
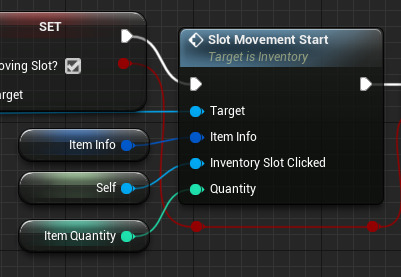
Going into the Inventory I made two custom events, one called Slot Movement Start and one called Slot Movement End. When a slot starts getting moved I need to grab the data from that slot and the reference to the slot itself.
Then when it's finished and the chosen slot has been selected and validated as a slot that can be populated, it needs to get the original slot and set it to the default info which is an empty slot, and then grab the chosen new slot and set it to the data grabbed from the slot you chose to move.
After setting this part of the code up in the Inventory this is what I had to begin testing with:
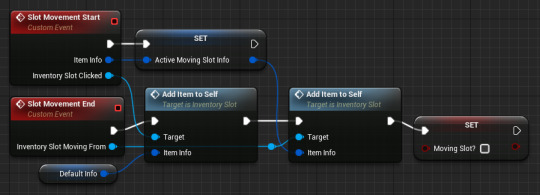
Back to the logic in the Inventory Slots themself then as I can now send the data I need around, if a slot is already being moved when a slot has been clicked on, it will check if the slot clicked on is occupied. If it is it won't do anything, but if it's not it will trigger the end event and send itself to the Inventory System to be overwritten with the new data and then mark it's internal 'moving slot?' boolean as false as it will now be done.
If the slot isn't already being moved though it will start the slot movement custom event in the inventory and send its data along with a reference of itself to the Inventory where it will update its stored data variable and then wait for the end event. I later realised I needed a boolean to check if the slot was occupied as well before starting the move or it starts moving an empty slot and that meant that empty slots added quantity to themself and caused errors before I added in that boolean when you clicked them etc.
It also sets its moving slot variable to true and then runs a validated get on the item stats, removing them if they exist and meaning that while the slot is being moved its stats won't show up. The reason I did this is so the stats don't get in the way when you're looking for an empty slot to populate.
After this was done I had this logic programmed into the Inventory Slot.
Testing Results
On testing it worked exactly how I wanted it to, except I forgot that the Item Quantity is seperate to the struct and therefore that wasn't transferring over, and that also every time it adds to itself it adds one to the quantity, meaning it was a very bad bug but with a simple solution.
The other issue was I couldn't stop moving the slot once I'd started cause clicking the orignal slot just said no to copying it to itself given it was only looking at the is the slot already occupied boolean.
Fixing the Bugs
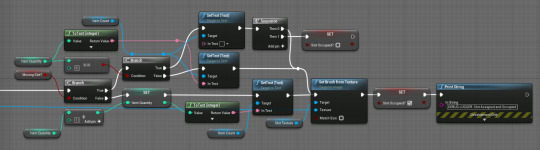
First I added a Quantity Input to the Add Item to Self and Start Move events, that I simply linked up so that the quantity variable would transfer through into the slot that was being set.

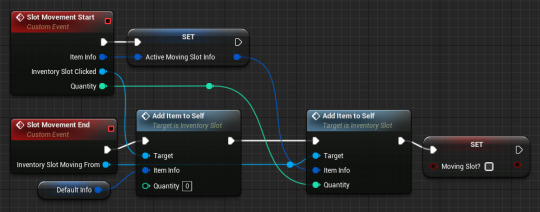
Afterwards I then added in a series of logic that first checks whether it's a slot being being populated or a slot that's part of a move process. If it's just being populated it will do exactly what it did before, however if it's part of a move, it will determine if it's being reset or not by the quantity. If the quantity is zero it will set its quantity to not show up at all and set the slot as unoccupied, but if its anything more it will set it to it's quantity without adding to it and then finish the add to self as if it was occupying a slot.
New Test Results
After testing this new addition to my code I found it to work perfectly except for one issue. The branch to check if the slot was being moved or not kept getting it wrong because it was adding one to the quantity even when I was moving them around.
Turns out the variable I was using wasn't updating live from the Inventory and the updated I did have for it weren't keeping it up to date. To fix this I implemented a cast to the code to get it as it's needed and that fixed all my problems and left me with a flawlessly functioning set of code with no bugs I'm currently aware of after further testing.
This is the code I added to fix the last issue I was having:
Outcome
Now that the core code for this is working I'm really pleased with it, especially since I engineered this code myself without using any form of tutorial online to get me started or point me in the right direction like I did when I began making this inventory system.
The reason I've stopped using tutorials and things at this point is given I only needed them in the first place because I was new to making inventory systems and needed some guidance on how to begin, I'm confident enough and feel I understand enough now that I can engineer more or less everything else from now on with my existing knowledge of Unreal, which I've proved to be true from my success with moving items around the inventory.
Things I'm still going to implement
While I have the base systems working for this inventory movement logic now, I still want to have it set the icon of what you're currently moving to the mouse and hide the icon of the slot you're moving so that it looks like you've taken it out of its slot and are holding it.
I also need to add the logic that checks if the slot you're moving to and the slot you're moving from are the same and to therefore cancel the slot moving as well cause that's important.
Other than those two things though which I will get to in the near future, I think the slot movent system aside from the hiccups I ran into while I was making it went really well, therefore I consider this a complete success.
0 notes
Text
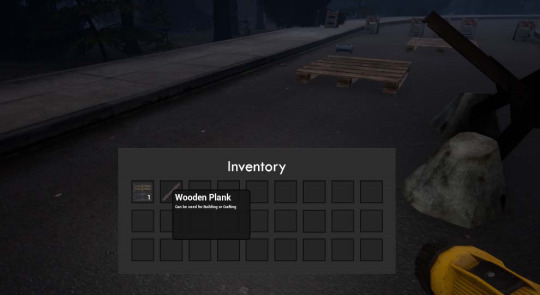
Adding the Stats Display for my Inventory Slots - Part 2
Now I had all the code working for the stats to display in my inventory, it looked like this when you hover over an item.
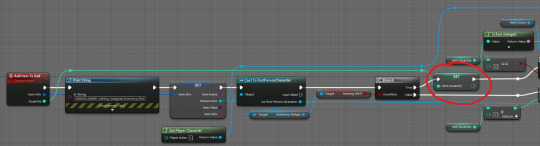
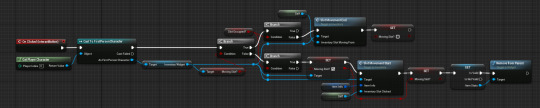
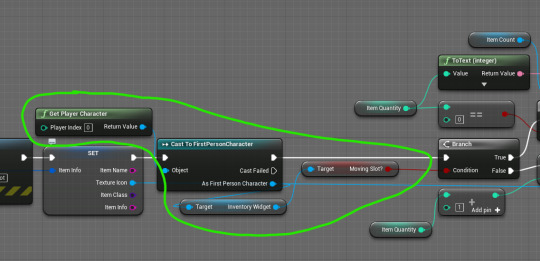
Everything worked well until however I discovered a bug where if you close the inventory hovering over an item it doesn't get rid of the stats as the code to check if you're hovering over it is no longer active. They just freeze in place given it switches the player out of UI mode, but I already knew how I was gonna fix this as I had an indirect way of interacting with the item slots widget from the Player Character who is the one toggling the inventory.
Going into the Player Characters code I appended some nodes onto the end of the code that runs when the player closes their inventory. All it does is grab the Inventory Widget and the Array of Inventory Slots from that. Then it loops through each one and checks if it currently has the Item Stats loaded using a validated get so that I don't get errors if it talks to a slot where the item stats widget doesn't exist yet. Any item stats widgets it finds open it will close them, which means that no matter what, all the iterations of the item stats widget are closed along with the inventory now with this new code.

This solved all my bugs and meant this method of viewing the item stats was flawless and bugless as I attempted to break it afterwards as I usually do with new things that I program.
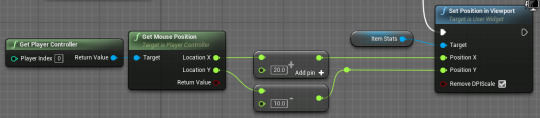
The last thing I did to stop the mouse from covering up the top corner of the stats a little was change the values of the mouse position with addition and subtraction, so that the stats appear to the right and slightly further up from the mouse than before. This looks a lot better, meaning I've now finished with the code for my item stats and can move on to the next part of the inventory system.
0 notes
Text
Making the Mouse Appear in the Middle of the Screen when you open your Inventory
The one thing I keep noticing with my Inventory at the moment that's annoying, is the mouse always appears at the far side of the screen as you're looking around in the game world so when it shows your mouse its always going to be a random position each time.
To fix this, I set it so that when the player opens their inventory, it will get their game settings, read their screen resolution from that, half the resolution and take that as the spot to spawn the mouse at, meaning it should always appear in the middle of the screen every time the player opens their inventory. Except for the amazing feature that... it doesnt!
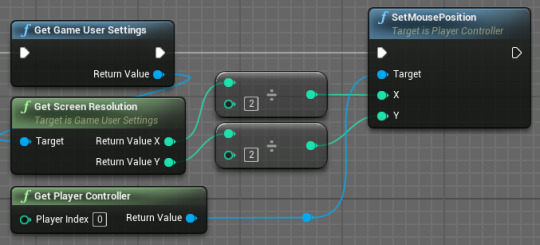
This code I have should technically not ever have an issue with it except for the fact that the resolution stays the same apparently and the screen just gets scaled around depending on how big the screen is so the mouse always gets put in a different place if it's not full screen.
To combat this, I tried multiplying the resolution by the scale before halfing the resolution to reach the center of the screen, and while I was fairly confident this would work it also didn't.
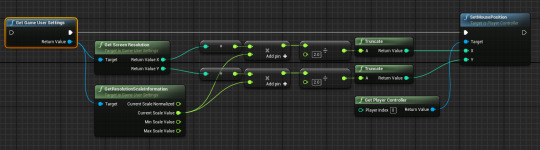
Eventually I looked online for the specific node I needed as it clearly wasn't the screen resolution, and found I was looking for viewport size instead for the specific values I needed to half to reach the middle of the screen.
I had been extremely close the first time when I went to figure this out myself but was just off by one node. You wouldn't have noticed if the game was in full screen, but it's important to have the scaled resolution so that it always appears in the center.
This is now the code I have and it works without issue.

0 notes