
Don't wanna be here? Send us removal request.
Statistics
We looked inside some of the posts by chromee23 and here's what we found interesting.
Average Info
Notes Per Post
254
Likes Per Post
196
Reblog Per Post
57
Reply Per Post
1
Time Between Posts
9 days
Number of Posts By Type
Photo
6
Text
1
Last Seen Tumblr Blogs


Fun Fact
The total number of visits Tumblr.com received during January 2021 is 327 million.
Photo

GREENPEAK MAGE KEEP
This lavish mansion is owned by a powerful but reclusive wizard Greenpeak, named after the foliage-covered mountainside he hails from. He is well known for both unique architectural design and his rare but extravagant parties. He has a multitude of both clockwork and human servants that travel the halls performing menial tasks and serving as guards. The lower halls of the keep are beautiful, but as the mansion rises to the heavens the structure becomes wondrous, magical, and at points difficult to traverse for anyone but the wizard and his servants. All the doors are expensive wood with the strength of metal, and all the windows are stained glass with the strength of thick wood.
The mage sat on an influential council of benevolent mages that must pledge an ancient and binding oath to never perform unethical or unsavory practices anywhere in the world. This did not stop the wizard though- he found a loophole in the wording of the pact and created demiplanes and pocket dimensions for his myriad of experiments. He hides the access points throughout his home, many of which reside on the upper floors.
1 FRONT DOOR the road to the keep winds up the side of a tall mountain, then bridges a gap over to wrap around a small spire jutting from the mountainside, before spanning a long gap to finally reach the arched 20 ft high double doors of the building itself. There is a permanent rune of alarm that will alert anyone in the guard post (room 2) if anyone approaches using the road. The bridge 5-35 feet is pair of magical stone drawbridges that the guards can and usually do raise if trouble approaches, unless the lord of the mansion is hosting a party.
2 GUARD POST This pair of towers sit on either side of the main entrance 15 feet from the road and can survey the surrounding mountainside and inspect visitors at the doors, which are magically sealed unless the guards open them. There are 1 foot wide arrow slits on all outward facing sides of the tower (one could leap to the tower and squeeze through the slits if the door is sealed, but it would be difficult.) Both guard posts have controls that raise the drawbridges, open the door, and send an alarm through the castle in case powerful enemy forces are coming to attack. Usually there are 6 guards at each post, with at least 1 human with enchanted gear to man the controls and automatons to guard them. There are stairs up to the next floor to access battlements, murder holes into the foyer, and the guard’s quarters. There are also stairs down to the castles private dungeons.
3 FOYER AND STABLES The vestibule past the double doors is always staffed by at least 4 automatons that will take overcoats to the coat room, horses and wagons to the stables, and clean off anyone dirtied by the journey if necessary. There are locked doors to the guard posts on either side, so guards can bring suspicious people in and apprehend them.
4 ENTRY HALL AND MAIN STAIRWELL This large 45 foot tall room spans 2 stories and has a wide double staircase to the second and third floors. There are beautiful carpets on the floors and tapestries on every wall, the latter of which depict the owner of the home performing acts of magic and heroism throughout the realm. The south walls have 4 stands of exquisite enchanted armor that are actually inert automatons that only animate when commanded by a guard or the owner of the home; They will also attack any non-staff individual if the alarm has been raised.
5 KITCHENS The large kitchen is staffed around the clock by either 1 or 2 human head chefs and up to 6 automatons under their command. With full staff they can feed 40 people. The kitchens have a steep staircase under a trapdoor that leads to the pantry and cellar, and a staff’s stairwell in an adjoining room that leads to staff quarters. None of the staff here are combatants and will flee to alert other guards.
6 DINING HALL This long hall can seat 20 people and has large windows that can see the beautiful mountainside. The armor here conceals clockwork automatons that function identically to those in the entry hall. The corridor that surrounds this room is patrolled by 4 clockwork guards that will join any combat in the surrounding rooms. The balcony is covered and the doors to which are locked unless the owner is hosting people.
7 BALLROOM This extravagant hall can comfortably fit 60 individuals, though its rare that more than 40 people are invited to the mansion. The floor is tiled with beautiful marble and the walls are lined with ornate banners with intricate gold-lined designs. There are tables in 3 of the corners of the room for dining. The 3 suits of armor function identically to those in the entry hall. The doors to the balcony are locked unless the owner is hosting people.
48 notes
·
View notes
Photo

THE ABANDONED SAUNA
This underground structure was constructed around underground geothermal vents and an underground stream that, when properly connected to, created a natural humid sauna. After an earthquake, the flow into the rooms increased and they flooded. The people who owned and operated the sauna tried to repair it but after one of them died mysteriously inside the flooded rooms they abandoned their livelihood. Many of their valuables are still down in this dank ruin for those foolish enough to try and pilfer them. Rooms are detailed after the read-more.
I hate to be struggling with the dungeon23 challenge in only the second month, but I have been running my first month’s dungeon for a party and my focus has been on DMing (as well as my other life responsibilities.) I already have a plan for march’s dungeon, and hopefully I can regain my previous creative rhythm.
1 CHANGING ROOM A large bench occupies the center of the changing room, with lockers on the east and west walls. A group of 6 overconfident thieves heard the sauna was abandoned and thought it would be a good place to hide out and store their loot. The thieves stashed their valuables in the furthest back locker on the east wall then continued to explore the area, being ambushed by the Olive Slime in room 2. the 6 thieves’ half deteriorated, slime-covered bodies now patrol rooms 1 and 2, waiting to grab anything that wanders in. The lockers have been emptied of anything of worth except for the furthest back right locker, which has the thieves’ stash hidden behind a potent poison gas trap.
2 BURNED LIVING QUARTERS This area once housed the owners of the sauna; it has since burned down, and the damp atmosphere has caused large amounts of plant growth (mostly mold) to spring from the ashes. The kitchen of this area once collected heat from the geothermal vents and used it to cook food for the owners; when left unattended, the heat buildup caused a fire that caught on the wooden separator walls. 2a. Burned-out Bedroom In the area where the bedroom once stood there is now an Olive Slime. The slime zombies in area 1 bring it food, and it thrives in the damp atmosphere of the abandoned underground building. There is also a hidden door in the north wall of the old bedroom that leads to area 3, the treasure vault. It was once well hidden but the fire burned away the paint that covered up the seams. A good investigation will spot the discrepancy. The magical lock is harder to pass, however. Only an extremely good lock picking check will open it and any attempt, whether it succeeds or fails, will trigger a deadly burst of electricity that engulfs the bedroom.
3 TREASURE VAULT This room houses the life’s savings of the owners, including their meager collection of magical antiques.
4 FLOODED FOUNTAIN This area was where the water once flowed into the sauna, with channels carved into the stone that flows water to the west, south, and east. There are benches in both the central fountain room and the lower rooms The room has flooded with 2 feet of water. There are 2 large slimes called Digers hidden in the top left and right corners; they are camouflaged in water, and their singular eye looks like a gemstone under the surface. If they are approached they will attack; otherwise they will try to ambush any stragglers that progress deeper into the structure.
5 HEATED POOLS The rooms to the south and east were once filled with 3 feet of heated water; now the water level has risen to 7 feet of lukewarm water. The ceiling is only 10 feet tall in the lower rooms, but reaches 15 feet in the central fountain room. both rooms house a Diger that will ambush anyone that enters, and the other nearby Digers will assist in the attack.
6 COMMUNAL BATHING This large pool once had a depth of 3 feet to the east and 6 feet in the deeper western area before the water levels rose by 4 feet. 2 snakelike transparent slimes called slithering trackers hide in this area, waiting to ambush anyone who enters. There are 2 exsanguinated corpses floating in the water; a pair of unlucky explorers who fell victim to the trackers. Their packs contain gear appropriate for travelers, as well as an enhanced sword, a magic wand, and a pair of healing potions each.
7 STEAM ROOM This room was once heated by the geothermal vents, but the heat has since subsided. the rising water levels did not reach this point, however, leaving it still dry.The slithering trackers will follow any one who enters this room and ambush them. When the owner came to inspect the damage to the sauna he was attacked by the slithering trackers in the communal bathing and was chased into this room, where he was drained of blood. He has his the key to the treasure vault (area 3) still on him.
31 notes
·
View notes
Photo

THE VILE RELIQUARY
This dungeon houses a large 5 foot wide golden chalice that magically consumes blood to power the resurrection of the devil that created it. A cult of worshipers created the hidden sanctuary to house the chalice and fuel it. It was found by crusaders and all the cultists were slain, but some of their spirits still live on. A few bandits discovered the abandoned hidden temple and attempted to set up a base inside, and the ghosts took their opportunity to possess them and go out to once again capture sacrifices to their grim master.
After starting the Dungeon23 challenge out with a large dungeon, I want to take the next month easy with a new dungeon each week. I’m still planning to Upload VTT-compliant files for Garessa, as well as update the posts, but first I'm going to finish running it for my campaign.
1. ENTRANCE The door is down a small tunnel hidden by stones and foliage and is crafted to look like part of the tunnel wall (there are a few marks along the wall where the bandits pried the door open, however). It requires one to speak the name of the devil, at which point the door opens on its own, but it can also be pried open like the bandits did. just past the door is a tripwire set up by the bandits that will trigger a mass of razor wire to explode out and lacerate whoever trips it.
2, CHAPEL The cultists would gather in this central room for worship. At one wall is a podium with an engraved and painted mural. The mural depicts a person in a black robe with deep red trim in the foreground with the devil behind him in the background. The cultist has his arms raised in veneration towards the devil. If someone wearing the cultist’s robes stands facing the mural and raises their arms to imitate the cultist’s pose, the wall will lower into the floor and reveal the sacrifice room. If someone in the robes poses that way again, the wall will magically raise as they raise their arms. The bandits had set up their camp in this area and where attacked and possessed in their sleep. Their belongings are still in the cave; they had a small lockbox they hadn't opened that contains gold.
3. CULTIST QUARTERS When the heroes came to kill the cultists, they ambushed many of them while they were sleeping. Many of the beds are stained in blood. There are 3 cultist ghosts that haunt this area and will attack if the area is entered. 3a. Armory At the center of the quarters is a locked room that housed their weapons and holy vestments. If the lock is picked or the room is entered without the black and red robes being worn, the room and the area in front of the door is flooded with damaging necrotic energy; it activates once a day. When the cultists were attacked, a head cultist ran into this room to hit their enemies with the trap. when it triggered, the head cultist was killed and the heroes left his body here. He has a protective robe, a wand that shoots fire and a key that opens the chest in room 7. There are also a number of swords and non-magical robes hung up in here, but there are empty racks that held enchanted swords that are now empty.
4..CENTIPEDE CAVES The sacrifices are thrown down into these caves for giant cave centipedes to feed on. The centipedes have taken on hellish qualities from feeding on a devil’s sacrifices for multiple of their generations. For every minute spent in the caves 1d6-2 giant hellish centipede will crawl through cracks in the cave walls and attack. The ramps that drop corpses into these caves are steep, dark, and 10 feet off the ground. Because of this, they could be missed unless the party is perceptive. the ramps are only 2 feet high and are difficult to climb up normally. In the north cave one of the Head Cultists was tossed into the pit after he was slain. He still has the key on his corpse, as well as a protective robe and a flaming sword.
5. PREPARATION CHAMBER This room has manacles to hold prisoners, oils to anoint them, and boxes for their belongings and clothing to be thrown into when they are stripped to be brought to the sacrifice room. currently there are 5 prisoners, and the 3 possessed bandits. The bandits have regular gear, and if the possession on them ends before they are killed they will flee. The ghosts of the head cultists have vestiges of their enchanted gear on them, but if their bodies were looted they lose them. If the battle turns against the ghosts, they will flee to the sacrifice room and summon hellish centipede swarms. The
6. SACRIFICE ROOM This room has a large altar at the top of a platform for bodies to be drained of blood on. the blood flows down a tube to the east to flow into the devil’s chalice and the bodies are thrown to the north or south for the centipedes. If the ghosts fight in this room they can activate a rune on the altar that engulfs the west walls in fire, and will summon hellish centipede swarms from the caves below. If they can, the ghosts will retreat into the walls and attack when their enemies are exposed or hurt by a trap.
7. FERETORY The large chest at the center of the room houses the devil’s chalice It is surrounded by 3 charred corpses. These are the paladins that attacked the cultists and were killed by the trap when they investigated the chest. The cultists also would store valuables and enchanted gear for the devil when it was finally summoned.The only way to open it is to use two large keys; each of the head cultists had one. There is a trap on the chest that will incinerate the room with hellfire whenever the chest is touched; It resets every minute. To open the chest without activating it one must use the two large keys to unlock then lift the lid. The trap does not trigger when the inside of the chest is touched. Inside the chest is a powerful sentient enchanted sword that can blaze with hellfire, but will press the wielder to turn evil, as well as a ring that offers potent magical protection. The chalice itself is 5 feet wide and solid gold- it is difficult to move or destroy.
32 notes
·
View notes
Photo

Finally done, and with less than an hour (in my time zone) to spare! This challenge was much more taxing than I had expected, but rewarding as well! I’m very proud of this dungeon, and I plan to find a way to post finalized maps of the dungeon for use in a VTT once I complete them. I’m also certainly going to edit the posts here on tumblr to fix spelling or grammar errors once I set aside the time for it.
As always, the room descriptions follow the read-more!
8. WALKWAYS The wooden walkways are affixed to the southern wall 50 feet from the quarry’s bottom and were recently made after the main doors were blocked off. They connect to the broken window in the Head Manager’s office, room 7b, so the insurgents can access the rest of the complex. The planks of the walkway are sturdy enough, but can squeak when stepped on; anyone trying to pass quietly is hindered and could alert guards in the overseer’s watch, room 14. They’ll send a squad to capture the party if they see them.
9. SOUTH TUNNELS The tunnels on the south wall are dug far and deep and are the main source of valuables that the mines have collected. The Insurgents abandoned the tunnels and rarely patrol here. They are connected to the lower quarry by a stairwell that descends 30 feet to the quarry’s slope. The stairwell is large enough that someone descending down it is hidden from sight.
10. ELEVATOR The southern tunnels connect to a second large elevator that goes deep into the earth. The insurgents disabled the elevator; they were not interested in further mining that deep and creatures beneath the earth occasionally make their way into those lower tunnels. 10a. Vestibule This area functions as both storage and guard post between the upper mines and the lower mines. There are 2 constructs that have been left here to attack anything that enters. There are 20 lockers that each have a pickaxe in them, and 4 of them have been enchanted to be much more resilient than normal.
11. EAST TUNNELS These tunnels were more recently dug and as such have no permanent defenses, though 5 guards are posted here at any time. The tunnels connected with a cave system that has not been cleared out; there are a number of asp nests here, and every 10 minutes someone is in the caves there is a 25% chance 1d4+1 asps emerge from cracks in the walls an attack. If the maximum number is rolled, instead 3 asps and 1 giant asp attack. after 5 encounters the caves will have been cleared out. 3 insurgents had attempted to clear these caves out previously; they were swarmed and killed by the snakes. Their bodies are in the southeastern cave, some of their belongings are still there- each body has 30 gold and one has a flaming sword.
12. LOWER QUARRY The insurgents sleep in the northern part of this camp. It has space for roughly 50 people, though only 25 are currently there. These are 5 guards and 20 noncombatants. 12a Refuse Pile The insurgents have disposed of many bodies here, all stripped of flesh down to the bone. There is nothing of value in the pile, and searching through will certainly alert the guards.
13. CENTRAL STAIRCASE The central pillar of the quarry is carved into a large spiral staircase. This is the only way up to the upper floors, which the guards watch attentively. If anyone ascends and is spotted, the guard captain in room 14 will send all but 1 of the others in the room to attack.
14. OVERSEER’S WATCH At any one time there are 4 guards posted here, including one captain, as well as 4 constructs. They can see throughout most of the larger quarry, though the central pillar blocks some sight lines. If the other guards have been sent after the party, the captain and one other guard are left here to defend the north tunnels from the party. The watch post has a number of suits of armor and weapons to supply the guards, and the captain has enchanted armor and a protective cloak on him.
15. NORTH TUNNELS These tunnels were carved recently; the miners were starting a new tunnel when the puppeteers came, and the puppeteers started repurposed them to their own purposes. The tunnels to the rest of the quarry has been blocked off by a rock pile, but they can be crawled through with some effort. There are 4 puppeteer guards crawling about in these tunnels; instead of the tiny slugs that control people, these ones have grown larger than a dog to protect their nest. they no longer have the ability to control people, but are much more capable of defending themselves. If the party is captured they will be brought here to be puppeted; the puppeteers need them to be awake for this though, so they must wait for them to recover from their wounds slightly. Once awake, each party member has a puppeteer attempt to charm, then dominate them. These puppeteers were originally controlling noncombatants, and the puppeteer guards will attempt to dispose of said noncombatants when their puppeteers relinquish control over them; this may give the party enough time to escape.
16. LAIR This large cave was dug specifically to house the puppeteer’s young. It is dominated by a large pile of flesh that the young are currently feasting on- this is what became of the rest of the mine complex’s occupants. The young puppeteers are too small to puppet anyone, but in a large swarm they can cover and quickly devour a body. Additionally, 2 more puppeteer guards now watch over the young.
17. VAULT This vault is filled with everything of value that the Insurgents gathered from the settlement- they store their food and other supplies here, and there are a large number of valuable gems, metal ingots, and roughly 3000 gold worth of coinage stored in here, alongside a number of enchanted items.
21 notes
·
View notes
Photo

I’m a little late posting this week’s work, and I’m very happy I decided to post this weekly instead of daily because I certainly would have struggled to motivate myself to keep up if I missed as many days as I did. I’m going to try to finish the rest of the mines by the end of the month, especially since I’ve started running this dungeon for a small party! When all is finished I’m likely going to post the final dungeon at the end of the month (hopefully in a roll20 compliant size!)
As always, a thorough description of the rooms will follow the read-more.
1. LOWER HALLS The stairwell descends to a smaller hall that connects the industrial area to the west and the mine itself to the east. The large door to the mine has been blocked by many large blocks of stone, as has the northern door to the larger offices. When the looters accidentally walked right into the offices where the insurgents made their base. If the elevator is used, the noise will let the insurgents know they have arrived even if they bypass the alarm on the first floor. The Insurgents are controlled by tiny alien slugs called Puppeteers. They are able to charm humanoids, then can dominate charmed beings when touching them. They infiltrated by controlling some refugees, began proliferating in the mines, then turned against the remaining occupants when discovered. They have moved all the useful supplies and food into their main lair and have taken all the bodies of those they killed to be fed to their growing larva.
2. THE SMELTER This room is dominated by a large furnace used to heat and refine metals gathered in the mine. The furnace is 10 feet tall, and the room is 20 feet tall. The metal is heated in a pair of large vats that hangs from chains. There are currently 4 insurgents working the smelter guarded by 4 constructs; the constructs will attack if the group does not carry a guard badge, but will otherwise wait for one of the insurgents to command it using his own guard badge. The insurgents are noncombatants and will try to avoid the party but will try to use the controls in area 3a to pour molten metal onto any attacker. 2a. Controls The large vats that contain molten metal hang from a conveyor on the ceiling connected to room 3, they can be directed to and from the Forge using a pair of levers. One lever lowers the vat to pour it and the other moves it from one room to the other. If one of the insurgents has the opportunity, they will try to pour one of the vats of metal on their assailants.
3. THE FORGE This area is filled with tools for metalworking; the walls are dominated by tool racks and the north-west corner has a furnace for heating and cooling weapons, armor, and tools while they are being worked. On the tables are 3 glaives of expert make. At the pommel and the base of the blade is an empty slot for magical gems to be placed.
4. GEMCRAFTER Gems and crystals harvested from the mines are cut and enchanted to enhance gear. The master gemcrafter has been turned to the rebel side and is helping forge weapons. He is guarded by 2 constructs while he works. If his work is interrupted he will attempt to subdue whoever is interfering. There are 2 completed gems- one that makes a weapon or tool stronger, and one that protects armor from strikes that aren't magical. Theres another 2 of the first and one of the later, but those are only half finished.
5. MANAGER’S OFFICES This area was once where the higher ups of the mine would do their bookkeeping. There is little of value here, but a thorough (and time consuming) study of the paperwork details from a detailed history of the mine, from its founding by the revolutionary Garessa Chain-breaker to its present day profits. This also reveals the expected amount of valuable crafts that are stored deeper in the dungeon. If the insurgents in rooms 2 or 4 do not return to deeper in the mines 2 hours after they began their work, the others will send a group of 4 guards joined by 4 constructs to investigate (an imposing force for the party); the party could hide behind desks to avoid detection. The guards will capture them if they can.
6. MANAGER’S ROOMS Some of the insurgents have claimed these rooms to sleep in, but they don’t return every night. The desks and wardrobes in these rooms each have 1d6 trinkets worth 10 gold each in them, but any coins have been taken. If the insurgents begin to search for their missing members the party could hide in wardrobes to avoid detection. The guards will capture them if they can.
7. HEAD MANAGER’S QUARTERS The head manager and owner of the mine lived and worked here. Her living space kept her very detached from the miners and even other managers and, when she heard they were revolting, she killed herself in her bed. Looking the room over with a good check reveals it was searched and valuables in the containers as well as on the owner have been taken. 7a. Secret Room Because of the owner’s distance from the employees none of them knew of her safe room. Only the leader of the looters, a rogue with magic abilities, was able to locate it after thoroughly searching the room. After entering the mines and stumbling upon the lair of the Puppeteers she fled to this room and has hidden, undiscovered, for a week. Her rations are running low and she is willing to work with the party to defeat the Puppeteers and perhaps free her remaining companion. On the looter’s body is a pair of enhanced daggers, an enhanced crossbow, enhanced armor, and a bag of holding that contains 1520 gold and a number of scrolls and potions. 7b. New Mine Entrance When the insurgents barricaded the main doors to the mine they broke the window that overlooks the mine’s atrium and installed a ladder there. They now use this to pass to and from the mine.
39 notes
·
View notes
Text
UPPER GARESSA Entering the mine complex itself may yield treasure, but a band of thieves has broken in first. While many have entered into the mines, none have left... what awaits inside? What caused the rioting amongst the residents, and why would they have abandoned the safety of the first floor for the lower levels?
While I am still going strong creatively for dungeon23, I definitely feel that my first drafts are in dire need of proofreading. I also am definitely going to abandon the current way I am typing up room descriptions- I am finding my plans too wordy to legibly fit in an image, and formatting the text on Dungeon Scrawl is not as easy as I had thought. I will instead be putting the descriptions solely on Tumblr under a read-more; hopefully this works better!
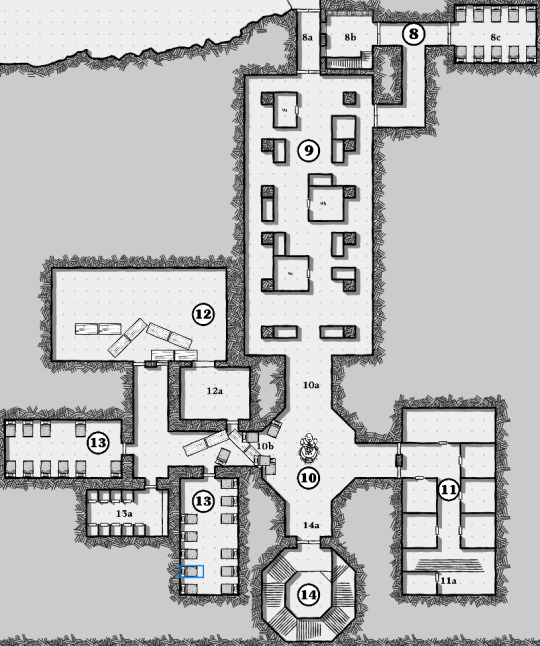
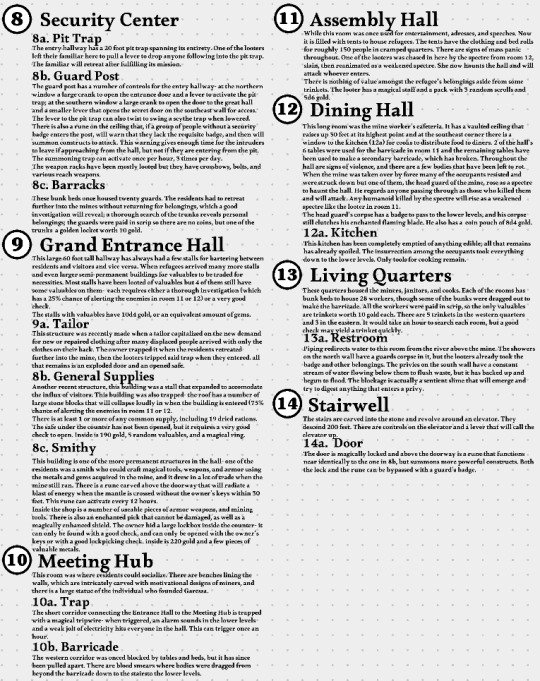
8. SECURITY CENTER 8a. Pit Trap The entry hallway has a 20 foot pit trap spanning its entirety. One of the looters left their familiar here to pull a lever to drop anyone following into the pit trap. The familiar will retreat after fulfilling its mission. 8b. Guard Post The guard post has a number of controls for the entry hallway- at the northern window a large crank to open the entrance door and a lever to activate the pit trap; at the southern window a large crank to open the door to the great hall and a smaller lever that opens the secret door on the southeast wall for access. The lever to the pit trap can also twist to swing a scythe trap when lowered. There is also a rune on the ceiling that, if a group of people without a security badge enters the post, will warn that they lack the requisite badge, and then will summon constructs to attack. This warning gives enough time for the intruders to leave if approaching from the hall, but not if they are entering from the pit. The summoning trap can activate once per hour, 3 times per day. The weapon racks have been mostly looted but they have crossbows, bolts, and various reach weapons. 8c. Barracks These bunk beds once housed twenty guards. The residents had to retreat further into the mines without returning for belongings, which a good investigation will reveal; a thorough search of the trunks reveals personal belongings; the guards were paid in scrip so there are no coins, but one of the trunks a golden locket worth 10 gold.
9. GRAND ENTRANCE HALL This large 60 foot tall hallway has always had a few stalls for bartering between residents and visitors and vice versa. When refugees arrived many more stalls and even larger semi-permanent buildings for valuables to be traded for necessities. Most stalls have been looted of valuables but 4 of them still have some valuables on them- each requires either a thorough investigation (which has a 25% chance of alerting the enemies in room 11 or 12) or a very good check. The stalls with valuables have 10d4 gold, or an equivalent amount of gems. 9a. Tailor This structure was recently made when a tailor capitalized on the new demand for new or repaired clothing after many displaced people arrived with only the clothes on their back. The owner trapped it when the residents retreated further into the mine, then the looters tripped said trap when they entered. all that remains is an exploded door and an opened safe. 9b. General Supplies Another recent structure, this building was a stall that expanded to accommodate the influx of visitors. This building was also trapped- the roof has a number of large stone blocks that will collapse loudly in when the building is entered (75% chance of alerting the enemies in room 11 or 12. There is at least 1 or more of any common supply, including 19 dried rations. The safe under the counter has not been opened, but it requires a very good check to open. Inside is 190 gold, 5 random valuables, and a magical ring. 9c. Smithy This building is one of the more permanent structures in the hall- one of the residents was a smith who could craft magical tools, weapons, and armor using the metals and gems acquired in the mine, and it drew in a lot of trade when the mine still ran. There is a rune carved above the doorway that will radiate a blast of energy when the mantle is crossed without the owner's keys within 30 feet. This rune can activate every 12 hours. Inside the shop is a number of usable pieces of armor weapons, and mining tools. There is also an enchanted pick that cannot be damaged, as well as a magically enhanced shield. The owner hid a large lock box inside the counter- it can only be found with a good check, and can only be opened with the owner's keys or with a good lock-picking check. inside is 220 gold and a few pieces of valuable metals.
10. MEETING HUB This room was where residents could socialize. There are benches lining the walls, which are intricately carved with motivational designs of miners, and there is a large statue of the individual who founded Garessa. 10a. Trap The short corridor connecting the Entrance Hall to the Meeting Hub is trapped with a magical tripwire- when triggered, an alarm sounds in the lower levels and a weak jolt of electricity hits everyone in the hall. This can trigger once an hour. 10b. Barricade The western corridor was once blocked by tables and beds, but it has since been pulled apart. There are blood smears where bodies were dragged from beyond the barricade down to the stairs to the lower levels.
11. ASSEMBLY HALL While this room was once used for entertainment, addresses, and speeches. Now it is filled with tents to house refugees. The tents have the clothing and bed rolls for roughly 150 people in cramped quarters. There are signs of mass panic throughout. One of the looters was chased in here by the spectre from room 12, slain, then reanimated as a weakened spectre. She now haunts the hall and will attack whoever enters. There is nothing of value amongst the refugee's belongings aside from some trinkets. The looter has a magical staff and a pack with 3 random scrolls and 5d6 gold.
12. DINING HALL This long room was the mine worker's cafeteria. It has a vaulted ceiling that raises up 30 feet at its highest point and at the southeast corner there is a window to the kitchen (12a) for cooks to distribute food to diners. 2 of the hall's 6 tables were used for the barricade in room 11 and the remaining tables have been used to make a secondary barricade, which has broken. Throughout the hall are signs of violence, and there are a few bodies that have been left to rot. When the mine was taken over by force many of the occupants resisted and were struck down but one of them, the head guard of the mine, rose as a spectre to haunt the hall. He regards anyone passing through as those who killed them and will attack. Any humanoid killed by the spectre will rise as a weakened spectre like the looter in room 11. The head guard's corpse has a badge to pass to the lower levels, and his corpse still clutches his enchanted flaming blade. He also has a coin pouch of 8d4 gold. 12a. Kitchen This kitchen has been completely emptied of anything edible; all that remains has already spoiled. The insurrection among the occupants took everything down to the lower levels. Only tools for cooking remain.
13, LIVING QUARTERS These quarters housed the miners, janitors, and cooks. Each of the rooms has bunk beds to house 28 workers, though some of the bunks were dragged out to make the barricade. All the workers were paid in scrip, so the only valuables are trinkets worth 10 gold each. There are 5 trinkets in the western quarters and 3 in the eastern. It would take an hour to search each room, but a good check may yield a trinket quickly. 13a. Restroom Piping redirects water to this room from the river above the mine. The showers on the north wall have a guards corpse in it, but the looters already took the badge and other belongings. The privies on the south wall have a constant stream of water flowing below them to flush waste, but it has backed up and begun to flood. The blockage is actually a sentient slime that will emerge and try to digest anything that enters a privy.
14. STAIRWELL The stairs are carved into the stone and revolve around an elevator. They descend 200 feet. There are controls on the elevator and a lever that will call the elevator up. 14a. Door The door is magically locked and above the doorway is a rune that functions near identically to the one in 8b, but summons more powerful constructs. Both the lock and the rune can be bypassed with a guard's badge.
60 notes
·
View notes
Photo


GARESSA ENTRANCE The Garessa mine was once the Primis Empire's source of gems and crystals. Now that Primis has fallen, Garessa was one of the few secure places for displaced refugees as well as a prime target for looters. Despite this popularity, no news has come from the previously bustling settlement over the last year. What has become of it? What is left?
I’ve taken up the challenge of Dungeon23 and this is the product of my first week! I plan to post weekly here and on my mastodon [email protected]. I’ve already begun making plans for running this in Pathfinder, but I’m going to try to keep this mostly setting-agnostic in case I or anyone else wants to run it in a different system.
I’ll also write out the room descriptions under this read-more, since I am not too happy with its legibility.
1. RIVER AND WATERFALL The river is wide and deep enough to make crossing without use of the bridge difficult (but not impossible.) Since the settlement was abandoned a large Hyaenodon has taken residence by the watering hole. It spends its days feeding on hunting or scavenging the surrounding prairie and returns at night; If it discovers trespassers it will be very territorial. 2 nights ago a group of bandits came to the mine to loot the mine were attacked at the entrance and their lockpicker was killed. The Hyaenodon took the body to eat later, and left it in the bushes it sleeps under on the west side of the pool. The body has average gear plus 4d4 gold, a few lockpicks, and 2 scrolls of Knock. These bushes additionally conceal numerous horse bones and damaged barding.
2. GUARD TOWER The guard tower is made from large stone bricks until the upper floor where it becomes planks and thatch. It reaches roughly 40 feet high and can see out over the surrounding flatlands easily. The upper floor has multiple murder holes on each side, as well as above the door, where defenders can fire down on anyone approaching the tower. The bandits that most recently came to scavenge left a lookout, but he has fallen asleep and can be snuck past over the bridge as long as no loud noises are made. If the guard is awoken he will ring the alarm, alerting both his allies and the Hyaenodon. The tower has some basic weapons among its racks, as well as an enhanced crossbow the bandit guard will use to snipe with.
3. OUTER BUILDINGS 3a.Outhouses While there is nothing of note in the outhouses, the smell is rank enough to mask the odor of anyone hiding in one. If the bandits are involved in a battle with the Hyaenodon and the tide turns against them, the leader will flee into one of the stalls. 3b. Stables The stables hold 3 horses the bandits rode in on and have been badly damaged and sprayed with blood. A little over a week ago a group of expert looters came to the mines and left their horses here when they entered. They never emerged and the Hyaenodon attacked and dragged away the still-hitched horses to eat.
4. TAVERN FRONT This spacious and rather fancy building reaches 30 feet to a point at the center of its roof. Its first floor is made from large stone bricks, the second logs, and the roof clay shingles. tavern used to host any visitor or trader coming to do business with the settlement. It is also currently in use by the bandits who fled here after the Hyaenodon killed their lockpicker. A proper investigation will show the muddy footprints of 5 individuals (one of which left to the guard tower where he fell asleep on watch.) 4a. Private Dining During its heyday the tavern would offer these rooms where, for a price, groups could eat, gamble, or otherwise be merry. Both rooms have a few coins that have fallen under the floorboards, and the southern room has a valuable dropped ring. These treasures can be found with a thorough investigation (or very good check.) 4b Bar The bar has been well used over the years, but has not been attended for nearly a year. There is a crossbow hooked under the counter and many different bottles of alcohol, of varying costs and types, all gathering dust.
5. TAVERN BACK The owners of the tavern never returned to the surface after bringing food inside the mines to the refugees. The stairs ascend 10 feet to the second floor. 5a. Owner’s Quarters This living space has little of value to offer, but the proprietor did have a set of journals kept on his bookshelves. He was a middle aged man who spent his life committed to this tavern and had gathered many stories from travelers. A full read of the journals will take 4 hours, and will inform of a hidden stash in the cellar behind one of the kegs. Additionally, a decent investigation will note that the final journal is not here- it was taken into the mine. A better investigation may reveal useful rumors about the surrounding region. 5b. Kitchen The stores here have mostly gone foul. There is still enough non-perishable food here for 2 weeks of rations. With a decent investigation one can find a door to the cellar, with 10 mostly full kegs of various types of alcohol. A great investigation locates a locked box with the owner's savings- 732 gold in various types of coinage. The key is with the owner in the mines; a great lockpicking check will open it.
6. UPPER TAVERN The remaining bandits have set up camp here, debating how to proceed. They have set a hidden tripwire on the stairs that, when tripped, will fire a barbed net to fire on who triggered it and significantly hurt and alert the bandits. The remaining bandits include a tactician who functions as their leader, a large brute of a man with a greatsword who only listens to the leader, and a capable tactician. Their archer is in the tower. If the party sneaks past the trap, they can overhear the bandits discussing their plight. If it is later at night, however, only the fencer is awake and the others are sleeping. On the bandits is 4d4 gold (doubled for the leader) and the leader has a magical protective cloak. There is little else of value in the rooms, but a thorough search will yield 2 mirrors from the fancier rooms, and a pouch with 32 gold in the northeastern room.
7. ENTRANCE The door is 20 feet wide and made of solid stone and locked, both magically and normally. The lock is high quality and also stonework. The spell is hard to normally bypass, but the body of the lockpicker has scrolls that will bypass it rather easily.
23 notes
·
View notes