
Doll resources compilation. Won't engage in doll discussion nor arguments. Guide yourself through the tag search categories as those clasify the stable tags. Pattern posts are updated regularly-------- ଘ(੭ˊᵕˋ)੭* ✩‧₊˚✂The fun thing about dolls is creating for them.✩‧₊˚
Don't wanna be here? Send us removal request.
Statistics
We looked inside some of the posts by dolldepository and here's what we found interesting.
Average Info
Notes Per Post
1K
Likes Per Post
1K
Reblog Per Post
393
Reply Per Post
8
Time Between Posts
2 months
Number of Posts By Type
Text
16
Link
1
Last Seen Tumblr Blogs


Fun Fact
Hackers stole 65M passwords from Tumblr in 2013.
Text
So You Wanna Make a 3D Printed Doll, BJD, or Action Figure Huh?

Everything you need, from start to finish, to make a 3D printed doll, figurine, BJD, action figure, etc. This list will be updated as needed:
3D Modeling Software Tools:
Clickwheel mouse! (IMPORTANT!)
Blender: Free, open source, and also free for commercial use. Sculpting mode is powerful, especially when used alongside the regular “Edit” mode. You can make a head, body, and joints on it.
Netfabb Basic: Free. Checks and auto-fixes errors, and answers the question of “but can I print this???”
Make Human: Good free and “free for commercial use” tool to make 3D printable bodies. You can toggle symmetry, age, gender, and add fat where you want it. Clean topology, so you can cut the body apart to add joints or change heads. Great base for Blender’s “Sculpt” mode. To avoid messing up your topology, import/export between Make Human and Blender as “.MHX”
Free 3D File Examples (Courtesy of various Blendswap artists):
These files to study and learn from, not to copy and steal!
Human Face #1
Human Face #2
Human Face #3
Human Face #4
Feminine Body #1 (Artistic Nudity NSFW)
Feminine Body #2 (Artistic Nudity NSFW)
Masculine Body #1 (Artistic Nudity NSFW)
Masculine Body #2 (Artistic Nudity NSFW)
Masculine Body #3 (Artistic Nudity NSFW)
Tutorials That You Can Directly Use (and that Aren’t Just Theory):
Good and Bad Facial Topology (i.e. How Not to Sculpt a Face)
3D Sculpt a Face From a Drawing
Note: If you don’t lay out the doll’s topology well, you will have trouble adding in joints. If your file is overloaded with too many squares/polygons or just has a bad topology, you can clean it up using a process called retopology.
How to Use 3D Printers Without Buying One:
Schools often stock 3D printers in a math-related, science-related, design-related, or engineering departments. These are usually free or cheap to use.
MakeXYZ (geographic directory of 3D printers. Quality/price varies and haggling is commonplace.)
Workshops or premium 3D printing services are currently the most expensive option. If you want a lab environment, consider a Hackerspace instead of a workshop franchise. And if you need premium printers, consider smaller local design studios— some even let you drop by to pick up prints. This is a great option for large multi-part volume orders.
Other Resources:
Free Blueprints for Single Jointed BJDs
10+ Different BJD Torso and Chest Designs
Hope this helps~!
1K notes
·
View notes
Text
I'd like to confirm that Ob11/Nendo/ 1:12 doll patterns added on the tag DO work in the Blind box BJD Antu Natural Wonderland dolls!
10 notes
·
View notes
Text
1/12 / OB11/ NENDO patterns have updated with a lot of content!
3 notes
·
View notes
Text
I'm interested in making a technical toy store (as in the kind of speciality shop that sells miniatures, doll houses and diorama materials) compilation list from many countries so I'd be thankful if you send me info about these kind of shops you know from your countries (either via anon asks-won't post them directly on the blog or replying to this post)
1 note
·
View note
Text
Made some updates on the blog's sidebar and the patterns, specially for the 1/12 dolls.
Merry sewing!
2 notes
·
View notes
Text
Dollmakers around the world: Anna Queen
Anna Queen is an artist from Taiwan with years of experience in BJD making.
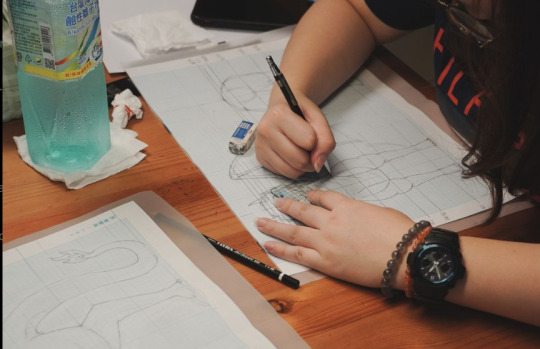

(Pictures taken from her instagram page, bjd head is her Blreno head sculpt in natural skin, available at her shop)
She started her endeavour in dollmaking in 2007, when she decided to make her own BJD as the ones being sold in the market were too expensive for her back then. This resulted in her first doll, that despite being brittle, made her love the proccess and pushed her towards improving her skills. Not only does she sculpt the dolls, she does the faceup and makes the eyes as well, making her a very versatile artist.
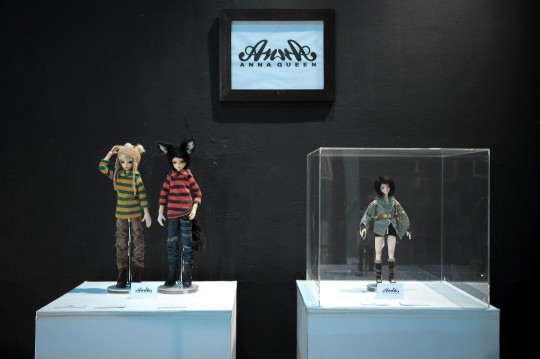
(In this image, the doll on the right is her first doll ever made, and the ones on the left are her first casted resin dolls)
Her sculpts range from bigger 1/3 full dolls and heads to smaller ones, and includes humans, animals and fantastical creatures. She shows her proccess and the result in several social media platforms, from designing and sculpting to customization, and some showcase of her art dolls.
Price: Low-Medium (depending on the item)
Her accessories (animal ears, bag heads) range around 16,35€
Her handmade eyes hit the 29-30€ Price range
Her BJD original heads are about 163,50€ per piece without faceup (she offers a lovely faceup option as well)
Full dolls (such as her dog BJD) and bust reach >600€
youtube
youtube
Social media:
Pinkoi (Shop)
Instagram (Please check her instagram to know when she opens faceup and body commissions!)
Youtube
Flickr
Facebook
Blog (outdated)
#dollmakers around the world#dollmaker#ooak doll#anna queen#anna queen bjd#bjd taiwan#bjd#bjd artist#doll resources#doll artisan#art dolls#bjd diy#bjd community#Youtube
11 notes
·
View notes
Text
Doll hair tips: heat styling
It’s been a long time since I’ve made a dedicated post for doll hair styling, and my methods/product recs have changed quite a bit so I figured I’d provide another one! I’ve been using my current methods for several years now, so I can confidently recommend all of them! I’ve been styling doll hair since I was in…well idk elementary school, and while I’m probably not the BEST out there, I know what I’m doing and I hope my experiences will help some people because I’m incredibly passionate about doll hair lol. This is what works for me, doesn’t mean it’s the end-all-be-all of doll styling! I get asked pretty often and rather than making a new post every time, I figured I’d make something more permanent that I can link to. <3 Let’s start with heat styling! I’ll make a post about products and tools as well, one about curls, and one about bangs because this post is already massive. Some of this information will probably be really obvious to some of you but hey…you can never be too thorough lol.
Keep reading
169 notes
·
View notes
Text
In regards of machine sewing
Sewing doesn't always go smoothly and for those who are starting I would like to gently remind them the following decalogue in regards of machine sewing for dolls, when the device doesn't seem to work properly:
How old is the needle? Replace it if you haven't done so in a while as an unsharpened needle will tend to "push" rather than pass through the fabric.
Is the tension right? Both from the needle tension and the bobbin tension. Use scrap fabric to test. Neither the stitches from top or bottom should be too tight or too loose, doesn't matter if one of the sides "looks right", because that means those stitches are weak. If there is too much tension, the fabric will ruffle as it is being sewn.
Does the machine have lint in it? It can cause malfunction and even staining of the thread and fabric if it is mixed with the machine oil.
Is the machine properly oiled? If it seems to make much more noise than usual or doesn't run as smoothly, remember to oil it or to bring it somewhere they can do it for you.
Does your fabric get pulled down into the bobbin housing? This can be due to several reasons: First one the bobbin having too much tension, second one the fabric being too thin or fraying, which might cause it to be pushed down into the bobbin howsing and getting caught in the pieces. You might need to tend to the tension, the way you have secured the fabric edges and the kind of fabric/way of sewing that fabric you employ.
Do the piece's edges get frayed while sewing? You might need to secure them with some white glue or zig-zag stitching them on the edge. Adding more seam allowance is also an option and can be later cut shorter and sergered properly once the garment is done or mostly done.
Are you sewing on a stable surface? Some cheaper domestic machines tend to "jump" or "shake" a little bit when sewing and this will affect the way the bobbin remains, on top of affecting the precission of your sewing. Place the sewing machine atop of a thick fabric like a folded towel and try again.
Is it hard to maneuver when sewing? Reduce the size of your stitches. Sewing for dolls oftentimes require thin fabrics that don't end up with bulky seams once the piece is done so you should use thinner stitches to give it stability, resistance and to help them look more polished. On top of that, thinner stitches allow you to move forward much less and to do small details with precission, turning and moving the small cut pieces more precisely than longer stitches that progress on big jumps.
The machine doesn't sew a specific fabric right! Consider changing the needle for a thinner/thicker one depending on the characteristics of the fabric and take into account that there are specific kinds of needles for stretch fabrics, jean fabric and such. In the case of stretch fabrics, try not to pull the fabric while sewing and use a stretch stitch (eg. for domestic sewing machines: an almost-straight zig zag stitch).
The thread breaks constantly! This could be due to the thread being unfit for that project be it because it is poor quality (I recommend investing on Gütermann threads in black and white at least-I prefer cotton ones in case I want to dye the piece later), unfit thickness (if it is hard to thread your needle, you might need to use a thinner thread because that thread can be so thick it gets cut with the movement and the friction; too thin and poor quality threads tend to be brittle), or unfit for that purpose (think about things like using serger thread or embroidiery thread for it). Special threads like those with metallic sheen can be very brittle as well and should be employed carefully. If it can't be sewn with a sewing machine you can always do it by hand.
65 notes
·
View notes
Text
Heads up!
I have updated the 1/3 and 1/4 posts.
I noticed the link bar doesn't work properly anymore, for whatever reason, so I'm working on it.
0 notes
Text
On wigmaking: MEGAPOST
Many dolls can accomodate or be modified to accomodate a wig, that allows for many hairstyles and hair colors in a faster and easier way than re-rooting hair.
Now, while is true that wigs can be purchased from several sellers there are also ways to make them yourself which, depending on the option can be cheaper and in many cases more satisfying.
When talking about materials, we have to take into consideration the kind of fibers because depending on them, it will be easier or harder to come across and to work with.
Acrylic yarn: The material is one of the easiest to obtain as most of them will do, but it is recommended that the yarn is thick so the strands can be separated more easily, obtaining more free fiber with less effort. This is one of the easiest tutorials for wigs, that takes less preparation of the materials to do the wefts.
Wool (needle felting wool): This material will give a poofier result than yarn, but is much easier to take apart and work with, and also more delicate. It's not advised to straighten it with hairstyling tools as it can melt or lose strands. It is soft and pliable and it's best suited for voluminous hair and for beginners, as it can be given shape with the finges and using some hairspray.
Mohair: It's a natural fiber of better quality than the prior. It can be heated with hairstyling tools and molded to shape. It is more expensive but oftentimes gives better results.
Saran. Shiny and soft. Barbie-like. Once boiled down it sits straight and doesn't take styles very well. Can take up a greasy appearance when handled too much. It melts easily with heat but can endure it if it's wet.
Nylon. It is easy to style and takes the styles well. It's slippery and thicker than saran, and it's harder to break. It can take hot styling tools in the lowest setting.
Polypropylene. A known fiend in the doll world, it might look similar to nylon but feels coarser and drier and gets tangled easily, hard to melt but doesn't take shaping well.
Kanekalon: It's soft and light and breaks easily. Doesn't take heat well so it requires to be wet to apply any kind of heat.
Costume fur: Fake fur. The advantage is that it's not needed to make a wigcap as is as the fabric base is the foundation for it. Popular at the beginnings of the doll custom community as other fibers weren't as easy to come across. You need to pay attention to the direction the fur goes so that you can cut it properly.
Lambskin: Real animal skin. Expensive and not vegan/vegetarian-friendly. Doesn't require a base as the skin is the foundation.
Other: There is no restriction to the materials you can use to make hair for your dolls. For instance other unusual materials that have been used are: (please click to open the hyperlinks)
Feathers. Tutorial by inhaletheresin.
Clay. Some bjds already offer the sculpted wig option, that is divided in two parts and joined by magnets or pegs over the head of the doll or replacing the wigcap in its back half. It can be done form air-dry clay as well. Other dools such as nendoroids use hard wigs as well. It's better to check for the compatibility of the materials. Examples of BJD with clay hair include SIO2's dolls.
Human hair. Preferably, from reliable sources (like you chopping your ponytail). In the source video there's shown the way.
Some of the fibers can be dyed and some others can't. Eitherway be mindful because dyed fibers can stain your doll and it can be extremely hard to remove them.
For the wigcap, there are several options as well but among the most popular we find:
Elastic mesh wigcap: Such as the ones made from pantyhose fabric and elastic cord. Can adapt a little to different heads but depending on the skill can take more or less time to make. Takes heat well and in many cases it's skin-colored so it's easier to hide.
Regular stretchy fabric: Such as that of t-shirts and elastic cord. Not as easily hidden as the elastic mesh wigcap, but can adapt a bit as well. Depending on the color and material, it could dye the doll.
In both of the prior options you can either search for patterns, do it by stretching the fabric over the head, or making a pattern by covering the head with saran wrap, then sticking washi/other tapes over it and then cutting it open. Tracing that shape over paper and adding seam allowance will provide the final pieces you will have to sew together and then add an elastic to.
Fabric and glue wigcap: Very extended because it's easy to do. The kind of fabric used can vary but the technique is mostly the same for most of them. Requires a tight fabric around the doll's head and several layers of white glue unitl it's turned hard.
Mesh, swisslace or tulle wigcap: Similar to the elastic mesh wigcap but with less support surface. If the holes in the mesh are too big it can become an issue when adding the hair fibres. Allows for the wig to be made with the ventilation technique.
Hot glue wigcap: It is fast and cheap, and allows for modification after the glue has hardened, however won't take boiling water to style the hair nor is good with hairstyling tools that use heat. Some materials might not react well to the heat of the glue gun.
Tissue paper wigcap: Made with the papier-mache technique using white glue.
Crochet wigcap: Made out of wool and similar fibres. Not very extended, more often used on soft dolls.
Tape/medical tape: I've seen this technique more used by certain korean doll customizers to do their wigcaps. It is fast and cheap although the wig can't be dipped in hot water and might not hold up well with hot hairstyling tools. The addition of wefts must be made with glue. HERE you can see how to do it.
Silicone wigcap: Used to hold wigs in place when put between the head and the wig rather than making one out of it. Bought more than made.
Air foam clay wigcap: Can also help with keeping bigger wigs in place for smaller heads. You need to check for compatibility. Wefts can be glued to it.
In order to make the
To keep the hairs stuck to the wigcap, the main two methods are:
Sewing: with thread and needle. Can scratch the scalp of the doll if no protection is provided. Done by hand. Industrial wigs are made with special sewing machines. Usually, a long weft of hair is sewn in circular shapes around the wigcap until reaching the top.
Gluing: The kind of glue can influence the result as some are water-soluble and some aren't (which can affect the way the wig is pressed down). The most popular ones are white glue, hot glue and fabric glue. Contact glue and superglue work as well but are less safe for the user due to the fumes. In every case, it's important to check for the compatibility of the materials and to respect drying times. The wefts can be either long or short, added in small layers or without cutting the strip.
Other less extended methods exist, such as the ventilation technique, that provides with very sightly results but is rather time-consuming and requires certain skill. Here you can access a tutorial made by Whispering Grass.
Unusual technique: In this video you can see someone doing individual grafts of hair over air-dry porcelain clay so that the hair ends up embedded in the wigcap.
No Nap Time has rooting patterns that can be helpul to follow.
In regards of the top of the head, there are several techniques as well. The more extended ones imply slipping a bit of folded/rolled hair wefts into a hole in the wigcap although there is the ventilated option as well. Another option, if the partition is in the middle, is to make a tight u shape that once sewn into the wigcap, has its opposite strands criss-crossed to hide the base of the wefts (SHOWN HERE).
Once the wefts are attached you will notice the hair sticks out too much in most cases. In order to keep it down we have to take into account its shape (straight or curly), its composition, and the wigcap and glue used:
Hot water pour: It entails heating water in a pot, and pouring it over the wig or sinking the doll or the test head with it , and then dipping it in cold water. Can't be done when any of the components of your wig is hot glue because it will soften and become sticky and there is a risk of it coming apart. It has no issue with fabric wigcaps, waterproof wigcaps and heat-resistant hair fibres. Might undo or soften curls and is a burn hazard.
Heat tools: Hair straighteners, curling irons, a hairdryer or small clothing irons can be pressed against the top parts of the wig to keep the hairs from the top down. Lomi from Lomi's playground does this in one of her videos using another cap to keep the hair down and work more easily. This could be done to hot glue wigs as well if they're only pressed for a brief moment. Not advised for non heat-resistant materials for the same reasons as above. Some fibres may frizz and it's ill-advised to use it with glues with volatile solvents due to the fumes and the fire hazard. Might affect the curls it touches and it's a burn hazard.
Saran wrap: Covering the hair all the way over the doll's head with tight saran wrap, adding some rubberbands and waiting for a few days. The safest, sometimes the results might not be completely satisfactory and takes time but is the less resource-consuming. May lay the curls flatter.
Depending on the partition of the hair, the way the wig is made may differ.
Smartdoll's creator has some videos on professional wigmaking and styling:
The whole wigmaking proccess
Styling a short hair wig
Styling a mid-length wig
Styling a long hair wig
Other helpful info includes:
Mozekyto making and styling a middle parted wig.
Dinga makes a short haired wig using short wefts at the begginning of her video.
Mini Bitsy shows how to do a buzzcut hairstyle to a barbie doll (can be done on a wigcap as well).
Antique Lilac's hard wigcap tutorial and weftmaking
Take into account you can use a tiny bit of double-sided tape to keep the wig in place in lieu of a wigcap (easier done on hard wigcaps- might not work well with those made of gentler materials like tissue or tape).
And always remember: Cut longer than what you expect because it's always easier to style and then trim the extra than to deal with a too-short result!
In regards of safakeeping and storage of wigs, the most space-efficient and safe method includes:
Stuffing a ball of soft tissue paper big enough to keep the shape of the wigcap.
Arranging the hairs in a way that won't affect much of the shape despite being stored (keeping curls all wound together, that short straight wigs get their tips pointed inwards towards the paper towel).
Covering it with a mesh, and then surrounding it with a strip of soft cardboard/poster board that is as thick as the wig when laid down (This step can be skipped but it's recommended).
Placing it into a drawstring or plastic bag that will protect it from dust.
Other options include wooden or doll head stands (HERE you can see a tutorial on how to do one yourself) that can be exibited, but might cause the wig to catch dust.
As always, keep in mind this post can be subject to modifications and updates so please check it from time to time and tell me if you've spotted something missing or wrong.
#BJD#BJD WIG#doll wig#wig#diy doll wig#diy#all dolls#all sizes#other dolls#megapost#link cluster#long post
13 notes
·
View notes
Text
Dollmakers around the world: NuniDolls
As this is a doll resource blog, I think it's a good idea to compile doll artisans and dollmakers by country. It allows easy access and helps smaller professional artists in the community. If you want to be featured, please send an ask with some contact info and a link to your work.

That said, I want to make my first post about NuniDolls.

Nuria, owner of NuniDolls is an art doll maker from Mallorca (Spain) that moved onto creating resin dolls of her own design after having a try at doll customizing with Monster High dolls. She created them with the idea of a posable doll that was meant to be customized and displayed like a little work of art, that didn't require removal of industrial face paint nor rooted hair.
(ATTENTION DOLL NUDlTY AHEAD)
NuniDolls uses eco-friendly resin and fabrics with Majorcan patterns and straw-soled shoes that are traditional there. Her dolls are 35cm tall, double-jointed, with 5cm*2cm feet (equivalent to 1/6) and a 1/4 head (work with 18-19 cm wigs) and come in several skin tones and two main body types: "regular" and "pregnant", which is a design I haven't seen a lot among BJDs. The face is wide, with a lot of space for the eyes and can be modified by the means of sanding or adding volume (think epoxy resin).
All the bodies are strung with elastic cord and the head is closed. They can wear wigs and you can change the face features by painting (that's what the artist made them for: to be customized). And if art isn't your forte, the artist can customize them as well from faceup to clothes.
Here you can see the unboxing of two of them in English.
And a collab with a Spanish youtuber who received a Card Captor Sakura and a blue ready-to-dress custom dolls.
Price range: Low (compared to other bjd companies that make dolls of similar size and materials)
Her blank doll with normal body and white, beige, chocolate and sky blue skin costs 50€, fully customised costs about 130€
A blank, pregnant doll in any of the skintones mentioned is 60€ and fully customised it fetches a price of about 150€
Other special dolls she puts up for sale fully customized, such as her mermaid doll or her Sally doll, have a different range of price.


Dolls are made-to-order and take a few days to be made and delivered, so be mindful of that when purchasing!
For purchasing her dolls you can go to her ETSY shop and you can see more of her designs on INSTAGRAM. Her webpage is still a WIP but you can access it HERE.


#bjd#bjd artist#bjd spain#nunidolls#dollmaker#bjd españa#dollmakers around the world#doll resources#doll artisan#art dolls#bjd diy#bjd community
11 notes
·
View notes
Text
1/3 doll patterns *WIP*
Beth Alvarez (https://www.ithilear.com) Thank you very much for allowing me to post a direct link to your patterns!
*Please check the youtube videos for instructions on how to assemble the pieces and drop a nice comment!
*Size reference: Iplehouse EID man ~71cm
Iplehouse EID man yoked dress shirt // Youtube tutorial HERE
Iplehouse EID man basic tee // Youtube tutorial HERE
Iplehouse EID man Rune’s jacket // Youtube tutorial HERE
Iplehouse EID man Rune’s pants // Youtube tutorial HERE
Iplehouse EID man Rune’s shirt // Youtube tutorial HERE
Iplehouse EID man vest // Youtube tutorial HERE
Iplehouse EID man fantasy/pirate waistcoat // Youtube tutorial HERE
Iplehouse EID man Rune’s masquerade coat
Iplehouse EID man laced breeches // Youtube tutorial HERE
Iplehouse EID man yukata // Youtube tutorial HERE
Iplehouse EID man moto jacket // Youtube tutorial HERE
*Size reference: Iplehouse SID man ~63cm
Iplehouse SID man poet shirt // Youtube tutorial HERE
Iplehouse SID man necktie // Youtube tutorial HERE
Iplehouse SID man kurta (shirt) // Youtube tutorial HERE
Iplehouse SID man casual/pajama pants // Youtube tutorial HERE
Iplehouse SID man basic tee // Youtube tutorial HERE
Iplehouse SID man vest // Youtube tutorial HERE
Iplehouse SID man jeans/pants, no yoke // Youtube tutorial HERE
Iplehouse SID man fantasy/pirate waistcoat // Youtube tutorial HERE
Iplehouse SID man Vahn tailed waistcoat
Iplehouse SID man boxers // Youtube tutorial HERE
Iplehouse SID man yukata // Youtube tutorial HERE
Iplehouse SID man sherwani (long coat-like garment)
*Size reference: Fairyland Feeple65 female ~62.5cm
Feeple 65 Firal’s dress // Youtube tutorial HERE
Feeple 65 laced skirt // Youtube tutorial HERE
Feeple 65 fantasy tunic // Youtube tutorial HERE
Feeple 65 simple waist cincher // Youtube tutorial HERE
Feeple 65 laced bodice // Youtube tutorial HERE
Feeple 65 reglan sweater // Youtube tutorial HERE
Feeple 65 mage robes
Feeple 65 high collared dress // Youtube tutorial HERE
Feeple 65 halter top/brassiere // Youtube tutorial HERE
*Size reference: Iplehouse nYID female ~58.7cm
Lined ballet flat shoe // Youtube tutorial HERE
Basic leggings // Youtube tutorial HERE
Cheongsam // Youtube tutorial HERE
Panties // Youtube tutorial HERE
Corset // Youtube tutorial HERE
Basic shirt
Hanfu // Youtube tutorial HERE
Fuzzy boots // Youtube tutorial HERE
Fantasy boots // Youtube tutorial HERE
Yukata // Youtube tutorial HERE
SMARTDOLL official patterns- Offered on the webpage
Smart doll patterns - Includes sets for men and women, just scroll down the text to find the links to the file.
Not clothes but the Smart doll page includes 3D printable parts.
Dolls West Designs free patterns recovered thanks to the wayback machine. Please go to the website to access the patterns as every pattern has a link for each size.
Pencil Skirt for Iplehouse BJD Females (nYID, SID, EID)
Panties for Iplehouse BJD Females (nYID, SID, EID)
Trouser pants for Iplehouse SID female
Trouser Pants for Iplehouse EID (female)
Trouser Pants for Iplehouse nYID (female)
Resin Rapture has several free patterns for Iplehouse dolls. Some of their patterns include tutorial, others don’t, but they are pretty self-explanatory. Pay attention to the “SEWING MATH“ category in case you want to resize a pattern to better fit your doll if it isn’t for their size exactly. Link HERE
The patterns available are:
KID pants
JID boy pants
JID girl pants
EID/SID/nYID man pants
EID/SID/nYID girl pants
EID/SID/nYID skirt
EID/SID/nYID top (girl)
EID/SID/nYID babydoll dress
KID/JID coat
FID man trunks
FID curvy top and leggings
Flat shoes for girls
#1/3 patterns#1/3 bjd#1/3#doll pattern#doll resources#bjd#iplehouse#smartdoll#feeple65#fairyland#EID#SID#nYID
50 notes
·
View notes
Text
“Dolls-n-Daggers“ by Valkyrie
I just came across with an old doll website by chance called Dolls-n-Daggers. The webpage is no longer available but thanks to the wayback machine we can access it and see all the cool content it had. It was made by someone dedicated to fantasy OOAK dolls and has a good amout of tutorials on it too. Here you can learn more about the author.

I found a rather interesting armor pattern (which is what brought me towards the site itself) that matches the one on this post, however, the link doesn’t work. For the sake of archival of a resource, it will remain uploaded here.
As always, if there is someone (in this case, a friend, family or representative of the late author of these patterns) who is against it, I have no problem removing it.
5 notes
·
View notes
Text
On adding head assets
I found a BJD maker called Lina Chouchou (click here for the English website) and they sell resin cat ears. What caught my attention though, is the way they recommend how to attach them in case your doll doesn’t have magnets on its head. You might find it useful for things like ears and horns and might help keeping the wig in place.

#bjd accessories#doll accessories#attaching cat ears#head accessories#head add-ons#bjd magnets#all sizes#all dolls#bjd customization#other dolls
9 notes
·
View notes
Link
Check the “On sewing for dolls“ section for some tips from experience!
As the rest of the blog, it can update quietly and change overtime so don’t forget to check from time to time. You can find the same link at the bottom of the drop down menu on the left of my blog.
5 notes
·
View notes
Text
Shoe form for dolls
I’ve seen around some shoe forms which can be useful for doing doll shoes without risking to ruin the doll foot itself but most do not adapt to the right shape because dolls are pretty variabe in their shapes so it can come in handy. It requires making but once the mold is done you can reuse it or modify the base that comes out of it (as there are pointy-toed shoes or others which have more of a square-is shape).
The tutorial is in russian but it’s comprehensive enough in the way it is shown plus the generated subtitles.
youtube
1 note
·
View note