#☆ C:\Program Files\Info . About
Explore tagged Tumblr posts
Visit Tumblr Blog
Explore Tumblr blogs with no restrictions, modern design and the best experience.
Last Seen Tumblr Blogs


Fun Fact
The KCSC sent more than 20K requests to delete posts related to prostitution and porn to Tumblr from January to June 2017.
Text
Enhancing Sims Thumbnails 🖼️🔍👀
So I have received some questions regarding this post and had another look at the ThumbnailConfig.ini file to see if there is anything else worth tweaking to enhance sims thumbnails.
I also decided to share my settings (though not sure if this is a good idea, I'll see how it goes). Disclaimer, that what works well for me/on my screen, might not be the best solution for you and you might be better off with the default settings. Also remember that generating higher resolution thumbnails can slow down your game. I think that visually the settings (only) make a big difference if you play on a larger screen and/or with an upscaled UI (game accessibility settings).
You can try my settings or use the info shared below (I might update it in the future) to experiment with the settings yourself. You can find examples on how to edit the file in my previous posts here and here and you can use any text editor like Notepad or Notepad++ to do so.


Download and details below the cut ⤵️
Below you can see what I changed (marked in green) and for what purpose as well as what resolution settings there are in general. I only looked at sims thumbnails and ignored everything else. I also think some settings should not be messed with, like the ones affecting pictures that are uploaded to the Gallery (exception is if you wanna extract these pictures for editing purposes) and there are a few settings that are not relevant for gameplay. Some settings I'm not sure about (feel free to share any info).


📥Download:
Sim File Share Last updated: February 27th, 2025
📒How to install:
This override does NOT go into your mods folder. Instead, you need to replace the original game file with it which you should find somewhere along a path like this:
C:\Program Files (x86)\Origin Games\The Sims 4\Game\Bin\res

The path might be slightly different for you and depends on where the game is installed on your computer. You can check the location in the EA app. To do so, select The Sims 4 -> “Manage” -> “View properties” (there should be a similar option on Steam):

Locate the file ThumbnailConfig.ini as described above.
Save a copy of the original file somewhere on your computer in case you need to go back. (However, you can also run a game repair to restore the settings if needed.)
Replace the original file with the override (either with my file or with your own version).
Delete the file localthumbcache.package (see info here), so that the game can generate new thumbnails, then restart the game.
Note that you will need to repeat the steps/redo the changes whenever this file is overriden or updated or by the game.
Current game bug (not a mod/config issue):
It seems that the game currently is regenerating thumbnails each time you restart the game, even when the thumbnails already exist in the file localthumbcache, thus unneccessarily slowing down the game and bloating up this file. I tested this with no mods, with basegame only, in a fresh save, with the thumbnail config file reset to factory settings and it’s still happening. Also added my findings to this bug report. If you noticed the same issue, please hit “me too”.
419 notes
·
View notes
Text
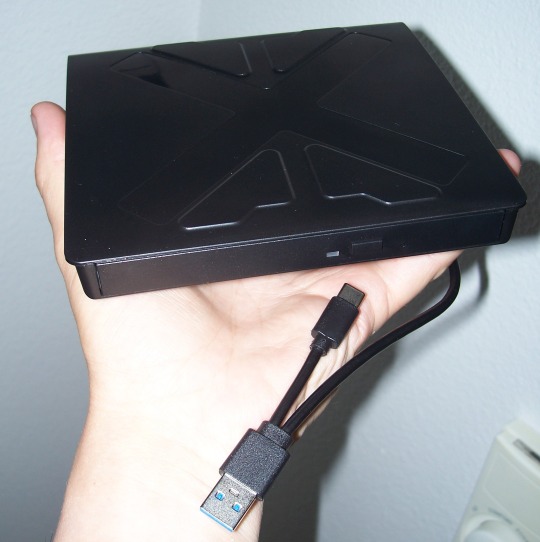
useful information: How to get a USB Blu-Ray player to work on your computer
Not a post about vintage technology, just an explanation of what you think might be simple to do but isn't: There are Blu-Ray players that plug into your computer by USB, and you discover that just plugging it in doesn't make it work* in the same manner that CD-RWs or DVD-RWs are automatically recognised and function. You will see "BR Drive" in My Computer and the name of whatever movie you have inserted, but that's as far as you're able to go.
*There is software you can buy to make a Blu-Ray (internal or external) function, sure, and if an internal came with your computer it's likely already installed -- but if you're like me you don't have that software, you're cheap and won't pay for software, and you want to use what you have installed already or find free solutions.
Looking in the Blu-Ray drive's package, there's not a lot of info about what you're supposed to do. The above no-name Blu-Ray player cost $40 from a popular website; name-brand ones can set you back $120 or so. Looking around online for those instructions, I never saw the whole set of directions in one place, I had to cobble them together from 2 or 3 sites. And so here I share that list. To keep out of trouble, I'm not linking any files -- Google will help you.
Get VLC, the free video player available for pretty much any operating system. Thing is, it doesn't come with the internals to make it work with Blu-Ray even if when you go to the Play Media menu there is a radio button for selecting Blu-Ray.
Get MakeMKV, a decoder for reading Blu-Ray disks. This had been totally free during the beta testing period but it's come out and has a month or two trial period you can work in.
Get Java if you don't already have it. Reason for this is, the menu systems on Blu-Ray disks uses this... technically it's not required, however it does mean you don't have options such as special features, language and sound changes, or scene selection if you don't have Java installed; insert a disk, it can only play the movie.
Get the file libaacs.dll online so you have AACS decoding. I am told it hasn't been updated in awhile so there may be disks produced after 2013 that won't work right, but you won't know until you try.
There's a set of keys you will also want to have so that the player knows how to work with specific disks, and so do a search online for the "FindVUK Online Database". There will be a regularly-updated keydb.cfg archive file on that page to pick up.
Got those three programs installed and the other two files obtained? Okay, here are your instructions for assembly...
In VLC: go to Tools, Prefs, click "show all"… under the Input/Codecs heading is Access Modules then Blu-Ray: Select your region, A through C. You can change this if you need to for foreign disks. Next related action: go to My Computer and C:, click into Program Files and VLC, and this is where you copy the libaacs.dll file to.
In MakeMKV: click View, then Preferences, and under Integration - add VLC.
Confirm that Java is set up to work with VLC by going to the computer's Control Panel, going to System Properties, and into Environment Variables. Click System Variables, and click New to create this key if it doesn't already exist: … Name: Java … Value: [the location of the Java 'jre#.##' folder... use Browse to find it in C:\Program Files\Java]
Let's go back into My Computer and C:, this time go to Program Data, and then do a right-click in the window and select New and Folder. Rename this folder "aacs" (without the quotes), and then you click into it and copy the keydb.cfg file here.
REBOOT.
And now you should be able to recognise Blu-Ray disks in your player and play them. Three troubleshooting notes to offer in VLC:
"Disk corrupt" -- this means MakeMKV has not decoded and parsed the disk yet, or that you don't have the libaacs.dll in place so that it can decode the disk. ...After checking the VLC folder for the DLL to make sure, launch MakeMKV, then go to File, Play Disk, and select the Blu-Ray drive. Now it will grind a bit and figure out the disk's contents.
A note appears when a movie starts saying there will be no menus, but the movie plays fine -- Java isn't running. ...Invoke Java by going to the Java Settings in Start: Programs. You don't have to change anything here, so Exit, then eject the disk and put it back in to see if the movie's menu now appears.
Buffering between chapters, making the movie pause for a few seconds? There is a setting for this but I need to find that info page again for where that is. (If you find it, tell me where it is!)
I don't claim to know a lot but if you have any questions I might have some answers or suggestions. So far I've watched "Office Space" and Disney's "Coco" without any issues beside occasional buffering.
87 notes
·
View notes
Text
learn to pirate. im sick of like 50k+ notes posts to some zip file hosted on a google drive or on some file sharing platform thqt gets taken down or has malware in it. a good vpn (proton, ivpn, mullvad) costs so much less than a single streaming service let alone 3 or more, plus adobe products plus whatever textbooks you're buying plus music services and whatever.
Torrent sites cannot be taken down because they host .torrent files, and they doesnt contain any pirated content, it just tells a program where to find it. Since the site doesnt host pirated content you're free to talk about it without any risk of shutting it down.
Be careful tho cuz by talking about you can increase the chances of companies finding out their stuff is on theae websites, and they can send cease and desists to the IPs that are downloading/seeding it. This issue is mitigated with a Private Tracker which only allows people who specifically have been invited by other users to download the .torrent files.
Also: Torrents are peer to peer. if someone hosting a torrent's house gets raided and gets taken down (very extreme example, AT MOST they will send a warning or a C&D to ur ISP) anyone else who downloaded the torrent is still also hosting it. as long as theres one person left on the planet that has it, you can still download it (oversimplified)
Also a note about C&Ds and ISP letters. Me and my family have been pirating content for definitely over a decade at LEAST. We mostly use invite only private trackers (google it, lots of info on reddit specifically) WITHOUT a VPN and also live in canada. All of that combined, we recieved a warning from our ISP once in 15 years(i was seeding cyberpunk 2077)
tldr go download qbittorrent and go to reddit and find private trackers for you to torrent shit from, or public trackers if you have a VPN that supports p2p
209 notes
·
View notes
Text


More doodles of the meta voice/fail text. Torn between keeping coming up with an actually unique design for them and keeping them as a generic stick figure ghost but no mouth. Except I've been struggling with coming up with an actual design for them.
I like the latter option because it's almost... symbolic? Iconic, but also generic; emotive and witty yet unable to be seen or heard by anyone... But that's a ramble for another day.
IDs under the cut
ID: A variety of doodles of a fan-made personification of The Henry Stickmin Collection's fail text, drawn in light blue (except in one case, where they are drawn in black for easier visibility). The persona is a mouthless but otherwise generic stick figure that is free floating, as though they are a ghost or phantom. All images have a watermark for the-irken-luxray.
ID 1:
The fail screen for the wormhole rifle option from Stealing the Diamond, which reads:
"I'm surprised you weren't able to get down there with that amazing portal technology. It's pretty strange how those portal guns work. I mean it combines the top scientific processes of our time. The portal gun contains a flux quantum generator which propels energy blasts with energy volumes of 4.23 GW with an average speed of 25 m/s. this speed is most effective because it allows the energy to be conserved while still maintaining a speed that is appropriate. The external plastic coating on the portal gun is constructed of a high polymer fireproof carbon fiber. This prevents the intense energy of the portal gun from burning the hands of the user. The intense energy causes intense heat. Oh by the way if you want an achievement click here. I've heard that scientists still do not know what happens if two portals are placed on top of one another. The last time that was attempted... Well I'm sure you heard about it on the news."
Five doodles of the fail text persona surround the screenshot, meant to be the fail text at various points in time. The top left holds a hand to its chin; the top right holds up a finger with their eyes closed, as though explaining the complex topic presented in the screenshot; the mid-left lays on their stomach while kicking their legs, as though excitedly rambling the info presented in the screenshot; the mid-bottom points to the word "here" in the screenshot; and the bottom right has their eyes closed while waving a hand dismissively in the other direction.
To the right of the screenshot and five doodles is a motion-blurred sketch of Henry Stickmin (drawn in black, to distinguish him as being physically present). A speech bubble pointing to Henry contains the Bugs Bunny "For the love of god please help me" meme.
ID 2:
A fail screen for one of the timeout options in Infiltrating the Airship, showing a closed metal door. The fail text reads: "Ok, ok! No more quick time events!" and, in smaller text, "How's your head by the way?"
Two doodles of the personified fail text overlay the drawing (drawn in black instead of blue for better visibility). The first is wiping away a tear and holding their other hand to their stomach as though they were laughing hard, and the second one shows mild concern for Henry (who is unseen).
ID 3:
A screenshot from Infiltrating the Airship with Henry glaring at the camera while holding the teleporter. A doodle of the fail text persona holds out a thumbs up. Text with an arrow pointing to the doodle reads "knows there's like an 80% chance of some shit going wrong".
ID 4:
A fail screen for the G.A.B.E.N. option from Infiltrating the Airship, which reads:
"error: stack overflow
"System.IO.FileNotFoundException:
"Could not find file C:\Program Files\HL3\G.A.B.E.N..dll
"Dump cache;"
Next to the screenshot is the fail text persona, but with smaller, circular eyes that are filled with television static. The stick figure is glitched in multiple places and has a chromatic aberration/"3D glasses" effect.
ID 5:
The fail screen for the Dark Energy Bomb option in Infiltrating the Airship, which has no fail text. Two doodles of the mouthless stick figure are to the left. The first holds up a hand with a bent finger, looking distraught. The second lowers its hand while looking away, looking sympathetic as well as distraught.
Text below reads "(was going to make a joke but a 10yo's dad just fucking died)"
ID 6:
Three miscellaneous doodles of the fail text persona. The left has its hand below its chin in a thinking expression. The middle has its eyes closed and is shrugging. The right is looking downward and pointing at something beneath them.
End ID.
#the irken luxray#my art#fan art#henry stickmin#the henry stickmin collection#thsc#thsc fail text#ask to tag#doodles from the drawer
38 notes
·
View notes
Text
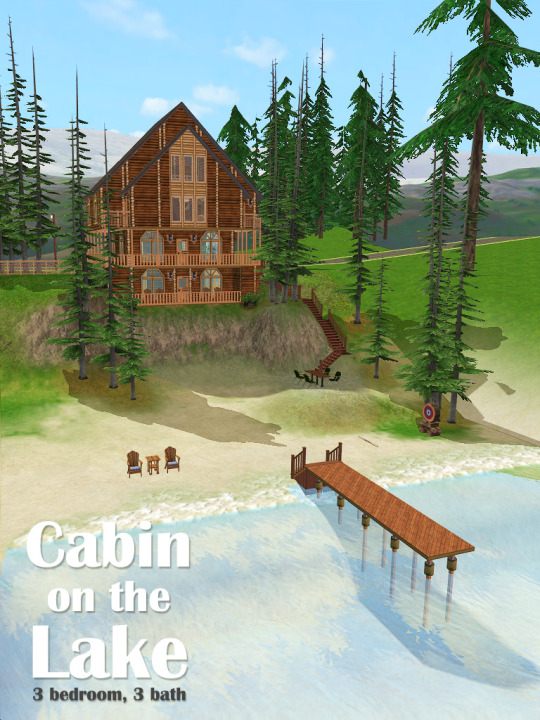
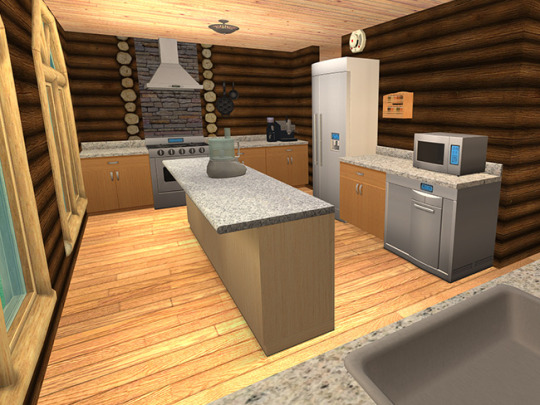
Cabin on the Lake | CC-Free Sims 2 Beach Lot House
This magnificent log cabin resort home is situated on a steeply sloping beach lot. It is surrounded by towering Fir trees, and has its own private dock!
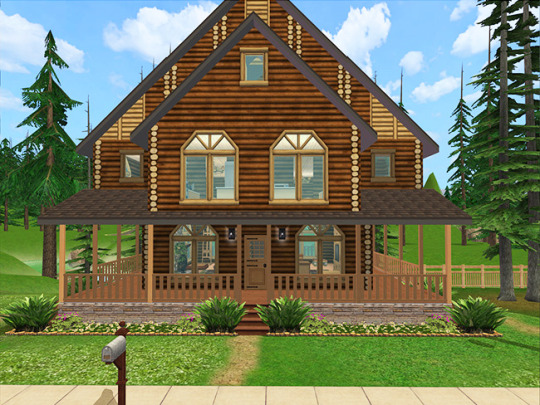
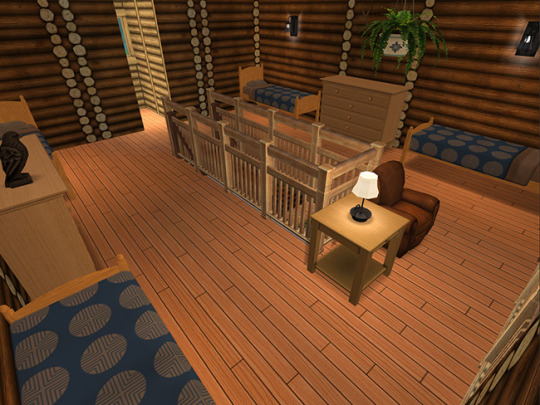
The 2 main levels have areas for gathering, a large kitchen, and cozy fireplaces. There is also a spacious dining room overlooking the lake. At the top of the home is a large bunk room that sleeps 4. The bottom level of this cabin has two separate suites with their own private bathrooms.
Outside there is plenty of space for picnicking, sunbathing, and swimming. This cabin is open year-round and is a great place to spend your summer or winter holidays.
Are you sold yet?
Here are a few more shots:
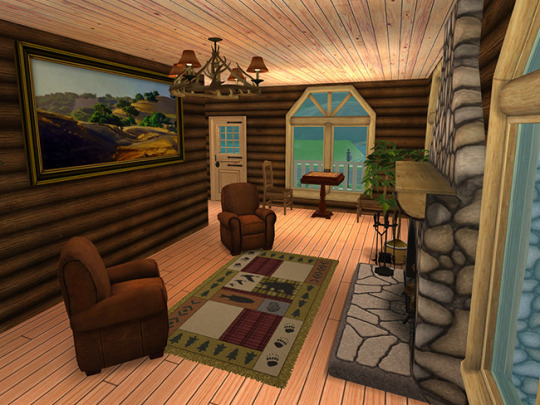
Connect with friends and family near the fireplace.
Feed your whole crew after the day’s adventures with this modern kitchen setup.
This bunkroom comes set to sleep 4.
Cabin on the Lake MF | SFS
This house was built on a 3X5 Beach Lot, has no custom content, but it requires all EPs and SPs.
Update 2025: The SDHB has been removed from this lot!
April 2022: It was recently brought to my attention that one of my lots was infected with the SDHB (super duper hug bug). 🤦♀️ While this bug is simply an annoyance and will not corrupt your game, out of an abundance of caution, I am letting you know before you download this lot. The funny thing is that this lot was built in a completely new neighborhood where no Sims had ever been played (either Maxis, or custom made sims). If you care about that kind of thing you can download the file that will check for the SDHB bug and fix it. I play with the NoSimLoaded patch which prevents the “Super Duper Hug” social interaction from ever happening in my game (this is the reason I just found out my game was infected).
Some additional notes about this lot: I used the “SetQuarterTilePlacement on” cheat to position a few things on this lot. If your sims get stuck, or the lounge chairs are not usable, you can simply delete the chairs and re-place them, or turn that cheat on by hitting ctrl-shift-c and entering SetQuarterTilePlacement on in the cheat box at the top of your screen. Then after hitting enter, press ctrl-f to activate it. Move the item until it’s not blocking whatever it was before. press ctrl-f to turn the cheat off. I don’t anticipate that you’ll run into this issue, but just in case you do, hopefully this helps.
The pictures shared here are all unedited, straight out of my game. If you want your neighborhoods to look like this here’s what I’m using:
CuriousB’s default replacement grass terrain
Lowedus’s Sky Box
Great Cheesecake Persona’s Seasons enabled skylines
Dread Pirate’s Maxis Match lighting mod
ReShade. I recently installed this program following the info in this Reddit thread. I am not the most adept at using it yet, but there’s a slight possibility that the saturation and texture sharpness of the game may be slightly improved by this addition. If you wish to install ReShade on your computer, be warned that this is a more involved process. Unfortunately, I do not have time to help you figure it out. (I’m still not quite sure how I managed to get it working on my computer haha!)
The terrain map I built this lot on is this one from ModTheSims.
You’ve scrolled this far, you want to see the complete floorplan layout, right?
Right!
That’s what I thought!
Basement/Ground floor:

Entryway:

Main level:

Loft/Bunkroom:

Ok, you good? Now go download the package and install it in your game already! 😄
I ALWAYS recommend using the Sims 2 Clean Pack installer to install lot files.
Game flashing purple? This is what has helped fix mine, and might work for you too, although there are no guarantees!
#ts2 build#sims 2 lots#sims 2 house#sims 2 build#cc-free lot download#sims 2 download#sims2#ts2#sims 2 maxis match#the sims 2#sims 2 simblr#sims 2 lot
6 notes
·
View notes
Text
@vexwerewolf So we played In Golden Flame tonight and damn, I did not expect to show up at the end of somebody else's cowboy movie, only to realize we were g-men.
Now that Blacksmith guy, head of the local worker's union, he hired us to kill a "thief". We find the thief, but let him say his peace. If I'm hired to kill someone, I'd like to know who the target is, and the Blacksmith wouldn't give us any info.
The Thief tells us the Blacksmith is a corpo plant, and he's got evidence. Sends us multiple files. Screenshots, data logs, audio and video. Correspondence between the Blacksmith and SSC. Now, I understand having to work with the corpos in order to get shit done out here. We've got no Blinkgate and Union doesn't give two shits about the Boondocks of the Galaxy. Shit, half of us are piloting SSC chassis. We cut our own deals, even got into their "VIP Pilot Program", or whatever. I get it. But icing somebody to keep your reputation intact? I don't like that. You can say it's for the "greater good" all you want, but the only life anyone has any right to sacrifice is their own damn life. I ain't gonna shoot a man for fucking whistleblowing. No corpo could ever pay me enough to stoop that low.
Now, I'm firm in my beliefs here. The squad as a whole, however, are of differing minds. I voice my opinion. Redline isn't having it.
"We were hired for a job, we should finish it."
Charlie pipes in. "Guys, remember our mission? We're trying to save those people who are literally being enslaved and forced to fight each other to the death by Steele. We need the Blacksmith's transport ships. If we trade one life to save all of them, I think it's reasonable."
Christ the Buddha, did this bastard just bring up the fucking Trolly Problem? But shit... He's making sense. We need those ships for evac. We don't have enough room on the Dragon's Tooth for all of those civilians. Still...
Redline pulls his pistol onnthe Thief. "I'll finish him off if you won't."
In that moment, I make my decision. I draw my blaster and point it at Redline. He looks indignant when he turns to me.
"Really, Al? You'd point your gun at me? Over this?"
"I ain't gonna kill an innocent man, Red."
"Oh, so you get to decide who's innocent, now? Who made you judge and jury!?"
"Who made you executioner!?"
While we're having our shouting match, Lamplight is frozen. He can't decide. We need to save all those people. But, killing this man in cold blood is wrong... Right? Lamplight always wanted to be a hero, like Jessie. This doesn't seem very heroic...
Redline's face is red. He turns to the Thief and I can see his finger squeeze the trigger. I'm faster. My blaster goes off first. (I roll for Assault. 23.) I aim for his hand. The plasma bolt sunders his pistol, sending molten slag flying. Redline can feel the reverberations through his hardsuit. His arm goes numb, and falls limp to his side. He doesn't cry out. He just grits his teeth and pulls out a stim with his good hand.
I just stand there, realizing what I've done. Red looks up at me.
"I always knew you were a coward."
I square my jaw.
"I've got nothing to prove to you."
"Hesitating at the end of a job like this? It's weakness."
"I don't fucking care. I'm not a corpo shill."
Lamplight suddenly realizes something. "I can just do both." He looks to me and communicates though Witness, into my mind. "We can just do both."
I understand what he's communicating in an instant. With the images, I can also hear the old Witch's words. "Now, you may find another way..." With a thought, I activate my dataplate visor and send a message to Charlie. "Make it look like we killed him."
Redline's eyes are wide from the stim. He's shouting louder now.
"You're fucking weak!"
I shout back at him.
"I don't fucking CARE!"
I whip around and aim my blaster at the Thief. (I roll for Assault. Natural 20.) I aim for his head and make eye contact with him. I put the plasma bolt right next to his head. Close enough to singe him, but not enough to kill. Charlie is recording the evidence to send to the Blacksmith. Redline jumps on the Thief, veins pumping with a cocktail of stimulants. He beats down on him with his good hand.
Lamplight opens his slate and, as the video is recording, makes a few minor adjustments. Just enough not to be noticed, to be a bit more convincing. He looks up and shouts "Alright, he's dead already! Templar, pull him off!"
I grab Redline and yank him back. "Christ the Buddha, come on! He's dead, and we aren't fucking savages!" I drag Red off, back to our mechs. Charlie cuts the video feed and Lamplight leans down to the Thief. Into his mind, Lamplight speaks to him. "He won't come for you for a while."
The Thief looks up, bruised and burned and bleeding. His voice is horse. "I... I don't know how to repay you."
Lamplight noded. "Wait to send your broadcast until our mission is complete. That's all we ask. We need those ships.
The Thief closes his eyes. "Al... Alright. I'll wait. I'll wait..."
Lamplight put a a chitinous claw on his shoulder. "Thank you. I believe in you. I think you're a hero."
*Apparently the GM didn't expect our conversation to go the way it did. Since the book only has two outcomes, he had to improvise a bit. We're going to get to use the Blacksmith's ships for the mission, but afterwards we will gain "Enmity of the Blacksmith", but we'll also gain "The Thief's Honor". This session was great. We all gained several points of pilot stress and extra pilot EXP. Love Space Cowboys.
#lancer rpg#lancer#mecha#mechs#lancerrpg#in golden flame#in golden flame spoilers#lancer ttrpg#space cowboys
19 notes
·
View notes
Text
A beginners guide to GIT: Part 4 - How to use GIT as 1 person
Table of content: Part 1: What is GIT? Why should I care?
Part 2: Definitions of terms and concepts
Part 3: How to learn GIT after (or instead of ) this guide.
Part 4: How to use GIT as 1 person
Part 5: How to use GIT as a group.
When it comes to not getting in each other's way, working alone is the simplest (It has a lot of other drawbacks). This is the simplest way to use GIT. You can do it with an external repository as a backup or just locally on your computer. It depends on how important your project is. If your laptop crashes tomorrow, which projects would you have a really hard time losing? Better to have an external backup for that. Github is often used for this (Maybe less now that Github makes machine learning AI’s, and so ARE stealing your code to train their AI on.) but you can also use Bitbucket (Which... may also steal your code...) and there are many many others out there. GIT is often used in certain patterns, called “workflows”. These have you working in more or less rigid ways to make it simple to work together. But since you are working alone, you do not risk others changing your code while you are working, so you can do it the simplest way :D
I will be doing a step by step guide that you can follow along. I will be doing it on a completely empty project and making a tiiiiiny program in C. This is because it is super simple. You do NOT have to know C to follow. You can also follow the steps with your own already existing project.
I PROMISE you, GIT cannot hurt you. Worst case scenario is that you fiddle around and break the repository part. (Meaning the files in the .git folder). But your files will always be safe.
(If you do not have git installed, check out part 3 for that)
First, I make a folder, navigate my shell into it, and call git init:
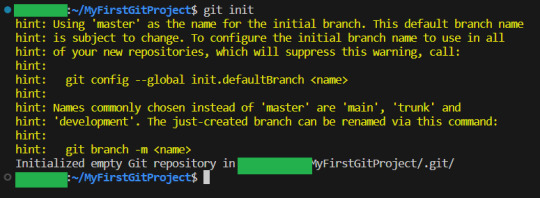
By the way, you can get used to GIT messages like this that tell you all your options, and explain what GIT has done for you. GIT is very good about giving you as much help and info as possible,
Now I will teach you the most important command in GIT.
It is more important than any other. Ready?
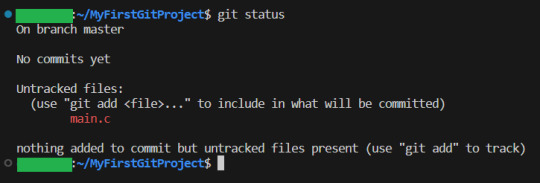
git status

This makes GIT tell you what git thinks is happening right now. What issues there are and what files are tracked, untracked or have been changed. Use this command often, especially while you are new to GIT, run it after every other command. It is how you learn what GIT is doing and thinking :3
Since our repo is empty it tells you what branch you are on (master. The only branch we will need since we are working alone)
and that you have not made any commits.
It also tells you the commands git think you will want to use on files. Since our repository is empty, it tells us to create some files, and then how to add them :3 So let's do that:
I have added my tiny program, as you can see:
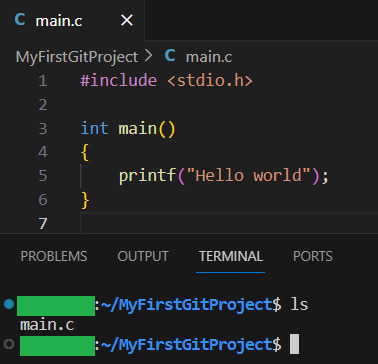
Now let us see what GIT thinks we did:
Now, since there have been changes, git shows us them.
Files can be untracked tracked and not changed (In which case, git status does not show them) tracked and changed.
Right now, main.c is untracket. Which basically means GIT have no idea about this file, other than it is in the folder.
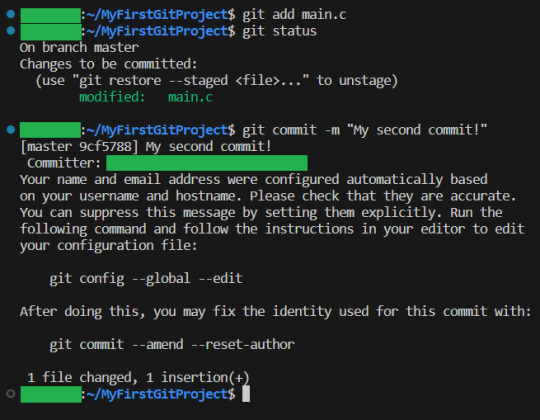
Ok, let us commit(save) the file. GIT tells us this is done with git add <File> . So we will write git add main.c
Then we use git status again to see what happened git status
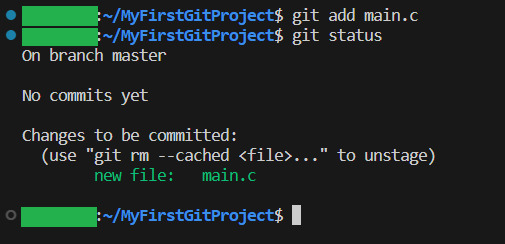
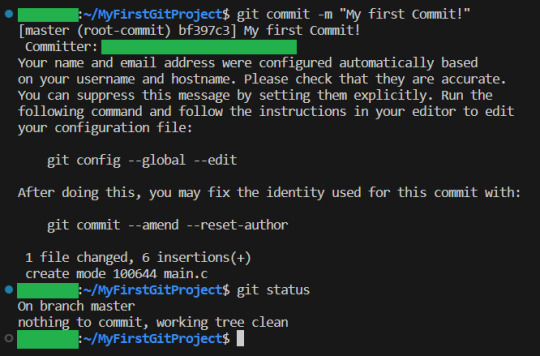
And yeah, our file is now ready to be committed. So lets do it! git commit -m “My first commit!”
The “-m” option is to write the git update explanation directly in the console instead of using an external program to do it. Done You have now committed your code! It is now saved!
git status shows that everything in the working tree is as it was last time we committed (Duh. We JUST committed)
I will now make some changes to the main file:

Git status shows us main.c was changed...but what if we wanted to know what was changed in more detail? How will we get status to do that for us? Let us find out! git help status
git then shows the help page for status And there we can see this part:

So if we write status with 2 -v arguments, we get all the details. Let us try:
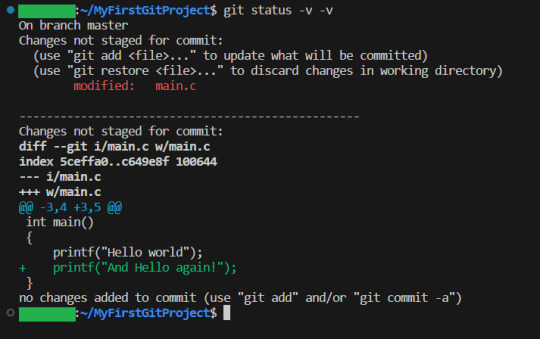
And look! It shows us EXACTLY what lines were changed! I stage the changes and commit:
And you have now learning enough about GIT to use it.. You now have all your work saved, in different commits. If you ever want to know all the commits you have made, write git log:

And if you want to know what a specific commit did, you copy the name of the commit, and write git show:

Now, everytime you want to save your work, you
1: Write/change the files you want
2: Add the files you want as part of this commit
3: make the commit These three steps are your workflow.
If you have a remote repository, then you add them steps
4: push to remote repository
To do this step, you can actually just write
git push
If you have set up a remote repository, then it just works. If you have not, then git will tell you what to do Whichever remote repository you use will tell you if you need to do other steps, like setting up passwords or ssh keys. They will also tell you how to set up the remote repository (That is not a GIT thing, that is a bitbucket or a github thing, so refer to whichever of those sites you want to use) And that is all! Every time you commit, your project is saved (it is smart to commit often, but usually only commit when your project can be compiled.) And whether you use a remote repository or not, you now have a fully valid GIT repository, and all the git tricks can be used on your project!
39 notes
·
View notes
Text
This is for installing Sun Haven mods from Nexus on a Windows PC. I don't know about Mac or Steam Deck. (Updated for Patch 1.7)
Each section of these instructions assumes you have read the previous sections and already finished those steps.
If you need more help, check out the Sun Haven Discord #game-mods channel!
----------
To install BepInEx (you can install from github or Nexus, I found the Nexus one to be easier):
1) Download this file: https://www.nexusmods.com/sunhaven/mods/30
2) Find where it was downloaded, right click, and unzip/extract it. If there is no unzip/extract option, you'll need to download a program that can do that, such as 7zip.
3) In a separate window, find where your game files are located. You can do this by opening Steam, opening the game screen in your library, clicking the gear icon, going to "Manage," and clicking "Browse local files." This should put you in a folder called "Sun Haven." Otherwise, you can likely find it by opening file explorer, then navigating to This PC -> C: -> Program Files (x86) -> Steam -> steamapps -> common -> Sun Haven
4) Find the mod you unzipped. Either drag or cut+paste the folder called "BepInEx" into the "Sun Haven" folder.
5) Also drag or cut+paste "doorstop_config.ini" and "winhttp.dll" into the "Sun Haven" folder. Your computer might not show the ini or dll file extensions, that's fine, they're still the same files.
BepInEx should now be set up. It's probably a good idea to start up the game, make sure things are still working. I think running the game will also generate a LogOutput file.

The above picture is what the inside of your “Sun Haven” folder should look like. It should have these three things the arrows are pointing to, if you downloaded from Nexus.

The above picture is what the inside of your “BepInEx” folder should look like, though you might not have a LogOutput until you run the game.
----------
To install other mods that use BepInEx (which I believe is all the Sun Haven mods on Nexus, but you should always read mod descriptions for instructions):
1) Download the mod you want.
2) Unzip the download.
3) Open the "BepInEx" folder we were just talking about.
4) Open the "plugins" folder.
5) Drag the dll file into the "plugins" folder. Your computer might not show the dll file extension, but it will be the only file in many mods (though there are some that also include folders that need to be moved too).
Note: ReadMe and info files, if they're included, have no effect and do not need to be put into the "plugins" folder. They are just instructions, credit, or extra info for you about the mod.
Now you can open the game and test if the mod is working. If you installed BepInEx from the Nexus download, you should be able to open the configuration manager by pressing F1, and you can use that to turn mods on/off or make adjustments to them. Some mods might not show up there, I'm not sure, but many will.

The above picture is an example of what the inside of your “plugins” folder might look like, though it will have different folders and files, depending on what you’ve downloaded. You may not have any folders. You also may not have the dll file extension showing.
----------
To install custom textures:
1) Download the Custom Textures Updated mod: https://www.nexusmods.com/sunhaven/mods/278/
*Note: There is an old Custom Textures mod that no longer works. Make sure you're using the one I've linked to if you are playing the latest version of the game.
2) Unzip it.
3) Put the "CustomTextures.dll" file into the "plugins" folder.
4) Start up the game. This should create a folder called "CustomTextures" inside the "plugins" folder. If it doesn't, you can right click and create a new folder and name it that yourself.
5) Download other mods with the custom textures you want.
6) Unzip them.
7) Place the image (png) files into the "CustomTextures" folder. (You can put the png files directly into the "CustomTextures" folder, or you can create more folders for organization. However, if you have two files with the same name, either one or both won't work. So the safest thing is to put all the png files directly into "CustomTextures." That way you can be sure you don't have any duplicates.)
8) Open your game, and the new textures should be working. If they’re not, open the configuration manager (F1) and make sure Custom Textures is toggled on.
----------
General Mod Notes:
When using mods, always make backups of your save files (copy+paste them to somewhere else on your computer), just in case. That's a good thing to do every so often regardless of mods. You can probably find saves in your computer files in C: -> Users -> YourName -> AppData -> LocalLow -> Pixel Sprout Studios -> Sun Haven -> Saves
You may need to change your computer settings to show hidden files, if you can't find the "AppData" folder.
If you need to use a backup, just delete the file from the "Saves" folder and then copy+paste your backup into the folder.
Whenever the game updates, mods may break. In which case, you'll just have to play without some mods or wait for modders to update them (if they update them). Then you replace the old files with the new files.
There might be some mods on Nexus that no longer work. Others haven't been updated for years but still work perfectly. Sometimes you just have to test things. If something goes wrong, that's what backup saves are for :-)
12 notes
·
View notes
Note
Hi, I've been following your "how to t*rrent sims 3" post from a couple years ago and I've made it all the way to the 6th step where I have to "crack" the game, however I can't get to the link that you say to follow for the steps. It tries to load the page and can't seem to load it, it says like "timed out" or something. Is there any chance you can send me another link or a photo of the steps, I would really appreciate it. Thank you so much for your post!
hi, omg that guide was written so long ago and i havent maintained it sorry 😭💀 i updated the post with the missing section which i just copied and pasted here for you:
so basically to crack the game, download the crack/ultimate fix that i reuploaded to simfileshare
Open the “# Crack” folder in the Ultimate Fix and drag & drop the .exe and .dll file in there to exactly: C:\Program Files (x86)\Electronic Arts\The Sims 3\Game\Bin and choose “Copy and Replace” on the pop-up that appears, telling you the files already exist in that folder.
(If you downloaded and installed your base game via Origin, the crack goes into this folder instead: C:\Program Files (x86)\Origin Games\The Sims 3\Game\Bin )
the new games4theworld forum is here which is the source for my info!
27 notes
·
View notes
Text
The French Fortran Code From Hell
My first job held the grandiose-sounding title of Technical Consulting Engineer, which was a very fancy way of saying "glorified customer support with some additional maintenance tasks."
I was assigned to a piece of software that was used to help people make their code more efficient. Among my duties were: creating documentation and how-to tutorials for the software; answering support tickets for the software; giving lectures on the software; and providing hands-on assistance in what we called Dungeons.
Dungeons were what happened when you locked a bunch of engineers in a windowless room with a handful of TCEs and lunch catering and let them go at their code with the software for the entire duration of the day, completely dead to the outside world - often repeating this process for several days.
I was in quite a few Dungeons during my three horrible years at that soul-sucking job. I want to be clear: the vast majority of this job was the soul-crushing tedium and agony of answering support tickets. The software in question was... not great at providing helpful error messages. 90% of everything resulted in "There's a problem with your license file" even when the license file was fine. So debugging was always an ordeal.
The best ones, strangely enough, were always the tickets from the military, because everything was classified. Anything that happens on their computer is classified. What does the error message say? That's classified. Can you send me the log output? That's classified. What does your license file say on line three? That's classified. You might wonder how this makes anything better for the poor sap trying to debug it. See, when they can't provide you any info, all you can do is send them the entire support script and tell them to go through the steps themselves. Then they message you back a while later politely telling you that it worked and you can now close the ticket. On the other end of the spectrum you had individual customers who bought the software for their own use, and some of these people were real pieces of work. Anyone who has worked customer-facing jobs knows the kind of person I'm talking about.
Anyway, Dungeons were more of an occasional interruption to the never-ending slog of support tickets, and usually a very welcome interruption.
But a couple times it was... let's say interesting. And both of these stories, oddly enough, involve the French.
The first one was the unfortunate time I was in a Dungeon full of engineers who had flown in from France - Paris specifically if I recall correctly. On the 15th of April, 2019. I received a text from my mother with rather alarming news, and thus I had to be the one to inform the room full of French engineers that Notre Dame Cathedral was actively on fire. Needless to say, very little got done that day.
The second one was just plain painful for me. The software in question supports code in both C++ (commonly used language, good) and Fortran (relic from the 1950s, extremely different from most programming languages). It was fairly rare for us to actually deal with the Fortran side of it, however.
But on this occasion, the French engineers I was in a Dungeon with wanted my help optimizing their Fortran code. Fine, I'm not exactly "fluent" but I can probably get the gist of it, I thought.
I was wrong.
You see, this Fortran code was auto-generated. It was not written by human hands and was not intended to be read by human eyes. It contained statements that were hundreds of lines long. Not functions, statements. To those not initiated in programming, this is akin to a run-on sentence that lasts 38 pages. It had variables with such helpful names as xyz and abc. Likewise, for the uninitiated, this is akin to having a pharmacy where all of the bottles are labeled "Medicine, probably."
It had, at some point, been minimally edited, or at least annotated, by humans, however. Because there were a very small handful of comments!
...Which were in French.
I do not speak French.
The French engineers did not know how to translate French Jargon into English.
Obviously, our company did not ever want us to say "we can't." But in this one case, nobody took issue when I looked these French engineers in the eye and just told them "I'm sorry, but this code is beyond our ability to optimize. It is beyond anyone's ability to optimize. It must be cast into the fire and destroyed; and may god help you."
#programming#this is longer than I expected#what do I even tag this with#stories from paladin's personal life
2 notes
·
View notes
Text
Stray Thoughts: The Cost of Making a Living
Yes, it’s that time again. Tax season!
Needed caveat: I’m no tax lawyer, just someone who’s done this more times than I like to think about. And gone through more paper than I like to think about doing it, because the IRS does not make it easy to be a self-employed person. And if you’re making any money as a writer, any at all, you count as self-employed.
So. What you’re going to need if you made money from books in the U.S. is probably going to include:
Standard 1040, or whatever version of it you use.
Schedule 1, for various self-employment taxes/income from royalties.
(The info you need for this will likely be on the 1099 form you got listing your royalties, if for example you get paid through Amazon. If you have some other side gig self-employed stuff like selling crafts, those calculations are on you... and mostly go on Schedule C.)
Schedule 2, ditto, other aspects of the self-employment tax.
Schedule C, for being a self-employed business person - book royalties count for this. Note, if you get royalties some other way that you are not self-employed but still get the royalties as part of your job, that’s apparently schedule E. But everything I can find says that’s not what applies to writers, even if you have another paying job.
(Also note that part of the info you need for Schedule C is the business code; the one for writers is also shared with acrobats and other “performing artists”. So I guess it is our circus, and our monkeys.)
Schedule SE, for calculating self-employment tax. Which you have to pay no matter where the whole of your income falls otherwise. Pfui.
The 1040-V, if you reach the end of your calculations and still owe the government money.
Scrap paper, plenty of.
Calculator.
Writing implements.
Caffeinated drink. (Anything alcoholic comes after the number-crunching, not during. Trust me on this.)
At least an afternoon free so you can crosscheck all the forms. Because they nest in aggravating and unexpected ways. You will pretty much end up doing the 1040 last, because it needs numbers from allllll the others.
Yes I do this by hand with paper and calculator. I don’t trust online tax programs to get everything right for writers. And I definitely don’t want someone else’s free program having my tax info. Meh.
Most effective order of operations I’ve found is: Gather all income info. Do the Schedule C. Then SE, then 1 and 2, then the 1040, then the 1040-V as needed.
But do them all on scrap paper first.
Work all the numbers out, put them together and leave the pile aside for a day. Or however long it takes to have a clear head.
Then redo all the calculations and check that you get the same numbers.
Checked and double-checked? Good. Fill out the forms, make copies of everything, then mail off the originals. It is possible, even likely, you will need extra postage beyond standard letter rate due to how many forms there are. I tend to bring the sealed envelope right to the post office and pay for postage there. I do not want to get this stuff back for insufficient postage!
File the copies where you can find them, labeled with the year. In case.
(And please, don’t make the check out to the Infernal Revenue Service. They will send it back, and hit you with late fees for nonpayment. No, I didn’t do this. Yes, I had to deal with the fallout from someone who did. Oy....)
If you make lots and lots of money from books - then go you! Remember you’re succeeding. Just don’t forget to pay your estimated taxes on a quarterly basis on top of this.
Off to fill out more paperwork!
4 notes
·
View notes
Text
dbh-adjacent writing-program nonsense under the cut, a.k.a. let's talk a bit about WriteMonkey 3
I've used WriteMonkey 2 and 3 on and off for. hm. I guess it's gotta be eight or nine years now? but those instances of use have always been erratic and short lived, and I've usually returned to either Scrivener or, more frequently for many reasons, MS Word. (I also did just a ton of first-draft writing in discord back when I had an account and c/ped my writing from there into Word. near-peerless syncing between devices, appalling security practices. what can ya do 🙃)
anyway, due to ~circumstances~ I've switched to writing on a computer that isn't my writing program–filled work laptop, and so I've been experimenting with WM3 again because it's super lightweight due to plaintext markdown instead of rich text and I have a license key for it, which = fun plugins. it's also way less complicated and labor intensive to set up per project and use than, say, Scrivener. I love Scrivener! but scriv can be overwhelming and distracting when all I want to do is write, especially if I want a unique, quick-to-set-up theme (and I always do, because Aesthetic Is Everything), which is one of the reasons WM3 is so handy

in addition to the gorgeous stripped-down UI that showcases whatever background I choose (mine can be found here!), WM3 has some really neat little plugins? I don't actually use the word-frequency checker myself, but WM3's shows you where each word appears in the document via the little indicator bars to the right of the word, which. rad! (you can tell at a glance which chapters are written in whose POV based off name usage alone and I think that's neat.) also, when you click on a given word in the frequency list, it'll highlight that word throughout the document and also display all uses of it vertically over the scroll bar path. lots of nice little visual indicators of what's going on. I just really like the design, it's simple but extremely useful and intuitive
admittedly, Scrivener cannot be beat when it comes to how easily you're able to make notes in it due to its multitude of note-taking locations, plus it has internal splitscreen capabilities that make referencing a second document a breeze, so there's definitely a mental transition involved when it comes to WM3 and its single-document-at-a-time system, on top of switching to markdown-style comments/reminders. that said! being able to not only see those comments below the headings in the left-hand sidebar but also jump to them when they're clicked? stellar 10/10 would use again
finally, the repository. I <3 the repository. being able to quickly toss whatever text I'm not quite ready to delete or info I know I'll want to reference at some point in the future into the repository is great. it's a seamless process, only a couple seconds' worth of effort required, allowing my focus to stay on what I'm writing instead of distracting myself by tabbing my way through various open files to find my notes. plus the repository is searchable(!!!!!), and using it also keeps the actual text editor clean visually, especially since the right-hand sidebar can be hidden too:

hm! possibly that is a sneak preview of chapter one! who can say!
so yeah! if you're looking for a stripped-down, highly customizable, portable writing program, I absolutely recommend it. there are downsides, of course, the biggest one being no official WM3 mobile options available at present, but since the program is both portable and plaintext, you can toss it into a syncing service and access it via your handheld devices that way. it's also not open source, and you need to pay to access the truly useful plugin features. with all that said, if you don't mind fiddling around with some CSS to make everything look juuuuuuuuust right, you can get yourself a really snazzy setup with relatively little effort. but maybe that's just me—aesthetic is king and all that
9 notes
·
View notes
Note
Hypothetical Question, I think?
AITA for 'mistreating' the characters in my games?
God, I can't believe I'm even writing this. This feels so dumb.
I'm in pretty hot water with the public right now, so I'll keep things as vague as possible. Don't make any assumptions who I am. You are definitely wrong. That guy has better things to do than be here and ask crazy questions.
Ever since I (Adult, m) was little, I've been developing games. I developed them by using a special program, Gameworks, this firm, GF, put out. My first game was a massive success, my second one (a sequel) was met with mixed reviews since many didn't like how radical it was. GF made me an offer to buy the rights and produce a third game.
Who in their right mind would refuse that? Obviously, I took the money. The third came crashed and burned. It was full of bugs and all that. A small part of me died when I saw what they did to the IP. But I couldn't hold onto it forever. I had bigger plans. Why should I care?
Anyway, I hired my chilhood friend C (Adult, f) to help me with game development. We both worked on female characters since she insisted i shouldn't have only male ones. But ever since she created hers, there were these weird bugs in my games...
Anyway, I started a franchise of fighting games (which I don't get nearly enough credit for btw). I bought the rights to one of my favorite characters and obviously added him to the franchise. (gamers were so annoying, constantly whining about how characters were overpowered, underpowered, boring, ugh)
I made a huge game after that, but it flopped on release. I even paid the biggest gaming streamer to play it, but it was all for nothing because C messed with the game! She left bugs in there to intentionally sabotage me! Her ego was just to big to stand in the shadow of my greatness. And since everyone saw everything go to hell live... it bombed.
I had to take the money that was left and make my next game completely on my own again. It was supposed to be my great comeback. But then those modders took my half-finished game and made a mockery of it! So I filed a lot of lawsuits to get them down!
Sorry, I'm rambling. I'll try to keep it brief from here.
I did start another series, a shooter, but the characters were just too old... a breach thankfully corrupted a lot of data.
My Gameworks Assistant has been acting weird since then, telling me I'm in danger. It's weird, but... I've been thinking a lot lately... what if the characters I created... live somehow? It sounds so dumb, but... I think I fucked up with one of my characters especially.
He was the main character of my very first game and based on a younger version of my grandpa. And when my second game ever made got insanely popular... I just wanted to get rid of the game so it made me look like a genius. So I let my Gameworks Assistant delete everything from that game.
I don't know, this all sounds so stupid and crazy, but AITA for mistreating my game characters?
11 notes
·
View notes
Note
Hi amoebae! I hope you are doing well! I am having some trouble with reshade as I have a new windows 11 computer and reshade makes my game crash when I attempt to change the shaders. I have completely uninstalled and reinstalled it several times and it happens each time. Do you mind sharing any suggestions or tips that I may be doing wrong?
Thank you for your time and expertise!
Hi anon! I'm sorry you're having problems. Is this your first time using Windows 11? (I'm about to get a new PC with it on, and ngl I'm low-key terrified!)
When you say it crashes when you change the shaders, do you mean when you switch between presets, or when you turn individual shaders on and off in the list below?
Either way, it could be related to a windows file permissions problem. Windows 11 is apparently really quite strict with its permissions. Not having the correct file permissions means that ReShade won't be allowed to modify any files, which can either lead to a warning that your settings can't be saved, or might theoretically lead to a crash. There are a couple of ways you can get around it.
You can install your games outside of Program Files (although I did hear recently it can be the entire C drive that Win 11 protects in this way, in which case installing it on a second internal drive is another option).
Or, you can set your EA App folder to have the correct permissions for your Windows user account. There's a very long and detailed article here about how to do it. I don't know if these extra steps are required because it's Windows 11 or because they're safer, I'm not sure, but whenever I've had to do it on earlier versions it's been a simpler process of just allowing full control to the top level game folder via the Security tab under Properties.
The final way is to just run your game (and EA App, and any other software you use with the game like SRWE or whatever) as admin each time you run it.
Now, I'm not certain this is what's causing your crashing, but it's definitely worth a shot. The quickest way to test it is to try option 3, running everything as admin one time. If it works fine, then you know it was a permissions problem, and you can either keep running as admin, or choose one of the other 2 options instead.
Also, be sure to look at any dependencies ReShade requires, like the correct .NET framework. All info should be on the main ReShade site. It used to be that Windows 11 didn't come with something ReShade needed. I don't know if that's changed now, but it's best to check.
7 notes
·
View notes
Text
Password Manager Part 1
So the other day I was thinking about what else I could do to make my cyber life safer. So I started to looking into a Password Manager. Now you can buy a subscription to a password manager service and there are some good sites out there, but the problem is two things the subscription and security.
By security I mean you look around and you see leaks every where. Corporations getting hacked or they use the info to sale your info and all the user data is under there control. All it would take is someone to hack the password manages and then all the passwords could be out there and your rushing to change everything before they get in.
I don't have the money to do something like that, so I started to dig into making my own Password Manager using Python.I started looking into what I would need.
First would be encryption, one of the standards of the cybersecurity world. Using a mix of hashing through the SHA256 algorithm, and always salting your hashes you can make your stored passwords even more secure.
The code
# Setting up crytogtaphy from cryptography.hazmat.primitives import hashes from cryptography.hazmat.primitives.kdf.pbkdf2 import PBKDF2HMAC from cryptography.hazmat.backends import defult_backend import base64
def derive_encryption_key(master_password, salt): kdf = PBKDF2HMAC( algorithm=hashes.SHA256(), length=32, salt=salt, iterations=100000, backend=defult_backend() ) key = base64.urlsafe_b64encode(kdf.derive(master_oasswird.encode())) return key
Then encryption and decryption, the method of the program will use to keep the passwords encrypted and then decryption when they need to be executed. Writing this code was more challenging but there some amazing resources out there. With quick google searches you can find them.
The Code
# Encryption and Decrptions from cryptography.fernet import Fernet
def encrypt_password(password, key): fernet = Fernet(key) encrypted_password = fernet.encrypt(password.encode()) return encrypted_password
def decrypt_password(encrytped_password, key): fernet = fernet(key) decrypt_password = fernet.decrypt(encrypted_password).decode() return decrypted_password
Next up I wanted Random Password generation, at least 12 chars long, with letters, numbers and special chars.
The Code
# password generation import string import random
def generate_secure_password(length=12): char_pool = string.ascii_letters + string.digits + string.punctuation password = ''.join(random.choice(char_pool) for _ in range(length)) return password
Finally it would be needing a data base to store the passwords. Through googling, and research. I would need to set up a SQL Data base. This would be something new for me. But first I could set up the code and the key for the user. Later I will add the SQL data base.
Now part of this would be setting up a Master Password and user name. This worried me abet, because anybody could just hop in and take a look at the code and see the Master Password and then get access to all my passwords and such. So to keep your code safe, it is all about restricting your code. Location, keep your code in a safe locked files, away from prying eyes and encrypted, and access to the source code should be restricted to just you and who ever you trust.
The Code
# Seting up SQL database. def setup_database(): conn = sqlite3.connect('users.db') c = conn.cursor() c.execute('''CREATE TABLE IF NOT EXISTS Uer_keys (user_id TEXT PRIMARY KEY, key BLOB)''') conn.comit() conn.close()
def main(): # setup database setup_database()
#create a key for the user master_password = input("Enter your master password: ") salt = b' some_salt' # Generate secure salt for each user key = derive_encryption_key(master_password, salt)
#Simulate user intreaction user_id = "[email protected]" #user ID user_password = "Password1234" #user password to encrypt
# Encrypt the users password encrypt_password = encrypt_password(user_password, key) print(f"decrypted password for {user_id}; {decrypt_password}")
# Placeholder for intrgrtating the password storage and retriecal logic # This would inculde calls to interact with the SQL database.
if __name__ == "__main__": main()
Now I have much more to do to the program, I need to set up a SQL data base for storage this will be its own can of worms. Learning SQL will be a new challenge for me.
Also I wanted to add more features to the program, I was thinking about setting up an auto fill feature. Now the program will just display the requested password and you have to manually put it in. I want to see if there will be a way to auto fill it.
So stay tuned as I do more research.
2 notes
·
View notes
Text
Easiest Mod You Can do in TF2: Hitsounds
Hi friends,
I recently changed my hit sounds in TF2 to 'Oktoberfeeest!!' and my kill sound to 'Thanks for standin' still wanker!', some of my favorite soundbites from Medic and Sniper respectively. If you vocal stim a lot or simply want to hear different fun little sounds, YOU SIMPLY MUST DO THIS!!! I love TF2 but I vocal stim A LOT and of course I quote a lot of my favorite lines from the game. Changing my hit/kill sounds is lowkey the best fucking thing I've ever done... ever.
SO anyway, I thought I'd share my wisdom with the fine people of Tumblr.
DOWNLOAD A SHORT (1-20ISH SECOND) .WAV FILE - MUST BE 16 BIT - MUST HAVE A SAMPLE RATE OF 11025, 22050, OR 44100 HZ, (44.1 is most reliable.) Too specific? No worries! This website can convert your file to fulfill all of these specifications: https://onlineaudioconverter.com/
THIS IS WHERE IT GETS A BIT CONVOLUTED... FINDING/NAMING YOUR FOLDERS AND FILES a. Go to Steam, open your Steam library, right click on TF2, click 'browse local files.' Your file path should look like this: C:\Program Files (x86)\Steam\steamapps\common\Team Fortress 2 b. click on the file labled tf. In that folder, go to the sound folder and delete the sound cache. Go back to your tf folder. In sound_workshop, do the same thing if necessary. Finally, go back to your tf folder once more. You may already have a file named 'custom,' if not, create one. Just name it custom in all lowercase, nothing else- IDK for sure if it'll mess up if you name it Custom but there are other files here that *will* bug out if you have any variation on the name. c. Make a folder in custom called customsound. Again, be sure to keep things simple and sweet with all lowercase letters, no spaces or symbols. In this folder, make another folder just called sound. Once more you may have to delete a sound cache file here. Then make a folder within the sound folder simply named ui.
THE FUN PART: ADDING THE SOUNDS Put your hit sound and your new kill sound into the ui folder, and name them hitsound and killsound respectively. I cannot stress this enough, all lowercase, no spaces. Computers are not smart and can't read as well as humans sometimes.
MAKING SURE YOUR SOUNDS ARE THERE a. Boot up tf2 and go to your advanced options, making sure that the killsound and hitsound is on default. b. Press ` to go into your console and copy and paste these three lines of code: play ui/killsound tf_dingalingaling_lasthit 1 tf_dingalingaling 1
GO INTO A GAME AND SEE IF YOUR SOUNDS WORK!
IF THEY DON'T, RECHECK YOUR STEPS AND/OR CHECK OUT THIS REDDIT THREAD: https://www.reddit.com/r/tf2/comments/15t7ayw/guide_to_adding_custom_hitsounds_and_killsounds/ IF YOU REALLY CAN'T FIGURE IT OUT, YOU'RE GOING TO WANT TO PEEP THE COMMENTS THERE OR ASK THE OP, I DON'T KNOW SHIT ABOUT FUCK ABOUT MODDING STUFF BUT I TRIED TO RELAY THE INFO THE SIMPLIST YET MOST SPECIFIC WAY I COULD!
5 notes
·
View notes