#3d model to sewing pattern
Explore tagged Tumblr posts
Visit Tumblr Blog
Explore Tumblr blogs with no restrictions, modern design and the best experience.
Last Seen Tumblr Blogs


Fun Fact
The Tumblr app for Google Glass was released on May 16, 2013.
Text
Convert 3D Models to Sewing Patterns with MPanel Software Solutions LLC
Transform your 3d model to sewing pattern with MPanel Software Solutions LLC. Our advanced software streamlines the conversion process, enabling designers and engineers to create precise patterns from 3D models effortlessly. Ideal for crafting custom-fit garments, upholstery, and industrial fabric applications, MPanel's user-friendly tools ensure accuracy and efficiency in every project. Enhance your design capabilities with our cutting-edge technology, making the transition from digital models to physical products seamless. Trust MPanel Software Solutions LLC for reliable solutions in converting 3D models to sewing patterns. Visit our website to learn more and start your free trial today.
0 notes
Text

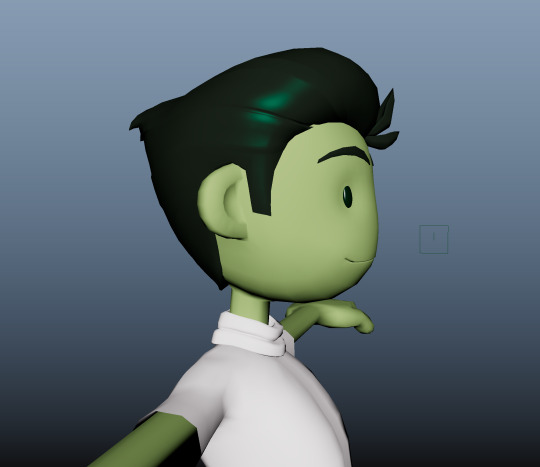
new hair for da babey!!
Also blocked out the clothes shape ~
Looking forward to but equally intimidated by his jacket ruh roh
#i also gotta sculpt the inside of his mouth.. and shooos#not the onside of his shoes but ya know#gotta make the shoes#puppet tag#my art#albin#wip#3D#man this is making me want to 3D print figuriiiiiines#i know I have the needle felted dolls which I adore but I wanna make posable skeletons#instead of wire#bc i wet felt som of the felt and ot made the armature rust 😞#so if I could 3D print a skeleton.. felt that somehow..#yeaaghhh#OOO OOO i also would wanna print accessories and stands and such#SO FUN#i also wonder.. could I use the 3D model to make a clothing pattern??#bc one issue i had with needle felting the dolls was that I literally couldn't sew patterns bc the dolls would inevitably be asymmetrical#but if i 3D printed a base and used the pattern from the model to make the clothes.... hmmmmm
67 notes
·
View notes
Text
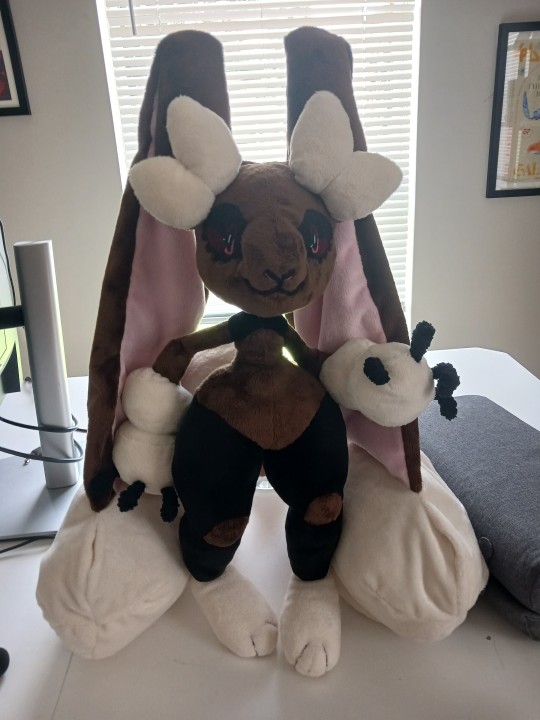
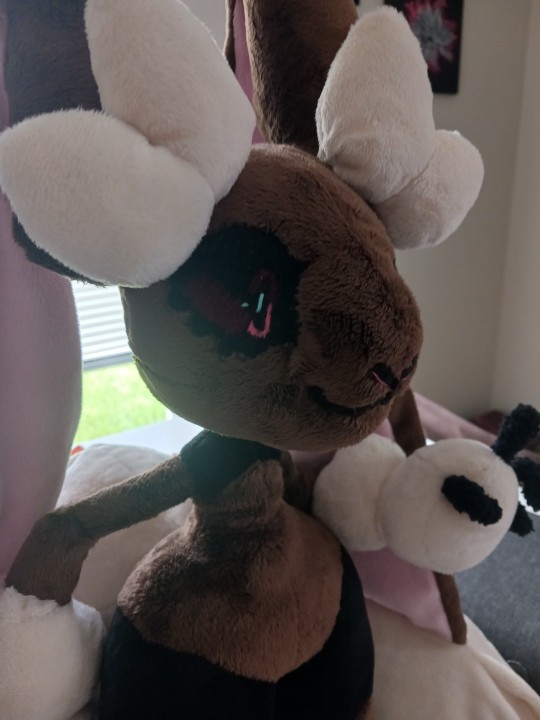
I finally finished my buni doll! he's taller than my arm and pretty hefty. it was my first time embroidering, wire armateuring, using this specific pattern making process, etc.... so I think he turned out better than I ever expected lol!
he's mostly posable tho the wire I had access to isn't strong enough to combat the minky. live and learn 🤷♂️
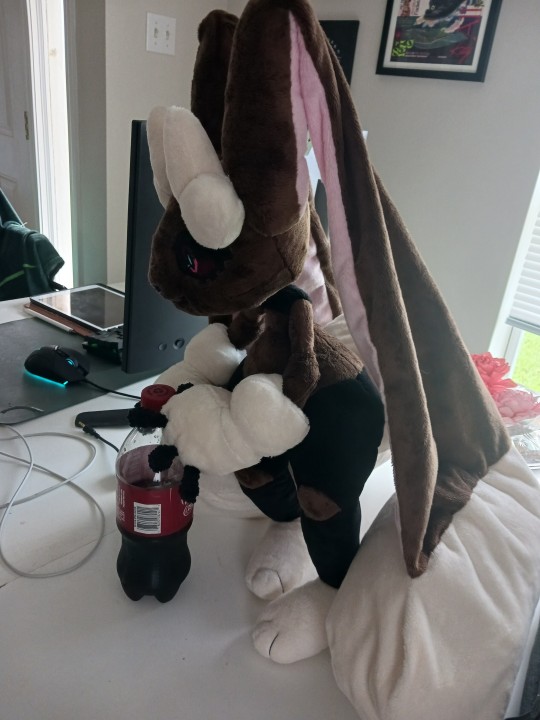
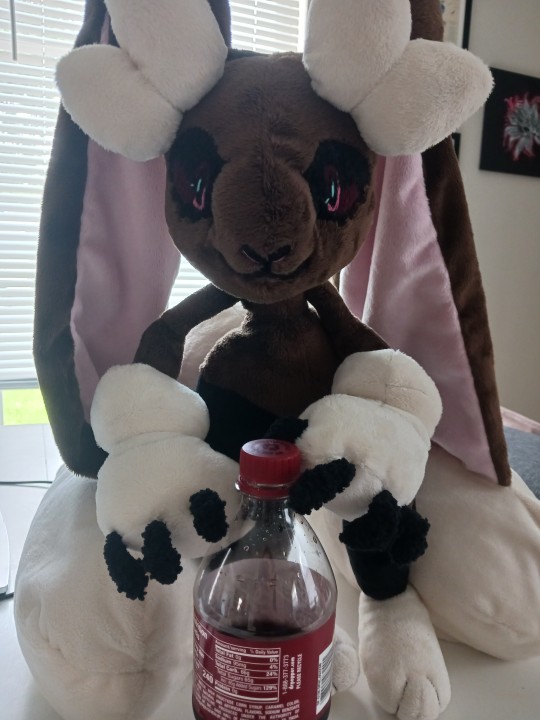
*& dr pepper for scale LOL
#pokemon#suckerpunch#anthro#ooak plushie#lopunny#mega lopunny#<- hes half of both to make his design better LOL#his fingers are fuzzy but that was a just get it done compromise#hes been shelved for months bc i couldnt make myself needle felt like i needed to#i finally said fuck it and sewed yarn to wire in thick wraps and called it finished LOL#better to finish at all 👌#i made his pattern with plushify by 3D modeling him first and then using uv seams to unwrap yhe pattern#plushify helps with scaling and predicting if your seams will actually work how you want them to#as well as labeling pieces and colors / fur direction / embroidery / etc#best part is it was a college project so theres no tracking or cookies. its all client side and totally free#oc#buni
65 notes
·
View notes
Text
I deeply and truly hate the software-ification of every damn aspect of creative making. I realize this is rich coming from me, the former programmer who is heading off to drafting school, but like if I wanted to learn 3d modeling I would have done that instead I am trying to make a damn sewing pattern and every ten minutes I have to stop to do calming breathing exercises so I don't throw my keyboard through my monitor out of frustration. And then pay fifty dollars a month for the privilege of using the software that I have to spend seventy hours of tutorial time before I can even practically use.
I seriously think much of the world would be better if the computer was removed as a mandatory middleman for private equity software consortiums to extract financial rents from people just trying to do their jobs. I can make the patterns with a pencil, a ruler, and some tracing paper. Let me go back to that please!
4 notes
·
View notes
Text
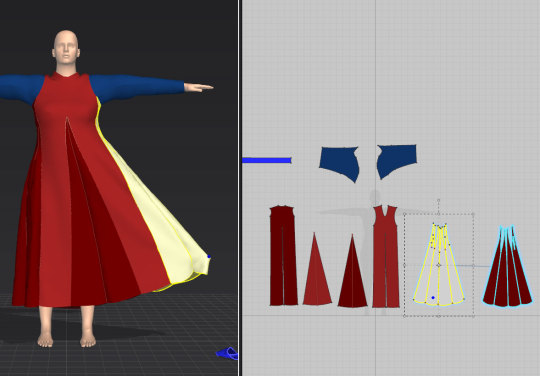
I do not have money for these programs at the moment, but I liked the idea enough to try it in blender. Because I enjoy making extra work for myself, I modeled the human completely by hand. I haven't figured out a way to make the fabric drape yet, but I'm having a good time.
I have always been more excited about making patterns than actually sewing them, so thus far all I have done is print them on paper and assemble them with Scotch tape. But look, I made a frog! And a little dress! (The dress is not for the frog, unfortunately, although that would be cute.) I think the poofy parts over the hips are probably too low, but it's more proof of concept than anything else. If I actually decide to make it I'll look at moving them.

I’ve been preparing for a Ye Olde SCA campout this weekend.
My technique in sewing medieval clothes without a paper pattern is a little involved, but I like being able to make a garment and have it fit perfectly the first time I put it on, without having to do a fitting even one time.
How do I do this? Two programs - MakeHuman and Marvelous Designer
- I made a perfect 3D model of myself in MakeHuman by using my measurements and height, following this tutorial
- I imported the creepily perfect 3D model of myself into Marvelous Designer.
- I took medieval patterns from the internet, traced them, and resized them to fit the perfect 3D model of me. Like this t-tunic.

or more complicated clothes:
- Cut out the fabric using the same dimensions, adding a seam allowance
- sew it together (correctly the first time, not wasting fabric)
The first time I made a t-tunic, it went over my head and fit perfectly. I made a t-tunic for my brother using this technique, and he didn’t have to be involved in the process at all except for putting it over his head and it fitting perfectly.
The hard part would be cutting out the fabric for more complicated clothes, but with ancient/custom clothing like this, you’d have to find a way to do that anyway. With this program, you know at least that it’s going to fit your beautiful body, and there’s less chance of wasting expensive linen..
I was actually using this technique to make custom 3D clothing to fit a Skyrim character (a much more difficult and painstaking process), but then realized that the skillset of making 3D model clothes could be applied to real life. And now all I want to do is invent my own weirdly perfect wizard fashion clothes, or even just make custom normal clothes that fit me weirdly perfectly.
8K notes
·
View notes
Note
What is the other plush? What medium are you using to make it? And most imporantly, can we see pictures of when its done?


I don't have a lot to show yet because it's still extremely WIP (just cutting out all the fabric pieces took nine and a half hours aaa) but this is the tag for my progress on my sideblog if ur interested
this is the 3D model I made to create the sewing patterns tho, so he's hopefully gonna look something like this when he's done
(he won't stand though, he's taller than the ceilings in my house. he's just gonna be floppy)
most of his body is gonna be minky, but his socks and wristband are gonna be terry cloth, his shoes are canvas and the rubber part of his shoes are pleather. I also have some really huge foam inserts for his shoes because stuffing them with regular stuffing would make the bottoms bulge out and I want them to be flat. might also put a bit of pool noodle in his neck to support his giant head too. we'll see how that goes
but yeah if enough people are interested I can reblog the final thing here, or you can follow @wiltenjoyer for progress pics. the queue only posts three times a day so it won't clog up your dash lmao
#this is. I guess technically my fourth plush ever?#made a cat when I was 8 with my mom's help (it was mostly my mom doing everything lmao)#ice cream cone in home ec class in like. 2009#two years ago I did a hand sewn frog for my aunt. you might've seen that frog sewing pattern post on tumblr I think it was popular for a bi#but this is like my first *real* sewing project
65 notes
·
View notes
Text
Wait!!!
Look at him
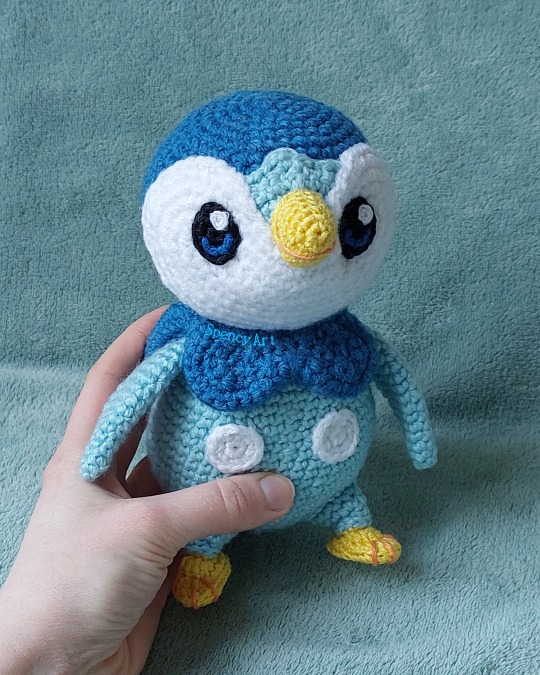
Him!!!!


I made him. He can stand upright. Sometimes.


yea..


It was surprisingly difficult to get Piplup's anatomy right, despite using the 3D model from Pokemon GO.
Progress pics:
Started 2022-02, completed 2023-06, finishing touches 2025-02. Free-hand crochet, no pattern.
Cotton yarn (feet and beak), polyester blend (body), and some sewing yarn (eyes). Garden wire sewn into the feet for stability.


I defined the midline using pins and some colorful scrap yarn (strongly recommend)
I had initially pulled the area around his eyes closer together to make them curve inwards (like eye sockets). I find it gives plushies a cuter face, defines the nose, and can help in making the eyes face the right direction. When I realised his head was canonically spherical, I cut the string between the eyes, and he was born. I spent so much time making sure he was perfect that I didn't want to leave such a tiny mistake. After almost 2 years of looking at his uncanny blank stare, I went back and redid the eyes. And he's perfect. To conclude this essay, sometimes you have to trust your gut instead of sticking to the reference.
#Piplup#Arigurumi#Pokemon#DIY craft#Piplup plushie#Plushie#Stuffed animal#Crochet#Pokemon crochet#My work
75 notes
·
View notes
Text
ACCESSORIES AND PAWS: FINISHING UP THE HEAD


this phase introduced another new material—3d printing! as of right now everything i’ve 3d printed i’ve modeled myself. this piece is an ear tag riffing on techno’s hypixel rank!


i painted it using a krylon leafing pen and acrylics for the text and weathering. the friendship emerald was resin printed & colored with a mix of acrylic ink and varnish.


the other accessories were all sculpted using foam clay, which is a material l absolutely adore. they’re painted with the same leafing pen and acrylics as the ear tag.


for the hand-hooves, i traced my hand and sketched out the shape i wanted around it. i then copied that over to 1 inch foam that i think i cut in half. i then tapered the wrist on the original paper pattern, and copied both versions over to fur and faux suede. cut, sew, stuff in the foam, and line it, and they’re assembled! i think they’re maybe a little short so I might add more length later, just based on how they fit relative to the shirt.

they then got the same airbrush treatment as the head and they’re done!

here’s the head and paws together!
73 notes
·
View notes
Text


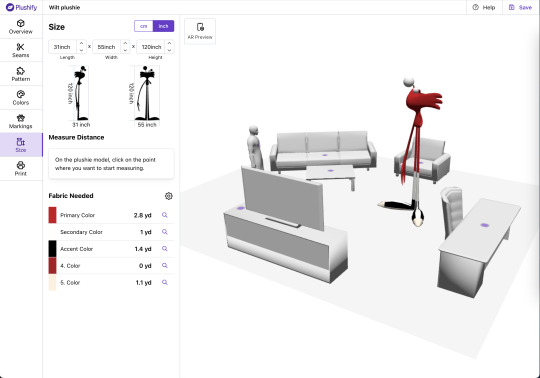
like I keep saying, Wilt doesn't fully translate to 3D bc his side profile is taller than is front view, so I kinda gotta make compromises + change things based on what I think looks good
also life size wilt torso:


me when I'm a chewed up piece of gum
#I've been hit with the need for a 10 foot life size wilt but that'd be sooooo expensive#but I was like. you know what. I'm pretty sure I have all the skills needed to do this#might not follow through on actually making it bc the fabric would still cost a lot plus I'm still figuring out the logistics#but maybe#that last pic is from a 3D model to sewing pattern site (plushify)#life size wilt saga
24 notes
·
View notes
Text

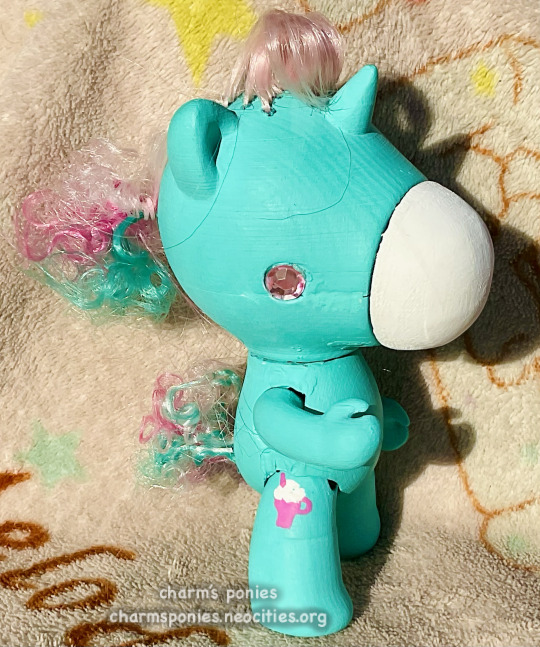


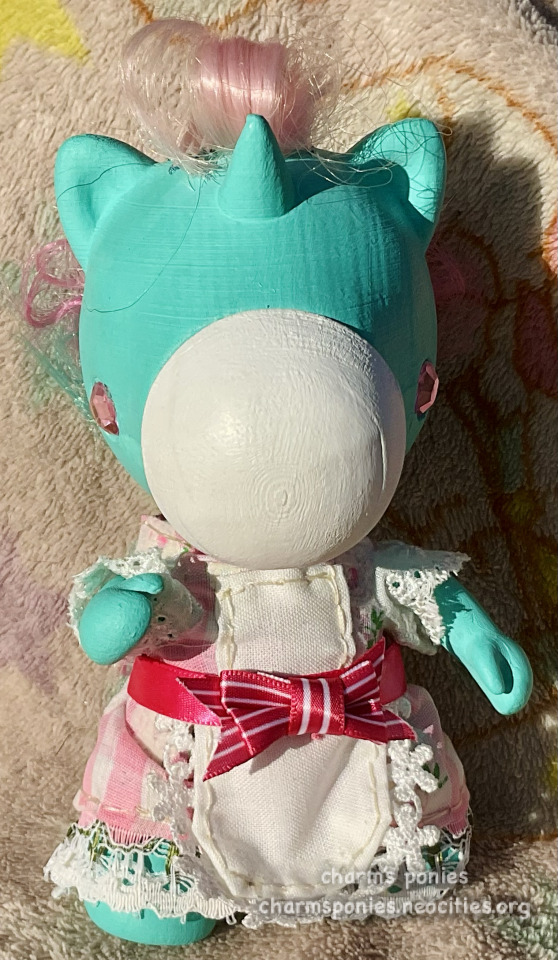
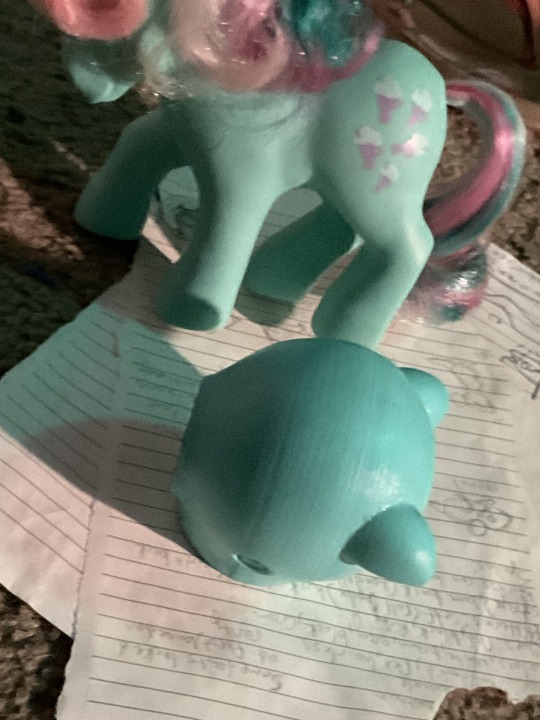
🩷💚 Custom Fizzy Takara Doll 💚🩷
Created using the 3d model made by Otteroflore!
Wip description and pics below the cut ^^
So I am a COMPLETE AND TOTAL NOOB when it comes to technology. and I made a lot of mistakes trying to print this Fizzy due to my own incompetence and also everyone online assuming you already kinda know something about 3d printing if you own a printer. We recieved a 3d printer as a gift and I knew Nothing about it so I reallly struggled trying to figure it out. Also my computer is ancient and had to download a like 5 year old out of date version of a 3d printing program (cura) to even get it to work. took an entire week and several failed tries T-T

FINALLY we got an attempt that was salvageable! And had to rip out all of the support beams from it. But even then there were some major mistakes:
It did not print hollow. Nobody online explained that if you want it to be hollow it wasn’t enough that the model itself had hollow parts, you have to turn off a hole setting in cura and mess with the infill or something
For some reason the bodies were Very Fucked Up? The middle and sides printed Weirdly to where, once the supports were all removed, They had no sides/shoulders. Wuh oh.


The way I combatted this was by taking extra filament plastic and a soldering iron gun to weald it on and do literal plastic surgery.


(A before and after) it looks like complete ass and is a little janky but. please be kind to her it was a major operation 😭😭😭
Then sanded things down a bit more. I know people say to sand it down until you can’t see the lines anymore but im an impatient motherfucker and only had a little bit of sandpaper so :P
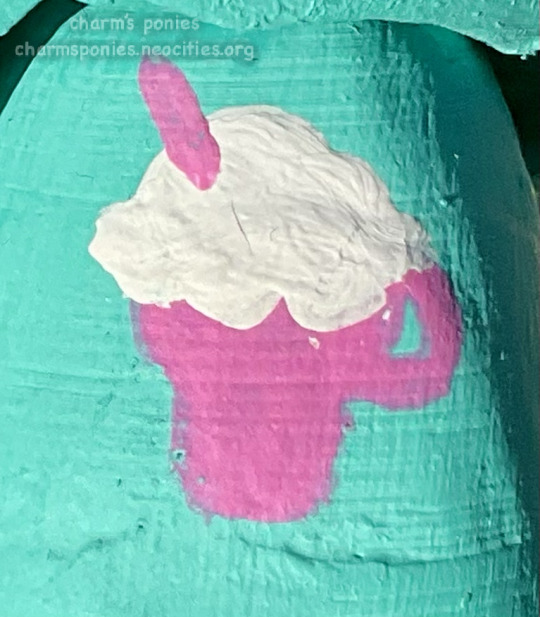
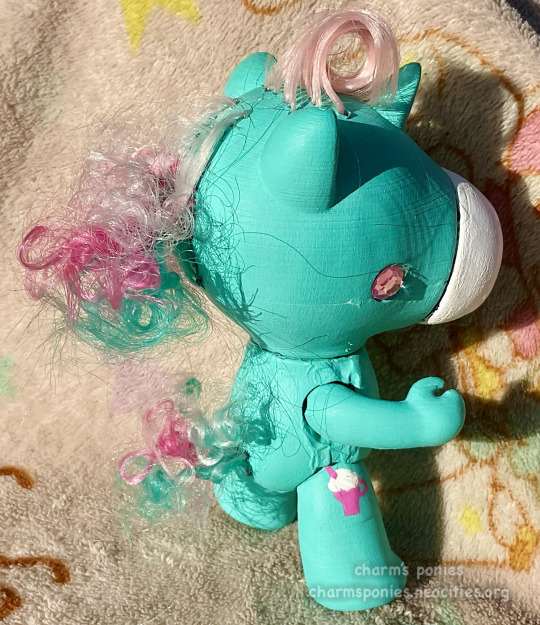
Then it was painting time! Used my own fizzy to color match, painted her green with a white nose and a milkshake cutiemark. I also glued stick on gems into her eye sockets


Then the hairing! Used a sewing needle heated up with a lighter to easily poke holes into her skull! The lovely user minticat on Mlptp provided great reference images of what a takara’s hair length and hair holes look like, so I did my best to mimic that

Her hair is the closest color matches for fizzy that Shimmerlocks had: Cotton Candy pink, Angel white, Heart Throb 2.0 pink and Gusty green. Now the head isnt actually all that hollow (I hollowed it out best I could with my soldering iron but still not the best) so I couldn’t use the usual hairing method where you punch the hair in and then glue it from inside. I realized I needed to attach glue to the hair itself and then get it into the holes.
At first I was too much of a scardey cat to use my actual hairing needle in fear it would break on the plastic, so I tried a very infuriating method of putting glue on hair strands and painstakingly trying to push them into the holes with a pin. This was awful. I quickly gave up, braved up and grabbed my rehairing needle. Punched the hair in after applying glue to the hair, and it worked out surprisingly well!


All that was left was to 1) String the doll using elastic bands to tie the legs and arms into place but still make sure they were moveable. 2) GENTLY trim, wash and style the hair (using buggys special method of getting tiny curly curls. 3) Figure out the head
I originally wanted to make a neckplug for her out of clay as you see here but it didnt work too well. The plastic of the doll is much harder than the clay and it kept breaking after trying to put the head on. So I accepted I would have to glue the head on in place (It cant turn, unlike the arms and legs 😔) You can also see i used some clay to patch up a crack in the plastic that formed (which I had to paint over again)


FINAL STEP was making the dress!!! I forgot to take ANY pictures of that ùwú Not that pictures would be useful to you guys as I kinds fuckin winged it and made up a pattern as I went. I think its adorable, but in the future I would make it a little bigger (the back doesnt fit quite right). Maybe if theres interest I’ll fix up the pattern so its better and share another doll dress tutorial with the class? 😳 sound off in the comments below haha
79 notes
·
View notes
Text
repcomm character's favorite parts of building armor in Costuming Club AU
Walon Vau- sanding. (the psychopath) he likes to get a printed item totally perfect and he has the patience to do it. because sanding a print is similar to torture because he has an eye for detail! he has the process down to an absolute science. resin coat, bondo thinned with acetone, automotive priner, wet sanding. but he won't do it for you- he's going to insist on teaching you his process. good luck.
Kal Skirata- weathering. it's one of the final steps in building a kit, and really pulls everything together and makes it look lived-in and real. and you get to be really creative with it- singe some things, build salt and hairspray texture into the paintjob, literally cut something up, physically damage a plate, make an unholy paint slurry to slap on and badly clean off, mist spraypaint, use bleach, emulate rust... you can really go ape shit. literally the opposite of sanding
Bardan Jusik- sewing! he's got like 3 machines- a regular heavy duty, one specifically for leather, and a serger. he loves the entire process, designing the item, modifying or drafting a pattern, selecting materials, mockups, cutting, construction, details. he loves seeing an item come together out of fabric. and then he chickens out on weathering and hands it to kal. he's made a lot of casual wear star wars clothes for himself!
Etain Tur-Mukan- WEAPONS. scratch built blasters, resin printed knives, large blaster assembly in a mix of printing and scratch building, spears, lightsabers, all of it. she collects greeblies and LOVES finding little bits to stick on a gun to really make it swarzy. great at painting weapons. can do some lights on her own but recruits help for anything involving coding.
Arligan Zey- actually isn't in the hobby for the making of the costumes, he's here for the community and trooping, mainly. does some basic sewing. mostly outsources/commissions things he doesn't want to do, but he enjoys going to armor parties and helping with whatever people need a hand with
Ordo Skirata- sintra fabrication. he's great at plate shaping. dude could make a goddamn bo katan chestplate out of sintra, do not ask me how. a huge proponent for scratch building as much as possible, prefers not to use 3d printed parts. for one thing you have to sand them, which only real freaks enjoy doing, they're also less durable. sintra all the way.
Mereel Skirata- 3d printing. it's incredible all the things you can make! maintaining a machine is a hobby all of it's own! 3d printing entering the hobbyist realm opened huge possibilities! and if you hate sanding, you should hear about resin printing.
Jaing Skirata- coding and electronics. he helps etain with finishing touches on blasters, such as sound effects and really fancy lights. all his shit has light effects in it, small coded screens that rotate through pictures and text. the amount of shit he can cram in a helmet is truly incredible. he's got fans, hearing assist, voice amp, and lights in there. has also made a lot of lightsabers
A'den Skirata- helmets. specifically helmets. he's done a lot, and sells them. he has several molds and has made his own helmet model. enjoys finishing and painting them, sometimes takes commissions for fully finished helmets.
Atin Skirata- coding and robotics. likes moving parts. because of safety rules prohibiting motorized weapons in armor, he mainly builds droids. does whistling birds and moving rangefinders and the like, but really enjoys building astromechs.
#repcomm#republic commando#modern au#costuming au#costuming club au#walon vau#kal skirata#bardan jusik#etain tur mukan#arligan zey#ordo skirata#mereel skirata#jaing skirata#aden skirata#atin skirata#yes i left out a bunch of characters#sorry prudii and kom'rk#im tired of having this in my drafts and im too sleepy to do more#might add on later#verp hc
26 notes
·
View notes
Text
I have today and tomorrow off from work and I’m going to work on a sewing project! Specifically I’m going to try to make a plushie of my character Redburn.

My sewing machine
I asked @kaleidoru if they’d be up to making a Redburn model in Blender as an art trade. I used the 3D model on the site Plushify, which takes models and turns them into patterns.

Plushify wasn’t foolproof - it had a hard time with the head shape and gave me 2 different patterns for it. I have enough fabric that I think I can make both and see which looks nicer. I also made the fire patterns by hand so hopefully they work!
30 notes
·
View notes
Note
Okay so this is technically it’s about patterns but more like. Asking for advice about patterning? But no need to answer if you feel like it’s crossing that line!
So when you start a Pokémon (say Pikachu or Eternatus) do you just blindly go at it? Or do you break down each element, piece by piece (say, would you do Pikachu’s red cheeks separately and then glue or sew them on, or would you switch yarn in the middle of the face to do it in one go)? Do you do a few practice/trial runs first with mystery yarn and write down what works and what doesn’t, or is it like intuitive at this point?
(Sorry if this does cross the no-patterning line!!)
I've talked about this before in other asks but I don't remember how I tagged it lol. There's also some stuff about my process in my crochet tips tag.
I wouldn't say I blindly go at it because yeah a lot of it is intuitive at this point. I still do break down the parts for each Pokemon mentally, but more in terms of shape and color (so Pikachu was like, 1. head-body, 2. set of feet, 3. set of arms, 4. set of ears, 5, tail. Colors yellow, black, red.) As much as I can, I like to make details in line with the normal crocheting, so in the Pikachu example, I would just switch between yellow and red yarn while crocheting the head instead of making the cheeks separately. I will never glue pieces on, that honestly sounds insane to me. I might embroider some details if that's more cost effective in terms of time, or if the details are too fine to portray as well with just color switching. If the specific part is something that bulges or distinctly "added on" (like the red crystals on a Gigalith), then I'll either make those pieces separately and sew, or crochet them on top of the main piece. I don't do practice/trial runs, I just go and write down what I do every row or few, frogging and adjusting as needed. A lot of it is very intuitive for me now.
Closest I can think to describe how I do these is like, back in the days of dial up internet when an image would load from the top down, line by line. It's like that but in 3D. Like if you built a hollow lego structure from the top down. Like reverse 3D printing. I look at the 3D model in the pokedex as reference, identify the major shapes and the colors, then make each shape by working at it from one side and working at it in a spiral, switching colors as I go.
25 notes
·
View notes
Text
Plushify is awesome! Use it in conjunction with Blender (free) to edit models if you need to!
I love accessible tools to make patterning easier and I will always celebrate them! 💖
THERE IS. a website. that takes 3D models with seams and pulls it apart to make a plushie pattern and informs you where things need to be edited or darts added for the best effect. and then it lets you scale it and print off your pattern. and I want to lose my MIND because I've lost steam halfway through so many plushie patterns in the mind numbing in betweens of unwrapping, copying all of the meshes down as pieces, transferring those, testing them, then finding obvious tweaks... like... this would eradicate 99% of my trial and error workflow for 3D models to plushies & MAYBE ILL FINALLY FINISH SCREAMTAIL...
91K notes
·
View notes
Text
They were left in Sparta (Lysandra and Calliope OOAK, part 2)
What's going on here?
Part 1 - Heads and bodies
You saw me straggled with Kratos!
You saw me wasted with Ares!
What can break me after all armor, weapons and warfare attributes I made!

Only women clothing..
I can embroider, but I absolutely can't sew. My brain is fully against this activity. I nearly fall asleep with a needle in my hand. Maybe it is different, when you use sewing machine, but i don't have one, so I had no choice.
This part will cover my tries to make dresses for Kratos's wife and daughter from the rectangle pieces of fabric, avoiding sewing like a plague.
____________
Preparation process
Must be said. I didn't even try to follow all cultural rules in reproducing these dresses in real life, because in the first trilogy we have a very fantactic version of Hellada after all. But I looked at concept arts and screenshots for hours deciding, what should I do to not feel myself like a fool.
I've already mentioned that before, but most of the time you just sit and brainstorm how to adapt conception of the clothes you see to the real life.
I want to be canon, but I also want to make my dolls feels right. This is actually just a continuation of my monologue about "searching the right fabrics which fits an ancient warrior". But things became more complicated here. I mean, at least Kratos wears short chiton under his armor. And Lysandra??
Don't fight me about it, I think we all can agree that Lysandra's dress aged not very well.. (Calliope has better situation..). I like the idea that Lysandra's dress made from two separate pieces, but it has very european vibe if said it straightly. I saw a lot of arts here on tumblr, where artists draw her wearing a classic chiton, so that means I am not alone here.

____________
Lysandra As I said before in the post about Kratos's armor, making dolls of ancient people with ascetic culture bans me from using fabrics which feels too modern. Both blue and white fabrics should have right and different! texture comparing to each other (underwear shouldn't be too rough), right thickness (for the natural folds at 1/6 scale), right color (close to something "basic").
Good points! - I thought and started to make sandals, because it is easier and needs only leather and threads.
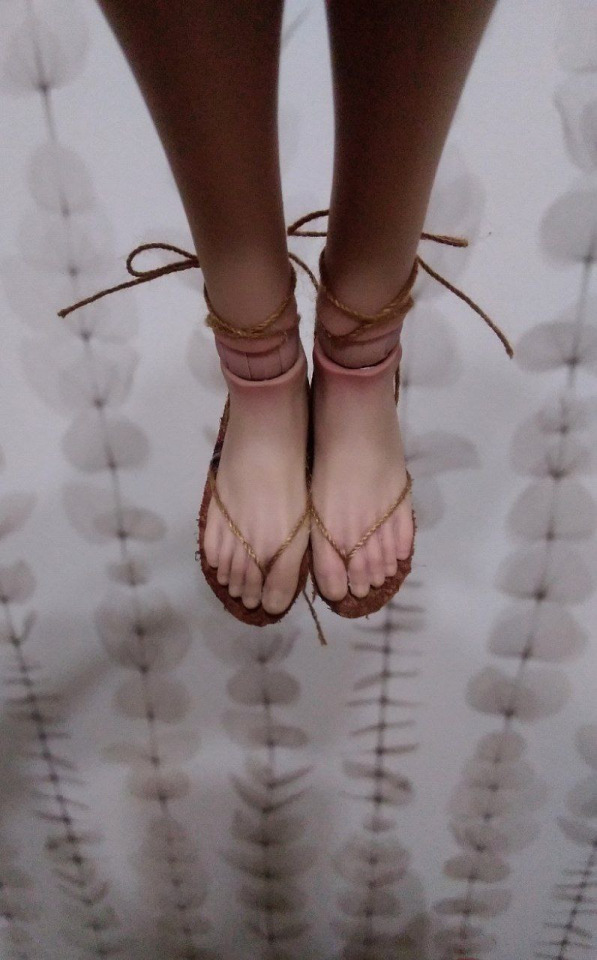

Okay, it was fast.. Returning to the fabrics...
For the white dress I found very very thin cotton cambric with a slight crush effect. After cutting a rectangular piece (I know it is not a right way, but I can live with it), I cut a hole for the neck and hemmed the edges of the collar.


For the blue dress I found and chose bright blue cotton gauze. Pattern is almost the same. Rectangular piece with a neck hole and front slit at hem.
First try with 90° angled hem "tails". (I ruined collar, wap wap wap..)
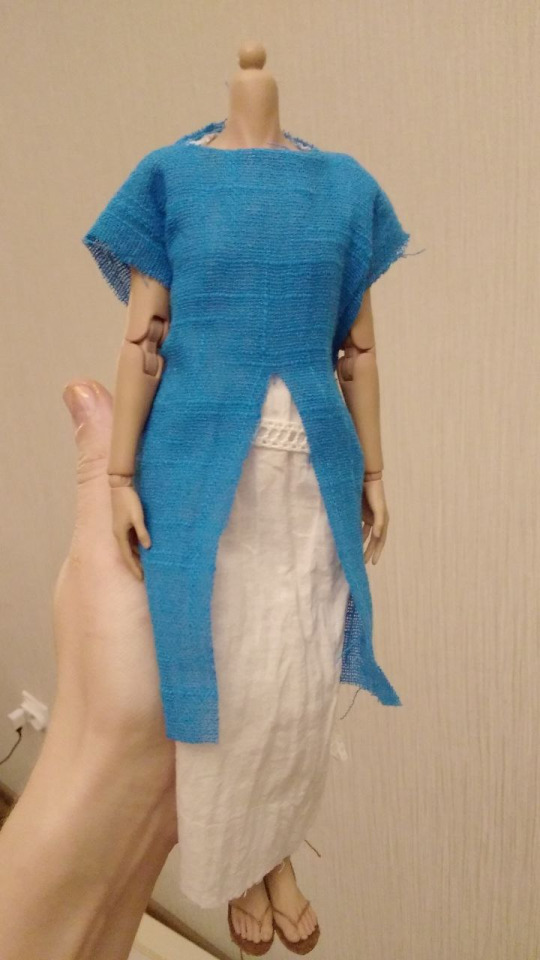
Second try with with more longer 60° angled hem "tails". And simple embroidery over the chest, which I made in between of cursing.


After that I drew claws-like patterns and other lines with the silver acrilic paint.

For the finish touches we need a hairband. And I'll say straightly.
There is absolutely no apportunity to make it the same as in the game. I tested silk ribbons and many variants of thin fabric, but it just doesn't lay right over the forehead and hair and looks very awkward and heavy. That's the problems you face when you try to recreate 3d models in reality..
Soooooo I made a little non-cannon variant of this hairband using blue threads, which turned out pretty good I think. I was not able to drew pattern on it (I tried and ruined the first try), but for the more fancy look I added a small dropping tassels behind her ears (uwu).
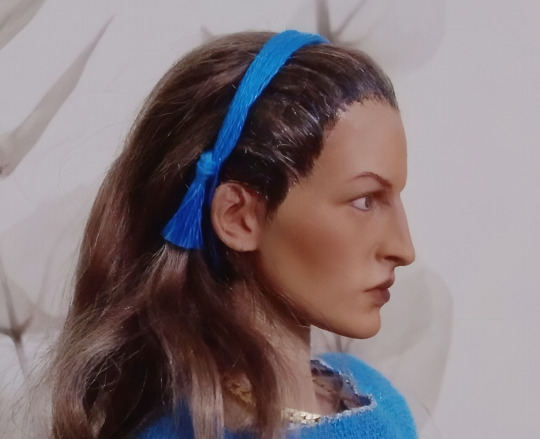
Other uwu-touches that nobody asked is her juwelry. Her significant golden pendant, Kratos's gift, which I don't like in the game, but like it in real life. Made from the things for the nail design. And a silver omega ring from GOW Ascension, which is not canon for GOW1, but I found perfect little blue marbles!!


____________
Calliope
Let I just make a scream and you believe me that I went absolutely insane with her tiny dresses.
You need to find blue fabric, but not the same blue (warm torquoise?) and much more thinner. Because Calliope's doll body is very tiny and fabric still should make folds more or less naturally. Okay, you found a nice thin cotton with embroidery. It has right thickness and feelings, but it is not blue enough and you are already too insane to search for more. But not too much! because you deside to tone fabric by yourself.


NO. It can't be too much efforts for the little Calliope.
White cotton cambric as an underneath dress and a two-pieced dress from above. Long enough to hide her tiny bare feet (uwu).


Oh, and a hairband. __________________________ And that's all I guess. My main purpose during making these two was 'separating' them. Because in GOW1 they are not really a characters. They are 'wife and child', one entity Kratos lost. They even have the same blue color pallete like clones.
I am happy that they turned out similar in some ways, but at the same time pretty different.


Calliope in process really received vibes of her father as I wish. She is a little strange girl and likeness to her father makes her face looks a bit awkward. But her light aquatic color and stripes feels very cheerful and playful. Same as Calliope herself.


Lysandra's blue color is more haunting, bright and strong. Has more complicated hue. Straight silhouette, lack of decor and rough texture complicates her. She is a spartan like her husband. Very disciplined, knows her role, but not so rigid as Kratos. And same as him deeply worried about people she loves.


If you think this the end of this chapter of my doll customizing, you are wrong! We will have a bonus level with other canon stuff which Kratos needs AND more family photos! Thank you for your support in comments and PM Stay tuned! seeeee ya

#god of war#gow#kratos#upn the sky handycraft#action figures#ooak doll#lysandra god of war#gow calliope#calliope#lysandra#gow kratos
20 notes
·
View notes
Text
Mr. Reachy Pattern

Please ignore how poor my execution is, I promise the pattern is better than it looks here
Notes:
First of all, did you know that giraffes’ horn thingies are called ossicones? The more you know..
Any unmarked sides on a piece of the pattern either attach to its mirrored piece or wrap around to attach to itself. Hopefully it’s self explanatory which of these is the case. The guide for spots is not really exact and they don’t always line up or look good (especially if you sew like me and approximate everything). If you have access to an actual spotted fabric, I’d use that, provided you also have a solid version of the colour for the nose. For the best results you should use fabrics that don’t fray and don’t stretch too much. The mane/hair bits aren’t included in the pattern. While I used two layers of fringe, I’d recommend using yarn cuz it’ll sit more nicely and look more like the actual hair. If you sew the seams exactly according to the pattern (maybe minus the ossicones and tail), it would hypothetically look really good I swear!!
Made by altering a pattern created with plushify
(I highly recommend using this if you have any experience 3D modelling it was really cool actually)
Mr. Reachy is not really drawn consistently throughout the show, so I kind of tried to average out all of its appearances. I put the mouth on the right side of the face, but it doesn’t really have a consistent position. Mine’s mouth also doesn’t extend onto the front of the face for simplicity’s sake.

(Observe the inconsistencies and validate my interpretation!!!)
Now you don’t need those old shrinky dinks

If you do use this pattern, please link here if anyone asks about it, and show me the result if you like
If you have any questions feel free to ask
#the venture bros#venture bros#mr reachy#plushies#plush toy#plush animals#stuffed animals#sewing#sewing patterns#giraffe plush#stuffed giraffe#plush pattern#giraffe#venture bros fanart#dean venture#(tangentially)#crafts#non-drawing art#my art
70 notes
·
View notes