#Adobe Acrobat Print to PDF
Explore tagged Tumblr posts
Visit Tumblr Blog
Explore Tumblr blogs with no restrictions, modern design and the best experience.
Last Seen Tumblr Blogs


Fun Fact
The “We are the 99%” Tumblr blog became the slogan for the Occupy Wall Street movement.
Text
Canva PDFs are not accessible
Explore the challenges of Canva PDFs being inaccessible to those with disabilities, and discover the secret tip to make them accessible. Watch step-by-step video guides on how to tackle common issues, such as reading order and tagging.
This post aims to explore how Canva PDFs are not accessible to people with disabilities. It seems like such a basic need at this point for any modern website to allow for exporting with a structure in place. This simply is not the case for Canva PDFs. Would you rather just have me make your Canva doc exports accessible for you? Get accessible Documents Now Video Overview of the Problem The…
View On WordPress
#Accessibility Compliance#Accessible PDF Solutions#Adobe Acrobat Print to PDF#Alternative Text for Images#Assistive Technologies#Canva PDF Accessibility#Educational Barriers#Inaccessible PDF Consequences#Legal Requirements for Accessibility#Navigation Challenges in PDFs#PDF Export Issues#PDF Remediation#PDF Tagging Problems#reading order tool#Screen Reader Incompatibility#Video Guide for PDF Accessibility#Visual Impairment#Workplace Inequity
0 notes
Video
youtube
How to Lock Print and Edit PDF file using Adobe Acrobat Pro DC
0 notes
Text
Fanbinding for absolute beginners - PART 1
There's a fanfic you love so much you'd like to have a physical copy of it? But you don't know how to make it? You've come to the right place! I'm a teacher and I've done this with my pupils (11 year olds), so you can do it, too!

To preface this, obviously this is only one of many methods to bind a book, and it's not perfect, but it's easy enough for my pupils to do it, so I thought I'd share how I do it, to hopefully help people who want to bind fanfics but have never done it before! :)
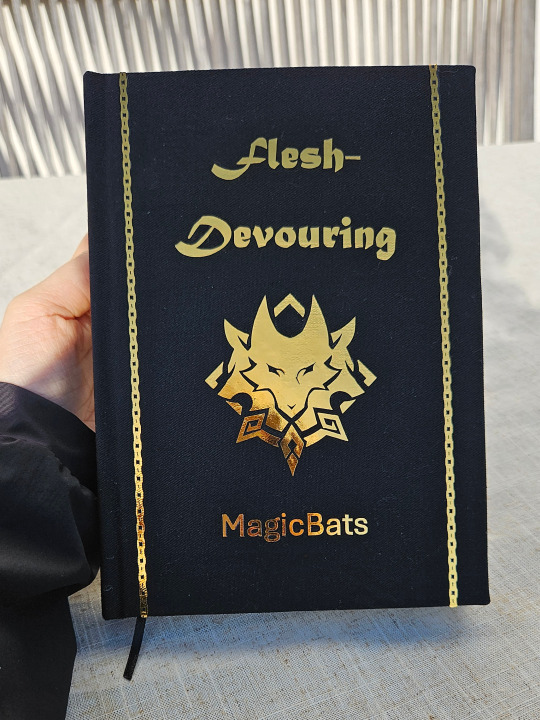
Here are some examples of what my books look like when done:


Part 1: Preparations on the PC and printing
To start off, a book is made up of several signatures, which is just a bunch of pages folded in the middle. I've found the best signatures for this method are made of four A4 (or letter format) sheets of paper, folded, so it makes 16 pages in total. But signatures of 5 or 6 sheets work well too!
That means you need to prepare your pdf to have a page count that is dividable by 16 (4 sheet signatures), 20 (5 sheet signatures) or 24 (6 sheet signatures). I usually just add blank pages to the front and back of the book until I reach a usable page count. Also check that your chapters start at the page you want (odd pages are on the right, even ones are on the left).
If that is done, you can get to printing. I print signature per signature, and use Adobe Acrobat for that. Apparently, the free trial version can do this too, so no need to pay for it if you don't have it!
The fanfic I'm printing has 320 pages, so I'm gonna print 20 signature made of 4 sheets (16 pages). I write down which pages make the signature so I can them just type them in:
Signature 1 consists of pages 1 - 16
Signature 2: 17 - 32
Signature 3: 33 - 48
Signature 4: 49 - 64
...
Signature 20: 305 - 320
Now, printing works like this:
In Adobe Acrobat, open your pdf and click on print. In the printing options, you first chose the "Booklet" option and then type in the pages for the signature you want to print (e.g. 1-16). Hit print and you'll have your first signature, which you can then fold in the middle! Repeat this step for all the signatures until you've printed the whole book. Done!
If you've got any questions or need clarification an anything, feel free to ask!
(This is just a screenshot from the web, so the numbers don't match, but my Adobe Acrobat is completely in German, so it would probably be even less helpful!)
About the paper: I use normal printing paper in a bit of a yellowish colour (looks better than the sharp white of normal paper). Printing paper has, however, the wrong paper grain, so if you have access to paper with grain in the other direction, take that instead! The results with printing paper are okayish, with maybe a few wrinkles, but nothing too bad (in my opinion, haha).
The parts of this tutorial:
Part 1
Part 2
Part 3
405 notes
·
View notes
Text
HI!!! After finishing Disco Elysium I wanted to read Sacred and Terrible Air, but there were two issues:
1. It’s not officially released in English
2. I don’t like staring at pdfs!
So I did what any sane person would do. That is take three days of my life printing and binding it.
TRANSLATION (“thank you Group Ibex” we all say in unison!):
PROCESS PICS:
I apologize in advance for anyone who has experience in this sort of thing this is so botched.
I have NEVER done anything like this before, I don’t even read books on my own volition, but if the Disco fixation wants me to learn how to sew and bookbind I’ll do that.
Four of the signatures above. There were nine total, eight of them with 8 sheets/32 pages and the last was five sheets I think. Threw the pdf into adobe acrobat and went straight to printing with those settings and the “booklet” option enabled.
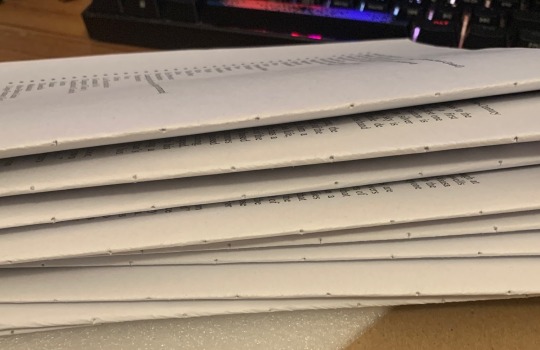
Pricked holes through each signature! Used thumbtacks and a piece of foam I scavenged from my room, worked out great. It’s probably also worth mentioning I do not have a bone folder, book press, or any of the other fancy schmancy bookbinding tools. Flattened the pages with a pencil and pressed with D&D books…
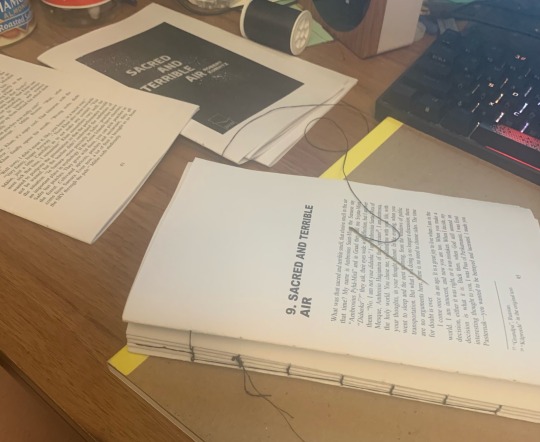
SEWING TIME. I have never sewn in my life. My success in this regard can be majorly attributed to Sea Lemon on youtube, particularly this tutorial:
youtube
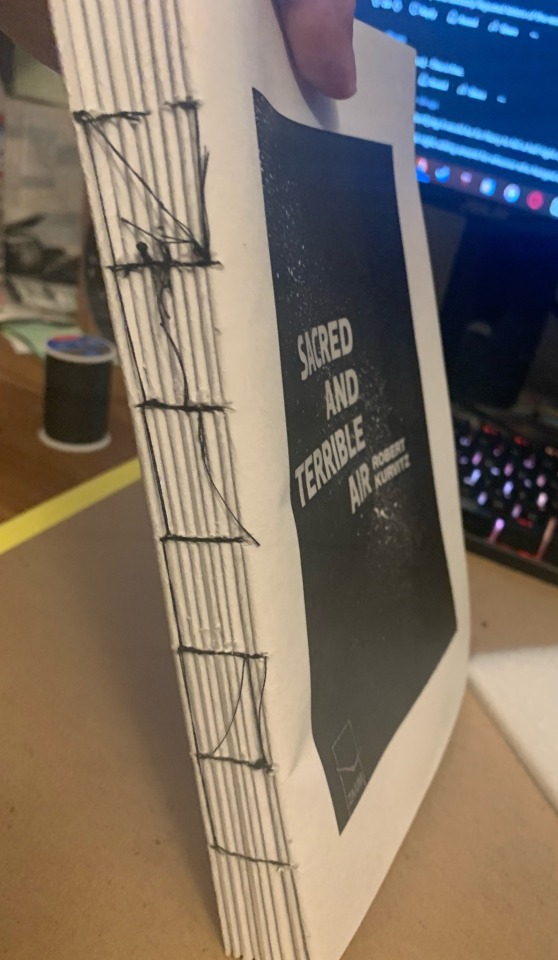
The process from printing to finishing sewing the signatures took ~8 hours. Now we hit our first roadblock, I had no glue for the spine! After going to sleep and waiting what felt like ages (literally 10 hours or so) before I was free to visit a craft store, I tried to find PVA glue because that’s what you’re supposed to use I think?? Yeah. They were out of PVA glue and my impatient ass got mod podge.
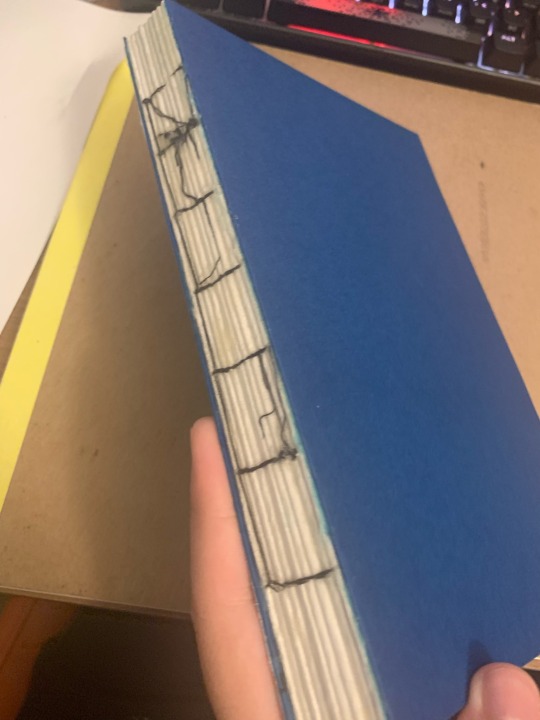
‘Tis glued! As you can see I added cardstock to the ends. Joyous day.
Also, you see that sketchbook in the pic? Yeah? You see that lovely cardboard?
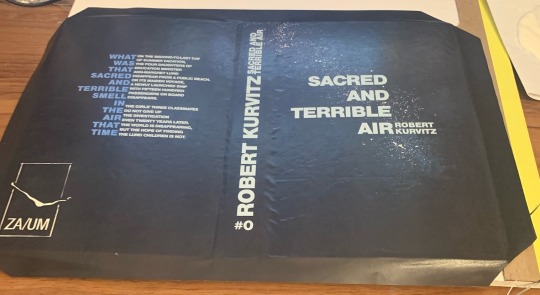
It is now the cover. Rest in piss bristol sketchpad backing.
———
EDIT: I see a bunch of people want to attempt this so here’s a video on how to make the hardcover: https://youtu.be/Av_rU-yOPd4?si=7T5zgVJGAfPFBxn-
youtube
I didn’t use any measurements or advice from it but it’s a good reference for when it comes to assembling the cover from ~3:50 onwards. The boards are same size as your text block pages and spine, I think I made the cover width a bit longer just in case it doesn’t cover the text block though. Do not do this with the spine, I regret it.
And note, this is NOT a tutorial, it is the process of someone who got a bit too silly and decided to bind a book, obviously do your own research lol. Don’t be afraid to try it though, it’s surprisingly simple!
———
… So, now that’s done! I swore to myself I wouldn’t start reading SATA/PJÕL until I finished this project completely, meaning I’ll be doing that now yippee :]
#sacred and terrible air#püha ja õudne lõhn#disco elysium#pjõl#i���m normal#proud of this despite it being pretty scuffed#uhh yeah#the spine is a bit too wide but who cares at this point HAHA#my art#i guess?? my creation??
336 notes
·
View notes
Text

Zelda zine update:
Changed the cover...again, it felt off so the whole theme has been reworked. As sneak peek here is the back cover yay! Hope you like it!
All the archives have been checked and sort of ready for printing, the issue has been asembling them. So if anyone knows an alternative to Adobe Acrobat to create pdfs, asign color profiles, and control dpi please share. It would be much appreciated
66 notes
·
View notes
Note
I hope you don't mind me asking. But how do you create PDF files that you can search through them? Your method is so unique, so I'm curious.
Hi anon!
After I scan a book and have a PDF saved, it can’t be searched. It has to be edited and made that way. So I open it up in Adobe Acrobat. There’s a tool called “Optimize PDF” which has a lot of different features you can fine tune the settings of but essentially what it does is:
Straighten out the text to be perfectly horizontal and level (I try to scan two pages at a time then crop, so raw scans can be a little wonky)
Recognizes the text on the page (which allows key word search, highlighting, commenting, everything you can do with a word document)
Reduces file size (I scan at 300 or 400 dpi, which makes a sharp image, but a huge file, so this compresses it to be easier to store and share)
I find this aspect of scanning to be very valuable, personally, as it can make researching and referring back much easier. Even though I’ve already read these books, searching through for a specific scene is vastly more efficient when you can pinpoint the exact sentence based on a remembered phrase. It’s also nice to be able to highlight those to emphasize a point. Furthermore by reducing the file size it’s much easier to share the information with others. I’m able to attach files to messages without going over limits and I can open the books right from the google drive mobile app wherever I go.
Like if I’m out and about wondering just how much Cherith Baldry loves Kay, I can crack open Exiled From Camelot and do this
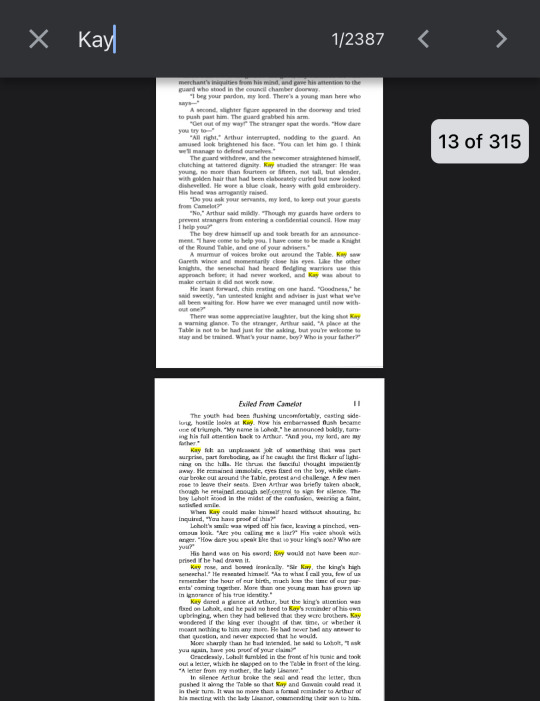
2,387 mentions of Kay? Yeah. He’s kind of a big deal. ;^)
But real talk accessibility is an important aspect of my archival work. I try to provide the best version of a scan I can with my limited resources because I don’t know that the book will survive otherwise. Ruth PM Lehmann has passed away, so scanning Blessed Bastard, which only had a limited printing to begin with and now lacks a beneficiary, felt significant to me. The same goes for Peter Hanratty’s The Book of Mordred, which is an English translation of a German story and hasn’t been in print for decades. As for medlit, La Tavola Ritonda and my janky scanner tested my will to live but it ended up being so worth it to see everyone’s thoughts on it! I couldn’t find PDFs of these texts available anywhere, so I wanted to make sure they were preserved in the most accessible state possible for everyone to enjoy.
Anyway I hope that answers your question. I’ve got two books on the way I’m going to scan next and looking forward to sharing! :^) Take care.<3
#arthurian preservation project#exiled from camelot#cherith baldry#blessed bastard#ruth pm lehmann#the book of mordred#peter hanratty#la tavola ritonda#arthurian legend#ask#anonymous
34 notes
·
View notes
Text

I had a bunch of people reach out to me about my PHF hardcover so I made a tutorial for y'all 🫡💕
As for the actual printing of the book and how I put it all together, I'm just gonna share some links and examples that I found helpful under the cut. I'm not an expert but it was fun so pls go have fun and if you end up making your own pls share!!
1. Purple Haze Feedback PDF
2. Instructions for printing booklets using Adobe Acrobat (fuuuuck Adobe, pirate that shit. I'm only sharing this bc my workplace has Adobe on our desktop computers so I printed my copy of PHF using the communal work copy machine lmaooo)
Video with instructions for printer settings/how to fold into a booklet.
If you don't have access to a printer (I don't outside of work) you can utilize your local library or office supply store and they'll help u print a booklet from a PDF.
Once printed, you should be able to fold all the pages in half and they'll be chronological. The last page you printed should fold in to be the center and the first page you printed should be on the outside, if that makes sense.

3. When you have your pages printed and folded, you can choose your binding. I chose this method because I had the materials, and it was pretty easy.
That's pretty much it I think!! If I missed anything or u have any questions just lmk I got u 👍 anyway go forth and make Fugo proud
#jojos bizarre adventure#jjba#purple haze feedback#i fidnt feel comfy making and selling copies so instead u get knowledge....piracy....90s early 2000s teenager hobbies
12 notes
·
View notes
Note
Hey violet!
What’s something you want to share with your audience that you couldn’t fit into TEG? Like a scene or some world building tidbit, etc :)
I wish you a wonderful day!!!
hey anon!
oooh this is always a fun question, but I can't think of anything in the moment. but! I hope you'll indulge me in this, something else I've been meaning to share for a while but hadn't taken the time to take pics yet
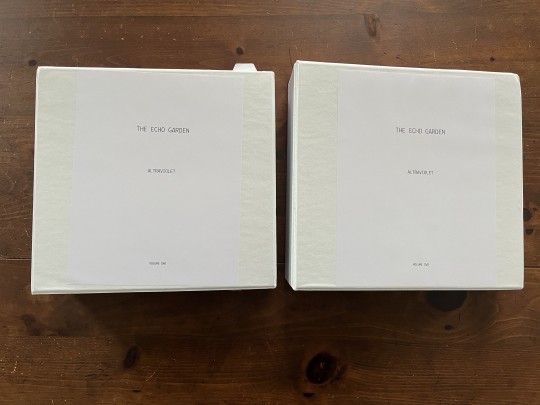
last year I printed all of TEG so I could edit it. I find editing a zillion times easier on paper than on the screen, especially because my free, ancient word processor doesn't play nice with AO3, so ALL OF TEG was hand typed with the html. so like every time you saw italics or bold, I hand wrote <i>the coding</i> in there. ANYWAY
I typeset it and went to interpolate (??? I forgot the word, but you have to order the pages a certain way in the PDF so the printer prints them correctly in folios) it in Adobe Acrobat (I think) but the function was broken Dx I haven't tested it since then, but I was VERY annoyed to find that was the case, cuz it meant instead of cutting TEG's ~1000 pages down by four to print, I could only cut down by two
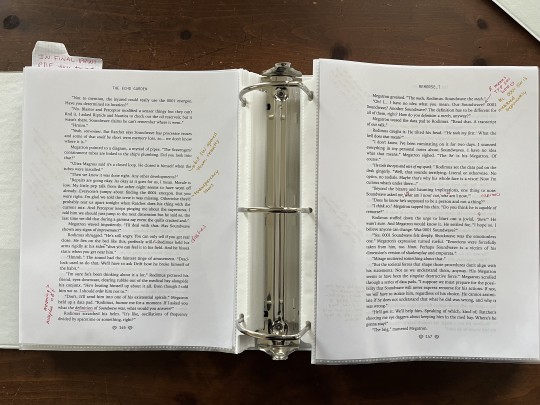
so I spent about 3 days printing the whole damn thing out. after editing, I put the pages in acid protected plastic sheets and put 'em into binders:
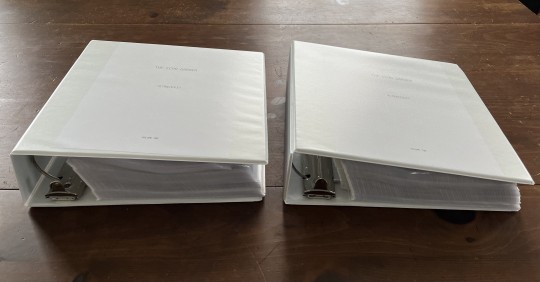
I went through the whole thing with a red pen, making as many corrections as I could find. I did a post about my most common mistakes (please learn from my mistakes!) but here's a quick recap of the major findings:
"if... then" NOT "if... than"
pouring vs poring -> "poring over data pads" is correct
reticules vs reticles -> "reticles" are what we want, "reticules" are little purses
reign vs rein -> "rein in emotion" is the correct one
how em dashes work
capitalizing in quotations
Then after all that was done, I went back through with gold pen and added little "fun facts" and bits of info because I thought maybe someday I could sell this massive tome, or use it for a raffle for charity, or something, and my author notes would add some interest and value :)
So for example in the above picture, the gold tid bits are as follows:
text: "Ultra Magnus said it's a closed loop. He closed it himself when the tubes were installed."
note: but Soundwave opened them recently (this was a note to myself- this line is to throw off the reader re: how Soundwave siphoned away the 0001 energon in the Scavengers' tubes)
text: I'm glad we told the crew it was missing. Otherwise they'd probably tear us apart tonight when Ratchet does his thing with the current mix.
note: transparency laws (here Rodimus is referring to an off-page meeting in which the leadership team told the crew the 0001 energon was missing. they did this because of the transparency laws they put in place)
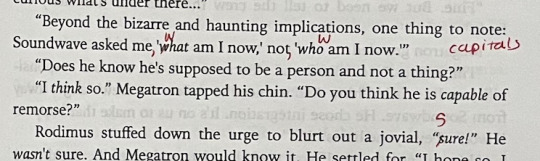
text:
Megatron: "If I asked you what the definition of Soundwave was, what would you answer?"
Rodimus: "I… I have no idea what you mean. Our Soundwave? 0001 Soundwave? Another Soundwave?"
note: R means TFP SW here :D b/c 0001 SW is mentioned separately (when Rodimus says "Our Soundwave?" he means the TFP Soundwave that has boarded the ship)
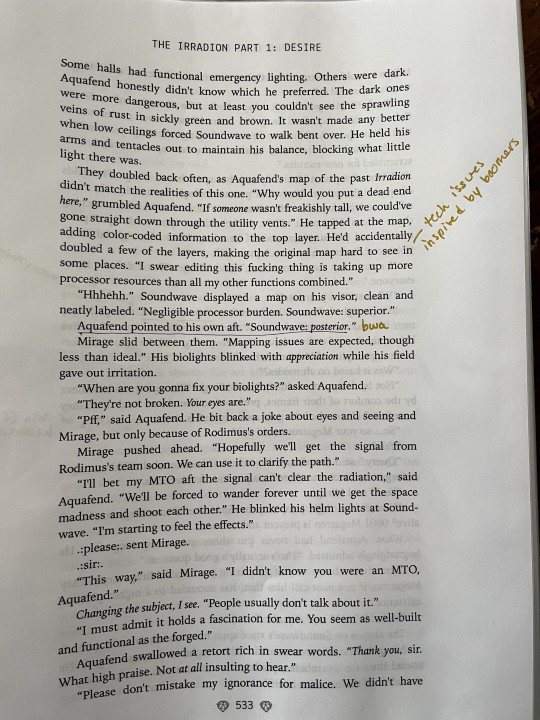
text: (Aquafend had) accidentally doubled a few of the layers, making the original map hard to see in some places.
note: tech issues inspired by boomers
text: Aquafend pointed to his own aft. "Soundwave: posterior."
note: bwa (I think this line is SO funny haha)
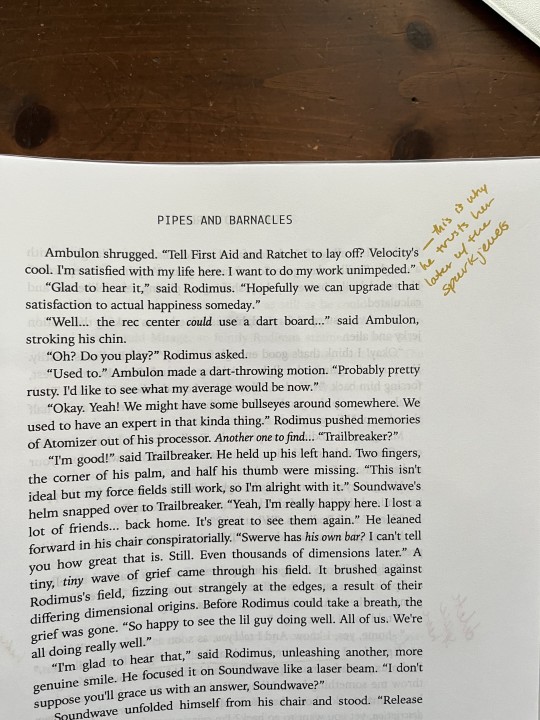
text: Ambulon shrugged. "Tell First Aid and Ratchet to lay off? Velocity's cool. I'm satisfied with my life here. I want to do my work unimpeded."
note: this is why he trusts her later with the spark jewels (by this I mean, it's very small and in the background, but Ambulon always defaults to Velocity as advisor or company over the other medics)
-
I did write a bunch of notes, but not on every page. I wanted to get going with making a typeset ebook available for folks (there's a link on AO3), and I do have the typeset PDF for anyone who wants to ficbind! I don't post that publicly, but I do give it out via email. Just email if you'd like to ficbind =)
So yeah! Right now these binders are just leaning against my bookshelf (in summer I use them to brace the door through the ever-present air pressure changes of a/c, lol). If I ever were to sell or give these away, I'd definitely go through and put notes on as many pages as possible. They're not on every page, but a good amount.
Thanks for the fun ask! =)
18 notes
·
View notes
Text
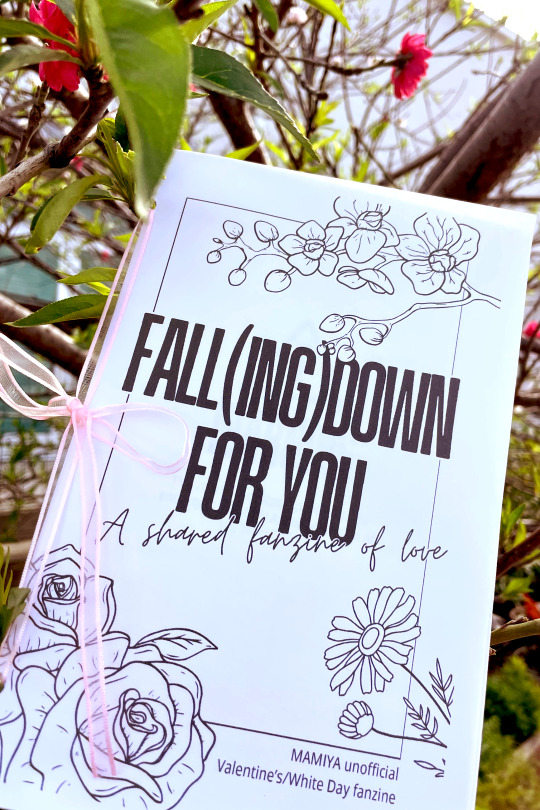
💝💕💘 [ FALL(ING)DOWN FOR YOU ] 💖💌💞
Happy White Day! To celebrate, here's a Valentine's/White Day-themed collaborative MAMIYA fanzine!!
Featuring lovey-dovey art & fic from 12 creators!
Read it digitally or print it out yourself!
⚠️ DDD spoilers
Get it here! ➡️ Google Drive (pdf)
Directions for printing/binding + contributor credits below!
PRINTING
This zine was designed for letter paper, but I think it should print fine on A4 (I haven't tested it, sorry). If it helps, each individual page is 5.5 in x 8.5 in (140 mm x 216 mm).
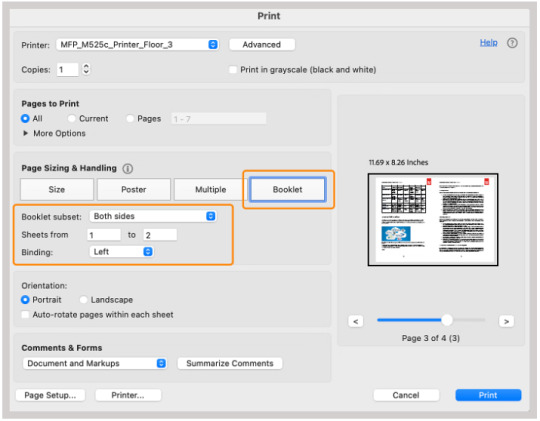
We're going to print using the Booklet setting, which requires Adobe Acrobat or Foxit to use. Both programs can be downloaded for free. (I'm using Acrobat for this tutorial, but Foxit works the same way)
To print:
Download the zine file to your computer and open it in Acrobat/Foxit.
Open up the print menu using ctrl+P or by finding the printer icon near the top of the window. The print menu looks like this:
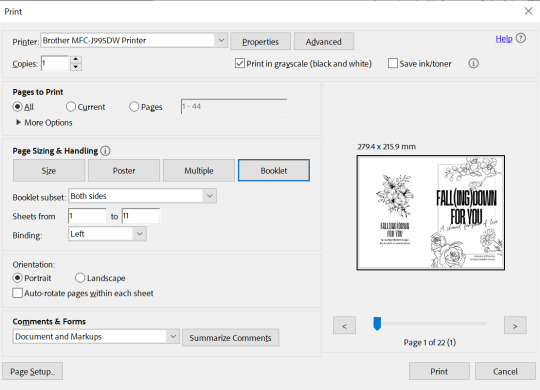
3. Select your printer from the "Printer" menu, then select the "Booklet" option under Page Sizing and Handling, as shown in the image above. You can also check the box near the top of the window to "Print in grayscale (black and white)" like I'm doing, or leave it unchecked to print in color.
4. Select the "Print" button to print.
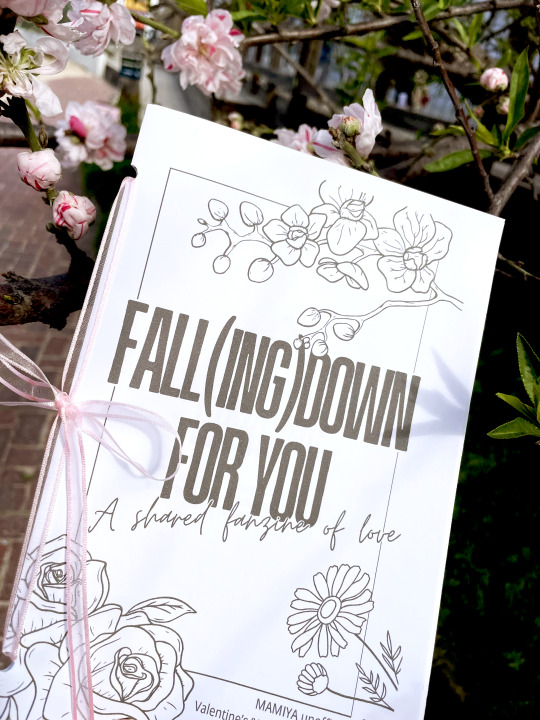
BINDING
Honestly, you can bind however you want! I chose something fancy this time (because I'm trying to show off for photos), but normally I go for something simpler. Here are some methods I've used to bind zines/booklets before:
Three-hole ribbon binding (this is the method I used here)
Stapling
Pamphlet binding/saddle stitching
Methods I haven't tried but would probably work fine:
Another three-hole ribbon binding method + ring binding
Perfect binding
Machine sewing
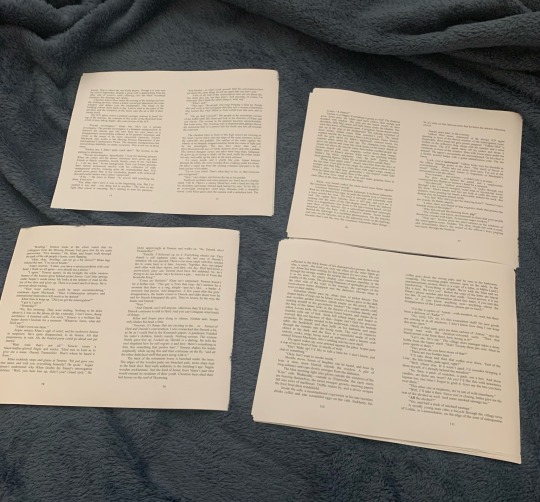
Regardless of which method you use, I always recommend pre-folding all the pages before doing any binding. I usually try to fold like 1-3 sheets at a time--enough pages that it doesn't take forever to fold all of them, but not too many pages because I want to ensure each sheet gets creased really well.
Watch out for page order, by the way, because these pages aren't numbered!!
Depending on how you've bound it, it should come out looking something like this. Isn't it so cute??
Feel free to contact me if you need help!
CONTRIBUTORS
Thank you to everyone who participated in this zine!
Gizzia (twitter @ GizziaAobara) Nana (instagram @ honeyqtea) Nikki Bane (twitter @ Ghosty_Bane) Kiwi (@kiwifie) WovenSnow Easter Cha (me) madhu (@bunycube) Rionne (twitter @ dawnspring45) Mio (twitter @ nifocide) Alle (@tindoiimu)
It was my first time organizing something like this, so I'm really glad it turned out so great!! You guys are all so talented and awesome and I love what we've made!!!!!!
18 notes
·
View notes
Text
After cursing my household's new printer for weeks for failing 9 out of 10 times, I found the culprit. The computer has an outdated version of Adobe Acrobat. Printing with any up to date pdf reader solves the issue.
Printers are still very much a scam though. This one sounds like it's about to fall apart everytime it prints, from how flimsy it is, and it also takes much longer to start printing compared to my previous one (rip), which was from the early 2000s.
11 notes
·
View notes
Text
Fortunately, in exchange for the exorbitant recurring and perpetual cost of $20/month, Adobe Acrobat Pro gives a user experience that critics refer to as "hot garbage" and "easier to print the PDF, write on it, scan it on the phone, and save it as a PDF than to edit it".
2 notes
·
View notes
Text
How to Add Adobe PDF Printer to Your Computer - Quick Guide
Learn how to add the Adobe PDF printer for easy document printing. Quick troubleshooting tips included. #PDFPrinter #AdobeAcrobat #PrintingTips #AccessibilityGuide
In today’s blog post, we’ll learn how to add the Adobe PDF printer to your menu for document printing. One of the most important reasons to use the PDF format for printing is that it preserves formatting. Let’s dive right in. Video Guide Get accessible documents now Check if Adobe PDF Printer is Available First, ensure you’re in Adobe Acrobat Pro DC. Press Ctrl+P on your keyboard. If…

View On WordPress
0 notes
Video
youtube
How to create fillable pdf form with print button in adobe acrobat pro D...
0 notes
Note
hi! so i have a standard pdf on my hands right now (yknow one thats one page per "paper" and you scroll through) but i want to print it out and bind it. i was wondering how i would format it or what options i should press on the printer for it to be like a standard a4 print and able to be signatured. or if theyre not options i can simply press: how would i change the layout and format? thank you in advance!!
Hi! I love me some asks. So, just to make sure I understood the situation, you have a page-per-page PDF (single page per single page) you want to print and bind in signatures. And it is not a double spread PDF. (and, because I wondered at first, it is also not a PDF from this here collection (I got scared at first thinking I gave page per page pdfs somewhere lol).) Let's see if I can help you with that.
So as it turns out I don't actually know much about this because I've always worked with my own InDesign files, meaning when I printed signatures I'd just export a double spread PDF, and so I've never had to make signatures from a page per page. But after some research I can give you 3 options:
The booklet function and how to make it your bff
Cannibalize your PDF to make a double spread PDF
Give up (on the signatures, and bind it another way)
1. The booklet function
Most PDF viewer have one. For example I opened one of my PDFs in Adobe Acrobat Reader: the function is there, and it looks like it should work with a page per page PDF to make proper signatures out of it, but since I've never had to use it, I can't tell you precisely what to do with it. I can advise this much: TEST PRINTS!!! Make that thing your best friend by test printing with it a thousand times over until you're sure. You can use a PDF splitter to get just the first 4 pages of your PDF and make those go through the booklet function until you've figured out all the right parameters, etc. There are probably online tutorials, too. Accessorily, you can also split your PDF into the different signatures, it might make it easier as a whole when you make the final print.
2. Cannibalism
Honestly, this solution is for barbarians, but I'm including it because it sure would work and, well, if I was in your position, it's what I would have done (if the PDF was under 100 pages). The big idea here is to turn the page per page PDF into a double spread PDF by opening it in any software that lets you move it around like a jpeg, manually sticking each page next to the right one, and exporting it into a new PDF. And you can even make the signatures manually while you're at it (but you should also probably do that in InDesign, and it has an inbuilt booklet function, so no need for the recipe for disaster that is making the signatures manually). Not recommended unless you're a purist, a maniac, or a masochist. Do not do that. Go back to #1. Help yourself.
3. Give up
...on the signatures. I don't think the booklet function is that hard to master, but just to give you more options, there absolutely are ways to print and bind a page per page PDF without signatures. Here are a few:
Japanese binding: with thread, beautiful, will work no matter how many pages you have, however it does not open flat (at ALL) and if you have text/images close to the inside margin the binding will eat it all up.
Perfect binding: with glue, very common binding. You'll see it on most paperbacks, everywhere. When it's clean, it's really nice, however, while it's easy to make a perfect binding, it's hard to make a clean one yourself. Also can't be done if you have less than? 20? pages, doesn't open flat, eats the inside margin (but way less than a japanese binding).
Whatever this is called: with thread, can be nice… on very specific occasions. Opens flat and looks cool, NOT recommended if you have thin paper and/or a lot of pages.
So many things. Thread. Tape. Side staples. Spirals. Screws and bolts, if you're going for in industrial look. Don't let any loser tell you that staples or spirals or any of those can't be sexy in the right conditions.
15 notes
·
View notes
Text
so what's happening here?
okay. so first off - i changed the main's url a while back and then realised 'wait if that's not using this one then i can put it back here' i intend to dedicate most of my spoons today to fixing links - if it's been more than 8 hours since this post was made and you find a broken link, please tell me
but anyway. we are reincarnating (i still got the long covid but trying to make it easier on me this go around)
what's changing? well, i intend to have two different types of builds here: - adaptations - direct adaptations of a character, presented without description as the original character's should suffice. for example, gym leaders and danganronpa characters would likely fall here. instead of characterisation notes, i'll just have ideas of how to integrate them. (this doesn't necessarily mean all the human characters will be human though. that's boring) - inspirations - the majority of existing builds fall under this. examples being basically any mon that isn't a specific one like guildmaster wigglytuff. these will have characterisation notes though perhaps not as in-depth as they used to - long covid messed that one up a bit.
and what's new?
i'll be making example sheets, probably using MPMB's pdfs. i say probably because they need adobe acrobat, so don't run natively on linux and i can't get them to run through wine - but they look so good i've set up a win10 virtual machine just to use them - why this over beyond? beyond still hasn't implemented some stuff properly, and the exported pdfs require scrolling in some fields in my experience which means no printing - why this over dicecloud? again, pdf export reasons - you can't export it in any easily readable way - why this over insert any other pdf here? this one does the maths for me :v
if these sheets don't work out for me i'll be using dicecloud for the maths and just copying stuff into another pdf. if they do work out i'll put a proper payment in for them; i appreciate PWYW for letting you try them out first too
generally these will be level 5 or 6 to play around with how i see them.
i have no schedule for this currently. i'm mostly posting this to try and force brain into it - the adhd stuff is. Going - but hopefully i'll get /somewhere/ next month.
i also intend to update all the existing builds. mostly just making sheets for them, but some of them there's cool new stuff they can use on heroforge. as such, i'll be preparing them, and once i have enough i'll start queueing them and updating their links once i do
regarding homebrew - my friend's homebrew i've used for a couple isn't available currently, so i'll adapt them to new roles. scrafty's going to be the hardest, but i can deal i do intend to look and see what homebrew is set up for whichever sheets i end up going with - it won't be the main focus but it will give some inspiration...
but yeah. tl;dr long covid + adhd are kicking my heck but we stay silly :3
2 notes
·
View notes
Text
How to Print a Digital Download from Etsy
The whole downloaded-file-to-framed-print-on-your-wall process breaks down like this:
- Save the file you purchased to your computer or thumbdrive.
- Take the file to a job printer and get it printed to the size you want.
- Take the printed file to a framer, and have it framed so it fits your décor.
Digital files are often much, much cheaper on Etsy than buying their physical item counterparts. Plus, when you buy a digital file, you can finetune it to the exact size you want for your own wall. And once it’s printed, you can also choose the exact framing and matting combination you want.
Now, the details:
You were on Etsy or an artist’s website, and you fell in love with an image. Perfect for your wall, but you’re not sure how the whole printing thing works.
Not to worry! Lots of people use printable downloads every day for party decorations, invites, or coloring pages for kids (using their own home printer, if they have one), or for higher quality prestige printing for smashing wall art. The following is a list of steps for accessing your digital downloads, and how to turn them into art you’ll be proud to see on your wall.
So, what’s a digital download, or ‘printable���? It’s not a physical object; it’s an image file, in the form of 1s and 0s, saved on your computer or a thumbdrive. You bought it, you keep it, and you can always print it, as many times as you like. You can copy the file to two or three locations, so you don’t lose it.
Digital downloads come in various formats, including PDF, JPG, PNG, SVG, EPS, and more. Each type of file depends on what you need to use it for and how you are going to print it. Printing services will specify which formats they need.
Etsy places the file to your account in the orders section and you can download it on a desktop. They’ll also send you an email with a link to it.
Or, log into your account and click on “Purchases and Reviews.” Find the button that says “Download Files”. If you run into troubles, there’s a Help page. (Remember, you can’t access your digital download file through the mobile Etsy app.)
Now that it’s downloaded, you can open your file, just to check whether you have the right image at the right size. You’ll need to use the right software.
.bmp (Microsoft Windows Photos, Apple Preview or Apple Photos, Adobe Photoshop, Adobe Illustrator, CorelDRAW)
.doc (Microsoft Word)
.gif (Microsoft Windows Photos, Apple Preview or Apple Photos, Adobe Photoshop, Adobe Illustrator, CorelDRAW)
.jpeg (Microsoft Windows Photos, Apple Preview or Apple Photos, Adobe Photoshop, Adobe Illustrator, CorelDRAW)
.jpg (Microsoft Windows Photos, Apple Preview or Apple Photos, Adobe Photoshop, Adobe Illustrator, CorelDRAW)
.mobi (Calibre, Stanza, Sumatra PDF, Mobi File Reader, popular eReaders)
.mov (QuickTime, iTunes)
.mp3 (Windows Media Player or iTunes)
.mpeg (Windows Media Player, QuickTime)
.pdf (Adobe Acrobat Reader, Most Internet Browsers)
.png (Microsoft Windows Photos, Apple Preview or Apple Photos, Adobe Photoshop, Adobe Illustrator, CorelDRAW)
.psp (Corel PaintShop Pro, Adobe Photoshop, ACD Systems Canvas)
.rtf (Microsoft Word, WordPad)
.stl (AutoDesk Viewer, Microsoft 3D Viewer, Microsoft Print 3D, ShareCAD)
.txt (Windows NotePad, TextEdit on Mac)
.zip (Usually, you can unzip a .zip file with any computer.)
.ePUB (Various eReaders)
.iBook (Internet browser or Apple iBooks)
You can print image files on home printers. This is great for low-resolution art up to 8.5” x 11”, like recipes, or sewing instructions. The downside here is that the print will only be as good as the printer itself. For larger wall art, the best move is to take your file to a professional printshop.
This can be done online, or it can be done in person. Local Walgreens and Costcos are often quite good. You can upload your saved image file to them using their official website, and just pick up your image, printed the size you specify, on the paper you choose, the next time you’re in the neighborhood. There are also online choices like Shutterfly or Vistaprint, who will ship you your prints in the mail.
You’ve got your print, and you love it. But it’s just a big piece of paper right now; what about framing? One easy option is to select a standard sized frame, mat and glass available at the local stores or mall shops, and insert your new print yourself. Or maybe your print deserves first-cabin treatment, and you’ll want to check out the local frame shop for the right frame, matting and glass. Either way, totally legit. Then just hang it on the wall, and enjoy.
And that’s the whole process. Before you buy a digital download, you should check a couple of things:
- Be sure you have the software you’ll need to open the download at home, or be sure you know where online to find a site that will open the image (such as Photopea.com, for opening a layered .psd file, if you don’t happen to have Photoshop on your own machine).
- Be sure you understand the optimum print size of the download and its aspect ratio. Artists generally will inform you that their image will look best at a certain size, say, 24” x 18”. Printing it larger will seem overblown, with visible pixellation; printing it smaller will cause it to lose detail.
In other words, make sure the digital download fits your needs before you buy.
+++++++++++++
#collage#abstract#art#modernart#digital download#etsy#midcentury#kolaj#homedecor#interiordesign#design
4 notes
·
View notes