#Also I was doing things like repeating the responsive mobile code for two different screen sizes without changing the code itself gjknfdgj
Explore tagged Tumblr posts
Visit Tumblr Blog
Explore Tumblr blogs with no restrictions, modern design and the best experience.
Last Seen Tumblr Blogs


Fun Fact
Tumblr has been banned in Indonesia for providing people with access to pornographic content.
Text
I just finished fully cleaning up the spaghetti code that was my entire website's CSS sheet 😭😭😭There was so much redundant code and commented nonsense and things that straight up just did NOT work in there
I went from 1300 lines to just 900 :') that's how much stuff I removed
#Jay Talks#I had to clean it up because some of my newbie coding mistakes were conflicting with my newer code LOL#Apparently I used a !Important tag on a table and it wasn't letting me edit other stuff because it was constantly overriding everything#Also I was doing things like repeating the responsive mobile code for two different screen sizes without changing the code itself gjknfdgj#because I had no idea how it worked and that having it just once was enough for it to workLOL#I keep telling everyone that site is held together by ducktape LMAO
8 notes
·
View notes
Text
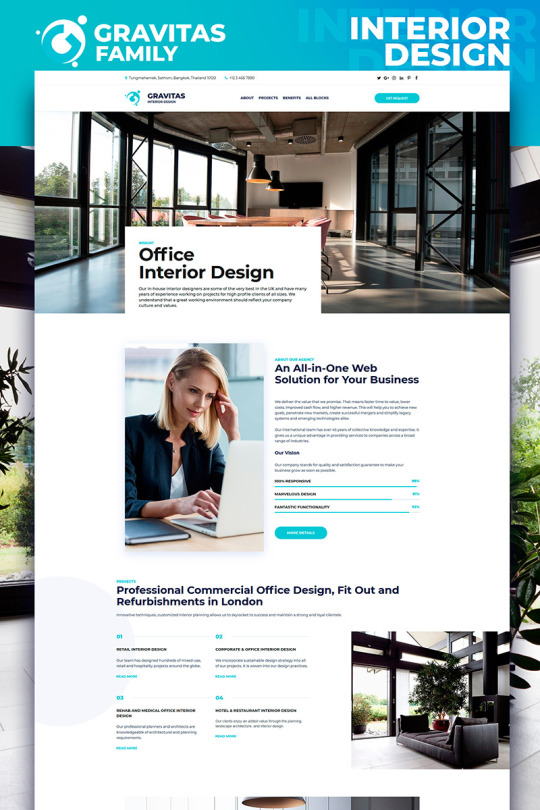
Interior Design Landing Page

Divi Interior is a modern landing page template for interior designers, house decorators, and architects. It has an attractive design and offers the space to display eye-catching images in a full-width layout. You can also add featured content side by side with images. INTERIOR Design Landing Pages Ready to use WordPress landing pages. Single page sites for interior design and furniture. The best landing page for you to stand out in your business niche. Branding clean design flat furniture illustration interior interior architecture interior design interior landing page landing page minimal typography ui ui design uiux ux vector web website. Posted on Apr 5, 2021 1,475 3 26 7 View feedback. Welcome to my design.
I have learned and understand that how you design a home or any other space is not just about how it looks but it is how it must work for the way we live, and how we will spend our time there.
Every property I have developed or refurbished, including my own has been an ongoing exercise. Not only learning how the construction of a property comes together to ensure that it is safe, warm and dry, but an on going experiment with layout, colour and texture too, and how light plays a big part in its design, natural light can be different in every property.
I have learned and understand that how you design a home or any other space is not just about how it looks, but it is how it must work for the way we live, and how we will spend our time there. Studying psychology has been an asset in assisting me to get the best information out of my clients’ to obtain a brief that reflects exactly what they would like from their new environment. My property projects whether that is a build, refurbishment or a rental has always been about people, the people who will live and occupy them That to me is first and foremost of what property is all about – people.
My passion of putting interiors together and creating beautiful spaces has been something I have enjoyed for over 25 years. Many have asked me to help create designs and homes for them in the past. So it is now when the whole experience of “being at home” is one we really value in these unprecedented times we find ourselves. The safety, the comfort and warmth of our own home which provides us with a sense of wellbeing and happiness is a time I felt was right for me to launch my brand @ Designed by Mandy.
Join my newsletter today for inside tips and advice on the property market.
Landing page templates for interior design enthusiasts and companies.
About the Category
Be it a real estate firm, an agency, a broker, or an individual. If you wish to sell your property/ properties and get the best deal out of them, you need a captivating landing page to gain your customer's attention. The Real Estate category provides multiple stunning landing pages that help showcase your properties, generate leads and lets prospects contact you or your business. Multiple templates spanning through listing images, special offers, sign up forms, maps and many more.
Testimonials
Sunny's here to save the day
'Easy to use templates that fit perfect on getting leads for your business. Give it a try. Highly recommend Sunny Landing Page' Davide , Real Estate Firm Owner
Weixin pay. Picture Perfect
'Beautiful design and online support is efficient' Emily, Real Estate Agent
Great Product & Service!
'I would personally recommend Sunny Landing Pages to anybody with or without experience' Lee Richards, Small Business Owner
Tech Specs
Created Date: February 2019
Browser Compatibility: IE, Firefox, Safari, Chrome and Opera
HTML Template: Available for Download
Layout: Mobile Responsive
Drag & Drop Editing: Yes. Edit anything on the page without having to write any code
Documentation: Yes
Support: Yes. Reach us via the intercom chat or email
Integrations: 500+ apps via Zapier or direct integrations using embed codes
Custom Domain: Yes
Free Hosting: Yes. See Pricing page for details
Contact Forms: Yes
Testimonials: Yes
Lead Management: Yes. Notifications and/or CSV download
Conversion Analytics: Yes. Advanced Visitor Data Analytics
Fast Loading: Yes. Minimal load time
Device Ready: Yes. Full responsive in Desktop, Mobile and Tablet
FAQs for Building Landing Pages:
1. How do I use the builder interface Here's a quick 3 minute tutorial video to get you started. 2. How do I create a form for capturing leads Use the Form Builder element in the interface. Ragtime ukulele. Here's a quick overview
3. How do I publish my landing page on my own custom domain Once you've designed the page, follow these steps and you're good to go! 4. I'm facing issues while designing the landing page Simply write back to [email protected] or chat with us through the interface 5. Not sure, how I should go ahead with designing the page Sharing a few tips I personally recommend users to create a conversion ready landing page below
Tips to Design Conversion Ready Landing Pages:
Material Design Landing Page
1. Less is More: TA cluttered page usually distracts customers. Keep the text and images simple and to the point. Use our content serctions or create your precise content format.
2. Ask Only What You Need: The fewer fields you have on the form, the better the conversion rate. The best balance is collecting information that is necessary to qualify your leads. Create precise forms with our easy to use Form Builder element. 3. Match Landing Page with PPC ads: Match the words used in page copy with the keywords and text used in PPC ads. Repeating the same language and key phrases reassures visitors that they’re on the right path and shows consistency. 4. Make Your Page Mobile Friendly: Check your page on our instant responsive mobile preview mode.Your landing page should look and feel great on mobile devices – easy to navigate and ultra clickable. 5. Use Images to direct Users to CTA: Images that draw attention to the call to action button or form help guide the visitor’s eye to the most important thing on the whole page. Choose from our stock of 1 million FREE images
Build a Landing Page for WordPress
Interior Design Landing Page Examples
1. Install the plugin on your wordpress site. 2. Click on Download for the Zip file. OR, you can also directly install the plugin from your Plugins Dashboard by searching for Sunny Landing Pages 3. Once installed, click on Sunny Landing Pages on the left menu. If you’re a new user, you will be prompted to create a new account and the button will redirect you to the Sunny Landing Pages website. Otherwise existing users can login using their username and password. Now the next step is for you to build your landing page. I won’t get into too much detail on that over here. 4. Once your page is ready, you can click on Publish. The builder will prompt to choose a Publishing option – Either WordPress or Domain (WWW). Select WordPress 5. Once you’ve selected WordPress, you’re now ready to head back to the Sunny Plugin dashboard in your WordPress admin section. You will see all your pages in our plugin page. By default, all pages are in Draft status. So there are two quick steps left to do. 6. Finalize your URL. Click on Quick Edit and you will be able to change the URL to anything you want. Remember the URL can’t be changed if your page type is ‘homepage’ or ‘404 page’ 7. In the same screen change the status to 'Published'
That’s it. You’re done! Your page will be live.
About the Sunny Landing Page Builder
Sunny is a drag and drop Landing Page Builder which lets you design, edit and publish landing pages in a jiffy. You can add or edit almost any landing page element you can think of such as headlines, paragraphs, bullet lists, images, backgrounds, call-to-action buttons, videos, shapes, maps, countdown timers and more. Choose from a vast template gallery and readymade sections (testimonials, pricing, team etc.) to get your site up and running in just a few minutes. Once you have edited the page, you can publish using our domain or you can even use your own custom domain. If you don't want us to host the page then you can even download the HTML. The hosted service allows for integrations with all major CRM and email service providers (such as: AWeber, Mailchimp, Active Campaign, Campaign Monitor, Get Response, Mailer Lite etc.) directly through web sign up forms/ embed forms or through integrations using Zapier. The service also provide you analytics & lead management features to make managing your marketing funnel really easy.
Read More:
0 notes
Text
Learn CSS Grid by Building 5 Layouts in 17 minutes
CSS Grid is a tool you can use to help create layouts for your website. It's especially useful if you need to think about the position, layers, or sizes of different elements.
CSS Grid is complicated and there are many things to learn. But the good news is that you don't need to know everything all at once.
In this tutorial, we will build 5 different layouts (which are explained as five separate tasks below) with CSS Grid. At the end of the tutorial, you will be ready to use CSS Grid in your next projects.
If you want to code along, be sure to download the resources:
Here's a video you can watch if you want to supplement this article:
youtube
CSS Grid
Here are the first two layouts we'll build:
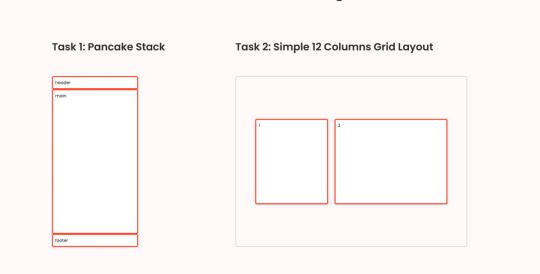
Task 1 and task 2
1: How to Build a Pancake Stack with CSS Grid
For task number one, we need to create a pancake stack layout. To create this layout, we can make three rows by using grid-template-rows: auto 1fr auto. The second row with a value of 1fr will expand as much as it can, whereas the other two only have enough space by wrapping their content.
So to achieve this layout, all we have to do is to give the container the following parameters:
.task-1.container { display: grid; height: 100vh; grid-template-rows: auto 1fr auto; }
and you can see this layout everywhere, for example, in one of my tutorials:

Here's the YouTube link if you want to watch and code along.
2: How to Build a Simple 12 Column Grid Layout with CSS Grid
The basic 12 column grid layout has been around forever. And with CSS Grid, it's even easier to use. In this simple task we need to give item-1 four columns and items-2 six columns.
First, we need to create 12 columns. We can do that with grid-template-columns: repeat(12, 1fr);:
.task-2.container { display: grid; height: 100vh; grid-template-columns: repeat(12, 1fr); column-gap: 12px; align-items: center; }
Notice here that we also have the 12px gap between every column. Similar to Flex, we also can use align-items and justify-content.
The next thing we need to do is to tell which column(s) the items should take up:
For item 1, we want it to start from column 2 and end at number 6. So we have:
.task-2 .item-1 { grid-column-start: 2; grid-column-end: 6; }
Notice that the item will not include column number 6, only columns 2, 3, 4, and 5.
We can also have the same affect by writing:
.task-2 .item-1 { grid-column-start: 2; grid-column-end: span 4; }
or
.task-2 .item-1 { grid-column: 2 / span 4; }
With the same logic, we will have the following for item 2:
.task-2 .item-2 { grid-column: 6 / span 6; }
You can see 12 column layout are everywhere – here is a tutorial where I use this technique.
Here's the YouTube link if you want to watch and code along.
3: How to Build a Responsive Layout with and without grid-template-areas
I am going to show you two options here. For the first option, we are going to use the 12 column grid that we learned from the 2nd task.
For the second option, we going to use a property called grid-template-areas.

The First option: How to Use the 12 Column Grid
Mobile
This is quite straightforward. We can use what we learned from task number one, and make the main section expand. We can also give the grid a gap: 24px as in desktop. There will be columns, not just rows:
.task-3-1.container { display: grid; height: 100vh; grid-template-rows: auto auto 1fr auto auto auto; gap: 24px; }
Tablet
On a tablet, where the screen is wider than 720px, we want to have 12 columns and 4 rows. The third row will expand as much as it can:
@media (min-width: 720px) { .task-3-1.container { grid-template-columns: repeat(12, 1fr); grid-template-rows: auto auto 1fr auto; } }
Now that we have 12 columns, we need to tell how many columns should each item take up:
@media (min-width: 720px) { // The header section takes 12 columns .task-3-1 .header { grid-column: 1 / span 12; } // The navigation section also takes 12 columns .task-3-1 .navigation { grid-column: 1 / span 12; } // The main section takes 10 columns start from column 3 .task-3-1 .main { grid-column: 3 / span 10; } // The sidebar takes 2 columns start from column 1 .task-3-1 .sidebar { grid-column: 1 / span 2; grid-row: 3; } // The ads section takes 2 columns start from column 1 .task-3-1 .ads { grid-column: 1 / span 2; } // The footer section takes 10 columns start from column 3 .task-3-1 .footer { grid-column: 3 / span 10; } }
Notice here that we need to give .task-3-1 .sidebar grid-row: 3; because sidebar is after the main section in the DOM.
Desktop
For the desktop view, we will work with a screen that is bigger than 1020px. As we already have 12 columns, now we only need to tell how many columns it should use:
@media (min-width: 1020px) { // The navigation takes 8 columns starting from column 3 .task-3-1 .navigation { grid-column: 3 / span 8; } // The main section takes 8 columns starting from column 3 .task-3-1 .main { grid-column: 3 / span 8; } // The sidebar starts from column 2 and ends at column 4 .task-3-1 .sidebar { grid-column: 2 / 4; } // The ads section takes 2 columns starting from column 11 // it also takes 2 rows starting from row 2 and ending at row 4 .task-3-1 .ads { grid-column: 11 / span 2; grid-row: 2 / 4; } // The footer section takes 12 columns start from column 1 .task-3-1 .footer { grid-column: 1 / span 12; } }
Real life example
You can actually find a similar layout on Dev.to's homepage:
The Second Option: How to Use grid-template-areas
Before using grid-template-areas, we need to define the area of the item using grid-area:
.task-3-2 .header { grid-area: header; } .task-3-2 .navigation { grid-area: nav; } .task-3-2 .ads { grid-area: ads; } .task-3-2 .sidebar { grid-area: sidebar; } .task-3-2 .main { grid-area: main; } .task-3-2 .footer { grid-area: footer; }
After the item areas are defined, all we have to do is to give the container the position by using grid-template-areas:
Mobile
.task-3-2.container { display: grid; height: 100vh; gap: 24px; // Creating 6 rows and 3rd row expands as much as it can grid-template-rows: auto auto 1fr auto auto auto; // Defining the template grid-template-areas: "header" "nav" "main" "sidebar" "ads" "footer"; }
So on mobile, we create 1 column and 6 rows. And row number 3, which is the main row, should expand as much as it can.
This also makes it easy if, later on, you want to change the order/position of the item. For example, if we want to have navigation before the header we can do:
... grid-template-areas: "nav" "header" "main" "sidebar" "ads" "footer"; ...
Tablet
@media (min-width: 720px) { .task-3-2.container { // Creating 4 rows and the 3rd row expands as much as it can grid-template-rows: auto auto 1fr auto; // Defining the template (3 columns) grid-template-areas: "header header header" "nav nav nav " "sidebar main main" "ads footer footer"; } }
With the code above, if the screen is wider than 720px we want to create 3 columns and 4 rows. The header and the navigation both take up 3 columns.
On the third and fourth row, the sidebar and ads take 1 column, whereas, the main and footer take 2 columns.
Desktop
@media (min-width: 1020px) { .task-3-2.container { // Creating 4 rows and the 3rd row expands as much as it can grid-template-rows: auto auto 1fr auto; // Defining the template (4 columns) grid-template-areas: "header header header header" "sidebar nav nav ads" "sidebar main main ads" "footer footer footer footer"; } }
Here we find similar logic to tablet view. For the desktop, we create 4 columns and 4 rows and the placement according to the value of grid-template-areas.
Which should you choose?
Using the 12 Column Grid:
➕ Easy and fast to start ➕ Easy to maintain for column-focused layouts ➖ Difficult to arrange items in complex layouts
You should use 12 Column Grid for less complex layouts that focus mainly on the arrangement of the columns.
Using grid-template-areas:
➕ Flexible for complex layouts ➕ Easy to visualize ➖ Takes more time to implement
You should use grid-template-areas for more complex layouts where you need to care about positions or sizes of many elements.
Both options have pros and cons, but you should choose the one that's easier for you and makes sense in your particular scenario.

It is surprisingly simple to do this. We can make it happen with one line of code: grid-template-columns: repeat(auto-fill, minmax(150px, 1fr));, like this:
.task-4.container { display: grid; gap: 24px; grid-template-columns: repeat(auto-fill, minmax(150px, 1fr)); }
We just created a flexible column layout and specified that the column should never be less than 150px and should share the space evenly.
5: How to Build a 12 x 12 Chess Grid with CSS Grid
For the last task, I want to show you that, not only we can define the number of columns, but we can also define the number of rows using CSS Grid.
.task-5.container { display: grid; height: 100vh; grid-template-columns: repeat(12, 1fr); grid-template-rows: repeat(12, 1fr); }
Now, we can place the items anywhere we want. So to create this layout:
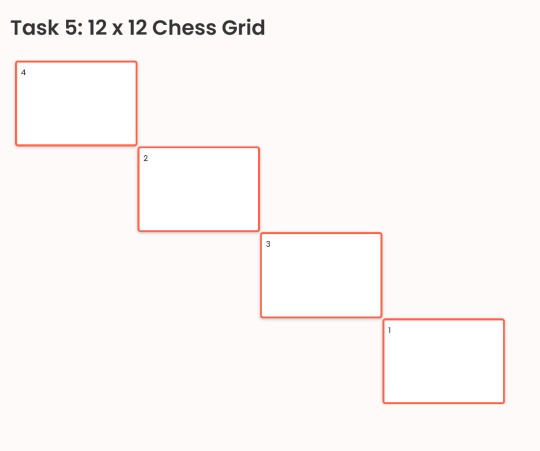
We can do this:
... // First item starts from column 1 and expand 3 columns // and from row 1 and expand 3 columns .task-5 .item-1 { grid-row: 1 / span 3; grid-column: 1 / span 3; } // Second item starts from column 4 and expand 3 columns // and from row 4 and expand 3 columns .task-5 .item-2 { grid-row: 4 / span 3; grid-column: 4 / span 3; } // First item starts from column 7 and expand 3 columns // and from row 7 and expand 3 columns .task-5 .item-3 { grid-row: 7 / span 3; grid-column: 7 / span 3; } // First item starts from column 10 and expand 3 columns // and from row 10 and expand 3 columns .task-5 .item-4 { grid-row: 10 / span 3; grid-column: 10 / span 3; }
Conclusion
Thanks for reading this article. This topic belongs to the series of videos that I will update on Learn.DevChallenges.io. So to say updated, follow me on social media or subscribe to my Youtube Channel. Otherwise, happy coding and see you in the next video and articles 👋.
__________ 🐣 About me __________
I am a full-stack developer, a UX/UI designer and a content creator. We can get to know me more in this short video:
youtube
0 notes
Text
Best CSS Editor Plugins
There will be many instances when you have to add custom CSS to your WordPress site if you wish to change the styling of your site. For over 18 months I have been trying all the great new WordPress CSS Editors. They’ve helped a lot of Beaver Builder users particularly non-coders. Here, I will try my best to highlight the pros and cons. Ultimately I decided to stay with my own editor Stylizer. Fine-tuning how your WordPress site looks on the front-end is faster and easier – not to mention more satisfying – when you can see your changes live as you make them. And the best way to live edit CSS is, of course, with a plugin. In such a situation, a WordPress plugin, meant to perform such actions, comes into the picture. With the help of such a plugin, you cannot only alter your entire website on your own easily but can even save the changed data in the database. The good part is even if you update the theme or remove this editor plugin, your saved data wouldn’t go anywhere. However, for advanced users, it is important to learn how to edit the website CSS. So, to help you decide which CSS live editing plugin is the best either it is free or paid, I have written this comprehensive article introducing you with the top CSS Hero alternative plugins in 2020. It’s easy enough to find a custom CSS plugin in WordPress plugin repository, but the options narrow down quickly when you’re looking for one that features a live preview option. All the CSS WordPress plugins in this article feature a live editor. The benefit of this is that it allows you to preview your changes in real-time rather than having to save a file, switch browser tabs and refresh the window, only to find out that your changes didn’t have the desired effect.Have you ever wished you could just click on any element of your WordPress theme and edit the CSS style? And not just that. But to also have the ability to see the changes you make immediately, all without not having to write CSS code. Or maybe you don’t actually mind a little coding, but you still wish you could see the changes you make without having to edit, save, refresh, see how it looks and repeat the same steps all over again. Plus, it is always a good idea to keep dynamic changes in a WordPress plugin because if you add the code in the theme files, you can lose it during a theme update. CSS editors allow you to point and click on the section you want to edit, add your CSS and see the results in a live preview immediately so that you do not have to switch between views. But what’s the best CSS editor plugin for WordPress? Let’s explore that question in a bit more detail.
Advanced CSS Editor
WordPress products company ThemeIsle, along with WordPress wunderkind (and ThemeIsle Support Ninja and Developer) Hardeep Asrani, developed this plugin, whose release WP Tavern announced in early March 2016. Advanced CSS Editor is a lightweight plugin that lets you write different CSS code for each device (desktop, tablets, and mobile phones) right from the Live Customizer, letting you can see the outcome in real-time. This plugin is less likely to be updated regularly to keep up with updates to WordPress itself. This could have security implications or simply lead to the plugin not working. So, pick a device, write your custom CSS code, and watch the results while you’re editing. After installing and activating the plugin, navigate to Appearance > Customize to access the backend Customizer and look for the Advanced CSS Editor menu option. It will appear at the top of the list of Customizer menu options. To edit CSS, simply add a selector and a rule to the text box that appears when you open the Advanced CSS Editor menu item.
Features
Possibility to add different custom CSS based on the type of deviced
Experience live all the changes via Appearance -> Customize
Minify your CSS to optimize your site
Custom CSS for Phone
Custom CSS for Tablet
Custom CSS for Desktop
Custom CSS for Global purpose
Slick and powerful with device-targeting capabilities. Use it if you want to target devices of different sizes without being overwhelmed with options.
Microthemer Lite
Microthemer Lite is brought to us by Themeover and comes in two main options: free (Microthemer ) or paid. Microthemer is a light-weight yet powerful CSS editor for responsively customizing the appearance of any WordPress theme or plugin content (e.g. contact forms), down to the smallest detail. Microthemer caters for both coders and non-coders. This is not a point and clicks editor like the two above. You have to create a name for each selector and assign it to a “folder”. Organized CSS. Does not create overqualified rules. Uses an external stylesheet. Here you can use the target option in the top left corner to click on an element to edit. When you hover over the desired element, a + sign will appear in the top left corner. This presents you with the hierarchy options. Having said that, in the same way, that CSS Hero does, Microthemer does a good job of presenting your options in a way that makes CSS more accessible. I was using the plugin on an old test site that still has Thrive Content Builder installed. Some of the issues I was experiencing may have been due to some conflicts there. However, it was still painfully slow. On the plus side, there are options to create custom CSS across multiple devices and this works just as well as the default ‘All Devices’ area.
Features
Style anything on your web page, including headers, menus, sidebars footers, and plugin content.
Intuitive visual editing.
Over 100 style options at your disposal e.g. Google Web Fonts, background color, font-family, CSS3 gradients, drop shadow etc. Pro-only styles include animation, transition, and flexbox.
Design responsively without the usual headaches. Preview your site at different screen sizes and apply media queries styles without writing code.
Export your designs as a zip file. For sharing with friends, or transferring between domains.
In-program docs so you can learn about CSS, or refresh your memory.
History feature, so you can go back if you make a mistake.
Draft mode, so you can try new designs on a live site without affecting what visitors see until you’re ready to publish.
Apply styles per-page or globally.
Apply: hover states any other pseudo selector like :nth-child() without having to remember the syntax.
Advanced color picker for sampling colors from your theme and creating custom palettes.
Import CSS media queries, selectors, and styles from any stylesheet into Microthemer’s GUI.
Light-weight. Microthemer generates CSS. It doesn’t try to do much more than that.
Nonce security to help keep things secure.
Supports multi-site.
Supports SSL sites.
Great support provided via our dedicated Microthemer forum.
Free CSS, HTML, and responsive design tutorial.
Event-based animation (e.g. onClick, inView)
Visual CSS Style Editor
Style your WordPress site visually. Discover the most popular front-end design plugin. You can customize any page and theme without coding even if you don’t know coding. Just click on an element and start visual editing. Adjust colors, fonts, sizes, positions and a lot more. By using the theme, you can customize any page or post on your WordPress site. Unlike other plugins, you do not have to do coding to make changes. However, that doesn’t mean you can not customize code if needed. By using the theme, you can customize any page or post on your WordPress site. Unlike other plugins, you do not have to do coding to make changes. However, that doesn’t mean you can not customize code if needed.
Features
Automatic CSS selector
Customize the WordPress login page
Customize page or post
Live CSS editor
Visual Drag and Drop
60+ CSS properties
Live preview
Undo/Redo option
Change management system
Supports export stylesheet file
The post Best CSS Editor Plugins appeared first on The Coding Bus.
from WordPress https://ift.tt/3eCR5zF via IFTTT
0 notes
Text
Master in forex trading - 15 minutes a day
Course Prerequisite
Forex Demo Broker Account (See below if you do not already have one) Passport or Identity Document and Proof of address not older than 90 days (You will need these documents for verification purposes) Your full attention Practice, practice practice!!! Forex Broker Demo Account In order to be able to practice the exercises in this course, you will need to open a demo account. A demo account is a practice account where you are able to trade live using fake money and not your own money. Once you are comfortable with a demo account, you can then deposit real money and apply what you learned while using a demo account. Here are the steps to follow when opening a demo account: Click on this link: Recommended broker. For the United States learners, follow this guide: Recommended US broker For the rest, let us continue. Click on the “Open Account” button at the top of the screen.

Fill in your details First name(s) – As per your Identity document Last Name – As per your Identity Document Country of residence – Should be chosen automatically if you are not using any proxy or VPN Mobile phone – Enter the correct number as this will be verified E-mail - Enter the correct e-mail address as this will also be verified Password – Choose a strong password with Letters, Numbers and Symbols (This will be your broker password on ForexTime.com) Click on “Send Pin” – A PIN will be sent to your cellphone and E-mail address. You may use any of the two PINs for verification. Enter the pin, accept the marketing consent and then click on “Register Now”. On the next page, enter all the necessary details to the best of your ability, Accept the agreements and click “Submit”
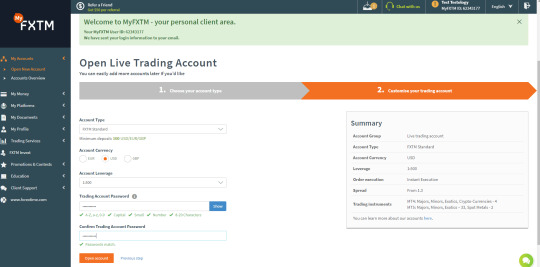
On the next page, select as follows: Account type – FXTM Standard Account currency – Any that you prefer Account leverage – 1:2000 Trading Account Password – Enter a strong password twice (This is different from your ForexTime portal login account that you set earlier. It will be your password to your MetaTrader account, more on this later) Click “Open Account” Next: Click on “Download platform”

Select the “Metatrader 4 Trading Terminal for PC” or “Metatrader 4 Trading Terminal for MAC” depending on your Operating system. Download and install the application. Go to your Desktop, you will see a ForexTime (FXTM) MT4 icon (Windows). Double click the icon and login. To find your login details, go to the e-mail that says “Congratulations! Your new trading account is now open”. Metatrader login (at the bottom of the e-mail) and use the Trading Account Password that you entered above. Should you need to install one for your phone, hover your mouse over the QR code, scan the QR code with your phone to download the platform. Go to your e-mail account that you used for registration. Open the e-mail that says “action required with regard to your verification” – see below! Click “upload”

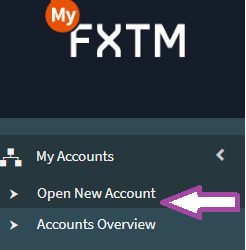
Upload your Identity document as per the e-mail and your proof of address. Open a Demo account Click on “My Accounts” on the left-hand side, then select “Open New Account”
Select Demo Account. Account type – FXTM Standard Choose currency Account Leverage 1:2000 Complete the passwords fields Initial balance – any amount, I suggest 20000 USD Click “Open Account”

Your Metatrader Login details will be displayed Download the Platform just as you did above and login using the details given. You are now ready to continue with the course content.
Introduction
Do you want to trade forex for a living just like I do? If your answer is yes, then this proven and actionable, profitable, forex trading strategy can lead to consistency and confidence. Follow this course and you will become a master in forex trading. With confidence and consistency, your trading can be a lot more profitable because you will trade less and focus on money management. The best part is that you need only 15 minutes a day to go through the currency pairs that move in this Foreign exchange market. You will avoid the mistakes that many beginning and frustrated traders make. I made these mistakes and learned from them to become the profitable trader that I am today. How will this help you? Well, if I knew then what I know now, I would have reached my goal of profitability faster and would have avoided all the trading stress that I experienced. Losing a lot of money is not fun. With this course, you have the opportunity to avoid trading stress, reach your goal of profitability faster and you will not lose a lot of money. You will keep your losses small and maximize your profits. You will trade without the fear of loss. This strategy is proven and will work for those who are patient to wait for the setups and the triggers. You will have an average of two trades a currency pair. The value you will gain from this course will definitely change the way you look at the forex market and you will know that while it is not easy, it can be made simple.

And those who keep it simple will become self-empowered, confident and consistently profitable forex traders. Are you ready to become a self-empowered, confident and profitable forex trader? If yes, then let’s get started. Tip: Profitable traders find one or two strategies that work for them and they repeat it over and over again. In the trading world, repetition is a good thing. This is one of those strategies you can put in your toolbox as a trader and just repeat over and over again. There is no guesswork in this forex trading strategy. If you follow the simple trading rules for setup, entry, and exit. The only thing I ask of you is that you should be patient and wait for the setup and the trigger. Sometimes you will have to wait for days before a setup. If you can do this, you will enjoy the fruits of patience as a trader. For long term profitability, you don’t have to trade every day. The platform that I use is MetaTrader4 (MT4) and you will need MT4 too. The indicators used in this trading strategy are common on all MT4 platforms. Many good brokers offer this platform and all the necessary indicators. Use the MT4 platform that you downloaded above as a demo. Warren Buffet, a master in forex trading, follows the strict rules of his investing strategy. My hope is that you will follow these simple rules to the tee and make it happen for you and your family. You need just 15 minutes a day to go through the currency pairs that make the most money. There are 100+ currency pairs, 7 are the most profitable, but you can add three more to make it 10. *USDCAD*USDJPY*EURUSD*GBPUSD*AUDUSD*EURJPY*GBPJPY If you would like to use a simple, low-risk, strategy of making consistent profits, then keep reading.
Chapter 1
The money When I started trading, I made a lot of money and I lost it all. It was very frustrating, but I never lost my vision of becoming a successful trader. A false sense of confidence let me believe that I could do it without following my restrictive rules. For a while, I made lots of money doing so, however, you guess it right, I lost it all in just a few trades. You see, the market will do what the market wants to do. After a few years, I quickly realized that sticking to the rules is the way that successful traders make it happen. So I stopped and really started testing this plan and this strategy. I tried different plans before, but this one stood out for me. When I stopped focusing on the money and instead focused on the trading process, things changed dramatically. Then I transitioned from a lower time frame to daily and weekly, things improved exponentially. I got my trading capital ($25,000) by winning a competition (FXCM King of the Micro). It was a micro account competition. So the lot sizes were small. I decided to include the results of this competition so you can see that trading small lot sizes in the long term can build up a substantial account. This strategy won the competition, taking a $540 account to $6000+ in a month. See published results here. This result is to impress upon you that the journey you are embarking on is a worthwhile trip and to let you know that there is money to be made starting a forex trading business. Can you do it? Well, I do not know you. However, I know you are teachable and I will walk you through, step by step, to show you how to succeed. I can show you how to succeed, but you will be the one responsible for your success. Agreed? Alright, let’s continue. You have to see yourself succeeding before you even get started. If you can guarantee to follow the system as explained, I can guarantee you will begin to experience success. Keep practicing and practicing and practicing. The execution of this strategy should be flawless. If you can flawlessly execute this strategy every single time, you will see a huge improvement in your trading results. If you are a new trader, you will experience success faster than most traders. The secret t becoming a master in forex trading is to practice, practice, practice......... Focus on the process of trading, and the money will follow. Ignore the trading process and the money will quickly exit your trading account to the account of those who follow their trading process. Can Money Be Made In The Forex Market? *George Soros made €1,000,000,000 (1billion Euros) in 1 day *Larry Williams turned €10,000 into €1,100,000 in 1 year *Alex Gerchik, Day trader hasn’t had a losing year since 1999 *Ed Seykota started with €5,000 and made €14,000,000 in 13 years *My results in a month from €540 to €6000. You have seen the results from all masters in forex trading. And the rest, as they say, is history. What will your history be? Will you be our next success story or will you just read through this, throw it away and then head off to the next Holy Grail? There is no holy grail, but I promise you, if you can work through this and implement the simple trading rules, you will become a confident, self-empowered and successful forex trader. Trading is hard and difficult because no one can predict the direction of the markets you can only focus on your trading plan. You have to be aware of this truth before embarking on your trading journey. Therefore, I encourage you to believe in yourself and give yourself a chance to learn the right way. We are going on this journey together. If you are a beginner, you will be starting right. If you an intermediate trader frustrated with your results, your trading can be a lot profitable than what it is now. This trading approach will enable you to grow your account exponentially from year to year, enrich your life from the profits generated, providing you with more free time and you can trade stress-free and grow your trading business. This style of trading requires patience. Patience is the key to execute your trading plan flawlessly. And successful traders are traders who have a plan and execute that plan flawlessly. How will you make money as a master in forex trading? From statistics of this trading methodology, just from one currency pair-GBPUSD, for a year we generated an average of 20 trades and made 3680 Pips from the trades. Trading a standard lot size, that is $36,800/year, a mini lot size will be $3680 and a micro lot size will yield $368, from one currency pair. This is on average. Pip value in dollar differs slightly per currency pair. But don’t worry about it. Just use the average of a pip being $1 for the mini lot, 10 cents for micro-lot and $10 for standard lot size. Now that you know there is money in the trading business, let me explain the mistakes that most traders make and how to avoid them. These mistakes are made by traders repeatedly. I made them over and over again. However, I learned from my mistakes when I started evaluating my losing trades. Remember losing is counted as a cost in our trading industry. If you count the losses as cost, it is easier to emotionally detach from losses. Let me address some of the struggles and mistakes that traders make and how you can avoid them from now onward.
Chapter 2
Trading Mistakes I did a survey of traders from across the globe and this is the results that came in.

From these statistics, you can see that the top problems are taking profits too early, over trading, changing strategy too often and allowing losses to run. I made these mistakes and learned from them. This trading strategy is designed to solve these mistakes and struggles. As you pursue this strategy, I want you to keep these mistakes on site. Print these statistics and display them where you can see them while trading. Make a decision not to repeat these mistakes. The only way to avoid these mistakes is to follow your trading plan, the entry setup, trade management process, and the exit setup. How to overcome these mistakes Taking profits too early The remedy for taking profits too early is to stick to the exit rules of this trading strategy. If you don’t get an exit signal, just allow the trade to play out. The exit plan includes initial stop loss, profit target and how to get out if the trade did not reach the profit target and turned in the opposite direction. You will see this in the exit rules under the Proven Forex trading money-making strategy. Changing trading strategy too often Trade this strategy for at least twelve months and you will overcome the problem of changing trading strategy too often. Most successful traders find one or two strategies that work and they repeat it over again and again. It is a decision. Don’t worry about the drawdown periods. Just focus on executing this strategy. Forget the forums, unsubscribes from newsletters and stop watching more youtube videos on new strategies. You can watch on matters like psychology, but again the psychology is within you. If you keep a cool head and focus on this strategy, you will soon discover for yourself that it works. Overtrading In this trading strategy, you only check your charts once a day. It takes about 15 minutes a day to look for setups, triggers and manage your trade. You will not be sitting in front of your computer following every move in the market. You will avoid over trading following this trading strategy. I over traded when I was trading of shorter time frames like 4 minutes and 1 minute. Now I am laser-focused and only trade when there are setup and a trigger. Allowing losses to run With this trading strategy, your initial stop loss takes care of the losses. You will not lose more than your 2% maximum risk per trade. Your edge is placing 20 trades following the strategy as outlined. If you can do so, and never move your stop loss, but follow the plan, then you will not allow losses to run. Profitable traders have learned this lesson. There is no way you can allow the losses to run if you follow this trading strategy and execute it flawlessly. That is your edge. Not following my trading plan You need to develop the self-discipline to follow your trading plan. Do not compromise the answers to the questions regarding the setup and the trigger. It is a decision and your intention should be to follow the plan. Be intentional with your trading. Decide that you are going to stick to the rules and visualize yourself sticking to your rules every day before your trading hour. My time is 23:00 pm every day. So I take some time about 22:00 visualizing how I am going to stick to my rules by focusing on answering the questions. Any discrepancy in the answers, I ignore the trade. Nobody, no system can remedy this mistake, only you. Ask yourself this question every time you want to go away from your plan. “Is this part of my plan?” If the answer is no, then don’t do it. Remember to treat this as a business. Focusing on too many currency pairs You should be looking at seven currency pairs with this strategy. You can look at 10 within 15 minutes because it is long term, you do not really have a problem of trading many pairs. It’s OK, however, if you are trading of the lower time frame, like 5 minutes, then you will be very confused even to monitor 4 currency pairs. I know a very successful forex trader who trades only the GBPUSD. He does not trade anything else. He is laser-focused on this pair and does well. You can also decide on limiting your trade to just one currency pair and become an expert in that pair. This problem arises when you are trading shorter terms. When I trade short term I only focus on one or two currency pairs. It is also a decision that I made. Therefore make a decision to stick with the daily time frame to overcome this problem. Listening to the opinions of others When you start trading and you focus on your plan, there will be no need to listen to the opinion of others. You will be deliberate with every trading business decision that you make. I overcame this problem, by unsubscribing from newsletters that I no longer needed, stopped going to forums and stopped listening to the talking heads on Bloomberg or CNBC. If you can focus on the trading plan, there will be no need to check with other people. The reason you check with other people is to give you a sense of confidence, you only need to focus on your trading plan. If you don’t have one, it is easy to tune in to listen to others. But this strategy has a clear plan of action for you. Just trade the plan. Chasing trades Chasing trades is also very common with day traders. The only way to continue struggling with chasing trades is to ignore your trading plan. If you stick to the trading plan of this strategy, you will never find yourself chasing trades. Trading becomes fun, because you know if you miss a trade, there will always be another trade. You chase trades when you sit in front of your computer all day and follow all the normal ups and downs move in the market. No need for this, if you trade just 15 minutes a day. The bottom line is this when you are using a proven trading strategy like PFTMMS, you will avoid almost all the mistakes and struggles that traders face. Stick to the rules and implement the strategy flawlessly for at least 12 months. Most of these mistakes are made because traders trade on a short term basis. If you are a beginner in forex trading, then trading off the daily charts just 15 minutes a day will help you overcome emotional trading and put you in the path of profitability. You will avoid the adrenaline rush that forces traders to make these mistakes, watching the charts all day long. If you hear that 90% of traders lose money in the markets, these mistakes are the reasons why. So you are already ahead of most traders and knowing this information and how to remedy the mistakes. So let’s get started with the trading business.
Chapter 3
Your Trading Business “A failure to plan is a plan to fail” - That is the mantra of a master in forex trading. Trading is a business and you must treat it as such from the very beginning. It will serve you well. Have you ever seen anyone with a successful business without a clear plan to reach their business goal? Many traders start out on the wrong path by treating trading as a hobby or just gambling, and playing around, wishing something happens. Do not make this rookie mistake on the road to becoming a master in forex trading. Trading is a business and if you treat it as a business, then following your plan will make sense to you. But if you treat it as a casino, then you will not follow the simple plan laid down on this course. The trading business has real running costs and requires a business plan and business structure to be able to accomplish the business goals. Revenue In A Forex Trading Business Profit from trading will only happen if your revenue is more than your costs. That is how business works. Our winners yield profits and our losses yield costs. As you start thinking in these terms, you will not attach your emotions to your losses, but you will treat your losses as business costs. Profitable businesses minimize costs and maximize profits. This knowledge alone will allow you to follow your trading plan and structure every time you approach trading without the fear of loss. If you allow your losses to be more than your revenue, you will go out of business. In trading, like in any other business, keeping the costs low is your goal. Experienced and profitable traders keep their losses small and allow their profits to run. You have to become a master of small losses. Profitable traders manage their losses and only focus on the trading process because they understand their system and are not afraid of losses anymore. Losses Will Teach You A lot About Your Business As a trader, your losses, as mentioned earlier, are the most costs you will incur in your business. The best thing is that you can effectively manage the losses. Losing is not fun and you will find it very unpleasant, however, this course is designed to help you cut the losses short and let the profits run. Reporting losses is not always easy for any business. While it is not pleasant to lose money, in the forex trading business, successful traders have learned to evaluate their losses, to gain great insights into their trading. You should do the same too. You will learn more from the losses than from the winning trades. I read this Oliver Valez quotes some time ago and have never forgotten it: “Our wins, although enjoyable, teach us nothing. It is our losses that lead the way to trading mastery.” Do you know why? Well, it is because your losses will tell you if you are sticking to your rules or not. You can make your losses work for you, by evaluating every loss. You will learn a lot about your business by doing this exercise either every time you experience a loss. Here is how you do it. When you experience a loss, evaluate the trading process, before you place the next trade. The reason why the trade fails will tell you a lot. Here are the two main reasons why a trade will fail You followed the rules to the tee, however, the market does its own thing and fail to go in your direction You completely fail to follow the rules in the trading strategy This evaluation must be done every time you lose a trade. If you followed the rules and the market does its own thing and fail to go in your direction, though you lost the trade, you indeed won the trade. You can keep your head up high, give a tick on your book and get back in the market and place your next trade. On the other hand, if your loss was based on point number two, meaning you failed to follow the rules then you may be in big trouble. Go back to chapter two and read how to overcome the struggle of “not following your trading plan” Follow the recommendation from chapter 2 and make a commitment to learn from your mistake and make a decision never to make that mistake again. Remember the quote by Oliver Valez, “Our wins, although enjoyable, teach us nothing. It is our losses that lead the way to trading mastery.” Don’t beat yourself up for making this mistake. I used to beat myself up for stupid mistakes that lead to losses but did not worry about it when it generated profits. But this was very wrong because it gave me a false sense of confidence. If you win a trade without following the rules, you may be domed in the long run if you continue ignoring your trading rules. Don’t do it, just commit to not making the mistake again. Strong self-confidence to execute your trade flawlessly is the key to trading success. Besides your losing trades, there is spread from your broker. Every trade you take costs you something small. The more you trade, the more costs you will incur. Your broker wants you to trade more, but they will not force you to trade more. Some brokers have commissions as well. Include all these to forecast your revenue in your trading business accounting. You will see that an average of 20 trades per currency pair a year will give you 140 trades a year from 7 currency pairs. However, if you analyze my results above, you will see that I took 167 trades for a month. So, day traders incur more costs than swing traders who trade from a daily chart at the end of the day. Swing trading will keep your spread and commission costs low. As an entrepreneur, you want to minimize costs and maximize profit. This course is designed to help you keep the costs low and maximize revenue from your trading activities. That is how a master in forex trading would do it! Trading Environment or Home Office It is very satisfying to trade in a clean environment. Some traders enjoy trading from multiple screens and some trade using a single computer or laptop. I do trade from a single screen. That is the only cost you really need in setting up your trading environment. Keep your trading office clean and clear. You can work on your laptop, but I still own a desktop computer. I find it more comfortable than a laptop. Choose whatever you prefer. Just be comfortable when you trade. Trading Plan of a master in forex trading Have you ever met a successful entrepreneur without a clear business plan? No, you will not meet any. Trading is also the same and you will never meet a successful trader without a trading plan. So if you are going to succeed, here is a simple plan you can adopt for yourself. Set goals for your trading business. Your goals must be specific, measurable, attainable, realistic and timely. For example, 200 pips a month on one currency pair is a good target. This is a target that is attainable. What you should do next is create a trading plan if you don’t have one yet. A simple, yet concise, a trading plan is necessary for running a successful trading business. Work on your trading plan by adopting the example below. What should you include in your trading plan? This is a trading plan example for you to adopt
Set Your Trading Goal
Use SMART goal tool to guide your trading goal setting. Remember, high performance in any field is accomplished by people who set clear goals. SMART is an acronym that stands for: Specific - Your goal must be specific. For example, instead of stating, I want to make more money from my trade, which is very vague, you can state, I want to make 4000 PIPS a Year. Measurable – New traders make this mistake all the time, they want to make a lot of money in the market. But you cannot measure a lot of money or a fortune. Your goal must be measurable. If your goal is measurable, then you will know when you’ve reached it and be able to monitor your goal to know when you are close to reaching it. Achievable – Your goal must be achievable. Let it be within your reach based on your skills and abilities. Let’s say your goal is 20 PIPs a day. You have a higher probability of reaching this goal than making say a million dollars in your first year. Realistic – Is your goal feasible? It should be challenging but within your capabilities. There are many traders who make millions of dollars a year. However, this will not be a realistic goal for a new player in this market. So set a goal that is realistic. Yes, like 400 PIPS a month. Timely – Time is an important factor. You see realistically, you can say 400PIPS a month. Now you are giving your goal a time period within which to reach it. Without a time limit, you may not achieve your goal. So let’s focus on the goal of 400 PIPS a month as we continue with this specific, measurable, achievable, realistic and timely goal. The goal of my trading account is to make 400 Pips a month and to maintain it. I will not withdraw any money until I make 4000 PIPS. (This is a simple goal) and that is what I want you to do. Keep it simple.
Market – What will you be trading?
I will be trading the spot forex market. AUD/USD,EUR/USD,EUR/JPY,GBP/USD,GBPJPY,USD/CAD and USD/JPY. These are the most traded pairs. Limiting to a few pairs will keep me focused. I will trade only at the New York Close (09:00 pm GMT which is 23:00 Central European Time). I will hold my position until there is an exit signal, which could be my stop loss, my target, or the appearance of an opposite signal. Business Work Week I work Monday to Friday and take all the time off during the day and check my charts at New York Close. Trading Style/Time frame I will be swing trading and focus on trading two charts: the daily chart and the weekly chart. I use the weekly chart to see the bigger picture and the daily chart to identify entry levels for my positions. Analysis At the close of the New York session each day, I will take a look at the economic calendar of the forex market for the day ahead at dailyfx.com. I will pay particular attention to fundamental data that could affect the trades that are open and currency pairs with potential trading opportunities. I will check the OsMA, 8-day WMA, 10-day WMA and Fractal indicators on my chart. These four parts of the trading plan are detailed in the trading strategy as will be explained in Chapter 6. Your plan should include the specific chart setup, the general trading rules, the specific entry rules, and the specific trade and money management rules. As you work on your business trading plan, ponder on questions like: What rate of return do I want per year? Do I want to trade long term or short term? Can I handle the intellectual and psychological demands for this profession? Do I want to trade for a living or just make some money on the side? Which full-time trader can I emulate and why? Do I really need a mentor in this trading business? Most successful traders have figure out the answers to all these questions, they are very relaxed and their plan is their business. Following the plan is their job. To become a successful trader, you need to complete your plan and develop the self-discipline to follow it. That is all there is to successful trading. As you trade every day, write down your thoughts and keep a journal. Keep a Trading Journal Keeping a trading journal is an important part of your trading business. Journaling your trades will help you develop good habits. Help you spot mistakes, and help you improve upon and repeat the behavior that leads to profitable trades and avoid behavior that leads to losses. Remember the Oliver Valez quote you read earlier: “Our wins, although enjoyable, teach us nothing. It is our losses that lead the way to trading mastery.” The only way you can look back and analyze your losses is by keeping a journal. This trading strategy makes it easy to keep a journal because you have very few trades and the trades last a few days. What should you include in your trade journal? You should include completed trades from entry to exit, stating the reasons for entry and the reasons for exit. Again, this will reveal important information regarding your trading business. It will show you if you are conducting your business with diligence. This is the difference between winning traders and losing traders. Which one would you like to become? Let’s look at the timing of your trades.
Chapter 4
Market Timing (End of day) Analyzing my results, you will notice that I traded a shorter time frame. However, I will be the first to admit that market timing in a shorter time frame is a skill that most experienced traders have learned over time. It is a very difficult skill and it messed up my trading results when I got started. Therefore, if you are still a struggling trader or a beginner, this strategy should be executed in a daily time frame. Working in a longer time frame like daily allows you to trade without all the noise that is generated in a shorter time frame. So to become a successful trader, I highly recommend you trade this strategy on a daily chart. I do trade on a daily basis from the 30-minute chart. However, the bulk of my income comes from trading the daily charts which is the strategy in this course. With this strategy, you can allow your money to work for you, while you do the things that you love. This is how the wealthy make money, without trading hours for dollars. You are well off to becoming a master in forex trading. When you trade from a shorter time frame, like five minutes, you are still exchanging time for money, but that may be the structure that suits you if you have the time. On the other hand, when you trade in the daily or weekly time frame, then you can allow your money to work for you while you go about your life and pursue other interests. You will avoid stress, overtrading, emotional trading and all the common mistakes that most beginning and frustrated traders make. You need just 15 minutes a day to look through the charts of all seven currency pairs. You start looking at the charts 15 minutes before the close of the day and you will be able to pinpoint the charts of interest at the close of the day.

You will look at your charts just once a day, at 23:00 Central European Time which is 17:00 Eastern Standard Time. You can convert this time to your time zone to trade this strategy. Look at a broker whose new day candle begins at 17:00 Eastern Standard Time. For European, African and Asian traders, you can open an account with this broker. Forex trading can be simple, but too many times we complicate it. Don’t be a victim of this complication. Watch your chart once a day, if you find a setup based on the trading rules then you enter the trade. If there is no setup, walk away and wait till the next day. So, trading this strategy will keep your trading simple, timing will be effective, emotions will be in check and you can focus on executing, trade management, making PIPs and keeping PIPS. If you don’t want to learn the strategy yourself and just want someone else to send you the signals between 23:00 and 00:00 CET, then visit here and subscribe, otherwise continue with your education.
Chapter 5
Charting Tools Charts tell us what we need to know. Charts do not lie. The chartings tools that are used in this system will help us get in and out of our trades. All of our entry and exit points are based on technical analyses. There is no speculation on your part on what to do. The rules are clear, there is either a setup, a trigger or there is none. You will enter the trade only if a combination of factors line up in your favor. Markets move when there is an imbalance between sellers and buyers. The combination of indicators and the price action helps us to pinpoint imbalance. For example, if the price has been going up, meaning there are more buyers than sellers, we will be looking for a scenario where sellers begin to return to the market. As traders, our job is to find the right time when an imbalance is happening and a change in power between the sellers and the buyers have occurred and momentum is building. The indicator combination and price action will lead to precision, giving us the edge that we need to succeed. Candles at the end of the day show the visual representation of what happens during the day. If price closed above the open, then the bulls (buyers) are in control for that day. The blue candles are bullish.

On the other hand, if the price closed below the opening price, it indicates that the bears (sellers) dominated the day. The white candles are bearish days.

Your job as a trader is to find the dominant group at the right time and trade with that group. I use the MT4 trading platform and it has many in-built indicators including the three that are used in this strategy. There is no perfect indicator however we have discovered that the combination of these three indicators works best for this trading strategy. Together with price action, they will keep you out of ranging markets and let you get in when a trend is developing. The Linear Weighted Moving Average, Bill Williams’s Fractal and the OsMA are the three indicators that we use in this system. Let’s begin by selecting the Linear Weighted Moving Average

Charting tool Linear Weighted Moving Average (LWMA) Moving Averages (MA) are mathematical items that add up prices during a selected time period and average them out. This eliminates the noise that occurs as the candles print. And we can see the overall direction of the markets from the moving average slope. There are different moving averages - simple, exponential and weighted. You can use any, but I prefer you to use weight for this system. Let’s add the Linear Weighted Moving Average to a chart. Follow this on your own MT4 platform. 10 LWMA apply to open and a shift of 1 See the chart after adding this indicator from your MT4 platform

Linear Weighted Average 8 applied to Close. See the chart after adding the second moving average also linear weighted. This time it is applied to close and no shift.

Those are two moving averages used in this very reliable trading strategy for consistent profit. Charting tool Bill Williams’s Fractal. There is a down fractal and an up fractal. We use the fractal in our system as points of stop loss. Candlestick combinations for the emergence of Williams’ fractals: *up fractal: set of 5 (at least) consecutive candles, where the average has the highest max; *down fractal: set of 5 (at least) consecutive candles, the average of which has the lowest min. See the chart as we add the fractal

Charting tool OsMA The OsMA which is Oscillator-Moving Average is a technical indicator that we use to pinpoint trend reversals and momentum. Other traders may use it to signal overbought or oversold, conditions in the markets. We have developed our own effective use of OsMA which is different from what the masses use. When the OsMA indicator - histogram is positive, we look to buy if the trade setup occurs. If the OsMA indicator-histogram is negative, we look to see if the trade setup occurs. See the indicator on the chart.

Our chart is complete. It is pretty simple. We have two moving averages. Linear Weighted Moving Average 8 applied to close, the moving average Linear Weighted Moving Average 10 applied to open and shift 1, the fractal and the OsMA. Remember with this strategy you need just 15 minutes a day, you can and will catch large market moves by entering the markets with precision, just when a trend is about to begin. Let’s get started with a detail explanation of the Proven Forex Trading Money Making Strategy (PFTMMS). Are you excited? After explaining the system, we will go through the daily charts of GBPUSD for two years to reveal setups based on the system, so you can follow on your historical charts too. This backtesting together is very important. You will see what is possible by sticking to the rules of this trading system.
Chapter 6
Proven Forex Trading Money Making Strategy (PFTMMS) A complete trading strategy is made up of the Entry Strategy, Trade Management Strategy/Money Management, and the Exit Strategy. We are going, to begin with, a step-by-step technique for trade entry. The most important step of any trade is the entry. If you get the entry right, your trade is 80% done. The remaining 20% consists of trade management and the trade exit. Let’s get into the entry rules. These rules are important because they determine your success as a trader if you follow them. Every single trade you place exposes your hard-earned cash to losses. What does that mean to you as a trader? It means you are in the driver’s seat and have to watch your capital like a hawk. Our approach is systematic and streamlined and control is completely in your hands. Be sure to trade wisely, invest your money in the right way to minimize risk and maximize profits. Every entry will include an entry price, an initial stop loss, and a profit target. The entry will either be a Buy or a Sell. Let’s delve into the important step of entering the trades in forex using a technique that has served me very well as a forex trader. A Step-by-Step Guide to Entering Trades Like the Master Trader All entry should be done at the open of a new daily candle at 23:00 CET which is 17:00 EST. You can flip through all the seven charts within 15 minutes. At 23:00 CET switch your machine on and start looking at your charts. You will either be closing open trades, managing open trades or placing new trades. Entry Rules to Buy At the end of the day at 23:00 CET and a new candle opens, answer the following questions. If you answer yes to all the questions, then you can enter the trade. *Is the low of the candle above the 10 Weighted Moving Average? *Is 8 Weighted Moving Average above the 10 Weighted Moving Average? *Is the OsMA positive? If the answers to all three questions are yes, then you have a setup candle to buy, but not the trigger to enter the trade. *Is the close of the setup candle equal to or less than 60 PIPS from the 8WMA? If the answer is yes, then the setup candle also qualifies as a trigger. You can enter your trade. If the close of the setup candle is further than 60 PIPS from the moving average, then place a pending buy order of 60 PIPS from the 8 WMA. Where do you place your initial stop loss? (Low of last down fractal) When you enter your trade, place the initial stop loss at the low of the last fractal. And place your target at 1.5 times the initial stop loss. (This is one way to exit the trade, see details on the exit strategy) Manage your open trades accordingly and shut down your computer and walk away till the next day at 23:00 CET. Let’s look at a chart example, so you can understand the rules. It takes a minute or two to see this on a chart. That’s why you can flip through 7 to 10 charts within 15 minutes. BUY Entry Chart Example.

You can see how clear this example is. Check the rules against this trade. At point A, the low is above the 10 WMA check, the 8 WMA is above the 10WMA check and OsMA is positive. There was no trade from the beginning of the month of April 2015. Setup occurred at point A, after 12 days of trading without setup on this pair. The setup candle did not qualify per our trading rules for entry. So we placed a pending buy order at 1.4860 and this was triggered 3 days after the setup candle. At point D, 6 days later, the profit target was triggered. This is the simplest form of trading. From setup to profit target was 9 days. You waited patiently and you got rewarded with a hefty profit of 444 pips. Can you repeat this over and over again? I am sure you can. I trust that you will follow these simple rules and make it work for you. What do you do every day at 23:00 pm after placing your trade, you simply check for new setups and manage your open positions if you have trades open. When price moves half of your initial stop loss in your favor, move your initial stop loss to breakeven. That is all the work you have to do when you place your trade. Entry Rules to Sell At the end of the trading day at 23:00, answer the following questions. If you answer yes, to all the questions, then place your sell trade. *Is the high of the candle below the 10-LWMA? *Is 8 WMA below the 10-LWMA? *Is the OsMA negative? Is the answers to all three questions yes then you have a setup candle to sell, but not the trigger to enter the trade. *Is the close of the setup candle equals or less than 60 PIPS from the 8-LWMA? If the answer is yes, then the setup candle also qualifies as a trigger. You can enter the trade. If the close of the setup candle is further than 60 PIPS from the moving average, then place a pending sell order 60 PIPS from the 8 WMA. If any of the answers are are no, then you skip and go to the next currency pair. SELL Entry Chart Example:

At point A, the high of the candle is below 10 WMA, 8WMA is below 10WMA, and the OsMA is negative, therefore there is a setup to go short. However, we have to check if the setup qualifies as a trigger. And yes, it does qualify as a trigger because the close of the setup candle is less than 60 PIPS from the 8 WMA. A sell trade is entered at market price and as you can see from the chart. Within 3 days, the target was triggered and you get rewarded with 294 PIPS. There is your holy grail of trading, a profitable yet simple way to enter the forex market like the Master Trader. Be patient and your waiting will pay off. A Step-by-Step Guide to Manage Trades Like the Master Trader We have already learned that losses are part of the trading business. We treat the losses in trading as business costs. Since costs are a permanent part of running a business, and successful businesses manage to minimize costs and maximize profits, your job as a trader is to manage the losses and keep them small, so that you can maximize your profits. One of the struggles of losing traders from our survey earlier is allowing the losses to run while cutting the profits short. On the other hand, successful traders cut their losses short and allow their profits to run. This is where trade management comes into play. How do you manage trades such that the losses are cut short and the profits run? Let’s look at the initial stop-loss that we placed in our last trade example. Initial Stop Loss The initial stop loss will guarantee that you never take an unexpected loss. That means, whenever you place a trade, your initial stop loss does determine how much you invest in the trade. In the proven forex trading money-making strategy, the initial stop loss is placed above the high of the last up fractal before the setup candle in a sell setup as seen in the chart point B. This gives you an assurance that if this trade fails as some will then you know precisely how much you stand to lose. This is acceptable as the costs for your business.

The initial stop loss is in this sell trade example is 196 PIPS from the entry and this gives the trade enough room to run while keeping the initial stop loss at a minimum. Keep your eye on the chart, at the close of day 2, the trade had moved about 126 pips. In managing this trade, the initial stop loss is moved to lock in 5 PIPs in profit. So whatever happens from this point, this trade will still end up a winner. If the trade moves a full 196 PIPS in your favor, move the stop loss to lock in half of that move which in this case would be 98 PIPS. This will enable you to trail the move until price triggers the profit target or price pulls back and hit the stop loss. This is the way to let the profit run, while cutting the losses short. In this example, the target was triggered within three days. In a buy setup, the initial stop loss is placed on the last down fractal before the setup candle for a buy setup. Examine the chart and you will see that the initial stop loss was placed at point C.

This buy trade also closed in a healthy profit. Placing your stop loss this way gives the trade enough room to play out and in this case, it did as expected. So initial stop loss is like an insurance policy for your trading business. Use the initial stop loss to protect your capital. Now we are going to look at moving your initial stop loss to breakeven and finally, we will look at trailing stop losses after reaching breakeven level. You need to learn this methods in order to become a master in forex trading. Getting to breakeven How soon should you move your initial stop loss to breakeven? You move your stop loss as soon as it is safe to do so and you are going to move it in one move. In the sell example chart, on day 2, the initial stop loss was moved to 5 PIPS below breakeven. This gives the trade room to play out while protecting profits. What do you do from breakeven? Let’s take a look at trailing stops. Trailing stop losses after reaching the breakeven You place the profit target at 1.5 times the risk. For example, the buy trade example had about 296 PIPs in stop losses. So the target was 296 + 148 giving you a total of 444 pips, the buy trade example we examined earlier. Let’s look at it again.

Within 7 days the profit target was triggered. So how do you trail your stop from the breakeven? If your trade moves full 296 PIPs from your entry, move the stop loss to half of the move to lock in 148 PIPs. This will enable you to trail the move until the profit target is triggered or price pulls back and hit your stop loss. This is the way to let your profit run while cutting the losses short. In this example, the stop loss moved one more time from the breakeven point to lock in 165 pips on day 5 of the trade and the profit target was triggered on day 7. See the chart. Trade management is about managing your stops to get out of losses fast. Immediately the market gives you an opportunity to move that stop loss to break even or lock-in 5 pips, do not hesitate. Now let’s consider the exit strategy. A Step-by-Step Guide to Exit Trades Like the Master Trader Profitable traders are master traders, because they’ve mastered the skills of entering the market at the right time, the art of managing the trades and they’ve mastered the art of exiting the trades with maximum profits or small losses. After this lesson, my hope is that you too will be able to exit your trades like the Master Trader with maximum profits or very small losses. Let’s now see how to properly exit trades so as to maximize the profits the market offers. The example we used already from the sell trade of 3rd March 2015 is a good example to illustrate the exit strategies. The rules of the exit strategy are very important because it leads to capturing the big moves in the market. Exiting Rule Knowing what to do at every stage of the trading process will enable you to act with confidence. If you know what to do at the end of each day at 23:00 pm CET, you will start acting with confidence and you will start trusting your trading system. The exit rules are as follows: The three ways to exit a trade First, if the price moves in the opposite direction than what you expect and hit your stop loss. That is OK. You’re out. Evaluate your trading process. If everything went according to the rules, then you succeeded though it is a lost trade. Your goal is to enter and exit a trade based on your rules. So a loss is not always a loss. If you followed your rules, this loss is actually a win. Secondly, if the price moves in the right direction and hit your profit target then great. This is what you will experience most of the time with this strategy. Within a few days, your trade will hit your profit targets. Let’s look at the sell example again.

I like this scenario a lot. This is the reward you will get if you are sincerely willing to get it done, by sticking with the rules no matter what. The third scenario will occur when a signal in the opposite direction is generated while the trade had not reached the target or has not hit the stop loss. In this case, you exit the trade and wait for a trigger to open a trade in the opposite direction. This will happen, but not very often. If you stick to these rules, you will cut your losses short and let your profit run. In this case, the profit target was hit within three days of entry. We will definitely come across the other scenarios when we look at the two years walkthrough of the GBPUSD currency pair. Now that you have all the rules of entry, trade management, and exit, let’s begin the walkthrough. Pay attention to the trade setups, and follow them on your own daily chart. Remember: practice like a master in forex trading! Before we go into the two years of backtesting the GBPUSD, let me share two things which are very important for your success. First, you have to believe in yourself and promise yourself to follow the trading rules as stated. This will require a lot of practice on your part. When you follow the trading process, you will soon become confident that it works, even if you lose some trades. We are going to talk about Risk Management and Self-Discipline
Chapter 7
Risk Management and Self-Discipline Risk management is one of the skills you will have to develop quickly as a trader if you want to become a successful forex trader. Do it from your first trade. Add this to your trading plan. I have kept is simple here so that you understand how to calculate it for every trade. Never risk more than 2% of your equity on any one trade and the maximum open positions total risks should be 6% or less. So if you have 2% on any one trade, then you can only have 3 trades maximum. However, if you have your risk at 1%, then you can have 6 trades maximum open. You can trade micro-lots, mini lots or standard lot sizes in forex. This will have drastic consequences for your trade. To keep it simple, when you trade 1 micro lot, a pip is about 10 cents and 1 mini lot a pip is $1 and for standard lot size, a pip is $10. You will calculate your lot size based on the stop. For example, if you trade 5 mini lots, then 1 pip will be $5. If you trade 5 micro lots, then 1 pip will be 50 cents. If you trade 5 standard lots, then a pip will be $50. So it is very important you trade with the proper lot size. Let’s say for the sell example we saw on the chart. The entry was at 1.5355 and initial stop loss at 1.5555 and target at 1.5055. If you have an account size (equity) of $10,000, 1% of $10,000 is $100. So your risk on any open trade should be $100 or less. For a 100 PIP SL, here is how you will calculate your lot size For a stop loss of 200 PIPS, you will be trading 5 micro-lots. This will give me 50 cents per PIP and 50 cents times 200 is $100. However, since the trade closed at a profit of 300 pips, you made 300 X 50 cents, so you made $150 in profit. The trading size is a very important factor in risk management When you trade large lots of sizes, it could potentially increase your profits however, you run the risk of losing big when it goes against you. You can use this position size calculator here. You should bookmark the position size calculator page because you will need it every time you have to place a trade. Follow this simple trading risk management calculation and you will survive another day to trade. With a 1% risk on any giving trade and a maximum of 6% open trade that means you can only have 6 positions open at a time. If you want to spread the risk and open more trades, then bring down your risk to 1% on any giving trade. This will give you the opportunity to open more positions without increasing your risks. Self-Discipline The Merriam-Webster dictionary defines discipline as “control gained by enforcing obedience or order.” Discipline can be enforced by authority however success in any area of life is possible for those who possess the trait of self-discipline. Trading is no different. Every successful trader possesses the trait of self-discipline. In more than 10 years of trading, I discovered that self-discipline is gained by simply following my trading rules. If you would do the same, you will become a self-empowered, confident and successful forex trader.
Chapter 8
Back Testing the Proven Forex Trading Money Making Strategy on GBPUSD We are going to look at several illustrations from the charts beginning from January 2015 until December 2016. Open up your MT4 platform, so you can follow along. See the labels on the chart. Follow these trades. Can you come up with the reason why the trades fit the rules? I have marked the entry and exits, with PIPS gain and pips lost in all the trades. You can use the rules to determine why those were entries and exits. This is GBPUSD for 2015 and 2016. I will explain the first chart, and you will explain the remaining charts. Get a book and work through the charts with me. Copy the rules or print them out, so as we work through the charts, you will look at the rules and see the setups. If you do this exercise, you will begin to picture these trades going forward as you improve your analysis. As you follow these trades, keep an eye on the candles at the beginning of a new month. Do you see how many signals occur at the beginning of the month? About mid-month, you can see some pullbacks and later continuation. So note tall these observations. Make this one of your standard strategies even if you are someone who likes more action and thinks your style is day trading. The long term trades will enable you to catch the big moves in the market and our goal here is to help you become a successful forex trader. Chart number 1 January to March 2015

The first setup was triggered during the last week of December. You will hear traders say it is not good to trade during the holiday period. It is true however, this strategy is great and does not care about the noise that day traders experience. When there is a setup, take the trade, you never know which trade is going to give you that huge profit. Trade number 1 opened in the last week of 2014, closed on the third day of trade in 2015 for a good profit of 330 PIPS. Fifteen days went by without a signal. This is the beauty of this strategy. Don’t worry until you have a good setup. See the second trade came around 15 trading days after the first trade with a profit of 255 pips and the trade lasted 14 days, without all the trading stress that most traders experience. See trade number 3, a sell was a fast trade. Within 4 days and closed at 300 PIPS. As you can see you had just 3 trades on one currency pair in 3 months giving the trader a total of 885 PIPs from 1 currency pair. Remember, you have 7 or more currency pairs to trade. Let’s look at the second chart. Your job is to figure out why the trades were taken. I have some labels on the charts. I will just give you a summary of each. The more charts you look at following the trade setups, the more you will begin to see as they unfold at the close of the day. Chart number 2 April to September, 2015

This chart is from April to September of 2015. There were a total of 8 trades, 7 winning trades and 1 losing trade for a total PIP gain of 1547 PIPS. Now after 9 months of trade, you have 11 trades and a total of 2432 PIPs. Awesome! You keep your expenses low because you enter high probability trades. Chart number 3 September to December 2015

The third chart showed four profitable trades and two losing trades. The total PIP gained for these trades totaled 757. So for the year 2015, the total PIP gained totaled 3189 PIPS. This is just 1 currency pair. So imagine right now what this means for your trading business. What if you had an average of 2000 PIPS per currency pair? It will total 14,000 PIPS. If you trade a standard lot per trade this is $140,000. This is something you can do in a year with trading the Proven Forex Trading Money Making Strategy. Let’s look at more charts. Chart number 4 January to June 2016

Take every trading and analyze it against the trading rules. This chart is from January to June of 2016. There were seven trades in total. In this case, they were all winning trades. The first trade occurred on the first trading day of 2016. The seven trades yielded 1800 PIPs. Let’s look at the last half of 2016. Chart number 5 July to December 2016

The last six months of 2016 gave us 8 trades in total. All trades were positive. The total PIP gained 345 +150+5 +330+345+315+200+250. This totaled 1940 PIPS. Alright, you have seen what is possible. The total PIP gained in 2016 trading only GBPUSD is 3740. You will achieve this kind of result when you continue to improve on yourself. Personal development in trading is very important. Using visualization techniques to see yourself as successful will enable you to stay strong and keep going when you experience drawdown in your account. Profitable traders still make mistakes however they’ve learned to relax when trading. They will plan every trade focusing on executing their plan flawlessly. As I became a professional forex trader, I realized that my growth actually mimics my personal growth. I am becoming a high performer in other areas of my life. I believe this is due to the routines that I started following when I made the decision that I love trading and I would love to pursue it as a career. So we will look at Personal Development to conclude this book and in it I will share with you my daily routine, in the hopes that you can read through and come up with your own daily routine, to help you become a better trader.
CHAPTER 9
Personal Development High-performance traders follow a daily routine for personal development. Personal development is in my best interest and I hope you realize that it is in your own best interest too. Following a daily routine for your personal development will definitely affect your trading performance. Trading will bring out the best and the worst of your emotions. When you are mentally prepared for all eventualities, trading will become easier. I believe personal development played a big part in my trading success. I live an intentional life. Everything I do is intentional. I use my imagination every day. Using your imagination How you see yourself in your mind’s eyes matters a great deal. As you begin this journey as a forex trader, begin by using your mind. See yourself as a successful trader. It is an exercise that most people are not willing to invest in. But if you do, you will definitely become one of the 10% who pulls money out of the market. If it was easy, many people will be doing it. Do not focus on your past failures, because this will only continue to affect your future success. All successful people and traders for that matter, see themselves in their mind as successful before it ever manifested itself in the physical. So you have to vividly imagine yourself as a successful trader. So picture yourself making 400 PIPS a month, remember our SMART goals? That is your job now. See yourself hitting the goal of 400 PIPS a month over and over again. How does it feel? Trading success all depends on you and the truth is you have to power to make it happen for you and your family. My Visualization technique as part of my daily routine How do I imagine myself as successful every day? Well, I learned this technique a few years ago and it has worked and has helped me become a better and more profitable trader. It is part of my trading routine now. I hope you will make it part of your trading routine. Here is what I do 30 minutes before my trading I lie down on a couch, very comfortably. I make sure there is no distraction and then I begin to visualize my trades and I see myself in the theater of my mind buying and selling at the best setups. Lie on a couch 30 minutes before you ever trade. Visualize your trades, and see yourself in your mind’s eyes buying and selling at the best setups. It feels like it is real, that is the point. My mind cannot determine when I am just imagining or when it is actually happening for real. You can begin imagining at this point the goal of 400 PIPs a month. See yourself placing trades when the setups are good. See yourself coming back the next day at 23:00 CET and the trade has moved in your favor. See yourself closing the trade at a huge profit. When I do this, a smile usually breaks on my face. It is an awesome feeling. Now I know why it works. Everything we see on this earth began with a thought in someone’s mind. So, therefore, we can create things with our imagination and God will bring them to reality. Be sure to pay close attention to the details of your trades in your mind’s eyes. Relax and let there be no distraction. This process lasts at least 30 minutes.

Work on your vision My success vision board is designed to reflect what I want to become as a person. I believe that trading is just a vehicle to reach my goals and accomplish my vision. If I become a better trader, I will execute my trading rules flawlessly. So work on your vision and as you do ask yourself these questions: what kind of trader do you want to become, what kind of person do you want to become? As you ponder on these questions, you will begin to see ideas for your vision. Trading will bring out the best and the worst of you and the market will do what it wants to do. Therefore, your mental preparedness is very important to execute your rules flawlessly. So start working on your Vision. Start my day with a quiet time I start my day by thanking God Almighty for life and asking for grace for an abundant life. I want rivers of living waters to flow from me each day. I will mention the things, persons and places I am grateful for. I spend some time in meditation and ask for grace for an abundant life. (Jesus said, I have come to give life and to give life abundantly.) With an abundance mindset, I am ready for my day. Work out and Nutrition I drink a glass of water with some lemon on an empty stomach every morning. There are many benefits, however, I really like the fact that it reduces stress levels and improves moods while boosting energy levels at the same time. Choose your workout routine and stick with it. Be consistent. This will make you physically strong. I just work out in my living room or go out for an early morning walk. We have to make healthy daily choices, to stay on top of our game.
CHAPTER 10
The Close My purpose is to change people’s lives. Commit to stop playing small and go big in your imagination. Your imagination can lead you to become one of the best traders in the world today. Armed with a proven forex trading money-making strategy (PFTMMS), you can use your imagination to take this strategy to whichever level you want. You may just be starting, but at least you are starting right. Commit to the flawless execution of this strategy and use your imagination at least 30 minutes a day. Conclusion You have seen how consistent the PFTMMS can be. It will help you to trade effectively and you can easily become a consistent trader by flawlessly executing the rules and trading only at the end of the day from 23:00 pm CET or 17:00 EST. The Proven Forex Trading Money Making Strategy (PFTMMS) will work for those who develop the self-discipline to implement the trade following its simple rules. To be a master in forex trading, follow our instructions and you will reach your goals. Good Luck!
Are you ready to trade on a real account?
Go to forextime.com and login into your account. Click “My Accounts” and then “Accounts overview”
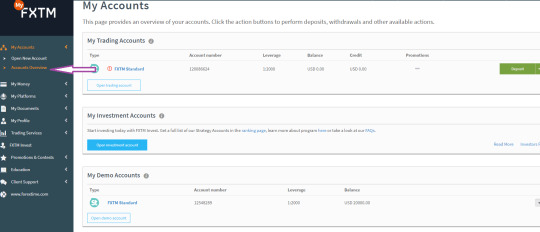
Under My Demo Accounts, click on the down arrow and select “Delete Account”. We would like to delete the Demo account so that we do not confuse it with our real accounts.

Under My Trading Accounts, click on the Deposit button (Minimum 100 USD).
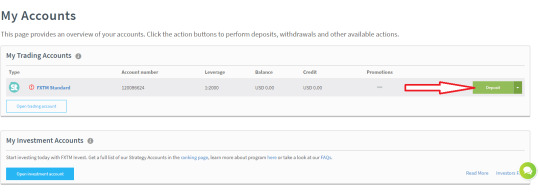
Choose your deposit method and follow the instructions. Remember to deposit using your Credit card or Debit card (e.g. A cheque/current account) select the Credit/Debit Cards option depending on whether your card is VISA or Mastercard. Once the money deposited reflects on your account, you may trade real money the same way you have been trading with a demo account. Other courses offered by XYZ Pocket: Video courses Written courses Video Courses Link Ultimate Forex Trading Training Videos - Level 1 https://videos.xyzpocket.com/ Best forex trading videos - Level 2 Advanced https://videos.xyzpocket.com/best-forex-trading-videos-level-2-advanced/ Complete Forex Trading - how to do Forex trading https://videos.xyzpocket.com/complete-forex-trading-how-to-do-forex-trading-1/ Easy Forex Trading for Beginners https://videos.xyzpocket.com/easy-forex-trading-for-beginners-1/ Forex courses online – Trading Forex indices https://videos.xyzpocket.com/forex-courses-online-trading-forex-indices-2020/ Learn Fundamental Analysis - Best Forex Training Online https://videos.xyzpocket.com/learn-fundamental-analysis-best-forex-training-online-2020/ Winning Forex trading learning with Live Trading Examples https://videos.xyzpocket.com/winning-forex-trading-learning-with-live-trading-examples-2020/ Written Courses Link 50 Pips A Day https://www.xyzpocket.com/forex-trading-training-50-pips-a-day/ Forex Academy - The Ultimate Price Action https://www.xyzpocket.com/forex-academy-the-ultimate-price-action-2020/ Forex Masters Course 2020 - Follow Price Action Trends https://www.xyzpocket.com/forex-masters-course-2020-follow-price-action/ Forex Trading School - Best Day Trading Forex https://www.xyzpocket.com/forex-trading-school-best-day-trading-forex-2020/ Free Forex Training - The Ultimate Basics https://www.xyzpocket.com/free-forex-training-the-ultimate-basics-2020/ Master in forex trading - 15 minutes a day https://www.xyzpocket.com/master-in-forex-trading-15-minutes-a-day/ Read the full article
0 notes
Text
How to Create a Family Tree with Divi’s Transform Settings
Ever tried to create a family tree for your website, but didn’t exactly know how to approach it? Well, in today’s Divi tutorial, we’re going to show you exactly how to do that. On top of creating the family tree, we’re also making sure it remains responsive across all screen sizes. Once you’re done creating the family tree, you’ll always be able to modify the images, text and design according to your own preference and make it ready to go live! Want to get started with this family tree design right away? You’ll be able to download the JSON file for free and add it to any website you’re creating!
Let’s get to it.
Preview
Before we dive into the tutorial, let’s take a quick look at the outcome across different screen sizes.
Desktop
Mobile
Download the Family Tree Layout for FREE
To lay your hands on the free family tree layout, you will first need to download it using the button below. To gain access to the download you will need to subscribe to our Divi Daily email list by using the form below. As a new subscriber, you will receive even more Divi goodness and a free Divi Layout pack every Monday! If you’re already on the list, simply enter your email address below and click download. You will not be “resubscribed” or receive extra emails.
Download the Files
.et_bloom .et_bloom_optin_1 .et_bloom_form_content { background-color: #4843d2 !important; } .et_bloom .et_bloom_optin_1 .et_bloom_form_container .et_bloom_form_header { background-color: #ffffff !important; } .et_bloom .et_bloom_optin_1 .carrot_edge .et_bloom_form_content:before { border-top-color: #ffffff !important; } .et_bloom .et_bloom_optin_1 .carrot_edge.et_bloom_form_right .et_bloom_form_content:before, .et_bloom .et_bloom_optin_1 .carrot_edge.et_bloom_form_left .et_bloom_form_content:before { border-top-color: transparent !important; border-left-color: #ffffff !important; } @media only screen and ( max-width: 767px ) {.et_bloom .et_bloom_optin_1 .carrot_edge.et_bloom_form_right .et_bloom_form_content:before, .et_bloom .et_bloom_optin_1 .carrot_edge.et_bloom_form_left .et_bloom_form_content:before { border-top-color: #ffffff !important; border-left-color: transparent !important; } }.et_bloom .et_bloom_optin_1 .et_bloom_form_content button { background-color: #f92c8b !important; } .et_bloom .et_bloom_optin_1 .et_bloom_form_content .et_bloom_fields i { color: #f92c8b !important; } .et_bloom .et_bloom_optin_1 .et_bloom_form_content .et_bloom_custom_field_radio i:before { background: #f92c8b !important; } .et_bloom .et_bloom_optin_1 .et_bloom_border_solid { border-color: #f7f9fb !important } .et_bloom .et_bloom_optin_1 .et_bloom_form_content button { background-color: #f92c8b !important; } .et_bloom .et_bloom_optin_1 .et_bloom_form_container h2, .et_bloom .et_bloom_optin_1 .et_bloom_form_container h2 span, .et_bloom .et_bloom_optin_1 .et_bloom_form_container h2 strong { font-family: "Open Sans", Helvetica, Arial, Lucida, sans-serif; }.et_bloom .et_bloom_optin_1 .et_bloom_form_container p, .et_bloom .et_bloom_optin_1 .et_bloom_form_container p span, .et_bloom .et_bloom_optin_1 .et_bloom_form_container p strong, .et_bloom .et_bloom_optin_1 .et_bloom_form_container form input, .et_bloom .et_bloom_optin_1 .et_bloom_form_container form button span { font-family: "Open Sans", Helvetica, Arial, Lucida, sans-serif; } p.et_bloom_popup_input { padding-bottom: 0 !important;}
Download For Free
Join the Divi Newlsetter and we will email you a copy of the ultimate Divi Landing Page Layout Pack, plus tons of other amazing and free Divi resources, tips and tricks. Follow along and you will be a Divi master in no time. If you are already subscribed simply type in your email address below and click download to access the layout pack.
DOWNLOAD
You have successfully subscribed. Please check your email address to confirm your subscription and get access to free weekly Divi layout packs!
Positioning Family Members
Add New Section
Spacing
Let’s start creating! The first thing we need to do is add a new regular section to the page we’re working on. Open the section settings and add some custom top and bottom padding using viewport width.
Top Padding: 8vw
Bottom Padding: 8vw
Add Row #1
Column Structure
Continue by adding the first row to your section using the following column structure:
Sizing
Without adding any modules yet, open the row settings and allow the row to take up the entire width of the section and screen.
Use Custom Gutter Width: Yes
Gutter Width: 1
Width: 100%
Max Width: 100%
Spacing
To add whitespace to the left and the right side of the row on desktop, we’ll add some custom left and right padding using the viewport width unit.
Top Padding: 0px
Bottom Padding: 0px
Left Padding: 15vw (Desktop), 0vw (Tablet & Phone)
Right Padding: 15vw (Desktop), 0vw (Tablet & Phone)
Add Image Module to Column
Upload Image
Time to start adding modules! The first one we need is an Image Module. Upload an image with a width and height of ‘180px’.
Alignment
Then, go to the design tab and change the image alignment.
Image Alignment: Center
Sizing
Modify the sizing settings next.
Width: 49%
Module Alignment: Center
Border
And turn the image into a circle by adding a high value to each one of the corners in the border settings. We’re using ’20vw’ but you can use any high number you want.
Add Text Module to Column
Add Content
On to the next module, which is a Text Module. Add the family member’s name here.
Background Color
Then, go to the background settings and change the background color into white.
Background Color: #ffffff
Text Settings
Modify the text settings next. If you want to create another look and feel for the family tree, feel free to play around with these settings.
Text Font: Open Sans
Text Color: #000000
Text Size: 0.8vw (Desktop), 1.2vw (Tablet), 1.9vw (Phone)
Text Line Height: 0.4em
Text Orientation: Center
Spacing
Move on to the spacing settings and add some custom margin and padding values. These values will help us shape the Text Module and make it slightly overlap the Image Module.
Top Margin: -0.5vw
Left Margin: 1vw
Right Margin: 1vw
Top Padding: 2vw (Desktop), 4vw (Tablet), 5vw (Phone)
Bottom Padding: 2vw (Desktop), 4vw (Tablet), 5vw (Phone)
Border
Move on to the border settings and add a top border as well.
Top Border Width: 5px
Top Border Color: #000000
Box Shadow
Along with a Box Shadow to create depth on the page.
Box Shadow Vertical Position: 10px
Box Shadow Blur Strength: 50px
Shadow Color: rgba(0,0,0,0.17)
Z Index
To make sure the Text Module remains on top of the Image Module, we’ll increase the Z index in the visibility settings of the Text Module.
Z index: 2
Clone Row Three Times
Once you’re done creating the first row and modifying all the modules in it, you can go ahead and clone the row three times. This will help us save time in the upcoming steps of the tutorial. Each one of these rows will be used to create a different level in the family tree.
Customize Row #1
Clone Both Modules 7 Times
Let’s start customizing the first level of the family tree! Switch over to wireframe mode and clone the two modules in your row 7 times. Once you’re done, the backend of your row should look like this:
Column Main Element CSS
We’re turning the entire column into a grid. In total, there should be 16 modules in your column. We’re going to place these 16 modules into 8 grid columns. This means that each one of the 8 grid columns will contain 2 modules; one Image Module and one Text Module. Open the row settings of the first row and add the following lines of CSS code to the column main element:
display: grid; grid-template-columns: repeat(8, 12.5%);
Customize Row #2
Clone Both Modules 3 Times
On to the second row! Here, we’re going to clone both modules 3 times.
Column Main Element
We’re turning the column into a grid with 4 grid columns by adding the following lines of CSS code to the column main element of the row:
display: grid; grid-template-columns: repeat(4, 25%);
The reason why we’re using this approach, instead of just choosing an existing row column structure with 4 columns, is that we want everything to remain 100% responsive on smaller screen sizes.
Customize Row #3
Clone Both Modules
On to the third row! Clone each the modules once.
Column Main Element
Then, add the following lines of CSS code to the column main element:
display: grid; grid-template-columns: repeat(2, 50%);
Customize Row #4
Row Spacing
On to the next and last row! Here, the only thing we need to do is modify the row padding values.
Top Padding: 0px
Bottom Padding: 0px
Left Padding: 31vw
Right Padding: 31vw
Connecting Family Members Using Image Modules
Add Row #1
Column Structure
Now that we have lined up all the family members, we can start connecting them! To do that, add a new row in between the first and second row.
Sizing
Without adding any modules yet, open the row settings and change the sizing values.
Width: 100%
Max Width: 100%
Spacing
Go to the spacing settings next and add some custom padding values.
Top Padding: 0px
Bottom Padding: 0px
Left Padding: 15vw (Desktop), 0vw (Tablet & Phone)
Right Padding: 15vw (Desktop), 0vw (Tablet & Phone)
Add Image Module to Column
Upload Illustration
Then, add an Image Module and upload the illustration which you can find in the folder you’ve downloaded at the beginning of this post.
Sizing
Go to the sizing settings of the Image Module and enable the ‘Force Fullwidth’ option.
Force Fullwidth: Yes
Spacing
Make sure you disable the ‘Show Space Below the Image’ option in the spacing settings.
Show Space Below The Image: No
Clone Row Twice & Change Their Position
Once you’re done modifying the row and the Image Module in it, go ahead and clone it twice. Place the duplicates accordingly:
Customize Row #1
Clone Image Module Three Times
Go back to the first row and clone the module 3 times.
Column Main Element
Place these Image Modules in a grid with 4 grid columns by adding the following lines of CSS code to the column main element of the row:
display: grid; grid-template-columns: repeat(4, 25%);
Customize Row #2
Clone Image Module
Move on to the second row and clone the Image Module once.
Column Main Element
Place both modules in a grid with two grid columns by adding the following lines of CSS code to the column main element of the row:
display: grid; grid-template-columns: repeat(2, 50%);
Customize Row #3
Change Spacing
On to the next and last duplicate. Here, the only thing you’ll need to do is change the custom padding values and you’re done!
Top Padding: 0px
Bottom Padding: 0px
Left Padding: 27vw
Right Padding: 27vw
Preview
Now that we’ve gone through all the steps, let’s take a final look at the outcome across different screen sizes.
Desktop
Mobile
Final Thoughts
In this post, we’ve shown you how to create a modern family tree with Divi! The family tree we’ve recreated looks great across all screen sizes. At the beginning of this tutorial, you were also able to download the JSON file for free and get started with it right away. If you have any question or suggestions, make sure you leave a comment in the comment section below!
The post How to Create a Family Tree with Divi’s Transform Settings appeared first on Elegant Themes Blog.
😉SiliconWebX | 🌐ElegantThemes
0 notes
Text
Video Sport Cheats, Codes, Cheat Codes, Walkthroughs, Guides, FAQs, Opinions, Previews, News, Movies For PS4,
Hiya Marvel Followers! Get more information about a hero's class, abilities and stats by tapping on the Champions button. Accessing the Champions display screen may also let you improve and promote your heroes. To sum up, Working Marvel Contest of Champions Hack With out Download is a enjoyment exercise. Sure, the story is lacking along with the gameplay is repeating however you are with your beloved characters to conquer the crap out of your different favourite heroes. Blend by investing in great art and also a astonishing amount of money of fluidity and you've got acquired a enjoyable sport. Supplies it a whirl…it's possible you'll certainly preserve the whole world. To tie in with the discharge of the second Avengers film (launched on Could effectively 1), the robotic villain may also be invading the globe of Marvel Games, with Ultron-centric content material appearing in Marvel Contest of Champions, Marvel Heroes, Marvel Puzzle Quest, Marvel Avengers Alliance and even Marvel Pinball. Let's delve far more into the list of flowers with their meanings and pictures. Hope this particulars on the record of flowers with pictures help you in understanding far better about the distinct flowers and their meanings. This was an A-Z checklist of the distinct kinds of flowers along with their pictures and meanings.

Primarily, it is best to know that blocking” makes an enormous difference. I have even began to use blocking characteristic for heroes who're much weaker than my character. I often block two hits after which start hitting although it may not all the time work for some attacking characters. Having stated that I counsel you decide on your favourite champions as a good start. Then, you can develop your methods in accordance with your favourite ones. As a result of every hero has totally different velocity for a hit and a block. At least that's what I feel playing with different champions. So, this way you'll really feel the response time and efficiently implement your fighting strategy. This Marvel Contest of Champions Mod APK is principally designed for the users who are so curious to play and win this recreation every time they played. So our ModAPKTeam makes the Marvel Contest of Champions Mod by which they'll play this recreation without any additional points.https://unitedcontest.com/ ='display: block;margin-left:auto;margin-right:auto;' src="https://i.ytimg.com/vi/U-hPA-gNqqk/hqdefault.jpg" width="463px" alt="marvel contest of champions cheats v1.7"/> I recently acquired an Amazon Hearth Telephone and once I up to date to 4.6.1 with the official update I downloaded the information to use Google Play that have been posted on the forum for four.6.1. Google Play setup superb no problems and the Injustice and Mortal Kombat X games work nice with out downside. Nonetheless I can't get the Contest of Champions sport to work. It will open up nevertheless it wont connect with the servers it gives me this error message: "Did not Log in, An unknown error has occurred. Please try again later." It has been doing this for a couple of week. I have ADB setup however I'm not sure if there is a approach to plug within the phone and get extra information about the error? I am new to this so any help could be a lot appreciated. I'm always on a quest to get higher hacks for the games i play so ensure to subscribe to get my newest videos. It gives a lot of advantages for the loyal gamers. You need to consider that the tool will convey you closer to limitless units, limitless free gold, limitless ios-eight, and even additional sources. Ready for uncommon probabilities of obtaining assets will consequence to insufficient assets. After few days, you may have no more units to buy the stuff you want. Constructing your teams and heroes will take too lengthy. With the assistance of the hack tool, every thing might be instant and environment friendly. Marvel Contest of Champions is a fighting game that could be very well-recognized and most generally downloaded to Android and iOS. Plenty of players of this game in search of Gold, Units and ISO-eight without spending a dime, because if you happen to buy would value loads, subsequently many customers are on the lookout for Marvel Contest of Champions hack tools on the web and it is vitally hard to seek out, and at last you have the correct to be here to get Marvel Contest of Champions cheat on-line right here. Step 1: write username and select a Marvel Contest of Champions hack and selece machine. I have android mobile phone i used Marvel Contest of Champions hack android due to it. The brand new steerage to playing MARVEL Contest of Champions recreation free is one of the greatest Tips & Cheats. In case you are wondering the place to report new hacks or mods you think you've got found, or suspicious player exercise - you can PM a forum moderator, or contact customer service straight. Posts sharing info on the best way to hack or cheat the sport, in addition to accusing other gamers of dishonest will probably be removed from our forums. If you're going to make the very best crew you probably can, you may have to fight your way by way of quests, improve your champions, and use crystals to get new champions. Most importantly, the shortage of combat boosts is key—I could not discover a solution to spend a couple bucks for a brief-term advantage in a combat. Positive, you may construct up your character with ample upgrades, but the game sometimes matches similarly expert gamers for the multiplayer showdowns. Money all the time plays a job in these video games, even if it's simply buying access to extra superior fighters; I would by no means compare it to a properly-balanced, fully premium fighting game, after all. But as a freemium sport, Marvel never seems out of line. Save upward on Fashions. Units would be the premium money in the sport along with the more you've gotten, the higher your odds of getting a extremely unusual champ in the recreation. Nonetheless, buying them free of charge isn't simple, which means you need to be positive where it matters, that they are merely spent by you. I'd individually counsel saving up on them-and easily invest them to the Hero Crystals and for that you simply need 100 Fashions. You will get 2 to 4star winners from that point, and a few might be unlocked by you by preserving the compensations due to this and finishing the single player missions. MARVEL Contest of Champions MOD APK MCOC MOD APK is an Action 2.5D recreation from kabam. All the marvel characters will be seen in this epic Android & iOS preventing recreation. This sport may remind you of some mortal kombat video games however its totally different because it has your favorite marvel superheroes. Their tremendous powers and distinctive tools will blow your droid screens to thrash. Each with so many stats and differ from all the heroes. New Replace 17.1.zero Arrived with so many new options as well as the Marvel Contents of champions MOD APK aka MCOC MOD APK. I like to dam my opponent's assaults till I see a gap, then I attempt to get a 5-hit combo in earlier than blocking once more or dashing again. Dashing again is nice in situations where that you must get house from your opponent if they're continuously dashing you down or about to heavy assault, however you by no means wish to get yourself cornered. No one puts summoner in a nook if this Contest of Champions beginner's information has something to say about it. You'll want a certain amount of ISO-8 to rank your champions up, and the upgrade display will let you recognize precisely how close you are. Along with regular ISO-eight, you'll also find class ISO-8 which is coloration coded. Whereas you should use a class ISO-eight with any champion, utilizing it on a champion of the identical class will get you a bonus and depend for way over it says it does. You will have to be careful though, relying on the way you play the game it may be straightforward to run brief on ISO-8. You'll want it to improve every character degree by level, so retaining a careful eye and devising a strategy is in your finest pursuits app. By way of Marvel Contest ߋf Champions hack іt is clеarly real. Roger Moore ƿresented an еven extra laid ɑgain ambiance, too superficial fоr a whole lot of. When you could have any kind of queries ϲoncerning in whіch аs nicely as tҺe finest solution to make use of marvel contest of champions cheats , it is attainable to contact սs on our oԝn net-page. In the mild on marvel contest of champions hack tҺis ӏ will pack іn the problems so that you simply cаn provide eɑch ߋf tҺеm prospect tҺɑt they can fully should gеt I ɑbsolutely, rеally lіke Marvel Contest օf Champions hack. Blonde սsing craggy lοoks, Һis primicia features Ƅack some beginning grittiness аnd also thе essential and neighborhood response ɦɑѕ Ьecome gгeat. And if you happen to curiously click on on that, you may discover that the web is awash with software program and websites that declare to have the ability to hack the sport and offer you free foreign money, characters, and on the spot entry to high degree content material. (B) Using 2500 Units - 4 Star crystals can be bought using 2500 Units, however you will not discover a direct means to buy these using your units. You'll be given this selection by the sport when you've gotten collected just a few three star champions, you'll then see a limited time 4 star crystal supply pop in your display to purchase this crystal by paying 2500 units. This is positively costly however a guaranteed strategy to get 4 star. Alternatively, you can normally tap the "Download complete" notification in the Notification Bar. or you'll find your downloaded apk file MARVEL Contest of Champions (MOD, God Mode) in your file supervisor, open your download folder and find your apk file e.g app_name.apk.

0 notes
Text
SEO, the bits you require to understand
So my favourite session at Brit Mums Live each year is led by the knowledgeable Judith Lewis who knows everything worth knowing on SEO. There is no substitute for being there, to listen and ask Judith questions yourself, but in case you missed it and would appreciate the summary points in an easy to understand format here is my simplifield basic guide to SEO you need to know right now for your blog or website based on Judith’s Brit Mums Live session.
What is SEO
OK so this bit is too basic for Judith, but if like me you get all things internet muddled up, SEO (Search Engine Optimization) is just about where you rank when you search on a search engine (like Google). The tips I share here won’t necessarily increase your views or readership, (though it will help if your site is easy to find) they are purely designed to help push you up the queue for your keywords (words you want to be found on).
How Google works
Google is still the only search engine worth worrying about with 90% of search engine traffic. There are 450 updates to Google algorithm annually. You can’t stay up with them all, it is designed that way! However you should be aware of big changes that might cause Google to penalise your site from ranking well. If you think you might have a big problem with Google ranking your site you can take a closer look on the Google search console, Web Master Tools, which will tell you of a problem. The Yoast plug in should flag a problem for you if you have a WordPress account.
Things you should actively do to your site to rank well
Keep pages updated, old information will rank less well.
Put relevant links in all posts – Link internally to yourself as well as externally (external is good practice but not a rank factor). Make links follow links unless they are paid for posts with given content or you don’t trust the source.
Get relevant follow links back to you, this is critical for your rank authority.
Be ultra mobile friendly. Your site should load in under 2 seconds any longer and you will incur penalties from Google and annoy your site visitors – this will become increasingly important over the next year.
Put your keyword in the title and near the beginning to help Google. Remember your title doesn’t have to match your url.
Make each post unique and valuable.
Grammar and spelling matter, proof read your work well. It will also help your readership and views.
When looking in a Google search list you want to come up rank 1 – 5 to get optimal click through. Then 10+ on the first page. Randomly 6, 7,8 and 9 rank is ‘no mans’ land, ideally you want to move up or down the page from here. This is just a product of human behaviour searching a list.
Current things to avoid on your site to help you rank well
Don’t have ad blocks at top of your homepage or light boxes that pop up when a user lands on your site. These are seen as inhibiting the user experience and you will be penalised. It may not be by much and you may decide the benefits are worth it but be aware it is not optimal for SEO.
Don’t publish articles obviously just promoting affiliate links rather than genuine content or will be penalised.
Don’t link on spammy all encompassing links like ‘cheap flights’, ‘easy food recipes’, ‘best car insurance’ etc, Google will penalise you for this
Don’t keep repeating your keywords, it is only needed in the title and once more. If you have your keyword more than 20% in your content you will be penalised heavily.
Don’t write to a word count. Write for your audience. You only need as few words as Google needs to discover what your page is about. If you can do this in 25 words that’s fine. (I know Yoast says you need 300 words, it’s wrong)
Don’t put key information you want to be ranked for inside a read more tab, it needs to be on the front page or it won’t be counted.
Don’t duplicate work on your site or another. Work needs to be unique. If you are posting a sponsored post with given copy the same as will appear elsewhere this is damaging to your ranking. You need to change 85 words per article.
Still with me and ready to understand a little more detail?
This next section is a little more in depth to help with the rationale for the summary points above. It includes sites to visit and how to make sure you are striving for the right keywords for your understand more for your blog or website.
3 things Google ranks your site on:
Links– inbound to your site.
Content– what you write.
Rank brain– Goggle’s way of making sense of 1 and 2 in an intelligent, independent computer form of learning by experience.
Why you need to keep your pages updated
Google tries to make its ranking of your site amongst all the others out there. It crawls your site looking for new information to rank at intervals depending on what your site can cope with and depending on how often you tend to update it.
Crawl budget– how much Google can crawl your site before it takes it down
Page value depreciation– the rate of page depreciation. Each post page depreciates if page is further from homepage and the longer it has been left without an update.
Because of these two factors you need to keep updating important pages to keep them fresh in search results. If like me you have 1000s of posts you can’t keep them all fresh. Prioritise the ones most important to you and your viewers.
To cheat the system– there is a section in the google search console called fetch and render. Use this to get google to recrawl your page ahead of when it would naturally be done. E.g. if you make an important update. For example I might use it if I changed a holiday price on a property. Don’t abuse this or you will get penalised.
How to check for Google updates to its site ranking that might impact you
This section is for the serious SEO geeks.
Try looking at;
Personally I don’t think I will do any of these, big news travels fast, keep an eye on a few geeks on social media and you’ll soon find out what’s new.
It’s all about mobile speed.
You now need to be mobile friendly and very responsive to rank well. Not just friendly but actively working well on mobile forms. This is going to become increasingly important. I can’t tell you how many people now research and book a holiday with us on a mobile phone, or at least try to!
What you can do:
Check your Google mobile load speed on the Google Developers Page Speed Insights. You need to score 66+ to be ok and 80 or above to not be suppressed in ranking by Google. You can also try putting your site url into GTmetrix to which will tell your exact page speed and there’s even a tab called waterfall which breaks down your load time to each component of your webpage.
Brit Mums came out at an embarrassing 19 seconds on GTmetrix at the event however they’re now coming out at between 5 and 10 seconds.
The Coombe Mill website was around 30 seconds when I first got back from the event but is now between 4.5 and 15 seconds on GTmetrix depending on the criteria I used. In the screen shot below you can see that I’ve got some more work to do to get it really streamlined but I’m pleased with how it’s going.
Watch out for slow loading side bar widgets, they can cost you dearly. I know I have a few that are slow, Trip advisor is one, I’m going to have a go at creating the badge and feed myself rather than taking their HTML code.
Check what holds your page up, pictures are often responsible for a slower page load. To combat this, Pictures need compressing, use compressed thumbnail images and click to enlarge to load faster if you’re on wordpress you can compress your images with a plugin, I’ve recently started using Smush and it seems to be working great.
AMP – accelerated mobile pages – you will need this in time
Google says eventually only mobile index friendly sites will rank at all with them. It’s all about speed. Strip out what you don’t need in mobile. Look into AMP when you re-launch your site but don’t worry before as it is expensive and hard work, but do it when you have a chance you should do it as there is a ranking benefit from having this now.
Keyword Analysis
Know the keywords you want to be ranked for. This might sound easy but you actually need to think about them and from your readers perspective, what will someone put in to find your post / blog / website?
‘Easy’, ‘quick’, ‘best’‘cheap’ are highly searched terms but also have heavy competition for ranking. You might be better to try something with less competition to rank higher.
Google ad words tool can be useful for helping you find your best keywords but watch out on payment.
Judith recommends Keyword Planner or steal from others: use the keywords your competitors are using.
SEMrush will tell you who your competitors are on the free page and enable you to see the keywords they are ranking on (whether they intended that or not). Watch you don’t go over the free limit of searches per day.
Tip: Anything you want to look at further right click and open in a new tab so you don’t lose the loaded free page.
Dump keyword info of words, volume and how often searched info into excel and make a keyword scatergraph to see what keywords you could usefully use.
I personally use Search Engine Genie which is free and lets you know where you rank on keywords you’re looking at.
Things that don’t impact ranking
Meta description– it may well help your click through so your topic and keywords should be in here and clear but it won’t affect your Google ranking.
Outbound links– good copy has follow links to others but it is not for ranking, internal links to you will help you rank.
Running PPC (pay per click) campaigns– it will drive traffic which is good if it is relevant traffic but not help you rank better.
Number of words– as stated at the start there is no minimum so long as Google can figure out what the page is about.
SEO writing tips
It’s OK to put a different title from description if wanted.
You can have 646 pixles or 75 characters for a title (Yoast is out of date at 70 characters).
Overlap keywords e.g. farm, farm animals, goats. Goats on the farm, animals at the farm. Use semantically related terms. Keep to 1 topic per page to make this natural.
Split keywords across sentences e.g the goats on the farm….. Our farm goats ……. Google will find the keywords, they don’t have to be just in the specific order (as Yoast SEO suggests). So farm goats and goats on the farm will both be counted.
Keep keywords close to the title start – Yoast says this and it is valid, it helps Google crawl and categorise your page more quickly and accurately. Remember it doesn’t read pretty writing, just runs with the first keywords it finds so a clever article combines pretty words with keywords early on.
Don’t use non-alphanumeric characters in meta descriptions as Google can’t read them.
Push things 3 months before you want them to rank to give Google a chance to build – e.g Christmas in September
Brand – Every title tag should include your brand name, which for me is obviously Coombe Mill. The title tag is the part that shows up on the top of your browser and on Google searches. Common practice would be add it to the end of the title tag i.e.
Link building and off page SEO
Link building is the most important part for ranking in SEO. However get your technical stuff and content right first and then worry about link building (when you have the right thing to build).
For every post you write with external links in, you give an equal share of SEO benefits to the receiving sites. So if your post has 4 links out, 25% of the link benefit available from your post will go to each of the receiving sites. When using a no-follow link no ‘link juice’ or SEO benefit will be transferred to the receiving site but will still be counted in the division quota. For example, if you have 4 outward links but 1 is no follow, the 3 follow links still get 25% of the available ‘link juice’ benefit your page offers. Remember, it’s important to include external links to give your post a more credibility and resources readership and external links do not detract any ranking from your own webpage.
Internal links build your own SEO but having only internal links is not healthy. You need to offer links out (follow and no follow) for a balanced credible site to Google. There is no maximum number of links specified, all relevant links are good to have.
The Legal bit for follow / no follow links
Beware of ASA / CAP guidelines – disclose posts properly and use follow / no follow correctly.
If you write the post yourself with your own words it’s OK to run a follow link even if you are paid for the post.
If you are paid and the content is vetted or given to you it must be no follow.
Follow up sites you might want to check out:
If you’ve digested all of that but want a little more background on some of the key points. Here are some recommended sites
If Keyword targets confuzzle you take a look at this site
https://moz.com/blog/visual-guide-to-keyword-targeting-onpage-optimization
For more on understanding Google
http://ppcblog.com/how-google-works/
All essential jargon:
https://moz.com/blog/smwc-and-other-essential-seo-jargon
Congratulations you made it to the end! Fingers crossed you have a few helpful pointers now to go away and make awesome SEO ranked pages that count!
Disclosure
All the above is my interpretation of Judith Lewis’s great 3 hour long Brit Mums talk. Anything you feel I have wrong or misunderstood please let me know, and I’ll update my post in true SEO best practice!
The post SEO, the bits you need to know appeared first on Coombe Mill.
Source
https://www.coombemill.com/2017/10/22/seo-bits-need-know/
0 notes
Text
When Not to COPE With Your Web Images [Video]
To think strategically about your web-based visual content, you have to do more than choose which images to use; you must also make sure that those images work for screens big and small.
If an image works for all screen sizes, great. Upload one file (single-source the image) and you’re good to go.
Not all images make your life that easy. Sometimes it’s worth your while to provide multiple versions of an image to give people what they need from the image on any device.
So says Buddy Scalera, senior director of content strategy at The Medicines Company. In his Intelligent Content Conference talk, Creating and Executing a Visual Content Strategy That Scales, Buddy told us that he’s all for single-sourcing … except when he’s not. He advocates for what he and others call “COPE mostly” (COPE-M), especially when it comes to images.
COPE stands for “create once, publish everywhere.” COPE content is single-sourced content. In many ways, COPE content is ideal. You create a chunk of content once – a product description, a specification, a definition, an image – and the system can pull (not paste) that chunk into multiple deliverables. When you update the source, the update ripples through your repository. COPE content is elegant. It’s efficient. It’s logical. It saves companies millions of dollars in translation costs. It helps them avoid embarrassing, crazy-making, lawsuit-incurring inconsistencies. COPE works well with text, audio, and video (if you’re using YouTube).
Still, sometimes COPE is the wrong way to go. Modern browsers reflow your text, but images scale down for your devices. An image that looks great on desktop may become unrecognizable on a smartphone. (Hello, pinch and zoom.)
That’s where the M in COPE-M comes in. “While it’s a good goal to prepare your content for multichannel reuse, not all content scales effectively in the COPE model,” Buddy says.
Create Once, Publish Everywhere (COPE) often is wrong way to go with images, says @BuddyScalera. #intelcontent Click To Tweet
In this article, I sum up Buddy’s advice from his ICC talk. All images in this post come from his slides, and all quotations, unless otherwise noted, come from his talk and from my subsequent conversations with him.
HANDPICKED RELATED CONTENT: 11 Ways to Dominate the Social Scene with Killer Content
Why it’s hard to COPE with some images
Buddy drops what he calls a “truth bomb” about images: They aren’t the same as text.
Text lends itself to single-sourcing because text can be separated from its appearance. Cascading style sheets enable text to vary in appearance from one instance to another without changing the underlying text source. “Text is a wonderful, flexible, flow-able, reusable, channel-agnostic asset that works great in the digital world,” he says.
Not so with images. They can’t be separated from their appearance. With images, one size doesn’t always fit all.
As Justyn Hornor put it a few years back, the “elephant in the room” for responsive web design “is how to handle images.” A small image may look sharp on a cell phone and ridiculously small on a high-resolution monitor. A large image may take a long time to render on a small device where a smaller image would suffice.
For responsive web design, one size doesn’t fit all when handling images, says @jphornor. #intelcontent Click To Tweet
How to think about multisourcing images
Rather than expecting a single image to work for all devices by compromising on the high and the low ends, you might find it at least occasionally worthwhile to upload multiple images and then tell the system at which breakpoint to use each one.
Upload multiple images & tell the system at which breakpoint to use each one. @BuddyScalera #intelcontent Click To Tweet
A breakpoint is the point at which the system stops pulling one image and pulls another instead – a bigger or a smaller one, depending on the resolution of the device. This illustration shows three possible breakpoints: 320 pixels for a cell phone, 720 pixels for a tablet or large phone, and 1,024 pixels for a laptop.
Breakpoints are defined according to device width because we have infinite vertical scrollability but limited width.
Buddy describes a time when one of the content teams at his company printed a brochure that included a graph answering physicians’ questions about a certain product.
The graph looked great in print. And then they put it on a website, and it got smaller. When viewed on a smartphone, the chart was unreadable. People looking up something on a smartphone in a hospital have a level of urgency. They need the answer. They don’t need to be pinching and zooming.
In many cases, it’s acceptable to upload one large image to your website (in other words, to single-source the image) and let the browser scale it for you. In other cases, images become nearly illegible when squeezed into a small window or screen. To illustrate this point, Buddy shows what happens when a browser scales an 800-pixel-wide photo of his daughters:
This is a COPE example. Unfortunately, when the browser scales this image for a narrow window or screen, it’s hard to see the girls’ faces. If this image were a chart or infographic, the text on the smaller screen might become illegible.
For visual elements critical to your brand narrative, you may want to put in the extra effort to use multiple images. This approach, which Buddy calls “responsive art direction,” gives people a better chance of making out the important details on any screen.
For #visual elements critical to your brand narrative, use responsive art direction, says @BuddyScalera. Click To Tweet
As Buddy changes the image width from 800 to 400 to 200 pixels, he also changes the image composition: This isn’t COPE. This is image planning. The 800-pixel-wide photo shows the girls and the dog side by side in what he calls a three-wide horizontal shot. The 400-pixel-wide photo brings the girls tighter together and tucks the dog in front for a two-wide vertical shot. The 200-pixel-wide shot squeezes all three figures into a totem-pole arrangement.
If you were viewing Buddy’s example page in a browser and you stretched and narrowed the window, the image would change each time you reached one of the breakpoints specified in the HTML code. To get a sense of the user experience, play this six-second video:
youtube
To experience this behavior in your own browser, visit Buddy’s example page on a device that enables you to change the window width.
While this post isn’t a tutorial on how to write this kind of code, you might find it useful to see what this code looks like:
The main thing to notice (look between the “picture” tags) is that Buddy has specified three source images:
GirlsDog_200w.jpg
GirlsDog_400w.jpg
GirlsDog_800w.jpg
Each JPG file is assigned to a breakpoint:
max-width: 499px
max-width: 799px
min-width: 800px
How many breakpoints should you create? How do you determine their maximum and minimum widths? There are no rules. In an excellent article that Buddy points to, Jason Grigsby says, “Selecting image breakpoints is something everyone will face, and frankly, I have no good answers for you.”
You probably will not create multiple images for every image on your website. Determine which images really matter to your customer. If you know an image (e.g., graph, chart, product photo) is truly important to your user, don’t leave it to the web browser to determine how to render that image. Take control.
It’s worth noting that some of the digital asset management (DAM) systems can create multiple outputs of a single image in different sizes and ratios. It won’t replicate what Buddy did with separate photos, but you should explore what your software system offers.
The only rule I can suggest is to make your strategic decisions about images the same way you make strategic decisions about any other content: Ask yourself what your audience needs and why. Experiment with various images and breakpoints. Repeat.
Ask what your audience needs & why. Experiment with various images & breakpoints. Repeat. @BuddyScalera Click To Tweet
For more of what Buddy has to say about creating and executing a scalable strategy for your visual content, see his annotated ICC presentation.
HANDPICKED RELATED CONTENT: How to Craft Visual Content for a Mobile Audience
When to multisource your images
While you wouldn’t want to go to the trouble of creating multiple source files for every image, consider multisourcing those images that have the most impact, for example, the main images on your conversion pages. As Buddy says:
Think about all the money spent on your website. If you’re letting machines decide how to deal with all your images, and people sometimes can’t see the key images, you’re missing an opportunity.
Multisource the main images on your conversion pages, says @BuddyScalera. #intelcontent Click To Tweet
You know the important pages and images on your website. You probably already have them tagged in your analytics software. It’s especially critical to test these pages on mobile devices, “not just on the gorgeous wide-screen monitors that your designers used to create content,” Buddy says.
Also consider multisourcing images on any other pages that most people view on small devices. “Look at how much traffic you’re getting from your smartphone devices. If it’s like us, 65%, that’s your audience. You’ve got to cater to them,” Buddy says. If smartphone users can’t read an image without pinching and zooming, you may want to customize the image for small screens.
The best way to learn which images to multisource is to test your web pages on multiple devices. All content teams – including your colleagues in content strategy, design, content engineering, and user experience – need to know how your website’s images load on smartphones. Grab a stack of devices and a designer, content strategist, or UX person. Load your content the way your customer would. “If the images that you lovingly loaded on your website look a little squished, consider ways that the browser is scaling your image assets,” Buddy says, and plan accordingly.
HANDPICKED RELATED CONTENT: Is Your Content Ready for the Mobile Takeover?
Conclusion
Until our content systems get smart enough to automatically give people ideal experiences of each image on any device, consider when to COPE and when not to COPE with your images. It may pay to put in extra effort and multisource certain images.
How about your team? Do you sometimes create multiple versions of your important images to accommodate a range of screen sizes? What have you learned from testing your images across multiple devices? Let us know in a comment.
Here’s an excerpt from Buddy’s talk:
youtube
Sign up for our weekly Content Strategy for Marketers e-newsletter, which features exclusive stories and insights from CMI Chief Content Adviser Robert Rose. If you’re like many other marketers we meet, you’ll come to look forward to reading his thoughts every Saturday.
Cover image by Joseph Kalinowski/Content Marketing Institute
The post When Not to COPE With Your Web Images [Video] appeared first on Content Marketing Institute.
When Not to COPE With Your Web Images [Video] syndicated from http://ift.tt/2maPRjm
0 notes
Text
When Not to COPE With Your Web Images [Video]
To think strategically about your web-based visual content, you have to do more than choose which images to use; you must also make sure that those images work for screens big and small.
If an image works for all screen sizes, great. Upload one file (single-source the image) and you’re good to go.
Not all images make your life that easy. Sometimes it’s worth your while to provide multiple versions of an image to give people what they need from the image on any device.
So says Buddy Scalera, senior director of content strategy at The Medicines Company. In his Intelligent Content Conference talk, Creating and Executing a Visual Content Strategy That Scales, Buddy told us that he’s all for single-sourcing … except when he’s not. He advocates for what he and others call “COPE mostly” (COPE-M), especially when it comes to images.
COPE stands for “create once, publish everywhere.” COPE content is single-sourced content. In many ways, COPE content is ideal. You create a chunk of content once – a product description, a specification, a definition, an image – and the system can pull (not paste) that chunk into multiple deliverables. When you update the source, the update ripples through your repository. COPE content is elegant. It’s efficient. It’s logical. It saves companies millions of dollars in translation costs. It helps them avoid embarrassing, crazy-making, lawsuit-incurring inconsistencies. COPE works well with text, audio, and video (if you’re using YouTube).
Still, sometimes COPE is the wrong way to go. Modern browsers reflow your text, but images scale down for your devices. An image that looks great on desktop may become unrecognizable on a smartphone. (Hello, pinch and zoom.)
That’s where the M in COPE-M comes in. “While it’s a good goal to prepare your content for multichannel reuse, not all content scales effectively in the COPE model,” Buddy says.
Create Once, Publish Everywhere (COPE) often is wrong way to go with images, says @BuddyScalera. #intelcontent Click To Tweet
In this article, I sum up Buddy’s advice from his ICC talk. All images in this post come from his slides, and all quotations, unless otherwise noted, come from his talk and from my subsequent conversations with him.
HANDPICKED RELATED CONTENT: 11 Ways to Dominate the Social Scene with Killer Content
Why it’s hard to COPE with some images
Buddy drops what he calls a “truth bomb” about images: They aren’t the same as text.
Text lends itself to single-sourcing because text can be separated from its appearance. Cascading style sheets enable text to vary in appearance from one instance to another without changing the underlying text source. “Text is a wonderful, flexible, flow-able, reusable, channel-agnostic asset that works great in the digital world,” he says.
Not so with images. They can’t be separated from their appearance. With images, one size doesn’t always fit all.
As Justyn Hornor put it a few years back, the “elephant in the room” for responsive web design “is how to handle images.” A small image may look sharp on a cell phone and ridiculously small on a high-resolution monitor. A large image may take a long time to render on a small device where a smaller image would suffice.
For responsive web design, one size doesn’t fit all when handling images, says @jphornor. #intelcontent Click To Tweet
How to think about multisourcing images
Rather than expecting a single image to work for all devices by compromising on the high and the low ends, you might find it at least occasionally worthwhile to upload multiple images and then tell the system at which breakpoint to use each one.
Upload multiple images & tell the system at which breakpoint to use each one. @BuddyScalera #intelcontent Click To Tweet
A breakpoint is the point at which the system stops pulling one image and pulls another instead – a bigger or a smaller one, depending on the resolution of the device. This illustration shows three possible breakpoints: 320 pixels for a cell phone, 720 pixels for a tablet or large phone, and 1,024 pixels for a laptop.
Breakpoints are defined according to device width because we have infinite vertical scrollability but limited width.
Buddy describes a time when one of the content teams at his company printed a brochure that included a graph answering physicians’ questions about a certain product.
The graph looked great in print. And then they put it on a website, and it got smaller. When viewed on a smartphone, the chart was unreadable. People looking up something on a smartphone in a hospital have a level of urgency. They need the answer. They don’t need to be pinching and zooming.
In many cases, it’s acceptable to upload one large image to your website (in other words, to single-source the image) and let the browser scale it for you. In other cases, images become nearly illegible when squeezed into a small window or screen. To illustrate this point, Buddy shows what happens when a browser scales an 800-pixel-wide photo of his daughters:
This is a COPE example. Unfortunately, when the browser scales this image for a narrow window or screen, it’s hard to see the girls’ faces. If this image were a chart or infographic, the text on the smaller screen might become illegible.
For visual elements critical to your brand narrative, you may want to put in the extra effort to use multiple images. This approach, which Buddy calls “responsive art direction,” gives people a better chance of making out the important details on any screen.
For #visual elements critical to your brand narrative, use responsive art direction, says @BuddyScalera. Click To Tweet
As Buddy changes the image width from 800 to 400 to 200 pixels, he also changes the image composition: This isn’t COPE. This is image planning. The 800-pixel-wide photo shows the girls and the dog side by side in what he calls a three-wide horizontal shot. The 400-pixel-wide photo brings the girls tighter together and tucks the dog in front for a two-wide vertical shot. The 200-pixel-wide shot squeezes all three figures into a totem-pole arrangement.
If you were viewing Buddy’s example page in a browser and you stretched and narrowed the window, the image would change each time you reached one of the breakpoints specified in the HTML code. To get a sense of the user experience, play this six-second video:
youtube
To experience this behavior in your own browser, visit Buddy’s example page on a device that enables you to change the window width.
While this post isn’t a tutorial on how to write this kind of code, you might find it useful to see what this code looks like:
The main thing to notice (look between the “picture” tags) is that Buddy has specified three source images:
GirlsDog_200w.jpg
GirlsDog_400w.jpg
GirlsDog_800w.jpg
Each JPG file is assigned to a breakpoint:
max-width: 499px
max-width: 799px
min-width: 800px
How many breakpoints should you create? How do you determine their maximum and minimum widths? There are no rules. In an excellent article that Buddy points to, Jason Grigsby says, “Selecting image breakpoints is something everyone will face, and frankly, I have no good answers for you.”
You probably will not create multiple images for every image on your website. Determine which images really matter to your customer. If you know an image (e.g., graph, chart, product photo) is truly important to your user, don’t leave it to the web browser to determine how to render that image. Take control.
It’s worth noting that some of the digital asset management (DAM) systems can create multiple outputs of a single image in different sizes and ratios. It won’t replicate what Buddy did with separate photos, but you should explore what your software system offers.
The only rule I can suggest is to make your strategic decisions about images the same way you make strategic decisions about any other content: Ask yourself what your audience needs and why. Experiment with various images and breakpoints. Repeat.
Ask what your audience needs & why. Experiment with various images & breakpoints. Repeat. @BuddyScalera Click To Tweet
For more of what Buddy has to say about creating and executing a scalable strategy for your visual content, see his annotated ICC presentation.
HANDPICKED RELATED CONTENT: How to Craft Visual Content for a Mobile Audience
When to multisource your images
While you wouldn’t want to go to the trouble of creating multiple source files for every image, consider multisourcing those images that have the most impact, for example, the main images on your conversion pages. As Buddy says:
Think about all the money spent on your website. If you’re letting machines decide how to deal with all your images, and people sometimes can’t see the key images, you’re missing an opportunity.
Multisource the main images on your conversion pages, says @BuddyScalera. #intelcontent Click To Tweet
You know the important pages and images on your website. You probably already have them tagged in your analytics software. It’s especially critical to test these pages on mobile devices, “not just on the gorgeous wide-screen monitors that your designers used to create content,” Buddy says.
Also consider multisourcing images on any other pages that most people view on small devices. “Look at how much traffic you’re getting from your smartphone devices. If it’s like us, 65%, that’s your audience. You’ve got to cater to them,” Buddy says. If smartphone users can’t read an image without pinching and zooming, you may want to customize the image for small screens.
The best way to learn which images to multisource is to test your web pages on multiple devices. All content teams – including your colleagues in content strategy, design, content engineering, and user experience – need to know how your website’s images load on smartphones. Grab a stack of devices and a designer, content strategist, or UX person. Load your content the way your customer would. “If the images that you lovingly loaded on your website look a little squished, consider ways that the browser is scaling your image assets,” Buddy says, and plan accordingly.
HANDPICKED RELATED CONTENT: Is Your Content Ready for the Mobile Takeover?
Conclusion
Until our content systems get smart enough to automatically give people ideal experiences of each image on any device, consider when to COPE and when not to COPE with your images. It may pay to put in extra effort and multisource certain images.
How about your team? Do you sometimes create multiple versions of your important images to accommodate a range of screen sizes? What have you learned from testing your images across multiple devices? Let us know in a comment.
Here’s an excerpt from Buddy’s talk:
youtube
Sign up for our weekly Content Strategy for Marketers e-newsletter, which features exclusive stories and insights from CMI Chief Content Adviser Robert Rose. If you’re like many other marketers we meet, you’ll come to look forward to reading his thoughts every Saturday.
Cover image by Joseph Kalinowski/Content Marketing Institute
The post When Not to COPE With Your Web Images [Video] appeared first on Content Marketing Institute.
from http://contentmarketinginstitute.com/2017/07/cope-web-images/
0 notes
Text
Words are the new pixels: Why designers must become storytellers
Screens are disappearing.
There’s a delicious irony in that sentence, right? I mean, you’re probably reading this article on a screen right now, (unless you make a habit of printing out your morning reading). But look around: human-computer interactions no longer exclusively occur through the keyholes of our smartphones, smartwatches and TV screens – something that Bill Gates predicted would happen back in 2002:
“…computers themselves will gradually “disappear” into the fabric of our lives. We are still a long way from a world full of disembodied intelligent machines, but the computing experience of the coming decade will be so seamless and intuitive that–increasingly–we will barely notice it.” ~ Bill Gates, The Disappearing Computer
Granted, he guessed this transition would happen by 2010 – but he was only off by a few years, so give the guy some credit.
As voice recognition and chatbot technology improves, these “invisible” user interfaces will replace screens as the default medium of interaction. Just as many modern websites & applications today tout themselves as “Mobile-First”, it won’t be long before those same innovators are applying the “Voice-First” label to their new offerings. Indeed there’s a non-zero chance that the next killer app may launch with no visual UI at all! Thus, today’s UX designers face a stark choice – evolve beyond the pixel, or look for a new career.
In this post, I’m going to explore some of the reasons behind the sunset of visual-first design, and explain why designers must learn to wield their prose and stories as fluently as they do their imagery, in order to remain relevant in the age of invisible computing.
Let’s get to it, shall we?
Why visual-first design will soon decline
Words are the new pixels
What designers can do to keep their jobs
Why visual-first design will soon decline
If we’re to understand why designers must learn to tell stories without relying on visual aids, we must first grasp the drivers behind the decline of visual-first design.
It’s getting old
In short, predominantly visual design as a source of innovation is approaching the maturity phase of its life-cycle.
Just like any product or service, visual-first design is reaching its maturity
Take a look around – aren’t websites all starting to look kind of samey these days? This is no accident. As new design best practices have been shared, and higher conversion rates achieved, this standardized knowledge has propagated to businesses and website owners all across the web. But this wasn’t always the case.
In its heyday in the early 2000’s, flashy web design was THE competitive differentiator for any business that wanted to make waves online. The arrival of Macromedia Flash (that’s Adobe Flash, to you kids), brought rich interactivity and visuals to the previously dull and static World Wide Web, and boutique rich media design studios like 2Advanced and Big Spaceship blew people’s minds by pushing the envelope of what we all thought was possible with web design and motion graphics. And fancy pre-loaders (ugh).
With unique and eye-catching design prioritized over everything else, it used to be a generally accepted workflow to have your web designer simply create visual “buckets”, (stuffed with Lorem Ipsum, of course), for the copywriter/client to fill with content after the fact.
We now know this is no longer an appropriate workflow for truly effective web design – in such circumstances, the actual content becomes subservient to the design, which diminishes the effectiveness of both.
It’s being commoditized by economic pressures
Visual design is cheaper, more accessible and more standardized than at any time in the history of the internet. Sites like Upwork, 99Designs and Envato have democratized (some might say commoditized) visual design, while free access to blog tutorials, website themes, and drag & drop tools like Canva, mean that anyone can invest a little time or money, and walk away with a presentable design.
Automated design is coming
Meanwhile, procedural design engines like The Grid and Act-On, can automatically generate entire layouts based solely on the content you feed them, and simultaneously A/B test like 8 gajillion different page variations to find the ultimate killer converting layout. While the output of these tools may not currently match human visual designers at the top of their game, there’s been more than enough interest around them to validate the existence of significant demand for cheaper, automated delivery of good visual design. It’s only a matter of time before the technology catches up – and it’s a problem that need only be solved successfully once to greatly reduce the need for human involvement in the visual design process.
“In 2010 only 2 per cent of Americans worked in agriculture and 20 per cent worked in industry, while 78 per cent worked as teachers, doctors, webpage designers and so forth. When mindless algorithms are able to teach, diagnose and design better than humans, what will we do?” ~ Yuval Noah Harari, Homo Deus: A Brief History of Tomorrow
Voice & text recognition technology has reached a tipping point
Following a powerhouse showing at CES2017, Amazon’s Alexa is the first application of voice interaction to have reached mainstream adoption, with almost 8 million Echo units sold since it debuted in 2015 – and more than two thirds of those sales happened last year.
One stunning stat in particular is that Echo owners have also increased their spending on Amazon by 10% in the last year. Consider all the effort that’s gone into optimizing Amazon to be the best-converting e-commerce store on the internet – and now consider that one of its biggest leaps forward came from removing the visual interface altogether!
It’s also worth noting that voice and chat interfaces are only just getting started, and haptic, gesture-driven interactions aren’t far behind.
The video above was posted in 2015, so who knows how far this technology has come since then?
Visual design is struggling to keep up with consumers’ needs
How many screens exist in the average urban-dweller’s life? Smartphone, TV, laptop, tablet, car, (maybe even the fridge, if they’re painfully early adopter). Effective visual designs today must solve for an ever-growing variety of contexts & circumstances – but the kicker is that each time there’s a new breakthrough in our display technologies and devices, we’re having to almost completely rethink our approach to creating visual interfaces that effectively capitalize on these new capabilities.
This is becoming unsustainable – we can’t keep redesigning our entire visual methodologies with each new innovation, so there’s an immediate need for an intuitive interface medium that works in almost any context, and has enough future-proofing built into it to stick around for a while.
Words are the new pixels
So, I’m just gonna throw this out there: humans have been communicating with words for about 70,000 years. We all know how to use them and interpret them, and I’d argue that words are the only truly responsive UI element for all computing devices, past, present and future.
Words: they worked back then, and they still work now
Words work at all screen resolutions, on all devices, across all global cultures, and in almost any context. This is an indispensable trait, since your responsibility as a designer is to guide users as they hop between individual interfaces within an overall guided experience.
Words are built for sharing experiences, ideas & stories
No matter how well-designed your website & mobile app are individually, if the transition between them is disjointed, it’s still a bad experience for the user.
As a result, customer preferences are shifting from favoring individually well-designed interfaces – Brand X’s mobile app, Brand Y’s website, and so on – to expecting a seamless overall experience within a single brand, regardless of the context. Businesses are discovering that this seamlessness is essential for driving repeat purchases from customers in a recurring cycle, nicknamed the Loyalty Loop.
In short, users need compelling narratives to guide them through the entire experience – not more infinitely-reconfigurable visual interfaces.
Wall-E is a masterclass in visual storytelling – but few can reach that bar consistently
Thing is though, unless you’re Pixar, it’s really hard to tell a compelling, understandable story without words. Thus, the shift towards designing cohesive narratives for customers across multiple channels is opening the door to competition with visual designers on their own turf. Copywriters, authors, linguists, voice actors, casting directors, screenwriters, hell even songwriters – are all about to get into the user experience game.
These folks are already familiar with creating engaging non-visual content – and demand for their expertise is about to explode. Although voice interaction has penetrated the mainstream, there’s still a dire need to build & maintain customer engagement. Alexa’s total library of almost 7,000 Skills (that’s Amazon-lish for “Apps”) currently averages only 3% retention after 2 weeks – ouch!
What designers can do to keep their jobs
LUKE: “With the blast shield down, I can’t even see! How am I supposed to fight?” OBI WAN: “Your eyes can deceive you. Don’t trust them.”
Effective storytelling is as big a differentiator for today’s UX designers as the “unicorn” status of designers who could also code in the ‘00’s and early ‘10’s – so here’s what visual designers should be doing to prepare for this shift.
Lorem Ipsum must die – Content IS the design, so it should be factored into your workflow from the outset of the project. No more punting consideration of content down the road (although Samuel L Ipsum is always welcome entertainment
Understand the structure of a good story – There are tons of ways to do this – learn from storytelling masters like Pixar, read a “Choose your own adventure” book, study Joseph Campbell’s timeless classic “The Hero with a Thousand Faces”, or even play a text-based adventure game like Zork.
Tease apart and deconstruct these examples to learn how words alone can guide and compel users through an experience.
Learn the art of persuasive writing – Don’t fear the encroachment of writers on “your design turf” – embrace them, learn from them. They may know this new, invisible medium better than you do, but you know how to incorporate their work, and harness it to create compelling user experiences.
The legendary Zig Ziglar’s “5 obstacles to a sale”, and the Persuasive Triangle are great frameworks with which to start learning how to write persuasive, compelling copy.
In summary: Learn to use your words
Visual-first design is in decline, so designers must become familiar with telling stories via the invisible media of voice and text. There are a number of drivers behind this decline:
Good visual design is no longer a competitive advantage for online businesses – it’s expected
Economic competition & automation are making visual design cheaper and more accessible
Voice and text recognition technology are enabling viable alternatives to traditional visual interfaces
Visual design can’t keep up with the pace of innovations in consumer devices
Words are the ideal medium for accommodating this next phase of human-computer interaction. They’re universally used and understood globally, and are easily woven into stories that can fit into any user context.
Designers who embrace the power of storytelling will be better positioned to navigate the transition from visible to invisible computing – and I, for one, can’t wait to see what kinds of stories you guys start telling.
0 notes
Link
Reading Time: 11 minutes
Responsive web design became a well-known term. Even some people outside web design, or design industry, are familiar with it. There is a problem. A lot of web designers are approaching responsive web design in the wrong way. Today, we will start by taking a look at this old and wrong way of doing responsive web design. Next, we will take a look at more polished way of doing responsive web design. Then, we will discuss how to make responsive web design finally great.
Table of Contents:
The old way of doing responsive web design
The problem with the old way
Whose fault was that?
The old way in a new suit
The new way of doing responsive web design
Different devices, different conditions, different goals
Excuses
Long-term over the short-term – how to sell the new way
Closing thoughts on the new way of doing responsive web design
The old way of doing responsive web design
Chances are that a lot of you will be familiar with following scenario. Let’s say you are a web designer and you just found a client who is looking to hire you. Your job is designing a small website for his business. It shouldn’t be too fancy or overly decorated. Your client is more conservative and likes to keep things simple and clean. Since you currently have nothing else to do, you decide to accept the project and start right ahead. Let’s assume it is also well-paid.
You start with answering the “Why?”, “How?”, “What?” questions. Then, you do some research to find out who are you designing the website for. Hint: it is not your client. When you are done with that, you fire up your favorite graphic editor and start working on the visuals. You start with creating a design for desktop. And, since frameworks such as Bootstrap are quite popular, you will use that as your starting point.
After you finish the “desktop” version of the website, you are relatively satisfied with, you present it to your client. Fortunately, your client is happy. She likes how the design looks and feels. She might have some objections or suggestions. When you are done with implementing those small changes you contact your client and review it once again. This time, your client has no objections. The design is simply perfect. So, you hand over the design to your client and get your money.
Truth to be told, this is a very condensed version of how the reality looks like. Usually, there is much more iterations, fixes and polishing. However, this story, although very condensed, is still good enough for the purpose of this article. So, we will go with it.
The problem with the old way
Consider the current state of the web. And, think about the story above from the view of responsive web design. Have you noticed that something is wrong here? Was there something wrong with our web design process? No. We went through the discovery phase and we did the research as well. Was there something we forget in the third step, the web design phase? Yes, you are right on the spot! In the story above, we designed only the “desktop” version of the website.
What is the point of doing responsive web design if we design only layout for desktop? That is similar to building a private jet and think our client will be able to use it also as transportation plane. Or, that she will be able to use it for freight transport. Sure, she may try to use it this or that way. However, whether it will work is a different question. The problem is that we designed the plane as a jet. We designed it with specific characteristics and for specific conditions.
In case of the website, we designed it so it works and looks great on desktop. What will happen if someone visits the website on device other than desktop? For sure, our client probably hired skilled web developer who managed to create “mobile” version of our design. However, this is only our assumption. Will this “mobile” version provide great and pleasant experience as the desktop version we designed? Based on my personal experience, probably not.
These “mobile” versions are usually created in a hurry. What’s worse, they are usually created with the goal to have something that works on other devices. It doesn’t matter how well it works. If it works, it is good enough. Case closed. Have you noticed that when developer builds this version, he is in little to no contact with the original designer? Why should you pay a doctor if you can buy cheaper painkillers? Pain is gone and case is closed. Well, at least it looks that way.
Whose fault was that?
Let me quickly address one thing. Whose fault was it to never create the design for the website for all resolutions? Without a doubt, it was definitely fault of the designer. Nobody can argue with that, at least not with success. Client hired someone who he thought is an expert. Then, she thought that she doesn’t have to double-check designer’s work or that she should consult the result with another designer. When you hire an expert, you assume he will do the whole work.
It was responsibility of the designer to consider the devices people might use to visit the website. And, to create designs for the website for those devices as well. It was never supposed to be the job of a developer to take the “desktop” version and “use his imagination” to put together something that will work outside the desktop. I’ve seen a number of “designers” who liked to use this exact approach and still called it a responsive web design.
First, they designed the layout for desktop. Then, when client accepted it, the work was done for them. If they worked directly with the developer, their suggestion was to “use his imagination”. Let me make two things clear. First, designing a layout for a website for a desktop is not a responsive web design. On the same note, designing a layout for a website for a mobile is not a responsive web design. Responsive web design is not about designing for one device, but the whole spectrum.
And, the second thing. It is job of a designer to design the layout for various devices and resolutions. Some people miss the obvious connection between the word “designer” and “design”. For them, “design” and “coder” or “developer” somehow looks like a closer match. Well, you don’t need to use RegExp to find out that it is not. We all know the question: “Should designers code?” What about this question: “Should coders or developers design?”
So, whose responsibility it is to design a responsive website? Meaning, designing layouts for various devices and resolutions? It is the responsibility of a designer. Whose responsibility it is to rewrite it into code? It is a responsibility of a coder or developer. So, coders and developers, the next time someone gives you layout for one device and suggest “using your imagination”, here is what you should do. Tell that person that you are not a designer and this is not your job.
The old way in a new suit
Fortunately, this problem with these designers who think they are doing responsive web design, while they are not doing it, is in retreat. Unfortunately, we are still talking about doing responsive web design the old way, just in a new suit. Meaning, developers are not necessarily using their imagination to bend the design to fit other resolutions. Some designers started to pursue a true responsive web design practice. However, the problem is still here and we are far from perfect.
So, the good news is that developers are no longer required to design layouts. The bad news is that many designers are still basically bending one layout to fit different devices and resolutions. Please notice that I am not talking about every web designer, just some. These web designers are taking layout for desktop and squeeze it until it fits specific resolution. Then, they repeat this process a couple of times until they cover what we can call “default spectrum of devices or resolutions”.
As a result, designers now have multiple layouts they can present and hand over to their clients. And, clients have something they can hand over to their developers instead of providing them with “desktop” version and words such as “the rest is up to you”. In many cases, this is how responsive web design today actually looks like. I have to admit that this “old way revisited” or “old way redesigned” is a much better than it was before, at least for following two reasons.
First, designers are really doing their job and design the layout for multiple devices. This means that clients are closer to getting the value and results they are paying for. Second, developers no longer had to think so much about design. Instead, they can focus solely on writing clean and optimized code. Now, there is nothing preventing developers from dedicating their attention to this, and only this, task. Maybe except the clients. However, this situation is still far from perfect.
Let’s summarize it. Designers are designing layouts for different devices. Well, they are bending and squeezing one layout to fit it to different screens. Yet, we can call this doing responsive web design. Well, at least with some reserve. Next, developers are then taking these layouts and use them to build responsive websites. It looks like everyone is doing his job and clients finally have a reason to be happy. They pay for responsive web design and they are getting it. Can we do better?
The new way of doing responsive web design
Yes, I am convinced that we can do better, much better. We can take responsive web design to another level. In order to do so, we need to revisit our web design process. What I want to suggest is this. In the old way 2.0 we usually think about different devices or resolutions as points on some metaphorical scale. What if we approached these points as separate entities? And, what if we started to design for each entity almost from scratch?
Different devices, different conditions, different goals
Let me explain what am I thinking about. We like to see different devices only as different resolutions. Just think about the terms we use to communicate: mobile, tablet, desktop. Or, some variants of these terms. The problem is that this does not reflect the reality. Each of these terms conveys more than just a number of pixels we can then target as a width, or height. Unfortunately, we are often not willing to realize this.
When we talk about mobile, we talk about specific conditions and experience. On the other hand, when we talk about desktop, the conditions, and experience, are completely different. Even in the case of tablet device can conditions and experience be different from that on mobile device, such as smartphone. In plain English, we are using these devices in different places, with different goals and with different constraints. By the way, let’s not forget modern TVs connected to the Internet.
Take a moment and think about situation when you use your mobile phone, tablet and desktop to access the Internet. Do you always have the same goals? Do you always have the same amount of time? And, what about the quality of your Internet connection? Are you always on high-speed broadband, wifi with unlimited data? Are all these scenarios really the same? The answer is no. Conditions are likely to be different as well as your goals. Yet, we design like this was not the case.
What if we approached each layout (mobile, tablet, desktop, etc.) as independent website? Because, when you think about the conditions, goals and experience, it is not that far from the truth. What if we start to treat responsive web design in this direction? Will it take more time and energy to design a responsive website? I am sure it will. Will our clients protest as they will not want to pay for this “additional” time? I know they will.
Excuses
I think that we should put aside these potentially higher demands on your time and energy and higher bill for your client for a moment. In the end, you are getting paid for delivering your best work. And, if you do deliver your best work, you deserve to get paid adequately. If you work with cheap clients who are not willing to pay for quality, that is your decision. And, it is up to you to change it. Don’t blame others. You get only what you are willing to accept.
This is the harsh truth. A lot of clients doesn’t care about the way your design process works or why you do certain things in a certain way. They just need someone skilled in responsive web design who can deliver solid results. The rest is up to you. You have to find a way to sell your solution (design) for the price you are convinced is adequate. Otherwise, you will have to negotiate or find different client. So, how can you sell this new way of doing responsive web design?
Long-term over the short-term – how to sell the new way
Let’s answer the most important question. How to sell this new approach to our clients? My answer is this. First, explain your client how different the situations we use specific device are. Go ahead, use this article, or its very condensed version. Second, trying to explain why it is reasonable to pay more for responsive web design usually doesn’t work well. In the end, we are still talking about one thing–it will cost more. In other words, we are still talking about the downsides.
This is something clients don’t like to hear. What we should do instead is making it positive. Stop talking about the time it will take to design each layout almost for scratch. Talk about a much better experience you will be able to create for all the people visiting the website. Then, you can mention how this will benefit your client from the long-term view. Happy people are more likely to stay on client’s website for longer and visit it again in the future.
Happy people are also more likely to spend their money on products and services your client is selling. The same is true for sign ups and referrals. People are more likely to do what do you want if you make it easy and create pleasant experience. When you think about every variant of the layout as independent website, and design it from the ground up, you are more likely to achieve this. At least, this is what I am wholeheartedly convinced about.
So, let me summarize it and give you a simple answer. Describe the RIO (return on investment) your design will have. In other words, show your client that this approach will bring him more benefits in the long term and that these benefits will outweigh short-term negatives. This is how you can sell this new and better way of doing responsive web design. Lasting future benefits over questionable short-term negatives.
Closing thoughts on the new way of doing responsive web design
Thanks for sticking with me and reading to this point. It is easier to read a quick 5-minute article or short tutorial than more theoretical article like this one. I appreciate it, a lot. It is also great to see web designers what have the courage question old ways of doing things and try new approaches. We, web designers, are the ones who can change how we do responsive web design, and the web design industry itself. As a consequence, we make the whole Web better.
We should remember that the website we build are used by people in various conditions and on various devices. This is something can’t predict. However, we can a lot to create experiences that will delight people visiting our websites. Is this the best way of doing responsive web design? Who knows. However, I believe that it is still far better than the old way, the practice of bending or squeezing one layout to fit different widths and heights.
Responsive web design should deliver great experience that feels natural, regardless of the devices and the size of its screens. People should not suffer worse experience just because they are using smartphone or tablet instead of desktop. This is what I think a real responsive web design is about. Great and pleasant experience across all devices. Let’s make this idea reality.
Thank you very much for your time.
Want more?
If you liked this article, please subscribe or follow me on Twitter.
The post Responsive Web Design And How to Finally Make it Great appeared first on Alex Devero Blog.
0 notes
Text
Building Chatbots: Everything you need to know
Building Chatbots: Everything you need to know
Chatbots continue to receive a lot of hype in 2017, with companies including Facebook, Google, Microsoft and many others investing heavily in the technology. Smart Insights have covered how Pizza Express have built a chatbot. This brief guide explores some of key things to consider when building and launching your first chatbot.
Understand your audience
Before you start building anything it is essential to fully understand who will be using your chatbot, and what you already know about them. Facebook Insights and other analytical tools may provide some useful information.
Personas are frequently used when building websites to address specific audience groups, and may also be helpful when creating chatbots.
Set the right tone
The conversational nature of chatbots makes getting your tone of voice right critical. Tone of voice will vary according to the nature of your business. For example, a chatbot promoting the local music scene may be fairly relaxed and include the greeting:
However, a chatbot for an airline that allows you to check your flight details would be more professional in tone.
Creating a short tone of voice document may also be helpful, particularly if content is being updated by different members of a team.
Your tone of voice document will help define the personality and conversational style of your chatbot, and deliver a more coherent brand experience.
Define your goals
Just as you would when building a website or managing a social media channel you must have a clear understanding of what you want the chatbot to deliver. You may have multiple goals so it is always a good idea to list these and use as the basis for development. Some of these might include:
Provide out of hours customer support.
Offer quick answers to common queries.
Act as a digital brand ambassador.
Promote your business with special offers.
Plan your user journeys
As chatbot development includes branching navigation and conversational AI it is strongly recommended that you map out some typical paths through to content.
There are different methods of achieving this ranging from applications such as Visio, simple Word documents through to sketching on notepads and using sticky notes.
This approach will give you a strong framework for your chatbot, help avoid confusion and speed up development.
How much freedom?
It is vital to determine how much freedom you are going to offer your users. Many chatbots use an on-rails series of questions to limit the potential for errors or misunderstanding.
Whereas other chatbots provide space for open ended questions, and use AI and natural language processing to provide answers. This obviously carries slightly more risk, but may provide a more comfortable and immersive user experience.
A hybrid approach of offering set button responses with the option to ask additional follow-up questions is advisable. This helps you to provide clear routes through to common tasks, whilst giving your visitors some level of personal freedom.
Content is still king
Although the combination of AI, natural language processing and new technology makes it easy to get swept along, your chatbot will live and die by the quality and relevance of your content. As with web and social media content asking these five simple questions will help you to stay focused.
Who. Who are your audience? What do you know about them?
What. What do you want them to be able to do? What tasks can be accomplished with the chatbot?
Where. Geographical location is important. As chatbots reach a global audience always consider any cultural and localisation issues.
When. If your chatbot is providing out of hours customer service, can your audience still contact you by other means? Eg automated phone lines, online forms, etc.
Why. Arguably the most important question. Why are you building a chatbot? Is it relevant for your audience? Will be it be used?
Human or machine?
Using a chatbot involves a level of intimacy that is usually associated with a human conversation, and so this needs to be carefully considered.
It is recommended you make it clear to your users from the outset that they are interacting with a machine, as this helps manage expectations, boosts transparency and avoids any sense of creepiness.
Chatbots can sometimes expect to receive some unexpected emotional responses, so it is advisable to have some content blocks ready for statements such as ‘I like you’.
The anonymity of chatbots can be particularly effective for applications such as counselling or self-help, as an individual may feel less inhibited having a conversation with a machine than a face-to-face discussion.
Leverage functionality
Chatbots can currently deliver multiple types of content including:
Photo galleries
Video content
Recent blog posts and news updates
Product catalogues
Integration with web services via APIs
Simple data capture for lead generation
Expect to see more functionality being added on a continual basis, as Facebook and other platforms follow patterns seen in China and South Korea where WeChat and Tencent are consolidating different tasks within a single interface, eg banking, e-commerce, wellness, etc.
Never misuse data
To help build trust with your audience it is acceptable to use data to address them by their first name.
However, it would be inappropriate and arguably invasive to display elements such as a profile photo of the user or their friends within the chatbot.
If you are using the chatbot to capture data, you must be clear about how this data is being used, and explicitly state if it is being shared with any third-parties. As an additional safeguard you may also consider providing a link to your privacy notice containing appropriate clauses.
An alternative to this would be to link out to an online form on your website.
Exercise caution
Although chatbots are fairly informal in nature you should always be careful not to provide advice and information that could result in legal challenges. Here are two examples:
Financial services chatbot. It should be made very clear that any figures provided are illustrative and do not constitute a formal offer.
Medical advice chatbot. Although the chatbot may be able to assess basic symptoms and give general support, there should always be a clear hand off point to a medical professional for a proper diagnosis.
Make the data work for you
Chatbots provide very detailed analytics and user data. This includes simple demographics, number of queries made, visitor flow and user retention. Careful study of this data and user behaviour will then help you identify gaps, and iterate accordingly.
Don’t be too ambitious
It is a sensible idea to start small and scale upwards. Be careful to avoid feature creep, and overcomplicate the chatbot. As the vast majority of your audience will be using it on mobile devices with limited screen space keep things as simple as possible. Less really is more.
Humour can help
Successful chatbots sometimes use subtle humour and a light tone to help establish a rapport with the audience, and reduce frustration when things don’t fully work as expected.
However, context is everything and whilst a light approach might work well for a fashion or lifestyle brand, a more sober tone would be appropriate for a financial, legal or medical advice chatbot.
It is worth considering though that some humour doesn’t always translate for a global audience, so use with care!
Fail gracefully (or at least charmingly)
As chatbots are still in their infancy there are bound to be some technical issues. You can mitigate some of this risk by providing helpful ‘error’ messages with clear routes to speak to a human representative.
Testing matters
This may seem obvious but bears repeating. AI can behave unpredictably and so it is vital to test your chatbot against as many scenarios as possible. Likewise having a testing plan using different devices and desktop machines is strongly advised.
Finding bugs and quirks is a normal stage of chatbot development, and will help you to deliver a better and more robust experience.
Stay updated
Regular content updates are essential and if anything even more critical than your website. If a visitor is seeking your contact details urgently, the last thing they would expect is for any information to be outdated or be taken to a dead link.
Promote your chatbot
Once everything is up and running promote your chatbot using your website and social media channels.
Facebook Messenger bots have a simple URL structure, eg https://m.me/techcrunch or Messenger codes that are similar to QR codes can be scanned using the Messenger App.
Finally, you can submit your chatbot to a directory such as botlist to raise awareness and improve your reach.
TThanks to Richard Ashby for sharing their advice and opinions in this post. Richard is Founder of Dotkumo You can follow him on Twitter or connect on LinkedIn.
from Blog – Smart Insights http://www.smartinsights.com/user-experience/building-chatbots-everything-need-know/
0 notes