#Arduino Create
Explore tagged Tumblr posts
Visit Tumblr Blog
Explore Tumblr blogs with no restrictions, modern design and the best experience.
Last Seen Tumblr Blogs


Fun Fact
The Tumblr app for Google Glass was released on May 16, 2013.
Text


Monty Jaggers McGraw:
I am writing new BASIC programs to demo at my VCF Southwest 2025 exhibit of my 1979 Tektronix 4054A color vector graphics computer.
One of the programs I am writing is a 1978-1979 Battlestar Galactica TV demo. That TV show had $500,000 of Tektronix vector graphics computers and test equipment and many screenshots of their green vector storage CRT displays - some stills - some animated. These computer graphics were generated on both 1975 4051 and 1976 4081 vector graphics computers - predecessors to my 4052 and 4054A computers (see first photo attached).
Miami Herald TV 1978 magazine interview with the Battlestar Galactica set designer indicated extras on the set stationed in front of the 4051 computers were playing games during filming to increase realism and were so absorbed they kept playing after the cut! (article page attached).
The 4051 and second generation 4052 were the same physical size and used the same CRT and same Display board, but the 4052 and 4054 computers replaced the 800KHz Motorola 6800 CPU with a custom four AMD2901 bit-slice CPU to create a 16-bit address and data bus ALU which emulated the 6800 opcodes and added hardware floating point opcodes to speed up these computers 10x over the Motorola 6800, doubled the BASIC ROM space to 64KB and doubled the RAM space to 64KB!
I created these vector bitmap graphics using a "3D CAD" picture I found on the web of the Battlestar Galactica (last attachment).
As far as I know - there was never any 4050 BASIC program to view bitmap pictures on any of the 4050 computers. The 1979 4014 vector graphics terminal had a grayscale bitmap mode in the Extended Graphics option board, but I have only found a couple of bitmap 4014 images on a single Tektronix demo tape cartridge.
My 4050 BASIC program to display bitmaps works on all 4050 series computers - with an optional Tektronix 4050R12 Fast Graphics/Graphics Enhancement ROM Pack. This ROM Pack speeds up displaying vector images (including vector dot images) 10x over using BASIC MOVE and DRAW commands.
The Battlestar Galactica bitmap image in R12 binary format is 332234 bytes - slightly larger than would fit on a DC300 quarter-inch tape cartridge in the internal tape drive of all three 4050 computers, but would have fit on a 3M DC600 tape cartridge with a capacity of 600KB - it would have been very slow to load.
I designed an Arduino board to emulate the Tektronix 4924 GPIB tape drive - with the help of my software developer. My GPIB Flash Drive board contains a MicroSD card with gigabytes of storage and the Flash Drive emulates a GPIB tape changer, storing all the files of a "tape" in a single directory. I have also attached to this post a photo of my GPIB Flash Drive.
I have recovered almost 100 Tektronix 4050 Tapes and posted the ones I think are the most interesting at this time on my github repository for Tektronix 4051/4052/4054 computers: https://github.com/mmcgraw74/Tektronix-4051-4052-4054-Program-Files I included Tektronix published MATH volumes 1, 2, and 3 and Electrical Engineering, but I don't think they have a lot of use today. I have in my collection but not recovered tapes on Project Management, Statistics, and over 100 more tapes from the very active user group, which Tektronix made collections and published abstracts in their newsletter and the newletter customer got the tape for free. Commercial software like CAD programs were likely encrypted to eliminate copying - since Tektronix 4050 BASIC included a SECRET command which would then encrypt the program file as it was recorded to tape and add a SECRET flag in the tape header that would signal to BASIC ROM when that file was accessed to decrypt the program when it was loaded into memory. One big limiter to the size of the program was RAM in the 4051 was limited to 32KB and the 4052 and 4054 were limited to 64KB of RAM, although Tek BASIC did include commands to allow program "chunks" to be overlayed as necessary. Tektronix used those commands in their 4050 System Tape which was shipped with every system and included a tutorial on many of their BASIC commands. The tutorial ran on the original 4051 with 8KB of memory, and if the program detected 16KB of memory it would APPEND larger program files to speed up the tutorial.

15 notes
·
View notes
Text
The Übersaw build breakdown, Part 1: (enjoy!)
Note: I'm more than happy to answer any and all questions about this build. Want me to breakdown a specific step or detail, please ask!
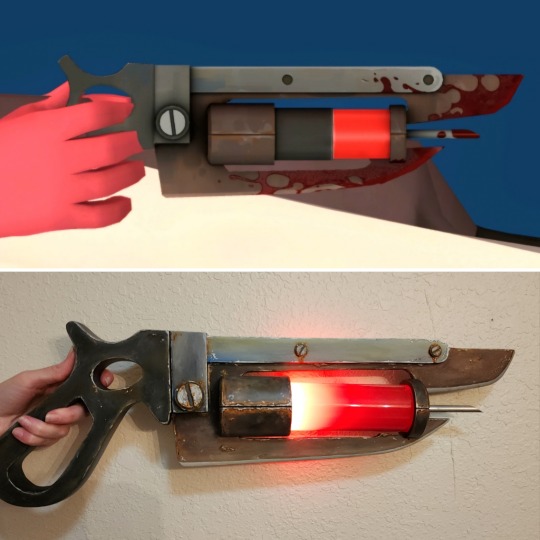
From top reference, to bottom complete, this build was a challenge from start to finish and required me to learn a ton of new skills, and reach out to a variety of people for help/advice/brainstorming! But when I decided I was finally going to make my dream cosplay of Medic, I knew this is the saw I wanted to make along with it.
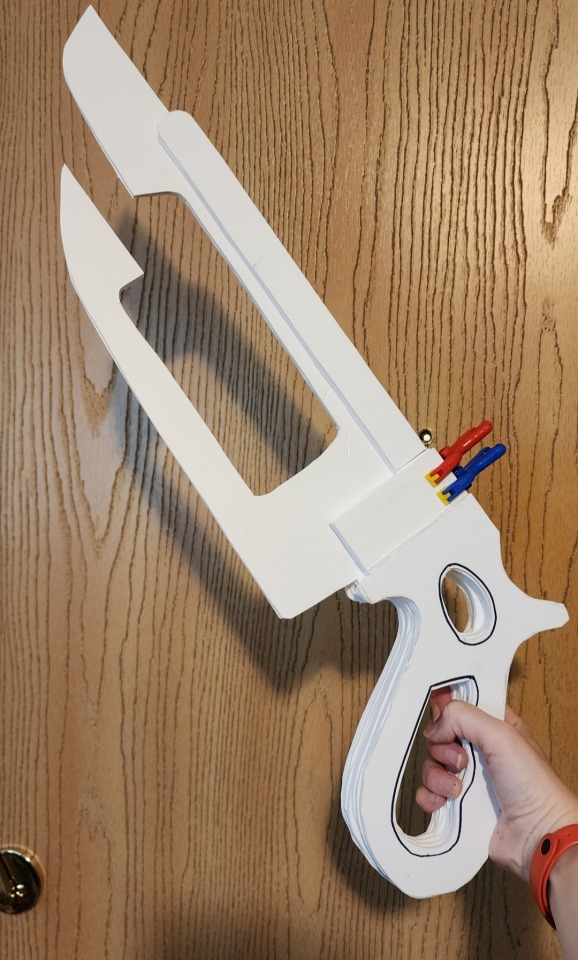
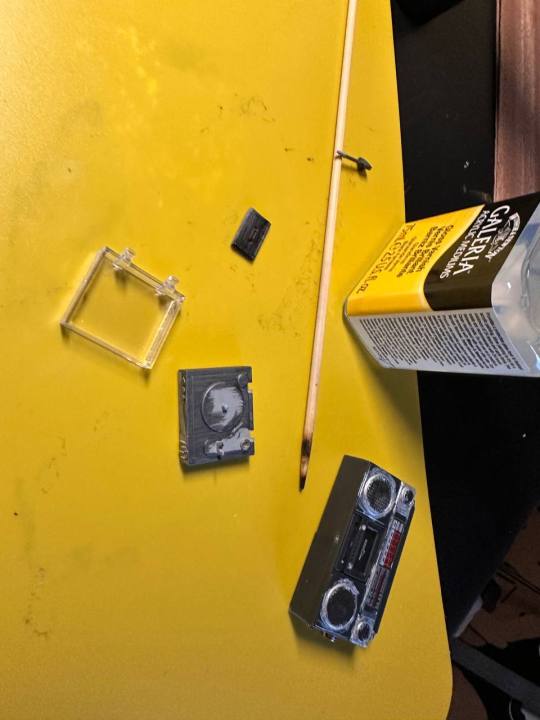
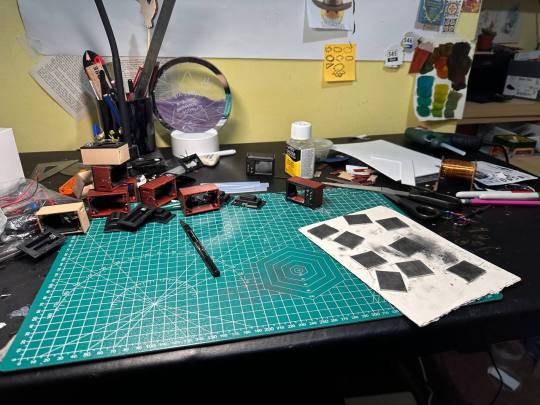
Every piece was made from scratch, and includes sintra, pla 3d printing, resin printing, acrylic tubes, a straw, bondo, E6000, hex bolts, led ring light, arduino trinket, metal switch, aaa battery pack, misc. wiring, spray paint, acrylic paint, and a whole lot of sanding sanding sanding!

I always wanted to stay as true to the original design as possible, but knew adjustments would have to be made, moving a model from a game to real life. Some details I wanted to keep a true as possible, such as the base shape and size. Some aspects were modified deliberately to fit better with the overall aesthetic of the specific version of Medic I was creating; such as smoothing out the edges of the handle, rather than keeping them sharp like in the game. (Something that would make it more realistic overall, a goal I kept in mind through every piece of the costume.)
One such change was adding liquid to the Übersaw core and an led light that pulses red. Looking at the base design, and the color palette the original creators used, they intrinsically translated in my mind to "liquid" and "light" rather than just a flat color. Thinking about Medic and his designs, I figured an ominous, pulsing red would be perfect for when the Übersaw was fully charged. (Plus it would look really cool, so... that definitely influenced my decisions!)
I mixed up a concoction of distilled water, red and silver mica powder, and filled an acrylic tube with the mixture. There's actually two tubes, the smaller inside one helps reduce water weight on this already hefty prop.

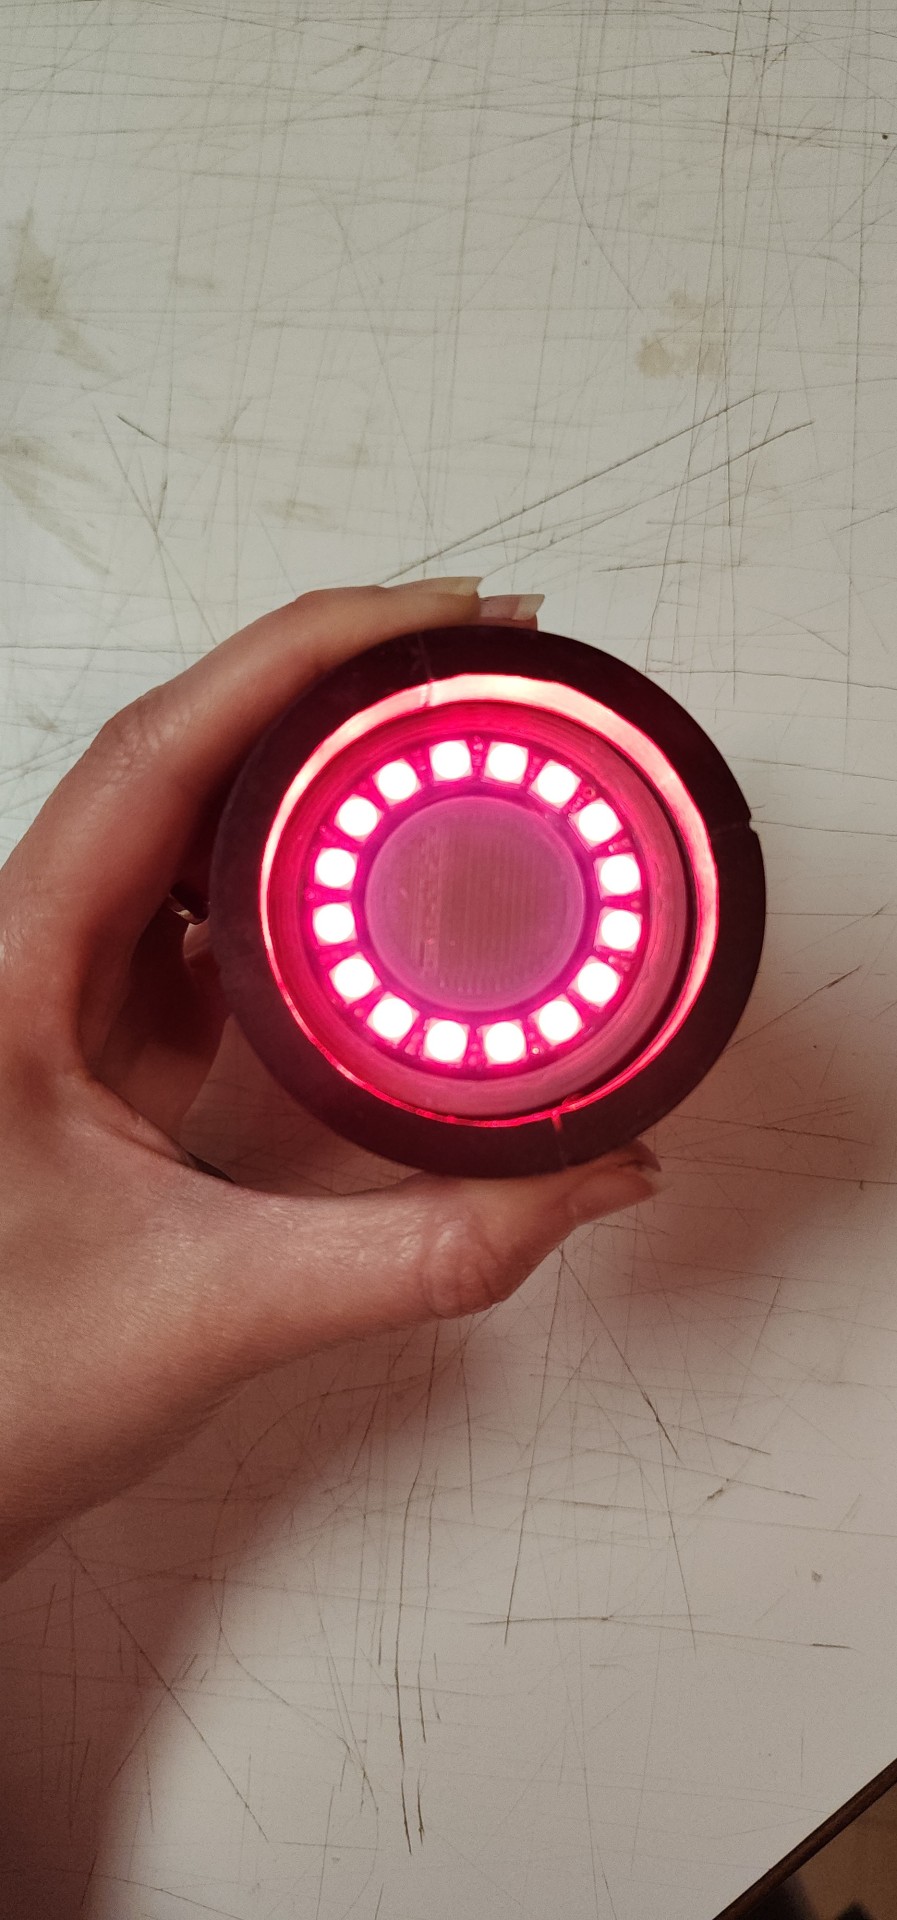
Of course, these changes also meant I needed to learning how to code an arduino trinket (which ended up being a lot of fun!), and create a special holder at the base of the Übersaw to hold the ring light, trinket, switch, battery pack and wiring. Not to mention it had to be accessible so I could change the batteries out when needed. That's when it was time to ask for help from some talented friends!

Here's what the resulting holder ended up looking like! (Not pictured is the ring the light sits on) It was 3d modeled and printed in PLA by my friend with some imput by me, but he knows so much more about this stuff I was happy to let him take the lead! The design includes hex bolts to secure the light holder to the Übersaw like a clamp, but also allows it to be opened in half for easy access to the batteries/any electronics that are having issues.
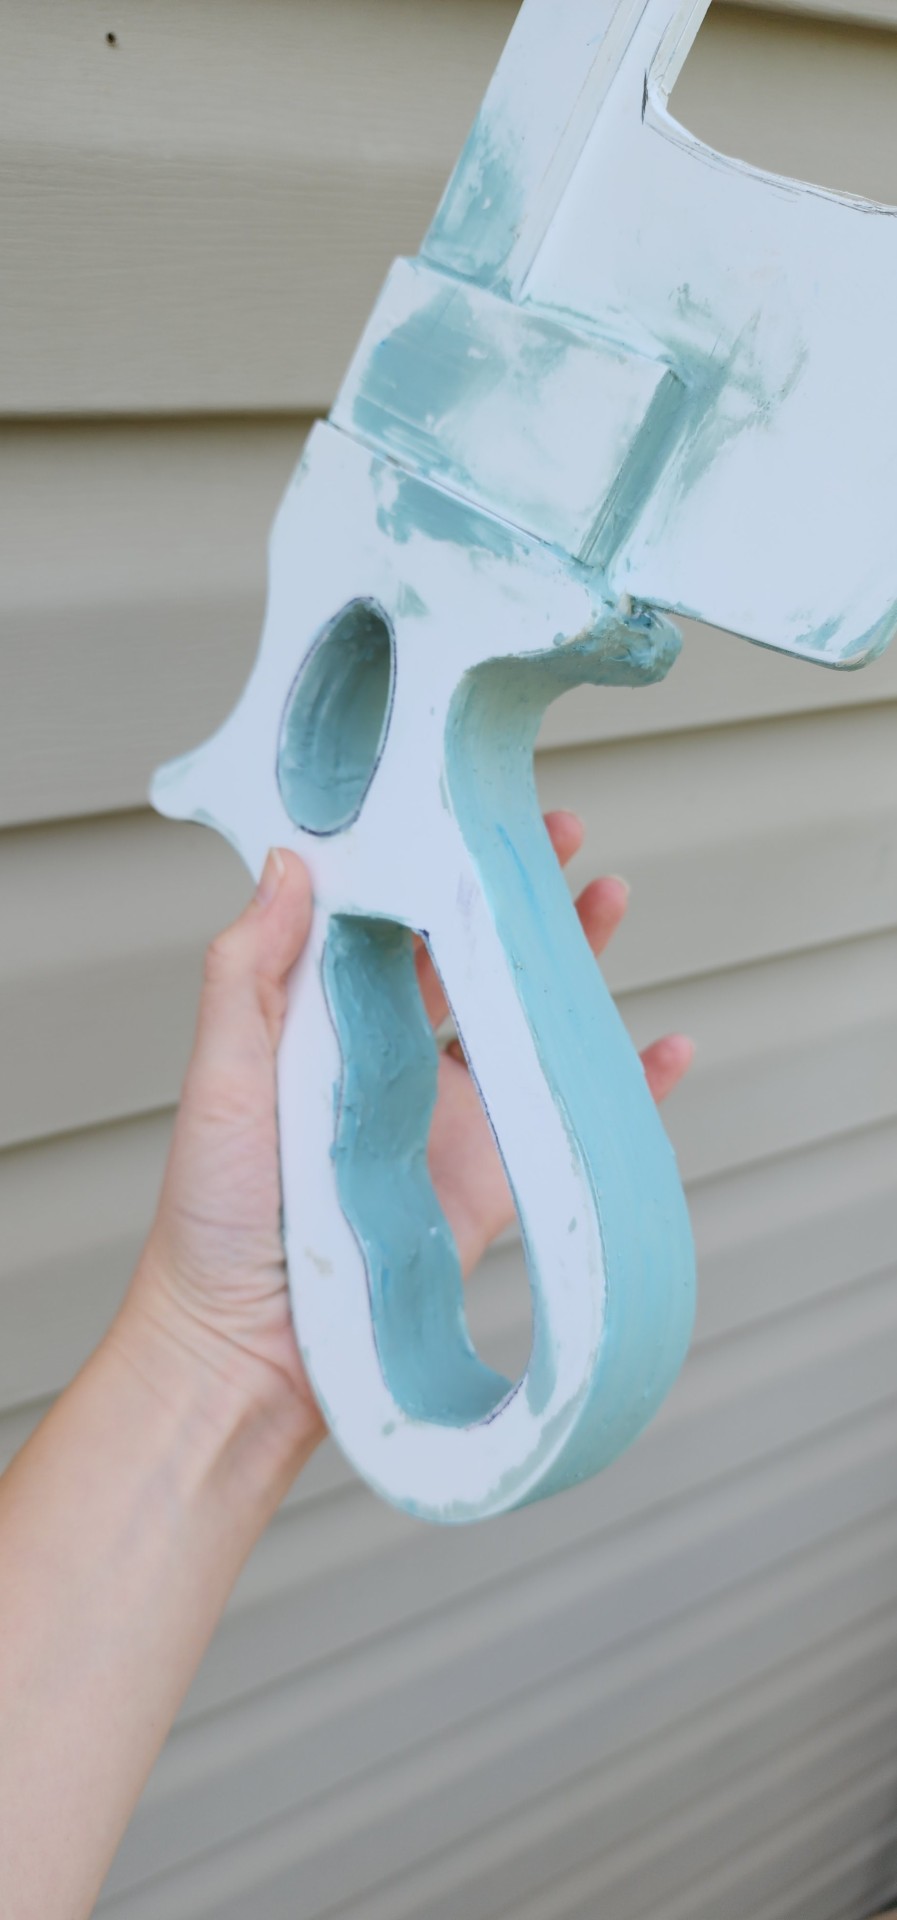

The base of the whole saw is sintra (pvc board), in many layers. The layers were then blended with Bondo and SO MUCH SANDING. After the piece looked like a cohesive whole, rather than 8 layers of plastic board, it was base coated with spraypaint and detail painted with acrylics. (I say this as though it was a simple task, but the spraypaint fought me every step of the way, had to be constantly re-sanded, and some layers refused to dry at all and had to be varnished to remove the tackiness. It was a trial to be sure!)

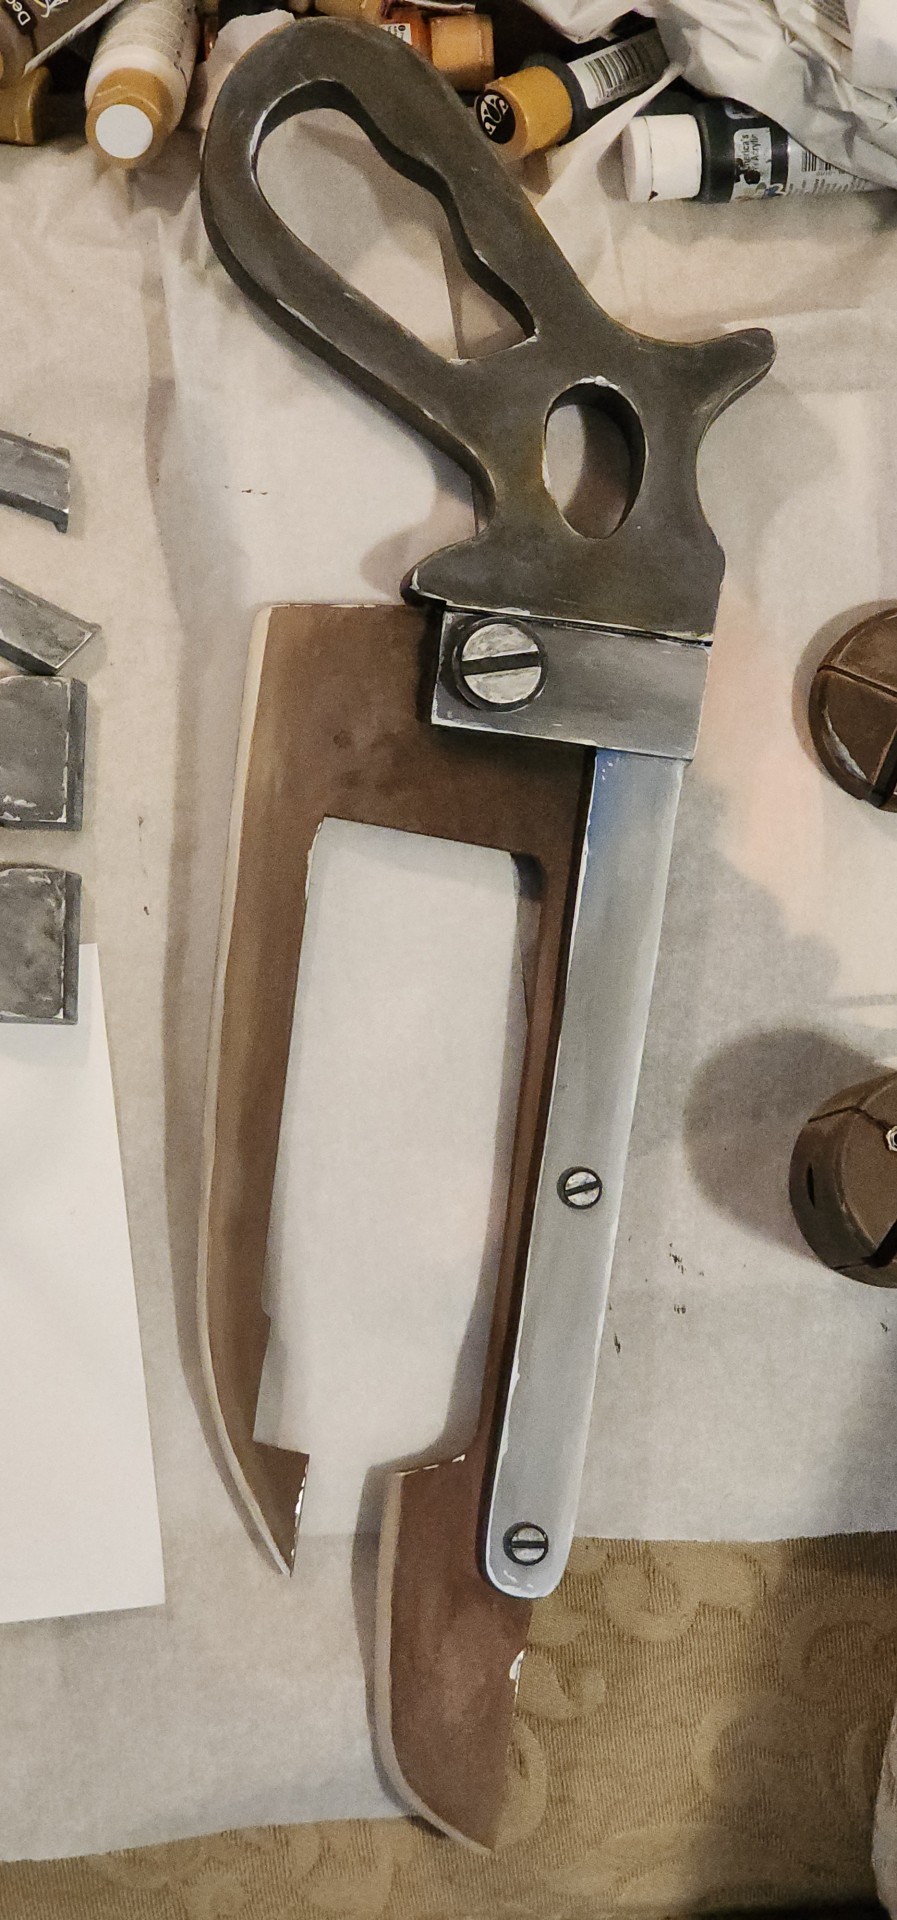
But after all was said and done, it was finally time for detail painting: My favorite part of any project! (Continued in part 2)
#cosplay#team fortress 2#tf2#tf2 medic#medic#ubersaw#cosplay wip#sisu squid stuff#tf2 cosplay#tutorial
47 notes
·
View notes
Text
About a month ago I decided to learn programming so I could level up my electronics journey, and am currently enjoying the roller coaster ride of learning to program microcontrollers. Although I have many ideas that I wish to develop, I first chose to co-create a magic mirror device with a witch named Eryk.
This is a small handheld electronic device that looks like a little scrying mirror, but when powered up, the mirror reveals a face that talks to you. You can ask it a yes or no question, which it will answer, and it has a divination mode, where you can ask a more specific question or obtain a general fortune.
I am still troubleshooting the hardware, which includes an ESP32, an OLED display and a DFPlayer mini. I started with an Arduino and a small OLED and everything was working well until I hit the memory limit of the Arduino. I upgraded to an ESP32, which I had to adjust my code to, and then decided to upgrade again to a slightly larger OLED. Along the way I somehow acquired almost as many electronic components as there are trees in my forest.


8 notes
·
View notes
Text
Raspberry Pi 5 / RP1 chip support for Neopixels with Python bindings coming soon 🎉💡🖥️🌈🐍
Hot off the PIO-presses, our resident Jepler created a Python binding for the Raspberry Pi 5 that lets us use the RP1 chip
on the 5/500 series boards to drive Neopixels using PIO. This is great because we can now use Neopixels
and friends on the latest Pi boards, and we can use any pin because PIO is not limited by underlying peripherals. You do need the latest kernel and firmware, so it is not quite ready for prime-time, but once piolib
is more readily available, we'll be able to have folks test this out.
#raspberrypi5#rp1chip#neopixels#pythonprogramming#pio#raspberrypi#adafruit#technews#opensource#hardwarehacks#makercommunity#ledlights#diyprojects#pythoncode#hardwaredevelopment#microcontrollers#embeddedprogramming#ledart#firmwareupdate#raspberrypilovers#neopixelmagic#techinnovation#raspberrypiupdate#codingcommunity#makerspace#iotprojects#diyhardware#ledprogramming#technologynews#pythonista
10 notes
·
View notes
Text

Hi Cats Tumblr People,


So I heard you like pics.
Please bear with me (AND TEACH ME) how Tumblr works/if I'm doing it wrong! I'm literally the "How do you do, fellow young people?" meme. Our Etsy is linked (unless I messed that up!) Right now it's bare (LOT of work and VERY old photos in the banner) but we'll be posting some cossies soon that are ready to retire. Some of our prices sadly will have to rise (we undercharge honestly for the amount of time put into them... we just LOVE making them). Anyway...
These are our original designs. We have taken inspiration from different productions, from the US tour to Gothenburg to Australia to Japan, less UK because it gets the most attention and we like COLOR! but this is all us. Our goal is to a) have characters be recognizable and b) make swing unitards in palates that could pass as at least 3 characters for emergency. When our rentals go out, swing unitards go with them, and ultimately it's the director who decides what makes the final cut (so a less yellow Demeter for example--but we LOVE that one).
If we ever do a production of Cats with Chaz, you'll notice one in Red, White, and some Black (but mostly Red and White, with fan ears, that is a design David created and is Chaz's FAVORITE design of all time. Any time he does a show, if we're hired, that costume goes. Usually Electra, but any ensemble/swing kitty and can cover for Sillabub or in a pinch Bombalurina. Yuka wore it at Interlakes before she did Victoria on the last US Tour! You might notice an Admetus in tans and GREEN undertones--that was my design he loved. We also did the purple twins (which was vetoed and I said, "Okay" then did it anyway because I knew he'd love it, which he did!), and REBA Gumbie Tap Suit was completely mine (everyone thought I was out of my MIND when I started making it! Even David! Then the shoulder pads came, and the belt, and tail, and BEDAZZLING!!! SO MANY RHINESTONES!!!!) Our Misto coat lights up but we still have a lot to learn about arduino since we'd eventually like to make it blink to music. The Misto coat is also created to fit a multitude of sizes, basically the theatre using their department for alterations since we make use of stretch fabric. I've known Bronson for almost as long as Chaz (he even designed my author website!!!) so when I saw him cast, I showed him his costume (a much, much browner/redder Gus than most see--I was serious about liking color) and let him choose between two coats. He said he wanted pants and we went, "NO! PANTLESS PRODUCTION!" because we thought he was joking! We didn't realize... HE REALLY WANTED PANTS!!!! SORRY BRONSON! So shout out to Wichita for making him pants! LOL!
There is a HUGE joke about Tumble thirsting for Tugger more than the girls so you'll notice that with the Tugger ABOUUUOUOUOUOUOUOUUUUUUUUUT THAT.
Hope that's of interest! And no, I'm not procrastinating on edits when my agent deadline is Sunday. Haha... ha... ha... ha... ha... Sera, if you're reading this I PROMISE I'M WORKING OKAY??? I DIDN'T KNOW WE GOT ON BROADWAYWORLD!!!
We also saw some comments about casting in general and some confusion/questions about different dancers doing different parts (Alonzo vs Plato). Would anyone be interested in learning more about the casting process in general and things that directors/choreographers need to take into consideration? Please note, I will not discuss ANY performers we work with. Ever. All are extraordinary and these are tough calls that aren't easy to make and based on other factors, including the ensemble at large, and sometimes huge changes are made.
96 notes
·
View notes
Text
How to Brand Short Links for Professional Apperance
How to Brand Short Links for Professional Appearance
In the age of social media, email marketing, and fast-paced digital communication, the way your links look plays a big role in how users perceive your brand. Long, clunky URLs are not only unattractive — they often appear suspicious or untrustworthy. That’s why branded short links have become a key component of professional digital marketing.
But creating branded links goes beyond simply shortening a URL. It involves strategy, customization, and branding to ensure your links reflect your brand identity and build trust with your audience.
In this article, we’ll explore how to brand short links for a professional appearance — and how to make them effective, recognizable, and conversion-focused.
What Is a Branded Short Link?
A branded short link is a customized, shortened URL that uses your own domain name rather than a generic shortener like bit.ly or tinyurl.com.
Example:
Generic link:
arduino
CopyEdit
bit.ly/2Gt4Ftr
Branded link:
bash
CopyEdit
go.yourbrand.com/summer2025
This branded link uses a custom short domain and a meaningful slug to promote clarity, trust, and brand consistency.
Why Brand Your Short Links?
Here’s why branding your short links matters:
Builds trust: People are more likely to click links from sources they recognize.
Increases engagement: Branded links can boost click-through rates by up to 34%.
Enhances visibility: Even when links are shared by others, your brand name remains visible.
Looks professional: Clean and branded URLs elevate your brand image.
Improves tracking: Most branded short link tools include advanced analytics.
Steps to Brand Short Links Professionally
Let’s walk through how to set up and use branded short links in a way that looks clean and communicates professionalism.
1. Get a Custom Short Domain
The foundation of a branded short link is a custom domain. Choose a domain that reflects your brand but is short and easy to remember.
Examples:
For mybrand.com, a short domain could be:
go.mybrand.com
mybrnd.co
mybn.link
mb.to
Tip: Use creative domain extensions like .link, .to, .sh, or .co.
2. Choose a Link Shortening Platform
You’ll need a service that supports custom domain integration. Popular options include:
Rebrandly (best for branding and custom slugs)
Bitly (popular and integrates well with social tools)
Short.io
TinyURL Pro
BL.INK
These platforms allow you to:
Connect your short domain
Create branded links
Track analytics
Add UTM parameters
3. Use Descriptive and Clean Slugs
The “slug” is the part of the URL after the domain, e.g., go.brand.com/**summer-sale**.
Avoid random characters like /Xy29aT. Instead, use human-readable and campaign-specific slugs:
/free-trial
/july-offer
/product-guide
/webinar-signup
This improves:
Professional appearance
Click-through rates
SEO visibility (when indexed)
4. Integrate with Marketing Tools
Many branded short link platforms integrate with:
Email marketing software (Mailchimp, ConvertKit, etc.)
Social media schedulers (Buffer, Hootsuite)
CRM systems (HubSpot, Zoho)
Ad managers (Facebook Ads, Google Ads)
This allows seamless usage of branded links in all your campaigns while maintaining consistency across platforms.
5. Add UTM Parameters for Campaign Tracking
For deeper insights, append UTM parameters to your URLs before shortening them. These tags help you track:
Traffic sources
Campaign names
Ad performance
Example:
bash
CopyEdit
go.mybrand.com/summer-deal?utm_source=facebook&utm_campaign=summer2025
Don’t worry — the short link will still look clean and professional, while behind the scenes it’s full of valuable data.
6. Use Link Retargeting Pixels
With advanced link shorteners like Rebrandly or PixelMe, you can add a retargeting pixel even if the link points to third-party content.
This allows you to show follow-up ads to users who clicked on:
Blog articles
Product pages
External content
It boosts engagement and keeps your brand in front of the audience — even after they leave the page.
7. Customize Links by Platform
Tailor your branded links for different platforms to maintain a clean look and optimize performance:
Instagram Bio: Use short and clear links like brand.to/shop
Email: Use branded links to increase trust and avoid spam filters
Print Ads or Flyers: Make links easy to type and remember
YouTube Descriptions: Add short branded links to product pages or landing pages
Branding Tips for a Professional Look
Here are a few extra tips to keep your branded links looking sharp:
Tip
Why It Matters
Keep slugs short and relevant
Easier to read and remember
Use hyphens for clarity
Example: /free-guide vs /freeguide
Avoid capital letters in URLs
They can confuse users or cause errors
Create a consistent naming structure
Example: /promo2025, /promo2026
Don’t use unnecessary numbers
Avoid slugs like /sale1234
Real-World Examples
Amazon uses amzn.to for affiliate links.
The New York Times uses nyti.ms.
Pepsi could use something like go.pepsi.com/campaign2025.
These links look professional, consistent, and brand-aligned.
Visit this websites to get more useful tools and knowledgeable helpful to grow in SEO tny.ws
Conclusion
In today’s competitive digital world, branding your short links is not a luxury — it’s a necessity. Every link you share is an opportunity to boost brand recognition, build trust, and encourage user engagement.
From setting up a custom short domain to crafting readable slugs and tracking user behavior, branded links are a small detail that brings big results. Whether you're a startup, influencer, or enterprise, mastering branded link creation can significantly improve the professional image of your marketing campaigns.
So take control of your links. Brand them. Track them. Share them with confidence.
2 notes
·
View notes
Text
SERVO DISTANCE INDICATOR USING ARDUINO UNO
INTRODUCTION
Distance measurement is a fundamental concept in various fields, including robotics, automation, and security systems. One common and efficient way to by emitting sound waves and calculating the time it takes for the waves to reflect back from an object, allowing accurate measurement of distance without physical contact.
In this project, we will use an HC-SR04 Ultrasonic Sensor in conjunction with an Arduino microcontroller to measure the distance between the sensor and an object. The sensor emits ultrasonic waves and measures the time it takes for the waves to return after reflecting off the object. By using the speed of sound and the time measured, the distance is calculated. This simple yet powerful setup can be applied in a variety of real-world applications such as obstacle detection in robots, parking assistance systems, and automatic door operations.

WORKING PRINCIPLE
1. Servo Movement: The servo motor rotates to different angles (0° to 180°). The ultrasonic sensor is mounted on top of the servo and moves with it.
2. Distance Measurement: At each position, the ultrasonic sensor sends out an ultrasonic pulse and waits for the echo to return after hitting an object. The Arduino records the time taken for the echo to return.
3. Distance Calculation: The Arduino calculates the distance to the object based on the time recorded and the speed of sound (0.0343 cm/µs).
4. Servo as Indicator: The servo motor's position provides a physical indication of the direction of the detected object. As the servo moves across a range of Image map out objects in different directions based on distance.
5. Visual Output: The Arduino can also send the distance and angle data to the serial monitor, creating a real-time visual representation of the detected object positions.
APPLICATIONS
1. Autonomous Robots and Vehicles
2. Radar Systems
3. Parking Assistance
4. Security Systems
5. Environmental Scanning in Drones
6. Warehouse Management and Automation
7. Industrial Automation
8. Robotic Arm Guidance
9. Collision Avoidance in UAVs/Robots
10.Interactive Displays or Art Installations
11.Smart Doors and Gates
CONCLUSION
The Servo Distance Indicator Project successfully demonstrates the integration of an ultrasonic sensor and a servo motor to create an effective distance measurement an object, the project provides real-time feedback through the movement of a servo motor, which indicates the measured distance via a visual representation.
7 notes
·
View notes
Text
It's so frustrating right now, Everything seems complicated. I want to get into building Power bank or Arduino nano at Home, In kitchen as I feel like cooking something with electronics, But it's Complicated because I don't know what is SoC or PCB boards?? Wtf is ATmega328P chip? What it is for??? Well, I'm trying and I'm trying really hard to understand it all and I still don't get it. "What can someone except for a 16 y/o" I say to myself but I should know about such stuffs, I believe.
I wanna to create a hobby or I want something to be obsessed with, incessantly into it and I have no passion, no desire for anything but whenever I try, it seems hard like really hard, I feel I lack something everytime and I feel less but never enough in myself.
-bella
#spilled words#spilled ink#words words words#writers#writers on tumblr#dark academia#spilled thoughts#writeblr#aesthetic#quoteoftheday#poetry#electronic#the mechanisms#interiors#building#cooking#i feel empty#i feel insane#feelings#bullseye#i hate everything
2 notes
·
View notes
Text
Essential Skills Every Electronics Engineer Should Master
Electronics engineering is an exciting and constantly evolving field. With new technologies emerging every day, the need for skilled professionals has never been greater. If you're pursuing a B Tech in Electrical and Electronics Engineering or exploring options at B Tech colleges for Electrical and Electronics, it's crucial to know which skills can set you apart in this competitive domain.
Let’s dive into the essential skills every aspiring electronics engineer should master.
Strong Foundation in Circuit Design
Circuit design is at the heart of electronics engineering. Understanding how to create, analyze, and optimize circuits is a must-have skill. Whether you’re designing a simple resistor network or a complex integrated circuit, mastering tools like SPICE and PCB design software can make your designs efficient and innovative.
Programming Proficiency
Electronics and programming often go hand in hand. Languages like Python, C, and MATLAB are widely used to simulate electronic systems, automate processes, and even build firmware for devices. Engineers proficient in programming can troubleshoot problems effectively and add versatility to their skill set.
Knowledge of Embedded Systems
Embedded systems are everywhere—from your smartphone to your washing machine. As an electronics engineer, understanding microcontrollers, sensors, and actuators is crucial for creating devices that work seamlessly in our daily lives. Hands-on experience with platforms like Arduino and Raspberry Pi can be a great way to start.
Problem-Solving and Analytical Thinking
Electronics engineers often face unique challenges, such as debugging faulty circuits or improving system performance. Strong problem-solving and analytical thinking skills help them identify issues quickly and find effective solutions. To cultivate these skills, tackle real-world projects during your coursework or internships.
Familiarity with Power Systems
As the world moves toward renewable energy and smart grids, knowledge of power systems is becoming increasingly important. Engineers in this field should understand how electrical power is generated, transmitted, and distributed and how to design energy-efficient systems.
Effective Communication Skills
Electronics engineering often involves working in teams with other engineers, designers, or clients. Communicating your ideas clearly—whether through reports, presentations, or technical drawings—is just as important as your technical skills. Strong communication ensures that your brilliant ideas come to life effectively.
Adaptability to New Technologies
Technology evolves rapidly, and staying updated is essential for electronics engineers. Whether you’re learning about IoT (Internet of Things), AI integration, or 5G communication, an adaptable mindset will ensure you remain relevant and capable of tackling emerging challenges.
Hands-On Experience
While theoretical knowledge is important, nothing beats practical experience. Participating in labs, internships, or personal projects gives you the opportunity to apply what you’ve learned and develop confidence in your skills. Employers often value hands-on experience as much as your academic achievements.
Preparing for Success in Electronics Engineering
Pursuing a B Tech in Electrical and Electronics Engineering is the first step toward mastering these skills. The best B Tech colleges for Electrical and Electronics not only provide a strong academic foundation but also opportunities for practical learning and industry exposure. By focusing on the skills mentioned above, you can position yourself as a competent and innovative engineer ready to tackle real-world challenges.
4 notes
·
View notes
Note
Hi, I just got into tech (actually 1 year in but I still feel like I don't know anything).
I learnt python, R, SQL, Tableau and concepts in Data Structures, Algorithms.
[Just the Basic level of the listed.]
But I can't write my own programs on python or create anything.
I was hella impressed by your microprocessor project, and when I took up tech (ai and data science) I assumed I would do something like that or at least code.
Now, I am just venting but where do I start, how do I make projects what are some interesting projects, what should I learn? A lot of my seniors tell me to have a wide range of knowledge like focus on one thing by depth but add other things. For example: you can study data analytics in depth but have some knowledge in ethical hacking and web development etc. Like an all rounder.
Wow ok a lot to unpack here, I'll get started
Lots of places recommend that you start with Arduino, as there are a lot of good tutorials out there. I somewhat disagree
I think that raspberry pi is better because it's usually a lot cheaper to buy the stuff you want to play around with
But an even cooler way to do it, go to wokwi.com and start a project on a Raspberry Pi Pico (make sure it's the micropython version) and then you can get started there
Google something like "Blink led with Pi Pico micropython" and there will be a tutorial or two
Then, once you've played around for a while you can buy a Pi Pico for very little money and see your stuff work irl!
If you need any more help or have any questions, feel free to DM me and I'll see what I can do
#micropython#coding#python#raspberry pi#raspberry pi pico#programming#microprocessors#microcontroller#microcontrollers
6 notes
·
View notes
Note
oh man your art is amazing. any tips on how to get creating art with old tech like you do? I love the idea
thank you!!! <3 there are soooo many different ways to approach it. really any old CRT TV/monitor you can acquire is a perfect start. ask around if you don't have one, they might get harder to find but in my experience a ton of boomers still have em lying around (and will be overjoyed to part with them)!! as for camera, I used an iPhone SE for years and loved it, you don't need anything too fancy.
if the CRTs are all dead or no longer easy to find, you can definitely use an upscaler and a capture card. don't let the CRT hunt scare you away; it's like a tube amp but for visuals. it's not gonna make or break good art, and i've used a capture card for a different aesthetic as well! it's just one of many ways to render the analog signal.
beyond that, if you already have a digital art style or have the discipline to develop one, just pick up a copy of Aseprite and an HDMI to composite converter and you're good to go! whether you learn traditional pixel art techniques to adapt, or just downscale your art style, it's a pretty low barrier to entry there.
if you're more hands-on and want a glitchy aesthetic, the Dirty Video Mixer by Karl Klomp is a go-to first build. a camcorder + VCR/DVD player + dirty mixer combo is a classic setup for video artists. or if you're more into software, you can build an 8-bit creative code machine with an ESP32 devkit; there's an Arduino library for analog video based on Sega Master System emulation.
if you want to do the vector-style aesthetics like my oscilloscope pieces, look into 'oscilloscope music'! I personally use OsciStudio hooked into Blender, but there's free software as well.
last but not least, just follow your sense of wonder, experiment, try whatever. except don't open up the case of your CRT TV because it has super high voltages even when unplugged and will kill you
5 notes
·
View notes
Text
G3T T0 KN0W M3 !
૮ ․ ․ ྀིა <- me (ena!)
Hey everyone! I thought it was about time I made an introduction post!
‧₊˚✩彡‧₊˚✩彡‧₊˚✩彡‧₊˚✩彡‧₊˚✩彡‧₊˚✩彡‧₊˚✩彡‧₊˚✩彡‧₊˚✩彡‧₊˚✩彡‧₊˚✩彡‧₊˚✩
currently a second yr student studying cyber security
currently learning python both in school and for personal use
linux user :3 (ubuntu)
some knowledge in java and html
Projects I am currently working on (will update):
#address book in python
#gameduino/arduino project (undecided what I want to do yet)
#create my own tumblr blog theme/neocities page
#creating my own personal servers using linux
#helping create a website for an on-campus club I'm in :D
Quick Facts about me !!
I LOVE old tech ; collecting, learning about and tinkering with it!
I modded a psp last year and it is one of my favorite items <3
^^ modding devices in general is something I love doing and learning about
I play the bass guitar and double bass !
I also study german and was learning russian for awhile
^^ very intrested in learning about both cultures!
I have a second tumblr page with my special interests... 🤫
That's about it for now! Thank you all for following my journey ! I am very excited to start posting more and hope to stay somewhat consistent! :)

7 notes
·
View notes
Text
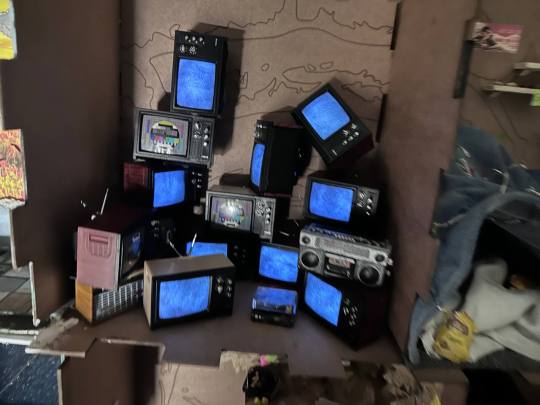
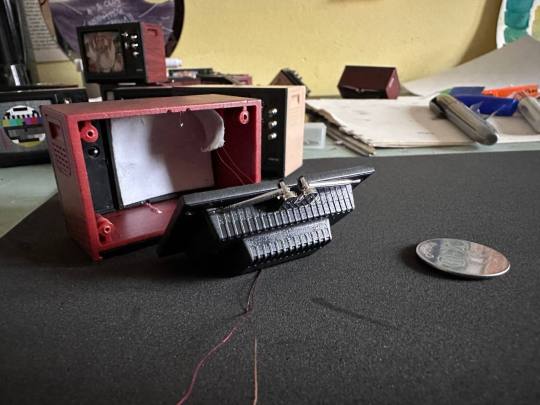
Every circutry in this project I made and soldered myself, also programmed this TV room to flicker from time to time, using Arduino.
And used Parallel circuit for TV room!
Also the Tv screen is white foam covered in charcola...as I still need light to be able to travel though the screen and show off the colour plus it creates this static effect which I need!


4 notes
·
View notes
Text
New at Adafruit this week! Slide Switch & 🪶 Feather Mounts for LEGO builds 📷 Raspberry Pi AI Camera (Sony IMX500), 🧲 ScoutMakes DRV5032 Magnetic Sensor 🖥️ RP2350 Adapter for HDMI Displays. Build, create, and innovate! https://adafruit.com/new
#adafruit#newproducts#electronics#makers#diytech#raspberrypi#lego#aicamera#magneticsensor#feathermounts#hdmidisplay#innovation#techgadgets#makercommunity#engineering#buildcreateinnovate#techfun#scoutmakes#slideswitch#sonyimx500
5 notes
·
View notes
Text
5 Arduino Courses for Beginners
Robotics, automation, and do-it-yourself electronics projects have all been transformed by Arduino, an open-source electronics platform. Entering the world of Arduino may seem intimidating to novices, but the correct course may make learning easier and more fun.
Arduino Step-by-Step: Getting Started (Udemy)
This extensive Udemy course is designed for complete novices. It provides an overview of Arduino's fundamentals, describing how the platform functions and assisting students with easy tasks like using sensors and manipulating LEDs.
Key Highlights:
thorough explanations for novices.
practical projects with practical uses.
instructions for configuring and debugging your Arduino board.
Introduction to Arduino (Coursera)
The main objective of this course is to introduce Arduino programming with the Arduino IDE. It goes over the fundamentals of circuits, programming, and connecting various parts, such as motors and sensors.
Key Highlights:
instructed by academics from universities.
access to a certificate of completion and graded assignments.
Concepts are explained in length but in a beginner-friendly manner.
Arduino for Absolute Beginners (Skillshare)
For those who want a quick introduction to Arduino, this brief project-based course is perfect. You'll discover how to configure and program your Arduino board to produce interactive projects.
Key Highlights:
teachings in bite-sized chunks for speedy learning.
simple projects for beginners, such as sound sensors and traffic light simulations.
Peer support and community conversations.
Exploring Arduino: Tools and Techniques for Engineering Wizardry (LinkedIn Learning)
This course delves deeply into Arduino programming and hardware integration, drawing inspiration from Jeremy Blum's well-known book. It is intended to provide you with the skills and resources you need to produce complex projects.
Key Highlights:
advice on creating unique circuits.
combining displays, motors, and sensors.
Code optimization and debugging best practices.
Arduino Programming and Hardware Fundamentals with Hackster (EdX)
This course, which is being offered in partnership with Hackster.io, covers the basics of Arduino hardware and programming. You may experiment with real-world applications because it is project-based.
Key Highlights:
Course materials are freely accessible (certification is optional).
extensive robotics and Internet of Things projects.
interaction with teachers and other students in the community.
Arduino is a great place to start if you want to construct a robot, make a smart home gadget, or just pick up a new skill. The aforementioned courses accommodate a variety of learning preferences and speeds, so every novice can discover the ideal fit. Select a course, acquire an Arduino starter kit, and set out on an exciting adventure into programming and electronics!
To know more, click here.
2 notes
·
View notes
Text
4x4x4 PCB LED CUBE
youtube
Bring life to your home with this enchanting 4x4x4 LED cube. From static to flashing, chasing, or fading this cube can be programmed to display many different types of 3D LED transitions. This customizable PCB LED cube is super easy to make and fun to have in your home. Go ahead and create a forest of these cubes using various color LEDs to enhance the beauty of your Christmas Tree this Christmas. This cube has 64 Blue LEDs organized in 4 layers. These LEDs are wired up to an Arduino Nano. Each LED can be addressed individually using Arduino IDE, enabling it to display amazing 3D transitions! There are hundreds of tutorials of these cubes made using exposed metal wires and by using crazy soldering techniques, which just gives me shivers. In this tutorial I'll show you guys how to make this super simple 4x4x4 PCB LED cube "without over complicating anything". With just basic soldering skills, you can create this PCB cube and light up your living room making everyone jealous.
3 notes
·
View notes