#Attribute name in HTML
Explore tagged Tumblr posts
Visit Tumblr Blog
Explore Tumblr blogs with no restrictions, modern design and the best experience.
Last Seen Tumblr Blogs


Fun Fact
Tumblr Inc. is funded by 13 investors.
Text
Convert HTML to Image: A Step-by-Step Guide ✨

Do you want to turn some HTML code you've made that's on your website and have a way to convert it into an image for you to save?
Well, look no further! I too wanted to do the same thing but funny enough, there weren't any straightforward tutorials out there that could show you how! After hours of searching, I finally discovered the solution~!
This is an old tutorial I made 🐼

💛 Set your environment
Before we dive into the conversion process, I'll assume you already have your HTML code ready. What you want to learn is how to turn it into an image file. You should have a good grasp of HTML and JavaScript. For this tutorial, we'll use the following HTML code example:

We won't include the CSS code, as it doesn't affect this tutorial. The JavaScript file (script.js) at the bottom of the body element is where we'll add the functionality for the conversion.
Your page should resemble the following:

As you can see, the "Click me" button will handle the conversion. We aim to convert everything within the div.info-div into an image.
💛 Using the html2canvas JavaScript Library
The html2canvas library allows you to take screenshots of webpages and target specific elements on a screen. Here are the steps to include the library in your project:
The steps to put the library in your project:
Visit the html2canvas website for more information.
Copy the CDN link from here

and include it in a script tag in your project's head tag in the HTML file:

That's it for including the library on the HTML side. Now, let's move on to the JavaScript code.
💛 JavaScript Functionality
Here's the JavaScript code to handle the conversion:

In this code, I want to turn the whole div.info-div into an image, I put it into a variable in const div = document.querySelector(".info-div");.
I also put the button into a variable in const button = document.querySelector("button");
I added a click event listener to the button so when the user clicks the button, it will follow the code inside of the event listener!
You can find similar code like this in the documentation of the html2canvas library:

What is happening here is:
We add the div (or what the element we want to take an image of) into the html2canvas([element]).then((canvas)
Added the image file type url to a variable = const imageDataURL = canvas.toDataURL("image/png"); - You can replace the png to other image file types such as jpg, jpeg etc
Created an anchor/link tag, added the href attribute to imageDataURL
The download attribute is where we will give the default name to the image file, I added "dog.png"
Perform the click() function to the anchor tag so it starts to download the image we created
And that's it!
💛 The End
And that's it! You've successfully learned how to turn your HTML into an image. It's a great way to save and share your web content in a unique format.

If you have any questions or need further clarification, please comfortable to ask. Enjoy converting your HTML into images! 💖🐼
#my resources#coding#codeblr#programming#progblr#studying#studyblr#programmer#html#html css#javascript#neocities#coding tips#html5 tutorial#html tutorial
155 notes
·
View notes
Text
Day 2 [Multimedia Elements In HTML]
Welcome to day 2 :D
Day 1 [Introduction To HTML]

Line By Line Explanation:
(An attribute is extra info added to an HTML tag. So, is a tag. Src, alt, width and height are the attributes)
Tag : Used to add images to webpages
src : Used to give the URL of the image or the name of the image file
alt : specifies what will appear on the browser in case the image doesn't appear.
Width and height : Specifies the width and height.
Tag : Used to add audio
controls: shows a play/pause bar.
: your audio file (paste your file link there).
Type: Tells the browser what file you're showing it
Tag: Used to add videos
controls : lets users play/pause the video.
width and height: size of the video frame.
: your video file (paste your file link there).
Here's The Output →

Additional Tip : Download these two extensions because they're really helpful.

Live Preview helps you to look your output without having to save it every time you make a change in VS code
Live Server is similar, it just shows you the output on the webpage.
You can search for these two in the extensions icon on the side.
_____________________
Hope it helps. Tomorrow, we'll cover links and lists xD
#code#codeblr#css#html#javascript#python#studyblr#progblr#programming#comp sci#web design#web developers#web development#website design#webdev#website#tech#html css#learn to code#school#study motivation#study aesthetic#study blog#student#high school#studying#study tips#studyspo#website development#coding
15 notes
·
View notes
Text
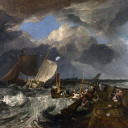
For my friend, Roger…
Sir William Jackson Hooker (July 6, 1785 – August 12, 1865) This is a plate from Curtis's Botanical Magazine, Volume 73. Date: 1847. [File:Curtis's Botanical Magazine, Plate 4323 (Volume 73, 1847).png] Public Domain
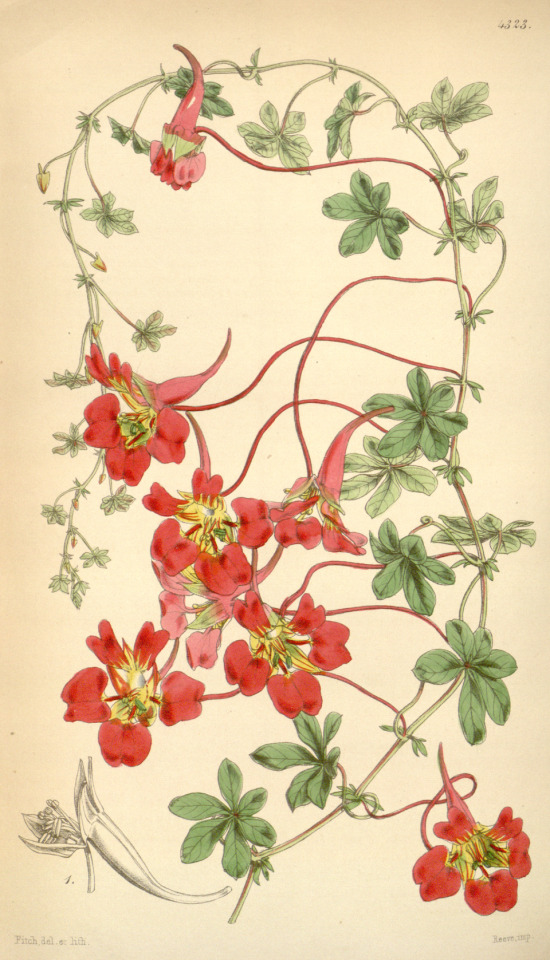
Sir William Jackson Hooker. Stipple engraving by H. Cook, 1834, after T. Phillips. Public Domain
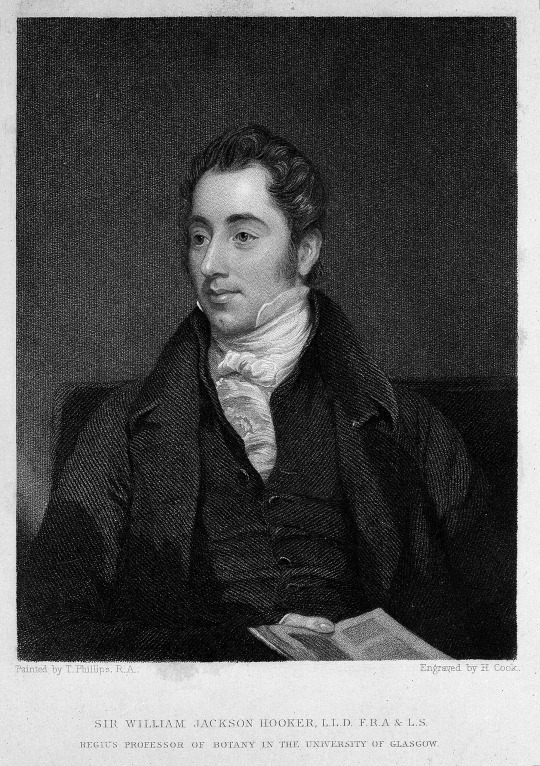
Thomas Herbert Maguire (1821-1895): Portrait of William Jackson Hooker (1785-1865) - charcoal pencil drawing, 1851. Public Domain
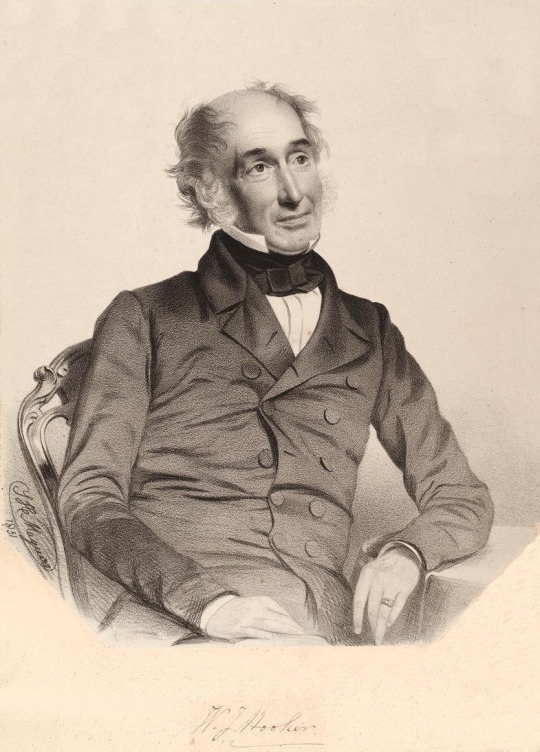
Ernest Edwards (1837-1903): Sir William Jackson Hooker, 1863 or 1864. Public Domain
Sir William Jackson Hooker (July 6, 1785 – August 12, 1865) was an English botanist and botanical illustrator, who became the first director of Kew when in 1841 it was recommended to be placed under state ownership as a botanic garden. At Kew he founded the Herbarium and enlarged the gardens and arboretum. The standard author abbreviation Hook. is used to indicate this person as the author when citing a botanical name.
Description: This is a plate from Curtis's Botanical Magazine https://commons.m.wikimedia.org/wiki/Curtis%27s_Botanical_Magazine, Volume 73. Date: 1847
Source: Downloaded from https://www.biodiversitylibrary.org/item/14351.
Author: William Jackson Hooker
Permission (Reusing this file): A mere mechanical scan or photocopy of a public domain original.
This image is in the public domain because it is a mere mechanical scan or photocopy of a public domain original, or – from the available evidence – is so similar to such a scan or photocopy that no copyright protection can be expected to arise. The original itself is in the public domain for the following reason:
Public domain https://en.wikipedia.org/wiki/public_domain
This work is in the public domain in its country of origin and other countries and areas where the copyright term is the author's life plus 70 years or fewer. This file has been identified as being free of known restrictions under copyright law, including all related and neighboring rights.
https://commons.m.wikimedia.org/wiki/Commons:Copyright_tags/Country-specific_tags#United_States_of_America
File history [current]: File:Curtis's Botanical Magazine, Plate 4323
Title: Sir William Jackson Hooker. Stipple engraving by H. Cook, 18
Description: Sir William Jackson Hooker. Stipple engraving by H. Cook, 1834, after T. Phillips.
Iconographic Collections
Keywords: T. Phillips; H. Cook; William Jackson Hooker
Credit line: This file comes from the Wellcome Collection https://wellcomecollection.org/, a website operated by Wellcome Trust, a global charitable foundation based in the United Kingdom. Refer to Wellcome blog post http://www.wellcome.ac.uk/News/Media-office/Press-releases/2014/WTP055466.htm (archive https://web.archive.org/web/20150815054440/http://www.wellcome.ac.uk/News/Media-office/Press-releases/2014/WTP055466.htm).
This tag does not indicate the copyright status of the attached work. A normal copyright tag https://commons.m.wikimedia.org/wiki/Special:MyLanguage/Commons:Copyright_tags is still required. See Commons:Licensing https://commons.m.wikimedia.org/wiki/Special:MyLanguage/Commons:Licensing.
References:
• Library reference: ICV No 3060 • Photo number: M0010688 • Full Bibliographic Record: http://catalogue.wellcomelibrary.org/record=b1167606
Source/Photographer: https://wellcomeimages.org/indexplus/obf_images/f8/e3/00abddb8132fe0a6d678c0961c94.jpg • Gallery: https://wellcomeimages.org/indexplus/image/M0010688.html • Wellcome Collection gallery (2018-04-03): https://wellcomecollection.org/works/d5kx9555 CC-BY-4.0
This file is licensed under the Creative Commons Attribution 4.0 International license. https://en.wikipedia.org/wiki/en:Creative_Commons https://creativecommons.org/licenses/by/4.0/deed.en
File history [current]: File:Sir William Jackson Hooker. Stipple engraving by H. Cook, 18 Wellcome M0010688.jpg
Description: Portrait of William Jackson Hooker (1785-1865) - charcoal pencil drawing. Date: 1851
[File:William Jackson Hooker, 1851.jpg]
Source: http://images.mobot.org/
Author: Thomas Herbert Maguire (1821-1895)
Permission (Reusing this file): PD
Licensing: This work is in the public domain in its country of origin and other countries and areas where the copyright term is the author's life plus 70 years or fewer. https://en.wikipedia.org/wiki/public_domain This file has been identified as being free of known restrictions under copyright law, including all related and neighboring rights. https://commons.m.wikimedia.org/wiki/Commons:Copyright_tags/Country-specific_tags#United_States_of_America
Sir William Jackson Hooker
Date: 1863 or 1864
Source: [1] https://www.npg.org.uk/collections/search/portrait/mw128278/Sir-William-Jackson-Hooker?LinkID=mp02264&search=sas&sText=William+Hooker&role=sit&rNo=5 [2] https://www.wisconsinhistory.org/Records/Image/IM46474
Author: Ernest Edwards (1837-1903)
Permission (Reusing this file): Public domain https://en.wikipedia.org/wiki/public_domain
This work is in the public domain in its country of origin and other countries and areas where the copyright term is the author's life plus 100 years or fewer.
This work is in the public domain in the United States. https://commons.m.wikimedia.org/wiki/Commons:Copyright_tags/Country-specific_tags#United_States_of_America
This file has been identified as being free of known restrictions under copyright law, including all related and neighboring rights. https://creativecommons.org/publicdomain/mark/1.0/deed.en
File history [current]
Date/Time: 03:21, 14 July 2018
Thumbnail: Thumbnail for version as of 03:21, 14 July 2018
Dimensions: 653 × 706 (212 KB)
User: Materialscientist https://commons.m.wikimedia.org/wiki/User:Materialscientist (talk | contribs) https://commons.m.wikimedia.org/wiki/User_talk:Materialscientist | https://commons.m.wikimedia.org/wiki/Special:Contributions/Materialscientist
Comment: rotation, crop, retouching, levels
8 notes
·
View notes
Text
How to Include Any GIF and Make it Attributed
(When GIF Search Fails)
So, you want to include a cool GIF in your post, but the GIF search can't find it, even when you paste in the blog link. Or it's not the first GIF on the post.
Here's how you can manually attribute any GIF.
This is the code you need to paste in the HTML editor, with the bold values replaced for your GIF:
<div class="npf_row"><figure class="tmblr-full" data-tumblr-attribution="BLOGNAME:EMBEDCODE:TINYURL" data-orig-height="YYY" data-orig-width="XXX"><img src="IMAGELINK" data-orig-height="YYY" data-orig-width="XXX" srcset="IMAGELINK XXXw" sizes="(max-width: XXXpx) 100vw, XXXpx"></figure> </div>
Spoiler alert, my sample GIF code is:

For example:
Original GIF Post

1. I think it's easier to do this at the Archive version of the post. The Dash URL is: https://www.tumblr.com/catnipster69/742522018223865857/episode-10x17-the-werther-project So the Archive URL is: https://catnipster69.tumblr.com/post/742522018223865857/episode-10x17-the-werther-project
BLOGNAME
2. In this case, the blog name is catnipster69.
IMAGELINK
3. Right-click the GIF you want, and choose Inspect (I'm using Firefox on the Mac). The image info is highlighted, including the URL (IMAGELINK) and the Height (YYY) and Width (XXX). Double-click to copy the URL and note the height and width.

The IMAGELINK is: https://64.media.tumblr.com/bb8af2e018bbcae2c9d98a635d62b7f9/a71ee1dc9ce83755-7b/s540x810/22b3f901fc453dcd3ab546e53683059306041997.gifv
YYY is 422
XXX is 540
EMBEDCODE
4. Way up at the top right of the page, click the Embed button:

5. Copy the Embed text into a text editor:

6. The interesting bit is in bold (the EMBEDCODE):

The EMBEDCODE is: zTy22yYiZilmbgDRmty9HA
TINYURL
7. Still on the Embed page, right-click anywhere and choose Inspect (or choose Tools > Browser Tools > Web Developer Tools).
8. In the Search HTML field, search for tmblr.co. This should highlight a big block of gobbledygook:

9. Double-click the block and copy it to a text editor.
10. Search for the tmblr.co URL. The interesting bit is in bold (TINYURL):

The TINYURL is: ZYTx4ifDzzTk8y01
Phew!
Paste the GIF Code in the HTML Editor
11. When creating a new post, change to the HTML editor:

12. Paste in your code:

13. Check the Preview:

Final GIF

16 notes
·
View notes
Text
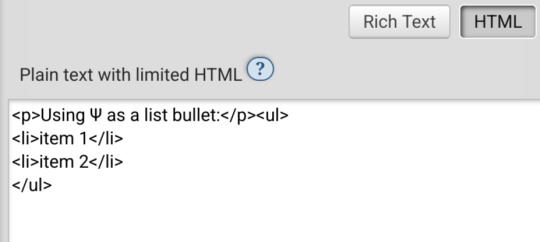
Is there an actually complete guide to AO3's limited HTML somewhere? I know for a fact that some features work but only under slightly weird rules.
For example, if you're using the <a> tag to form an anchor to refer to later, you HTML will end up looking like <a name="Anchor" rel="nofollow" id="Anchor"> when it's done auto-correcting in the Preview. If you type in <a name="Anchor"> or <a name="Anchor" id="NotAnchor">, it will autocorrect to that, but if you type <a id="Anchor"> it will correct to an <a> tag whose only attribute is rel, or <a rel="nofollow">. (The rel="nofollow" attribute has no practical effect for most users' purposes.)
I know that AO3 will autocorrect any incompatible HTML to compatible HTML, but I don't know what the compatible HTML is, and the above <a name="Anchor"> example demonstrates that some things are compatible but don't look compatible unless you do them right!
This is especially confusing because the editor will autocorrect some HTML as soon as you switch from the HTML editor to the Rich Text editor - but it won't correct everything. I've attempted to do slightly funky things with styling that seemingly worked just fine in the editor, but vanish when I preview the chapter.
For example, here I am trying to use using the Greek character Ψ as a list bullet. When I originally typed it into the html field, I used the actual character Ψ. As soon as I switched to rich text and then back to html, it had autocorrected to Ψ, which is the escape character for Ψ. (For those who don't know, escape characters are a special code to tell the browser that this is NOT supposed to be code. <p> is an html tag; < p > will literally render "< p >".) So, it accepted the style attribute and the list-style-type, but it forced it into an escape character. So far so good.
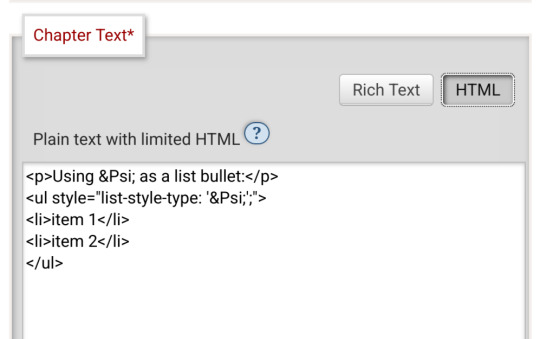
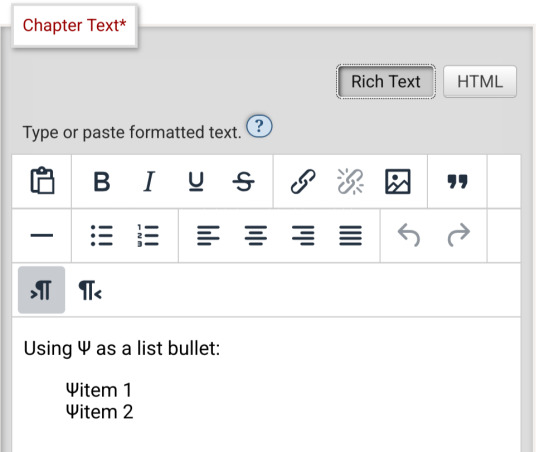
Until I click preview. Now the custom bullet is gone, replaced with the standard circle. If I click edit again, the code has removed the CSS attribute that changed the bullet... and also replaced the escape character Ψ with the character Ψ.
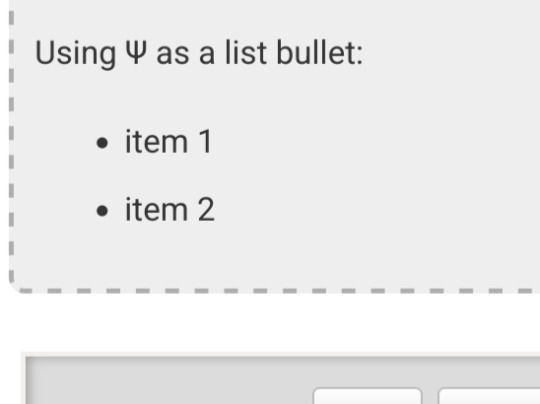
Weird.
#ao3#otw#html#ao3 formatting#ao3 html#I do not mind the lack of a clear standard at all#OTW is a nonprofit full of overworked staff and volunteers#and complete documentation is very hard#I just wanna be able to nerd more effectively#Can anyone direct me to the part of the open-source code that dictates HTML autocorrection? Is that a thing I can examine?
19 notes
·
View notes
Text
How to Download (Almost) Any Audio File from Tumblr
Use this method at your own discretion. Proper credit and attribution is key to a healthy online ecosystem. Just be cool. I was inspired to make this how-to because the Wikihow article on this subject doesn't work (at least for me).
Step 1:
Find the post containing the audio file you want to download. It doesn't matter if this is on your own blog, in a tag, on your dash, or whatever.
Step 2:
Right click/Control+click on the audio player and select "Inspect." The Inspector panel will contain the programming for the audio link.
Step 3:
Orient yourself in the Inspect panel. Look at the ribbon at the top of the panel and make sure you're in the "Inspector" tab or the "Elements" tab (this depends on your browser, i think). This tab is open by default and contains the code for different elements of the site (like the audio player).
Just below the tab ribbon, on the left-hand side of the panel, there should be a search bar.
Step 4:
Use the search bar to search for the audio source in the html code. The quickest way to find the audio file is to type "audio-source". Hit Enter when you're done typing.
The code panel should highlight an inner line that goes something like this: source class="audio source" src=https://64.media.tumblr.com/a bunch of gobbledygook.mp3
That link is what you want.
Step 5:
Right click the highlighted line, and Open Link in New Tab. This should open up a black page containing nothing but a basic audio player (which will probably autoplay depending on your browser settings).
Step 6:
Right click on the audio player from the previous step, and Save Audio As...
This allows you to save the audio to your computer as a .mp3 file. The Save As window will probably say you're saving it as an MPEG file (mp3 is a type of MPEG; don't worry about it). Give the file a name that is easy to find/sort and save it to whichever folder you want.
Step 7:
Enjoy! You can play that .mp3 file on your computer's native audio player or do whatever.
(Anyone who's more knowledgeable is welcome to jump in with tips or corrections. I've only done this on a Windows PC on Firefox, and the process might look different on a different browser or OS.)
9 notes
·
View notes
Note
Hello, wanted to say I read and loved the demo. Very well done. I just had a few questions, would love to know what Twine Template you use, especially at the beginning. Where you have the character creator, I love that the box around your selection changes to say/match what you chose. Such as depending on what skin color I choose it changes to signify that. Would love to know if you would share how you did that. I look forward to future updates! Best of luck.
Thank you! 🤍
I'm using the default template for SugarCube, if I remember correctly. Glad that you liked the box effect, it was my solution to reducing the number of passages whilst still allowing the validation of user input in character creation.
I did it through a combination of HTML tags and SugarCube native macros. Technical stuff under the cut:
Here is an example for eye color:
<fieldset class="charbox"><legend id="chareyes" class="chartxt">$p.appearance.eyes</legend> <div class="charoptions">Your eyes are: <<link "hazel">><<set $p.appearance.eyes to "hazel">><<replace "#chareyes">>$p.appearance.eyes<</replace>><</link>> <<link "brown">><<set $p.appearance.eyes to "brown">><<replace "#chareyes">>$p.appearance.eyes<</replace>><</link>> [rest of the options removed for brevity]</div> </fieldset>
The fieldset and the legend HTML tags together form a single box, a so-called legend, which I declare per attribute such as name, skin color, etc. You need a fieldset to make legend work iirc, but legend is where that text is displayed and it is positioned on the box frame by default. Important here is to give a unique ID to the legend tag ("chareyes" in this case), as we are interested in manipulating the text shown in it depending on our box.
In the sample above, the options I present for the eye color are listed within the Twine <<link>> tags. For these links there is no target passage to go to. Instead, you can see it is coded to do two things upon clicking the respective option. One, setting a game variable to the selected color.
<<set $p.appearance.eyes to "brown">>
Two, triggering a replace command to change the value shown in the legend to the description of the selected eye color according to the variable we have set in the same line. This is the bit you are asking about:
<<replace "#chareyes">>$p.appearance.eyes<</replace>>
Replace triggers without changing passages, so this way you can adjust multiple variables on a single "page". You'd obviously need to adjust the corresponding CSS classes to make it look the desired way, but the mechanics are serviced with just this idea above.
Hope this helps!
12 notes
·
View notes
Text
Gods of Antiquity: Weather Deities

Source: https://www.weathercompany.com/proven-accuracy/
While weather covers any atmospheric condition, from clear, calm, balmy days to the worst storms, weather deities are generally associated with stormy phenomenon, from rain to snow to hurricanes. Clear skies are usually attributed to just the sky deity. Storm deities are generally associated with thunder, wield thunder (presumably lightning), and their names frequently mean 'thunder'. In pantheons where there is more than one weather deity, there is often at least a storm/thunder deity, a rain deity, and a wind deity. Sometimes wind deities are separated by wind direction and the storm deity might be associated with the ocean. Many times, these deities have multiple roles.

Source: https://www.meisterdrucke.us/fine-art-prints/Giulio-Romano/318954/The-Gods-of-Olympus%2C-Trompe-l%27oeil-Ceiling-from-the-Sala-dei-Giganti.html
Perhaps the best known in the English speaking world are the Greco-Roman weather gods, which includes a thunder/sky god (Zeus/Jupiter), a storm/sea god (Poseidon/Neptune), as well as multiple gods of winds from various directions. These gods at times worked together, at other times fought with each other, depending on the myth. There are even myths that have their powers being used by others, poorly in most cases.

Source: https://rafaelvelezjr.com/artwork/4564667-Guabancex%20Board%20%232.html
In the Pre-Columbian Caribbean, the Taino people had Guabancex as their zemi or deity of chaos, disorder, and weather, from whom we derive our word 'hurricane' through the Spanish Juracán. The Taino people knew that the winds of the storms spiraled around a central point as shown in her iconography. She was the 'Cacique of the Wind', over Coatriquie and Guataubá, who controlled the wind and rainfall. She was responsible for corralling them, but also had a terrible and volatile temper. When enraged, she would spiral her arms in, picking up the ocean and the land, putting Coatriquie in control and allow her to blow everything everywhere. Guataubá went before her, heralding her arrival with his thunder and lightning.
2 notes
·
View notes
Text
shitfuck I need to. I think I really need to start advertising commissions again. I also, yes, need to stop working myself into the ground on a personal project. to do that.
it's more stressful thinking about the fact that everything I spend so long putting out there into the world is just... gone, though. I want to have this archive up soon. there's a few critical problems I overlooked, the main one being you can't link directly to the entries. but, well, I already have functions set up to handle hash targets to spit out particular entries so I think it's not too tall of an order. it's annoying trying to think what particular identifiers to use because just listing them in a particular order is liable to change so I suppose I could have codes based around the... really stupid file names...
I think I might cull the loader because it's causing more problems than it's fixing but I did figure out how to do that! the onload event listener was what I was looking for, I just didn't realise that applying it to an element only applies to the specific piece of html and not its content - so flagging entry posts with an onload listener isn't very useful, but flagging the individual images with one works.

the one thing I didn't expect is that it fires off every time the html is altered, so every image adds multitudes more 'onload' functions every time more are loaded in. this wasn't hard to solve - I just stuck an extra condition to erase the attribute after it had fired off once.
so a neat experiment, nonetheless.
4 notes
·
View notes
Text
Accelerate LWC Development With Salesforce’s Local Development Server

Tired of constantly deploying and refreshing your UI every time you update your Lightning web components (LWCs)?
With Local Dev (beta), you can streamline your workflow by developing your LWCs while previewing them in real-time directly within your Lightning app or Experience Cloud site.
Note: Before you begin make sure that you have the latest version of the CLI command, run “sf update”.
Step 1: Install the Local Dev Plugin To begin, install the Local Dev Plugin using one of the following commands based on your environment:
For Production or Scratch orgs:
sf plugins install @salesforce/plugin-lightning-dev
OR
sf plugins install @salesforce/plugin-lightning-dev@latest
For Sandbox environments:
sf plugins install @salesforce/plugin-lightning-dev@prerelease
Step 2: Enable Local Dev
Navigate to Setup in Salesforce.
In the Quick Find box, type Local Dev.
Select Local Dev and enable the feature.

Step 3: Enable Local Dev for Your Scratch Org
To configure Local Dev for a scratch org:
Open your SFDX project.
Locate the config/project-scratch-def.json file.
In the settings section of the file, add the following key “enableLightningPreviewPref”: true

Step 4: Preview
Use Local Dev to run a preview of the following types of Salesforce projects.
Lightning Experience apps (desktop and Salesforce mobile app)
LWR Sites for Experience Cloud
To preview your application, use the following steps:
Run the command below in the CLI to start the guided setup: sf lightning dev app
Alternatively, if you want to bypass the guided steps, you can directly use the following command in the VS Code terminal: sf lightning dev app — target-org — name — device-type — device-id — flags-dir
Replace the placeholders with the appropriate values for your project. This will launch the application preview.
Guided Steps When Running the Command sf lightning dev app:


Step 4: Build an LWC Component and Experience the Real-Time Magic of Local Dev (Beta).
Start by creating a Lightning Web Component (LWC).
Embed the LWC into any Lightning app. For now, you can add it to any page in the Sales App.
Make changes to your LWC, such as modifying the HTML, CSS, or JavaScript. As soon as you save your code, you’ll experience the power of Local Dev (Beta), with changes reflected in real-time on the UI.
Notice how quickly the LWC updates, without needing to deploy your code or refresh the page. The changes are applied instantly!
Considerations and Limitations:
LWCs automatically update for the following changes only.
1. Basic HTML revisions: Changing component attributes, like in our case
lighting-button variant=”neutral” to variant=”brand”
Get More info: https://www.kandisatech.com/blog-details/accelerate-lwc-development-with-salesforces-local-development-server
#Salesforce#salesforcepartner#Lightning#LWC#SalesforceDevelopment#salesforcelightning#SalesforceLWC#LWCDevelopment#usa#uk#salesforceconsultant
2 notes
·
View notes
Text
HTML (HyperText Markup Language), web sayfalarının yapısını ve içeriğini tanımlamak için kullanılan bir işaretleme dilidir. İnternet tarayıcıları tarafından okunarak görsel olarak kullanıcıya sunulan web sayfalarının iskeletini oluşturur. HTML, metin, resim, bağlantılar, tablolar ve diğer multimedya öğelerini düzenlemek için çeşitli etiketler kullanır.
HTML, aşağıdaki gibi ana unsurlardan oluşur:
Etiketler (Tags): İçeriği tanımlayan yapısal bileşenlerdir. Örneğin, <h1> etiketi bir başlığı belirtir, <p> etiketi bir paragrafı tanımlar. Çift taraflı etikette açılış (<etiket>) ve kapanış (</etiket>) bulunur.
Öznitelikler (Attributes): Etiketlere ek bilgi sağlar. Örneğin, <a href="https://example.com"> etiketi, bağlantının gideceği adresi belirtir.
Elementler: Etiketler ve onların arasındaki içerikten oluşur. Örneğin, <p> Bu bir paragraftır. </p> bir elementtir.
HTML Yapısı: HTML dosyası, genellikle bir <!DOCTYPE html> bildirimi, <html>, <head>, ve <body> gibi ana bölümlerden oluşur.
Örneğin, temel bir HTML yapısı şu şekildedir:
———————————————————
<!DOCTYPE html>
<html lang="tr">
<head>
<meta charset="UTF-8">
<meta name="viewport" content="width=device-width, initial-scale=1.0">
<title>Örnek Sayfa</title>
</head>
<body>
<h1>Merhaba Dünya!</h1>
<p>Bu, bir HTML örneğidir.</p>
</body>
</html>
———————————————————
HTML'nin ana amacı, web içeriklerini organize etmek ve yapılandırmaktır. Tarayıcılar, HTML kodlarını okuyarak kullanıcıların görsel olarak etkileşim kurabilecekleri bir web sayfası oluşturur.
———————————————————
Telif Hakkı Uyarısı!
Bu içerik bana aittir ve izinsiz kullanımı, kopyalanması veya paylaşılması yasaktır. Lütfen kaynak belirtmeden veya izin almadan paylaşımda bulunmayınız. Tüm hakları saklıdır.
———————————————————
#batman#captain curly#dan and phil#formula 1#free palestine#jujutsu kaisen#agatha harkness#anya mouthwashing#bucktommy#cats of tumblr
4 notes
·
View notes
Text
I love that ancient, fundamentally pointless bits of the web standard like "html elements with id or name attributes automatically become globals in the javascript context for absolutely no reason" repeatedly become security issues
I'll give you one guess where this particular behavior was first implemented. actually I'll give you zero guesses it's internet explorer
4 notes
·
View notes
Text
How Web Scraping TripAdvisor Reviews Data Boosts Your Business Growth
Are you one of the 94% of buyers who rely on online reviews to make the final decision? This means that most people today explore reviews before taking action, whether booking hotels, visiting a place, buying a book, or something else.
We understand the stress of booking the right place, especially when visiting somewhere new. Finding the balance between a perfect spot, services, and budget is challenging. Many of you consider TripAdvisor reviews a go-to solution for closely getting to know the place.
Here comes the accurate game-changing method—scrape TripAdvisor reviews data. But wait, is it legal and ethical? Yes, as long as you respect the website's terms of service, don't overload its servers, and use the data for personal or non-commercial purposes. What? How? Why?
Do not stress. We will help you understand why many hotel, restaurant, and attraction place owners invest in web scraping TripAdvisor reviews or other platform information. This powerful tool empowers you to understand your performance and competitors' strategies, enabling you to make informed business changes. What next?
Let's dive in and give you a complete tour of the process of web scraping TripAdvisor review data!
What Is Scraping TripAdvisor Reviews Data?
Extracting customer reviews and other relevant information from the TripAdvisor platform through different web scraping methods. This process works by accessing publicly available website data and storing it in a structured format to analyze or monitor.
Various methods and tools available in the market have unique features that allow you to extract TripAdvisor hotel review data hassle-free. Here are the different types of data you can scrape from a TripAdvisor review scraper:
Hotels
Ratings
Awards
Location
Pricing
Number of reviews
Review date
Reviewer's Name
Restaurants
Images
You may want other information per your business plan, which can be easily added to your requirements.
What Are The Ways To Scrape TripAdvisor Reviews Data?
TripAdvisor uses different web scraping methods to review data, depending on available resources and expertise. Let us look at them:
Scrape TripAdvisor Reviews Data Using Web Scraping API
An API helps to connect various programs to gather data without revealing the code used to execute the process. The scrape TripAdvisor Reviews is a standard JSON format that does not require technical knowledge, CAPTCHAs, or maintenance.
Now let us look at the complete process:
First, check if you need to install the software on your device or if it's browser-based and does not need anything. Then, download and install the desired software you will be using for restaurant, location, or hotel review scraping. The process is straightforward and user-friendly, ensuring your confidence in using these tools.
Now redirect to the web page you want to scrape data from and copy the URL to paste it into the program.
Make updates in the HTML output per your requirements and the information you want to scrape from TripAdvisor reviews.
Most tools start by extracting different HTML elements, especially the text. You can then select the categories that need to be extracted, such as Inner HTML, href attribute, class attribute, and more.
Export the data in SPSS, Graphpad, or XLSTAT format per your requirements for further analysis.
Scrape TripAdvisor Reviews Using Python
TripAdvisor review information is analyzed to understand the experience of hotels, locations, or restaurants. Now let us help you to scrape TripAdvisor reviews using Python:
Continue reading https://www.reviewgators.com/how-web-scraping-tripadvisor-reviews-data-boosts-your-business-growth.php
#review scraping#Scraping TripAdvisor Reviews#web scraping TripAdvisor reviews#TripAdvisor review scraper
2 notes
·
View notes
Text
Understanding HTML: The Building Blocks of the Web
In the vast landscape of the internet, HTML stands as the foundation upon which the digital world is built. From simple static web pages to dynamic interactive experiences, HTML (Hypertext Markup Language) plays a pivotal role in shaping the online landscape. Let's embark on a journey to demystify HTML and understand its significance in the realm of web development.
What is HTML?
HTML is a markup language used to create the structure and content of web pages. It consists of a series of elements, or tags, that define the various components of a web page, such as headings, paragraphs, images, links, and more. These elements are enclosed within angled brackets (< >) and typically come in pairs, with an opening tag and a closing tag, sandwiching the content they define.
The Anatomy of HTML:
Tags: Tags are the building blocks of HTML and serve as the basic units of structure. They encapsulate content and provide semantic meaning to different parts of a web page. Common tags include <html>, <head>, <title>, <body>, <h1> (heading), <p> (paragraph), <img> (image), <a> (anchor/link), and many more.
Attributes: Tags can also contain attributes, which provide additional information about the element. Attributes are specified within the opening tag and consist of a name and a value. For example, the <img> tag may include attributes such as src (source) to specify the image file and alt (alternative text) for accessibility purposes.
Nesting: HTML elements can be nested within one another to create hierarchical structures. This nesting allows for the organization and hierarchy of content, such as placing lists within paragraphs or dividers within sections.
Document Structure: Every HTML document begins with a <!DOCTYPE> declaration, followed by an <html> element containing <head> and <body> sections. The <head> section typically contains metadata and links to external resources, while the <body> section contains the visible content of the web page.
The Role of HTML in Web Development:
HTML serves as the backbone of web development, providing the structure and semantics necessary for browsers to interpret and render web pages correctly. Combined with CSS (Cascading Style Sheets) for styling and JavaScript for interactivity, HTML forms the core technology stack of the World Wide Web.
Conclusion:
In essence, HTML is the language of the web, enabling the creation of rich and immersive digital experiences. Whether you're a seasoned web developer or a newcomer to the world of coding, understanding HTML is essential for navigating the intricacies of web development. Embrace the power of HTML, and embark on a journey to craft compelling narratives and experiences in the ever-evolving digital realm.
5 notes
·
View notes
Text
Demystifying Image Optimization: Tips and Tricks for Optimal Results
In today’s visually driven digital landscape, the importance of image optimization cannot be overstated. Images are crucial in attracting and engaging users, whether it’s a website, social media platform, or online store.
However, optimizing images for optimal results can often seem mysterious. We have compiled this guide to demystify image optimization and provide practical tips and tricks to achieve outstanding results.
From reducing file sizes without sacrificing quality to improving load times and enhancing user experience, this article will equip you with the knowledge and techniques necessary to master the art of image optimization.
What Is Image SEO?

Image SEO, or image search engine optimization, means making pictures on a website better so that they appear higher in search engines when people look for things. It is about using different tricks and methods to help search engines find images easily. This way, the website gets more visitors from people who search for things online.
Here are a few key factors to consider:
1. File Names
Giving descriptive names to image files is crucial. Using relevant keywords in the file name helps search engines understand the image’s content.
2. Alt Tags
Alt tags (alternative text) are HTML attributes that provide text descriptions of images. They are essential for accessibility and help search engines comprehend the image content. Including descriptive and relevant alt tags with appropriate keywords can improve image SEO.
3. Image Size and Format
Optimizing the size and format of images is important for both user experience and SEO. When images are too big, they can make websites load slowly, which can make the website rank lower in search results. Compressing images and using appropriate file formats, such as JPEG or PNG, can help improve loading times and overall SEO performance.
4. Image Captions and Surrounding Text
Including captions and relevant textual content near the image can provide additional context to search engines. This helps them understand the image more easily, which makes it more likely to show up in search results that match what the image is about.
5. Image Sitemaps
Including images in the website’s sitemap helps search engines discover and index them more efficiently. This can enhance the visibility of images in search results.
What Does Image Optimization Mean?

Image optimization refers to reducing an image’s file size without significantly compromising its visual quality. Image optimization aims to create images that load quickly and efficiently on web pages or other digital platforms, leading to improved website performance, reduced bandwidth usage, and a better user experience.
There are several techniques used in image optimization, including:
1. Compression
This involves reducing the file size by removing unnecessary data from the image file. Lossless compression methods preserve all image data, while lossy compression methods discard some less visually important data.
2. Resizing
Scaling down the dimensions of an image can significantly reduce its file size. This is especially useful when displaying images on mobile devices or in responsive web design.
3. Format Selection
Choosing the appropriate file format for an image can contribute to optimization. Common image formats include JPEG, PNG, and GIF, each with strengths and best use cases. JPEG is typically used for photographs, while PNG is better suited for transparent graphics and images.
4. Caching and CDN
Using caching and content delivery networks (CDNs) can load images on a website faster. They do this by storing the images in different places and sending them from the closest server to the person looking at the website. This way, the images load quickly, and people don’t have to wait too long.
Why Is Image Optimization Important?

Image optimization is important for several reasons:
1. Improved Website Performance
Images on a website can be quite big and slow down how quickly the site loads. But if we make the images smaller without making them look worse, it can make the website faster and better for users. Faster loading times also contribute to better search engine rankings.
2. Bandwidth Optimization
Optimized images consume less bandwidth, crucial for users with limited data plans or slow internet connections. When you make images smaller, your website will load faster for everyone, no matter how fast or slow their internet is.
3. Search Engine Optimization (SEO)
Search engines consider page load speed a ranking factor. Optimizing images contributes to faster page load times, positively affecting your website’s SEO. Additionally, optimized images often include descriptive alt tags and relevant file names, which can improve the visibility and accessibility of your content in image search results.
4. Mobile Optimization
As people use mobile devices to use the internet, it’s important to make sure images look good and load quickly on mobile screens. By reducing file sizes, you can minimize the data users need to download, resulting in faster loading times and a better mobile browsing experience.
5. Social Media Sharing
When users share your content on social media platforms, the image associated with the post can impact engagement. Optimized images load quickly, making users more likely to interact with and share your content.
What Is the Best Image Format for SEO?

The best image format for SEO (Search Engine Optimization) purposes is the JPEG format (Joint Photographic Experts Group). JPEG is widely supported and recognized by web browsers and search engines, making it an ideal choice for optimizing images for the web.
Here are a few reasons why JPEG is considered the best image format for SEO:
1. File Size
JPEG images can be compressed significantly while retaining good image quality. Smaller file sizes help improve website loading times, which is crucial for SEO since search engines favor fast-loading websites.
2. Compatibility
JPEG is compatible with all major web browsers and devices, ensuring your images will be accessible to a wide audience. It is a universally accepted format supported by nearly all platforms and devices.
3. SEO Metadata
JPEG supports embedding metadata such as alt text and image descriptions. This information about the image (metadata) is crucial for image SEO. It helps search engines figure out what the image is about and show it in the right search results.
While other image formats are available, such as PNG (Portable Network Graphics) and GIF (Graphics Interchange Format), there may be better choices for SEO. PNG files, for example, tend to have larger file sizes, which can negatively impact website loading times. GIF is more suitable for animated images rather than static ones.
How Does Image SEO Work?

Image SEO, or search engine optimization for images, refers to making images on a website better for search engines to be shown higher in search results and more people can find them. While search engines primarily rely on text-based content to understand web pages, they consider images important in determining relevance and user experience. Here’s a brief explanation of how image SEO works:
1. Image Relevance
Choosing relevant images that align with the web page’s content is crucial. The image should accurately represent the subject matter and provide value to the users.
2. Image Optimization
This involves optimizing the image file itself to improve loading speed without compromising its quality. It includes compressing the image file size, choosing the appropriate format (JPEG, PNG, etc.), and resizing the image to fit the intended display size.
3. File Naming
Giving descriptive and relevant names to image files can improve search engine understanding. Using keywords that describe the image content in the file name can be helpful for search engines to associate the image with the web page’s topic.
4. Alt Text
Whenever you add alt text to an image, it provides important details to search engines and helps people who can’t see the image (visually impaired users) understand what the image represents when they use special tools called screen readers. The alt text should be concise, descriptive and include relevant keyword research to represent the image’s content accurately.
5. Captions and Surrounding Text
Including captions and relevant textual content near the image helps search engines understand its context. Captions should be informative and contribute to the overall relevance of the page.
6. Image Sitemaps
Creating an image sitemap and submitting it to search engines can ensure that the images on your website are discovered and indexed properly. An image sitemap provides search engines with additional information about the images, such as their location, caption, and license information.
7. Page Load Speed
Making sure that your webpage loads quickly is really important for both users and search engine rankings. This involves making images smaller and optimizing the page’s HTML, CSS, and JavaScript.
8. Image Hosting and CDN
To make images load faster and be available in many places around the world, you should use a good image hosting service and also a content delivery network (CDN). These help ensure your images are quick to load and can be accessed from various locations.
How To Optimise Images for Web and Performance?

Optimizing images for the web and performance involves reducing their file size while maintaining acceptable quality. This is important because large image files can slow website loading times, negatively impacting the user experience and search engine rankings. Here are some key steps to optimize images for the web:
1. Resize Images
Start by resizing your images to the desired dimensions before uploading them to your website. You can use any editing software for images or online tools to change the image size by adjusting its width and height. Ensure the dimensions match the display size on your web page to avoid wasting file space.
2. Compress Image Files
Image compression reduces file size without significantly losing quality. You can use compression tools such as Adobe Photoshop, GIMP, or online services like TinyPNG or JPEGmini to compress your images. These tools use techniques to remove unnecessary data and reduce file size, such as removing metadata, optimizing color palettes, or applying lossy compression.
3. Choose the Right File Format
Selecting the right file format can make a big difference in how big the file is. For photographs or images with complex color gradients, use JPEG format. For images with fewer colors or transparent backgrounds, use PNG format. Consider using SVG (Scalable Vector Graphics) format for simple graphics or icons, which provides excellent quality at a minimal file size.
4. Optimise Image Resolution and Quality
When saving your images, adjust the resolution and quality settings. Usually, a resolution of 72 pixels per inch (PPI) is enough to use web images. As for quality, find a balance between file size and visual clarity. Preview your images to ensure they still appear sharp and clear after compression.
5. Leverage Responsive Images
With the HTML ‘srcset’ attribute, you can provide different image sizes depending on the device’s screen size. This ensures smaller screens receive smaller image files, improving loading times and user experience.
6. Implement Lazy Loading
Lazy loading delays the speed of loading of images until needed. This technique improves initial page load times by only loading images visible to the user, while other images are loaded as the user scrolls down. Numerous JavaScript libraries and frameworks provide easy-to-implement lazy loading functionalities.
7. Consider content delivery networks (CDNs)
Utilise CDNs to deliver your images. CDNs store and serve your image files from multiple locations worldwide, reducing latency and improving loading speeds for users across different geographic regions.
Image Optimization Methods

Image optimization is reducing an image’s file size without significantly compromising its quality or visual appearance. This is important for various reasons, such as improving website loading times, reducing bandwidth usage, and optimizing user experience.
There are several methods commonly used for image optimization:
1. Compression
Compression techniques reduce the file size of an image by removing unnecessary data or by encoding the image in a more efficient format. Lossless compression preserves all image data without any loss in quality, while lossy compression sacrifices some details to achieve a smaller file size.
2. Resizing
Resizing an image involves adjusting its dimensions by reducing its width and height or by scaling it down proportionally. This reduces the overall file size as fewer pixels need to be stored.
3. Format Selection
Choosing the appropriate image file format can significantly impact file size. Common formats include JPEG, PNG, and GIF, each with its advantages and best use cases. JPEG suits photographs and complex images, while PNG is better for images with transparency or limited colors. GIF is typically used for simple animations.
4. Image Optimization Tools
Various software tools and online services automatically optimize images. These tools often employ compression algorithms, resizing options, and format selection techniques to achieve optimal results.
5. Lazy Loading
It is a technique where images are loaded only when needed, such as when a user scrolls to a particular webpage section. This approach reduces the initial page load time and improves a website’s performance.
6. Image Caching
Caching involves storing image files locally on a user’s device after they have been initially loaded. This way, subsequent visits or page reloads can retrieve the images from the cache instead of re-downloading them, resulting in faster loading times.
Image Optimization Plugins You Can Use

There are several image optimization plugins available that can help to optimize the images on your website. Here are a few popular ones:
1. Smush
Smush is a widely used WordPress plugin that optimizes images by reducing their file size without compromising quality. It automatically compresses images upon upload and offers features like lazy loading, bulk optimization, and integration with popular page builders.
2. EWWW Image Optimizer
EWWW Image Optimizer is another WordPress plugin that optimizes images by automatically reducing their file size. It supports various image formats and offers lossless and lossy compression options. It can optimize newly uploaded and existing images in your media library.
3. ShortPixel
ShortPixel is an image optimization plugin available for multiple platforms, including WordPress, Magento, and Shopify. It uses advanced compression algorithms to reduce image file sizes without significant quality loss. It also supports WebP conversion and lazy loading and offers a bulk optimization feature.
4. Optimole
Optimole is a cloud-based image optimization service that works as a plugin for platforms like WordPress. It optimizes images in real time and delivers them via a global CDN (Content Delivery Network). Optimole automatically compresses and resizes images based on the visitor’s device, ensuring optimal performance.
5. Kraken.io
Kraken.io is an image optimization service that offers a WordPress plugin for easy integration. It utilizes lossless and intelligent lossy compression techniques to reduce image file sizes. Kraken.io also supports image resizing and WebP conversion and provides a user-friendly dashboard to manage optimization settings.
7 Tips for Image Optimization
Here are seven tips for image optimization, along with brief explanations for each:
1. Choose the Right File Format
Choosing the appropriate format can significantly impact image size and quality. JPEG is best for photographs, PNG for images with transparency or crisp graphics, and SVG for vector-based graphics.
2. Compress Images
Decrease the file size of your images without sacrificing too much quality. There are many online tools and software available that help you compress your images efficiently.
3. Resize Images
Scale your images to the appropriate dimensions required for your website or application. Large images can slow down the page loading times, so resizing them to the necessary dimensions can improve performance.
4. Optimise Alt Text
Alt text provides alternative text descriptions for images, making them accessible to visually impaired users and improving SEO. Use concise and accurate descriptions that convey the image’s content or purpose.
5. Utilise Descriptive File Names
Give your image files descriptive names that reflect their content. This not only helps with the organization but also assists search engines in understanding the context of the image.
6. Optimize Image Metadata
Fill in relevant metadata fields such as title, caption, and tags. This information can enhance the searchability and understanding of your images by search engines and users.
7. Implement Lazy Loading
Lazy loading is a technique where images are loaded only when they appear in the user’s viewport rather than all images simultaneously. This can significantly improve page loading times, particularly for pages with many images.
Conclusion
Understanding and implementing effective image optimization techniques can greatly enhance a website or digital platform’s overall performance and user experience. This article aimed to demystify the process and provide valuable tips and tricks for achieving optimal results.
By following the recommendations discussed, such as using appropriate file formats, compressing images, and optimizing alt tags and descriptions, website owners can significantly improve page load times, reduce bandwidth consumption, and increase accessibility.
It is very important to stay updated with the latest image optimization practices to adapt to evolving technologies and deliver visually appealing and high-performing web experiences to users.
Source Link: Demystifying Image Optimization: Tips and Tricks for Optimal Results
2 notes
·
View notes
Text

Specialty steels for targeted applications in industry - Virat Special Steels, INDIA ! …
Virat Special Steels Pvt. Ltd., INDIA is a name of distinction in the segment of steels and it offers different steel grades as per suitability and demand of the enterprising client. Steel is an alloy of iron and its composition is marked by the presence of specific constituents like Carbon, Chromium, Nickel, Vanadium and Tungsten among others. These constituents ensure the salient attributes of steel which are high strength, toughness, tensile capacity, elasticity and wear resistance.
Today, steels are an array and every grade is marked by some special characteristic that makes it suitable for specific application. The most popular segments in steels include #ToolSteels, #Mould & #DieSteels, hot work steels and stainless steels. These are developed by manipulating the alloying composition during manufacturing stage and also through the targeted heat treatments (annealing & tempering) that optimize hardness and other desirable features.
ViratSpecialSteels is the leading manufacturer, stockiest and exporter of various types of steels that are sought in different enterprising orientations across verticals.
The segments that #ViratSteels specialize in are:
🏆Cold work steels – D2 & D3 types, A2 & o1 types ( Din 2379, Din 2080 etc. ) https://www.viratsteels.com/din-2379.html
🏆Hot work steels – H10, H11, H12, H13, H21 and DB6 ( DIN 2343, Din 2344, Din 2714 etc. ) https://www.viratsteels.com/din-2344.html
🏆High speed steels – M2, M35, M42 and T1 ( Din 3243, 3343 ) https://www.viratsteels.com/m2.html
🏆Alloy steels – EN24, EN31, EN353, 8620, 4140, 16MnCr5 and 20MnCr5 https://www.viratsteels.com/en353.html
🏆Plastic mould steels – P20 and P20Ni ( Din 2738 ) https://www.viratsteels.com/p20.html
To get detailed information on all the above industrial grade steels, visit the website – www.viratsteels.com
Any further queries feel free to contact us : Email us at [email protected]. or Call on mobile number +91 98140 21775
We Provide our Special Steels in All Cities in India:
#ludhiana#india#viratsteels#gurgaon#viratspecialsteels#toolsteelsupplier#pune#gurugram#iso9001#steel#Delhi#Kolkata#Chennai#Bangalore#Hyderabad#Ahmedabad#Pune#Surat#Ludhiana#Nashik#Faridabad#Manesar
2 notes
·
View notes