#Avidemux
Explore tagged Tumblr posts
Visit Tumblr Blog
Explore Tumblr blogs with no restrictions, modern design and the best experience.
Last Seen Tumblr Blogs


Fun Fact
There are dozens of funny blogs to kill time on Tumblr.
Text
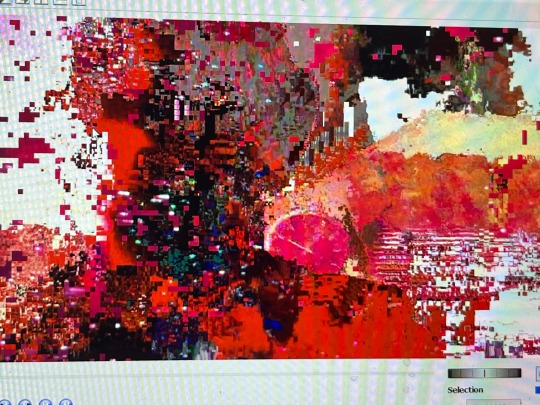
#datamosh#still#avidemux#video art#glitch art#analog glitch#sludge#sludge aesthetic#abstracart#abstraction
0 notes
Text
Estabilizar videos en Linux con Avidemux
Aparte de ffmpeg o transcode en la terminal, existen dos manera sencillas -hace poco descubrí esto-. Lo que sucede es que antes usaba más el programa, ahora no tanto, solo para videos verticales, que en editores de video avanzados lleva toma mucho tiempo y trabajo.
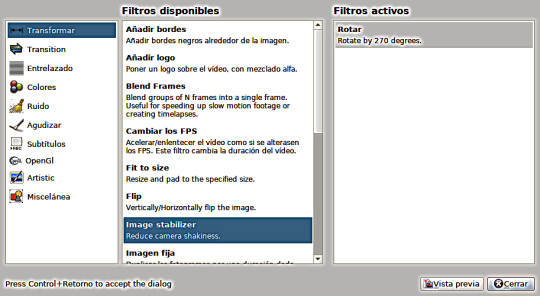
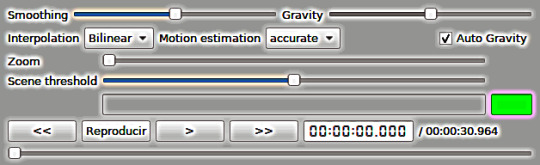
💿 Avidemux. Ir al menú > video > filtros: "Image stabilizer". Recomiendo dejar todo como estar y no probar nada. Como sigue:
💿 kdenlive. Después de añadir el video -sin tirar en la línea de tiempo-, clic derecho y buscar la opción como muestra el tutorial.
youtube
0 notes
Text


#squidgameedit#squidgamegif#seong gihun#balgif#when i tell you i drove myself crazy trying to figure out why photoshop didn't like the mp4 clips from the 4k file version of this episode#turns out it was the codec#but if i converted in handbrake to a different codec it worked but somehow the image became super desaturated#which never happened before using handbrake#BUT when avidemux did the decoding it worked#took a good few hours to figure it out lol#glad i did because i think it's the same issue with a movie i tried to gif like in january#so may finally be able to make that hdh/kubrick gifset i wanted to make 6 months ago lol
114 notes
·
View notes
Text
So, I started with ClipChamp. That's kind of a pain and I don't know how long-term I can keep things, but it's fairly intuitive.
I tried out OpenShot, but it lacks zoom functionality and has tremendous audio issues.
Went with Avidemux, but that one is just for trimming video files. Can't audio-layer. Still, that might have potential. I can hopefully use it to create a bunch of smaller clips for use. Maybe.
Giving KdenLive a try in a moment.
#swan stuff#OOH#OKAY I AM LOVING AVIDEMUX#THIS IS GONNA TAKE A BIT BUT I CAN CLIP THIS SCENE INTO TALKING AND NOT TALKING#this will be fun#...probably overcomplicated
5 notes
·
View notes
Text
why does this ts file hate meeeeee? i just wanna make iomt gifs :(
1 note
·
View note
Text
Quick GIF tutorial (Photoshop)


#holy shit this is perfection!!#i am so jealous of this set!#the coloring op THE COLORING!!! (original post)
alright @dontyouknowemma-itsyou and anyone interested, this was really easy to colour so I'm gonna give you a quick breakdown. (i didn't save the psd file?? so i'm redoing this i guess, but i did it on autopilot in the first place. i've been making gifs for over 15 years.)
GONNA INCLUDE A VIDEO AT THE END SHOWING OFF THE SETTINGS!!
General GIF stuff
This is in Photoshop CC. I extract a clip from a video as an MP4 file, which photoshop can open. (I use AviDemux for this, which is free, because it lets you save clips using 'copy' encoding for video output and still change from MKV to MP4 format - without losing any video quality, cause you're not re-encoding.)
Open that shit directly in photoshop as a video layer (just drag and drop), that lets you scan through it to check the colouring works overall. Convert the video layer to Smart Object, that lets you resize and edit it. (Do NOT open a full movie in Photoshop, it'll probably die and it has a max length anyway.)
Also all the colour adjustments are gonna be adjustment layers you can tweak and turn on/off whenever. There's a lil button at the bottom of the Layers window to add them quickly.
When we're done we're choosing a section of the video in the Timeline window and we're doing File->Export->Save For Web. 'Adaptive' (or selective) palette selection, 'pattern' style dithering.
Colouring
Curves layer to lighten. Just pull the curve up. Curves seem to give a much smoother lightening, since it mostly affects the middle, leaving the brights and the darks where they are.
Levels to make the darkest darks pure black, and the lightest lights pure white. Good for limiting GIF size. Don't overdo it though.
Colour balance!! My beloved, most important. So for the Shadows and Highlights, you're gonna move the sliders towards Cyan and Blue, but for the Midtones you're gonna do the opposite - towards Red and Yellow. This means you don't shift the overall colour of the picture, but trust me it does SO MUCH for the contrast and colour. I swear I do this for almost any edit, and also my art tbh. Also if the original clip is like very green or whatever, you can correct that here.
Selective colour. For this I did one thing. For 'Black' dropdown, I upped 'black' and 'yellow' sliders (the latter to counteract the blue in the darks). This in combination with:
Levels again. Bring in those darks, turn them pure black. Basically this does a couple things. It preserves GIF file size, by making sure the dark areas are static (file sizes mostly depends on pixels that are CHANGING). It ALSO makes the palette much more optimized, meaning you don't waste palette on the darks no one sees anyway, and instead uses them in the mid range colour variation, giving much smoother gradients. That's it!! That's all the colouring!!
EDIT: Uh I probably also had a Vibrance layer?? Idk. This just ups the saturation, but it's softer than upping Saturation. Makes the colours pop without overdoing it.
Other tips and tricks
Often I'll put a Smart Sharpen (50% amount, 0,5px radius) filter on the video layer, just to make it a bit crisper. Subtle but effective.
You can manually edit the palette when you save as a GIF, either to reduce file size, or because some colour areas look pixelly. See the video for how.
If your file size is huge but you don't want to shorten or resize, you can reduce the frame rate manually. To do this, FIRST save the GIF, then open the GIF you just saved. Go through in the Timeline window (which is now a Frame Animation rather than a Video Timeline), select every other frame, and delete them. When you do this, remember to select the rest of the frames and double their Frame Delay so you don't end up with a super speedy GIF. (You can also make a GIF slow-mo like this.)
Since the video is a smart object, I literally just resized it in between saving the different GIFs, to change composition between the different shots.
Selective Colour layer can be used for a lot of image tweaking. For example, if something is overly yellow or green, I may go to the Yellow and Green in dropdown and just reduce the yellow slider. (I usually then go to Red in dropdown and ADD some yellow to that, to balance out the reds to be less pink.) Or maybe the overall colours are nice but the blues are dull, so I'll just go to Blue/Cyan and tweak those specifically.
If you have a colouring you like that you want to use on lots of things, remember you can drag-and-drop layers between different images. You can also save a photoshop file with nothing but those layers, to use on later gifs and just tweak as needed. (You can also make Actions to automate stuff, but I won't go into that.)
How easy or hard something is to colour HUGELY depends on the original video, both lighting/colouring and video quality.
Finally the video showing settings!
This is like 5 minutes long and has no commentary or anything. This is mostly to show off where you find each individual thing, and what difference it makes in the colouring.
ANYWAY hope someone found this useful!!! ♥
#next to normal#gif making#photoshop#gif tutorial#photoshop tutorial#my posts#my gifs#art things#tutorials#PS if you can't afford Photoshop then just you know.... yo ho ho and all that
129 notes
·
View notes
Text
for all robron gifmakers who use the uksoapshare videos:
the videos are 1080i and not 1080p, meaning there are some sort of lines that appear when on pause or used in photoshop
most of the time it's fine, i haven't had much trouble because photoshop deals with it in most cases and it's not visible to the eye in gif form (even if you can see the lines when you pause)
see, on the left the lines aren't visible wherease on the right they very much are : (or to my eyes at least)
but! no worries, there is a fix! you can convert the videos to 1080p with handbrake (free software!). it's a fairly easy process and let's you have the episodes in 1080p 60fps if you ever were looking for such quality
once you've opened your video in handbrake, go to the video tab and choose 60fps, and then go to filter, select "deinterlace" and the drop down menu, select Bob or EEDI2 Bob (this one will take longer)
you can use it on the whole episode so that's done, but it'll take roughly as long as the episode for it to be converted, so i suggest cutting clips (i use avidemux but you can do the cutting in handbrake, i just like that process less 'cause you've got to input start and end time manually whereas with avidemux i can do it with a visual)
once in photoshop:
however you make your gifs, by importing screencaps (tho maybe the lines don't bother you then) or by simply drag and dropping the video in photoshop, you now have 60fps to use.
either have fun with that (makes for very smooth movement) (but bigger file size)
or once you're done dealing with the gif and it's ready to be saved, you can convert to timeline and change the fps in the timeline settings
Nb: the converting time will depend on your computer's memory and processor. I have an Intel i7 and 16Mo of RAM, and the converting time takes about as much as the duration of the video.
#robron#emmerdale#gif making#i am still using uksoapshare videos because they're 1080p and the camera raw filter looks best with higher quality#if you have a better way of dealing with it i'm all ears!#this is a bit of a faff and i'm all for doing things as efficiently and as quickly as possible#(hence using the video directly and not using screencaps because it takes up time and slows photoshop down too much for my liking)
59 notes
·
View notes
Text
i decided to make a video showing my giffing process to anyone that might be interested.
youtube
I make my gifs with Photoshop 2024 on a macOS
Avidemux download
How to install and use vapoursynth
Action to turn the gif into frames again so you can adjust the frame delay before saving the gif.
If you have any questions, feel free to ask me.
136 notes
·
View notes
Text
Show of hands, who does video edits?
Suppose I wanna make an AMV (as they called it in the Bush administration). Suppose the only video-editing software I've ever worked with is avidemux, used for nothing but cutting segments OUT of a video. Not sure how to stitch segments IN, or how to change/add an audio track. And suppose my poor PC is old and tired, and has no processing power to speak of. What software do I install and learn?
The idea is Leonard Cohen's "Who by fire", with a video of Arcane scenes, where every line corresponds to a death. Who for his greed? Marcus dies on the bridge. Who for his hunger? Connol and Felicia die on the bridge. Who by brave ascent? Viktor goes up. Who by accident? Renni's son goes down. And so on.
(Ideas are not copyrightable, thankfully, so PLEASE feel free to give it a shot if you can. Then send me the link!)
15 notes
·
View notes
Note
would you ever make your own gif tutorial :>
I DID I DID!!!!!! it's 4 years old and i still use the exact same method (different sharpening and skills) the only difference is when you cap in avidemux, the video output should say "Mpeg4 AVC (x264)" otherwise that's what i've been doing for years<3
4 notes
·
View notes
Note
For the Ask a Vidder meme, 5, 1, 16!
5. Hardest vid to edit?
Hm depends on how you define hardest...
I think the biggest technical challenge I've had, which was entirely self-inflicted, was trying to get rid of all the zillions of stupid hallmark channel logos on my hallmark hanukkah vid with absternr, which was very fussy and also unsuccessful and something I volunteered to do while absternr was away from a computer because I like fiddly technical things for the first hour of them... BeatriceEagle's cleancredits program was really great for getting rid of the simple hallmark logo! It was surprisingly easy to get rid of just a white circle with an H in the middle. But they also stuck this big countdown to Christmas thing on the bottom of some of the movies that had a mistletoe border and was kinda faded in and I tried a bunch of different mask options and all of them looked awful... Anyways this has been an unnecessary rant about something I did 100% for fun.
From more of an artistic perspective I think a little wicked was the hardest vid to edit, partially because looking back on it I have pretty mixed feelings about it. I had some pretty specific things I wanted to say about the character but also the way she was being treated in the shows at a meta level and I was trying to make one unified statement about who the character is like and how she's treated in these shows across 3 shows and a movie where she has different amounts of screentime and is treated differently by the narrative.Like I opened with a shot of a badass moment and a moment of her unnecessarily falling on her face from each show but in the one movie, she actually only loses when it's appropriate (e.g. fights with superpowered oponents) and I was sorta faking it with a shot of her falling down in a fight that she eventually won, and in one of the shows I had to work really hard to find those shots of her being badass. (Which is why I wanted to make the vid in the first place - if you have a female character who dresses cool and is verbally said to be badass and in charge but you only ever have her falling over and getting undermined on screen that says something!)
What program do you use?
Davinci resolve! I guess if we're being comprehensive I've also used avidemux a bit for clipping as well as as using ffmpeg/someone's python script to run ffmpeg for multiple clips from a spreadsheet. (Resolve freaked out on my old computer with more than a handful of whole episodes of a show and tomb shows are too many episodes not to clip regardless.)
16. Favorite thumbnail for one of your vids?
I've gotta admit I've always gone with one of the default youtube provided options (though I try to choose whatever one of those is not actively misleading?) Pulling them up, my vimeo thumbnails are way better because vimeo just lets you choose a shot from the video (which is to say they're still just whatever still looked good). I have not uploaded all that many of my vids on vimeo. But maybe I should! For example this is the youtube thumbnail for Emerald City

It looks okay! It's a shot of a car on the infinity train, which is the VAST majority of what's in this vid so you'd think that it'd be very easy to get, but going in to edit the video the other automated options for thumbnails are more focused on characters and it's hard to see what's going on with the train car, which was the focus of the vid. I get why youtube's algorithm thinks that people should be in a thumbnail, it's just wrong with this one.

In contrast this is the vimeo one which I'm pretty sure is just the beginning of the vid. It's still not great! I could have actually made a title screen! But it is a focus on scenery and I think it's fun to have the thumbnail for something titled "emerald city" as a shot of a green room.
Anyways this didn't really answer the question... This one from love is an open door is pretty good - the thumbnail is kind of the ship manifesto for this one (which is real character Wu Xie, who has in other shows in this universe been played by Zhu Yilong, serious actor/the random side characters made up for him to have someone to do exposition with in this 10 episode show) - look at them! they have weirdly a lot of chemistry for how little there is in the character of the guy on the right! (sometimes a "good thumbnail" can be me going I still think this ship and my vid is funny)

3 notes
·
View notes
Text
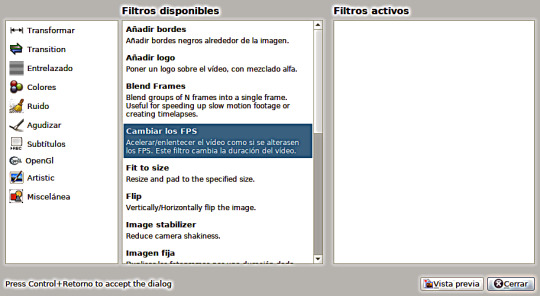
Videos en cámara lenta con Avidemux
Avidemux es un editor de video simple -demasiado bueno para ser cierto-, que lo tiene casi todo. He podido ver su evolución desde el 2008 hasta la fecha, aunque la última versión es del 2022.
1️⃣ Antes que nada hay que determinar ¿cuán despacio queremos que sea; la mitad de lento o SÚPER lento?
2️⃣ Este filtro funciona con las imágenes por segundo "fps" -en inglés-, así que en mi caso, que quiero que el video vaya al 66%, un poquito más lento: multiplico los fps x 0.66 (30x0.66=19) redondeando valores. Si fuera la mitad fps x 0.50 o al 33% fps x 0.33.
Ir al menú > video > filtros: "Cambiar los FPS"

0 notes
Text
has everyone just been using avidemux to convert mkv files into mp4 this whole time and i'm the only one who's been living in the middle ages
4 notes
·
View notes
Note
what program do you use to make your gifs? I've just been using Photoshop and working with the frames but the process is so long and I've heard there were better ways of doing it.
Hello! I use Avidemux, Premiere, and Photoshop. I followed this tutorial here, except instead of using KMPlayer I use Avidemux (also free). I generally will clip an episode of something, load all my files into Premiere, and then export them. Depending on what I'm doing that day, I'll load batches of 25-100 gifs into Photoshop at the time. When it comes to speeding up the process, I definitely recommend automating as much as possible. There's another useful tutorial here.
I hope this helps!
3 notes
·
View notes
Text
☆ピョイスのムヒムヒ☆データモッシュ講座☆
――――――
例へば、 .mp4 は I フレームと P フレームと云ふフレームで
大體が構成されてゐる。
(B フレームもあるが殆ど使わないので省略。)
―――
I フレームはシーンが大きく替はる時やエンコーダーに依り、
等間隔に打たれている、情󠄁報が詰まったフレーム。
(キーフレームとも云ふ。)
―――
P フレームは I フレームを元に、
一定の動きなどの動作の予測をメディヤプレイヤー等に再現させるフレーム。
(削除シた所で余り動畫は破壞されない。)
―――
まず、シーンが替はる瞬間に大體が打たれてゐる
I フレーム (キーフレーム・情報フレーム) を强制的に削除すると、
当該シーンを破壞しながら次のフレームが表れる。
―――
そして、動作中の P フレーム (動作予測フレーム) を
コピーして何回もペーをすると、
プレイヤー上で動作予測が繰り返され、
グニャ~と伸びる樣に動畫が破壞される。
(メディヤプレイヤーで再生しないと、破壞されて表示されないので注意。)
―――
元々、昨今のエンコーダーは高畫貭で、
データーの破損が少なくなるように設計されてゐるので、
"QTConverter 1.3.0" 等の Y2K 系アプリにて、
强制的に低畫貭かつキーフレームを打ちまくる樣にシた。
―――
そして、 I フレームと P フレームの確認ができるソフト。
ピョイスが使ってゐるモノは
"Avidemux" (オープン・ソースのフリーソフトだゼ)
このソフトは動作も𦘠き出しも輕快でおれのお氣に入り。
( P フレーム等をコピペ連打したりすると流石にクラッシュするが。)
――――――
大体の動画ファイルの大まかな構成; [I-PPP-I-PPP-I-PPP…]
youtube
I フレームを削除した場合; (I-PPP-PPP-PPP-I…)
youtube
P フレームをコピペしまくった場合; (I-PPPPPPPPP…)
youtube
――――――
20231101 - Additional Note; ―――
また、バイナリエディターを遣つた無造作な破壞法も在り、
Google 等で検索シて出てきたエディターを遣ひ、
映像のキーフレーム等の周辺を担ってる數値の
"01 B0" の數値を別の ("02 B2" 等 ) の文字列に置き換へるコトでも
再生可能な狀態で破壞出來るので、
人の手による故意がない全體的な損傷を動畫に與へるコトが出來る。
―――
バイナリエディタで "01 B0" を "02 B2" に總て書き換へた場合;
youtube
3 notes
·
View notes