#Cosplay tutorial
Explore tagged Tumblr posts
Visit Tumblr Blog
Explore Tumblr blogs with no restrictions, modern design and the best experience.
Last Seen Tumblr Blogs


Fun Fact
25% of US internet users with an annual income of $80-100K use Tumblr.
Text
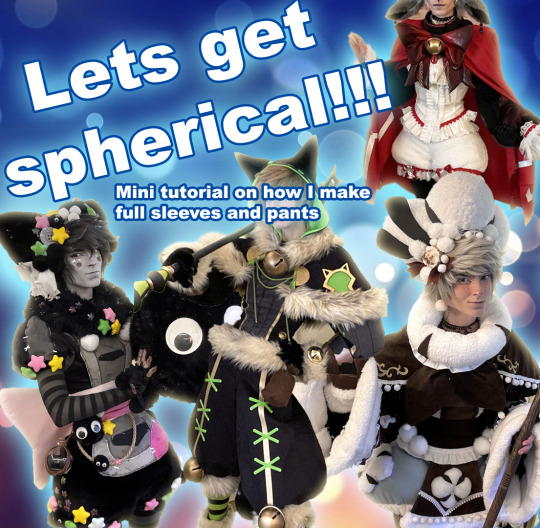
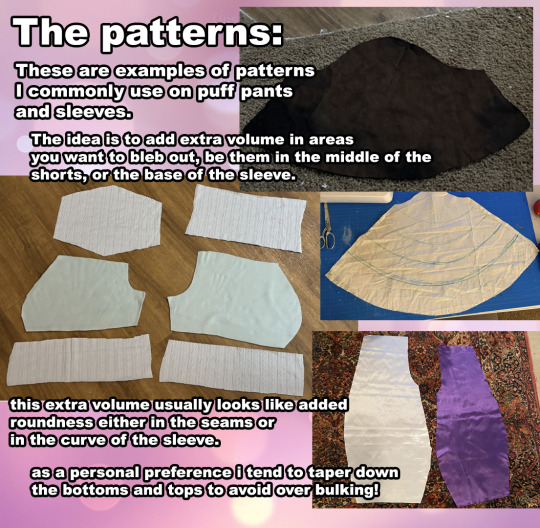
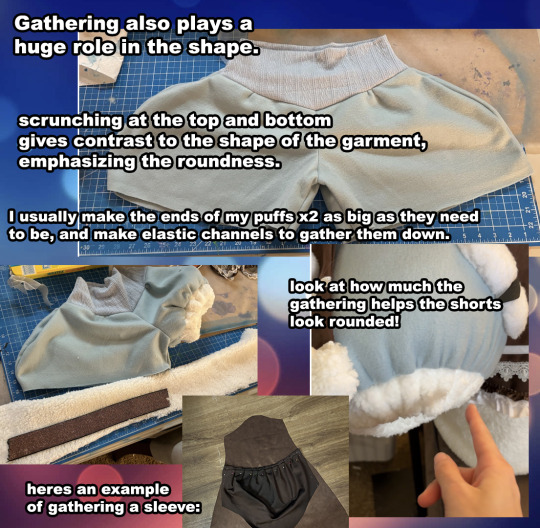
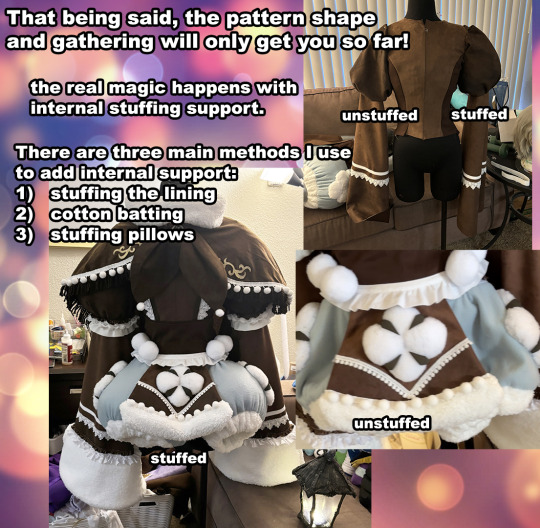
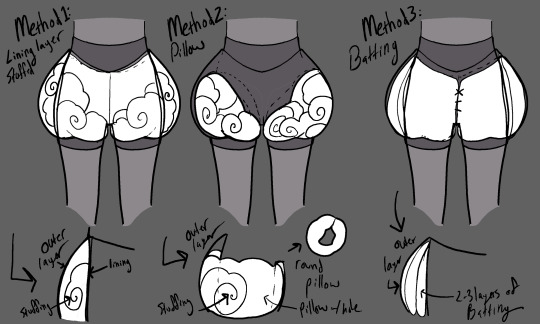
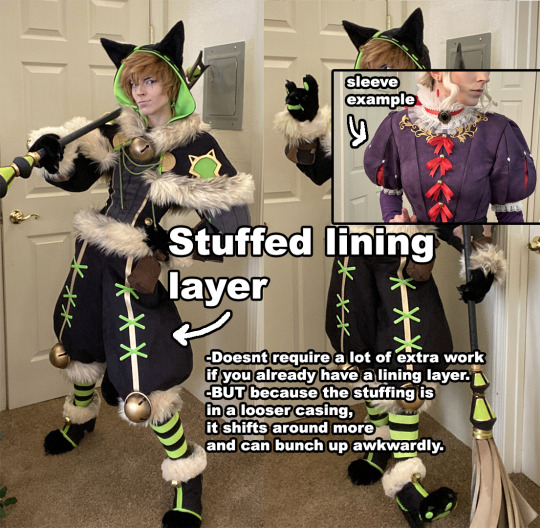
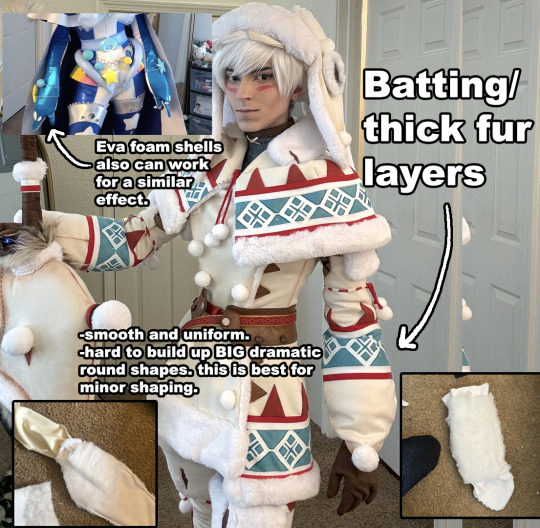
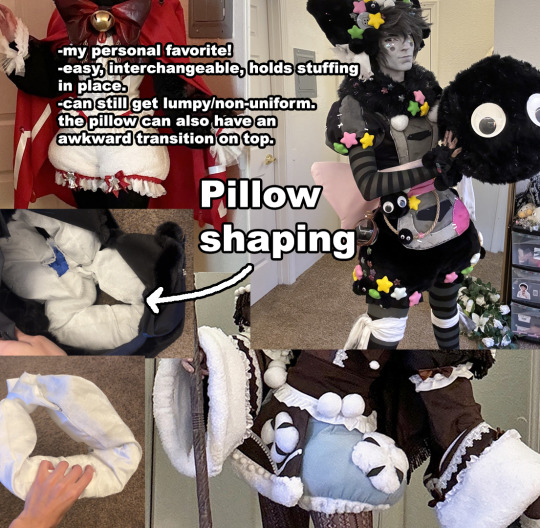
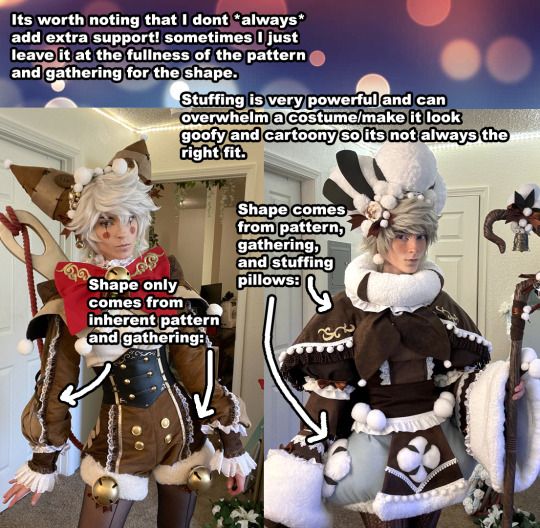
some information about how I shape my cosplays!!!
583 notes
·
View notes
Text
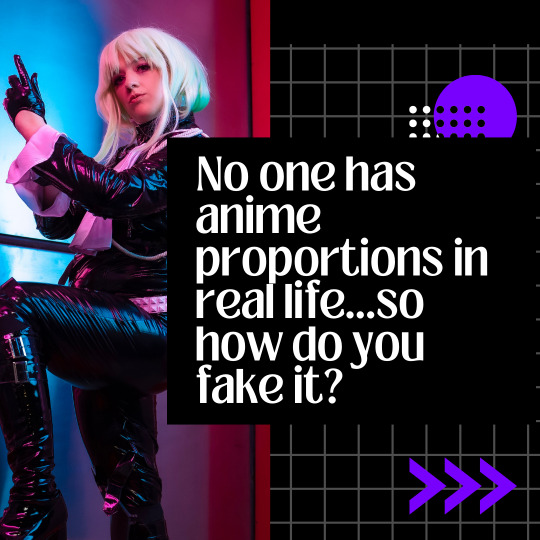
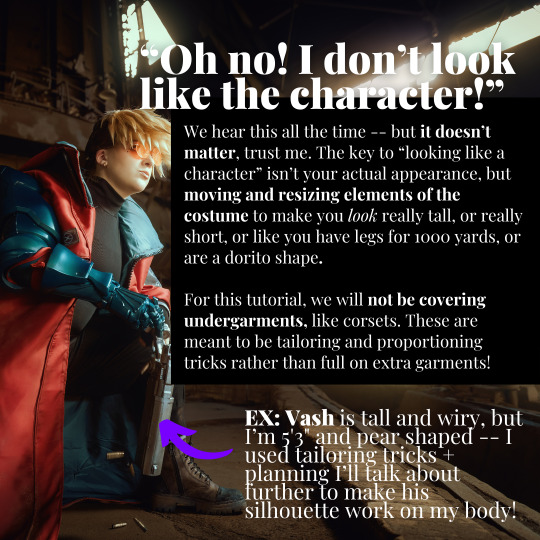
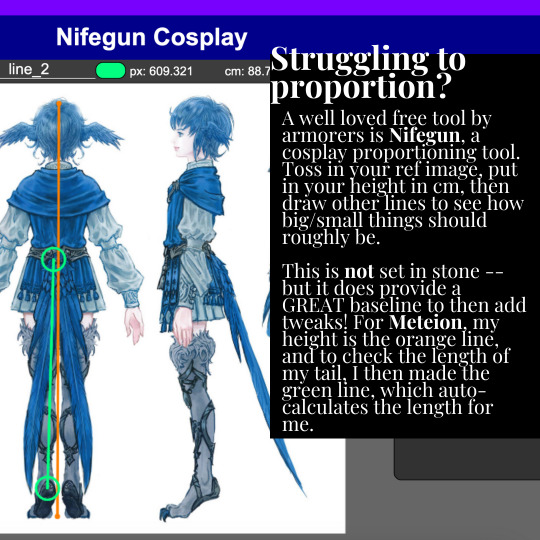

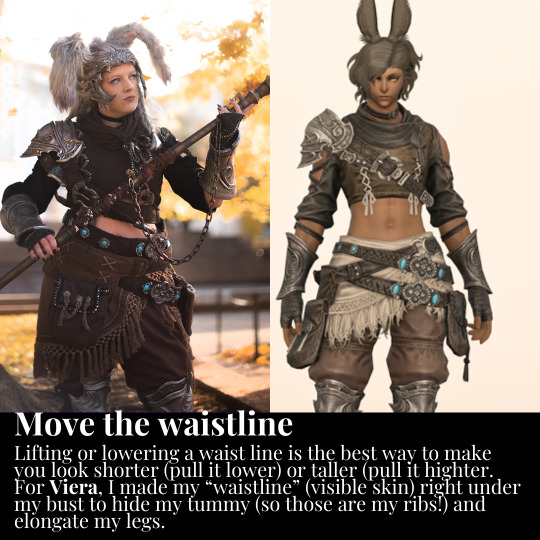


Tutorial on how I proportion cosplays on my very short body!
2K notes
·
View notes
Text
youtube
Today's cosplay post is a tutorial! I sat down and put together a full breakdown on how I use fabric painting to get my cosplay details. In this world where it seems like everyone on the big social media pages has an embroidery machine, a desktop laser cutter, and a heat-transfer vinyl workflow, I feel like sometimes we need to get back to basics and understand how to achieve clean finishes without a $2k overhead.
Video is fully captioned using the script I read from (not auto-generated captions!) And includes timestamps for different parts of the process. I recreated Marcille's t-shirt from one of Ryoko Kui's illustrations in this video, but it's useful for way more than just shirts!
I've never tried my hand at video tutorials before so I hope this is helpful!
#cosplay tutorial#cosplay how to#fabric painting#painting tutorial#beginner tutorial#cosplay reference#cosplay ref#reference#dungeon meshi#delicious in dungeon#cosplay#my posts#Youtube
136 notes
·
View notes
Text


One of my absolute favourite techniques for getting synthetic wigs with depth and realism is to go at them with alcohol markers (copics if you can afford them, but store brand also work!)
Light-coloured wigs give the most possibilities for dramatic alterations, but you can add depth to medium-darker shades as well! By adding roots and lowlights, you can get really beautiful blended shades, or you can even change the colour completely. You can also tint wigs warmer or cooler depending on your goals - a blonde wig for example could read more platinum if you blend in a cool grey, blue, or purple tone.
For most of the work featured here, I literally just drew on the wig strands with markers, and heat-set with a hairdryer after! You could also do alcohol inks mixed with isopropyl alcohol in a spray bottle if you need more coverage.
Basically, I always encourage folks to look at wigs (and any materials tbh) with an eye for not an exact match, but what they COULD become with a little work behind the scenes! Happy wigging!
(Oh and to add!! The one thing you have to be careful of is hairspray! Wigs that are lightly markered are usually okay, but the more ink you add, the more likely it will be reactivated by the alcohol in hairspray cans, so keep that in mind for your projects!)
366 notes
·
View notes
Text
Cece Olson for Twin Cities Geek:
It’s the end of your latest convention weekend. You’re feeling great, but you’re also exhausted. It’s been a long day of sweating, eating, dancing, and more. You finally strip off your cosplay, and it’s then you notice the wear and tear. A stain here, a tear here, wrinkles everywhere. And it smells! Because most cosplays don’t consist of things you can toss in the washing machine, it’s not always obvious how to clean them. I enlisted the help of some cosplayer friends to help create a quick guide of what to do when it’s time to clean your nontraditional clothes.
99 notes
·
View notes
Text
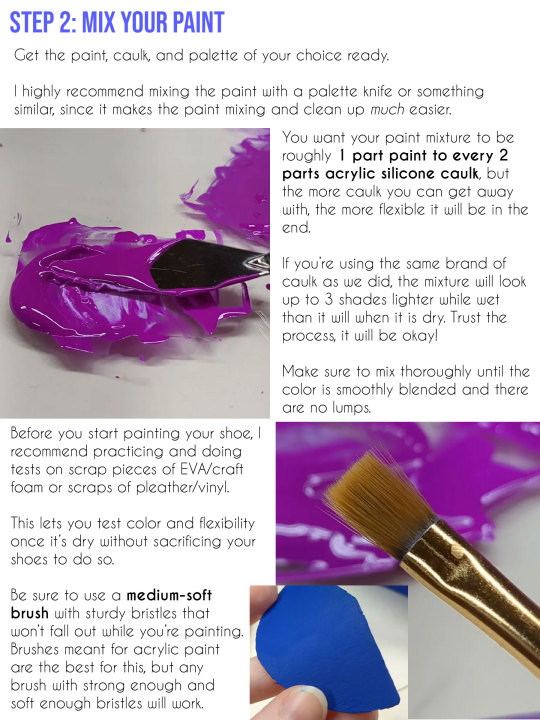
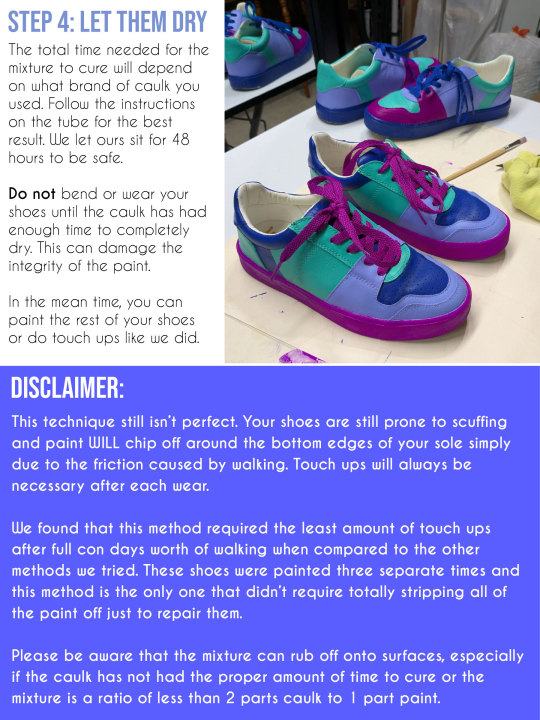
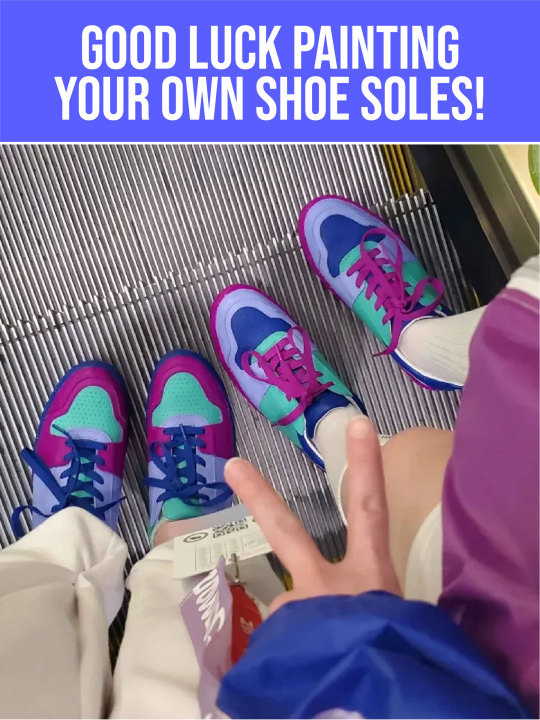
How to Paint Rubber Shoe Soles
Are you a cosplayer? Are you painfully stubborn and tired of every video and tutorial out there about painting shoes telling you not to paint the rubber soles? Me too! So I did it anyway.
Here's a full break down of how I did it complete with suggested materials and pictures!
Apologies to those that use screen readers, Tumblr is NOT letting me add alt text on desktop, so I would greatly appreciate anyone who wants to add an image description in a reblog. I'll try to write one up and add it to the end of this post later, but you are free to beat me to it!


116 notes
·
View notes
Text


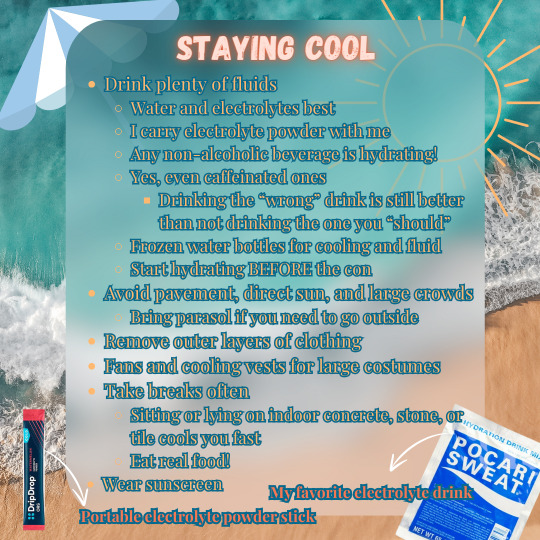
It's coming up to summer con season in the Northern Hemisphere, so I want to post this little infographic I made about staying cool at summer cons!
Don't mess around with heat, since heat stroke can be deadly. Heat exhaustion will make you miserable. Just don't.
Stay cool and hydrated out there, and don't forget to pregame water so you're well hydrated before the con even starts. ;]
#helpful things#cosplay tutorial#cosplay help#cosplay advice#cosplay#anime cons#comic cons#cosplay safety#thinking of the time i got heat exhaustion at a con#and then said “I don't want this to happen again”#so i made bikini armor for my next con lmao
35 notes
·
View notes
Text
Ema Skye Cosplay VIDEO - The Opal Empress
#ema skye#ace attorney ema skye#apollo justice#the opal empress#game cosplay#ace attorney cosplay#ace attorney art#ace attorney#ace attorney fanart#ace attorney apollo justice#cosplay video#cosplay tutorial#cosplay
697 notes
·
View notes
Text
hi I’m a very long time cosplayer (20+ years experience) who has chronic headache and migraine problems and this is a post about how to prevent your cosplay wigs from giving you painful headaches! Nobody likes wandering around the con in blinding pain and so hopefully this post will help you reduce the chances of this happening.
1. If your wig is way too tight, don’t use it. Get something with a bigger cap. tbh I often wear slightly too big wigs to reduce the pressure! Find out what brands and sellers sell wigs that are comfy on your head and prioritize buying wigs from them! I made a big master list of cosplay wig sellers a while back so here’s a few you might not have known about. Arda (and its Canadian and European sites) sells by far the biggest wigs, but I personally find Classe the most comfortable for my specific head. It’s all very YMMV and it’s totally possible for a wig to not actually be too small but fit your head in an uncomfortable way (Blue Beard on taobao does this to me every time), so just don’t buy from suppliers that do that. Also consider resizing wigs to be larger! For wig clients with extra large heads I like to nip the edge of the wig right behind the ear where your ear and hair from above will cover it and add in a little godet of elastic.
2. Reduce weight! A heavy wig will make head pain much more likely, so here’s a few tips on wig weight reduction!
A) if your wig doesn’t need a ton of volume and is already very dense, rip out some wefts in the bottom half. Anything on the part of your head from the ridge where your head starts going in towards your neck won’t really show unless your wig is very short and it’ll obviously reduce weight instantly! You can replace any missing volume with light crimping or light heat and tease, or leave the wig as is for a natural and silky look without the unnatural volume of a cosplay wig.
B) if you need more volume in your wig, instead of going straight to adding wefts for more volume, see first if combining crimping with heat and tease at the roots will give you the extra volume you need! Crimping or heat and tease adds volume and if you straight up destroy the fiber in the first two inches from the scalp by doing both repeatedly, it’ll add huge volume without you needing to add extra hair! When I do this I like to heat the fiber near the roots, tease it, let it cool, crimp the teased part, let THAT cool, and then brush it out. You can flat out double the perceived volume in the back of the wig this way!
C) if your character has a high ponytail or high pigtails, consider using clip on ponytails that you can easily remove if you need the weight off your head right the fuck now. here’s two tutorials I swear by for making a short wig + clip on combination look more natural! They’re in Japanese but easily comprehensible if you use machine translation thanks to the clear photography. They also help with spreading out the weight on the wig itself, and if your hair is long enough, using a clip on with a fishnet wig cap and clipping through the wig and into your real hair will also he lp make it more secure and distribute weight more evenly.
if your character has high pigtails
if your character has a high ponytail
D) when you need extra wefts, opt for sewing in wefts rather than gluing whenever possible. Glue doesn’t seem heavy but enough of it can make a wig get real heavy REAL fast.
E) redirecting the weight to your entire head and not just the front hairline will feel lighter and give you less forehead tension, which is one of the biggest causes of wig headache. Toupee clips sewn evenly around the edges and a Wig Fix https://therenatural.com (the name brand one, the knockoffs genuinely don’t work half as well) can help with doing this. A Wig Fix will also let you use fewer pins to keep your wig on, which is another cause of wig headache. Can’t suggest trying those enough. There are also some velvet wig grips out there but I find those don’t work quite as well, but they’re by far better than nothing.
3) make sure your wig is easy to remove. A lot of characters have horns or veils or other head things on top of the wig so make sure those can easily come off if you need a wig break! I’m a big proponent of using wig glue or double stick tape to glue strands (face framing layers etc) to your face for a more natural and more flattering look, but if you get headaches from wigs, keep that glue or tape in your bag so if you have to de-wig for a bit, you can get it back on!
4) take the ibuprofen or whatever BEFORE you put the wig on, and not when your wig is already making your head miserable! It’s like taking the ibuprofen before you wear the horrible shoes for a special event; it’s more effective in advance.
5) what are your normal headache triggers? Make sure you’re doing the work to EXTRA avoid them before wearing a cosplay wig. Stay hydrated. Keep up with your electrolytes. If you have any food triggers, make sure you’re managing them properly.
6) try multiple types of wig cap before deciding which ones to use! I’m a big fan of the fishnet kind because I’m in agony every time I try to use the stocking kind. Some people find relief in doing pin curls under their cap, and @/battleangelgif on twitter suggested doing this with damp hair the night before you wear the wig. There are tons of methods! Stretching out fishnet caps can be done more effectively when they’re slightly damp and that’ll make them pinch less. Experiment with what you like best to keep your irl hair in place and once you find a method you like, go for it! Make that your go-to!
7) always remember: wearing a short wig is less miserable than wearing a wig to your ankles. consider very carefully whether or not you can actually handle that wig that’s as long as you are tall. sometimes you just can’t and that’s okay! reduce the length of any super long haired character to hip length and it’ll be FINE. I swear. It’ll still read as super long and it won’t be as terrible.
8) always remember you can just. take the entire wig and cosplay off if you’re in agony. it’s not worth it. don’t do that to yourself. If the migraine hits anyway, just take it off.

Hope some of this might help you out! Focusing on reducing and redistributing weight is what helps me out the most 😌 feel free to reply or reblog or message with questions and I’ll try and get back to you ASAP!
#cosplay#cosplay tutorial#wigs#wig tutorial#cosplay tips#reducing wig weight#I just want to save everyone from blinding cosplay wig induced migraine#nobody likes head pain at the con#hope I was clear enough hhhhhh#yes this is an expansion of a twitter thread I wrote#y’all get the better version
633 notes
·
View notes
Text
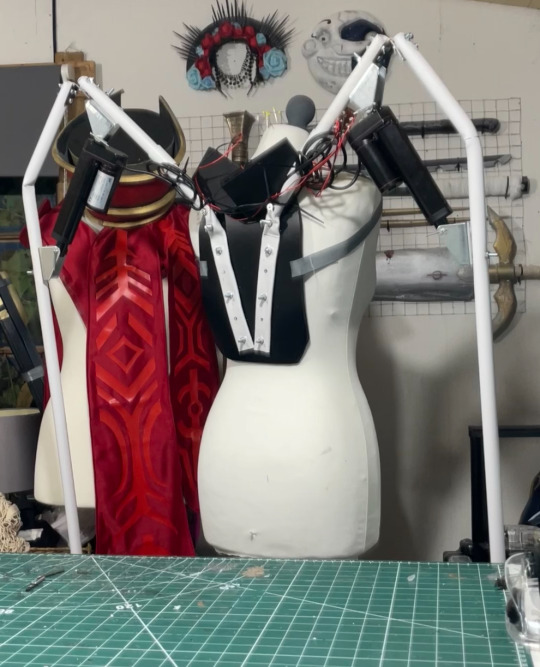
How to Make: Electronic Wings for Cosplay
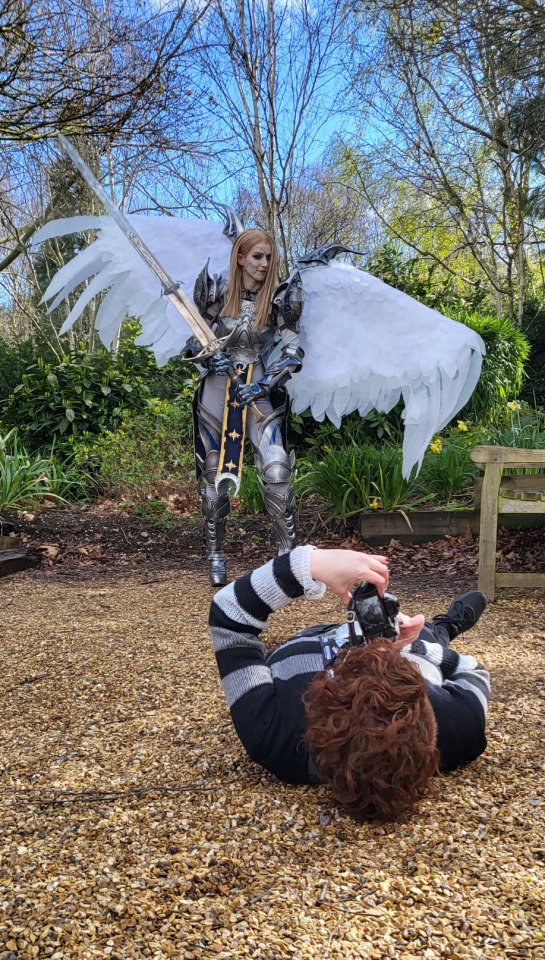
Hello Everyone! It's been a while since I last uploaded a written tutorial on here and since I just finished and wore my Dame Aylin cosplay this last weekend it seemed appropriate to jump back in with a tutorial on one of the costume pieces!
Her wings were the star of the show this weekend and I know a lot of people were curious about how I made them! A huge source of knowledge and inspiration behind these wings was this video by Axceleration, I made a few changes to the frame shape and electrical circuitry for mine but her tutorial was a huge stepping stone to give me the confidence to tackle them myself!
Health and Safety:
When working with Sintraboard (as well as other thermoplastics) it is incredibly important you wear a respirator as well as goggles when heating, moulding and cutting it. The fumes this plastic will give off when heated up are no joke! Make sure you're in a well-ventilated space!
Basic tool safety knowledge is also really important! wearing gloves when using power tools can be more dangerous in most situations, so always be aware of where your hands are vs where the tools are. Always cut away from yourself and take things slowly, don't panic.
Electrical safety! You're working with live wires and circuitry! make sure your hands are dry, you aren't touching the bare wires at any point when they are connected to a power source, and if you choose to solder anything, make sure you're wearing heat-proof gloves and a mask in a ventilated space!
Tools
Wire stripper
Screwdriver and wrench
Dremel - I recommend the Dremel 3000 rotary tool personally! Some essential Dremel bits you'll need for this include, a sanding bit, drill bit (smaller or same size as your screws/bolts), and a small/narrow cutting bit. These will usually come with the Dremel!
Heat Gun (A hairdryer will not get hot enough to heat the Sintraboard!!)
Pipe cutter (alternatively you can use a hacksaw for this!)
Hacksaw
Ruler
Scissors (for cutting fabric straps)
Materials
Heat shrink Tubing
2 core electrical wire
switch (you want a three position, six pin switch, like this one, even better if it has the Screws on the pins! otherwise you'll need a soldering kits to solder the wires to the pins.
2x 8AA 12v Battery Holders
2x 12v Linear Actuators (Mine had a stroke length of 100mm)
21.5mm PVC Pipes (I got 2x 3m Lengths)
2x 21.5mm PVC Pipe straight couplers
6mm 8"x12" Sintraboard
Nuts/Bolts/Screws (I used M5 bolts for the base & Actuator connectors and M6 screws to attach the hinges to the pipes! You'll need Washers for every Nut & Bolt!)
Hinges (I used 2.5cm wide hinges that were skinny but long so they would just about fit along the PVC pipe! 3" gate hinges would work!)
50 metre Polythene Jiffy foam roll (in retrospect this was ALOT of foam, you could definitely get away with maybe a 20-30 metre roll! I now have a load leftover XD)
16 AA Batteries (I used 16 and had enough for the whole day with them on, I think They'd probably be enough for another half a day-full day too! but have spares just in case!)
Webbing strap ( I went for grey to match my base suit colour!)
Buckle - as wide as the webbing strap you use!
3 metres of white cotton fabric (or whatever colour wings youre going for!)
Optional
Zipties (for cleaning up the wires)
Lets Go!
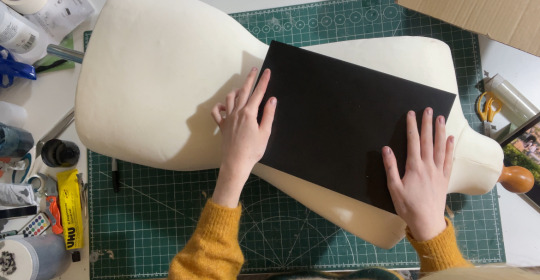
Sintraboard is this wonderfully stable thermoplastic that is relatively easy to cut into (with the right tools) and when heated allows you to mould its shape! I started by using a mannequin and heating the Sintraboard with a heat gun for a few minutes to make it pliable, I recommend using gloves for this part as the materials gets VERY HOT! Press the board into the shape of the mannequin's back, taking note of the edges especially! you want this board to sit as comfortably to your body shape as possible as it makes a huge difference to how long you can wearing the wings for in this backplate is comfy!
Once shaped, I placed it against my back to make sure it was a good fit, heating again and making any alterations I needed (again don't place bright hot plastic to your bare skin! wear protective clothes and wait till its slightly cooler to do this, with the help of a friend!). I then took a hacksaw and rounded the corners, before sanding the edges with my Dremel! Try to avoid cutting off loads, just enough to make things less likely to snag.
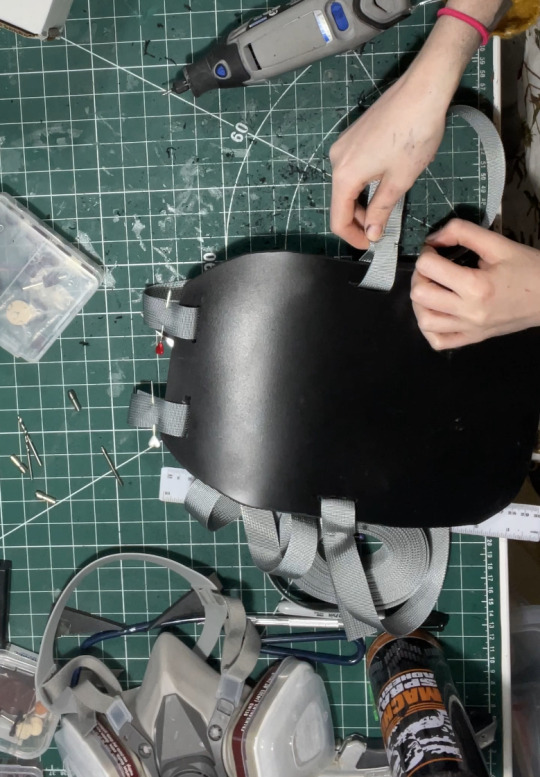
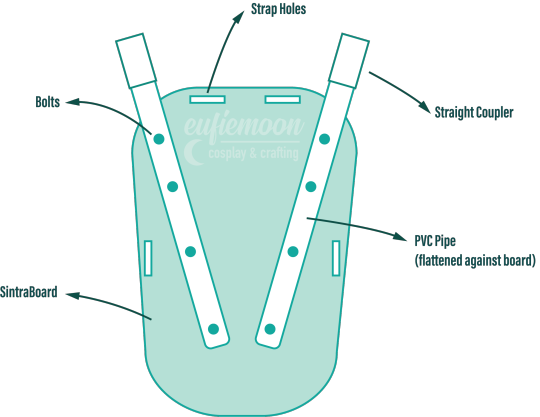
3. I then cut in four holes, wide enough to feed my webbing strap through, two at the top and one on either side below where my arms would sit! I measured the webbing strap by firstly feeding them through the top holes and pinning them, and then bring the strap over my should to everything sits where it should and seeing where the strap hits the side hole and cutting the length there! you'll also want a strap that attaches across the chest, meeting in the centre with a buckle!
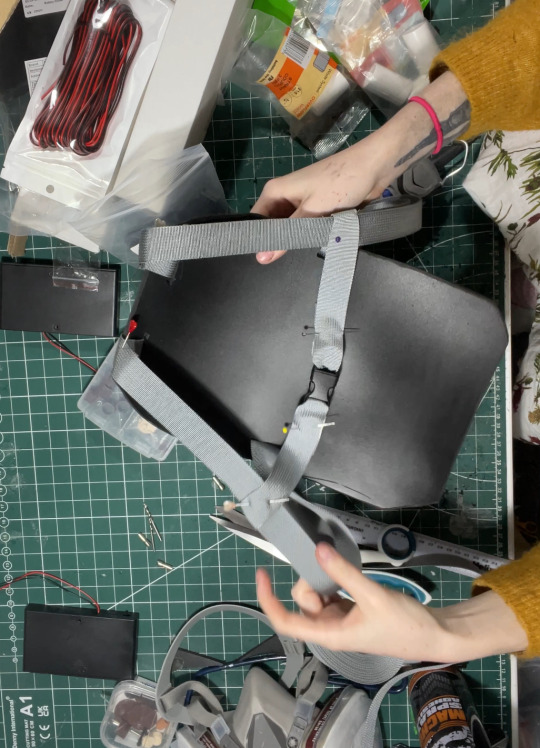
4. After sewing the straps closed I was able to move onto the PVC pipe structure! This may change slightly depending on the finished shape you want but I needed the PVC pipes to come out from inside a breastplate so had a particularly angle as well as character references to work with! I began by heating the pipe over my heat gun and flattening a portion of it under a heavy object so it would sit much more flush against the backboard and sit better underneath my breastplate before moving onto securing the first portion of the structure to the backplate. This mainly involved lots of try-ons and measuring to make sure the angles were correct and symmetrical and was quite fiddly but well-worth the effort! I'll include a diagram of the general shape I went with below:
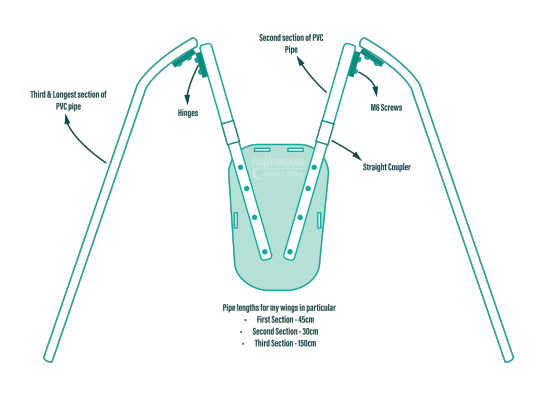
5. I wanted my wings to be relatively modular for ease of travel so I needed to make sure certain portions of them could come away from other parts easily, so I popped a straight coupler on the top of the pipes that were attach to the breastplate, this also meant I could slot the breastplate over these shorter pipes and wear everything correctly! Then these second pipes slot on and at the other end they are attached via hinges to the longest portion of the pipe 'skeleton', Diagram below:
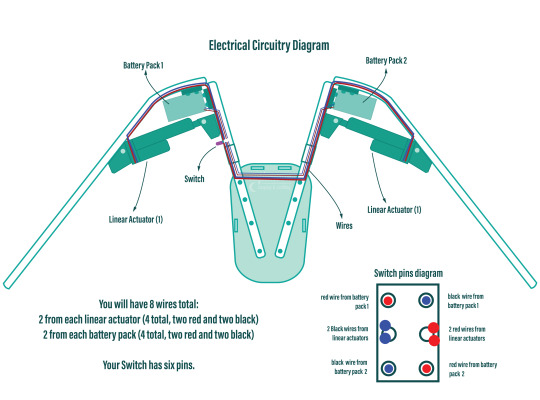
6. Now that the skeleton was put together, it's time for the electrical stuff! It's a good idea to figure out where your circuit is going to lay on the skeleton - consider if you want the battery packs mounted the the backplate or, like me, put them inside the actual wings in removeable pockets for easy access and removal for battery changes. all your wires will go through the switch so deciding where you want to place that is very important! Mine was placed just over my shoulder on the front side, mounted to the PVC pipe with a metal cover I drilled a hole into to slip the switch through and then drill through the pipe.
I've included another diagram below that explains all the electrical circuitry, including which wires go on which pins on the switch!
Important to note: The linear actuators need to be placed and bolted into the PVC pipes at *exactly* the same angle on each side, any slight deviation will lead to the wings going up wonkily! So take your time and make as many adjustments as necessary.
7. You can extend your wires by adding on the electrical wire, just match the colours, and put heat shrink tubing over the connections to hide the live wires! I ended up zip-tying the wires into organised bundles once the wings were done to help keep everything safe from snags.
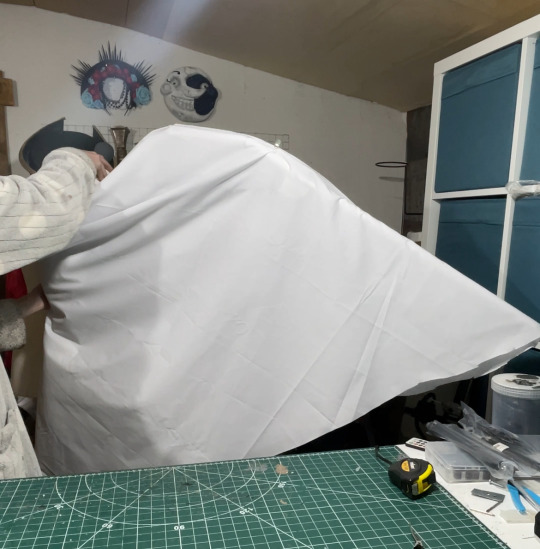
8. Now its time for the Wings themselves! I drafted my base pattern by just draping the white cotton fabric I had over the wing when it was fully extended. I then pinned the wings to the shape I wanted them to be along the bottom before cutting along the pins. I ran the fabric through my sewing machine to close the bottom edge, leaving a gap wide enough by the wing base so I could slip the wing on and off, closing it with velcro. I also added little fabric pockets inside of these to hold my battery packs, which also connected via velcro for easy removal!
9. Now that I had a wing base I was able to begin making feathers! I cut out a total of 800 feathers out of polythene jiffy roll for these wings, in 6 different styles and using real life bird wings to dictate the shapes I used and where I placed them. I ended up hot gluing every individual feather onto the white fabric base, going row by row until every side was covered, the wing covers themselves are super light because of the foam feathers and they shine light through them in a really magical way!
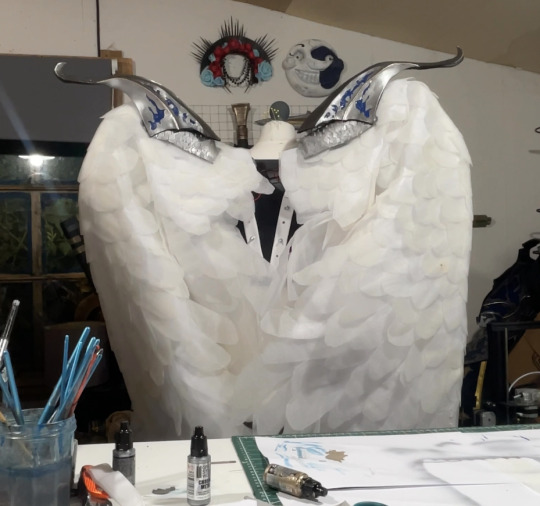
Optional: I also ended up going over these feathers with my airbrush and some super light beige paint to help darken the shadows, this is entirely optional and may change depending on the wings you're looking to make!
When in neutral position and in extended position the wings looks like this:

Mine had a wingspan of about 7ft total when fully extended but when in neutral position they were fairly close to my own proportions! mainly staying behind me and weren't much of a problem in a packed con hall!
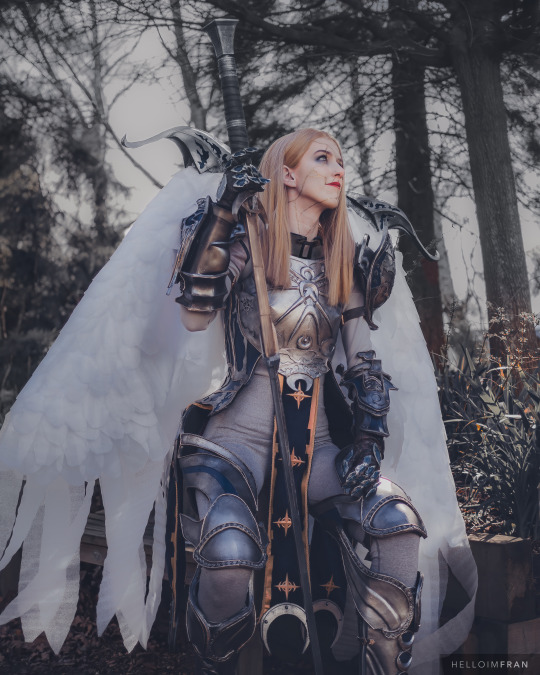
Photo by: Helloimfran (on Instagram and Twitter)
I hope this tutorial helped and if there are any questions about anything in specific don't hesitate to reach out at [email protected] or on my instagram or twitter (@eufiemoon)
Happy Crafting!

#cosplay#cosplayer#cosplaying#baldurs gate iii#baldur’s gate 3#baldurs gate 3#bg3#dame aylin#aylin x isobel#bg3 aylin#cosplay tutorial#Wings#fantasy#tutorial#cosplay help#cosplay tips
166 notes
·
View notes
Text
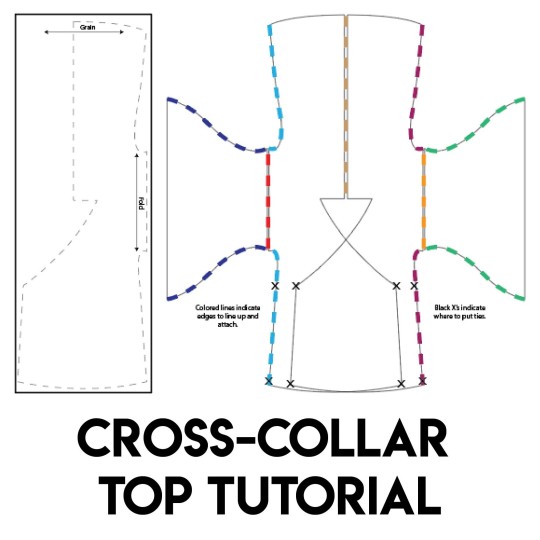
hello to the two people following me :) I haven't shared any patterns I've created before for sewing, but in making some period c-drama and danmei inspired cosplays and my resurging Hanfu fixation realized there aren't many good English resources for sewing cross-collar tops for zhongyi and other pieces so I made my own!
there are three pages but I tried to pack a bunch of information into it and you can download it via Gumroad for free :) I'm also entirely down to help out with patterning for anyone (if any lol) who might want to use this little pattern tutorial.
✨download link✨
270 notes
·
View notes
Text


66 notes
·
View notes
Text
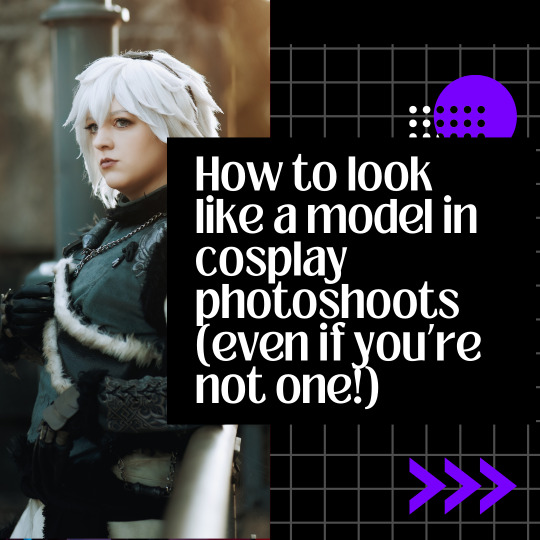
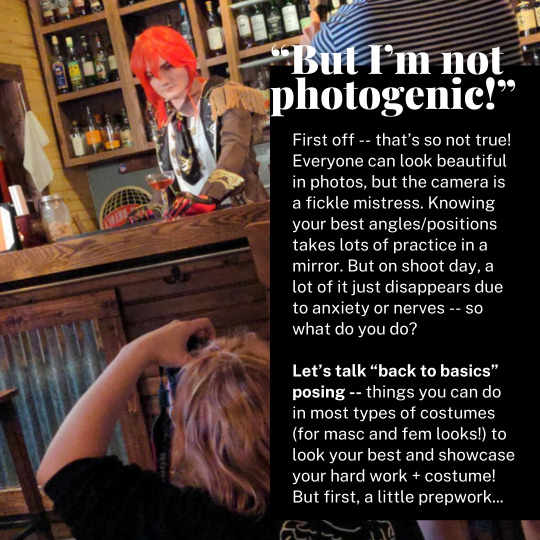
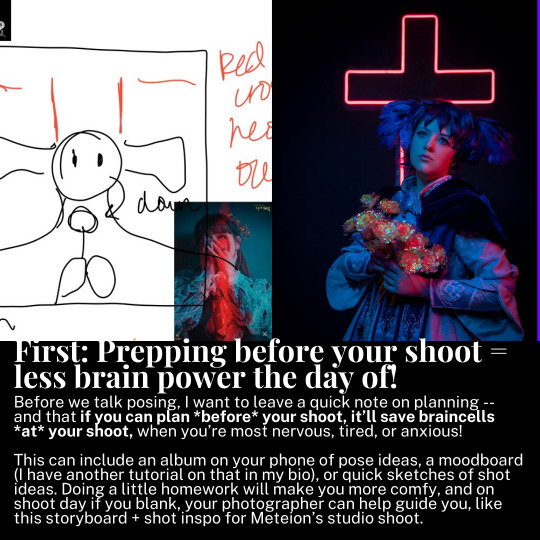
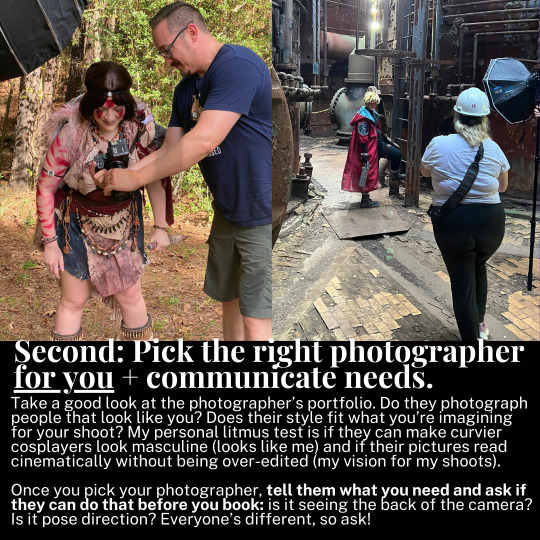

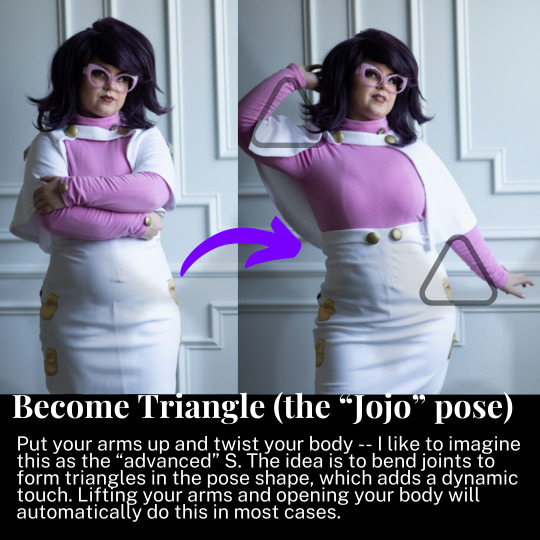

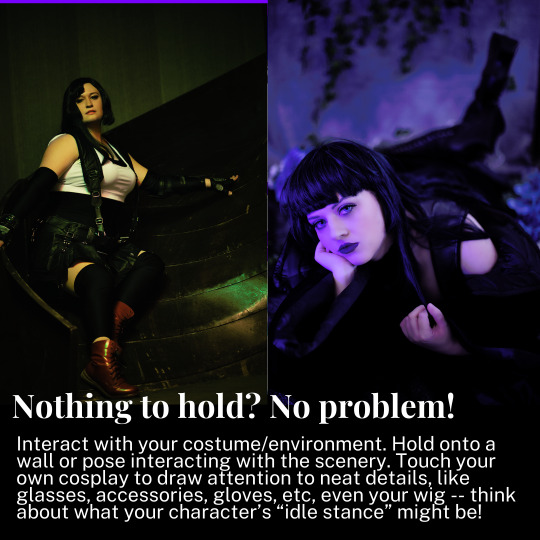
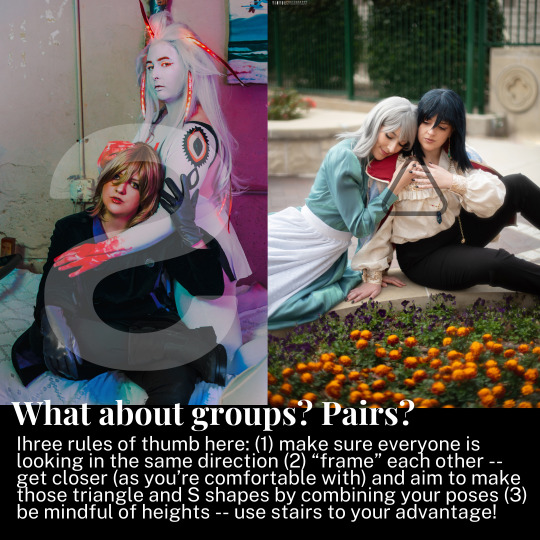
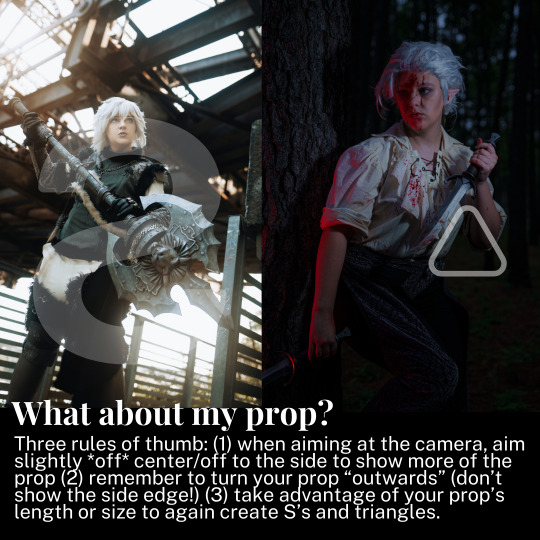
A cosplay tutorial on how to pose for photoshoots, no matter what you look like and what you're wearing -- with example shots to help guide you along.
304 notes
·
View notes
Text
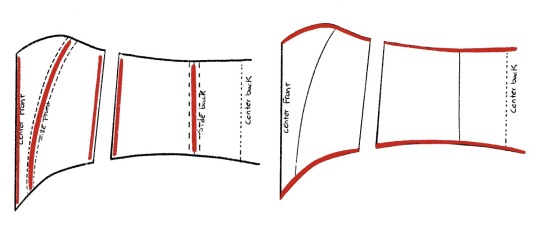
From Bodice to Corset (ish): A walkthrough
A quick insight requested by @shykitten28 about how I altered an ill-fitting bodice to a well-fitting corset!
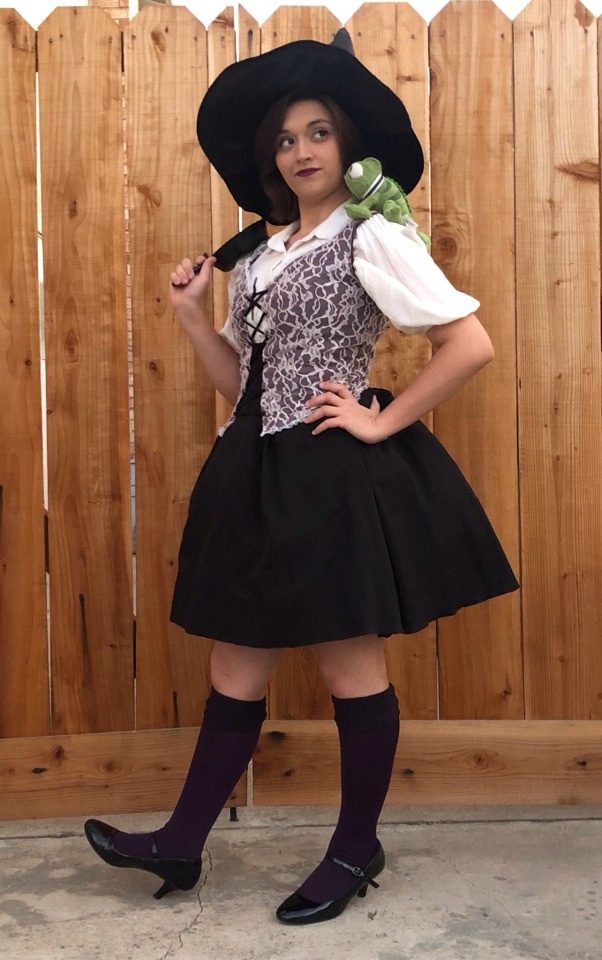
Suitable for: Turning a lace-up top into a boned corset
note: This is not a REAL corset! Real corsets are supportive undergarments measured to your exact shape. This is a CORSET-STYLE BODICE, often used in cosplays!
Difficulty: Intermediate, probably
Directions:
1. Cut up the side seams and cut off the straps to separate the back from the front
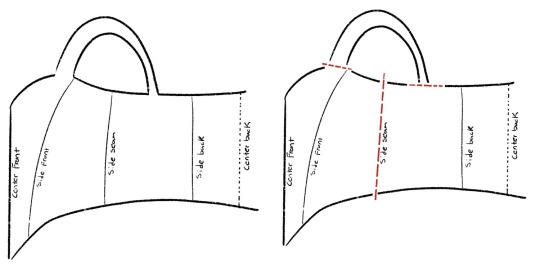
2. Reshape the bust curve, top of side panels, and back panels to adjust fit for lack of straps
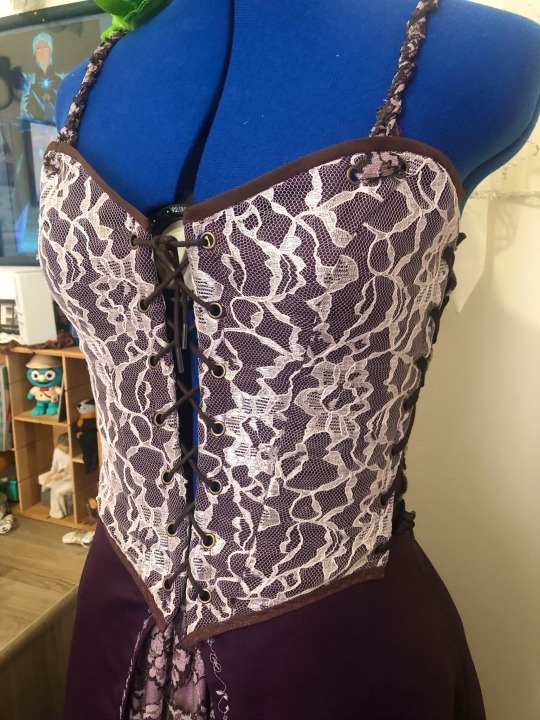
3. Create a new casing out of the old side seams by turning them under 3/4” (the sides will become lace-up for versatile fitting). Do the same for the original front lacing if there is no boning.
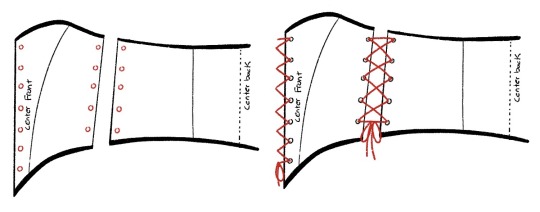
3a. If there isn’t boning in the side front/side back seams, I recommend adding a casing by stitching twill tape inside. This will keep the waistline from bunching like in the original picture!

4. Add boning to all seam casings (I recommend doubling up if you are using the thin plastic stuff, the metal stuff is sturdier but much harder to work with)
5. Bind top and bottom edges with bias tape (creates a nice border and you don’t need to worry about seam allowance to turn under)
(Plastic vs metal boning, I’ve used both!)

6. Install grommets to center front and sides (follow directions and practice beforehand!)
7. Lace-up to size
This grommet pack is great for beginners, I’ve been using the same one for years. And a trusty RUBBER mallet! (Don’t use a hammer, it destroys the grommets)

For strap replacement:
1. Add grommets where strap met up with bodice
2. Create strap with fabric ties, lacing, or old strap pieces (with matching grommets and small ties)
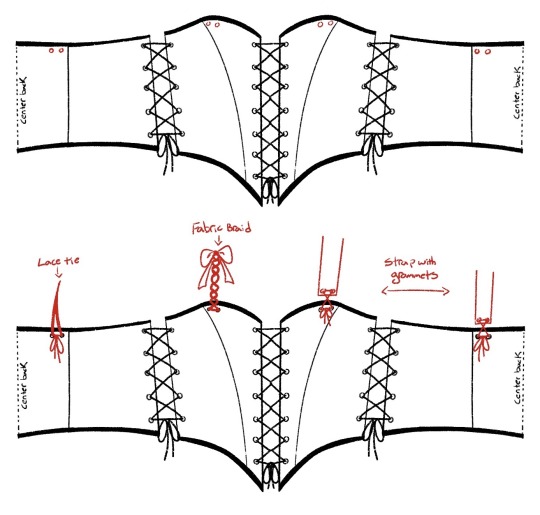
Done! Now you have a beautiful boned corset!
All pictures and sewing by me! This is just my personal process, find what works best for you! :)
#cosplay#my cosplay#cosplay tutorial#sewing#sewing tutorial#tangled cosplay#rapunzel cosplay#tutorial
21 notes
·
View notes
Text
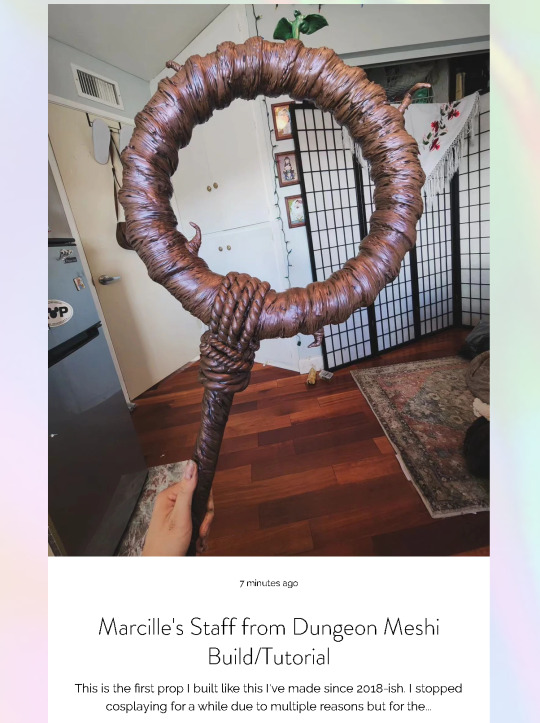
I made a tutorial/build log for how I made Marcille's staff from Dungeon Meshi!
#cosplay#personal#props#propmaking#dungeon meshi#delicious in dungeon#marcille donato#marcille dunmeshi#dunmeshi#dungeon meshi cosplay#cosplay props#tutorial#cosplay tutorial#cosplay wip#my cosplay#prop build#cosplay prop#delicious in dungeon marcille#marcille dungeon meshi
172 notes
·
View notes