#CreativeCooking
Explore tagged Tumblr posts
Visit Tumblr Blog
Explore Tumblr blogs with no restrictions, modern design and the best experience.
Last Seen Tumblr Blogs


Fun Fact
The total number of visits Tumblr.com received during January 2021 is 327 million.
Text
Cornbread (and the some)

There is a cornbread mix out there on the market that we all know and love but making it from scratch is almost as easy and you are 100% in control of what goes into it. You can increase or decrease the sugar, swap out the milk with a variety of dairy products, and stir in what you want to and create the cornbread of your dreams. The cornbread of my children’s dreams is one with actual corn and grated cheddar cheese in it. Once I made it this way it is the only way they will have it now. How are you going to do it that will become the mandatory creation with your loved ones?
Cornbread
Makes about 9 servings
1 cup cornmeal
1 cup all-purpose flour
1/3 cup granulated sugar
1 teaspoon baking powder
¾ teaspoon salt (½ teaspoon plus ¼ teaspoon)
1 cup milk or buttermilk
1/3 cup cooled melted butter or vegetable oil
1 large egg
Preheat the oven: Set your oven to 400°F. Generously grease an 8-inch square baking dish or a 9 inch cast iron skillet.
Whisk together the cornmeal, flour, sugar, baking powder, and salt in a large bowl.
In another bowl, combine the wet ingredients and mix the milk, vegetable oil (or melted butter), and egg. Should be well combined.
Pour the wet ingredients into the dry ingredients and stir just until combined. Don't overmix, it's okay if there are a few lumps. Over-stirring will make it tough.
Pour the batter into the prepared baking dish or skillet. Bake for about 25-28 minutes, or until the top is golden brown and a toothpick inserted into the center comes out clean.
Allow the cornbread to cool slightly before slicing and serving.
Simple things to try-
Add corn. This works for a sweet or savory product. ½ to 1 cup of frozen corn that has been defrosted can be added to the batter right before putting it into the baking dish. You may have to cook another 5 minutes because of the added bulk.
Swap out the milk for sour cream or plain yogurt. This will make your cornbread more moist and tender but the batter will be a bit dry to mix (don’t worry).
Sweet additions
Sprinkle a coating of sugar on top before baking. Demerara sugar works nicely here if you have it in your pantry.
Swap out honey or maple syrup for the sugar. This makes the batter a little looser so you may have to bake another 2-3 minutes.
Add a teaspoon of cinnamon to your batter. It can go in with the dry ingredients.
½ cup of almost any fruit works. Be sure to chop it fairly small. I like a peeled apple or sliced bananas.
½ cup of cooked, mashed sweet potato
Any kind of chopped nuts sprinkled on top before baking
Savory Additions
½ to 1 cup of grated cheese. This is a no-brainer as a side dish for chili. Almost any cheese will work.
4 ounces of canned diced green chilis.
½ to 1 cup of diced fresh poblano peppers.
Arrange sliced jalapenos on top of the cornbread before baking
½ cup of sliced green onions or ¼ cup of chopped chives
1 cup of shredded zucchini, squeezed dry of excess liquid (there are a lot of sweet choices to incorporate with this too)
Cooked Chorizo. Almost enough said? 1 cup of cooked crumbled chorizo stir in before baking.
Are you inspired? A cornmeal batter is sturdy and can hold up to any addition you want to add to it. Remember, the more you add, the more baking time you may have to the total.
What’s your crazy idea and when are you going to add it to an 8x8 pan of cornbread?

#creative cooking#calmdownandcook#easy cooking#creativecooking#homemade#calm down and cook#foodie#foodies#foodporn#foodpics#cornbread
8 notes
·
View notes
Text

Adorable cake with winking smiley face and pink bow
Emoji Cake #WinkingSmileyCake #EmojiCake #Celebration #Birthday #Simplicity #SweetArt #CakeDesign #Joy #PinkBow #Vibrant
#culinaryart#creativecooking#happyface#happiness#emojicake#adorablecake#birthdayparty#baking#birthdaycake#Imagella
2 notes
·
View notes
Text

Meet the silly face ham chowder, where culinary creativity meets childlike wonder! 🍲 Let your kids design their own delicious masterpiece with this fun and flavorful recipe. Get the details. Let's bring joy and imagination to the kitchen!
2 notes
·
View notes
Text
Looking for an extra special vegan surprise meal? Here is a recipe on how to make vegan fish and chips. This delicious treat calls for banana blossoms, which are big, tear shaped flowers that grow at the end of a banana fruit cluster.
🌱 Heat 1 liter (4 cups) of vegetable oil in a large saucepan (180˚C). 🍌 Split banana blossoms from two cans, add juice of half a lemon, 20-30g of seaweed flakes, and sprinkle with salt. 🍲 In a large bowl, mix 200g (1⅔ cups) plain flour, 7g (1½ tsp) baking powder, and 6g (1 tsp) salt. Add 275ml (1⅛ cups) sparkling water or vegan alcohol-free beer; stir. 🌾 Coat banana blossom pieces in extra plain flour, then dip in batter. 🔥 Fry battered flowers until golden and crisp. 🍋 Squeeze fresh lemon, serve with baked wedges or fries.
🍽️ Bon appétit!
Free International Vegan Recipes? Log on 2 SupremeMasterTV.com/veganrecipes
✨✨✨✨✨✨✨✨✨✨
💗 Please join Supreme Master Ching Hai to sincerely thank God Almighty for World Vegan, World Peace and souls’ Liberation 💗 Every day at 9:00 PM Hong Kong time 🙏
SupremeMasterTV.com
#SupremeMasterTV#VeganFishAndChips#PlantBasedCooking#CrueltyFreeEating#PlantPowered#VeganTreats#CreativeCooking#EasyVeganRecipe#VeganCooking
2 notes
·
View notes
Text
Paws-itively the Coolest Oven Mitts
Protect your hands and upgrade your kitchen game with a touch of the wild. The Bear Hands Oven Mitts are a great gift, a funny surprise, and surprisingly practical! 👉 Get the full details and customer love here: https://omgthingz.com/bear-hands-oven-mitts

0 notes
Text
Omny kitchen (Boulevard, Tower 1, Magnum Global Park, Sector 58, Gurugram)
In a nutshell: A beautiful, new restaurant in Gurgaon where food is THE KING, service is warm, music is peppy, lights are dim in general & chef Vicky Ratnani & Chef Krishna constantly walk around the dining hall, interacting with guests. Great place for meeting friends & family, apt for small gatherings & also perfect for couples. Address & other details: omni kitchen Instagram : omni…

View On WordPress
#best food restaurant continental Gurgaon#best fusion food restaurant Gurgaon#best restaurant Gurgaon for office party#Casual Dining in Gurgaon#celebritychef#chef Vicky Ratnani new restaurant Gurgaon#chefkrishna#cheflife#chefslife#creativecooking#delhifoodblogger#delhifoodies#delhincrfood#desigourmet#eating out in Gurgaon#experientialdining#fineeating#foodart#foodgasm#foodpornindia#foodstory#foodwithatwist#fusioncuisine#fusionfood#gourmetindia#Gurgaon Restaurants#gurgaonblogger#gurgaoneats#GurgaonFoodie#GurgaonRestaurants
0 notes
Text
Cook More Than Just Appams: Genius Mini Appam Pan Ideas You Haven’t Tried

Introduction: The Versatility of Mini Appam Pans
Mini appam pans are traditionally used to make appams, a beloved South Indian breakfast staple. But their unique shape and size make them perfect for cooking a variety of creative dishes. If you’ve been sticking to the same old recipes, it’s time to get adventurous!
Traditional Uses of Mini Appam Pans
Making Perfect Appams Every Time
Appams are soft, lacy pancakes made from fermented rice and coconut batter. The mini appam pan ensures even heat distribution, creating appams with a perfect crispy edge and soft center.
Regional Variations and Recipes
Different regions add their own twist — from sweet jaggery appams to spicy vegetable-stuffed ones.
Beyond Appams: Creative Dishes to Try
Mini Pancakes with a Twist
Experiment with batters like semolina, oats, or even quinoa to create healthy, bite-sized pancakes perfect for snacks or breakfast.
Savory Snacks: Mini Uttapams and More
Use the pan to make savory mini uttapams topped with onions, tomatoes, and chilies — perfect for quick appetizers.
Sweet Treats: Mini Puddings and Cakes
Try baking small portions of traditional sweets like rice pudding or coconut cakes in your mini appam pan for perfectly portioned treats.
Tips for Cooking with Your Mini Appam Pan
Preparing the Pan for Non-Stick Cooking
Season your pan with oil before use to prevent sticking and enhance flavor.
Batter Consistency and Cooking Time
Adjust batter thickness based on the recipe for fluffy or crispy textures, and monitor cooking time carefully due to the pan’s size.
Cleaning and Maintenance of Mini Appam Pans
Seasoning Tips for Longevity
Regular seasoning keeps the pan’s surface smooth and non-stick.
Cleaning Methods Without Damage
Avoid harsh detergents and use soft brushes to clean without scratching.
Where to Buy Quality Mini Appam Pans
What to Look for in Material and Size
Cast iron and carbon steel pans offer durability and heat retention.
Recommended Brands and Sellers
Look for trusted kitchenware brands or local artisans for authentic quality.
FAQs About Mini Appam Pans
Q1: Can I use the mini appam pan on induction stoves? Yes, if it’s made of compatible materials like cast iron or stainless steel.
Q2: How do I prevent batter from sticking? Properly season the pan and use adequate oil before cooking.
Q3: Can I cook non-Indian dishes in a mini appam pan? Absolutely! The pan’s shape allows for creative cooking beyond Indian cuisine.
Q4: How do I clean my mini appam pan? Use warm water and a soft brush; avoid soaps that can strip seasoning.
Q5: Is the mini appam pan dishwasher safe? Generally, no. Hand wash to preserve seasoning and longevity.
Q6: Can I use it on gas, electric, and induction stoves? Yes, with material compatibility; check the pan specifications.
Conclusion
Your mini appam pan is a versatile kitchen tool far beyond making appams. From savory snacks to sweet treats, it invites you to explore new flavors and cooking styles. Embrace its potential and bring more creativity to your meals today!
#MiniAppamPan#AppamRecipes#SouthIndianCooking#KitchenHacks#CreativeCooking#BreakfastIdeas#HealthySnacks#TraditionalCookware#IndianCuisine#CastIronCookware#CookingTips#FoodieIdeas#KiyasKitchen#EasyRecipes#SnackTimeIdeas#HomeCooking#CookLikeAPro#FoodInnovation#TastyTreats#KitchenEssentials
0 notes
Text
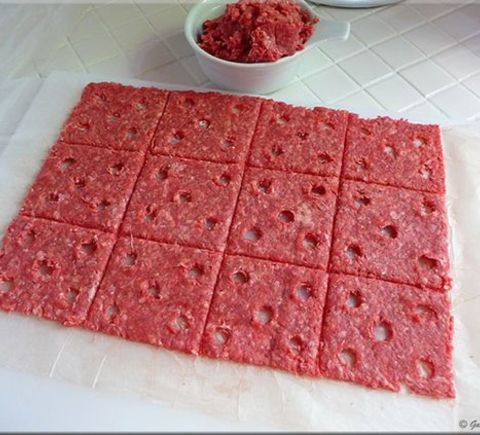
Burger Patty Holes are a tasty and fun change from regular burgers. The patties have holes in them that are perfect for holding your favorite toppings and sauces. This makes every bite tasty and satisfying.
Ingredients: 1 lb ground beef. 1/2 cup breadcrumbs. 1/4 cup grated Parmesan cheese. 1/4 cup diced onions. 1/4 cup diced bell peppers. 1/4 cup diced mushrooms. 1/4 cup diced pickles. 1/4 cup shredded cheddar cheese. 1 egg. Salt and pepper to taste. 6 small burger buns.
Instructions: In a bowl, combine ground beef, breadcrumbs, Parmesan cheese, diced onions, diced bell peppers, diced mushrooms, diced pickles, shredded cheddar cheese, and the egg. Season the mixture with salt and pepper to taste, then mix until well combined. Form the mixture into small patties with a hole in the center, making sure to press the edges firmly to seal. Heat a grill or skillet over medium-high heat and grease it with some oil. Place the burger patties on the grill or skillet and cook for about 3-4 minutes on each side, or until they reach your desired level of doneness. During the last minute of cooking, place a small burger bun on top of each patty hole to toast it lightly. Remove the patties from the grill or skillet and let them rest for a minute. To assemble, place your favorite burger toppings and condiments inside the patty holes and cover them with the toasted bun tops. Serve hot and enjoy!
Prep Time: 20 minutes
Cook Time: 10 minutes
Parental Alienation is Domestic Violence
0 notes
Text

What Kind of Cook Are You? Take This Quiz Before You Burn the Kitchen Down! https://momreducesstress.com/2025/05/18/what-kind-of-cook-are-you-take-this-quiz-before-you-burn-the-kitchen-down/?utm_source=dlvr.it&utm_medium=tumblr&utm_campaign=tiny%20garden%20%E2%80%94%20tinygarden-me
0 notes
Text

104 CUBE Silicone Mold – Versatile Square Mold for Creative Culinary Creations
Explore the 104 CUBE silicone mold—oven, microwave, freezer, and dishwasher safe. Ideal for crafting elegant, single-serve desserts and dishes.
Checkout now: 104 CUBE Silicone Mold – Versatile Square Mold for Creative Culinary Creations
#104CUBE#SiliconeMold#CreativeCooking#SingleServeDesserts#KitchenInnovation#CulinaryTools#HomeBaking#FoodPresentation#GourmetKitchenworks#Silikomart
0 notes
Text
Not Mom’s Ratatouille

The movie, Ratatouille, has a moment where the cold hard restaurant critic, Anton Ego takes a bite of Ratatouille so good that he’s propelled back to his joyful childhood with his Mom. It is a magical moment that I will never experience when eating ratatouille because I think eggplant is gross. Growing up there was always eggplant in my Mom’s version. My parents basically had a ratatouille garden. Zucchini, yellow squash, tomatoes, and the dreaded eggplant. It was served a lot. My sister remembers my father's joy when announcing “It’s all from the garden”. My mother even made a vat of it the night I got married to feed out-of-town guests.
This dish, however, is my version. It is as “unclassical” as it could be. There is lots of wiggle room to play with here. It is baked in the oven instead of on the stovetop. It can be a side dish or a main dish. We are very lucky, perhaps a little spoiled, because we can get the vegetables year round. But they are the most glorious toward the end of the summer when you’ve come home with a bounty from the farmer’s market. This version is gorgeous and requires very little artistic talent to assemble. It should move right in amongst your standard rotation of dishes.
My Ratatouille
Serves 6
Sauce
2 tbsp olive oil
½ medium onion, diced
3 cloves garlic, finely minced
1 teaspoon dry oregano
1 teaspoon dry basil
14 ounces crushed tomatoes
salt and pepper to taste
Vegetables
4 tbsp olive oil
2 teaspoons basil
1 tsp dry thyme
2 cloves garlic, chopped
½ teaspoon salt
½ ground pepper
2 large yellow squash (or 3 small)
2 large zucchini (or 3 small)
4 tomatoes
1 large red onion
1 yellow or red bell pepper
Sautee the onion and garlic from the sauce in the olive oil in a large oven-proof skillet. About 4 to 5 minutes or until the onions start to soften and become translucent.
Sprinkle the oregano and basil on top and stir until well combined.
Pour in the tomatoes and let simmer for 5 minutes (it will cook more in the oven), give it a taste. Does it want some salt or pepper? Spread the sauce out so it covers the bottom of the skillet evenly.
For the vegetables, mix the olive oil, basil, thyme, garlic, salt, and pepper in a small bowl and set aside.
Preheat your oven to 400°
Slice all your vegetables about a ½ inch thick. Don’t make yourself crazy. Do the best you can, you don’t need a ruler.
Arrange the vegetables in alternating pieces around the outside of the pan, spiraling towards the center. You will have more zucchini and squash than onions, tomatoes, and peppers but come up with a pattern that works for you (a pattern is not even mandatory, you do you). You can also cut the pieces of the vegetables to make the size work for you.
Spoon the seasoned oil you made for the vegetables over the top, trying to moisten every piece.
Wrap the pan in aluminum foil and bake for 20 minutes, remove the foil and bake for another 30 minutes. Stick a knife into a vegetable, is it tender enough? If you like them softer give them another 10 minutes. You can also pop it under the broiler for 10 minutes to give it tasty charred bits.
You are done but you want to let cool for 15 minutes before serving.
You’ve conquered this and it’s gorgeous. How are you going to dress it up and take it out on a date? Mix and match flavors, and give it a few accessories. One of those dress-it-up, dress-it-down situations.
The sauce is so easy to customize, add more or less garlic. A couple of shakes of red hot pepper is the way I grew up with.
You could use all basil or all oregano, depending on your mood. Some dried thyme would be nice.
A sprinkle of pitted Greek olives or capers will give the sauce a salty, briny, bite.
You can add some cooked crumbled Italian sausage to the sauce to make this a meal.
Overwhelmed and stressed? Use a jar of pre-done marinara sauce. Skip the whole sauce step, I won’t tell.
Look at your vegetables, they don’t have to be red or yellow pepper. They are just pretty but go for green if it’s what you have or what’s on sale.
There would be nothing wrong with a healthy dusting of parmesan on top after you’re done cooking. Could even be mozzarella, call it Ratatouille Pizza.
If you have access to some fresh herbs (Basil, oregano, or thyme) sprinkle some on top before serving.
Sneak some sliced boiled potatoes in the vegetable spiral. Cut them thin and “par” cook them first. (To par-cook means to cook food partially. So you should boil potato slices for 3-4 minutes)
This is an impressive but easy dish to make and I’m sure the variations will come to you. Also, I’m open-minded. You can add thin eggplant slices if you must.
Leftover fun. Take a generous scoop of leftovers and heat in a small pan with a bit of vegetable oil. When it is all warm, turn the heat up and make a small hole in the middle, place a couple of drops of vegetable oil in the hole. Crack an egg into that hole and let fry. Place a lid on it to help the egg steam if you need to cook the whites a little more. You are on your way to Ratatouille Innovations.

3 notes
·
View notes
Text

Baking Bad Flavors isn't just a name - it’s a revolution in culinary innovation. Crafted in a cutting-edge facility, each canister delivers exceptional quality, consistency, and creativity right into your kitchen or bar. Whether you’re whipping up gourmet treats or mixing up signature drinks, Baking Bad Flavors is your secret to extraordinary results.
For more information, visit- https://miamimagic.com/products/flavored-baking-bad-2-2l-cream-charger-cannister
#MiamiMagic#BakingBadFlavors#CulinaryInnovation#GourmetTreats#SignatureDrinks#WhipItUp#CreativeCooking#ExceptionalQuality#ConsistencyInEveryWhip#KitchenEssentials#BarTools#FlavorRevolution
0 notes
Text
✨ Break out of the basics! If you're still only grilling chicken in your tandoor, you're missing out 😍
From smoky stuffed mushrooms to clay-baked fish fillets, check out 5 out-of-the-box tandoori recipes that’ll spice up your meals 🍗🔥
Ready to get creative?
https://tandoormorni.com/creative-tandoori-recipes-in-the-tandoor-oven/
#tandoormorni#tandoorcooking#tandoor#homecooking#tandooroven#foodie#outdoorcooking#tandooridelights#tandoormagic#commercialtandoors#TandoorRecipes#CreativeCooking#FoodieFinds#ClayOvenVib
0 notes
Text
🍽️ Love Cooking? Discover Delicious Recipes on Kitchen Chronicles! 👩🍳🔥
Looking for easy, mouthwatering recipes that inspire your inner chef?
Kitchen Chronicles is your go-to spot for tasty meals, comfort food, creative kitchen ideas, and everyday cooking joy!
From classic favorites to modern twists — we make cooking fun, simple, and satisfying.
🔗 Explore Recipes Now:
👉 https://www.kitchenchronicles.kozow.com/
Perfect for:
✅ Home Cooks
✅ Food Lovers
✅ Busy Parents
✅ Beginner Chefs
✅ Anyone who loves good food!
✨ Easy-to-follow instructions
✨ Flavor-packed dishes
✨ New recipes added regularly
✨ Great for any skill level

#KitchenChronicles#HomeCooking#EasyRecipes#DeliciousDishes#FoodLovers#CookingInspiration#TastyMeals#RecipeOfTheDay#FoodieBlog#ComfortFood#CreativeCooking#CookAtHome#MealIdeas
0 notes
Text
Slice with Style: Precision Cutting Made Easy with the Crinkle Knife

Upgrade your kitchen experience with the Crinkle Knife, the must-have tool for anyone who loves adding flair to their food presentation. Whether you're slicing vegetables for a salad, prepping potatoes for crinkle-cut fries, or creating fun shapes for kids’ snacks, this knife makes it easy to turn the ordinary into extraordinary. The sharp stainless steel blade and ergonomic handle provide maximum control, making each cut effortless and precise.
At My Blacktree, we believe that the tools you use should be as stylish as they are functional. Our Crinkle Knife is designed not only to perform but also to inspire creativity in the kitchen. Ideal for chefs, home cooks, and food artists alike, it’s a versatile addition that adds a touch of gourmet to your everyday dishes. Discover how a simple cut can elevate your presentation—and your entire cooking game.
0 notes
Text
youtube
#TinyCooking#MiniatureFood#SmallButDelicious#TinyKitchen#LittleChef#CookingFun#TinyMeals#MiniatureBaking#CuteCooking#MiniKitchen#EdibleMiniatures#TinyFoodCreations#CreativeCooking#MiniCookingShow#AdorableFood#MiniChef#TinyBaking#CookingMagic#HandmadeFood#MiniFoodArt#BiteSizedDelights#DeliciousMiniFood#MiniatureDesserts#Youtube
0 notes