#Digitalaudio
Explore tagged Tumblr posts
Visit Tumblr Blog
Explore Tumblr blogs with no restrictions, modern design and the best experience.
Last Seen Tumblr Blogs


Fun Fact
Tumblr has 4 main sources of revenue.
Text

中森明菜
Early 1980s, holding a compact disc which obviously was a high technology at that time.
85 notes
·
View notes
Text
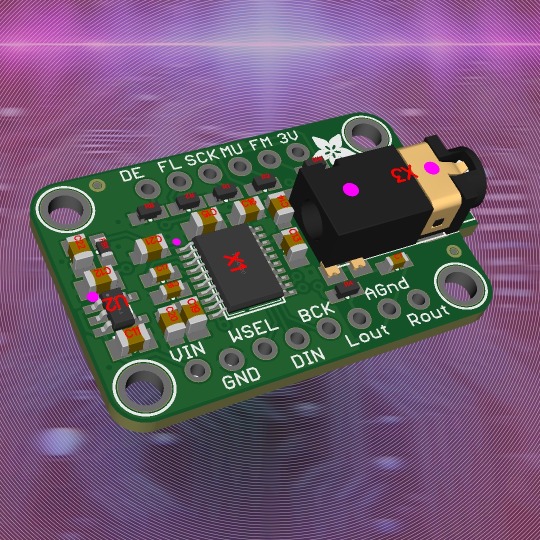
PCM510x MCLK-less I2S DAC with line level out 🎧💻
We're starting to stock a lot of chips that are able to do digital I2S out, which makes for great-quality audio playback. That's great when you have enough processing power to decode WAVs or MP3s in real-time. However, we could really use some better DACs in the shop. We like the UDA1334A
..., but that's technically discontinued - it's great because it doesn't require an MCLK that some boards like the Raspberry Pi don't have and doesn't need I2C configuration either. The PCM510x is a good family, too; it ranges from the inexpensive PCM5100 (https://www.digikey.com/short/z50cnp0h) to the PCM5102 (https://www.digikey.com/short/80z2nh3h) which has high quality output at a higher cost. This breakout could use any of the family chips & gives you all the GPIO needed with a 3.5mm headphone jack for line-level output.
#audio#dac#pcm510x#i2s#linelevel#audiophile#electronics#raspberrypi#wav#mp3#audioengineering#breakoutboard#maker#hardware#soundquality#techgadgets#digikey#chipset#diyprojects#musictech#sounddesign#embeddeddesign#circuitdesign#headphonejack#audioboards#digitalaudio#electronicsmaker#techinnovation#opensourcehardware
16 notes
·
View notes
Text

Lee Perry - Return Of The Super Ape
#Lee Perry#Return Of The Super Ape#ape#Audiophile#Recommended#albumcover#music#highend#hifi#audio#cdplayer#cdcollection#record#cdjunkie#vintage#cd#vintageaudio#sacd#cdcollector#hiresaudio#mp3#compactdisc#dac#flac#compactdisccollector#digitalaudio#cdcover#cdalbum#compactdisccollection#art
3 notes
·
View notes
Text
Soundscapes with Cutting-Edge Percussion Download
Prepare to embark on a sonic journey like no other with Keepforest – Ferrum, an innovative virtual instrument designed to push the boundaries of industrial percussion. Dive into a realm of metallic textures, rhythmic pulses, and dystopian atmospheres as you harness the power of Ferrum to craft intense soundscapes and epic musical compositions.
Keepforest – Ferrum Download
Keepforest has meticulously curated Ferrum to serve as the ultimate toolkit for composers, sound designers, and producers seeking to infuse their projects with the gritty allure of industrial sound. Drawing inspiration from the mechanical landscapes of science fiction and the visceral energy of modern dystopias, Ferrum offers a diverse array of meticulously sampled percussion instruments that capture the essence of raw, industrial power.From thunderous anvils and reverberating metal clangs to relentless drum rhythms and pulsating loops, Ferrum delivers a level of realism and depth that will captivate your audience and elevate your compositions to new heights. Each sound is meticulously crafted to evoke the atmospheric intensity and haunting beauty of industrial machinery, ensuring that every note resonates with authenticity and impact.
#Keepforest#Ferrum#industrialpercussion#cinematicpercussion#virtualinstrument#musicproduction#sounddesign#epicmusic#dystopianmusic#sci-fimusic#actionmusic#download#musicsoftware#digitalaudio#percussionlibrary#immersivesoundscapes#metallictextures#rhythmicpulses#DAWintegration#pluginformat
2 notes
·
View notes
Text
🎵 Vinyl to Digital Watford – Give Your Records a New Life in High-Quality Audio
🎶✨ Got a stack of vinyl records gathering dust? It’s time to bring your music into the digital age! At Tapes To Digital Watford, we specialize in vinyl to digital Watford transfers that capture every beat and groove perfectly.
Whether you want to preserve your classic collection or enjoy your favorite tunes on your phone or computer, our expert service makes vinyl to digital Watford conversion simple, fast, and high quality.
Don’t lose those timeless sounds to time—trust Tapes To Digital Watford to transform your vinyl into crystal-clear digital files you can play anytime, anywhere!
📲 Contact us now and let’s start your vinyl to digital Watford journey!
#VinylToDigitalWatford#TapesToDigitalWatford#MusicPreservation#DigitalVinyl#WatfordMusic#VinylConversion#MusicLovers#DigitalAudio#WatfordLocal
0 notes
Text
LO-FI Towards HI-FI: The Shift from TDAI 2175 to SDAI 2170
My hi-fi journey has always been about chasing that sweet spot where technical precision, economy is reasonable, and it meets musical emotion. In this journey has the Lyngdorf TDAI 2175 been a corner stone that balance beautifully in my system. I chose it for its strong performance and uncolored, honest sound. It carried that unmistakable Lyngdorf DNA; clarity, control, and build quality from A…
#AmplifierUpgrade#AnalogAndHDMIExtensions#AppIntegration#AudioPrecision#AudioRefinement#AudioTech#AudioTechnology#ClassDAmplification#DigitalAudio#HiFiJourney#HiFiSetup#ListeningRoom#lyngdorf#ModernAmplifier#MusicEmotion#MusicExperience#MusicFlow#MusicLovers#RoomAcoustics#RoomPerfect#SDAI2170#SDAI3400#SecondHandHiFi#SoundPerformance#SoundQuality#StreamingAudio#TactileControl#TDAI2175#ValueForMoney
0 notes
Text
youtube
Amiga Samplers: Budget dance music in 1990
0 notes
Text
How to Download Sonokinetic – Sotto
Sonokinetic's Sotto is a game-changing orchestral sampled instrument, designed for creating delicate musical moments and achieving nuanced expression in your compositions. Whether you’re crafting gentle cinematic scores or subtle background textures, Sotto offers unparalleled realism and versatility. In this guide, we’ll walk you through the process of downloading this revolutionary product from Kalaplugins.
What is Sonokinetic – Sotto?
Sotto is part of Sonokinetic’s esteemed orchestral series, designed to provide softer and more intimate orchestral phrases. Unlike traditional loud, dominant orchestral libraries, Sotto emphasizes quiet, delicate playing techniques, capturing the beauty of subtler dynamics. Features include:
Rich Orchestration: Sampled from strings, woodwinds, and brass ensembles with unique playing techniques like sul ponticello, frullato, and harmonics.
Advanced Voice Leading: Smooth transitions between chords for a seamless musical flow.
Breath Control Slider: Adds a natural ‘air’ quality to brass and woodwind instruments for added realism.
Custom Presets and Mod Wheel Integration: Allows detailed expression and control over each orchestral group.
Drag MIDI Functionality: Quickly export MIDI data to your DAW for greater flexibility.
Why Choose Sotto?
Sonokinetic products are renowned for their high-quality samples and innovative features. Sotto takes this reputation further by introducing intelligent tempo mapping, sample offset adjustments, and harmonic shift capabilities, ensuring effortless synchronization with your compositions.
With over 37,000 samples, recorded in pristine 44.1kHz, 24-bit quality, Sotto offers endless creative possibilities for both aspiring and professional composers.
Step-by-Step Guide to Download Sonokinetic – Sotto
Visit Kalaplugins Navigate to Kalaplugins.com to access the official Sotto product page. Kalaplugins is a trusted source for premium music production tools.
Add to Cart Once on the product page, click “Add to Cart” and proceed to checkout. Ensure you have the required Native Instruments Kontakt software installed, as Sotto is designed to run exclusively within Kontakt.
Complete Purchase Fill in your details and finalize the payment. Kalaplugins offers secure payment options to protect your transaction.
Download the Product After successful payment, you’ll receive a download link. Follow the instructions to install Sotto on your system. The package includes:
Strings, woodwinds, and brass instruments.
Lite versions for systems with limited resources.
Comprehensive documentation for setup and usage.
Activate in Kontakt Launch Kontakt and add Sotto to your library. Enjoy exploring the dynamic and intimate sounds this product delivers.
#Sonokinetic#Sotto#OrchestralSamples#MusicProduction#KontaktLibrary#CinematicScoring#FilmComposing#MusicTools#MusicMakers#OrchestralInstruments#DAWPlugins#Kalaplugins#AudioSamples#SampleLibrary#ComposerTools#MusicStudio#DigitalAudio#FilmMusic
0 notes
Text
Comprehensive Beginner’s Guide to Music Production in FL Studio: Step-by-Step Tutorial
Music production can feel intimidating for beginners, but with the right tools and guidance, it’s easier than you might think. FL Studio, one of the most popular digital audio workstations (DAWs), is a great platform to start producing your own music. This step-by-step tutorial will walk you through the basics of FL Studio, from setting up your project to exporting your first track.
Step 1: **Download and Install FL Studio**
Before you can start producing, you need to download and install FL Studio from the official **Image-Line website**. Choose the edition that suits your needs (the free trial version is fully functional but doesn’t allow you to reopen saved projects). Once installed, open the software, and you’ll see the main workspace where your creative journey begins.
Step 2: **Familiarize Yourself with the Interface**
The interface of FL Studio can be overwhelming at first, but understanding its key components will make navigation much easier. Here are the main areas:
- **Channel Rack**: Where you create your beats and patterns using instruments and samples.
- **Piano Roll**: Allows for detailed editing of notes and melodies.
- **Playlist**: The arrangement window where you place your patterns and audio clips to build your song.
- **Mixer**: Where you control the volume, panning, and effects of each track.
- **Toolbar**: Includes transport controls (play, stop, record) and various tools for editing.
Step 3: **Set Up Your Project**
Start by setting up your project:
1. **BPM (Beats Per Minute)**: Set the tempo of your track by adjusting the BPM at the top of the interface. Most pop songs are around 120 BPM, but you can adjust this based on your genre.
2. **Add Instruments**: In the **Channel Rack**, click the + button to add instruments (synths, drums, etc.). FL Studio includes a wide range of built-in instruments, such as **FL Keys**, **3xOsc**, and **Fruity DrumSynth Live**.
3. **Save Your Project**: Always remember to save your project regularly. Go to **File > Save As** and give your project a name.
Step 4: **Create Your First Beat**
Let’s start by creating a simple drum beat:
1. In the **Channel Rack**, select a drum sample (FL Studio provides a wide variety of samples in the **Browser** on the left).
2. Click on the individual steps in the **Step Sequencer** to create a rhythm (for example, place a kick drum on steps 1 and 9, and a snare on steps 5 and 13).
3. Press **Play** to listen to your beat.
You’ve just created your first drum pattern!
Step 5: **Add Melodies and Chords**
Next, let’s add some melodies and chords using the **Piano Roll**:
1. Select the instrument you want to use (for example, **FL Keys** for a piano sound).
2. Right-click on the instrument in the **Channel Rack**, then choose **Piano Roll**.
3. In the **Piano Roll**, click to add notes, adjusting their length and pitch by dragging them. Use the vertical axis for pitch (higher notes are higher up) and the horizontal axis for timing.
4. Experiment with different chords and melodies to complement your beat.
Step 6: **Arranging Your Song in the Playlist**
Now that you have a few patterns, it’s time to arrange them into a song:
1. Open the **Playlist** by clicking the **View Playlist** button (located in the toolbar).
2. Drag your patterns from the **Channel Rack** into the **Playlist**. You can copy and paste patterns, move them around, and create variations.
3. Organize your patterns into sections (e.g., intro, verse, chorus). This will give your track structure and flow.
Step 7: **Mixing Your Track**
Mixing is where you balance the levels of your different tracks and add effects to improve the overall sound.
1. Open the **Mixer** by clicking the **View Mixer** button (found in the toolbar).
2. Assign each of your instruments and samples to a separate **mixer track**. Do this by clicking on the instrument in the **Channel Rack** and adjusting the track number at the bottom.
3. In the **Mixer**, adjust the volume of each track so that nothing is too loud or too quiet. You want your track to sound balanced.
4. Add effects (reverb, compression, EQ, etc.) to each track by selecting the **FX slots** in the Mixer. FL Studio has a variety of built-in effects to experiment with.
Step 8: **Exporting Your Track**
Once you’re happy with your arrangement and mix, it’s time to export your song as an audio file.
1. Go to **File > Export**, and choose your preferred format (WAV or MP3).
2. Adjust the export settings (bit rate, quality, etc.) if needed, then click **Start** to export.
Congratulations! You’ve just created and exported your first track in FL Studio!
Step 9: **Continue Experimenting**
FL Studio is a powerful DAW with countless possibilities. Once you’re comfortable with the basics, start exploring more advanced features like automation, sound design, and complex arrangements. Don’t be afraid to experiment with new sounds and techniques to develop your own unique style.
Conclusion
Music production in FL Studio can be incredibly rewarding, especially once you get the hang of the workflow. By mastering the basics like creating beats, melodies, and mixing, you’ll be well on your way to producing professional-quality music. Keep practicing, experimenting, and learning new techniques, and you’ll quickly see progress in your production skills!
#MusicProduction#HomeStudio#AudioEngineering#LearnMusicProduction#FLStudio#MusicCreation#DigitalAudio#MusicTutorial
0 notes
Text
Oversampling in Audio: A Simple Explanation of Its Impact 🎶✨
If you’re an audiophile or just someone who loves great sound, you’ve probably heard of oversampling. But what does it actually mean, and why should you care?
In simple terms, oversampling is the process of increasing the number of samples per second when converting an audio signal from analog to digital. This means the digital version of your sound wave has more data points, making it smoother and more accurate. The result? Clearer, more detailed sound with less distortion, even at higher frequencies.
Whether you’re listening to music, watching movies, or gaming, oversampling can drastically improve the quality of your audio. It’s like upgrading from HD to 4K for your ears!
Curious to learn more about how oversampling affects your sound system?
1 note
·
View note
Text
#AIAudio#artificial intelligence#digitalmarketing#MusicProduction#AudioTechnology#MusicTools#MusicEditing#CreativeAudio#MusicCreators#DigitalAudio
0 notes
Text
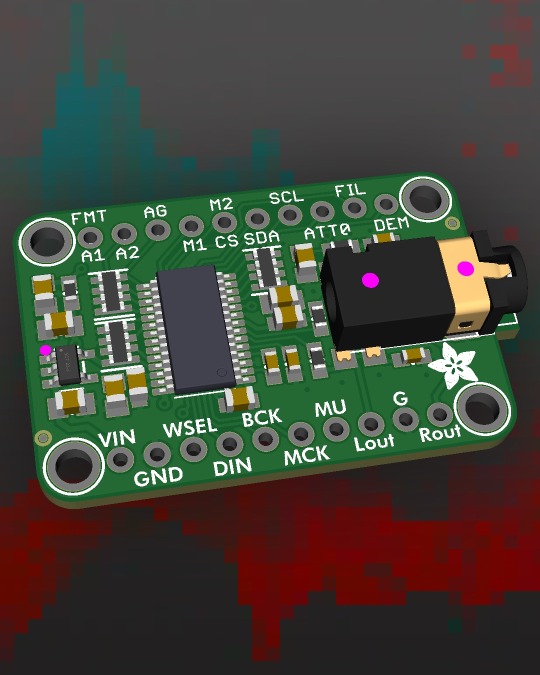
PCM5122 is an I2S DAC that does it all 🎶🔧
Having wrapped up our PCM5100 and PCM5102 breakout boards
and added them to the Adafruit shop, it's time to explore more DACs we could support. This is the PCM5122
https://www.digikey.com/short/v9pnq1b2
the "big sister" to the PCM5102. Like its sibling, it supports MCLK-less I2S input, making it a great choice for any microcontroller or Raspberry Pi.
It also features a stand-alone "hardware mode," where mute and format can be set via GPIO pins—no I2C configuration required! However, unlike the PCM5102, it also supports I2C/SPI if needed, with built-in filters, numerous configuration flags, and a pin-settable gain option in hardware mode for attenuation.
#pcm5122#i2sdac#audiophile#dsp#raspberrypi#maker#electronics#dac#adafruit#diyaudio#hardwarehacking#embedded#microcontroller#hifi#audiotech#musiclovers#techinnovation#openhardware#gpio#electronicsengineering#dspaudio#audiodevelopment#hackerspace#techenthusiast#hardwaremode#i2c#spi#audioprojects#soundengineering#digitalaudio
16 notes
·
View notes
Text
youtube
"The World's Best-Sounding Power Amplifier" of 1977—Electrocompaniet's Surprising 52-Year History
#Electrocompaniet#Audiophile#Recommended#albumcover#vinylcollector#music#solidstate#tube#amplifier#poweramp#preamp#highend#mood#headphone#hifi#audio#vinylcollection#vinyl#record#vinyljunkie#vintage#art#vinylcommunity#vintageaudio#cd#cdcollection#dac#sacd#digitalaudio#Youtube
3 notes
·
View notes
Text
Tips for Optimizing Your Audio Quality with Cleanvoice

Cleanvoice offers a range of features for enhancing audio quality, but knowing how to utilize its tools effectively can make a significant difference. Here are some tips to help you optimize your audio with Cleanvoice.
Tip 1: Record in a Quiet Environment
Explanation: While Cleanvoice can remove background noise, starting with a clean recording in a quiet environment will yield the best results. Try to minimize external sounds during recording.
Tip 2: Use High-Quality Microphones
Explanation: Invest in a good quality microphone to capture clear audio. The better your initial recording, the more effective Cleanvoice will be at enhancing the sound.
Tip 3: Experiment with Settings
Explanation: Don’t hesitate to adjust the settings in Cleanvoice to see how different levels of enhancement affect your audio. Experimentation can lead to optimal results.
Tip 4: Take Advantage of Batch Processing
Explanation: If you have multiple recordings, use the batch processing feature to save time. This allows you to enhance several audio files simultaneously.
Tip 5: Regularly Monitor Performance
Explanation: After processing your audio with Cleanvoice, listen to the output carefully. Monitoring performance helps you understand how adjustments impact your final product.
Implement these tips to maximize the quality of your audio content with Cleanvoice. Visit aiwikiweb.com/product/cleanvoice/
#AudioTips#Cleanvoice#AI#SoundQuality#AudioProduction#ContentCreation#Podcasting#Voiceovers#DigitalAudio#AudioEditing
0 notes
Text
Vinyl to Digital Haynes: Preserve Your Music Collection with Experts
🎵💿🔊 Rediscover your vinyl records with crystal-clear digital sound at Tapes To Digital Haynes! Our professional vinyl to digital Haynes service captures the warmth and depth of your vinyl collection in high-quality digital formats.
Vinyl records can wear out or get damaged over time. By converting your collection to digital files, you gain easy access to your music on any device—smartphones, computers, or car stereos—without worrying about scratches or skips.
We use advanced audio equipment to ensure your digital files sound authentic and vibrant. Whether for personal enjoyment or business archives, our vinyl digitization services are fast, affordable, and customized to your needs.
Preserve your music legacy with trusted local professionals. Choose Tapes To Digital Haynes for expert vinyl to digital Haynes conversions today!
📲 Message us or visit our website to get started.

0 notes