#FTP User Setup
Explore tagged Tumblr posts
Visit Tumblr Blog
Explore Tumblr blogs with no restrictions, modern design and the best experience.
Last Seen Tumblr Blogs


Fun Fact
Premium Tumblr themes are available from anywhere between $9 to $49.
Text
CloudPanel Migration Script: Automate CloudPanel Migration
The CloudPanel Migration Script automates the complex process of migrating PHP-based websites between CloudPanel servers, handling everything from site creation to database transfer and file syncing for a seamless migration experience.
Migrating websites between CloudPanel servers often requires handling multiple tasks such as transferring databases, updating configurations, and moving website files. To simplify this complex process, we’ve developed a powerful CloudPanel migration script that automates these tasks, ensuring a seamless migration of PHP-based websites between servers. In this blog post, we’ll provide an overview…
#Automated Migration#CloudPanel#CloudPanel Automation#CloudPanel Migration#CloudPanel Migration Script#CloudPanel server fix#Database Transfer#FTP User Setup#PHP Site Migration#Rsync File Transfer#Website Migration
0 notes
Text
YI Cam Remote Access: Your Guide to Self-Hosted Surveillance

Want to have complete control over your YI Cam and go beyond its default cloud? For more privacy and customization, many users prefer YI Cam Remote Access, rather than using the manufacturer's cloud. Therefore, this post explores how to accomplish this sophisticated configuration, assisting you in navigating the frequently challenging process of self-hosting your camera's feed. Walk through this post to learn more details!
Understanding the YI Cam Remote Access
Generally, you need to install a custom firewall on your device if you want to access the YI camera remotely and connect it to your server. Additionally, it allows leveraging the benefits of the RTSP (real-time streaming protocol) streaming as well as FTP access. Moreover, it eliminates the need for third-party platforms and for configuring cameras to the self-hosted servers.
However, it acts as a “Network Remote Controller,” especially for the multimedia servers. It allows users to control media playback remotely. But it does not deliver audio or video streams continuously; instead, it communicates with the servers streaming the multimedia content. Hence, for the YI Cam Remote Access, users must connect their security cameras to the server through RTSP.
How to Connect Camera To Server for YI Remote Access?
Moreover, enabling the YI Cam Remote Access opens up several possibilities and advanced functionalities. So, let’s begin with the essential steps to Connect Camera To Server for managing and monitoring your YI camera remotely.
Initially, confirm your YI Cam supports the RTSP or streaming compatibility, as some models may require custom firmware.
Subsequently, set up your chosen server device, such as a computer, NAS, or Raspberry Pi, with a suitable operating system.
Next, install essential software like Blue Iris, MotionEye, FFmpeg, or Home Assistant to manage the video feed.
Finally, configure secure remote access using methods such as port forwarding, VPN, or Dynamic DNS for external viewing.
Now, you can view, configure, and control your YI camera remotely.
Bottom Line
In conclusion, YI Cam Remote Access empowers you with full control over your camera's feed through self-hosting, prioritizing privacy & customization. Additionally, this advanced setup typically requires RTSP compatibility, a dedicated server, and management software. With secure remote access methods such as VPN or port forwarding, you can ensure seamless monitoring from anywhere.
#YICameraSetup#YICamRemoteAccess#SelfHostedCamera#IPCameraSetup#RemoteCameraAccess#YICamOnServer#RTSPStream#ONVIFCamera#YICamRTSP
2 notes
·
View notes
Text
How To Set Up Socks5 Proxy List in Wingate.me?
What Is Private Proxy Wingate.me?

Wingate.me is a private proxy service that delivers secure managed internet access across your entire network and all your online activities. It caters to a range of requirements, from small networks to large enterprises. Known for its high-quality private proxies, particularly in the Russian region, Wingate.me has carved a niche for itself as a powerful online platform.
Supporting for Internet hosting ensures that the WinGate Proxy Server is compatible with all browsers, SSL, FTP, streaming audio and video, DirectPlay Internet gaming, etc. Socks5 proxy list wingate.me provides clients with a safe, anonymous, and unrestricted internet browsing experience. They shield users from data collection and facilitate access to otherwise blocked websites.
Types of Private Proxy Wingate.me
It offers a variety of private proxy types, including:
1. SOCKS4 proxy
A versatile proxy for web browsing, file sharing and online gaming, known for its speed and efficiency.
2. SOCKS5 proxy
These proxies support TCP and UDP traffic, making them ideal for online streaming, torrenting, and high-performance tasks.
3. IPv4 proxy
Stable and reliable proxy based on IPv4 protocol, compatible with most websites and services on the Internet.
4. Mix of SOCKS5 and IPv4 proxies
This option combines the advantages of both proxy types, providing flexibility for different tasks.
An Overview Of Wingate.me’s Socks5 Proxy List
Socks5 proxy list wingate.me provides an extensive list of Socks5 proxy servers, ensuring users have access to a broad range of functional and efficient proxies. The list, updated regularly, includes information such as the IP address, port number, country, and the last time the proxy was checked for functionality. This transparency empowers users to make informed decisions when selecting a proxy server.
Get 1GB Proxy Free Trial of Residential Proxies Now!
How To Set Up Wingate.me’s Socks5 Proxy?
Setting up a Socks5 proxy from Wingate.me is straightforward. After selecting a proxy from the list, users can configure their web browsers or applications to use the proxy by entering the provided IP address and port number in the relevant settings. Specific setup instructions may vary depending on the application or browser used. Here are detailed instructions:
Step 1 Installing Wingate Proxy Server
After downloading the latest package of WinGate Proxy Server, double-click its ‘.exe’ package to start the installation setup wizard of WinGate proxy server. After that, you will be greeted by its welcome page to get started with the installation on your devices. Click on the “Next” button to continue.

Get 1GB Proxy Free Trial of Residential Proxies Now!
Step 2 License Agreement
You need to read and accept the license agreement before the installation and use of Wingate by choosing the right option as shown.

Step 3 Installation Folder
Choose the location on your system, where you like to place the WinGate installation setup.

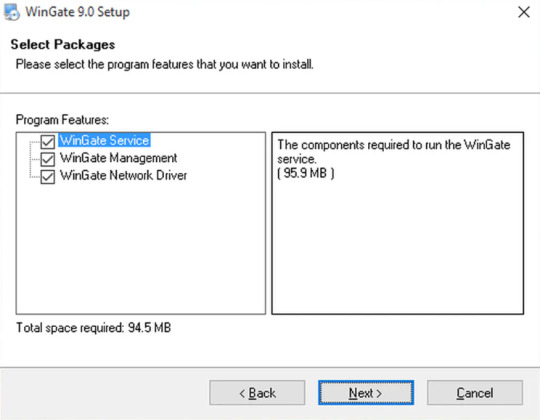
Step 4 Select Packages
You will be asked to choose the program features that you wish to install on your system.
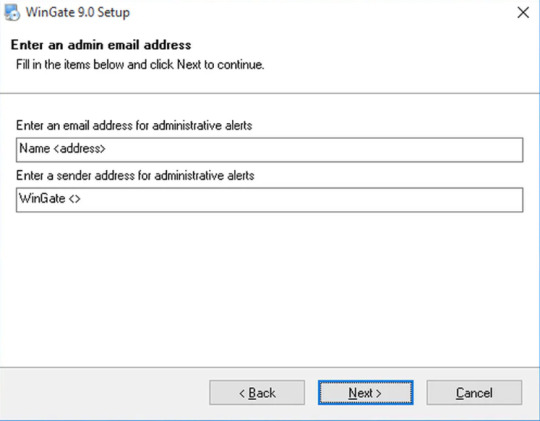
Step 5 Admin Email Address
You should provide your Administrative User Name and Email ID along with the Senders’ address for the administrative alerts.
Step 6 Ready to Install
If you click on the ‘Next’ button, your installation process will start processing files and other selecting configurations. After finishing the installation process of WinGate, click on the ‘Finish’ to exit the installer. Remember to click on the ‘Yes’ to go for system reboot and wait till it is back.

Step 7 Setting Up
After you finish the installation, you can set up Wingate.me’s Socks5 Proxy List now.
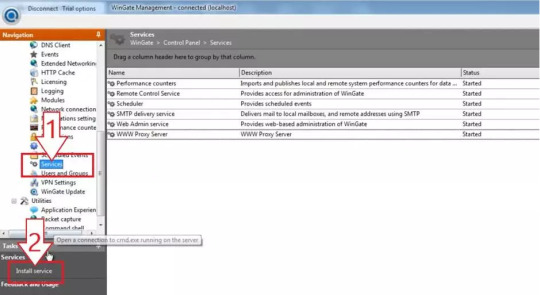
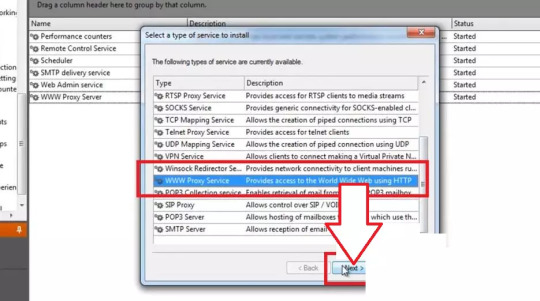
1. You will see a welcome page and a navigation menu on the left with available configuration options. Please focus on setting up the proxy. To do this, select “Services” from the navigation menu, then right-click on the empty space on the right and select Install Service.
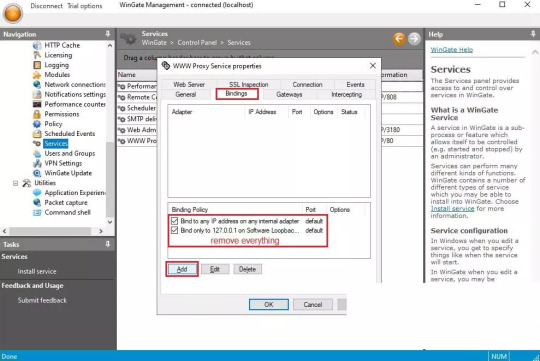
2. The service properties window will appear. Navigate to the Bindings tab. Remove all active bindings and click Add. Select “Any External Adapter” and click “OK” to save your configuration.
3. Now, go to the Connection tab. Check the box next to “Connect through upstream proxy.” Go to the IP Settings dashboard to configure your proxy. Note down the HTTP proxy host, proxy port, proxy username and proxy password of the private proxy you obtained from the website and import this data into WinGate.

By following these steps, you will successfully configure a private proxy using Wingate’s user-friendly interface. This ensures safe, anonymous and efficient internet browsing while protecting your online activity and data.
Get 1GB Proxy Free Trial of Residential Proxies Now!
Conclusion
Wingate.me’s Socks5 proxy list is a powerful tool for anyone seeking to navigate the digital world with anonymity, versatility, and global access. However, like any tool, it should be used responsibly and ethically. As we continue to sail through the data-driven era, tools like Wingate.me’s Socks5 proxy list will undoubtedly play a crucial role in shaping our digital experiences.
For more please read the original article which is from:
#socks5 proxy list wingate.me
#private proxy wingate.me
#buy wingate me private proxy
#proxy for email wingate.me
3 notes
·
View notes
Text
In retrospective, the shift whose culmination we see today seems to be about making hardware more uniform and the system infrastructure less opaque to anyone who isn't a developer.
Looking back as a millennial, I feel like the Gen-X are the most literate computer-wise because they dealt with all the weird pre-Windows systems and physical LAN party setups before the Internet at homes became fast enough to hold online gaming. Still, it's strange to read posts like this as a Millennial who was taught to use a PC in primary school because it was a new thing for the entire generation, and then I had to pass this knowledge on to teach my own parents to send an email and not to panic whenever "my window disappeared".
What I see in my boomer parents is a sort of a mental blockade from engaging with a typical window-based UI, like every time you could literally read something on the menu and click accordingly to perform an unknown activity, my mum has a little meltdown and wants to be taught the activity step by step so she can perform it by muscle memory. The greatest peril of my mum's boomer PC experience is that she doesn't watch what's going on on her screen outside the application in focus, she is not used to interactivity on a basic level, a robust system UI is too much for her because you need to learn to "dwell" in a structure of a certain complexity, you need to get used to the thought that a PC has a massive hidden side among all the nested folders, settings and policies. I think my dad has less problems with using a PC because he had vocational technical education before, he understands mechanical schematics and electrical installation charts and abstract structures of that sort. A classic menu is a little like this.
As a kid, I was taught basics of the structure of a pre-XP Windows system. I was taught a common technique to type using as many fingers as possible, without looking at the keyboard as you do it. I was taught how to use the Office suite, how to build a simple website using the ugliest incarnation of HTML, and how to push it to the teacher's host using a FTP manager. I was even taught basics of programming in one of the code-free visual gamified editors made solely for teaching purposes. All of it to familiarize us with a certain innate logic of software that was norm at the time.
Even as an IT worker nowadays, accessing most things I need on mobile devices as a QA tester is locked behind a hidden procedure of enabling Developer tools, and even then, if you look at the folder structure on the device when accessing it from your PC, the said structure is more code-like and obviously not meant for any end user. Or, I need to use workarounds through third party applications like iTunes to even access some stuff in the first place. iOS is a true nightmare when it comes to trying access the things Apple does not want an average end user to access.
What mostly changed since my childhood is that hardware is becoming uniform to the point building your own PC and setting it up to work is easy and foolproof, and Windows is trying to be quicker in providing some template behaviors and more "transparent" in its inner workings. The mobile device design simplified user experience to the levels of "Go to store, download app, tap and swipe, the system takes care of everything else". At the same time, the systems are more intrusive, and they heavily discourage messing around and finding out. Everything is meant to be done from the status bar, or a popup that appears right at your main screen.
Teaching my parents smartphones was a different experience insofar as notifications and popups from Android keep appearing without their consent, so to speak. They feel like they have no agency over their own phone, all they want is to make a call, the entire device with its apps and ads and intrusive messages is the enemy, and "they don't want IT" (where "IT" is an SMS from the provider, a system update notification, a push notification, information about used data, there's too many icons again, there's too much everything, yada yada). Once they learned the basics of using a laptop to click things on an Internet browser, phones started to be the opposite thing.
So this was originally a response to this post:
****

****
Which is about people wanting an AO3 app, but then it became large and way off topic, so here you go.
Nobody under the age of 20 knows how to use a computer or the internet. At all. They only know how to use apps. Their whole lives are in their phones or *maybe* a tablet/iPad if they're an artist. This is becoming a huge concern.
I'm a private tutor for middle- and high-school students, and since 2020 my business has been 100% virtual. Either the student's on a tablet, which comes with its own series of problems for screen-sharing and file access, or they're on mom's or dad's computer, and they have zero understanding of it.
They also don't know what the internet is, or even the absolute basics of how it works. You might not think that's an important thing to know, but stick with me.
Last week I accepted a new student. The first session is always about the tech -- I tell them this in advance, that they'll have to set up a few things, but once we're set up, we'll be good to go. They all say the same thing -- it won't be a problem because they're so "online" that they get technology easily.
I never laugh in their faces, but it's always a close thing. Because they are expecting an app. They are not expecting to be shown how little they actually know about tech.
I must say up front: this story is not an outlier. This is *every* student during their first session with me. Every single one. I go through this with each of them because most of them learn more, and more solidly, via discussion and discovery rather than direct instruction.
Once she logged in, I asked her to click on the icon for screen-sharing. I described the icon, then started with "Okay, move your mouse to the bottom right corner of the screen." She did the thing that those of us who are old enough to remember the beginnings of widespread home computers remember - picked up the mouse and moved it and then put it down. I explained she had to pull the mouse along the surface, and then click on the icon. She found this cumbersome. I asked if she was on a laptop or desktop computer. She didn't know what I meant. I asked if the computer screen was connected to the keyboard as one piece of machinery that you can open and close, or if there was a monitor - like a TV - and the keyboard was connected to another machine either by cord or by Bluetooth. Once we figured it out was a laptop, I asked her if she could use the touchpad, because it's similar (though not equivalent) to a phone screen in terms of touching clicking and dragging.
Once we got her using the touchpad, we tried screen-sharing again. We got it working, to an extent, but she was having trouble with... lots of things. I asked if she could email me a download or a photo of her homework instead, and we could both have a copy, and talk through it rather than put it on the screen, and we'd worry about learning more tech another day. She said she tried, but her email blocked her from sending anything to me.
This is because the only email address she has is for school, and she never uses email for any other purpose. I asked if her mom or dad could email it to me. They weren't home.
(Re: school email that blocks any emails not whitelisted by the school: that's great for kids as are all parental controls for young ones, but 16-year-olds really should be getting used to using an email that belongs to them, not an institution.)
I asked if the homework was on a paper handout, or in a book, or on the computer. She said it was on the computer. Great! I asked her where it was saved. She didn't know. I asked her to search for the name of the file. She said she already did that and now it was on her screen. Then, she said to me: "You can just search for it yourself - it's Chapter 5, page 11."
This is because homework is on the school's website, in her math class's homework section, which is where she searched. For her, that was "searching the internet."
Her concepts of "on my computer" "on the internet" or "on my school's website" are all the same thing. If something is displayed on the monitor, it's "on the internet" and "on my phone/tablet/computer" and "on the school's website."
She doesn't understand "upload" or "download," because she does her homework on the school's website and hits a "submit" button when she's done. I asked her how she shares photos and stuff with friends; she said she posts to Snapchat or TikTok, or she AirDrops. (She said she sometimes uses Insta, though she said Insta is more "for old people"). So in her world, there's a button for "post" or "share," and that's how you put things on "the internet".
She doesn't know how it works. None of it. And she doesn't know how to use it, either.
Also, none of them can type. Not a one. They don't want to learn how, because "everything is on my phone."
And you know, maybe that's where we're headed. Maybe one day, everything will be on "my phone" and computers as we know them will be a thing of the past. But for the time being, they're not. Students need to learn how to use computers. They need to learn how to type. No one is telling them this, because people think teenagers are "digital natives." And to an extent, they are, but the definition of that has changed radically in the last 20-30 years. Today it means "everything is on my phone."
50K notes
·
View notes
Text
How to Capture and Upload Print Jobs as PDF Files to FTP While Automatically Forwarding to a Physical Printer with VeryUtils HookPrinter SDK
How to Capture and Upload Print Jobs as PDF Files to FTP While Automatically Forwarding to a Physical Printer with VeryUtils HookPrinter SDK
A Real-World Use Case for HookPrinter SDK on Windows XP, 7, 10 and 11
Many companies rely on industrial systems that generate print jobs through third-party software, with no way to customize or modify how those jobs are created. In these environments, having a tool that can capture every print job, save it as a PDF, and automatically forward the job to the printer—without disrupting the workflow—is essential.

One such solution is VeryPDF HookPrinter SDK, which allows seamless integration into existing Windows environments to capture and manage print jobs. Below is a detailed overview of a real-world use case and how HookPrinter SDK fits in.
✅ Use Case Overview A company approached us with the following scenario: • Environment: Six Windows laptops, each controlling a different industrial machine and connected to a local or network printer. • Operating Systems: Windows XP (SP3, 32-bit), Windows 7 (64-bit), and Windows 10 Enterprise (64-bit). • Software Constraints: Print jobs are initiated by third-party applications, which cannot be modified or reprogrammed. • Primary Goal:
Intercept all print jobs and save them as PDF files
Upload the captured PDFs to a remote cloud server via FTP
Forward each print job to the laptop’s default printer, maintaining an uninterrupted user experience
Two Critical Features Needed
To meet their objectives, the customer required the following features:
FTP Upload of Captured Print Files Automatically send the intercepted PDF files to a cloud server using the FTP protocol.
Print Forwarding to Default Printer Ensure that every print job, once captured, is sent to the printer so the end-user’s workflow remains unchanged.
❓ Frequently Asked Questions
✅ Does HookPrinter SDK support this type of behavior across Windows XP, 7, and 10?
Yes.
HookPrinter SDK works reliably across all the platforms mentioned: • Windows XP (SP3, 32-bit) • Windows 7 (64-bit) • Windows 10 Enterprise (64-bit) • Windows 11 (64-bit) The SDK can capture print jobs from any application without requiring changes to the third-party software generating them.
✅ Does the free trial version allow us to test this full workflow?
Partially.
The trial version of HookPrinter SDK lets you test the basic print job capture functionality—saving printed content as PDF files.
However, the two essential features—FTP upload and print forwarding—are not included in the trial. These capabilities require a custom-built extension to the SDK.
✅ Can we get FTP upload and print forwarding developed for our environment?
Yes.
We can provide a fully integrated solution that includes: • Automatic FTP upload of each PDF to your server • Transparent forwarding of the print job to your local or network printer
These features will be tailored to your setup to ensure seamless performance across all six workstations and operating systems. Please contact us for a quote for this custom development.
Next Steps If you're evaluating HookPrinter SDK for your industrial workflow:
Try the free version to confirm that it can reliably capture print jobs as PDF files on your systems.
Contact us if you would like to move forward with enabling FTP upload and print forwarding.
We will be happy to provide a quote and discuss implementation details.
Contact Us For pricing, custom development inquiries, and technical support, please reach out to: VeryPDF Support Team http://support.verypdf.com/
By combining the powerful print interception features of HookPrinter SDK with customized FTP and print forwarding modules, you can streamline document capture and maintain a smooth printing workflow without modifying your existing software stack.
Let us help you build a solution that works quietly and efficiently in the background—so your team doesn’t even notice it’s there.
0 notes
Text
Setup Secure FTP Server(SFTP) with WebDAV using SFTPGo

.tdi_3.td-a-rectext-align:center.tdi_3 .td-element-stylez-index:-1.tdi_3.td-a-rec-imgtext-align:left.tdi_3.td-a-rec-img imgmargin:0 auto 0 0@media(max-width:767px).tdi_3.td-a-rec-imgtext-align:center File Transfer Protocol (FTP) is a communication protocol used to transfer files between computers via the internet. FTP uses a client-server model with different data and connections between them. Normally, users in FTP authenticate themselves using a clear-text sign-in(username and password) but once can also connect to it anonymously if the server is configured to accept it. Secure File Transfer Protocol(SFTP) is a secure FTP that uses shell encryption when sending and receiving files to provide maximum security. SFTPGo can be used to run SFTP with added HTTP, WebDAV, and FTP/S support. Furthermore, it […]
0 notes
Text
Cat5e vs. Cat6 vs. Cat6a – Which is Best for NYC Users?
In a city as fast-moving and digitally connected as New York, your internet performance can make or break your productivity. Whether you're managing a home office in Brooklyn, running a startup in Manhattan, or streaming movies in Queens, the type of Ethernet cable you choose has a big impact. If you're stuck deciding between Cat5e, Cat6, and Cat6a, this guide is for you.
We'll break down what each cable type offers, compare them in practical NYC scenarios, and help you choose the one that matches your environment and speed requirements.
Understanding Ethernet Cable Categories
Ethernet cables are categorized based on speed, frequency, and shielding. The three most common types for residential and commercial use today are:
Cat5e (Category 5 Enhanced)
Cat5e is an upgraded version of the original Cat5 cable, designed to reduce crosstalk and support faster data speeds.
Key Features:
Speed: Supports up to 1 Gbps
Bandwidth: 100 MHz
Distance: Up to 100 meters (328 feet)
Usage: Home networking, basic office setups
Cat5e remains popular due to its affordability and ease of installation. It's ideal for light internet users in NYC apartments or smaller residential setups.
Cat6 (Category 6)
Cat6 cables offer better shielding and tighter twists compared to Cat5e, which helps reduce interference and allows for higher data transmission speeds.
Key Features:
Speed: Up to 10 Gbps (over 55 meters)
Bandwidth: 250 MHz
Distance: Up to 100 meters for 1 Gbps
Usage: Small to medium businesses, remote workers, gamers
Cat6 Plenum is perfect for NYC users who stream 4K content, video conference daily, or operate in shared office spaces.
Cat6a (Augmented Category 6)
Cat6a takes everything great about Cat6 and enhances it. With added shielding and increased bandwidth, it’s ideal for high-demand environments like data centers or large office networks.
Key Features:
Speed: 10 Gbps over full 100 meters
Bandwidth: 500 MHz
Shielding: Often fully shielded (F/UTP or S/FTP)
Usage: High-performance offices, enterprise-grade networking
In NYC, Cat6a is best for businesses with advanced networking requirements, smart office infrastructure, and PoE-enabled devices.
Which Cable is Right for NYC Users?
Choosing the right Ethernet cable in New York depends on several factors: internet usage, physical space, interference levels, and future scalability.
Home Users in NYC
If you're in a studio apartment or a small family home and just want reliable internet for browsing, video calls, and streaming, Cat5e is more than enough. It's affordable, widely available, and easy to install.
However, if you live in a building with many wireless devices and thick walls (common in older NYC apartments), you might want to consider Cat6 to reduce interference.
Remote Workers & Freelancers
For freelancers working from home or individuals hosting frequent Zoom calls, Cat6 is a better choice. It offers more speed and less latency, which is especially important in NYC where digital communications are essential.
Cat6 cables also support basic Power over Ethernet (PoE) devices like VoIP phones or security cameras, useful for tech-savvy users.
Small Businesses & Shared Offices
Coworking spaces, startups, and small businesses in NYC need strong and stable internet connections to operate efficiently. Cat6 provides the balance between performance and cost-effectiveness. It's scalable enough to support additional workstations as teams grow.
If your office uses cloud-based applications, video conferencing, and large file transfers regularly, Cat6a might be the better long-term investment.
Corporate Offices and Data-Heavy Environments
In corporate offices or buildings that house servers, media editing suites, or multiple smart devices, Cat6a is the top-tier choice. Its shielding ensures optimal performance, even in electrically noisy environments like server rooms or HVAC-packed spaces.
Shielding Matters in NYC
New York buildings are packed with electronic devices, HVAC systems, and heavy wiring. This creates a high level of electromagnetic interference (EMI). Shielded cables like Cat6 STP and Cat6a offer protection against this.
Benefits of Shielded Cables in NYC:
Reduced EMI: Clean signals for smoother internet
Better for Smart Devices: Ideal for IoT and PoE systems
Improved Security: Less chance of signal leakage
If you're setting up a business in a busy commercial area like Midtown or Downtown Manhattan, shielded Cat6a cables can offer the consistency and stability your network demands.
Future-Proofing Your Network
Internet speeds and technologies are always evolving. While Cat5e may work today, upgrading to Cat6 or Cat6a means you won’t have to replace your cabling in a few years when bandwidth demands increase.
For example:
Smart homes are becoming more common
Streaming services are pushing into 8K
Remote work tools require high bandwidth
Investing in better cabling now saves you the hassle and cost of reinstallation later.
Where to Buy Ethernet Cables in NYC
Looking for high-quality Ethernet cables in New York? At NewYork Cables, we offer:
Bulk Cat5e, Cat6, and Cat6a cables
Shielded and plenum-rated options
Same-day shipping in NYC
Expert advice for choosing the right cable
Whether you're setting up a home office in Harlem or wiring an enterprise office in Wall Street, we have the perfect solution for your networking needs.
Final Thoughts
So, Cat5e vs. Cat6 vs. Cat6a – which is best for NYC users?
Choose Cat5e for affordable, basic setups.
Go with Cat6 for speed, reliability, and flexibility.
Opt for Cat6a for maximum performance and future readiness.
Every network is different, and choosing the right cable depends on your current needs and future plans. Still unsure? Contact NewYork Cables and let our experts guide you.
Your network deserves the best especially in a city that never slows down.
0 notes
Text
How to Make a WordPress eCommerce Website

Launching an online store with WordPress is accessible and flexible—here’s a step‑by‑step guide:
1. Choose Domain & Hosting
Start with a memorable domain name through Namecheap, GoDaddy, or your host. Pick hosting optimized for WordPress—DreamHost, Kinsta, Bluehost, or similar offer one‑click installs plus free SSL and solid uptime.
2. Install WordPress
Most hosts provide one-click installation. If not, download WordPress and upload it manually via FTP, set up a MySQL database, and run the installer.
3. Select a WooCommerce‑Compatible Theme
Pick a theme designed for e‑commerce—Astra, OceanWP, Storefront, or Flatsome are popular picks. Install via Appearance > Themes > Add New, then customize layouts, colors, and site identity.
4. Install & Setup WooCommerce
WooCommerce is the leading WordPress e‑commerce plugin, powering over 9% of all websites Install it under Plugins > Add New, activate, and follow the built‑in wizard to set your store location, currency, shipping, tax, and payment methods.
5. Add Products
Go to Products > Add New and enter product information: title, description, images, price, inventory, variations, and shipping details. You can add items individually or bulk‑import via CSV if you have many products.
6. Configure Payment Gateways
Enable trusted options like Stripe, PayPal, Razorpay, and Cash on Delivery. Install corresponding plugins (e.g., Stripe for WooCommerce, Razorpay), activate them in WooCommerce > Settings > Payments, and test in sandbox mode.
7. Set Shipping & Taxes
Define zones, rates, and methods in WooCommerce > Settings > Shipping. For taxes, either let WooCommerce calculate automatically or set rates manually. Consider extensions for advanced rules.
8. Enhance Security & SEO
Online stores must be secure. Use SSL, enable two‑factor authentication, perform regular backups (UpdraftPlus, BlogVault), and install security plugins like Wordfence or Sucuri. For search engine visibility, use Yoast SEO, clean URLs, title tags, alt text, and schema markup .
9. Install Analytics & Marketing Tools
Integrate Google Analytics (GA4) with enhanced e‑commerce tracking to monitor user behavior, cart abandonment, and conversion rates. Add plugins for email marketing (Mailchimp), social feeds, and pop‑ups to boost engagement.
10. Launch & Optimize
Before going live, test the shopping experience end‑to‑end. Once launched, regularly analyze site speed, bounce rates, and conversion funnels. Apply CRO techniques—like adding testimonials to checkout pages—and persist with improvements based on data.
Why Choose Zethic for Your WordPress eCommerce Build?
Ready to bring your store to life? Zethic, a leading WordPress website development company in India, specializes in custom WooCommerce sites built for performance, security, and seamless UX. With a team of 50+ experts in Bangalore serving global clients, Zethic ensures your e-commerce platform is pixel-perfect, scalable, and optimized from launch to ongoing growth.
0 notes
Text
Web Hosting Best Practices Suggested by Top Development Companies
Behind every fast, reliable, and secure website is a solid web hosting setup. It’s not just about picking the cheapest or most popular hosting provider—it's about configuring your hosting environment to match your website’s goals, growth, and user expectations.
Top development firms understand that hosting is foundational to performance, security, and scalability. That’s why a seasoned Web Development Company will always start with hosting considerations when launching or optimizing a website.
Here are some of the most important web hosting best practices that professional agencies recommend to ensure your site runs smoothly and grows confidently.
1. Choose the Right Hosting Type Based on Business Needs
One of the biggest mistakes businesses make is using the wrong type of hosting. Top development companies assess your site’s traffic, resource requirements, and growth projections before recommending a solution.
Shared Hosting is budget-friendly but best for small, static websites.
VPS Hosting offers more control and resources for mid-sized business sites.
Dedicated Hosting is ideal for high-traffic applications that need full server control.
Cloud Hosting provides scalability, flexibility, and uptime—perfect for growing brands and eCommerce platforms.
Matching the hosting environment to your business stage ensures consistent performance and reduces future migration headaches.
2. Prioritize Uptime Guarantees and Server Reliability
Downtime leads to lost revenue, poor user experience, and SEO penalties. Reliable hosting providers offer uptime guarantees of 99.9% or higher. Agencies carefully vet server infrastructure, service level agreements (SLAs), and customer reviews before committing.
Top development companies also set up monitoring tools to get real-time alerts for downtime, so issues can be fixed before users even notice.
3. Use a Global CDN with Your Hosting
Even the best hosting can’t overcome long physical distances between your server and end users. That’s why agencies combine hosting with a Content Delivery Network (CDN) to improve site speed globally.
A CDN caches static content and serves it from the server closest to the user, reducing latency and bandwidth costs. Hosting providers like SiteGround and Cloudways often offer CDN integration, but developers can also set it up independently using tools like Cloudflare or AWS CloudFront.
4. Optimize Server Stack for Performance
Beyond the host, it’s the server stack—including web server software, PHP versions, caching tools, and databases—that impacts speed and stability.
Agencies recommend:
Using NGINX or LiteSpeed instead of Apache for better performance
Running the latest stable PHP versions
Enabling server-side caching like Redis or Varnish
Fine-tuning MySQL or MariaDB databases
A well-configured stack can drastically reduce load times and handle traffic spikes with ease.
5. Automate Backups and Keep Them Off-Site
Even the best servers can fail, and human errors happen. That’s why automated, regular backups are essential. Development firms implement:
Daily incremental backups
Manual backups before major updates
Remote storage (AWS S3, Google Drive, etc.) to protect against server-level failures
Many top-tier hosting services offer one-click backup systems, but agencies often set up custom scripts or third-party integrations for added control.
6. Ensure Security Measures at the Hosting Level
Security starts with the server. Professional developers configure firewalls, security rules, and monitoring tools directly within the hosting environment.
Best practices include:
SSL certificate installation
SFTP (not FTP) for secure file transfer
Two-factor authentication on control panels
IP whitelisting for admin access
Regular scans using tools like Imunify360 or Wordfence
Agencies also disable unnecessary services and keep server software up to date to reduce the attack surface.
7. Separate Staging and Production Environments
Any reputable development company will insist on separate environments for testing and deployment. A staging site is a replica of your live site used to test new features, content, and updates safely—without affecting real users.
Good hosting providers offer easy staging setup. This practice prevents bugs from slipping into production and allows QA teams to catch issues before launch.
8. Monitor Hosting Resources and Scale Proactively
As your website traffic increases, your hosting plan may need more memory, bandwidth, or CPU. Agencies set up resource monitoring tools to track usage and spot bottlenecks before they impact performance.
Cloud hosting environments make it easy to auto-scale, but even on VPS or dedicated servers, developers plan ahead by upgrading components or moving to load-balanced architectures when needed.
Conclusion
Your hosting setup can make or break your website’s success. It affects everything from page speed and security to uptime and scalability. Following hosting best practices isn’t just technical housekeeping—it’s a strategic move that supports growth and protects your digital investment.
If you're planning to launch, relaunch, or scale a website, working with a Web Development Company ensures your hosting isn’t left to guesswork. From server stack optimization to backup automation, they align your infrastructure with performance, safety, and long-term growth.
0 notes
Text
CloudPanel Migration Script: Automate CloudPanel Migration
Migrating websites between CloudPanel servers often requires handling multiple tasks such as transferring databases, updating configurations, and moving website files. To simplify this complex process, we’ve developed a powerful CloudPanel migration script that automates these tasks, ensuring a seamless migration of PHP-based websites between servers. In this blog post, we’ll provide an overview…
#Automated Migration#CloudPanel#CloudPanel Automation#CloudPanel Migration#CloudPanel Migration Script#CloudPanel server fix#Database Transfer#FTP User Setup#PHP Site Migration#Rsync File Transfer#Website Migration
0 notes
Text
Top Accounting Practices in Tally for Better Financial Management
Effective Accounting Practices with TallyPrime – A Complete Guide
TallyPrime is a powerful accounting software that simplifies financial management for businesses by streamlining tasks like recording transactions, managing expenses, generating reports, and tracking inventory. With a user-friendly interface and automation features, it ensures accuracy, saves time, and supports informed decision-making.
Why Effective Accounting in Tally Matters: Accurate accounting in Tally helps businesses stay tax compliant, prevent errors, and maintain transparency with stakeholders. Tally’s real-time data, customizable reports, and seamless integration with third-party tools enable better financial insights.
Key Accounting Practices Using TallyPrime:
Setup and Configuration: Tailor Tally with default paths, multi-address support, and voucher settings for smooth operations.
Transaction Recording: Use vouchers and ledgers to accurately record sales, purchases, and expenses.
Bank Reconciliation: Match bank statements with your records to detect discrepancies and ensure accuracy.
Cash Flow & Inventory Management: Monitor inflow/outflow of cash and maintain real-time stock tracking with various inventory vouchers.
Financial Reports: Instantly generate reports like Balance Sheet, Profit & Loss, and Cash Flow to evaluate business performance.
Integration & Customization: Connect Tally with ERP, eCommerce, and mobile platforms using APIs, FTP, or Excel with help from Antraweb.
Security & Backup: Apply user roles, enable password protection, and automate backups with Smart Backup++.
Remote Access with Tally on Cloud: Access your data securely from anywhere, on any device, ensuring uninterrupted operations.
TallyPrime Server: Improve multi-user performance and data consistency with advanced monitoring and administrative control.
Boost Tally’s Capabilities with Antraweb Add-ons: Enhance your Tally experience with tools like Document Manager, GST Reminder, and One Click Outstanding for greater efficiency.
👉 Explore more Tally solutions tailored to your business needs with Antraweb Technologies.
Click Here To Read The Full Blog Now:
Top-Accounting - Practices - in - tally - for - Batter - Financial - Management
Visit Our Website To Learn More:
0 notes
Text
Sponzy Nulled Script 5.8

Download Sponzy Nulled Script – Monetize Your Content Creatively If you're looking for a powerful yet cost-effective solution to launch a creator-support platform, Sponzy Nulled Script is the perfect tool for you. Whether you're building a Patreon-style website or looking to monetize content through subscriptions and donations, this script is a game-changer. Enjoy full access to premium features without any licensing restrictions. Get the latest version for free right here and empower your online journey today! What Is Sponzy Nulled Script? Sponzy Nulled Script is a premium PHP-based platform that enables creators to receive financial support from fans and subscribers. With seamless payment integrations, customizable layouts, and multi-language support, Sponzy allows you to create a community-focused platform that rivals the best in the business. The nulled version gives you complete access to its premium functionalities for free—no subscriptions, no hidden charges. Technical Specifications Script Type: PHP Laravel Framework Responsive Design: Fully Mobile-Optimized Database Support: MySQL 5.7+ Latest Version Compatibility: PHP 8+ Security: Integrated reCAPTCHA, CSRF Protection Powerful Features & Unique Benefits The Sponzy Nulled Script comes loaded with high-end features that give you a competitive edge: 1. Multi-Currency & Payment Gateway Support Integrate with PayPal, Stripe, and even cryptocurrency gateways to offer a seamless payment experience worldwide. 2. Membership Tiers Create different support plans with varying benefits to attract a wider range of supporters—from casual fans to superfans. 3. Real-Time Notifications Keep users engaged with real-time alerts for messages, tips, and subscription renewals. 4. GDPR-Ready and SEO-Friendly Built to meet modern data privacy regulations while optimizing your platform for search engines right out of the box. 5. Monetization Tools Enable tipping, subscriptions, and pay-per-view content—all built into the system with intuitive admin control. Why Choose Sponzy Nulled Script? Unlike many open-source alternatives, Sponzy Nulled Script is professionally designed and continuously updated. The nulled version saves you hundreds of dollars while providing the exact same user experience. It’s ideal for entrepreneurs, influencers, bloggers, and creative professionals who want to launch a content support platform without financial risk. How to Install Sponzy Nulled Script Download the script from our website. Upload it to your server using FTP or cPanel. Create a new MySQL database and import the included SQL file. Open the installation URL and follow the on-screen setup process. Log in to your admin panel and start customizing your platform! Use Cases of Sponzy Nulled Script Content Creators: Monetize exclusive videos, blogs, or artwork. Influencers: Offer membership perks to loyal followers. Nonprofits: Receive recurring donations without complex setups. Writers & Journalists: Launch subscription-based content easily. FAQs About Sponzy Nulled Script Q: Is it safe to use the nulled version? A: Yes, we ensure all scripts are scanned for malware and viruses before making them available. However, always use a secure hosting environment. Q: Can I update the script? A: Updates are manual, and you may need to download the latest version from our website when available. Q: Does it support RTL languages? A: Absolutely. Sponzy Nulled Script supports both LTR and RTL, making it perfect for global use. Q: Can I integrate custom themes? A: Yes, the script supports theme customization and development for a personalized user experience. Final Thoughts The Sponzy is more than just a content monetization tool—it’s your gateway to building a thriving digital community. Whether you're just starting out or scaling an established brand, Sponzy delivers professional-grade features without the professional-grade price tag. Don’t miss this opportunity to download it for free and unlock unlimited potential!
Looking for more premium resources? Check out our collection like avada nulled for even more web design flexibility. For a powerful eCommerce theme, try woodmart nulled—a must-have for modern online stores.
0 notes
Text
Ping vs Other Monitoring Methods: Why Choose Ping Monitoring?

In the digital world, your website or server is the front line of your business. Whether you're running an e-commerce platform, a blog, or a SaaS product, keeping your site live and responsive is essential. That’s where monitoring tools come into play. But with so many monitoring methods available, how do you choose the right one?
Among these, Ping Monitoring stands out for its simplicity and effectiveness. Let’s explore how it compares to other methods—and why it might be the best fit for your needs.
💡 What is Ping Monitoring?
Ping monitoring checks the availability of your server or website by sending small packets of data (ICMP echo requests) and waiting for a response. If the server replies, it’s online. If not, it may be down or unreachable.
✅ Benefits:
Real-time uptime checks
Fast detection of server failures
Lightweight and efficient
Easy setup
It’s perfect for quickly knowing whether your website or system is online without needing deep configuration.
🔧 Other Monitoring Methods Explained
Let’s take a look at some other popular methods:
1. HTTP Monitoring
Checks if a webpage loads correctly and returns the right status code (like 200 OK). It ensures the website is not only up but also functioning.
2. DNS Monitoring
Monitors if your domain name resolves correctly and quickly to the right IP address.
3. TCP Port Monitoring
Checks specific ports (e.g., 80 for HTTP, 443 for HTTPS, 21 for FTP) to ensure services are accepting connections.
4. Application Performance Monitoring (APM)
Deeply analyzes application behavior—response time, transaction flow, database calls, etc. Best for complex backend systems.
5. Synthetic Monitoring
Simulates user actions (e.g., logging in, adding to cart) to test the user experience from different regions.
📊 Ping vs Other Monitoring: A Quick Comparison
FeaturePing MonitoringHTTP MonitoringAPMSynthetic MonitoringSetup ComplexityVery LowLowHighMediumDetects Downtime Fast✅ Yes✅ Yes✅ Yes✅ YesDetects Broken Features❌ No✅ Sometimes✅ Yes✅ YesSimulates User Experience❌ No❌ No✅ Partially✅ YesIdeal ForServers, RoutersWebsitesWeb AppsFull User Journey
🕒 When to Use Ping Monitoring?
Ping monitoring is best when:
You want quick alerts for server uptime
You're monitoring basic infrastructure like web servers or routers
You don’t need application-level details
You need a low-cost and low-maintenance solution
It’s ideal for small businesses, developers, IT admins, and anyone who wants basic uptime tracking.
⚠️ Limitations of Ping Monitoring
While powerful, ping monitoring has some limitations:
Doesn’t detect if a website is returning errors (like 500 or 404)
Doesn’t check if a site’s layout is broken or buttons don’t work
Some firewalls may block ping requests
Doesn’t simulate actual user interaction
That’s why it’s often best to combine ping with other monitoring methods for complete coverage.
🚀 Why Choose Ping Monitoring with WebStatus247?
If you want easy, reliable, and global uptime checks, WebStatus247’s Ping Monitoring is a perfect choice.
Here’s what you get:
🌍 Global monitoring nodes
📩 Instant alerts via SMS or email
📊 Clean, simple dashboard
💸 Affordable plans
🧠 Easy setup – no technical skills needed
Whether you're monitoring one website or an entire network, WebStatus247 helps you stay ahead of downtime.
🏁 Final Thoughts
Ping monitoring may seem basic, but it's often the first and fastest line of defense against downtime. It’s lightweight, cost-effective, and incredibly useful for anyone managing a website or server.
0 notes
Text
Boost WordPress Performance: Why Disabling Services Manager Plugin Helps
When it comes to optimizing your WordPress website for performance, security, and privacy, one often overlooked solution is to Disable Services Manager Plugin. Many site owners install plugins without realizing the potential overhead they can add to loading times, server resources, and even security vulnerabilities.
In this guide, we’ll break down what the Services Manager plugin is, why disabling it could be beneficial, and how to do it the right way without breaking your site.

What Is the Services Manager Plugin?
The Services Manager plugin in WordPress acts as a centralized module that controls and manages external and internal services. This includes anything from API calls, data sharing modules, and sometimes even telemetry or third-party integration services.
While its purpose is to streamline service management, not every WordPress site actually needs this plugin. In fact, it can become a performance bottleneck, especially if you’re running a lightweight site or one with a custom setup.
Why You Should Disable Services Manager Plugin
Let’s take a closer look at why you might want to Disable Services Manager Plugin to enhance your WordPress site’s performance:
1. Improve Website Speed
Every plugin you activate adds to your site’s backend and frontend processing. The Services Manager plugin often makes background calls and service checks that can slow down page loading times. By disabling it, you can remove unnecessary resource consumption and reduce the time it takes for your website to render.
Example: If your Services Manager plugin is connecting to third-party APIs or collecting data, these background operations can delay page generation, particularly on shared hosting environments.
2. Strengthen Security
One of the critical aspects of maintaining a secure WordPress website is minimizing your attack surface. Each plugin represents a potential entry point for hackers, especially if it’s not frequently updated or widely used.
The Services Manager plugin, depending on its configuration, may open external communication channels, making your site vulnerable to external exploits.
3. Enhance Privacy Compliance
With growing concerns around GDPR, CCPA, and other privacy laws, it’s vital to control what data your site is collecting or sending to third parties. If the Services Manager plugin facilitates background tracking or telemetry, it could put your site at risk of non-compliance.
Disabling the plugin helps in maintaining full control over data flow and user privacy.
4. Reduce Plugin Bloat
WordPress sites thrive on simplicity. The more plugins you have, the harder it is to maintain your website. If you’re not actively using the Services Manager plugin for essential tasks, it’s just digital clutter.
By choosing to Disable Services Manager Plugin, you streamline your site’s backend and reduce conflicts between plugins.
Signs You Should Disable the Services Manager Plugin
Not sure if this plugin is causing issues? Here are a few tell-tale signs:
Sluggish site speed even after caching and optimization.
Increased server load or high CPU usage without clear reason.
Unnecessary outbound API calls you didn’t configure.
Privacy or compliance red flags from audits or legal tools.
Errors in your error_log file pointing to the services manager.
How to Disable Services Manager Plugin Safely
Disabling a plugin might sound simple, but it’s important to do it the right way to prevent any disruptions on your website.
Step 1: Backup Your Website
Before making any changes, always take a full backup of your site. Use plugins like UpdraftPlus, Jetpack, or manually back up using your hosting cPanel or FTP.
Step 2: Identify Dependencies
Some themes or plugins might rely on the Services Manager plugin. Check if anything else is dependent on it by reviewing plugin documentation or developer notes.
Step 3: Disable the Plugin
Login to your WordPress admin dashboard.
Navigate to Plugins > Installed Plugins.
Locate Services Manager and click Deactivate.
If no issues arise after deactivation, click Delete to remove it.
Step 4: Test Your Website
After deactivation, visit the front-end and check if:
All key features work properly.
No unexpected layout changes or errors occur.
Website speed improves (use GTmetrix or PageSpeed Insights to compare).
Alternatives to Services Manager Plugin
If you still need to manage services or integrations but want a more optimized solution, consider lightweight or modular plugins. Here are some recommendations:
WP Crontrol: Manage and monitor scheduled tasks with precision.
Code Snippets: Add service-related code snippets without needing a full plugin.
REST API Toolbox: Control how your site interacts with external services via REST.
These tools are more streamlined and offer targeted functionalities, which avoids unnecessary bloat.
Real-World Case Study
A tech blog using the Services Manager plugin noticed increasing bounce rates due to slow page load times. After a performance audit, the plugin was identified as making frequent third-party API checks, even for unused integrations.
Upon choosing to Disable Services Manager Plugin, the website saw:
35% faster load times.
20% reduced server resource usage.
Improved Core Web Vitals scores in Google Search Console.
Increased user engagement and time on page.
SEO and Performance Gains from Disabling the Plugin
WordPress SEO is heavily tied to speed and user experience. When Google indexes your site, it evaluates performance metrics like loading time, interactivity, and content stability.
Here’s how disabling the plugin can give you an SEO edge:
Faster Load Times = Higher Rankings: Speed is a confirmed ranking factor.
Fewer JS Calls = Better Mobile Usability: Services Manager may inject scripts you don’t need.
Improved Crawl Budget: Googlebot can crawl more pages in less time on a leaner site.
Common Questions About Disabling Services Manager Plugin
Q1. Will disabling the plugin break my website?
Only if other plugins or themes are dependent on it. Perform a compatibility test first.
Q2. Can I disable it temporarily?
Yes. You can deactivate it and observe your site behavior. If nothing breaks, it's safe to delete it permanently.
Q3. Is there any risk to SEO?
Not if the plugin isn’t providing core SEO features. In fact, your SEO may improve due to better speed and performance.
Final Thoughts: Should You Disable Services Manager Plugin?
If your WordPress site doesn’t rely on the Services Manager for critical operations, it’s often a good idea to disable it. Doing so can lead to better speed, tighter security, and cleaner code—all of which are essential for a modern, optimized WordPress site.
To get a complete walkthrough and more reasons why you should Disable Services Manager Plugin, check out our detailed guide.
By making smart choices around plugins and only keeping what you truly need, you’re setting your site up for long-term success.
0 notes
Text

How to Set Up Your Local Development Environment for WordPress
Setting up a local development environment is one of the best ways to experiment with and build WordPress websites efficiently. It offers you a safe space to test themes, plugins, and updates before applying changes to a live site. Whether you’re a beginner or an experienced developer, having a local environment is essential in streamlining your workflow and minimizing website downtime.
Before we dive into the technical steps, it’s worth mentioning the benefits of WordPress for your business website. WordPress offers unmatched flexibility, scalability, and user-friendliness, making it an ideal platform for businesses of all sizes. When paired with a solid local development setup, WordPress becomes even more powerful in enabling fast and secure site builds.
Step 1: Choose Your Local Development Tool
There are several local development tools available that cater specifically to WordPress users:
Local by Flywheel (now Local WP): Extremely beginner-friendly with features like SSL support and one-click WordPress installs.
XAMPP: A more general-purpose tool offering Apache, MySQL, PHP, and Perl support.
MAMP: Ideal for macOS users.
DevKinsta: Built by Kinsta, it offers seamless WordPress development and staging capabilities.
Choose the one that suits your OS and comfort level.
Step 2: Install WordPress Locally
Once you’ve chosen your tool:
Install the software and launch it.
Create a new WordPress site through the interface.
Set up your site name, username, password, and email.
After setup, you’ll get access to your WordPress dashboard locally, allowing you to install themes, plugins, and begin your customizations.
Step 3: Configure Your Development Environment
To ensure an efficient workflow, consider these configurations:
Enable Debug Mode: Helps in identifying PHP errors.
Use Version Control (e.g., Git): Keeps your changes tracked and manageable.
Database Access: Tools like phpMyAdmin help manage your WordPress database locally.
If your project requires dynamic functionality, leveraging PHP Development Services during the setup phase can ensure custom features are implemented correctly from the beginning.
Step 4: Customize Themes and Plugins Safely
With your local environment set up, now's the time to begin theme development or customization. You can safely create or modify a child theme, experiment with new plugins, and write custom code without any risk of affecting your live site.
For those unfamiliar with theme structures or WordPress standards, it’s often wise to hire a professional WordPress developer who understands best practices and can ensure clean, maintainable code.
Step 5: Syncing to a Live Server
After building and testing your site locally, you'll eventually want to push it live. Popular methods include:
Using a plugin like Duplicator or All-in-One WP Migration
Manual migration via FTP and phpMyAdmin
Using version-controlled deployment tools
Syncing should always be done carefully to avoid overwriting crucial data. Regular backups and testing are essential.
Step 6: Maintain Your WordPress Site Post-Launch
Launching your website is only the beginning. Ongoing updates, security patches, and performance optimization are critical for long-term success. Enlisting website maintenance services ensures your site remains fast, secure, and up-to-date.
Services can include:
Core, plugin, and theme updates
Malware scans and security hardening
Site performance monitoring
Regular backups
Final Thoughts
A local WordPress development environment not only speeds up your development process but also protects your live website from unintended changes and errors. With tools and strategies now more accessible than ever, there's no reason not to use one.From learning the basics to running advanced builds, setting up locally gives you the confidence and space to grow your WordPress skills. And if you want to see real-world examples or follow along with tips and tricks I share, feel free to check out my work on Instagram for practical inspiration.
0 notes
Text
Top 7 Multiple URL Opener Tools for 2025 (Free & Paid)

In the fast-paced world of digital marketing, research, and productivity, speed matters. Whether you're a social media manager juggling dozens of links, a researcher handling countless tabs, or just someone who wants to avoid repetitive copy-paste cycles, multiple URL opener tools are lifesavers.
In 2025, the demand for efficient bulk opener URL tools is rising. People want convenience, speed, and security – all wrapped in one tool. We’ve rounded up the top 7 multiple URL opener tools for 2025, both free and paid, to help streamline your browsing workflow.
Let’s jump right in.
1. URL Lookup (Top Pick)
If you’re looking for a sleek, no-nonsense online URL opener, URL Lookup should be your go-to. It's built for speed and simplicity, making it ideal for professionals who deal with hundreds of URLs every day.
Key Features:
Bulk URL paste and open
Works with all browsers
Custom open delay to avoid crashes
Minimalistic interface, no ads
Secure & privacy-friendly
Pros:
Fastest in its category
Mobile-friendly UI
Does not require login
Cons:
No extension yet (expected later this year)
Best For: Digital marketers, bloggers, and link auditors
Price: Free (Premium version coming soon)
2. Open Multiple URLs (Chrome Extension)
One of the most popular Chrome extensions, Open Multiple URLs is perfect for power users who live in the Google ecosystem.
Key Features:
Paste URLs and open all in new tabs
Option to open in incognito
Remove duplicates automatically
Pros:
Lightweight and fast
Works offline
Cons:
Chrome only
No delay timer
Best For: SEO experts, students, and Chrome users
Price: Free
3. Linkclump
This one’s for those who love automation. Linkclump lets you drag and open links directly from any webpage. It’s a game-changer if you’re opening URLs from a list or search results.
Key Features:
Drag-to-select link opening
Multiple action options (new tabs, new window, copy)
Filter by keywords
Pros:
Extremely efficient for bulk link tasks
Customizable settings
Cons:
Setup may take a few minutes
Limited support outside Chrome
Best For: Researchers and data miners
Price: Free
4. URLOpener.com
A classic tool that’s been around for years, URLOpener.com is a reliable online URL opener with no frills. It does one job and does it well.
Key Features:
Paste unlimited URLs
Opens in multiple tabs instantly
No login required
Pros:
Works on all browsers
Extremely lightweight
Cons:
Very basic interface
No customization
Best For: Casual users
Price: Free
5. Batch Link Opener by SEO Tools Centre
This one’s built for SEO professionals. It doubles as a bulk opener URL tool and a link analyzer. That makes it a solid choice for those needing more than just tab opening.
Key Features:
Bulk URL opening
Link checker
SEO report generation
Pros:
Great for SEO audits
Extra tools included
Cons:
Cluttered interface
Ads on the free version
Best For: SEO professionals and digital analysts
Price: Free & Paid Plans (from $9.99/month)
6. Multi URL Opener by Small SEO Tools
Another tool tailored to marketers, this one from Small SEO Tools integrates URL opening with quick SEO checks and keyword analysis.
Key Features:
Paste & open 200+ URLs
Integrated keyword analysis
Mobile responsive
Pros:
Multi-functional
Easy to use
Cons:
Opens links slower than others
Heavy on ads
Best For: Marketing teams and agencies
Price: Free (Ad-supported)
7. Bulk URL Opener Online (Browserling)
Browserling offers a secure multiple URL opener that emphasizes privacy and performance. It’s trusted by developers and IT pros.
Key Features:
Secure sandbox environment
Instant bulk open
Supports various protocols (http, https, ftp)
Pros:
Highly secure
Works across platforms
Cons:
UI is a bit dated
No mobile app
Best For: Developers, security-conscious users
Price: Free & Premium ($10/month)
What Makes a Great Multiple URL Opener?
Before you pick your tool, here are a few things to look for:
1. Speed: Can it open 50+ tabs without crashing?
2. Simplicity: Is the interface user-friendly?
3. Customization: Can you set delay timers or filters?
4. Security: Does it respect your privacy and data?
5. Cross-Device Support: Can you use it on both mobile and desktop?
Final Thoughts
Using a multiple URL opener isn’t just about saving time. It’s about working smarter. The right tool can turn a 30-minute chore into a 30-second task.
If you're just starting out, go with something easy like URL Lookup or URLOpener.com. Need more features? Opt for tools like Batch Link Opener or Browserling. Chrome users will find Linkclump and Open Multiple URLs extremely handy.
And remember: not all tools are made equal. Try a few and see what fits your workflow best.
Got a favorite bulk opener url or online URL opener we didn’t mention? Drop it in the comments below!
Stay productive. Stay smart. And keep those tabs under control.
0 notes