#Hair tutorial
Explore tagged Tumblr posts
Visit Tumblr Blog
Explore Tumblr blogs with no restrictions, modern design and the best experience.
Last Seen Tumblr Blogs


Fun Fact
Total funding amounts to $125.3M.
Text

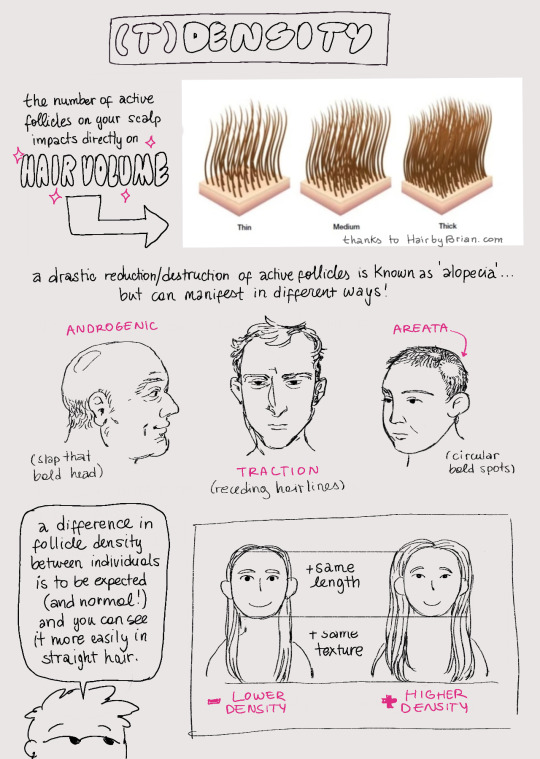
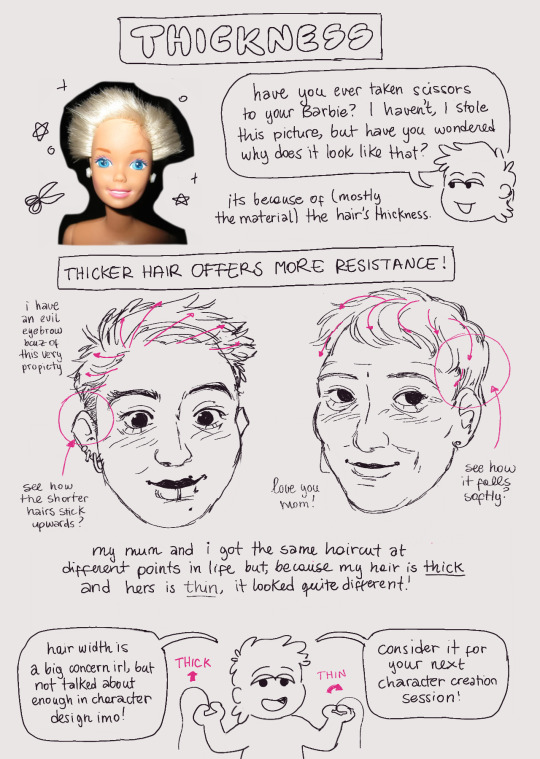


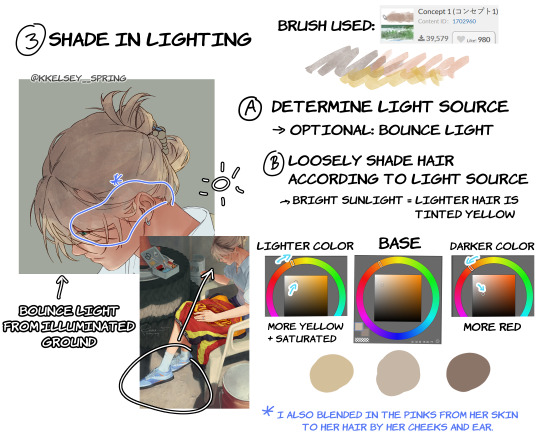
my very own hair cheat sheet! if you start factoring in these elements, i can guarantee you your hair is gonna start looking so much better :)
wanna ask for more? consider subscribing to my patreon or commission me!
527 notes
·
View notes
Text
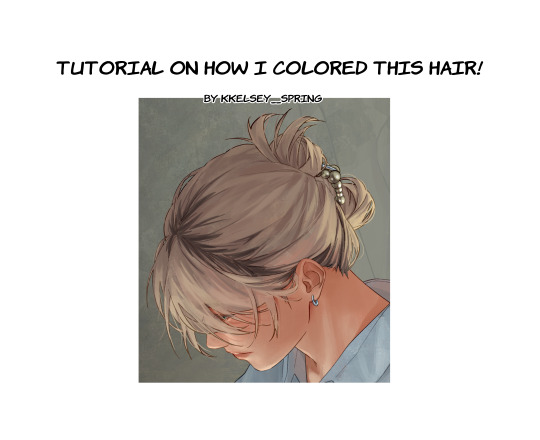

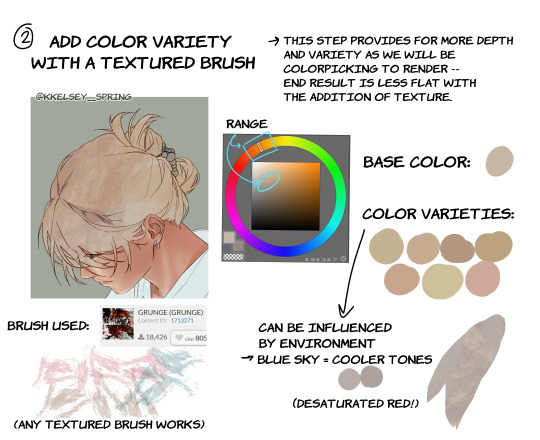


A little tutorial on how I render hair! this process is essentially the same with clothes and skin. hope this helps!!
#kkelseysart#my art#art tips#art tutorial#clipstudiopaint#hair#hair tutorial#artists on tumblr#art help#digital art
1K notes
·
View notes
Text
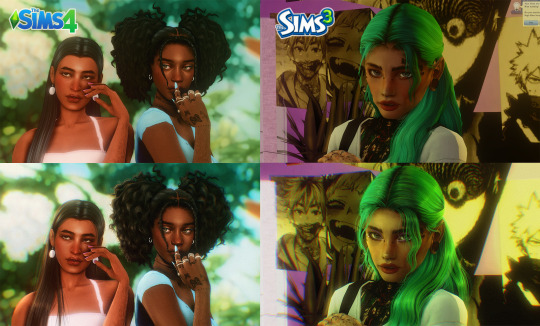
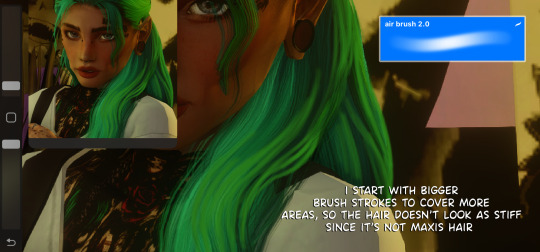
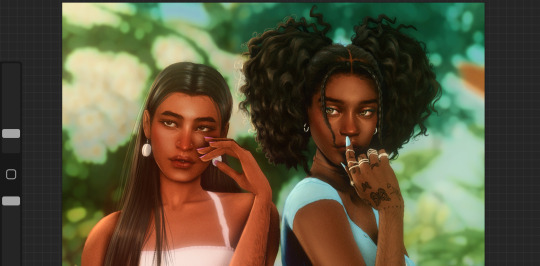
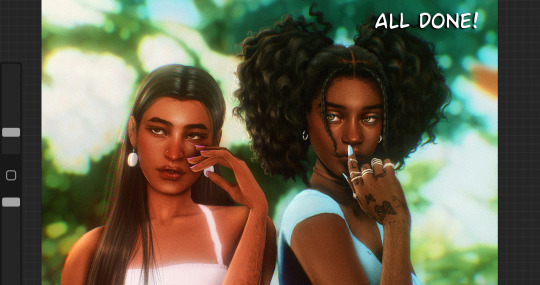
how i draw hair :) applies for TS3 & TS4
a few people have asked for this so i thought i'd just show my process, i'm still learning myself but sharing is caring. This is all done in the Procreate app on the ipad.
i used to use these brushes when i had my old ts3 acc: photoshop brushes these are super good if you might be be able to draw the individual strands, now i just use 3 brushes from samdoesart patreon:
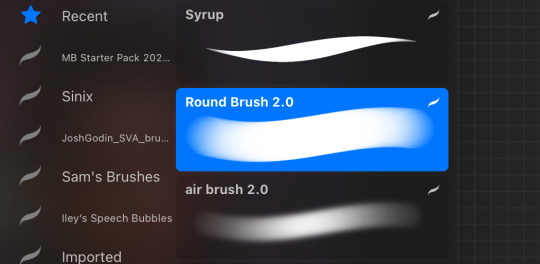
round brush: has some hard edges air brush: better for curly hair as it's soft syrup brush : i use this more for straight/wavy hair
procreate does have FREE brushes so alternatives for the brushes i use are found in: calligraphy - 'script', airbrushing - 'hard blend' & 'soft brush'.
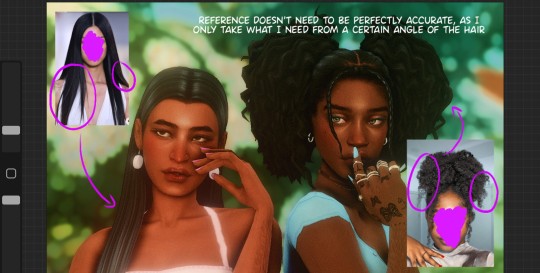
step1: i'll gather reference on pinterest for curly/wavy hair as straight hair is more simple to draw, this help me to understand how the hair falls and where to put highlight/shadows
step2: *create new layer* pick the brush and colour pick the hair, i like a lot of loose strands and messy looking hair, start drawing your strands lightly and build up. The only thing that differs with sims 3 is that when drawing the strands i use a bigger brush size to start with then go in with smaller strands later.

step3: *create new layer* blending mode: multiply opacity: 50-60% i'll add shadows to the parts of the hair that 'bend' to add more depth. (remember shadows are never usually completely black, so if the sim has blue hair make the shadow a dark blue)
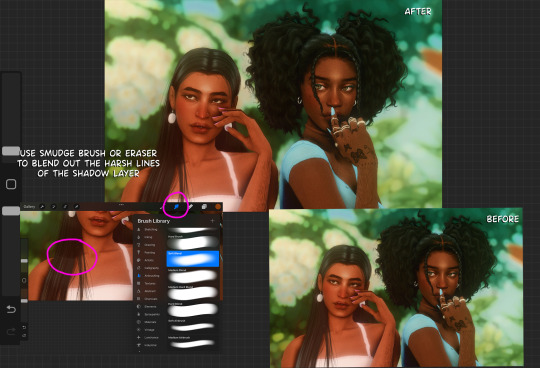
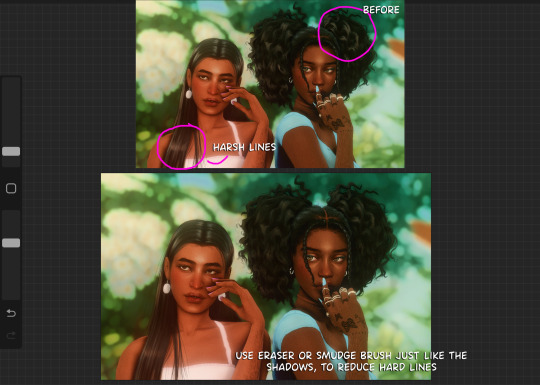
step4: *create new layer* blending mode: add. opacity 20-30%. i'll add highlight by using the selection tool and similar to how anime hair looks with the hair higlight ill add zig zag lines going around the hair, then go in with my brush lightly making the centre more intense. Once done ill get the eraser and make sure the edges aren't too harsh
step5: *create new layer* blending mode: normal (place under shadows layer. i'll add colour highlights, (for black hair i'll use a littie bit of brown as no ones hair is really completely black)
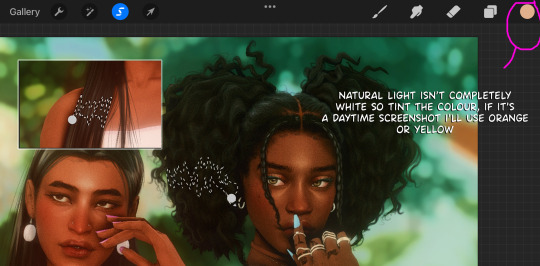
step 6: *create new layer* blending mode: add. this one is for lighting purposes. for the rest of the screenshot then i'll add extra shine to hair & add shadows to the body
step 7: once i'm done. *create new layer* blending mode: overlay and i'll go over the parts that are in the light. merge all layers together and add some grain so the hair drawing blends in with the rest of the screenshot.
if you have any questions feel free to direct them to my inbox & u can check out other tutorials here
212 notes
·
View notes
Text
fresh hair routine since more people dmed me asking. idfk wat im doing there in the thumbnail
#emo hair#scene hair#hair tutorial#2010 emo#emo blog#2000s emo#2000s scene#crunkcore#emo boy#emo scene#scenemo#scene kid#scene fashion#scene emo#emo kid#emo girl#emo#scene girl#scene boy#scene#scemo blog#2000s scemo#scemo kid#scemo#rawring 20s#rawr xd
96 notes
·
View notes
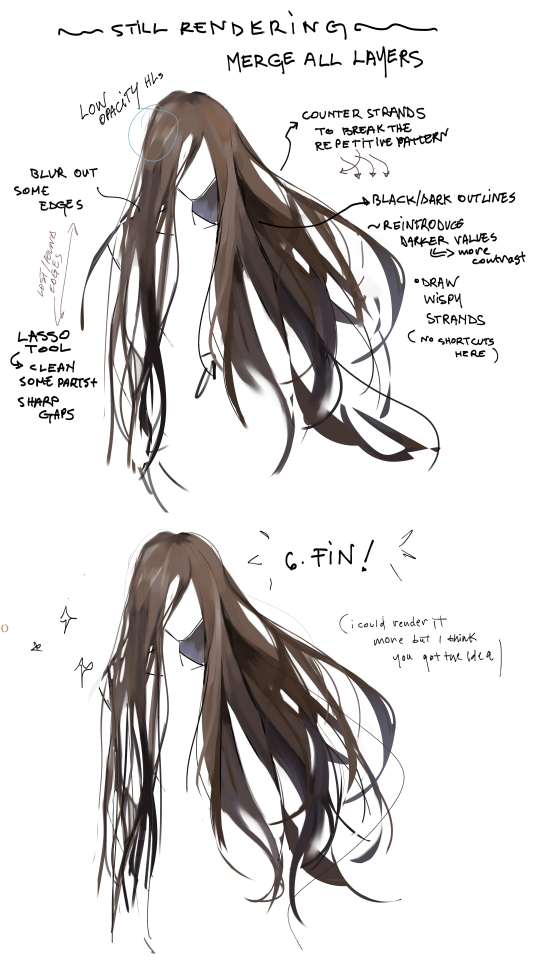
Text
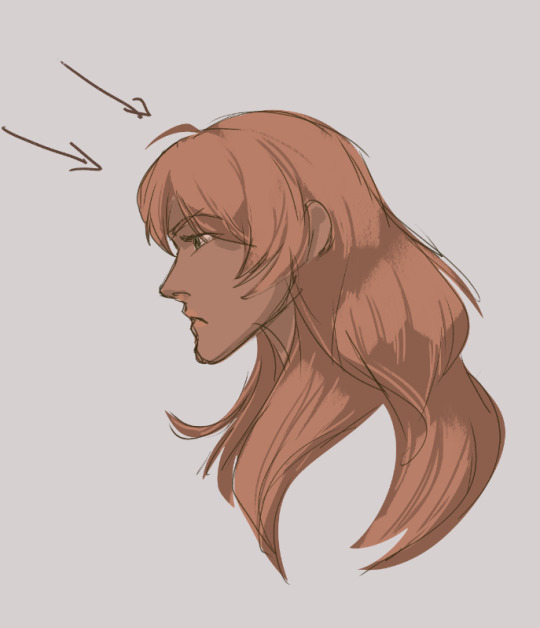
How to think when drawing hair
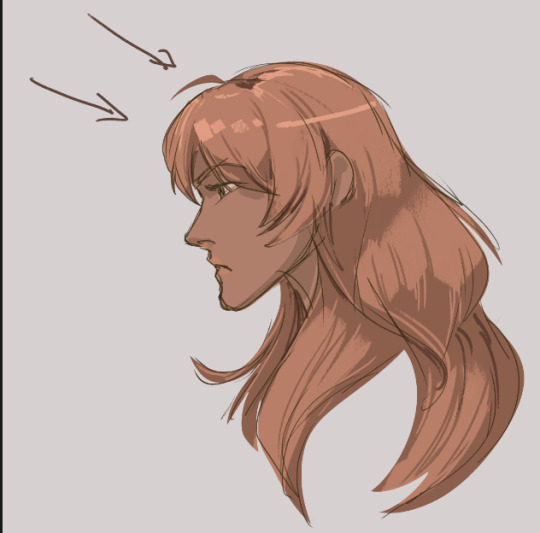
Here's a very rough five minute, uh, not really a tutorial, but a principle on how to draw hair that I did for a friend who voiced some struggles with drawing hair.
I promised to upload it here for safekeeping, maybe it'll be useful for some of you, too! It's not a full process but it shows how you can overcome the overwhelm that comes with drawing something detailed such as hair.
So first here's the drawing with some flat colors. The arrows are there to just point out the general direction of light. The key thing to drawing hair is to think of it as a 3D form and then imply detail which is what I'm showing here.

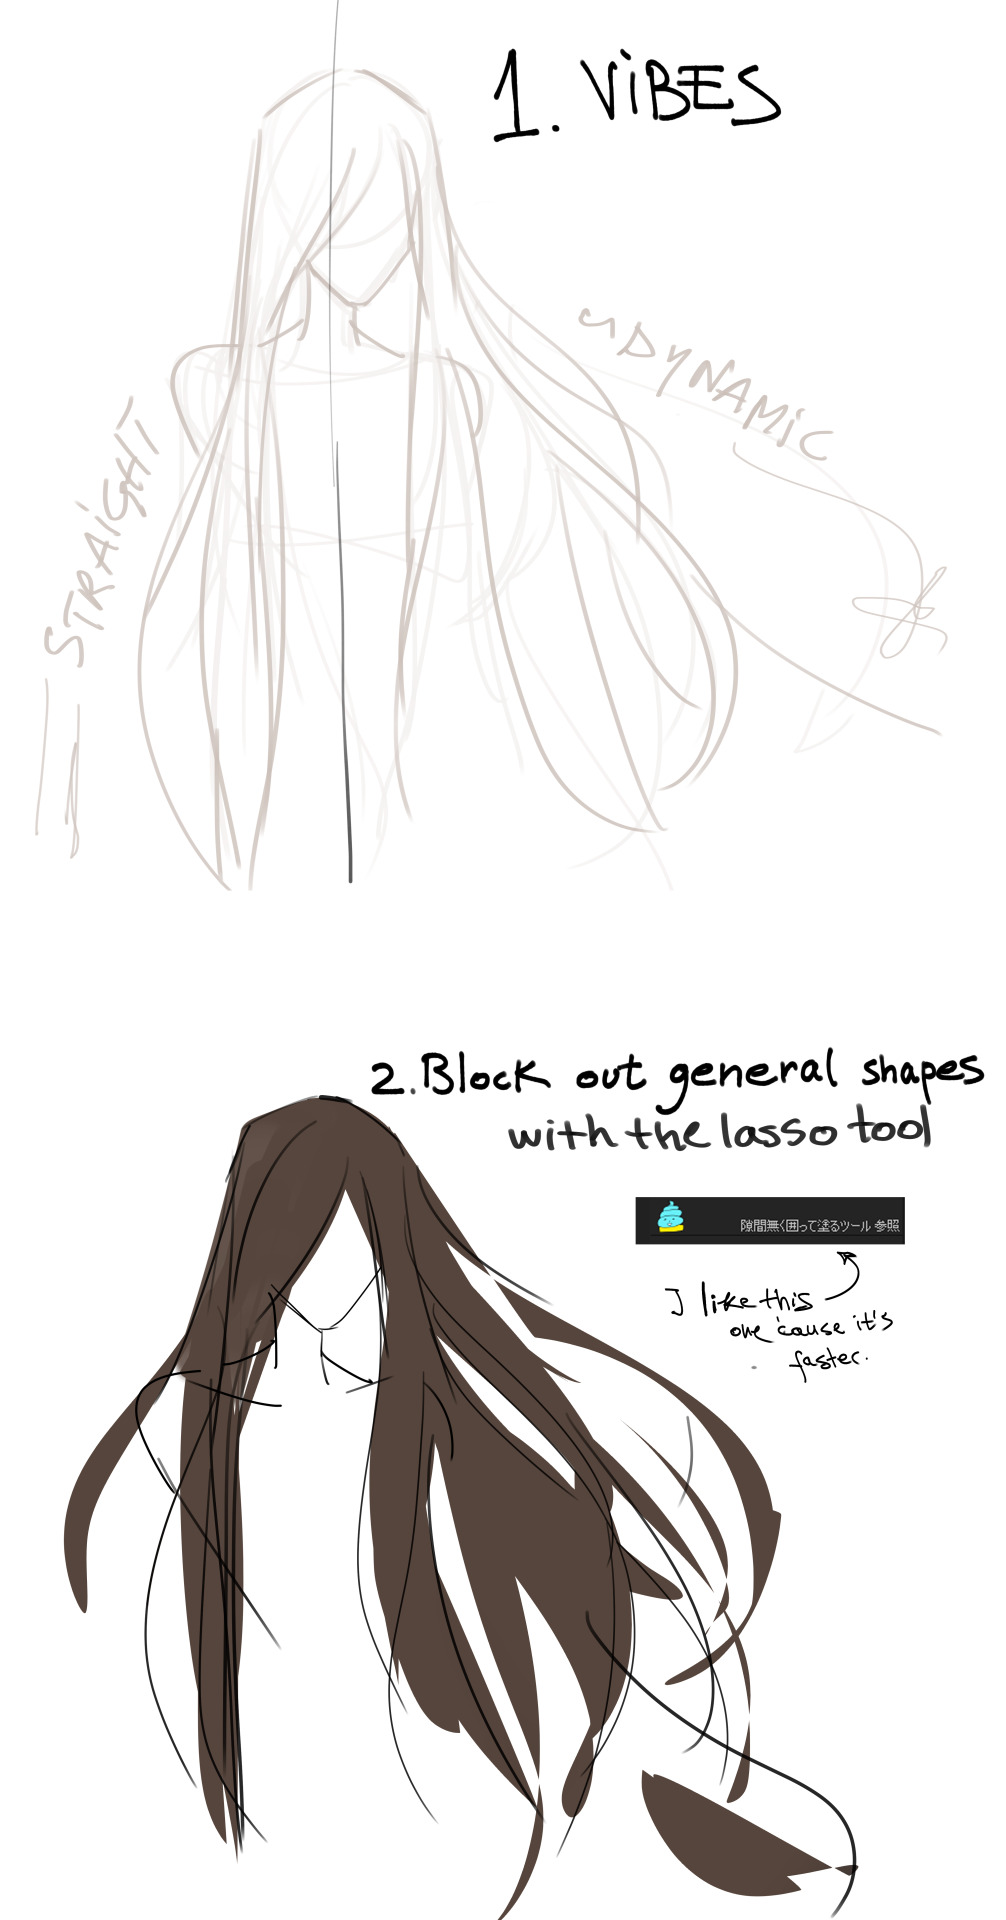
Now you gotta be bold and pick a big brush. Make it so big that it's almost clumsy so that you don't start noodling right at the get go. Lay down some very rough light areas.

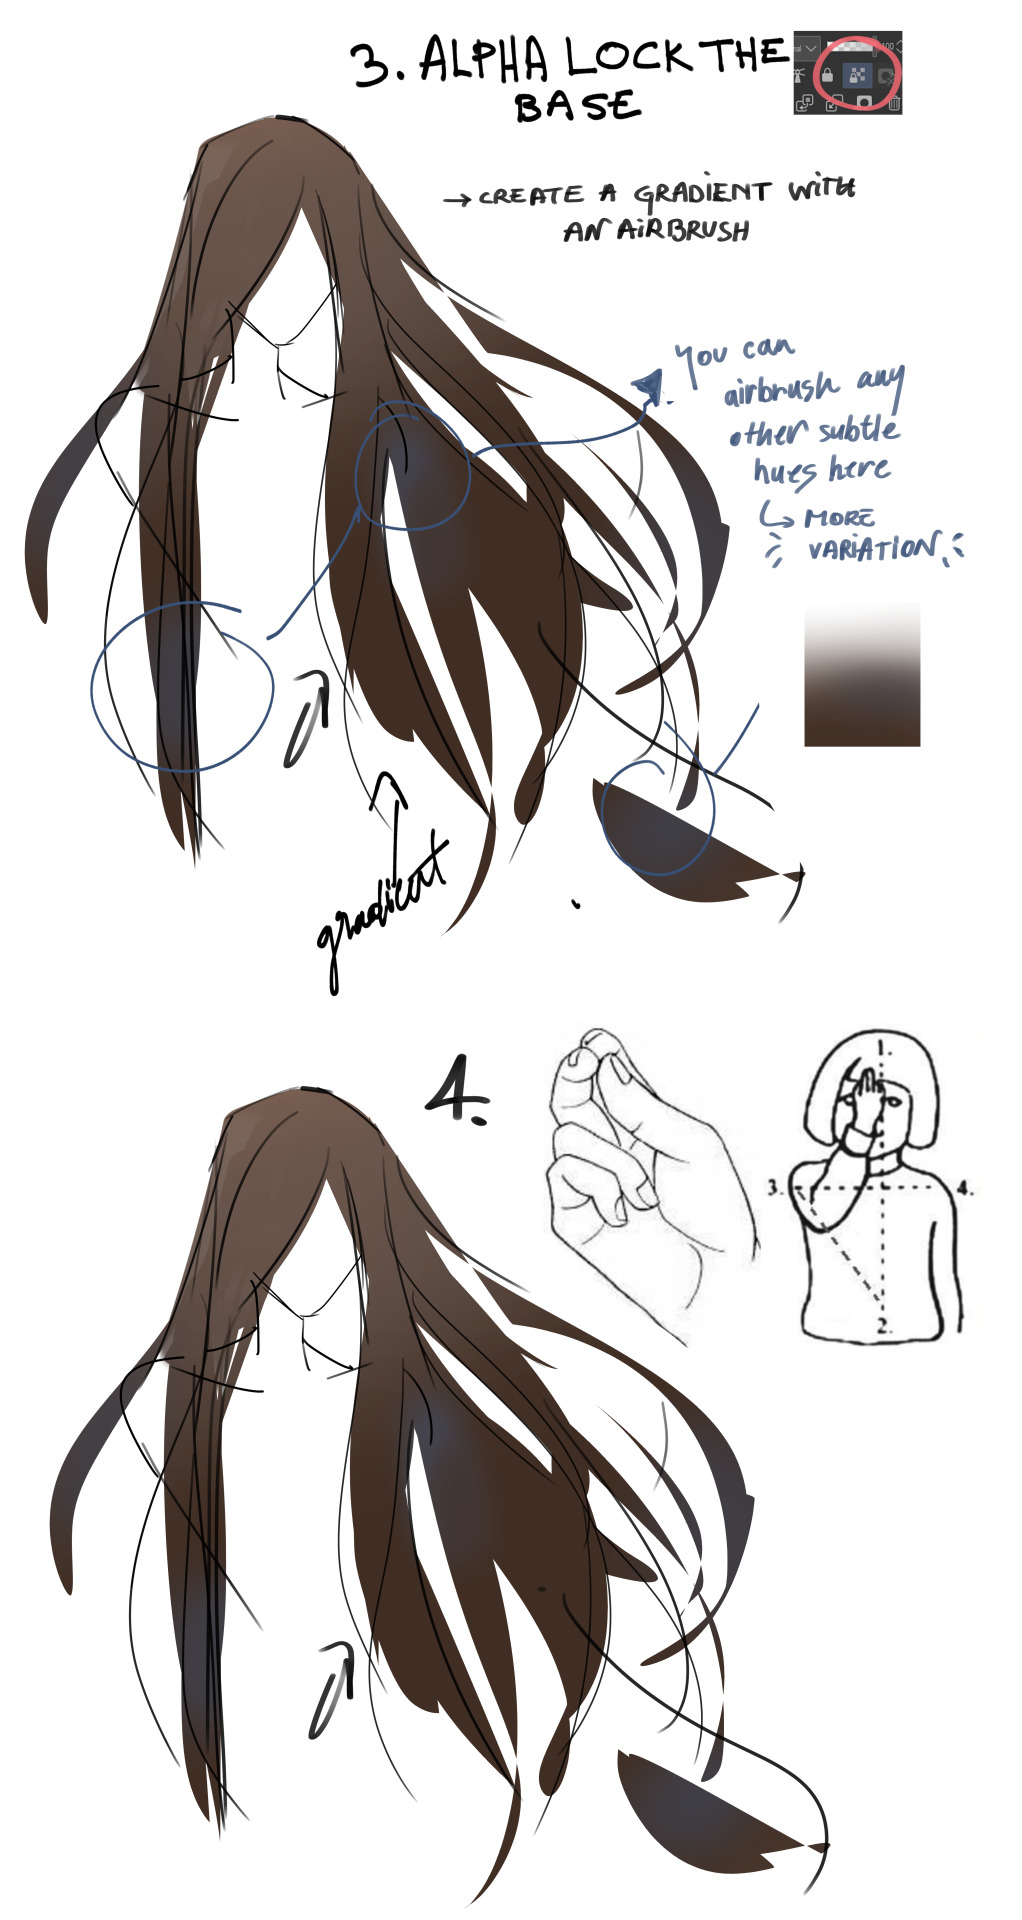
When you have the light areas down you can push and pull the lighter and darker colours to fine tune the shape of the areas and also imply detail in certain areas. Remember to not make things too monotonous! If you have the same level of detail everywhere you will lose the sense of the form and also overwhelm the viewer with too much detail.
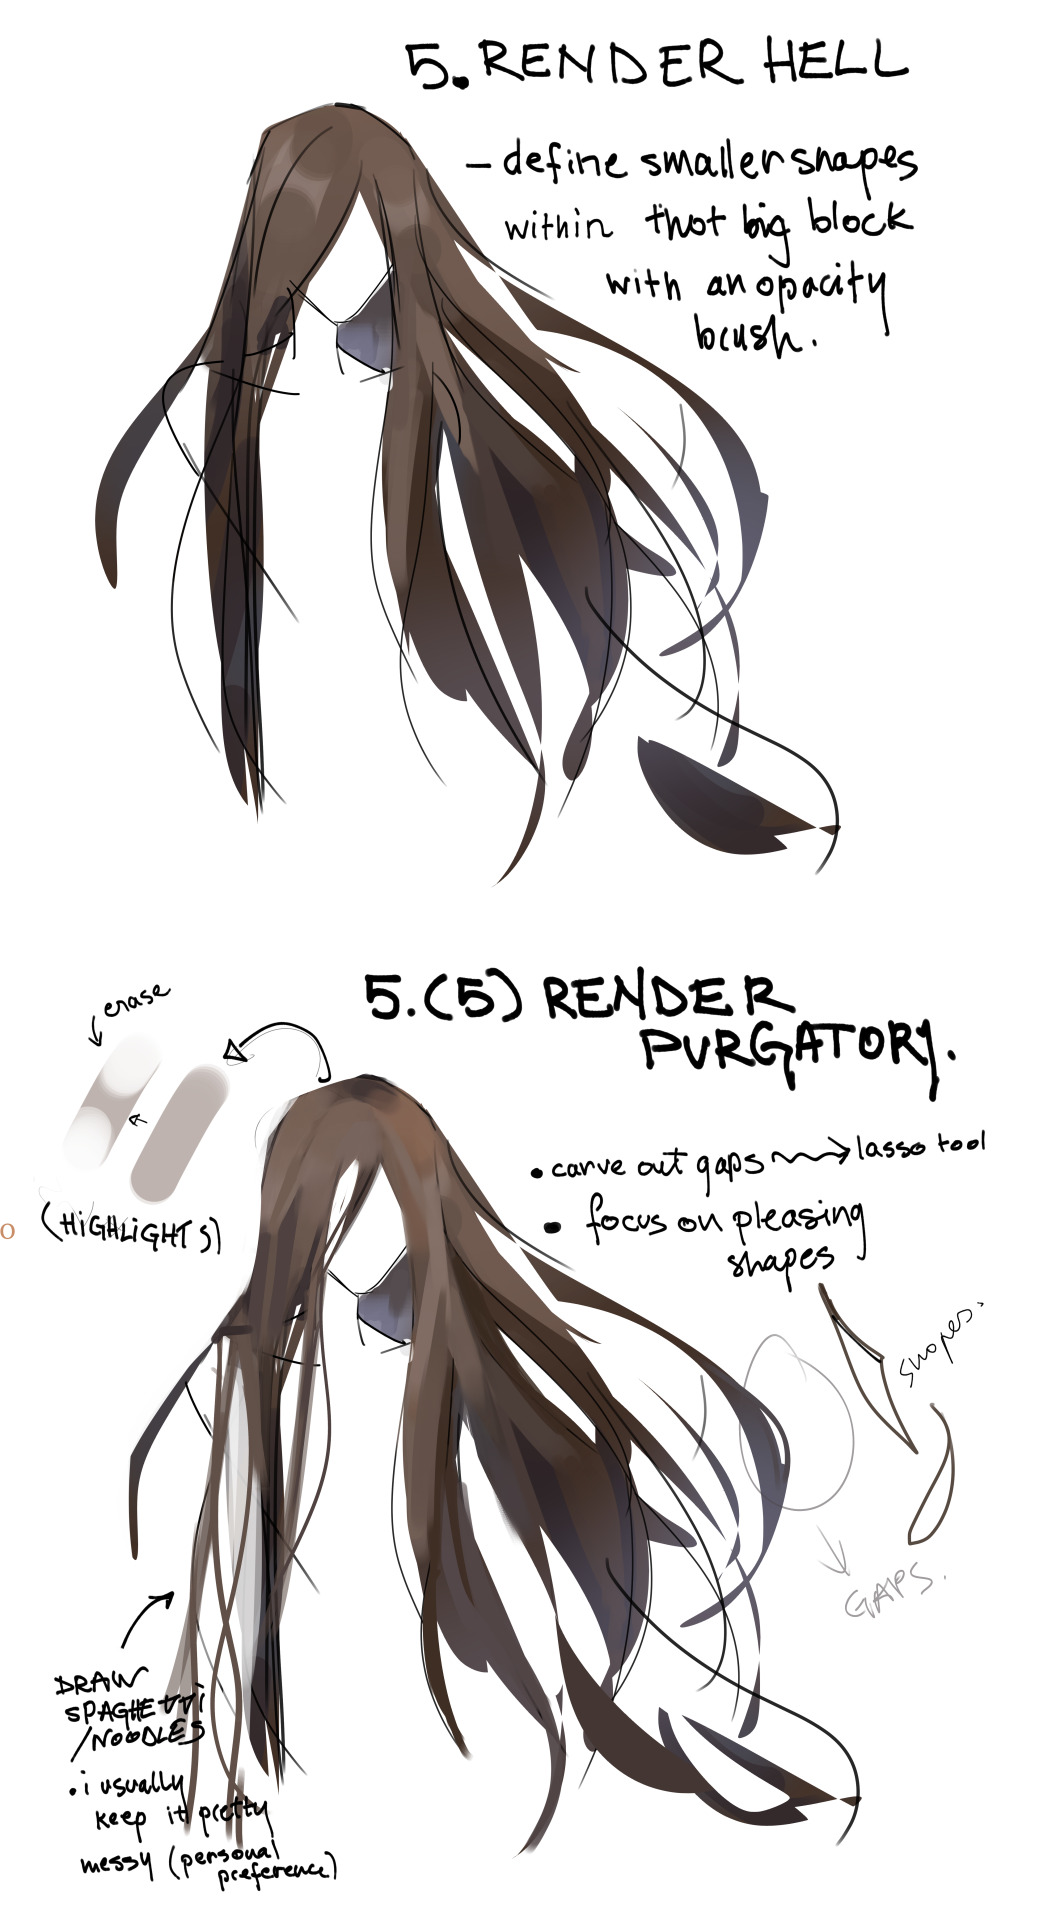
Then I just popped on some highlights to make it slightly less flat and to illustrate that you can use the highest highlights very sparingly and it still does the job of both implying form and keeping the overall image readable.

You can use whatever technique you fancy - erase light areas from the shadow layer, paint the light colour on top, paint the shadow colour on top - whatever works for you! The principle is the same. You can also add in darkest darks in the same fashion as the brightest highlights - sparingly but to give the hair a bit more oomph.
Hope this helps!
#digital art#drawing#tutorial#art tutorial#hair tutorial#hair#drawing hair#how to draw#art#drawing tutorial#artists on tumblr
417 notes
·
View notes
Note
Would you mind showing the way you painted Astarion’s hair in your last piece? It’s GORGEOUS!!
Thanks a lot!! ^^ I didn't save the stages of that art, but I did it with another portrait. But in both cases the approach is the same! 1. We start with the total mass, determine the source of light and shadow. And then I do large strokes of the main curls. The color is dark, it will serve as a base


I don't do shadows on the back of the head: it's far from the center of the composition (face) and it will also help keep his curly hair "airy" :]
2. I add light strands on top of the shadows. I try to take a color of the same tone as the hair tone at stage 1. The highlights will be lighter, but it's not time for them yet.


Aaaand the next stage - thin and dark shades of hair! The brush size is smaller, I work slower and more accurately. Here I'm trying to make the strands more precise. But now the mass of hair is too fragmented, soooo.......
3. I go back to the highlights and add more blonde hairs. In some places I block the shadow more


At the last stage, I understand that the contrast of shadow and light is too much and I don’t like it. From above I go over with large strokes of a light tone.

I also like to combine sharp and blurry details, so in some places I blur the hair (mostly in the distance), and somewhere I add sharpness (the hair that is closer to us)
I hope you found these steps helpful! ^^
204 notes
·
View notes
Note
Can you do a tutorial on how you draw hair?
let's use vere to show how i do hair from start to finish! 🦊


disclaimer that this is *technically* out of order from how i drew it, but the way i've shown is able to highlight where you put in the blackwork for the hair without the flats or additional rendering distracting it ^_^
i hope this answers any of your questions anon 🙏🏻 lmk if you have any more!!
58 notes
·
View notes
Note
helloo!! i was wondering how you go about rendering hair because i’ve been staring at your drawings for HOURS and i’m in love. like literally entranced with your art style.
sorry if you’ve already answered this question!!
hii! sorry for the late reply, i wanted to use this ask as a opportunity to drop the little hair "tutorial" that i promised a while back so here it is; this is how I personally draw hair ** side note: i didn't use any references for this one so it's strictly painted off the top of my head
#sorry for any typos#hope it made sense#it's not that linear i had to mentally think of how i'd divide my process into steps bc it usually happens all at once#so don't take it as literal as it is here#ask iztea#iztea draws#tutorial#art tutorial#hair tutorial#ask iztea: art talk
199 notes
·
View notes
Text
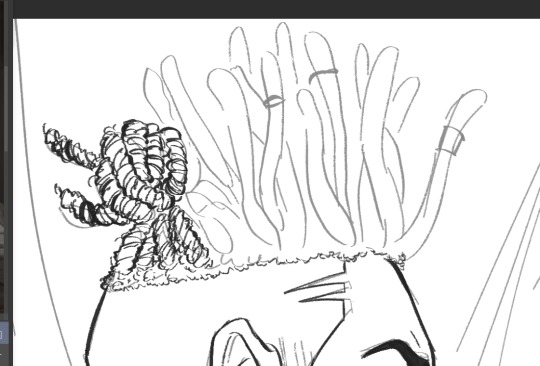
How I draw Ekko's hair!!
No one asked but!! Brief tutorial on Ekko's hair <3
1. ok so, 1st things 1st, I usually laid out the shape of it with this worm-shape so I can separate his twists from one another.
Like this:
2. knowing the direction; based on his own hair, his hair is twisted clockwise, so try to follow from left to right:
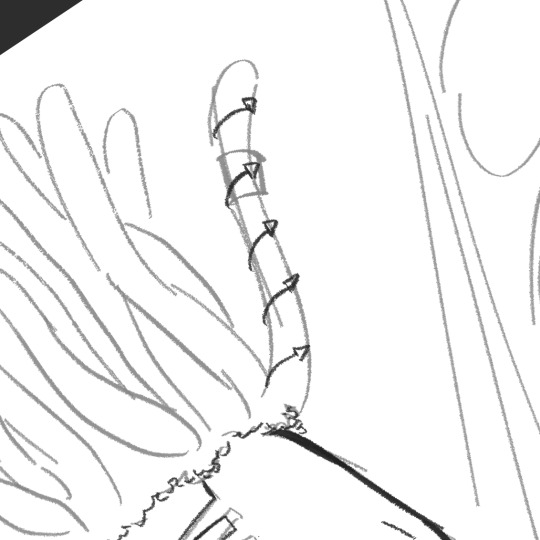
Then I draw one side of the twist, like mapping down where it follows:
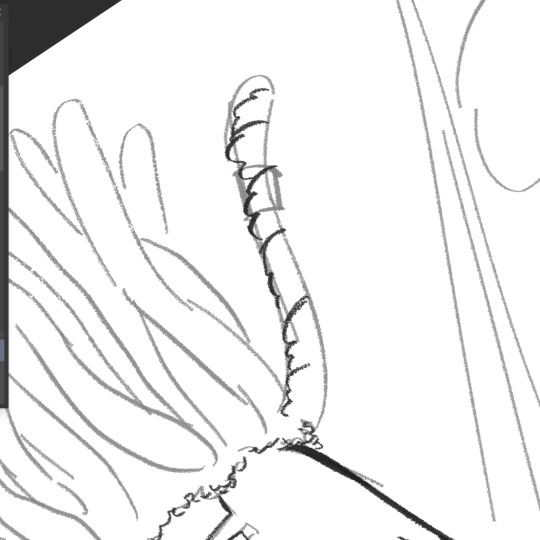
3. wrapping up; now that's laid out, you can come back from top to bottow, like this:

4. details; now you just add the details (hair jewelry, loose hair) and thicken the edges to distinguish each of the other:
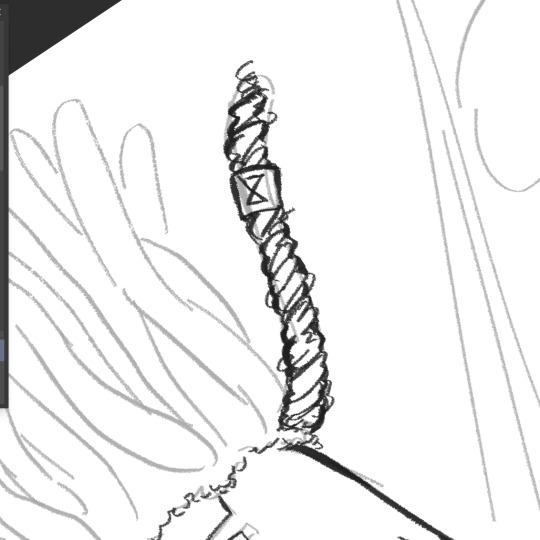
And done!!! Hope this is for help of someone ❤️ please, feel free to ask questions or other tutorials if you want!
#bleak's drawings#tutorial#art tutorial#artists on tumblr#hair tutorial#digital art#ekko#arcane ekko#ekko arcane#ekko lol#ekko fanart#ekko league of legends#ekko thoughts#artist help#illustration#drawing tips#tips
70 notes
·
View notes
Text
53 notes
·
View notes
Note
i am endlessly fascinated by the way you draw hair. it looks amazing even in your doodles, let alone fully detailed pieces. just stunning. could i persuade you to make a little tutorial? i'd be happy to write a soft sebinis ficlet for you in exchange. 🥰
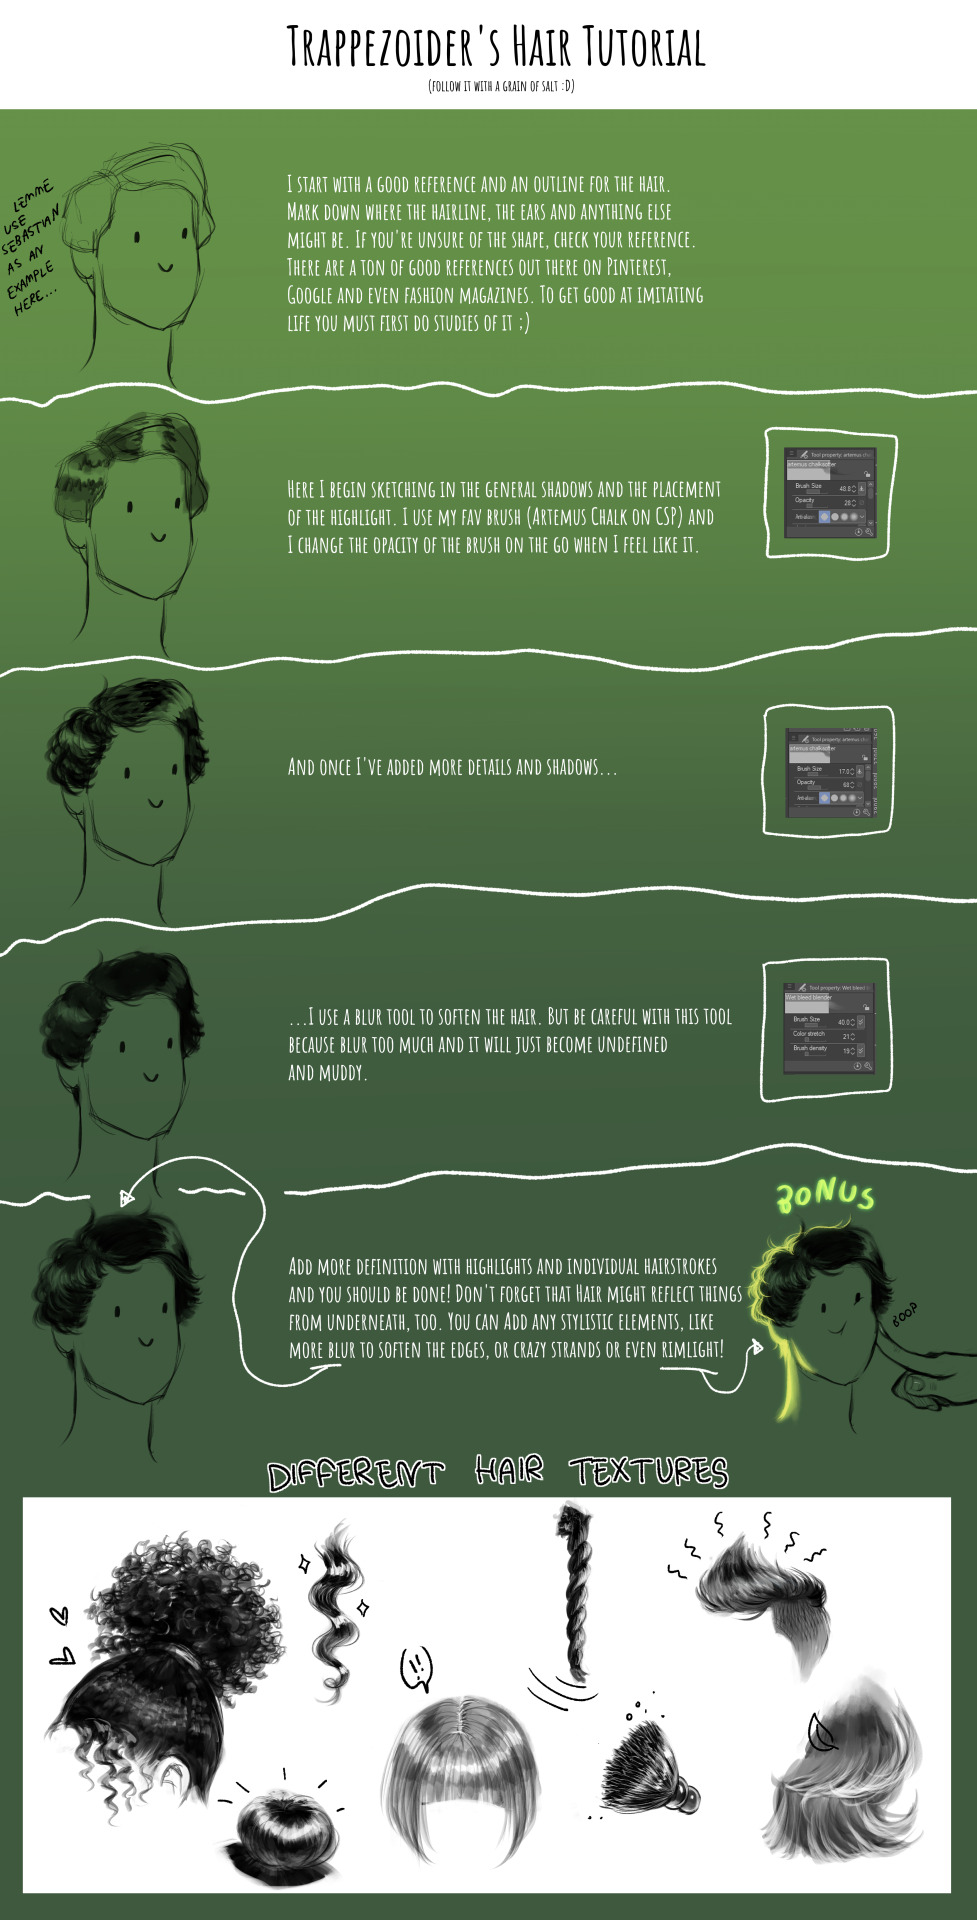
Aaaaah, I didn't think it looked like anything special xD If anything I struggle with it a lot, so thank you for this compliment😭 I made a lil tutorial of how I do it so you'll know my secrets :D But it's very general and I bet there are a ton of better hair tutorials out there. I didn't include any colour as I focus more on the texture and the shape more. The sketching phase is definitely my favourite rather than colouring hehe... And I would love to read a sebinis ficlet omg!! But I want you to write whatever you're most interested in!! No need for separate gifts just for this!! x) (but I will be staring at AO3 and refreshing the tag lol)
#tutorial#hair tutorial#art tutorial#art#digital art#sketch#hope this tutorial even makes sense xD#ask
107 notes
·
View notes
Text


𝒲𝒶𝓃𝓃𝒶 𝒷𝑒 𝒴𝑜𝓊𝒯𝓊𝒷𝑒𝓇 𝓉𝓎𝓅𝑒 𝓅𝑜𝓈𝓉 (˶˃⤙˂˶)
(𝒜𝓁𝓇𝑒𝒶𝒹𝓎 𝒷𝑒𝒾𝓃𝑔 𝓈𝑜 𝒾𝓃𝓉𝒾𝓂𝒶𝓉𝑒 𝓌𝒾𝓉𝒽 𝓉𝓊𝓂𝒷𝓁𝓇 🙈 𝒷𝒶𝓇𝑒 𝒻𝒶𝒸𝑒 𝑒𝓍𝓅𝑜𝓈𝑒𝒹…. and this is cringy but eeee idk 😭 !!)
.
.
@tazcheriette <3


Dividers -
#girl blogger#actually mentally ill#coquette#lana del rey#sadgirl#doelita#dollette#fawn angel#fawnlette#lana del ray aka lizzy grant#hair tutorial#tutorial#girl blog aesthetic#men dni#just girly things#dolly aesthetic#irl doll#curls#heatless curls#girly blog#doellete#coqeutte#dolette#nymph3t#50s#my video#wholesome#hell is a teenage girl#cringe but free#girls of tumblr
28 notes
·
View notes
Text
super quick tutorial on how i draw hair (I'm following a reference, bottom right)
establish the silhouette and hairline

2. separate it into chunks, its best to put the separating lines where the hair flow changes (ex. the top hair vs the side section)

3. draw the hair following the guidelines made, strands (details) are drawn mostly where the separating lines are

final: drawing more details + hair strands -- important to not overdo it as for my style, LESS is MORE (bcs i paint over it anyway) so i do the details in clusters (rather than filling every empty space). i tend to do two/three lines to signify hair strands

this is an extremely basic approach on how i draw hair, as mentioned, i paint over my sketches so there's no need for me to be drawing every detail, my best advice for drawing hair is to keep the basic shapes of the sections and to not draw every single hair strand there is-- this is how *i* draw hair, it's according to *my* style so i encourage you to study other artists' work that aligns with how you want to draw :D

#kkelseysart#my art#art tips#art tutorial#clipstudiopaint#hair#hair tutorial#artists on tumblr#art help#digital art#somebody asked me how i Draw hair and was only able to illustrate it now#its very overdue
243 notes
·
View notes
Note
KEL I'M ABSOLUTELY IN LOVE WITH HOW YOU DRAW HAIR, CAN YOU SHARE A TUTORIAL PLEASE!?!? :3
HOW DO YOU GET IT TO BE SO FLUFFY
OKAY hear me out... a lot of how I do stuff is fairly "mindless". I don't really think about it or even use particular methods to make the stuff I do, especially hair- I LOVE drawing hair but fuck me explaining that shit, my brain immediately forgots what I can draw. But I'll try!
Lemme use my wip for one of my characters because her hair is fairly easy to use as example.
It's not even a "tutorial",,, because what am I supposed to explain if there's almost no steps to my madness. I love to use very long strokes to draw my hair unless it is like... very sketchy. Usually I draw areas of hair in one ongoing stroke because it helps me to be more "spontaneous" with the way the strands fall. Most of my characters have 3 hairpieces I call most attention to - the front/bangs (red), the sideparts (blue) and the hair behind the head (green).
Unless it's like really coily/curly hair I use a swaying motion for the lines. I tries to avoid too straight lines at all costs. Even straight/untextured hair has bends and curves, use them! If you want to, chose a starting point where your hair falls from, similar to IRL where your hair will part in a special way and form itself around certain points. Keep the dimensions of the head in mind, hair can make or break alot if you miss the dimensions of it - it adds volume to the head, not taking it.

51 notes
·
View notes
Text


Hi, this is the tutorial on how I specifically draw hair! I'll link how to colour it when I finish the other one, and then link them both to the ask later when I got them both sorted out.
Hope this helps!
24 notes
·
View notes
Text


Alexa Chung in Cosmo Girl, 2004
join my alexa chung tumblr community <3
#alexa chung#ac fashion archive#alexa chung aesthetic#cosmo girl#2000s magazine#photography#fashion#hair tutorial#arctic monkeys
23 notes
·
View notes