#How to Install MACOS and Any PC
Explore tagged Tumblr posts
Visit Tumblr Blog
Explore Tumblr blogs with no restrictions, modern design and the best experience.
Last Seen Tumblr Blogs


Fun Fact
25% of US internet users with an annual income of $80-100K use Tumblr.
Text
youtube
How to Install MACOS and Any PC Using a Windows Computer | COMPLETE GUIDE, Step by Step!
#education#windows 10#free education#hacking#windows10#youtube#How to Install MACOS and Any PC#hacking tips#Hackintosh#computer tips#Youtube
2 notes
·
View notes
Text
How to read the new Witcher book, Crossroads of Ravens, in English (e-book) [GUIDE]
Thanks to @nohtora for the method, I decided to write up a short post detailing how to use Calibre e-reader to read a side-by-side English translation from the Polish text.
This post is dated 12/02/2024 - as of yet, no English translation has been scheduled, nor even announced. I am writing this because I have seen many fans say they want to read the book and are sad because they can't read Polish and don't want to wait forever for a translation and get to posting memes already. Well, me too.
So, I read it.
Because, if you are an international fan like I, and do not live in Poland, you can still purchase a copy of the new book of Rozdroże kruków ("Crossroads of Ravens") and read it... also in English.
How, you might ask? Well, by buying it and translating it yourself... or rather, not yourself, but with the assistance of... *Percival Schuttenbach voice* modern technology!
Now, when I read it, I did the foolish thing of copying and pasting literally page-by-page into Google Translate. Noels (nohtora) had a much better solution, which I will detail here.
This method is easy, free (well you gotta buy the book, but not the software) and accessible (available on Mac, PC, Linux). If you have access to a computer and are OK with reading from screens, I recommend this.
In total, it took me about 10 to 20 minutes to set up from scratch.
Step 1. Download Calibre, a free and open-source e-reader program. Step 2. Install the translation plugin - also free and open-source. Step 3. Purchase the e-book. Step 4. Open the e-book with the plugin, translate. Step 5. Read!
Step 1: Install your e-book reader.
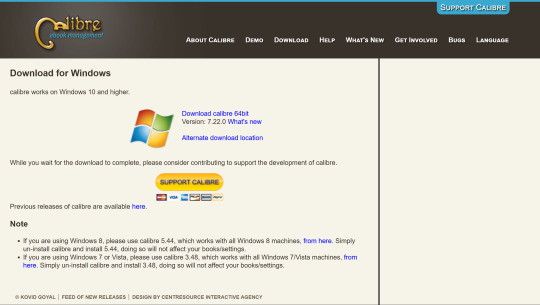
Download Calibre here. It is a free and open-source e-reader program for laptops/computers (although it does not run on mobile devices). You install it like any other program on your computer (Windows, MacOS, or Linux).
Step 2: Download the translation plugin.
youtube
Use this free Calibre plugin to translate e-books.
Watch until 1:00 to install the plugin. The rest of the video you should return to later, during Step 4.
Notes of steps to install plugin: (1) Open Preferences. (2) Get plugins. (3) Get "Ebook Translator" from Author "bookfere.com"
Step 3: Buy the book.
You can purchase Rozdroże kruków online for about $8.
I purchased my copy from Legimi, which I will show you now. I didn't really poke around for other websites, it seems like Legimi had it the quickest. But other sites will have this ebook eventually, so don't feel pressured to get it from Legimi, specifically. I just wanted to include a "how to purchase" step in this guide because (1) it's a direct link to get it (2) in case people felt anxious about navigating a UI they can't read.

This is what the page for Rozdroże kruków looks like. As you can see, it is currently 34.99 zł, or: $8.57 US, $13.21 Aus, £6.77, or €8.15.
For me, it was $8.49 after foreign transaction fees. (I paid through PayPal).
But before you buy anything, you first need to create an account.

From the homepage, click the yellow button, "Zarejestruj się", "Sign up".

Put your username, email address, password, and confirm password. Check the first box to accept the terms of service. Don't check the second box unless you want their newsletter.
I kind of... already bought the book, so I can't buy it again on this account. I have selected a couple of other books for demonstration purposes. Same process.

Select the "ebook" tab, the right one on the ribbon (underlined in green), to buy the singular book and not a subscription. Then select the yellow button, "Dodaj do koszyka", or "Add to cart".

After adding to your cart, click the yellow button to go to your cart and checkout.
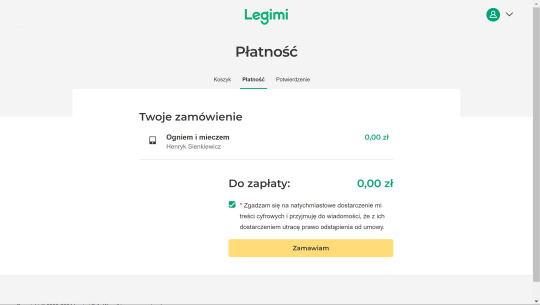
Check to accept the digital distribution agreement.
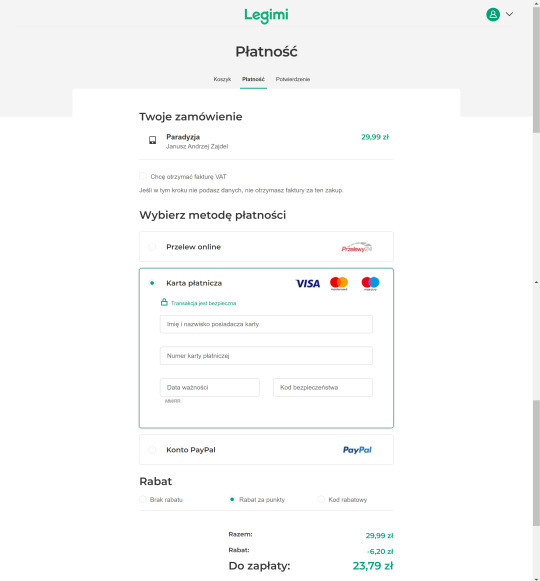
You can then pay with your credit card or PayPal. (From top to bottom, left to right: "First and last name on card" "Credit card number" "Expiration date" "Security code").
Don't worry that it says you will pay in złoty, it will be converted. There may be a foreign transaction fee depending on your bank, but it is typically small (around 3%). If you are only buying an $8 book, that will not be much.

From here, you are going to want to click the WHITE button: "Przejdź do półki", "Go to shelf". (The green button is to download their application, which we're not gonna do for this).
If you skip this on accident, just go to your profile in the top right corner and click "Półka", "Shelf", to see the books on your account.

You will see it in your shelf. Click on it.
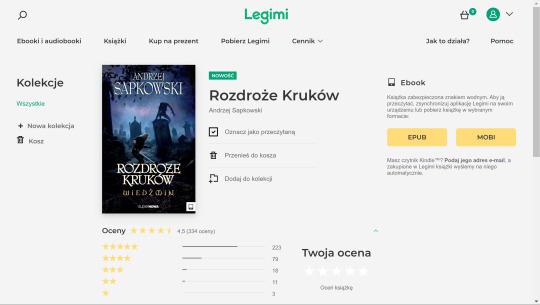
Click the yellow button "EPUB" to download it as a .epub format. Save to your Downloads or where-ever is convenient.
Step 4: Open the book in Calibre.
Refer back to the video from Step 2 for this section and watch the part on how to use the plugin. I will add my example here, too.
Open Calibre. Click "Add Book" at the top of the ribbon. Locate rozdroze-krukow.epub from where you saved it. It will be copied to your Calibre library.
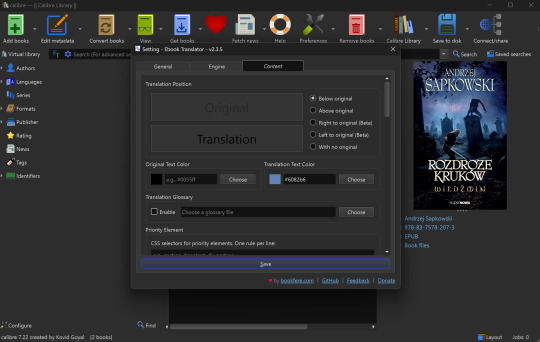
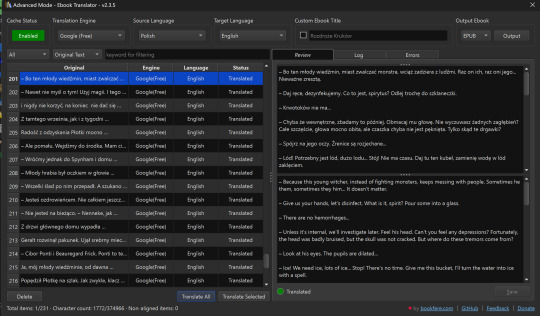
Before starting the translation, make sure to adjust settings in the Translate Book option (sometimes hidden in the ribbon as you can see in my screenshot - just click the kebab menu on the right to bring it up) to export the file the way you would like it to be formatted. I also recommend checking the box in "General" to allow it to merge paragraphs, Google Translate tends to work better when it has more context.
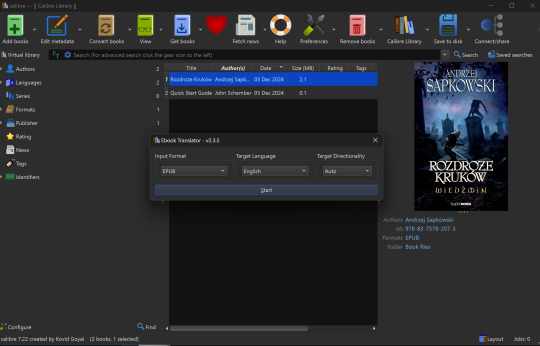
Select Translate Book as shown in the video. Translate into English (or - hey - language of your choice! Sky's the limit). You can also use different translation programs if you'd like, the default is Google.
You should select "Output" at the top right after this is complete.

It will create a separate epub in your library, tagged as "Translation."
Step 5: Read it and have fun! It's a fun read!
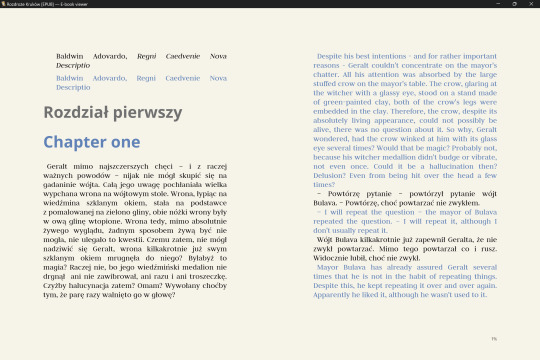
I set up my formatting this way because I want to read a Polish paragraph, then an English paragraph, but you can also set it up to be side-by-side (left page in Polish, right page in English), or even hide the original text if you're not interested and just want the translation.
The days of manually copying-pasting into Google translate are over! Thanks again to Noels for sharing this method in the Discord.
Now, this translation will NOT be 100% perfect - this is a Sapkowski novel after all; humans have difficult translating him, and this is only a machine. I wrote a Reddit post about some caveats to this desperate method of translation, and some silliness I specifically encountered with this book (light spoilers, I mention a couple of characters and settings, but no plot points).
My rule of thumb for when the translation is weird: Pay attention to the context. It is usually not too hard to figure out what the translation meant. If you have real trouble understanding it, or are just curious, Google the Polish phrase that it seems to be hitching on. Make use of Reverso Context, Reddit (r/learnpolish), and Polish learning forums.
Oh, and make sure to watch out for "grasshoppers" ;)
Finally, I recommend you also support the official English translation when it does come out; if not to compare translations, to show Orbit-Gollancz that English readers do want more translations (and ideally we'd like them sooner rather than later).
Good luck on the path ~ Powodzenia na szlaku ~
66 notes
·
View notes
Text
i think people should try a little Linux, just for something different yknow
doesn’t have to be any specific “beginner-friendly” distro or whatever, could just be WSL even . just gives you a different perspective on OSs :)
like if you’re sick of Windows/MacOS and are frustrated that you need to keep upgrading your hardware to run the newest versions, why not experience something else and download VirtualBox n try out a Linux distro for a bit, see if you like it,, I think you might be surprised by some of em :)
i still use Windows 10 for my desktop, mainly for gaming and art etc, but i switched over to Linux Mint on my laptop a while ago and have used it for school, and it’s been running better than when it had Windows on it. does what i need it to do, and using the terminal to do stuff feels fun and kinda powerful with how easy it is to install stuff with it :)
was there troubleshooting involved? yes, but it was often fixed by just looking up your problem and finding answers on stackexchange or linux forums, not too different from troubleshooting windows tbh lol
i’ve also recently got a mini pc to use as a little server for stuff, like discord bots. even tho the specs are a little on the lower side, it’s still able to run stuff pretty well since I installed Xubuntu on it, which is specifically designed to be quite light on system resources, and it’s been great too :)
anyways point is,, try out Linux in some form, why not :) if you have an old laptop/desktop sitting around, try reviving it by installing a lightweight linux distro on it! the less e-waste the better :3
105 notes
·
View notes
Text
The story of Microsoft's meteoric rise and IBM's fall has been on my mind lately. Not really related to any film, but I do think we're overdue for an updated Pirates of Silicon Valley biopic. I really think that the 80's and 90's had some wild stories in computing.
If you ask the average person what operating system your computer could have they'd say that if it's a PC it has Windows, and if it's a Mac it has macOS. All home computers are Macs or PCs, but how did it get this way?
In the 70's everyone was making home computers. Tandy was a leather supply goods company established in 1919, but they made computers. Montgomery Ward was a retail chain that decided to make their own store brand computers. Commodore, Atari, NEC, Philips, Bally and a million other assorted companies were selling computers. They generally couldn't talk to each other (if you had software for your Tandy it wouldn't work on your Commodore) and there was no clear market winner. The big three though were Tandy (yeah the leather company made some great computers in 78), Commodore and Apple.
IBM was the biggest computer company of all, in fact just the biggest company period. In 1980 they had a market cap of 128 billion dollars (adjusted for inflation). None of these other companies came close, but IBM's success was built off of mainframes. 70% of all computers sold worldwide were IBM computers, but 0% of it was from the home market.
IBM wanted to get into this growing and lucrative business, and came up with a unique plan. A cheap computer made with commodity parts (i.e. not cutting edge) that had open architecture. The plan was that you could buy an IBM Personal Computer (TM) and then upgrade it as you please. They even published documentation to make it easy to build add ons.
The hope was that people would be attracted to the low prices, the options for upgrades would work for power users, and a secondary market of add ons would be created. If some 3rd party company creates the best graphics card of all time, well you'd still need to buy an IBM PC to install it on.
IBM was not in the home software business, so they went to Microsoft. Microsoft produced MS-DOS (based on 86-DOS, which they licensed) but did not enforce exclusivity. That meant that Microsoft could sell MS-DOS for any of their competitors too. This was fine because of how fractured the market was. Remember, there were a lot of competitors, no one system dominated and none of the competitors could share software. Porting MS-DOS to every computer would have taken years, and by that point it would be outdated anyways.
IBM saw two paths forward. If the IBM PC did well they would make a ton of money. Third party devs like Microsoft would also make a lot of money, but not as much as IBM. If it failed, well then no one was making money. Either way the balance of power wouldn't change. IBM would still be at the top.
IBM however did not enjoy massive profits. It turns out that having cheap components and an open architecture where you could replace anything would... let you replace anything. A company like Compaq could just buy their own RAM, motherboards, cases, hard drives, etc. and make their own knockoff. It was easy, it was popular, and it was completely legal! Some people could order parts and build their own computer from scratch. If you've ever wondered why you can build your own computer but not your own tv or toaster, this is why. IBM had accidentally created a de facto standard that they had no control over.
In 1981 IBM's PC was worth 2.5% of the marketshare. By 1995 IBM PC compatibles were 95% of the marketshare, selling over 45 million units and IBM had to share the profits with every competitor. Apple is the only survivor of this time because the Macintosh was such an incredible piece of technology, but that's a different story for a different time.
And Microsoft? Well building an OS is much harder than putting together a few hardware components, so everyone just bought MS-DOS. With no exclusivity agreement this was also legal. That huge marketshare was now the basis for Microsoft's dominance.
IBM created a computer standard and gave the blueprints to every competitor and created a monopoly for Microsoft to boot. And that's why every computer you buy either is made by Apple with Apple software, or made by anyone else with Microsoft software. IBM is back where they started, having left the home computer business in 2005.
It's easily the biggest blunder in computer history. Other blunders have killed companies but none were quite as impactful as this one.
This story, and many others I know of, I first read in "In Search of Stupidity", a book authored by a former programmer and product manager that was able to see a lot of this first hand. I make no money advertising this book, I just had a great time reading it.
#software#hardware#microsoft#ibm#apple#tandy#nec#compaq#Wordstar#borland#ashton-tate#lotus#Ms-dos#windows#word#excel#access#commodore#atari#philips#bally#In search of stupidity#macintosh#montgomery ward#pirates of silicon valley
12 notes
·
View notes
Note
What is considered both a reasonable and maximum polycount for custom content hair and other types of custom content in The Sims 2 and does it depend on gaming specs? Also your work is great!
Thank you for taking the time to read it.
I, personally, use hair that is under 25K polys unless it's unique and cute. Anything over that is overboard and should get decimated. Any furniture or clothing over 10K is extreme for me.
As for specs, I'm inclined to believe that it's a game limitation, how powerful your computer specs are, and a secret third and fourth thing, your OS, and if you're a laptop user.
This OS talk is a side tangent, so bear with me:
Big disclaimer that this is all my opinion, not a factual piece. Don't take this as gospel and I'm far from an expert on operating softwares, computers, and CC for that matter. I went a little bit insane with the OS talk because you mentioned specs and this has been on my mind for a while 🥴
Every single time I've heard that someone installed TS2 on Linux, they are able to play on maximum settings with a BUNCH of CC for a long time and experience no pink soup or pink soup related crashing. I want to do my own research and play the same heavily detailed lot for the same amount of time on Windows and Linux and compare the differences as well as compare how they use resources differently. If I already did not have an attachment to Photoshop CC 2017, I would have made the switch by now.
Okay so Windows... I've played TS2 on my Asus laptop from 2020 and on my new desktop. Here's the spec difference
Laptop: Intel Core i7-9750H 6 Core Processor, 8 GB RAM, NVIDIA GeForce GTX 1650 (Windows 10)
Desktop: AMD Ryzen 5 2600X Six-Core Processor, 16 GB RAM, NVIDIA GeForce GTX 1080 Ti (Windows 11)
My laptop was really good for it's time (I bought it in March 2020), but it was pink soup galore for any cluttered CC lot, even with all of the fixes and GRM edits. My current setup is a mish mosh of my bf's and ex's computer parts and it runs perfectly fine, but I do not play long enough to encounter pink soup. (I have a job and I mainly play to get CC previews these days.) If you noticed, both my CPU and GPU were made before my laptop was sold, and yet it still performs way better. Laptops with top of the line hardware will never be more powerful than PCs with even mid to high level hardware from 5 years ago. Don't forget that laptops will throttle performance to protect itself from overheating and causing damage.
There is also no difference between installing and playing the game on Windows 10 and Windows 11, except that you should absolutely uninstall OneDrive if you haven't already. There might be some issue if you install with discs, but I don't own the discs.
And as for Mac, I truly believe that Mac is the worst way to experience Sims 2. Between the Super Collection crap, not being able to use third party tools (SimPE, Hair Binner, any other .exe files made to run for Windows), and the file limit that really hits you hard if you download a bunch of CC that you can't merge anyway because CCMerger can't run on Mac. I should say I have never played Sims 2 on a Mac, but this is my opinion after reading about the struggles of other MacOS users online.
The point of this OS tangent? None, really. I'm not trying to persuade you to use Linux or stop using Mac, this is simply what I've noticed and my opinions on the matter. There's millions of variables I did not cover such as DXVK, texture sizes, difference in specs between each OS and user and many other things I am forgetting.
Feel free to correct, add on, extrapolate or whatever. If you have any thoughts, please comment, add it in reblogs, or tag me in your post. I'm very interested in the current topics about high polys, pink soup and big textures for this game.
#spell.txt#cc discussions#my opinion on macs wont change though#sorry mac users#only thing im qualified for in this discussion is my photoshop certificate lmao
17 notes
·
View notes
Note
Hello!! Sorry to bother you but i found your madoka fonts and theyre AMAZING and perfect for a drawing im working on but i dont see any information on how to execute them in things like ipad or PC. How are they used?
Ah hello! On pc you download them and then intalled them for the System Font's folder or just by opening them on Windows or macOS and they should open and hit install.
To install custom fonts on your iPad for use in Procreate or other apps, you need a third-party font manager app from the App Store
so try from there. hopefully this helps!
4 notes
·
View notes
Text
Obsidian And RTX AI PCs For Advanced Large Language Model

How to Utilize Obsidian‘s Generative AI Tools. Two plug-ins created by the community demonstrate how RTX AI PCs can support large language models for the next generation of app developers.
Obsidian Meaning
Obsidian is a note-taking and personal knowledge base program that works with Markdown files. Users may create internal linkages for notes using it, and they can see the relationships as a graph. It is intended to assist users in flexible, non-linearly structuring and organizing their ideas and information. Commercial licenses are available for purchase, however personal usage of the program is free.
Obsidian Features
Electron is the foundation of Obsidian. It is a cross-platform program that works on mobile operating systems like iOS and Android in addition to Windows, Linux, and macOS. The program does not have a web-based version. By installing plugins and themes, users may expand the functionality of Obsidian across all platforms by integrating it with other tools or adding new capabilities.
Obsidian distinguishes between community plugins, which are submitted by users and made available as open-source software via GitHub, and core plugins, which are made available and maintained by the Obsidian team. A calendar widget and a task board in the Kanban style are two examples of community plugins. The software comes with more than 200 community-made themes.
Every new note in Obsidian creates a new text document, and all of the documents are searchable inside the app. Obsidian works with a folder of text documents. Obsidian generates an interactive graph that illustrates the connections between notes and permits internal connectivity between notes. While Markdown is used to accomplish text formatting in Obsidian, Obsidian offers quick previewing of produced content.
Generative AI Tools In Obsidian
A group of AI aficionados is exploring with methods to incorporate the potent technology into standard productivity practices as generative AI develops and speeds up industry.
Community plug-in-supporting applications empower users to investigate the ways in which large language models (LLMs) might improve a range of activities. Users using RTX AI PCs may easily incorporate local LLMs by employing local inference servers that are powered by the NVIDIA RTX-accelerated llama.cpp software library.
It previously examined how consumers might maximize their online surfing experience by using Leo AI in the Brave web browser. Today, it examine Obsidian, a well-known writing and note-taking tool that uses the Markdown markup language and is helpful for managing intricate and connected records for many projects. Several of the community-developed plug-ins that add functionality to the app allow users to connect Obsidian to a local inferencing server, such as LM Studio or Ollama.
To connect Obsidian to LM Studio, just select the “Developer” button on the left panel, load any downloaded model, enable the CORS toggle, and click “Start.” This will enable LM Studio’s local server capabilities. Because the plug-ins will need this information to connect, make a note of the chat completion URL from the “Developer” log console (“http://localhost:1234/v1/chat/completions” by default).
Next, visit the “Settings” tab after launching Obsidian. After selecting “Community plug-ins,” choose “Browse.” Although there are a number of LLM-related community plug-ins, Text Generator and Smart Connections are two well-liked choices.
For creating notes and summaries on a study subject, for example, Text Generator is useful in an Obsidian vault.
Asking queries about the contents of an Obsidian vault, such the solution to a trivia question that was stored years ago, is made easier using Smart Connections.
Open the Text Generator settings, choose “Custom” under “Provider profile,” and then enter the whole URL in the “Endpoint” section. After turning on the plug-in, adjust the settings for Smart Connections. For the model platform, choose “Custom Local (OpenAI Format)” from the options panel on the right side of the screen. Next, as they appear in LM Studio, type the model name (for example, “gemma-2-27b-instruct”) and the URL into the corresponding fields.
The plug-ins will work when the fields are completed. If users are interested in what’s going on on the local server side, the LM Studio user interface will also display recorded activities.
Transforming Workflows With Obsidian AI Plug-Ins
Consider a scenario where a user want to organize a trip to the made-up city of Lunar City and come up with suggestions for things to do there. “What to Do in Lunar City” would be the title of the new note that the user would begin. A few more instructions must be included in the query submitted to the LLM in order to direct the results, since Lunar City is not an actual location. The model will create a list of things to do while traveling if you click the Text Generator plug-in button.
Obsidian will ask LM Studio to provide a response using the Text Generator plug-in, and LM Studio will then execute the Gemma 2 27B model. The model can rapidly provide a list of tasks if the user’s machine has RTX GPU acceleration.
Or let’s say that years later, the user’s buddy is visiting Lunar City and is looking for a place to dine. Although the user may not be able to recall the names of the restaurants they visited, they can review the notes in their vault Obsidian‘s word for a collection of notes to see whether they have any written notes.
A user may ask inquiries about their vault of notes and other material using the Smart Connections plug-in instead of going through all of the notes by hand. In order to help with the process, the plug-in retrieves pertinent information from the user’s notes and responds to the request using the same LM Studio server. The plug-in uses a method known as retrieval-augmented generation to do this.
Although these are entertaining examples, users may see the true advantages and enhancements in daily productivity after experimenting with these features for a while. Two examples of how community developers and AI fans are using AI to enhance their PC experiences are Obsidian plug-ins.
Thousands of open-source models are available for developers to include into their Windows programs using NVIDIA GeForce RTX technology.
Read more on Govindhtech.com
#Obsidian#RTXAIPCs#LLM#LargeLanguageModel#AI#GenerativeAI#NVIDIARTX#LMStudio#RTXGPU#News#Technews#Technology#Technologynews#Technologytrends#govindhtech
3 notes
·
View notes
Text
Hills to die on
If it's a JPEG or PNG it's not HDR. It's just tone mapping.
JPEG needs taking out back and euthanising. There are better formats and have been for like 15 years.
In any situation where there is a clearly better option, someone will contrive a way to fuck the situation up so massively that everyone will just keep using the shitty scenario. That someone is usually Sony.
GIMP and people who promote GIMP to unsuspecting would-be artists has done more to harm digital art than the cost of buying all the hardware.
Discord sucks ass. It won't ever not suck.
It doesn't matter what Android can do or how customisable it is, if you e.g. get a Samsung it's going to be so larded down with crap and cruft that any benefits over iOS will be lost.
Windows is not better than MacOS.
MacOS is not better than Windows.
Both are better than any Linux install that isn't running on a tablet.
For drawing, sketching, painting and generally enjoying things, an iPad with a ludicrously overpriced stylus is way better than a full PC with a Wacom...
... and the tablet's a better way to enjoy media.
Customer service agents are not paid enough
Customer service agents should be allowed to say "Jesus fucking Christ I asked what the problem is, not 'Tell me about your day' Shut. The. Fuck . Up. Now what is the problem. 6 words or less, or I'm hanging up and blocking your number".
CSATs and NPS are astrology anti-vax conspiracy theories for middle management. They're deeply flawed, harmful to everyone involved, a huge pain in the ass, and nobody wants to deal with them... apart from some middle manager who firmly believes they can boil down a human being and their entire job to two numbers every month.
Billionaires and politicians should be tried every year and if found guilty of being utter shits, be wired up for life support and encased in amber, and displayed to the public along with a list of the bad shit they've done. I firmly believe that these dinguses will see their comerades frozen mid scream in a big block of resin, while a machine keeps them alive in permanent hellish torture and still do the stupid things they do.
Nobody likes soft mozarella as much as block mozarella.
UBI and free cheese would probably solve almost all problems.
Nestlé are now so evil they're just doing it to see how far they can push things before anyone actually does something other than tut-tutting.
Most politicians should be guillotined.
15 notes
·
View notes
Text
Installing XRDP on Ubuntu Remote Desktop Access Easy Way

Introduction
Remote access to systems has become an essential part of today’s tech environment. Whether for system administration, remote support, or accessing files on a home server, having reliable remote desktop access is crucial. For Ubuntu users, one of the most efficient ways to achieve this is by Installing XRDP on Ubuntu.
XRDP is an open-source server that allows Linux users to access their systems via the Remote Desktop Protocol (RDP), which is widely supported by Windows and other operating systems. With XRDP, you can log into your Ubuntu machine’s graphical desktop environment from virtually any other device.
This comprehensive guide will cover what XRDP is, why it’s useful, how to install and configure it on Ubuntu, and how to ensure it runs securely and efficiently.
What is XRDP?
XRDP is a free and open-source implementation of the Microsoft RDP server for Unix-like systems, including Linux. It bridges the gap between Linux and RDP, allowing remote access to the Linux desktop using Microsoft’s native Remote Desktop client.
This means if you're using a Windows PC and want to remotely control your Ubuntu machine, you can use the built-in “Remote Desktop Connection” tool to log in and interact with your Linux desktop. That’s the power of XRDP.
Why Use XRDP on Ubuntu?
Using XRDP on Ubuntu brings multiple benefits:
Cross-Platform Access: XRDP allows users to connect from Windows, macOS, or another Linux system.
No Extra Clients Needed: Windows has a built-in RDP client, which makes it easy to connect without installing third-party software.
Multiple Desktop Environments: XRDP supports lightweight desktops like Xfce, MATE, and more, ensuring fast and smooth sessions.
User-Friendly: Graphical desktop access makes tasks easier for those less comfortable with the command line.
Open Source & Free: No licensing costs or vendor lock-in—just a reliable tool supported by the community.
Preparing to Install XRDP on Ubuntu
Before Installing XRDP on Ubuntu, make sure:
Your system is updated.
You have sudo access.
The firewall allows traffic on port 3389 (the default RDP port).
You have or plan to install a desktop environment.
This guide is tailored for Ubuntu 20.04, 22.04, or later, but the steps will work for most Ubuntu versions.
Step-by-Step Guide: Installing XRDP on Ubuntu
Step 1: Update the System
Run the following commands to update all packages:sudo apt update && sudo apt upgrade -y
This ensures the system is running the latest stable software before adding XRDP.
Step 2: Install XRDP
Install XRDP using the apt package manager:sudo apt install xrdp -y
After installation, XRDP runs automatically. You can check its status:sudo systemctl status xrdp
It should show the XRDP service as active and running.
Step 3: Install a Desktop Environment
If you're using Ubuntu Server or a minimal version without a graphical interface, install one. Xfce is lightweight and works well with XRDP:sudo apt install xfce4 xfce4-goodies -y
Other supported desktop environments include MATE, LXQt, and KDE Plasma, but Xfce is preferred for speed and compatibility.
Step 4: Configure the Desktop Environment for XRDP
Tell XRDP to use Xfce for the remote session:echo "startxfce4" > ~/.xsession chmod +x ~/.xsession
This file will be executed when you log in via XRDP, starting the Xfce desktop.
Step 5: Edit XRDP Startup File (Optional Fix)
Edit the XRDP startup script to ensure the right session loads:sudo nano /etc/xrdp/startwm.sh
Find and comment out the following lines (if present):# test -x /etc/X11/Xsession && exec /etc/X11/Xsession
Then add this line before the final exec:startxfce4
Save and close the file.
Step 6: Allow RDP Through the Firewall
Enable RDP traffic through the default port 3389:sudo ufw allow 3389/tcp
If you’re using another firewall tool, adjust the settings accordingly.
Step 7: Restart XRDP
Apply all configuration changes:sudo systemctl restart xrdp
Connecting to Ubuntu via XRDP
After installing and configuring XRDP, connect from another computer.
On Windows: Open “Remote Desktop Connection,” type the Ubuntu system’s IP address, and log in with your Ubuntu username and password.
On Linux/macOS: Use an RDP client such as Remmina, FreeRDP, or Microsoft Remote Desktop.
Upon connection, you’ll be greeted with your Ubuntu desktop environment remotely.
Securing XRDP on Ubuntu
While XRDP is powerful, security should always be top of mind. Here are best practices:
Use SSH Tunneling
Instead of exposing XRDP directly to the internet, set up an SSH tunnel to forward port 3389 securely. This encrypts your connection and reduces attack risks.
Restrict Access to Specific IPs
Use UFW or other firewall tools to allow RDP access only from trusted IPs:sudo ufw allow from 192.168.1.100 to any port 3389
Use Fail2Ban
Install Fail2Ban to monitor failed login attempts and block potential brute-force attacks:sudo apt install fail2ban -y
Enable TLS Encryption
XRDP supports TLS for encrypted communication. Set this up by creating and configuring SSL certificates in the XRDP config files.
Keep Your System Updated
Security patches and updates often fix vulnerabilities in XRDP and Ubuntu itself. Keep your system current using:sudo apt update && sudo apt upgrade -y
Troubleshooting XRDP on Ubuntu
Black Screen After Login
This usually means the desktop environment isn’t configured correctly. Verify .xsession has the line:startxfce4
Also check if the session is conflicting with another X server.
Immediate Logout
This can occur if file permissions are incorrect. Ensure the user owns their home directory and .xsession is executable.
Port Blocked
If you can’t connect, test port 3389 using telnet or nmap from the client machine. Check firewall settings if blocked.
Advantages of XRDP for Ubuntu Users
Seamless Remote Access: Provides a graphical interface without the need for SSH or CLI-based tools.
Lightweight Performance: Excellent for low-resource systems when paired with Xfce.
Reliable for Daily Use: Stable connections and session persistence.
Great for Teams: Enables multiple users to access their own sessions simultaneously.
Enterprise-Friendly: Can be integrated with Active Directory and centralized access management.
Final Thoughts
Installing XRDP on Ubuntu gives users a powerful and flexible way to remotely access their Linux systems through a graphical interface. Whether you are managing your home server, working remotely, or offering IT support, XRDP is a reliable solution that integrates easily with Windows-based RDP clients.
The steps outlined above provide everything needed to get started—from installation to configuration and security. By taking the time to set up XRDP correctly, you can ensure stable, secure, and smooth remote desktop sessions on any Ubuntu machine.
0 notes
Text
What is OpenAL? OpenAL: Should I Remove It?

Have you ever looked at your installed software or system programs and noticed something called OpenAL? You might have been asking yourself, "What is OpenAL, and do I need it?" Here in this article, we will tell you all there is to know about OpenAL, its purpose on your computer, if it's safe, and if you can remove it.
What is OpenAL?
OpenAL is an abbreviation for Open Audio Library, a cross-platform audio API (Application Programming Interface) used for the rendering of multichannel three-dimensional positional audio. It was authored by Loki Software and then continued to be supported by Creative Labs, the same entity responsible for Sound Blaster sound cards.
The API has the same idea as OpenGL (Open Graphics Library), but for rendering graphics. Although OpenGL is concentrated on graphics, OpenAL is concentrated on 3D audio, particularly in 3D environments such as video games or simulations.
Simply put, OpenAL gives realistic sound experiences through emulating how a sound behaves in three-dimensional space. It enables programmers to define how sound propagates from various directions, how it reflects off surfaces, and how it varies based on listener movement, contributing to realism in a game or program.
Why Is OpenAL Installed on My Computer?
Now that we’ve answered "What is OpenAL?", the next logical question is, Why is it on my system?
You might not remember installing it yourself, and that’s perfectly normal. OpenAL typically gets installed automatically alongside certain games, multimedia applications, or drivers that use it for audio rendering.
Some common scenarios include:
PC Games: Titles that use 3D audio may bundle OpenAL with the game installer.
Sound Card Drivers: Especially those from Realtek or Creative Labs will include OpenAL as part of their driver package.
Software Suites: Certain multimedia editing software and simulation games have OpenAL available for their advanced sound playback.
Basically, if an application relies on OpenAL for sound capabilities, it will automatically install it, usually without prompting, since it's considered a runtime dependency.
Is OpenAL a Virus or Malware?
Not at all. OpenAL is not a virus, malware, or malicious software of any kind. It's an authentic audio API utilised by programmers to improve the audio performance and experience.
Since OpenAL tends to appear without user-initiated installation, some users may mistakenly think it's suspicious. But you don't have to worry—it's a safe and stable component created and supported by reputable companies.
If you're still in doubt, you can scan for security using your antivirus or anti-malware software, but OpenAL itself doesn't have any inherent danger.
What Does OpenAL Do?
Let's dive deeper into what it can do. OpenAL supports precise simulation of 3D audio, which makes it perfect for:
Video Games: Sound effects such as footsteps, shots, and ambient sounds can seem like they're coming from certain directions and distances.
Virtual Reality (VR): Precise audio positioning adds to the sense of immersion.
Simulations and Training Software: Realistic sound placement aids in the creation of realistic situations.
Multimedia Editing: In certain situations, editing tools might utilise OpenAL for 3D audio track rendering or previewing.
OpenAL uses a listener-source model. Think of the "listener" as your ears (the player), and "sources" as the various sounds in a game environment. OpenAL then calculates how those sounds should be heard based on position, movement, and acoustics.
OpenAL Versions and Compatibility
OpenAL is designed to be cross-platform, meaning it works on Windows, macOS, and Linux systems. There are different versions and implementations, including:
OpenAL Soft: A widely used open-source version of OpenAL, frequently employed as a drop-in replacement for the original.
Creative Lab's OpenAL: The closed-source edition is occasionally included with sound cards.
Most current systems or games utilise OpenAL Soft nowadays because of its continuing development and support for new systems.
OpenAL and Gaming: Does It Enhance Performance?
In games, OpenAL doesn't accelerate system performance itself, but plays its role in sound quality and immersion. You may not get additional FPS (frames per second), but:
Sound will be more natural-sounding and responsive.
Directional audio cues will be more precise, particularly in 3D environments or first-person shooters.
Hardware acceleration (in certain sound cards) can transfer audio processing from the CPU.
So while OpenAL isn't a performance enhancer in the classical sense, it is a boost to your audio experience, and that can be a vital part of gameplay.
Should I Remove OpenAL?
This is one of the most popular questions you will get after finding OpenAL installed on your machines. The short response? In most instances, no, you don't need to remove it.
If you're gaming in 3D, playing virtual reality software, or launching any program that provides surround sound, OpenAL is probably necessary to make those applications function properly. Even if you don't know whether a program employs it, uninstalling OpenAL may cause problems with sound to behave unexpectedly or for applications to crash when you play games or multimedia software.
Alternatively, if you've completely removed old games or software from your system and you're certain that nothing you're using relies upon it, you can remove OpenAL. To be honest, though, the software is small—usually under 10 MB—and won't affect system performance or storage in any significant way. So, unless you're purposefully seeking to clear space of unwanted software, there's no advantage in getting rid of it.
In summary, if you haven't had any issues, it's best to leave OpenAL alone. It's harmless, lightweight, and can still be needed by some programs that you utilise today, or perhaps use in the future.
Can I Reinstall OpenAL?
Yes! If you uninstall OpenAL and subsequently discover that a program or game requires it, you can simply reinstall it.
Here's how:
Have the game or app reinstall itself—most will ask or do so quietly at launch.
Manually download it from reputable sources such as the OpenAL website or through Steam/driver packages.
OpenAL alternatives
While OpenAL is prevalent, there are other audio APIs:
FMOD – Used frequently in indie and AAA titles for more complex audio.
Wwise – A professional, highly customizable audio engine.
DirectSound / XAudio2 – Microsoft's closed-source audio libraries.
These alternatives can be employed at the whim of the developer, but a lot of older and even some modern games still make use of OpenAL for certain audio functionality.
Conclusion: Is OpenAL Worth Keeping?
Let's summarise:
What is OpenAL? It's an API for cross-platform delivery of 3D audio in games and software.
Why is it on your system? Installed with games or drivers that need it.
Is it safe? Yes, 100%.
Does it do any good? For supported games and applications, yes—it enhances audio immersion.
Should you uninstall it? Only if you are certain you don't need it, and you're trying to eliminate unnecessary programs. Even then, its effect is minimal.
In the majority of instances, it's better to leave OpenAL installed. It will not do any harm to your system, does not occupy much space, and may be essential to your gaming or multimedia experience. If unsure, leave it be, particularly if you play 3D games or have VR software.
#OpenAL#WhatIsOpenAL#AudioAPI#3DSound#PCGamingTips#TechExplained#GameAudio#SystemFiles#ShouldIRemoveIt#TechSupport#WindowsHelp#GamingAudio#PCOptimization
0 notes
Text
Fast & Reliable Computer and Laptop Repair Services in Edmonton West
When your computer or laptop breaks down, it can disrupt your entire day—or even your business. That’s why finding reliable computer repair near me or laptop repair near me is crucial. At Tech4Service, we offer comprehensive computer and laptop repair services in Edmonton West, ensuring your devices are back in working order—quickly, affordably, and professionally.
Best Laptop Repair Shop Edmonton West
At Tech4Service, we take pride in being recognized as the best laptop repair shop in Edmonton West. Whether your laptop is suffering from a cracked screen, battery issues, slow performance, or software glitches, our technicians are trained to diagnose and fix problems efficiently. Our team uses high-quality parts and offers warranty-backed services that guarantee customer satisfaction.
If you’re searching online for "laptop repair near me" in Edmonton West, look no further than our laptop repair service. We work with all major brands including HP, Dell, Lenovo, ASUS, and more.
Professional Computer Repair Services Edmonton West
Desktop computers are still widely used in homes and businesses across Edmonton. From hard drive failures to virus infections and motherboard issues, we’ve got the expertise to handle it all. Our computer repair services in Edmonton West are fast, professional, and competitively priced. Whether you're a student, a professional, or a small business owner, our goal is to get your device functioning optimally in the shortest possible time.
When searching for computer repair near me or PC repair services Edmonton West, you can trust our certified technicians to provide dependable solutions.
Best Macbook Repair Edmonton West
MacBooks are known for their reliability, but like any device, they can run into issues. From macOS errors to battery replacement and water damage repairs, our Mac repair specialists are experienced in handling all kinds of Apple devices. We understand how valuable your MacBook is, which is why we take every precaution to ensure it’s repaired to Apple’s standards.
If you're looking for the Best Macbook Repairing Edmonton West, or need a reliable MacBook repair shop Edmonton West, we are the top-rated choice in the area.
Local, Trusted PC and MacBook Repair Shop
Tech4Service stands out as a leading Pc Repair Shop Edmonton West, offering services that include software troubleshooting, data recovery, virus removal, component upgrades, and hardware replacements. Whether you use your PC for gaming, business, or personal use, our experts provide tailored solutions to match your needs.
Likewise, as a premier MacBook repair shop in Edmonton West, we handle every repair with precision and care, using only quality parts to extend the life of your Apple device.
Why Choose Tech4Service?
Local Expertise: We are proud to serve the Edmonton West community with trusted, local repair solutions.
Certified Technicians: Our experienced team is trained to handle a wide variety of hardware and software issues.
Fast Turnaround: We understand time is money—that’s why we offer same-day and next-day repair options.
Affordable Pricing: Transparent pricing with no hidden fees.
Customer Satisfaction: We’re known for our friendly service and 5-star customer reviews.
Common Services We Offer:
Laptop screen repair
MacBook battery and logic board replacement
Hard drive and SSD upgrades
Virus and malware removal
Operating system installation
Data recovery and backup
Network troubleshooting
Looking for Computer Repairing Edmonton West?
We’re your go-to experts for all things computer-related. From simple troubleshooting to complex hardware fixes, Tech4Service is the name you can trust for computer repairing in Edmonton West. We also offer specialized solutions for Apple devices, making us your best bet for MacBook repairing in Edmonton West.
Call to Action:
Need a quick and professional repair? Contact Tech4Service today for the most trusted computer and laptop repair services in Edmonton West! 📞 Call us or 📩 Visit our website to book your repair now!
0 notes
Text
How To Make Sure Information On Your Old Computer Is Really, Truly Deleted
It Isn’t As Simple As Pressing ‘Delete’ And Emptying The Trash. Here’s A Step-By-Step Guide.
— By Sean Captain | June 17, 2025 | The Wall Street Journal (WSJ)

Illustration: Jon Krause
Spring-cleaning season is almost done, and it is time to finally get rid of that old computer. But be very careful before you sell, give away or recycle it.
You could be handing over sensitive information.
Even if you think you deleted everything on it, your old computer may hold lots of personal items you don’t want anyone seeing. In a 2019 study by the University of Hertfordshire (funded by security tech-reviews site Comparitech), researchers purchased 200 used hard drives from the U.S. and U.K. An analysis found data remaining on 59% of the drives, including passport and driver’s license scans, bank statements, utility bills and “intimate photos.”
Just pressing “delete” and emptying the Trash in macOS or the Recycle Bin in Windows won’t do the trick. That’s because your computer maintains an index of where every file resides. Deleting a file erases only its entry in the index, telling your system that it can put new files in that space. But until the system actually does put new files there, the old ones remain accessible. Simple consumer-level file-recovery apps can get at it—never mind professional-grade forensic software.
Here’s how to make sure your data is really gone—even on a computer that won’t start up.
Back-up And Log Out
Start by backing up anything you want to keep. You could drag files onto an external hard drive or use backup software such as the Time Machine app in macsOS. You can also back up to the cloud using Microsoft OneDrive, Apple iCloud, Google Drive, Dropbox or other services. (Don’t empty the Trash or Recycling bin. The wipe process will take care of this.)
Next, log out of applications or games with an online component, so the license is no longer associated with your old computer. Also do this for services like Gmail or Facebook, and web browsers like Chrome that sync your data online—on the admittedly remote chance that an incomplete wipe allows the next owner to access those accounts.
Another step for any type of computer is making sure your files are encrypted—scrambled in a mathematical operation based on very long strings of random numbers and letters called encryption keys. The wiping process will delete the keys to make sure any files that may remain on the machine are unreadable.
What you do next depends on your operating system.
Clearing Out A PC
Windows 10 and the current Windows 11 have a feature called “Reset this PC,” which, with the right settings, thoroughly wipes your data. First, make sure your operating system is up-to-date, as Microsoft recently fixed a bug that sometimes caused the reset process to fail. Press the Windows key, search for “updates” and select “Check for updates.” Install any that are available.
Now check on encryption. In Windows 10 or 11 Home editions, press the Windows key and search for “device encryption settings.” Click “Device encryption settings” on the next screen, then make sure the switch next to “Device encryption” is toggled on. Windows Pro, Enterprise and Education editions have an encryption utility called BitLocker. To enable it, click the Start button, type “bitlocker” and select “Manage BitLocker” from the list of results. (All versions of Windows 10 and 11 also encrypt deleted files.)
Now you’re ready to wipe. Tap the Windows key again, search for “Reset this PC,” then click on it. On the next screen, tap “Reset PC” (Windows 11) or “Get started” (Windows 10), and on the following screen, click “Remove everything.” On the next screen, select “Local reinstall.” (If this doesn’t work, try the “Cloud download” option.) Then click “Change settings,” and on the following screen (under “Clean data?”), toggle the switch to “Yes” and press “Confirm.” On the following screen, press “Next” (Windows 11) or “Reset” (Windows 10). On Windows 11, you will press “Reset” on one more screen. Then let the process run for a few hours.
“Reset this PC” deletes your files, apps and settings, logs you out of your Microsoft account and disables the “Find My Device” feature so the computer is no longer associated with you. Then the serious wiping starts. The encryption keys are deleted, making any encrypted data irretrievably scrambled, and the Clean data option overwrites the ones and zeros that had encoded data on your drive. A clean copy of Windows is also installed.
The MacOS Method
Apple’s “Erase Assistant” feature made its debut in 2021’s macOS 12 Monterey. If your current OS is older, you may be able to update it. To update an older OS to Monterey or a later one, click the Apple menu, then “System Preferences” and “Software Update.” If the update process doesn’t work, jump to “If all else fails” below for another option.
As with Windows, the “Erase All Content & Settings” process should start with encryption. On newer Macs (starting between 2018 and 2020, depending on the model), data is encrypted automatically. Just to be safe, though, turn on a feature called FileVault that adds encryption to older systems and an extra layer to newer ones. Click the Apple icon, then “System Settings” (or “System Preferences” in Monterey). In the next window, click “Privacy & Security” (or “Security & Privacy”), then click FileVault.
Now it is time to wipe. Click again on the Apple icon and “System Settings” (or “System Preferences”), click “General” on the left, then “Transfer or Reset” on the bottom right. Finally, on the next screen, click “Erase All Content & Settings.” (In Monterey, you’ll go there directly from “System Preferences.”)
This process signs you out of Apple services, turns off the “Find My” and “Activation Lock” security measures so that the system is no longer associated with you, and erases all your files, settings, apps and anything else. It deletes the encryption keys, permanently scrambling any data that remains.
If All Else Fails
If your PC or Mac is so old that it can’t run a modern wipe process, you have one more option before seeking pro help. For Windows, several experts recommended the KillDisk app. The $49.95 Professional version runs from a USB drive and overwrites the ones and zeros that encode data on your hard drive with all zeros. Afterward, your computer will no longer boot into Windows unless you reinstall the OS.
For a Mac, your best option is a complex process that Apple describes online.
If these processes sound too complicated, or if your system won’t even turn on, use Apple’s recycling program for Macs or a disposal company that offers hard-drive destruction (or shredding) and recycling for consumers with either type of system. Look for ones that issue a certificate of destruction to verify the process. For instance, Ship ‘N’ Shred accepts drives or whole devices, with prices that include shipping ranging from around $30 to $200.
Modern technology leaves a lot of digital footprints, but at least you can sweep them off your old computer.
— Sean Captain is a Writer ✍️ in New York.
#Technology#Personal Technology#Personal Information#Old Computer 💻 🖥️#Deleting Personal Data#‘Delete’ | Emptying The Trash#Step-By-Step Guide#Sean Captain#The Wall Street Journal (WSJ)
0 notes
Text
Asphalt 8 APK for PC – Easy Install, Smooth Gameplay
If you’re a fan of high-octane racing games, then you’ve likely heard of Asphalt 8. Known for its stunning graphics, arcade-style gameplay, and intense multiplayer action, Asphalt 8 has become a favorite among mobile gamers worldwide. But what if you could enjoy all that excitement on a bigger screen with smoother controls? That’s where the asphalt8 apk for pc comes in. By installing the APK version on your computer, you unlock the potential for an enhanced, lag-free experience.
Why Choose Asphalt8 APK for PC Over the Mobile Version?
There are several compelling reasons to run asphalt8 apk for pc rather than sticking with the mobile version. The most obvious is the improved gameplay. A PC offers better hardware performance, meaning you can enjoy ultra-smooth frame rates, high-resolution graphics, and zero overheating issues.
Additionally, a larger screen and more precise controls (keyboard or gamepad) significantly boost your racing skills. Whether you're drifting through Tokyo or soaring through the Alps, the immersive experience on PC is far superior to that on a small phone screen.
Using the APK version also allows for greater flexibility, such as modding, advanced settings, or access to game files you typically can’t manipulate on a mobile device.

Understanding APK Files and How They Work on PCs
APK stands for Android Package Kit, the file format Android uses to distribute and install apps. While these are designed for mobile use, you can still run APK files on a PC using Android emulators.
An emulator is a software that mimics Android’s operating system on your computer. Popular emulators like BlueStacks, LDPlayer, and NoxPlayer make it incredibly easy to open and run APK files on Windows or macOS.
To run asphalt8 apk for pc, you’ll simply need to install an emulator, download the APK file from a reliable source, and open it through the emulator interface. The setup is generally straightforward and doesn’t require technical skills.
How to Install Asphalt 8 APK for PC – Step-by-Step Guide
Here’s how to install and start playing Asphalt 8 on your PC in a few simple steps:
Download an Android Emulator Choose a trustworthy emulator like BlueStacks, LDPlayer, or NoxPlayer. Go to the official website and install the latest version compatible with your system.
Download the Asphalt 8 APK Visit a reputable APK hosting site (such as APKMirror or APKPure) and download the Asphalt 8 APK file. Ensure the file is free of malware by scanning it with antivirus software.
Install the APK Open your emulator and drag the APK file into the emulator window. It should begin the installation automatically. If not, use the emulator’s “Install APK” option.
Launch the Game Once installed, you’ll see the Asphalt 8 icon in your emulator's app drawer. Click it to launch the game.
Log In and Sync Data (Optional) If you previously played Asphalt 8 on mobile, you can log in with your Google account to sync your progress.
With these steps, you can easily get asphalt8 apk for pc up and running in minutes.
Smooth Gameplay and What to Expect
When you play Asphalt 8 on PC, the difference is immediately noticeable. The game runs smoothly with no frame drops or lag, even during intense multiplayer races. You’ll enjoy enhanced lighting, detailed textures, and fluid animations—all of which contribute to a console-quality racing experience.
PC controls also give you the upper hand in competitive matches. You can steer with arrow keys or a controller, and customize key mappings for nitro boosts, drifts, and jumps, creating a tailored racing setup.

Safety and Legal Considerations
Before downloading any APK, make sure it comes from a trusted source. Illegitimate APKs can carry viruses or be modified with malicious code. It’s also important to consider the legal implications. While using emulators is generally allowed, downloading APKs for paid games without purchase may violate terms of service. Always opt for games that are free or ones you own legally.
Tips for the Best Performance
To get the most out of Asphalt 8 on your PC:
Allocate more RAM to the emulator (found in settings).
Enable high-performance mode on your PC.
Keep graphics drivers updated for optimal rendering.
Close background apps to dedicate more resources to gameplay.
Conclusion
In summary, installing the asphalt8 apk for pc is a smart way to enjoy one of the best racing games on a whole new level. With better visuals, superior controls, and smooth gameplay, it offers an experience far beyond the mobile version. Just follow the steps carefully, and you’ll be tearing up the tracks in no time—right from your desktop.
1 note
·
View note
Text
Download DeepL PC Version The Ultimate Guide for Windows Users
In an increasingly interconnected world, language barriers can often slow down communication, productivity, and understanding. Whether you're a student translating research material, a professional communicating with international clients, or simply someone traveling abroad, translation tools are more vital than ever. Among the many tools available, DeepL Translator has emerged as a top-tier solution for accurate, context-aware translations. This article provides a comprehensive guide on how to download and use the DeepL PC version, its benefits, and why it's considered one of the best translation tools available.

What is DeepL Translator?
Download deepl PC version is an advanced machine translation service launched in 2017 by DeepL GmbH, a company based in Cologne, Germany. Unlike many other translation services, DeepL uses artificial intelligence, particularly a neural network-based approach, to deliver highly accurate and natural-sounding translations. Its ability to understand nuances, idioms, and complex sentence structures makes it stand out in a crowded market.
Initially accessible only via a web browser, DeepL quickly expanded its offerings by releasing a PC version for Windows and macOS, catering to users who prefer a dedicated desktop application.
Why Use the DeepL PC Version?
While the web version of DeepL is effective, the desktop version offers several significant advantages, especially for frequent users:
Faster Access and Workflow Integration
The desktop app allows you to use keyboard shortcuts for instant translation. You can select any text on your screen, press Ctrl + C twice, and DeepL will automatically translate the selected text. This feature is invaluable for professionals working with multiple documents or browsing foreign-language websites.
Offline Functionality (Partial)
While DeepL primarily relies on an internet connection to process translations, the PC version is often more stable and responsive than web-based alternatives, especially in environments with inconsistent internet access.
Clipboard Translation
You can copy text to your clipboard and have it translated instantly, streamlining translation tasks without opening a browser window.
Security and Privacy
The PC version may offer enhanced privacy, especially for Pro subscribers. DeepL ensures that translated text is not stored permanently, and enterprise users can expect higher data confidentiality standards.
Navigate to the Downloads Section
Click on the “Apps” section in the top menu or scroll to the bottom of the homepage where you’ll see a “Download for Windows” button.
Start the Download
Click the Download button for the Windows version. This will download an installer file named something like DeepLSetup.exe.
Install the Application
Double-click the downloaded .exe file to begin the installation. Follow the on-screen instructions. You might need to allow permissions or accept terms and conditions during installation.
Launch DeepL
Once installed, launch the Download deepl PC version app from your desktop or Start Menu. You’ll be prompted to sign in or create a free account. For more features, you may consider upgrading to DeepL Pro.
Using the DeepL PC App: Key Features
After installation, you'll notice the sleek and minimalist design of the DeepL interface. Here's how you can make the most of it:
Text Translation
Paste any text into the left-hand box, and the translation will appear in the right-hand box. You can change languages easily using the dropdown menus.
Shortcut Translation
Highlight text in any application, press Ctrl + C twice, and a DeepL popup will display the translation. This is especially useful in Word documents, PDFs, emails, and web browsers.
D. Document Translation
With the Pro version, you can translate entire documents (.docx and .pptx) while preserving the formatting. Just drag and drop the file into the app, and it will translate the entire content.
Tips for Getting the Most from DeepL
Use Keyboard Shortcuts: Save time with the Ctrl + C twice trick.
Install Language Packs: If available, downloading language packs improves performance.
Customize Settings: You can adjust things like formality level in some language pairs.
Use it Alongside Other Apps: DeepL works seamlessly with Microsoft Office, browsers, and even messaging apps.
Conclusion
The DeepL PC version is a powerful tool for anyone needing fast, reliable translations. With its high-quality output, intuitive interface, and useful features like shortcut translation and document support, DeepL stands out among translation tools.
Whether you’re a student, a professional translator, a business owner, or simply someone exploring global content, downloading the DeepL PC version will enhance your productivity and break down language barriers efficiently. Best of all, it’s easy to set up and start using right away.
0 notes
Text
How to Convert AVI to MOV Effortlessly
Some types of video files aren't changing as quickly as the devices that play them. Even though AVI has been a popular file since the 1990s, it doesn't work well with macOS and Apple apps. That's why you may be looking for a solution to change AVI to MOV without losing quality or wasting your time. The good news is that there are dedicated programs to help you with the issue. We've put together three handy solutions that you can use for this purpose. Each of them works well for its own purpose. So keep reading and pick a program that works well for you.

#1 — Movavi Video Converter
Movavi Video Converter is a top choice for those looking to convert videos with zero stress or hassle. When using the tool, you will hardly have any questions on how to convert AVI to MOV — the process is straightforward. The software has been an excellent helper for both personal and work-related tasks. Fast processing, a wealth of configuration options, and an easy-to-navigate interface are its win-win features.
To convert AVI to MOV with Movavi Video Converter, follow these steps:
Download and install software — Visit the Movavi website and download the appropriate version of the program for your Windows or Mac computer. Install the software by following the on-screen instructions.
Add your AVI files — Launch Movavi Video Converter. Hit “Add Media” and select “Add Video,” or simply drag and drop your AVI assets into the program window. You can add multiple videos for batch conversion.
Select MOV as the output format — In the formats menu, choose MOV as your desired output format. You can also adjust settings such as bitrate, resolution (including HD and 4K), and codec if needed.
Choose the output folder — Click the “Save to” button to specify where the converted files will be saved.
Convert the files — Click the “Convert” button to start the conversion process. Once finished, your MOV files will be saved in the chosen folder.
You can also use Movavi’s online converter for smaller files: just upload your AVI, select MOV as the format, and download the result when ready. This process ensures high-quality, compatible MOV files ready for playback or editing, especially on Apple devices and software.
#2 — AnyMP4 Video Converter Ultimate
If you are using a high-end camera or editing movies in 4K, then quality is really crucial. This is where AnyMP4 Video Converter Ultimate comes in handy. Designed with compatibility for latest video technologies and a focus on preserving maximum quality, this tool is strong.
To convert AVI to MOV with AnyMP4 Video Converter Ultimate, follow these steps:
Download and install — Download AnyMP4 Video Converter Ultimate from the official website and install it on your PC.
Upload the target AVI files — Launch the program. Click the “Add Files” button to deliver your AVI videos to the program.
Pick MOV as output format — Click the format icon next to your imported AVI file. In the format list, select MOV as the output format. You can also adjust video resolution, encoder, and quality as per your needs.
Set output folder — Choose where you want to save the converted files by setting the output folder.
Convert — Click the “Convert All” button to convert files without a watermark. The process is quick, and your MOV files will be ready in seconds.
Follow these steps to ensure fast, high-quality conversion from AVI to MOV. It is suitable for playback or editing on a wide range of devices and platforms
#3 — EaseUS VideoKit
Some people don't work with video every day. If you are one of those who only need to change an AVI file once for it to work on an iPhone or in iMovie, EaseUS VideoKit is the best tool for you. It is simple, flexible, and easy to use.
To convert AVI to MOV with EaseUS VideoKit, follow these steps:
Download and install EaseUS VideoKit — Get the software from the official EaseUS website and install it on your personal computer.
Add AVI files — Launch EaseUS VideoKit. Click “Choose Files,” drag your AVI files into the interface, or use the + button to add them.
Select MOV as output format — Click on “Settings” or the format option next to your file. Choose MOV as the target format. The program will also give you an option to customize video quality, resolution, encoder, frame rate, and bitrate.
Set output folder — Choose the destination folder for your converted files.
Enable high-speed conversion — If needed, enable the high-speed conversion option for faster processing.
Start conversion — Click “Convert” to initiate the process. The software will convert your AVI files to MOV quickly, maintaining the original quality.
This workflow makes converting AVI to MOV with EaseUS VideoKit simple and efficient. It is suitable for both beginners and advanced users.
Choose Your Preferred Solution
Have a batch of files to convert? Not sure what solution to use? Now, you have a list of options to consider. Do not waste your time researching the market. Jump on the video conversion task right away!
0 notes
Text
Computer Hardware vs. Software: Key Differences Explained
When we dive into the world of technology, two key players often steal the spotlight: computer hardware and software. Both are crucial for a computer to operate, but they each have their own unique roles. Grasping the differences between them can empower users to make smarter choices when it comes to upgrading their systems, fixing problems, or simply getting to know the ins and outs of computing.
What Is Computer Hardware?
Computer hardware is all about the physical parts of a computer system. These are the components you can actually see and touch. Here are some examples:
- Central Processing Unit (CPU) – Think of it as the brain of the computer.
- Random Access Memory (RAM) – This is the temporary storage for tasks that are currently in action.
- Hard Disk Drive (HDD) / Solid State Drive (SSD) – These serve as long-term storage solutions.
- Motherboard – The main circuit board that connects all the different components.
- Graphics Processing Unit (GPU) – This one takes care of the visual output.
- Power Supply Unit (PSU) – It’s responsible for providing electricity to the entire system.
- Peripherals – These include keyboards, mice, monitors, and printers.
Since hardware is made up of physical parts, it can wear out over time, which means you might need to replace or upgrade certain components to keep things running smoothly.
What Is Software?
Software, on the other hand, is all about the programs and instructions that guide the hardware on what to do. Unlike hardware, software is intangible and exists in the form of code. There are two main categories:
- System Software – This type manages the operations of the hardware (think operating systems like Windows, macOS, and Linux).
- Application Software – These are the programs that perform specific tasks (like web browsers, word processors, and games).
While software depends on hardware to work, it can be easily updated or swapped out without needing to change any physical parts.
Key Differences Between Hardware and Software
Aspect
Hardware
Software
Nature
Physical, tangible components.
Digital, intangible programs.
Durability
Can wear out or fail over time.
Doesn’t degrade physically.
Upgrades
Requires purchasing new parts.
Updated via downloads or installations.
Function
Executes tasks based on software commands.
Provides instructions to hardware.
Examples
CPU, GPU, RAM, Motherboard.
Windows, Google Chrome, Photoshop.
How Hardware and Software Work Together
To keep a computer system running smoothly, you need both hardware and software. Let’s break it down:
When you fire up a web browser (that’s the software), the CPU (the hardware) jumps into action to process your request, while RAM temporarily holds onto data, and the GPU takes care of rendering all those visuals you see.
The operating system (another piece of software) plays a crucial role by managing the hardware resources, ensuring everything runs without a hitch.
If either the hardware or software is outdated or not working properly, you might find your system slowing down or even crashing.
Conclusion
Even though computer hardware and software are quite different, they rely on each other to create a functional computing experience. Hardware gives you the physical structure, while software provides the necessary instructions to get things done. Knowing how they differ can really help when it comes to troubleshooting, upgrading, or optimizing your computer’s performance.
By understanding how these components work together, users can make smarter choices—whether they’re building a new PC, installing fresh software, or figuring out technical problems.
1 note
·
View note