#How to install joomla in localhost using xampp
Explore tagged Tumblr posts
Visit Tumblr Blog
Explore Tumblr blogs with no restrictions, modern design and the best experience.
Last Seen Tumblr Blogs


Fun Fact
Tumblr Inc. is using 66 technologies for its website.
Text
Joomla 4 installation on Localhost
This is Joomla 4 Installation and setup on Windows 10. You will learn how you can install Joomla Latest version 4.0.2 in localhost XAMPP. To install Joomla 4 you need PHP version 7.4+ and MySQL version 5.6+ if you have any issue with the installation or any other please comment, and I will try to help you.
youtube
View On WordPress
#how to install joomla#how to install joomla 4 in window 10#How to install joomla in localhost using xampp#how to install joomla in xampp#how to install joomla in xampp step by step#how to install joomla on windows 10#how to install joomla template on localhost#joomla 3 10 download#joomla 4#joomla 4 beta 8#Joomla 4 installations#joomla 4 templates#joomla overview#joomla review#JoomTech Solutions#Youtube
0 notes
Text
Complete PHP Tutorial: Learn PHP from Scratch in 7 Days
Are you looking to learn backend web development and build dynamic websites with real functionality? You’re in the right place. Welcome to the Complete PHP Tutorial: Learn PHP from Scratch in 7 Days — a practical, beginner-friendly guide designed to help you master the fundamentals of PHP in just one week.
PHP, or Hypertext Preprocessor, is one of the most widely used server-side scripting languages on the web. It powers everything from small blogs to large-scale websites like Facebook and WordPress. Learning PHP opens up the door to back-end development, content management systems, and full-stack programming. Whether you're a complete beginner or have some experience with HTML/CSS, this tutorial is structured to help you learn PHP step by step with real-world examples.
Why Learn PHP?
Before diving into the tutorial, let’s understand why PHP is still relevant and worth learning in 2025:
Beginner-friendly: Easy syntax and wide support.
Open-source: Free to use with strong community support.
Cross-platform: Runs on Windows, macOS, Linux, and integrates with most servers.
Database integration: Works seamlessly with MySQL and other databases.
In-demand: Still heavily used in CMS platforms like WordPress, Joomla, and Drupal.
If you want to build contact forms, login systems, e-commerce platforms, or data-driven applications, PHP is a great place to start.
Day-by-Day Breakdown: Learn PHP from Scratch in 7 Days
Day 1: Introduction to PHP & Setup
Start by setting up your environment:
Install XAMPP or MAMP to create a local server.
Create your first .php file.
Learn how to embed PHP inside HTML.
Example:
<?php echo "Hello, PHP!"; ?>
What you’ll learn:
How PHP works on the server
Running PHP in your browser
Basic syntax and echo statement
Day 2: Variables, Data Types & Constants
Dive into PHP variables and data types:
$name = "John"; $age = 25; $is_student = true;
Key concepts:
Variable declaration and naming
Data types: String, Integer, Float, Boolean, Array
Constants and predefined variables ($_SERVER, $_GET, $_POST)
Day 3: Operators, Conditions & Control Flow
Learn how to make decisions in PHP:
if ($age > 18) { echo "You are an adult."; } else { echo "You are underage."; }
Topics covered:
Arithmetic, comparison, and logical operators
If-else, switch-case
Nesting conditions and best practices
Day 4: Loops and Arrays
Understand loops to perform repetitive tasks:
$fruits = ["Apple", "Banana", "Cherry"]; foreach ($fruits as $fruit) { echo $fruit. "<br>"; }
Learn about:
for, while, do...while, and foreach loops
Arrays: indexed, associative, and multidimensional
Array functions (count(), array_push(), etc.)
Day 5: Functions & Form Handling
Start writing reusable code and learn how to process user input from forms:
function greet($name) { return "Hello, $name!"; }
Skills you gain:
Defining and calling functions
Passing parameters and returning values
Handling HTML form data with $_POST and $_GET
Form validation and basic security tips
Day 6: Working with Files & Sessions
Build applications that remember users and work with files:
session_start(); $_SESSION["username"] = "admin";
Topics included:
File handling (fopen, fwrite, fread, etc.)
Reading and writing text files
Sessions and cookies
Login system basics using session variables
Day 7: PHP & MySQL – Database Connectivity
On the final day, you’ll connect PHP to a database and build a mini CRUD app:
$conn = new mysqli("localhost", "root", "", "mydatabase");
Learn how to:
Connect PHP to a MySQL database
Create and execute SQL queries
Insert, read, update, and delete (CRUD operations)
Display database data in HTML tables
Bonus Tips for Mastering PHP
Practice by building mini-projects (login form, guest book, blog)
Read official documentation at php.net
Use tools like phpMyAdmin to manage databases visually
Try MVC frameworks like Laravel or CodeIgniter once you're confident with core PHP
What You’ll Be Able to Build After This PHP Tutorial
After following this 7-day PHP tutorial, you’ll be able to:
Create dynamic web pages
Handle form submissions
Work with databases
Manage sessions and users
Understand the logic behind content management systems (CMS)
This gives you the foundation to become a full-stack developer, or even specialize in backend development using PHP and MySQL.
Final Thoughts
Learning PHP doesn’t have to be difficult or time-consuming. With the Complete PHP Tutorial: Learn PHP from Scratch in 7 Days, you’re taking a focused, structured path toward web development success. You’ll learn all the core concepts through clear explanations and hands-on examples that prepare you for real-world projects.
Whether you’re a student, freelancer, or aspiring developer, PHP remains a powerful and valuable skill to add to your web development toolkit.
So open up your code editor, start typing your first <?php ... ?> block, and begin your journey to building dynamic, powerful web applications — one day at a time.

0 notes
Video
youtube
How to install Joomla in your Localhost Server using XAMPP web server application and the process to do it. #DITS #InstallJoomlaLocal #HowtoInstallJoomla
Visit our website for more videos - http://www.dahkila.com/multi-media/videos.html
1 note
·
View note
Text
How to Easily Install Joomla 4.x
As you know, Joomla is one of the most popular open-source Content Management Systems in the world. In previous years, you are used to using Joomla 3 to manage and build up their sites. We offered you a way to install Joomla 3.x so that you can easily and simply install and use the Joomla 3 versions. However, currently, the Joomla! 4.x coming with many new features has been released, which means you need a guide on how to install Joomla 4.x. That is the reason why we give you the blog today. So, let's start to explore it now!
The technical requirements to install Joomla 4.x
If you want to install Joomla 4.x, you need to check the technical requirements first in order to ensure that you can smoothly install without any trouble. Let's have a look at the requirements below: - Server: Linux, Apache. Besides, you can also locally install it on your computer using WAMP/ JAMP/ MAMP/ XAMPP software. - PHP: 7.3, 7.4, or 8. - MySQL/ MySQLi 5.6+ or MariaDB. - PostgreSQL: 11 (if you install on localhost). - memory_limit = 128MB or more. - upload_max_file_size = 4M or more. - max_execitopm_time = 180 or more. - CURL library: your server works with url_fopen or curl. - OpenSSL Libraries: enabled. - PHP file_get_contents() function: available or unlocked.
How to install Joomla 4.x
There are 2 ways for you to install Joomla 4.x. Thus, we will find out both of them so that you can easily choose the most suitable one. Install Joomla 4.x on a web server First of all, before you install Joomla 4.x on the web server, you need to download the Joomla! 4 package from the official website. After you click on the download button, the Joomla 4 installation package will be downloaded and saved on your computer. Don't forget to unzip it to a new folder.

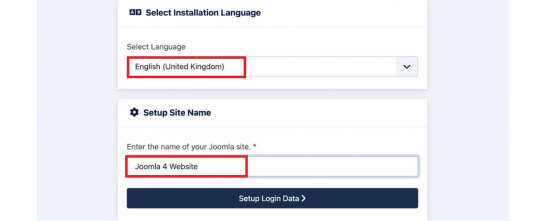
Set up the Database Now, it's time for you to generate a MySQL database, then assign a user with full permissions. In order to do that, let's follow the steps below: - Login to the cPanel. - Scroll down and select MySQL Databases in the Database section. - Create a new database by entering the name of the new database, then click on the Create Database button. - Generate a user for the database by filling out the username, password, confirmed password, and pressing the Create User button. Besides that, you can also add more users to the database in the Add User to Database section. - There will be a table of User Privileges, so check the All Privileges box at the top of the table to make sure the user will have all the privileges or full permissions. Install and set up Joomla 4 The next step you need to do is upload the Joomla files to your server via FTP Client. Let's ensure that you are utilizing an official release of an FTP Client so that there will no error during the Joomla 4 installation and setting process. Once uploading the Joomla package, we will start the installation by accessing your URL or domain you uploaded the Joomla 4 files before. For instance, it may be https://your-domain.com/folder-name. The interface will show you the language and site name setup first. Thus, simply choose the language, then fill out the name of your site. After that, you just need to click on the Setup Login Data button to move on to the next step.
Next, you need to enter the login data, including the Super User name, Super User account as well as password, and the email address of the Super User. Then, let's press the Setup Database Connection button.

Now, we will move on to the database configuration. So, you need to choose the database type first. After that, simply enter the hostname, username, password as well as database name. Besides that, you can fill out the table prefix randomly. Once everything was entered, let's click on the Install Joomla button.

Everything is done. You installed Joomla 4 successfully. There will be a congratulation message to ensure that. So, now, you can go to the admin backend dashboard or open the site without any difficulties.

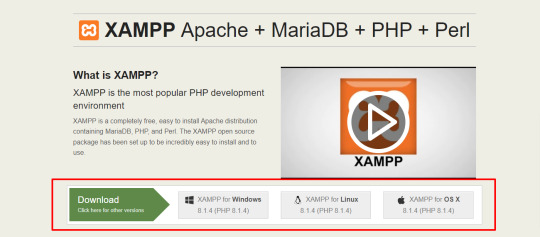
Install Joomla 4.x on Localhost with XAMPP If you don't want to install Joomla 4.x on a web server, you can also do it on Localhost via XAMPP. In order to do that, simply implement the following steps. First of all, you need to download and install XAMPP.
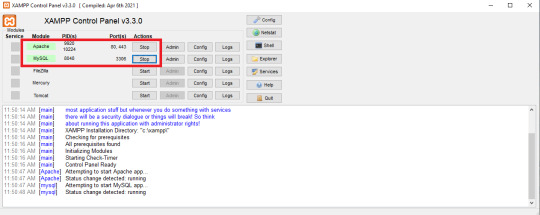
Once installed, it's time for you to start the XAMPP and turn on the two options including Apache and MySQL.
Next, let's open the browser and type localhost/phpmyadm, then click on the New option in the top left of the screen. Now, simply fill out the database name and press the Create button.

We will go on the process by downloading the Joomla 4 package and extracting it from the root of your site. For instance, it may be C drive -> Program Files (x86) -> Ampps -> www -> create a folder and unzip the package there. Now, you just need open the browser to access localhost/yourfoldername. So, this is the place where you moved the unzipped Joomla file. For example, it may be localhost/joomla-file-name. So, the interface will show you the language and site name setting. You just need to follow the Joomla 4 configuration steps we introduce to you above.
Wrap up
In conclusion, we hope that the two methods we bring you will help you install Joomla 4.x quickly and effectively. If you have any trouble or difficulties during the Joomla 4 installation, don't hesitate to leave your comment below so that we can support you as soon as possible. Besides, in case you try to install Joomla 4.x successfully after following the steps below, let's share it with others. Last but not least, once Joomla 4 installation, don't forget to give it an eye-catching and professional appearance. All you need to do is visit our site as well as explore a lot of high-quality, attractive, and responsive Joomla 4 Templates. Thanks for your reading and hope you enjoy the blog. See you the next time with many tutorial blogs related to Joomla 4. Read the full article
0 notes
Text
How to Build a Website With Joomla 3.8 [Business Website] - Part 1 - 2018
How to Build a Website With Joomla 3.8 [Business Website] – Part 1 – 2018
#wordpress #login How to make a Joomla Website: This is a tutorial on how to create a website using Joomla 3.8. At this first stage of this guide on how to design a business website using Joomla, I will be taking you through the process of downloading and installing XAMPP Server on your Windows 10 PC or Laptop to act as our website host, some times referred to us as a LocalHost. XAMPP Server:…
View On WordPress
0 notes