#how to install joomla on windows 10
Explore tagged Tumblr posts
Visit Tumblr Blog
Explore Tumblr blogs with no restrictions, modern design and the best experience.
Last Seen Tumblr Blogs


Fun Fact
Average visit duration of Tumblr.com is 10 mins and 25 secs.
Text
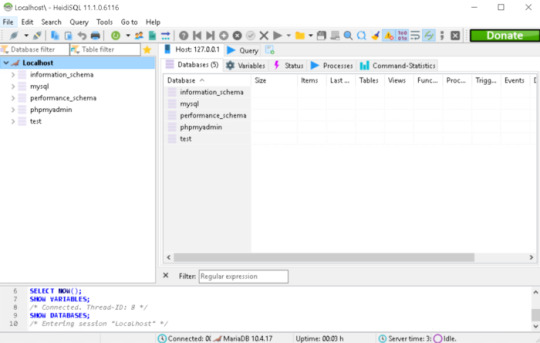
Joomla 4 installation on Localhost
This is Joomla 4 Installation and setup on Windows 10. You will learn how you can install Joomla Latest version 4.0.2 in localhost XAMPP. To install Joomla 4 you need PHP version 7.4+ and MySQL version 5.6+ if you have any issue with the installation or any other please comment, and I will try to help you.
youtube
View On WordPress
#how to install joomla#how to install joomla 4 in window 10#How to install joomla in localhost using xampp#how to install joomla in xampp#how to install joomla in xampp step by step#how to install joomla on windows 10#how to install joomla template on localhost#joomla 3 10 download#joomla 4#joomla 4 beta 8#Joomla 4 installations#joomla 4 templates#joomla overview#joomla review#JoomTech Solutions#Youtube
0 notes
Text
Xampp for windows server 2019

Xampp for windows server 2019 how to#
Xampp for windows server 2019 mac os#
Xampp for windows server 2019 install#
Xampp for windows server 2019 software#
Whereas, on the right side, you can see the process ID number and port numbers every module is using. Once you start the modules, you should see their status turn to green. Or say you have successfully installed XAMPP locally. You have successfully installed XAMPP on Windows 10. Now click on the ‘Start’ button corresponding to Apache and MySQL. If the entire process of XAMPP installation went correctly, then the control panel would open smoothly. As of now, I am choosing the English language. After that click on the ‘Save’ button to confirm your selected language. It is up to you which language you choose.
Xampp for windows server 2019 install#
Step 3: Select your XAMPP Install LanguageĪs soon as you will click on the Finish button in the final step of install XAMPP process, you will be asked to select the preferred language between English and German. Once the installation is completed, you will be asked whether you would like to start the control panel now or not, displaying the message “Do you want to start the control panel now?” Check the box and click on the ‘Finish’ button and see if the XAMPP is working fine. Now just be patient and wait for the installation to complete. You just have to hit the ‘Next’ button to proceed. You will be shown a windows security alert. Select the installation directory where you want to install XAMPP. For most web apps you only need Apache, MySQL, PHP, and phpMyAdmin. Now you’ll see another window with a message “Setup is now ready to begin installing XAMPP on your computer” like shown below. Choose the components you want to install. WordPress, Joomla etc on your newly installed XAMPP. However, if you wish to learn more about the Bitnami, then you may check the box saying ‘Learn more about Bitnami for XAMPP.’īasically Bitnami is for installing open source applications i.e. Simply click on the ‘Next’ button to move further. Now will see a window showing you information about Bitnami. You can choose the default location or you can choose any location of your choice and choose the ‘Next’ button to move ahead. Now you need to choose the folder where you want to install the XAMPP. Now click on the ‘Next’ button to continue.
Xampp for windows server 2019 software#
These are the options which are necessary to run the software and will automatically be installed. You can see there are a few options which are light grey in color. Next, you need to check the components which you want to install and can uncheck or leave as it is which you don’t want to install. Now click on the ‘Next’ Button to proceed. Soon after you click on the downloaded file, the XAMPP setup wizard will open. But you would probably click ‘Yes’ to start the installation process. Step 2: Run the Installer to Install XAMPPĭuring the installation process, you may come across warning pop-ups.
Xampp for windows server 2019 how to#
Since we are discussing How to install XAMPP on Windows 10, therefore, we will choose the Windows option as shown below. You can skip FileZilla FTP Server, Mercury Mail Server, and. When selecting the components make sure to select Apache, MySQL, PHP and PHPMyAdmin. After the download is finished, Double click and run the.
Xampp for windows server 2019 mac os#
You will see XAMPP ready to download for cross-platform like Windows, Linux, Mac OS X. Download and save the windows version of the xampp installer to your PC. Make time for other users and experts to answer your questions.To download and install XAMPP, go to apachefriends downloads page, the official link to download XAMPP from. You can follow the Learn how to open a port on a Windows firewall.ĭear user, we hope you would enjoy this tutorial, you can ask questions about this training in the comments section, or to solve other problems in the field of Eldernode training, refer to the Ask page section and raise your problem in it as soon as possible. Then right-click on it and select Restart. In the window that opens, select the windows time option. Open the Services by searching in start menu or hitting on the windows key.Ģ. The following options explain the information about AnnounceFlags:ĭefault value for domain members and stand-alone clients and servers is 10.ġ. Recommended Article: Tutorial Configure NTP Server in Windows Server 2019
0 notes
Text
Xampp Download Success

Scroll down and find the portable version in.exe format. Click on the file name to begin the download. Once you have downloaded the XAMPP portable file, you need to double click on the file to run the installation. During the installation you will be asked to select the location where you want to install XAMPP.
I've covered installing XAMPP on your Mac or PC in another tutorial. If you don't already have it setup, go through that tutorial first. How to install WordPress in XAMPP from scratch: Make sure XAMPP Control is running; Create a new database; Create a folder in /xampp/htdocs/ Download WordPress to the folder.
Xampp App Download Windows 10
Xampp Download 64
Xampp Download For Windows 7
Xampp For Windows 10 Download
Download Xampp Apache Friends
This is a PHP/MYSQL Tutorial for beginners that teach you how to Download and install xampp server in your own pc. Their is Step by Step process.
XAMPPis a free and open-source cross-platform web server solution stack package. Apache Friends developed XAMPP. it consists mainly of the Apache HTTP Server, Maria Db database, and interpreters for scripts written in the PHP and Perl programming languages. Since most actual web server deployments use the same components as XAMPP, it makes transitioning from a local test server to a live server possible. XAMPP’s ease of deployment means a developer can install WAMP or LAMP stack quickly and simply on an operating system. With the advantage, a number of common add-in applications such as WordPress and Joomla! can also be installed with similar ease using Bitnami. here we teach how to Install Xampp in easy steps.
Read also: How to dual boot macOS Mojave and windows 10
Prerequisites
XAMPP requires only one zip, tar, 7z, or exe file to download and run, and little or no configuration. The Windows’ version of XAMPP requires Microsoft Visual C++ 2017 Redistributable. Because it is very easy to install and use, so many users recommend it.
How to Install xampp on windows?
1. Download and Install Visual Studio 2008 redistributable package because XAMPP will need this to run properly.
2. Download and Install XAMPP for PHP 5.X for Windows- Be sure to select the proper version of PHP as there are many choices.

3. Allow the program to make changes to your machine.
4. It is very important to install on the root of c:. If you don’t, some functions of XAMPP may have restrictions that will force you to adjust the settings in your UAC, which isn’t recommended.
5. Double-click on the new XAMPP Control Desktop shortcut. Use the Search feature in Windows 10 to find the XAMPP Control App, which opens up the XAMPP Control Panel Application. There you will see a column of “Start” buttons. Select the ones for MySQL and for Apache.
6. now see a green “Running” indicator
Step 1. Download the XAMPP installer
Xampp App Download Windows 10
Download XAMPP for Windows. The download file size is around 124 MB.
Step 2. Run the XAMPP installer
Once you run the installer, you will see Windows User access control asking for permission to go ahead with the installation. Click Yes and to start the installation process.
Step 3. Anti Virus Warning
Now you will see an anti-virus warning. You can disconnect from the internet and temporarily disable the internet. Before clicking on Yes.
I have Norton antivirus running on my system. I decided to ignore this warning and continue with the installation.
Step 4. User Access Control Warning
You will see a warning related to User access control is turned on. To get around this, we will have to install XAMPP in the root C directory instead of Program Files(x86) directory. Click yes to continue
XAMPP installation- UAC Warning

Step 5. Welcome to the setup wizard
Now you will see the actual setup wizard. Click next to continue.
Step 6. Select Component
In this dialog box, you have to select the components to install. I generally uncheck perl, tomcat, Filezilla and Mercury Mail server. But since you are starting out, leave everything as it is and click on next.
XAMPP installation- Select Component
Step 7. Select Installation Folder
Select the installation folder. Leave it as it is. If you plan to change this folder, please do not select Program Files directory. It will result in problems later on because these folders have certain restrictions imposed by Windows.
To be on a safe side, leave it as it is and click next.
XAMPP installation on Windows – Select Installation Folder
Step 8. Bitnami for XAMPP installation
Bitnami provides a free setup for WordPress, Drupal. But we can skip this for now. Click on next.
If you leave the Learn more about Bitnami for XAMPP, it will open a bitnami page in your browser after you click next. There is no harm in glancing over the page. Not necessary though.

Step 9. Ready to install xampp
Now the setup is ready to install xampp. Click next to start the installation process.
XAMPP installation on Windows – Ready to install
Wait for the installation process to complete.
XAMPP installation on Windows – Installation in Progress
Step 10. Installation of xampp has been completed
Xampp Download 64
Click on Finish to complete the installation. If you leave the “Do you want to start the Control Panel now? checked, XAMPP will start after you have clicked finish. You uncheck the box, you will have to start XAMPP manually.
Xampp Download For Windows 7
Leave it checked for now and see if XAMPP starts successfully.
Xampp For Windows 10 Download
XAMPP installation – Setup Wizard – Installation Complete
*XAMPP when it starts for the first time, it asks for application language. It for XAMPP only and not for PHP, MySQL, etc..
Download Xampp Apache Friends
I selected English. You can choose yours and clock on save. You have just two options anyways.
0 notes
Text
Online Server Administration Training
The Server Administrator has the full control of a server. The main role of a server administrator is to preform various things related to server or servers.
Roles of a Server Administrator
configuration
management
improve servers
This ensures perfectly working and cost efficiency of the server.
The Server Administrator will help with managing the physical security, uprightness, and well being of the server or data centres.
Salary of a Server Administrator:- Depends on the company and size of the server infrastructure and the experience level
Starting Range Salary = 15k / month
Mid Range Salary = 35k - 50k / month
Advance Range Salary = Starting from 90k / month
How this program will help you?
This Certification Program will help with laying preparation towards a world-class Server Administrator and Engineer, this program is both an journey and a destination. A way to become skilled IT professional and demonstrate your expertise to the world. It helps you to gain skills and proficiency in the latest Server technologies and solutions.
Our Mission
Provide enhance recognition and career development.
Prove commitment to growing IT skills.
Demonstrate job readiness and performance.
Why Us?
Get trained by Server Administrators who has years of experience.
100% practical training
Each trainee will have access to his/her server 24/7.
We develop troubleshooting skills on our own production servers.
Job Placement assistance and interview preparation.
Training Modules
Module 1
Introduction and basics of Linux
Linux administration - Beginner
Linux administration - Networking
Linux administration - Advanced
Linux firewall configuration
Module 2
DNS Server installation, configuration & administration - Linux
FTP Server installation, configuration & administration - Linux
Web Server installation, configuration & administration - Linux
PHP installation, configuration & administration - Linux
Database Server (MySQL) installation, configuration & administration - Linux
Email Server installation, configuration & administration - Linux
Module 3
Introduction and basics of Windows Servers
Windows Server administration - Beginner
Windows Server administration - Networking
Windows Server firewall configuration
Module 4
DNS Server installation, configuration & administration - Windows Server
Web Server installation, configuration & administration - Windows Server
PHP installation, configuration & administration - Windows Server
ASP. Net installation, configuration & administration - Windows Server
Module 5
Email Server installation, configuration & administration - Windows Server
FTP Server installation, configuration & administration - Windows Server
Database Server (MySQL) installation, configuration & administration - Windows Server
Microsoft SQL Server installation, configuration & administration - Windows Server
Module 6
Introduction to Web hosting & Control Panel
Linux cPanel installation, configuration & administration
Linux Virtualmin installation, configuration & administration
Windows WebsitePanel installation, configuration & administration
Windows Plesk installation, configuration & administration
Installation and configuration of PHP/Asp.net web applications
(Joomla, WordPress, DotNetNuke etc.)
Module 7
Linux Server backup & disaster recovery strategies
Linux MySQL databases backup & disaster recovery strategies
Windows Server backup & disaster recovery strategies
Windows MS SQL databases backup & disaster recovery strategies
Windows MySQL databases backup & disaster recovery strategies
Module 8
Linux hacking - admin password break/reset & recovery
Linux hacking - access data (files/folders) on locked system
Windows hacking - admin password break/reset & recovery
Windows hacking - access data (files/folders) on locked system
Linux Server - recover damaged/unbootable system
Windows Server - recover damaged/non booting system
Module 9
Introduction to Server Security, hacking attacks & techniques
Hacking test website's to understand how hackers work
Securing Linux Servers
Linux tools and techniques to fight against hackers
Securing Windows Server
Windows tools and techniques to fight against hackers
Implementing Web application firewall on servers to mitigate common hack attacks
Module 10
Introduction to SPAM emails & Spammers
Install configure & manage spam filter for Mail Servers
Tweaking and optimization of Web server, PHP & MySQL Server
Introduction to DNS clustering
Install, configure & manage DNS cluster
Module 11
Introduction to Intelligent Platform Management Interface (IPMI)
Intelligent Platform Management Interface (IPMI) configuration & management
Troubleshooting OS problem using IPMI
Remote Operating System installation using IPMI
Remote troubleshooting Operating System, backup and file system management using IPMI
Module 12
Introduction to cloud computing & virtualization
Virtualization/cloud - install, configure & manage Linux KVM
Virtualization/cloud - install, configure & manage Microsoft Windows Hyper-V
Virtualization/cloud - install, configure & manage VMware vSphere - ESXi
Cloud computing - install, configure & manage private cloud infrastructure (VMware)
Cloud computing - install, configure & manage private cloud infrastructure
(RHEV/OVIRT)
Virtualisation / cloud infrastructure backup & disaster recovery strategies
Module 13
Improving troubleshooting skills
Learn how to analyse system logs to troubleshoot issues
How to use Google to troubleshoot issues
Troubleshooting common server side issues
Want to know more about the course or when new batch is starting?
Reach us at 9806532911 or 7987168352
1 note
·
View note
Photo

BEST WEB HOSTING FOR UNITED KINGDOM 2021 HELPING YOU FIND THE BEST HOST IN THE UK
FIND OUT THE BEST HOSTING PROVIDERS FOR UK TARGETED WEBSITES
Web hosting has come a long way in the past couple of decades. What once was a small industry with only a handful of solid options is now quite vast. UK bloggers and businesses now have plenty of great hosting providers to choose from. With that being said, choosing the best UK server for your needs is no easy task.
The quality of service you can get from a web hosting company varies dramatically, so it’s important that you put some extra time and attention into selecting a plan that’s appropriate for you. A host is responsible for storing your website data and providing access to visitors. Having substandard hosting can result in serious performance issues on both sides of the equation. If you run an e-commerce website or rely on your digital space to perform business operations, you’re looking at a loss of potential income.
Whether you’re starting a brand-new blog or relaunching an established online store, you need to make sure that your hosting is capable of offering you fast and reliable performance. Here’s a buying guide to help you find the best web hosting the UK has to offer.
Best Overall Web Host For UK
Siteground
SiteGround is a popular hosting option for UK businesses and individuals. Not only are they incredibly affordable, but they offer impressive performance capabilities. The provider has servers around the world. There’s even a data centre in London. To increase your speeds even further, the company’s proprietary SuperCacher system is available. It can prevent performance problems, even if someone is accessing your website from the other side of the world.
From £2.95 per month!!!
SiteGround also offers a free SSL certificate with most plans. If you already have an established website and want to switch to a more powerful server, the company even offers free site transfer, which is pretty rare in the industry. If you ever need assistance, the customer support section is quite robust. There are detailed guides and access to a live specialist. Most chat requests have a response time of 10 minutes or less.
Pros:
Many different hosting plans
Recommended by WordPress
Worldwide servers
SuperCacher technology for enhanced speed
Free SSL certificate
Free site transfer service
Great Customer Support
99.9 percent uptime guarantee
30-day money-back guarantee
Cons:
Doesn’t offer as much disk space as other options
CLOUDWAYS – Excellent Managed WordPress Hosting Service For UK
PRICE FROM: $10 p/m UPTIME: 99.99% FREE DOMAIN NAME: No FREE EMAIL: No LIVE CHAT SUPPORT: Yes FREE WEB BUILDER: No
Cloudways is a relatively new option in the web hosting market, having been established less than a decade ago. However, it’s growing rapidly in popularity due to its blazing fast speeds and versatile service. The only type of web hosting plan offered by this provider is cloud hosting.
Rather than using their own network of servers, the company utilizes third-party equipment from some established tech giants. As a result, you can rest easy knowing that your data is on advanced equipment you can rely on.
All of the Cloudways plans are scalable. You can easily add more resources as your business grows. Cloudways doesn’t do long-term commitments. They operate on a month-to-month hosting system to provide you with as much flexibility as possible.
Pros:
Uses powerful worldwide servers
Scalable hosting solution
SSD storage
Proprietary CDN feature
Auto-healing servers
Built-in security features
24/7 support
Can be used with WordPress, Drupal, Joomla, and more
No long-term contracts
Free Migration
Cons:
Doesn’t offer any other type of plans other than Cloud hosting
Can be difficult to learn for those who aren’t tech-savvy
WPengine – Excellent Managed WordPress Hosting Service For UK
LATEST OFFER: 5 MONTHS FREE HOSTING ON ALL WPENGINE PLANS
WP Engine is a provider that focuses solely on WordPress hosting. They offer high-performance servers with locations around the world. While their plans on not the cheapest around, the performance capabilities of WP Engine make the investment well worth it. The provider uses PHP7 and HHTP/2 for webpage loading. These protocols can handle three times more requests per second than the alternatives. As a result, your visitors can enjoy up to 27 percent faster load times.
Additional technology is used to ensure that your worldwide audience has no problem viewing your UK site. One is their EverCache system. It helps to reduce the load on the servers and make your site more accessible to those who aren’t in the UK. There’s also a built-in CDN for global reach and malware protection for safety.
Pros:
High performance WordPress hosting
Proprietary caching system
Free CDN
Large network of servers
Supports many plugins and WordPress tools
Malware protection
Cons:
Doesn’t offer any other type of plans other than managed WordPress hosting
More expensive than other options
BLUEHOST – Best For WordPress – Reliable and Solid – ($2.95 per month)
PRICE FROM: $2.95 a month UPTIME: 99.95% FREE DOMAIN NAME: Yes FREE EMAIL: Yes LIVE CHAT SUPPORT: Yes MONEY BACK GUARANTEE: 30 Days
With over 20 years of experience, Bluehost is one of the oldest providers in the industry. Alongside HostGator and GoDaddy, Bluehost is considered to be one of the originals. The company continues to be one of the best website hosts for UK users. They have many plan options.
You can invest in shared, dedicated, and VPS hosting. Bluehost also has managed WordPress web hosting packages with one-click installs, hundreds of themes, and automatic updates.
When it comes to performance, Bluehost doesn’t disappoint. Most of the provider’s servers are located in the US. However, they do have a selection of international centers as well. There’s even one in the UK to ensure that you have fast connection speeds. To help your site visitors in other parts of the world, Bluehost offers a free CDN with most plans.
Pros:
Versatile hosting plans
Reliable performance
Free domain for first year
One-click WordPress installs
No bandwidth limitations
Uses cPanel
Includes CDN
Generous disk storage
24/7 support
Cons:
No UK servers
Business focused service
Pricier than other options
HOSTINGER – Best Cheap Web Host For UK – Great Value For Money – From $0.80 p/m
PRICE FROM: USD 1.45 per month UPTIME: 99.89% FREE DOMAIN NAME: No FREE EMAIL: Yes LIVE CHAT SUPPORT: Yes FREE SSL CERTIFICATE: No
We’ve rated Hostinger as the Best Cheap Web Host. They have over 30 million customers worldwide and is an absolute beast of the hosting universe. They offer an excellent service as well as very good customer care for a low price web host.
Hostinger is a simple and affordable web hosting company. They offer very low prices if you choose to commit for multiple years of service, the quality of which is superb. The company has a server farm in the UK as well as many other locations. Advanced connection protocols are used to optimize the service and achieve fast speeds, especially on the WordPress plan.
The exact features of each plan vary quite a bit. The Premium and Business plans have the most to offer. The latter includes free daily backups of your files. The Business plan also comes with a free SSL certificate, unlimited bandwidth, and unlimited email accounts. Premium plans come with weekly backups for peace of mind.
Pros:
Shared, Cloud, and VPS hosting plans
Free domain names with upper-tier plans
Optimized for WordPress
24-hour customer support
Very affordable fees
Weekly and daily backups on some plans
Free SSL certificate on Premium plan
Free website builder
Cons:
Doesn’t use standard cPanel
Most affordable price requires long-term committment
GREENGEEKS – Decent Web Host For Bloggers an Small Business – ($3.95 USD per month)
PRICE FROM: $3.95 per month UPTIME: 99.94% FREE DOMAIN NAME: No FREE EMAIL ACCOUNTS: Yes LIVE CHAT SUPPORT: Yes
GreenGeeks is a pretty unique hosting provider. They’re relatively new to the market but have already made quite the splash. They offer plenty of hosting options to suit your needs. All of them offer unlimited storage, bandwidth, and domains.
Whether you need standard shared hosting, reseller hosting, or managed WordPress hosting, GreenGeeks has you covered. This innovative provider is dedicated to much more than just providing you with reliable performance. They’re an environmentally conscious company that gives you the opportunity to reduce your carbon footprint. All of the energy that’s used to power the servers is put back into the local grid three-fold with renewable energy.
While the company doesn’t have servers in the UK, the closest option is in Amsterdam. High-tech optimization techniques are also used to reduce lag. This includes PowerCacher, MariaDB, HTTP/2, and PHP7 protocols. There’s also a free CDN with each account.
Pros:
Offers many types of hosting
Unlimited storage and bandwidth
Unlimited email accounts on most plans
Eco-friendly hosting solution
Custom security tools
Free CDN
Multiple optimization protocols
24-hour support
30-day money-back guarantee
Cons:
Doesn’t accept GBP
No servers in the UK
A2 Hosting – Decent Web Host For Bloggers an Small Business – ($3.92 USD per month)
PRICE FROM: $3.92 a month UPTIME: 99.94% FREE DOMAIN NAME: No FREE EMAIL: Yes LIVE CHAT SUPPORT: Yes
Like the previous hosting company, A2 Hosting’s closest servers to the UK are in Amsterdam. However, they also have servers around the world. The provider has a lot to offer businesses and Internet entrepreneurs. Multiple plans are available.
You can get affordable shared plans or more expensive dedicated plans. The great thing about A2 Hosting is that they have both Windows-based and Linux-based hosting. You’ll be able to get a service that matches your unique technical requirements.
All of your website data is stored on reliable SSD drives. If you’re unsure about how much space you’ll need, don’t fret. A2 Hosting has unlimited disk space and no bandwidth limitations to worry about. The company also has free SSL certificates, optional premium SSL certificates, and the ability to protect an unlimited number of subdomains.
Pros:
Shared, VPS, Dedicated, and Reseller hosting plans
Unlimited disk space and bandwidth
99.9 percent uptime
Offers both Windows and Linux hosting
Optimized for WordPress
Also offers domains
Turbo Server Option
Anytime money-back guarantee
Cons:
No servers in the UK
INMOTION HOSTING – Top For UpTime Levels 99.99% ($3.99 per month)
PRICE FROM: $4.99 a month UPTIME: 99.99% FREE DOMAIN NAME: Yes FREE EMAIL: Yes LIVE CHAT SUPPORT: Yes FREE WEBSITE BUILDER: Yes
While you may not be familiar with InMotion hosting, the company has been in the industry for over 15 years. They are primarily focused on serving businesses.
As a result, many of their plans have a higher price tag and come with user-friendly features. The company focuses on providing an easy-to-use service that can be picked up by any business.
InMotion offers pretty fast connection speeds. They have a robust server network. Though, most of their servers are in the US. None are in the UK. With that being said, the provider does have a custom server caching system. This helps to improve performance for those in the UK and abroad. Some additional perks of InMotion are their very high uptime figures of 99.999 percent, free SSL certificates on most plans, and fast SSD storage.
You can use this Uptime Calculator to check the differences between different web hosts.
Pros:
Multiple hosting plans to choose from
Custom server caching
SSD storage
99.999 percent uptime
Free SSL certificate
Protection from hacking
Available user-friendly site builder
Hack guarantee
Cons:
No UK servers
Business focused service
Pricier than other options
Kinsta – Decent Managed WordPress Host For Australian Users – ($30 USD per month)
Kinsta is a WordPress-only hosting company. The hosting service is fully managed so that you don’t have to worry about a thing. The company takes care of the logistics, including updating WordPress and security patches. Speaking of security, the provider has many built-in features to keep you and your visitors’ connections safe. There’s DDoS protection, hardware firewalls, and a free SSL certificate.
All of your data is stored on Cloud servers. Kinsta doesn’t use their own servers. Instead, they utilize Google Cloud servers, which are very fast and reliable. To keep your files safe, the provider performs daily backups for free. If you want to make more frequent backups, you can do that as well for an additional fee. Kinsta is all about making things as easy as possible for you. So, they have a knowledgeable support team, many detailed guides, and a free hack guarantee with every plan.
Pros:
Uses Google Cloud servers
Includes CloudFlare CDN
Fully managed for simplicity
Support from WordPress experts
Free SSL certificate on all plans
Security features
Customizable backup system
Hack guarantee
Cons:
Doesn’t offer email accounts
Which Type of Hosting is Right For You?
The world of web hosting is more complex than what most people think. There are actually many different types of hosting plans available. While they all serve the same purpose and achieve similar end goals, the way they do that is vastly different.
Before you start looking into different web hosting companies, you need to figure out what type of hosting would be best. To do this, consider your monthly Internet traffic, the size of your site, and what types of content you plan to display. From there, you can narrow down your options and choose accordingly.
If you’re just starting out, shared hosting is your safest best. These types of plans are typically marketed towards small businesses that don’t have a ton of web traffic just yet. It’s also suitable for bloggers or anyone wanting to create a small-scale project.
When you have a shared hosting account, your site is stored on the same server as several other sites. The resources of that server are then shared among all of the sites. While shared hosting plans are often limited in what they can achieve, they have the added perk of being a cheap web hosting option.
Shared plans do come with some tradeoffs. On one hand, they’re designed to be as user-friendly as possible. Many hosting providers offer one-click installs for popular scripts and content management systems so that you can get your site up and running quickly. On the other hand, the fact that you share resources may cause problems. One site on the server can hog bandwidth and RAM with high traffic, resulting in slow performance on your site.
VPS hosting plans are also shared. However, they offer greater control because the server is partitioned fairly. The resources are allocated individually, guaranteeing a certain level of performance. Essentially, providers will create VPS, also known as virtual private servers. They act as a single server that you have complete control of. You can make adjustments to your web hosting service through the provider’s control panel to customize the way your visitors experience your site.
Cloud hosting plans are a unique option that is growing in popularity. These, too, share resources. Though, the key difference is that your website’s data is not stored in one single place. Instead, it’s spread out through multiple servers. The benefit of this design is that connection speeds are significantly improved. Rather than having to load data from one slow server that’s far away, users can gather data from multiple places. In most cases, cloud hosting plans are fully managed so that you don’t have to deal with the technical side of things.
Larger online businesses and e-commerce sites can benefit greatly from a dedicated server. With a dedicated hosting plan, you’re given an entire server all to yourself. That means no sharing resources and no worrying about performance dips. You can control every aspect of your service to work for your own website needs.
The downside of a dedicated hosting plan? They’re incredibly expensive and technically demanding. Depending on your particular skill level, you may have to hire outside help and a system administrator to keep things running smoothly.
If you’re a web developer, reseller hosting plans are a must-have. They allow developers to act as a host themselves. Essentially, you purchase large amounts of server space. You can then split this up how you see fit to meet the needs of your own clients. You’ll even be able to provide separate accounts so that your clients can make modifications to their website on their own. However, you’ll retain control over all of those sites thanks to the dedicated reseller control panel.
What About WordPress?
WordPress is the most popular content management system out there. As of 2018, almost 60 percent of active sites tracked utilize the WordPress platform. If you have ever visited WordPress.org, it’s not hard to see why. It’s incredibly versatile and easy to use. WordPress is free and open-sourced. As a result, it’s constantly improving.
Many web hosting companies have a dedicated WordPress hosting plan. It’s very similar to a shared plan. However, the entire hosting process is managed so that you don’t have to do much. It’s an easy-to-use option for those who are just learning the ropes about digital content publishing.
Typically, hosting services with this plan offer a lot of other great perks as well. They may have one-click installation of scripts, plugins, and add-ons. Some also have an intuitive website builder, essentially acting as a one-stop shop to get your site published.
How to Compare Web Hosting Providers
Your next step in choosing the right hosting service is to compare providers. There are a lot of things to consider to ensure that you’re getting the most bang for your buck. The following factors are mostly performance based. You’ll want to read customer reviews and get more information about each provider’s capabilities before you commit.
Where a provider’s data centres are located will affect how fast your content loads for visitors. Ideally, your co.uk website should be stored in or near the UK. The goal is to go with a hosting company that has servers near your target audience. If you’re trying to reach a UK audience, it wouldn’t make sense to have your site stored on a US server. That’s because distance is a big factor in connection speeds. Keep things close to your target demographic to ensure that they have no problem accessing your content.
If you serve a broader global audience, choosing a specific server location is tough. The Internet is open to people across the world, so you’re bound to get traffic from users that are significantly farther away than your target demographic. So what do you do to help those people experience good connection speeds? You must utilize a CDN, or Content Delivery Network.
Many providers have CDN features built right in. The most popular is CloudFlare. Basically, this global network of server nodes stores a cached version of your site. So, when someone tries to connect to your site, the information from the closest node to them is loaded. It helps to eliminate the performance dip while also reducing the resource load on your host server.
The two previous points both involve connection speed. While distance is certainly a big factor in load times, it’s not the only thing that affects it. Server resources and optimization also play a role. More resources, such as memory and CPU power, can help to make your website faster. Also, many providers utilize optimization scripts to minimize performance issues as much as possible.
Before you commit to a provider, check on their connection speeds. You can perform speed tests to get a better idea of how your website will feel to your visitors.
Your site can only be accessed if the web server it’s on is running smoothly. Servers are complex machines. They’re not immune to damage. To ensure that your visitors can access your site around the clock, you need to go with a hosting provider that has a very high uptime percentage.
Most companies offer 99 percent uptime. Though, take this with a grain of salt. Check out customer reviews and see if the provider has any data to back this claim. Typically, providers will go to great lengths to ensure that servers are protected and limit downtime. They may be continually monitored, cooled with some big machinery, and quarantined for safety.
Every time a computer connects to a website, data is transferred. The amount of data depends entirely on the content your displaying and whether or not you’re offering downloads. If you have a lot of traffic, you’re going to need a high bandwidth allotment. Luckily, many providers are now offering unlimited or unmetered bandwidth so that websites can handle any amount of traffic without being forced off the grid.
How big is your website? If it’s relatively small, you won’t need more than a few GB of disk space to get by. However, if you have multiple pages, you’ll definitely need a lot more. E-commerce sites tend to use up the most space due to individual product pages.
You can find hosting plans with varying amounts of storage space. Many providers are also now switching to SSD storage. Solid State Drives are much more reliable and can transfer data at much faster speeds. If you’re looking for the best UK hosting service for a content-heavy project, go with a provider that offers unlimited SSD storage.
If you own a business, the last thing you should be doing is communicating with clients through a free email address from Google. Providers often have email features built into their plans. They allow you to have a dedicated email address with your own domain name.
Email features vary dramatically. Some companies have their own webmail platform while others require you to use third-party clients. Others have strict limitations on how many emails you can send or receive. It’s important to see how many email accounts you can have per hosting account and what types of limitations are put in place.
Do you plan on hosting more than one website or implementing multiple subdomains into your digital space? If so, you need to make sure that your provider allows it. Base shared plans often limit you to a single domain. To raise that limitation, you may have to invest in a higher tier plan or pay for extra add-ons.
SSL certificates are a must-have on all websites nowadays, not just e-commerce sites. Hackers and digital thieves are constantly on the attack. Web users are fully aware of this fact and often won’t visit a site unless it has an SSL certificate. SSL, or Secure Sockets Layer, is a security technique that encrypts the data connection between your host server and your visitor’s device.
An SSL certificate shows that your site uses this protocol. Most trustworthy hosting providers will offer a free SSL certificate with every account. Premium and business plans may even include additional certificates to protect your site even further.
No one likes to deal with connection issues. If your website goes down, it pays to have a knowledgeable customer support team you can rely on. Just because a provider has a support system doesn’t mean that its any good. Some companies outsource their support, which leaves much to be desired.
A responsive support team can mean the difference between getting your site back up in less than an hour and spending several days trying to figure out what’s wrong. Look out for companies that have live chat or telephone support available around the clock. This means that you can get a response and assistance as quickly as possible. If it’s based in the UK, even better.
Finally, let’s talk about operating systems. No, not the operating system of your computer, but the operating system of the actual host server. Most systems run on Linux. The open-sourced platform is incredibly versatile and quite reliable. Due to its open-sourced nature, Linux servers are compatible with most scripts and protocols. These include MySQL and PHP.
Windows servers are also available, though they tend to be a bit pricier. With a Windows server, you can use many technologies that you can’t with Linux. This includes ASP, .NET, Microsoft Access, and more.
When it comes to the operating system, it all comes down to personal preference and the technology powering your site. However, Linux-based servers are much more prevalent.
#web hosting#hosting#best hosting#free hosting#hosting reviews#make money online#make money 2021#make money as an affiliate
0 notes
Text
HOSTDIME HOSTING REVIEW

HOSTDIME HOSTING REVIEW
HostDime was founded by Vivar Manny in Florida, United States in 2001. With the increase in number of its servers, the company deemed to take necessary steps to establish a full-fledged data center. In December 2003, HostDime became a proud owner of a high-tech data center. HostDime mainly focus on delivering managed cloud web hosting and tools to help their individuals and business to make their online availability without any hassles. HostDime is attractive for its affordable pricing, high uptime, and 24/7 customer service.
General Information
1. Speed - 920 ms (November 2019 to November 2020 average)
2. UpTime - 99.99% (November 2019 to November 2020 average)
3. Support - live chat, email, phone line
4. Apps - Joomla, WordPress, Drupal, PHP, Zen Cart, and other popular apps.
5. Features - Softaculous website builder, DDoS protection, SSL certificates, Remote site backups, CDN and Cloud Accelerator, Bandwidth limits, Activity monitoring and web stats, WordPress support, One- click app installs, 24/7 tech support, Money-back guarantee.

6. Plans - Dedicated server hosting/ Cloud services Colocation
7. Site Transfer - Free site transfers within the first month of signing up
8. Price - The cheapest hosting plan from HostDime costs $35.51 per month
Pros and Cons of HostDime Hosting
1.Reliable uptime - HostDime promises good performance and an uptime of 99.99% per month. They value their promise by giving a refund if their scales fall into a range,
# 95% to 99.98% - refund of 10% of your monthly payment
# 90% to 94.9% - refund of 25% of your monthly payment
# 89.99% and below- full refund of your monthly payment
The company has put several measures to ensure that your site remains up and running throughout. Their real-time monitoring system helps them to get live updates about how their server is fairing. This system is popularly known as Synapse. HostDime gives tech support to rectify issues even before we notice them.
2.Impressive loading times
HostDime features fast page loading times. On average, most hosted sites display results within 920 ms. HostDime being one of the largest data centre in the south-east US has excellent network credentials. Additionally, the web host partners with highly reputed Tier-1 carriers including NTT Communications and Cogent to deliver stellar connection speeds and bandwidth.
3.Helpful customer support
HostDime data centers are fully equipped with complete around-the-clock tech support and can be contacted by means of live chat, telephone, or email with just few details to link with customer support representative.
HostDime website and blog section are two areas from which useful information and answers are available for all type of queries of the customers.
HostDime also has a few self-help options. FAQS, manuals, guides, and video tutorials. There is a customer community, where HostDime staff and fellow customers can be interacted.
4.Top-class security
HostDime hosting offers top class security features at an additional cost. HostDime provides DDoS protection to all users. This comes in three different types,
- traffic scrubbing
- NETSCOUT’s mitigation - NETSCOUT’s filtering helps to guard sites against unusual high or irregular traffic.
- Cloud Protection - Cloud protection is a hybrid system that provides real-time site monitoring of all sites.
- SSL certificate from HostDime is an advantage that authenticates website and assures visitors as safe website.
5. Easy-to-use dashboard
HostDime features a very easy cPanel that allows users to painlessly manage all the aspects of their hosting. The cPanel dashboard displays useful information like bandwidth graphs, billing information, affiliate program, server performance, and licenses management.
6. Cons
HostDime policy on strict money-back guarantee is not attractive. Some users notice a fall of uptime.
Hosting Plans
1.Managed VPS – 1: Cost at $65/ month, Storage space 60 GB, Bandwidth limit 5 TB.
2. Managed VPS – 2: Cost at $80/month, Storage space 100 GB, Bandwidth limit 5TB
3. Windows WVPS- 1: Cost at $85/ month, Storage space 60 GB, Bandwidth limit 5 TB.
Other Hosting Plans
1. Quad-core dedicated servers
2. Managed VPS
3. Colocation packages
Recommended
Though not a smart option for beginners or small businesses most of the plans are made for customers with complex IT needs and big budgets. Generally, HostDime is a professional web hosting provider.
0 notes
Text
How To Use GSA Search Engine Ranker Tutorial To Desire
GSA Search Engine Ranker Tutorial - Asia Virtual Solutions
Table of ContentsGSA Search Engine Ranker - video tutorials Honest GSA Search Engine Ranker Reviews How to Install GSA Search Engine Ranker. How To Build Backlinks With GSA Search Engine Ranker GSA Search Engine Ranker Tutorial
No, no. We are actually using GSA Captcha Breaker which is imitating AntiGate. If you want to understand why we are doing it like this, check out our GSA Captcha Breaker Ultimate Tutorial, but in other words, it is more effective that method. Let's look at the buttons on the right-hand side of the table: This will permit you to add a new captcha solving service.

GSA Search Engine Ranker Review - Best link Building Tool Help
com 9kw. eu sluggish AntiGate AntiGate API with IP Best DeCaptcha Beat Captchas Bolo API Bypass Captcha Captcha 24 Captcha Bot Captcha Infinity obsoleted Captcha Sniper Captcha Trader Captcha Tronix Captcha X CheapCaptcha Death by Captcha DeCaptcher DeCaptcher API with IP Eve specializes in ReCaptcha OCR Expert Decoders HiCaptcha Image Typerz Image Decoders Mega OCR unstable and slow PixoDrom ReversProxies OCR RipCaptcha RuCaptcha ShaniBPO unstable SpamVilla deletes the captcha you have selected from the table.
opposite to. resets the captcha stats for the picked captcha fixing service in the bar. opens the homepage of the selected captcha resolving service. tests the selected captcha (if you are using GSA Captcha Breaker and connecting it with GSA Online Search Engine Ranker by replicating some third-party captcha solving software application, if the test achieves success, it needs to show something like this: ).
e. utilizing the "Include" -> "GSA Captcha Breaker" combination of actions, often, they might lose connection to each other and GSA SER will stop building links or at least will lose a lot of VpM. So either imitate AntiGate utilizing GSA CB (see how) and link the two tools this method, or evaluate the connection frequently to make sure the captchas are being sent to GSA CB.
GSA Search Engine Ranker: Learn To Rank Sites
Below the buttons you can see the configuration of the chosen captcha service for each captcha, these fields may differ: some have logins, some keys, some API secrets, and so on. Nevertheless, there are a few settings which apply to all captchas: the variety of times the selected captcha resolving service will attempt and solve each captcha (we keep this at 3, however remember that the greater the number, the lower the LpM, however the lower the number, the lower the success rate you will have i.
successful registrations on target sites). this is excellent if you are utilizing some high paid captcha resolving service such as Death by Captcha and you desire to utilize it only for the crucial websites. beneficial in the same method as the above choice. again, beneficial in the exact same method as the above alternative.
GSA SER gives you the possibility to by hand fix a captcha if all other captcha fixing services fail it will open a small window with the captcha image and a basic input. Badbenz.Com. Nevertheless, if you run a lot of projects, or perhaps simply a few, this will get frustrating and irritating - GSA Search Engine Ranker manual.
youtube
this will flash the window if you have actually ticked the above option and a new captcha window pops up. Delight in the lightning program if you have numerous tasks. At the bottom of the tab we have several API secret input fields, again for services which solve captchas. I have not used any of these so I truly can't comment on them.
GSA Search Engine Ranker Tutorial - Free Guides
The is ticked by default, but we have actually not added this service, so it doesn't matter anyhow. Nevertheless, if you have SpamVilla added, this checkbox will force captchas which are basic questions (not images) to be responded to by SpamVilla's text captcha solver. That's it for the "Captcha" tab. Moving along the waves of this GSA SER tutorial.
As you can see, you have a basic checkbox, which if ticked, will send out all verified backlinks to the chosen blog site online search engine from the list you see below the checkbox. Now, the method this works is, when a job gets a brand-new validated URL, it is merely pinged by all the selected blog site engines.
Just my humbled viewpoint. Next to the list, as you can see, you can add, edit, delete, import, or reset blog search engines. Basic as that. The next part of the tab is where you can set up various indexing services. Supported ones are: GSA SEO Indexer while it is really low-cost, we do not utilize it because in my opinion, from reading and understanding what it does, it is not worth the resources it will utilize from our VPS.
GSA URL redirect PRO This GSA SEO tool quite simply builds 301 redirect URLs to your site (this one is not an indexation tool particularly) InstantLinkIndexer Indexification Linklicious. me ExpressIndexer LinkHuggers NuclearLinkIndexer LinkPipeline BacklinksIndexer IncredibleIndexer XIndexer LinkCentaur Lindexed. com OneHourIndexing LinkProcessor Crazy Indexer WitchIndexer FastLinkIndexer LinkIndexr When you select your indexing service (if you choose to utilize one at all), you can then pick from a couple of settings listed below the list of supported indexing softwares: will send just DoFollow links to the indexing services.
How To Use GSA Search Engine Ranker Tutorial To Desire
Get Kick-ass GSA Search Engine Ranker Help at - Asia Virtual Solutions
a few of the indexing services above assistance drip feed, which you can take advantage of, and you should. this will open a window where you will have the ability to choose from the engines supported by GSA Online search engine Ranker i. e. WordPress, Joomla, etc (we will note all soon).

Supreme GSA SER tutorial
And you are ready with the configuration of your GSA SER. Next we move onto the tab: You can utilize this tab to filter out some possibly spammy and dangerous websites which appear on the blacklists you have actually marked from the table. We have disabled this because, I can't keep in mind where I read it (I think it was a post by a SERengines developer), but enabling this.
And besides, we setup each of our jobs with filters set up from its job settings, so no worries there. And we also save GSA SER some time by preventing this blacklist check. If you do select to use this functionality: the number of minutes which will have to pass prior to the chosen blacklists get automatically updated add a brand-new blacklist URL edit the chosen blacklist URL from the table erase the picked blacklist URL import blacklists from a.
The choice merely sets the limit (in megabytes) which a website's HTML code can be in order for GSA Online Search Engine Ranker to download it and parse it using among its engines. So, for instance, if you have a target URL which GSA SER is going to download, but it is some guestbook which has 10s of countless discuss it, making its HTML way too fucking big (perhaps 1.
GSA Search Engine Ranker Tutorial - Free information

And now you know how to use the tab of GSA SER. Carrying on with the supreme tutorial of this link structure beast. Lastly. This is where a great deal of the magic takes place. Read this area thoroughly, due to the fact that it is of vital value! The tab: Let's begin with the first 4 rows of this tab i - GSA SER tutorials.
the ones with the input fields filled in with courses to directories - GSA SER tutorials. This is a screenshot of a few of the files inside the lists folder. Each of the. txt files you see has lots of possible target URLs which you can later utilize in your jobs to try and publish a backlink on each of them (we will see how in a minute).
0 notes
Text
How To Use Wget Linux
This tutorial will show you how to use wget command in Linux. We also give examples of 12 useful wget commands. As a result, you will see all the uses of wget and be able to download files from the World Wide Web.
Read more:
How To Check If A File Is A Directory
How To Block Messages On Macbook
What is Wget Command?
Wget is a computer tool created from the GNU Project. You can use it to extract data and content from many different web servers. Its name is a combination of the World Wide Web and the word get. It supports downloading over FTP, SFTP, HTTP, and HTTPS.
Wget is made in portable C and can be used on any Unix system. It can also be deployed on Mac OS X, Microsoft Windows, AmigaOS, and other popular platforms.
How to install Wget?
For this wget command tutorial, we will be using Ubuntu 16.04. But the command structure can be used on other Linux distributions.
First, access the server via SSH. Execute the following command to install wget on your computer:
When the installation is finished, you can start using it. Also, the basics of SSH can be of great help.
Wget Command example
We give you 12 examples of wget command that you will probably use every day. Please note that you can also use this function from scripts and cron jobs!
Use Wget Command to download each file
One of the most basic wget commands is to download the file and save it in the current directory. For example, if you want to download the latest version of WordPress, use the following command:
wget https://wordpress.org/latest.zip
Result
--2018-02-23 12:53:10-- https://wordpress.org/latest.zip Resolving wordpress.org (wordpress.org)... 198.143.164.252 Connecting to wordpress.org (wordpress.org)|198.143.164.252|:443... connected. HTTP request sent, awaiting response... 200 OK Length: 9332728 (8,9M) [application/zip] Saving to: 'latest.zip' latest.zip 100%[===================>] 8,90M 6,88MB/s in 1,3s 2018-02-23 12:53:14 (6,88 MB/s) - 'latest.zip' saved [9332728/9332728]
In this example, a file named latest.zip will be loaded into the directory you are using. You will see additional information such as, trim progress, speed, size, time and date.
Use Wget Command to download multiple files
We can use wget to download multiple files at once. To do this, you need to create a text file and put URLs to download the file into. In this example, we will download the latest versions of WordPress, Joomla, and Drupal. Enter the following command:
nano example.txt
This command will create a file named example.txt and open the text ditor. Paste the following links into:
https://wordpress.org/latest.zip https://downloads.joomla.org/cms/joomla3/3-8-5/Joomla_3-8-5-Stable-Full_Package.zip https://ftp.drupal.org/files/projects/drupal-8.4.5.zip
Then you can use -i to get all the files contained in the example file:
wget -i example.txt
Wait for a while the download will complete and you have the 3 most popular versions of Content Management.
Use Wget Command to download files under a different name In this wget example we'll save the file with a different name with the -O option:
wget -O wordpress-install.zip https://wordpress.org/latest.zip
In this case, the download is saved as wordpress-install.zip instead of the original name.
Use Wget Command to save the file in a specified directory You can use wget to put the file in another directory using the -P option:
wget -P documents/archives/ https://wordpress.org/latest.zip
The files you have downloaded will appear in the documents / archives / folder.
Use Wget Command to limit download speed
With wget, you can limit the download speed. This is useful when you are downloading a large file and avoid it using up your bandwidth. The example below is limited to 500k:
wget --limit-rate=500k https://wordpress.org/latest.zip
Use Get Command to set the number of reload attempts
Internet connection may cause simple paragraph errors. For this, we can increase the number of reload attempts using the -tries option:
wget -tries=100 https://wordpress.org/latest.zip
Use Wget Command to load files in the Background
For very large files, you can use function -b. It will run in the background
wget -b http://example.com/beefy-file.tar.gz
A wget-log will appear in the current directory, you can check the progress and status. This command will help you test it:
tail -f wget-log
Use Wget Command to download files via FTP
This command can be used with FTP. You just need to set the correct name and password as in the following case:
wget --ftp-user=YOUR_USERNAME --ftp-password=YOUR_PASSWORD ftp://example.com/something.tar
Use Wget Command to resume interrupted file downloads
Downloading can be interrupted if there's a problem with the connection. This usually happens when you are downloading a large file. Instead of reloading from scratch, you can continue with function -c:
wget -c https://example/very-big-file.zip
If you proceed without the -c function, the new file will have .1 added at the end as it already exists.
Use Wget Command to download the entire website
You can also use the wget command to download the entire site. It will show you on your computer without internet connection. Use the following command:
wget --mirror --convert-links --page-requisites --no-parent -P documents/websites/ https://some-website.com
Let's parse the fields in the wget command:
–mirror It helps you to download in recursive format. –convert-links All links will be converted to offline links. –page-requisites This command will include all the necessary files such as CSS, JS, and images –no-parent It ensures that there are no directories above the downloaded website directory -P documents/websites/ Make sure all content is saved to the specified folder.
When done, you can open the website on your computer and find all the necessary files in the directory documents/websites/
Use Wget Command to locate the error link
Use commands in a more advanced way. You can use the wget command to define broken URL that shows a 404 error on your website. By executing the following command:
wget -o wget-log -r -l 5 --spider http://example.com
-o Group all outputs into one file for later use -l Determine the recursive level -r Make the download recursive –spider Put wget in spider mode
We will continue to investigate more wget-log file to determine the link error. Here's the command to do this:
grep -B 2 '404' wget-log | grep "http" | cut -d " " -f 4 | sort -u
Use Wget Command to download files by number
If you have images or files numbered according to a certain list, you can download them all using the following structure:
wget http://example.com/images/{1..50}.jpg
See more:
How To Undo Deleted Text In Gmail App How To Burn Large Iso To DVD
Congratulations. By completing this tutorial you learned how to use wget professionally. You can utilize it to download one or more files. Furthermore, you can also use its advanced feature of downloading the entire website and identifying broken links. For more information, see also this official documentation section
Do you have any tips or tricks you want to share? Feel free to leave your comments below!
Source: https://blebees.com
source https://blebees.com/how-to-use-wget-linux/
0 notes
Text
RANK YOUTUBE VIDEOS WITH GSA SER
GSA Search Engine Ranker Tutorial - Latest Post
Table of ContentsGSA Search Engine Ranker Youtube - How to Promising GSA Search Engine Ranker video tutorials GSA Search Engine Ranker Recommend Services COMPLETE GSA SER Tutorial by Asia Virtual Solutions Tremendous GSA Search Engine Ranker manual
No, no. We are really utilizing GSA Captcha Breaker which is replicating AntiGate. If you need to know why we are doing it like this, take a look at our GSA Captcha Breaker Ultimate Tutorial, however in short, it is more effective that method. Let's look at the buttons on the right-hand side of the table: This will allow you to add a new captcha fixing service.

What are the best GSA search engine ranker tutorial settings
com 9kw. eu slow AntiGate AntiGate API with IP Best DeCaptcha Beat Captchas Bolo API Bypass Captcha Captcha 24 Captcha Bot Captcha Infinity outdated Captcha Sniper Captcha Trader Captcha Tronix Captcha X CheapCaptcha Death by Captcha DeCaptcher DeCaptcher API with IP Eve focuses on ReCaptcha OCR Specialist Decoders HiCaptcha Image Typerz Image Decoders Mega OCR unstable and slow PixoDrom ReversProxies OCR RipCaptcha RuCaptcha ShaniBPO unstable SpamVilla erases the captcha you have actually chosen from the table.
opposite to. resets the captcha statistics for the selected captcha solving service in the bar. opens the homepage of the selected captcha solving service. tests the selected captcha (if you are utilizing GSA Captcha Breaker and linking it with GSA Online Search Engine Ranker by emulating some third-party captcha solving software, if the test is successful, it needs to show something like this: ).
e. using the "Add" -> "GSA Captcha Breaker" combination of actions, often, they might lose connection to each other and GSA SER will stop constructing links or a minimum of will lose a lot of VpM. So either imitate AntiGate utilizing GSA CB (see how) and link the two tools this method, or check the connection frequently to make certain the captchas are being sent to GSA CB.
Should I buy GSA search engine ranker? Reviews
Below the buttons you can see the configuration of the picked captcha service for each captcha, these fields may differ: some have logins, some keys, some API secrets, etc. However, there are a couple of settings which apply to all captchas: the number of times the picked captcha fixing service will try and fix each captcha (we keep this at 3, but keep in mind that the greater the number, the lower the LpM, however the lower the number, the lower the success rate you will have i.
successful registrations on target websites). this is good if you are using some high paid captcha solving service such as Death by Captcha and you wish to use it just for the crucial websites. helpful in the same way as the above choice. once again, helpful in the exact same method as the above alternative.
GSA SER provides you the chance to manually resolve a captcha if all other captcha fixing services fail it will open a little window with the captcha image and a simple input. Beauhorn.com. Nevertheless, if you run a lot of tasks, or even simply a few, this will get frustrating and bothersome - GSA Search Engine Ranker manual.
youtube
this will flash the window if you have ticked the above choice and a new captcha window pops up. Delight in the lightning show if you have several projects. At the bottom of the tab we have several API key input fields, again for services which fix captchas. I have not utilized any of these so I actually can't comment on them.
How to Install GSA Search Engine Ranker.
The is ticked by default, but we have actually not included this service, so it doesn't matter anyhow. However, if you have SpamVilla included, this checkbox will require captchas which are simple questions (not images) to be responded to by SpamVilla's text captcha solver. That's it for the "Captcha" tab. Moving along the waves of this GSA SER tutorial.
As you can see, you have a general checkbox, which if ticked, will send all confirmed backlinks to the chosen blog site online search engine from the list you see below the checkbox. Now, the way this works is, when a job gets a new confirmed URL, it is merely pinged by all the selected blog site engines.
Simply my humbled viewpoint. Beside the list, as you can see, you can include, modify, delete, import, or reset blog site search engines. Easy as that. The next part of the tab is where you can configure numerous indexing services. Supported ones are: GSA SEO Indexer while it is very cheap, we do not use it because in my viewpoint, from reading and understanding what it does, it is not worth the resources it will use from our VPS.
GSA URL reroute PRO This GSA SEO tool quite merely builds 301 redirect URLs to your website (this one is not an indexation tool specifically) InstantLinkIndexer Indexification Linklicious. me ExpressIndexer LinkHuggers NuclearLinkIndexer LinkPipeline BacklinksIndexer IncredibleIndexer XIndexer LinkCentaur Lindexed. com OneHourIndexing LinkProcessor Crazy Indexer WitchIndexer FastLinkIndexer LinkIndexr When you pick your indexing service (if you pick to use one at all), you can then pick from a few settings below the list of supported indexing softwares: will send out only DoFollow links to the indexing services.
How to Export Content for GSA SER
Get Kick-ass GSA Search Engine Ranker Help at - Asia Virtual Solutions
some of the indexing services above support drip feed, which you can take benefit of, and you should. this will open a window where you will have the ability to pick from the engines supported by GSA Search Engine Ranker i. e. WordPress, Joomla, etc (we will note all soon).

7 Tier GSA Search Engine Ranker - Overview
And you are all set with the configuration of your GSA SER. Next we move onto the tab: You can utilize this tab to filter out some potentially spammy and dangerous sites which appear on the blacklists you have marked from the table. We have disabled this because, I can't keep in mind where I read it (I believe it was a post by a SERengines designer), however allowing this.
And besides, we setup each of our projects with filters set up from its task settings, so no concerns there. And we likewise save GSA SER a long time by preventing this blacklist check. If you do pick to use this performance: the variety of minutes which will need to pass prior to the chosen blacklists get automatically upgraded add a new blacklist URL modify the picked blacklist URL from the table erase the chosen blacklist URL import blacklists from a.
The alternative merely sets the limit (in megabytes) which a site's HTML code can be in order for GSA Search Engine Ranker to download it and parse it utilizing one of its engines. So, for example, if you have a target URL which GSA SER is going to download, but it is some guestbook which has 10s of thousands of remarks on it, making its HTML way too fucking big (maybe 1.
Exciting GSA Search Engine Ranker video tutorials

And now you know how to utilize the tab of GSA SER. Carrying on with the ultimate tutorial of this link structure beast. Finally. This is where a great deal of the magic occurs. Read this section thoroughly, since it is of essential importance! The tab: Let's begin with the first 4 rows of this tab i - gsa search engine ranker video tutorials.
the ones with the input fields completed with courses to directories - GSA SER help. This is a screenshot of some of the files inside the lists folder. Each of the. txt files you see has lots of possible target URLs which you can later use in your projects to attempt and post a backlink on each of them (we will see how in a moment).
0 notes
Text
New Post has been published on Strange Hoot - How To’s, Reviews, Comparisons, Top 10s, & Tech Guide
New Post has been published on https://strangehoot.com/how-to-install-xampp-server-in-windows-10-xampp-guide/
How to install XAMPP server in Windows 10 - XAMPP Guide

You might be having an idea about what is a server, even if you are a newbie in the technical field. In this article, we are going to learn “How to install XAMPP server in Windows 10” with the help of simple steps.
Before fleeing to the steps of installing the XAMPP server, let’s get the idea about what truly a XAMPP server is?
XAMPP is an all-in-one server package that supports PHP and Perl server-side programming. It also involves an email and FTP server as well as a self-signed certificate to use the apache web server in HTTPs model.
This package is available for various platforms such as Linux, Windows, Mac, and Solaris. Among all the packages the XAMPP packages most prevalently used. It was mainly developed by the Apache friends organization to hype the use of the Apache web server in the web development environment. However, in this article, we are installing it in Windows 10.
Now, let’s learn how to install XAMPP server in windows 10, step by step.
STEP 1: Open your browser and go to www.apachefriends.org.
It is an official website of Apache friends organization, where you can find various server packages specifically for various platforms and apps.

STEP 2: Go to download category
Now, search for “Download” category in the menu or you can also click on the link for which Operating System you want to download the XAMPP server, here we are downloading for Windows 10.
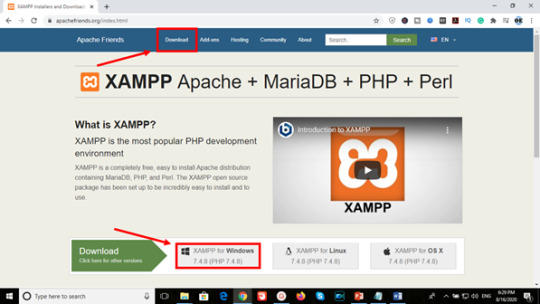
STEP 3: Download the file
In the “XAMPP for Windows” section, choose the PHP version you want to download and click on the download button.

Once you click on the download button, it immediately pops a tab signifying that the automatic download will start soon but if it doesn’t work you can on the “click here” link.

In our case, it started downloading in one tap as shown in the image below.

STEP 4: Run the installer
After the download finishes, run the downloaded file, this will start the XAMPP installation wizard. If you encounter any warning asking “Do you want this application to making changes to the system”, Ignore the warning and click Yes. Now, click on next in the XAMPP setup window.

STEP 5: Choose components
The “select components” windows enables you to select which components in XAMPP you want to be installed in your system. There is no compulsion of installing everything contained in XAMPP package, but feel free to install the entire package and explore on your own.

Click next to continue the installation process.
STEP 6: Select installation folder
In this step, you are required to select the folder where you want to install XAMPP. The default location for windows is drive “C” and inside “program files 84x” folder. However, if you have received any “warning” regarding UAC because of an activated UAC on your system, you would rather choose to install to a folder outside the “program files 84x” folder. The alternate method is to disable UAC (User Account Control) as an administrator through the control panel. It will open a User account settings form where you have to drag the slider to never notify.

Select the folder and click on next.
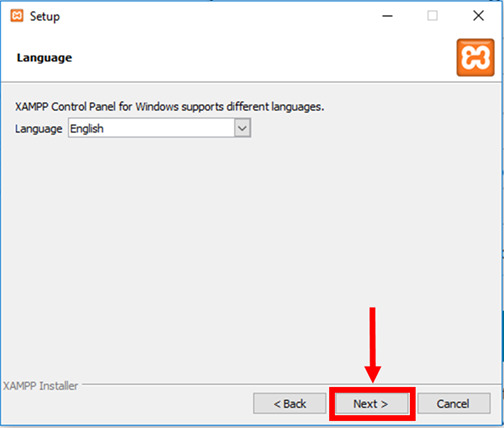
STEP 7: Select the language
In the final step, once you complete the installation process, you have to select the language among English and German. The user can select the language in which S/he is comfortable with and click on save.
STEP 8: Bitnami for XAMPP
In this window, it will show you Bitnami’s pre-packaged web applications specifically for use in XAMPP such as Joomla, WordPress, Drupal. Apache friends organization has collaborated with Bitnami for providing these pre-packaged solutions.

You can learn more about Bitnami by leaving “learn more about Bitnami for XAMPP checkbox checked, or if you want to skip this step remove the checkmark from the checkbox, and click the Next button to continue.
STEP 9: Ready to install
Now, this is the last step for starting the installation process. Click on next.

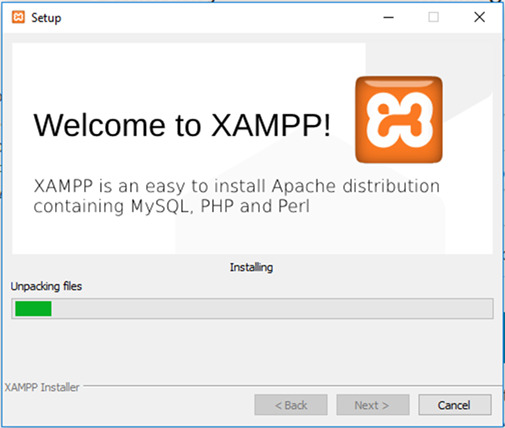
STEP 10: Welcome to XAMPP wizard
Here the progress bar will show the status of the installation wait until the installation is finished.
STEP 11: Installation complete
As soon as the installation process accomplishes, it pops up a window asking the user whether he or she wants to start the control panel at the current instance. Check the box “Do you want to start the Control Panel now?”, if you wish to start it and uncheck the box if you don’t want to start it at that moment and tap finish.

STEP 12: Running the XAMPP
If the user follows the whole process in a proper manner, the XAMPP will be successfully installed and the control panel will start with ease. Now, tap on the start button corresponding to Apache and MySQL.
So, this is how you can install and run XAMPP successfully on windows 10.
Read: How To Choose The Best WordPress Theme For Business.
0 notes
Video
youtube
How to Install Joomla 4 & New Features joomla installation in xampp, install joomla, ubuntu, install joomla on Windows 10, how to install joomla on wamp, how to install joomla on server, install joomla centos 7, install joomla cpanel, how to install joomla linux, install joomla template, Download Joomla 4 joomla.org/announcements/release-news/5811-joomla-4-0-0-beta1.html Please Donate: paypal.me/AmulyaShhai =============================== Start Blogging today! Fast & Reliable Hosting for Wordpress & Drupal https://ift.tt/2Rssi7Q My Favorite SEO & SMO tools https://ift.tt/2JYtfAM These are my favorite tools that I use to find easy to rank keywords, spy my competitors, and host my affiliate websites for speedy page load. These are my affiliate links with extra cost to you, however I get commission when you subscribe to them. Thanks..:) ================================ by TubeMint
0 notes
Link
Introduction
In a plethora of hosting facilities, there is a name for WinHost hosting that specializes in the windows hosting.
Winhost literally wins many hearts by facilitating them with windows hosting in a budget. In this post, we will perform a close encounter with the Winhost offerings.
It’s actually the pricing of Winhost which truly makes us write this review.
So, what actually is WinHost hosting?
Winhost is mere a small company that fulfils every user need for Windows Hosting and managed WordPress hosting. Although the offering is quite inadequate Winhost seems interested in fulfilling the needs of the user who seeks Windows Hosting.
The company started its operation in Sierra Madre, California. Unlike its competitors who boast large infrastructure and hardware. Winhost is dependent upon its home-grown local datacenter.
Usually, WinHost mainly serves customers from the US although they do not have issues taking money from anyone else either.
Winhost offering windows hosting that is specialized in providing reliable ASP.NET hosting for beginners or for who just want to start their first WordPress website.
This is mainly because of the consistent efforts to bring consecutive web hosting packages that differ in prices with the specifications.
Winhost currently uses their servers using stable Microsoft hosting environment software.
Windows 2012 and 2016, IIS 10.X and IIS 8.x, SQL 2016, 2014 and 2012, ASP.NET 4.7 and ASP.NET Core.
Winhost quality windows hosting service is affordable and in people reach making this a great alternative for people hunting to manage a small website.
Even though the web host marginally established themselves as one of the strongest competitors on the market.
Below we have summarized the Pros & Cons of Winhost hosting.
PROS CONS
Inexpensive pricing (No hidden charges)
Has only one Server
Great Performance under Budget
Paid Backups
100% uptime guarantee
No live technical support
Good speed and value for money
ISS adaptive Silverlight streaming is not enabled
Intuitive control Panel
Poor Support mechanism
In this post, we’ll talk about the Winhost simple pricing structure to see if the packages are adequate for perfect windows hosting.
At first instance, we see the company has a very distinct pricing structure starting from – $3.95 per month for the Basic Plan.
Having 3 GB of server space along with 50 GB of bandwidth.
The next plan they have sells around $15.95 per month and known by Ultimate Plan.
But when you see both closely you will feel the difference between the various contract length.

You can defiantly sign up with the service using 3 different contracts such as-
A quarterly one
Annually
Biennial
As you see, the plan is taken for consideration having longer period or duration you basically pay less and can save more.
What’s more! Winhost do not charge on setup. The domain is provided free with 1 year with Max and Ultimate plans consist of 1 free domain name registration for 1 year in total.
It helps build saving up to $144 between a 3- month and 2- month plan.

Furthermore, they are no hidden fees apart from what showed up here.
The information about the monthly charges of each plan carries a definite contract length which is publicly revealed in their webpage.
But how do you see what’s actually included in their plans?
What do you think does Winhost can leave their counterparts in utter distress? How does each of the plan compare to their competitors?
Well both the plans, when compared with each other (Max and Ultimate), looks absolutely decent. Although the basic plan is not worthy enough offering only one MySQL databases.
Moreover, it is impossible to host more than one WordPress website in the basic plan. So, we prefer not to talk much about it.
Winhost boasts selective datacenters located nearby to its offices. As when they have redundant electricity from local plants and include UPS battery-powered backups along with standby generators.
Winhost really cared about their servers additionally they maintain perfect air conditioning in order to maintain the system temperature which is essential to hosting.

Though you can see none of the plans offers SSL along with anti-malware protection (purchased separately). Also, there is no option for automated backups.
Considering backups as an integral part of how much testing and editing websites requires a backup in case you want to be safe side.
You may seek availability of a bit of additional security for a price of $35.40 for 10 GB of backup storage.
You can see the below screenshot in order to find the storage quota and pricing accordingly.

However, there are some predefined features and that you don’t have to worry about.
As because all hosting plans include Anti-DDoS protection along with you get the one-click installation of WordPress, Joomla, and other apps. In case you wish to migrate from the existing hosting.
Winhost will help you out with everything.
In regard to the hosting plans and pricing are concerned. Winhost offer you a straight 30 days money-back guarantee.
How good is Winhost Performance?
Winhost exceptionally performs well within most cases, instead WinHost is far ahead from other windows hosting provides in the speed test.

Also, the uptimes you get is marginally better allowing users with 99.9% guarantee and it is shown in the above screenshot too.
There are certainly having lots of benefits choosing WinHost (windows Hosting) over others. In reality, this windows host looks similar to Linux competitors but far ahead in performance and speed.
you may also looking for best Angularjs Hosting in 2019
What do you get in Winhost (Features)?
Sadly windows host do not carry cPanel which is limited to Linux. Winhost control panel is defiantly one of the most intuitive control panels we have seen before.
The controls are easy to use and you will literally find everything within.
The biggest advantage of WinHost is that their dedicated efforts for offering windows hosting service.
Winhost focuses mainly on its platform and leverage the need to optimize their windows hosting service.
Winhost developers take care of the security and performance issues and that being told WinHost servers are always managed and monitored by experts.
Unlike other web host control panels, WinHost control panel is easy to operate even for beginners.

Excellent performance
Winhost provides windows hosting that is inexpensive in nature. Although to our surprise the performance seems to score high on our test.
After scanning a few things we did find that having just one local data center is good enough for us.
No hidden charges (price comparison)
Winhost allows you to compare their offerings depending upon the contract lengths. They seem pretty transparent by allowing the price comparison before a user actually buys it.
In-House developed hosting control panel
Despite WinHost did not uses 3rd party hosting control panel software in order to serve its users. In fact, they have people on-board who designs their own hosting control panel by .net technologies.
The control panel offered by WinHost is worth everything with simple navigation and basic functions. All web service can be set up easily with no much learning.
A lot of hosting features
Windows & asp.net technologies are offered in WinHost plans. Users can get benefitted with features that are assimilated here such as Asp.net MVC, SQL Server Crystal report, IIS Remote manager, etc. are fully supported by WinHost.
In order to match up with other web-hosting providers, they have included the requirement for all.
Such as requirements for web developers, PHP/MySQL technologies have been introduced into the system.
Price value
If you research on the web you will come out 80% of web hosting is Linux based and very few who offer windows hosting just because the price is high on it.
Winhost is an exception in the industry that comes out to be inexpensive windows hosting providers.
If you are an ASP.net developer or SQL server developer than WinHost should be in your list. Due to its affordable pricing its worth giving a try.
Support Availability
Winhost claims to provide 24×7 support. However, this is not true as customer service support is only available through ticket and email.
Unlike other web hosting providers.
Winhost is lesser-known to everyone because of the bad support services.
Things that we did not like about WinHost Hosting
Like other web-hosting providers, WinHost has weaknesses too. First & Foremost no live support is the biggest disadvantage.
Especially when you are in a hurry and need to ask someone for instant resolution of your query.
Winhost uses Email for primary contact and ticket support is followed then. It’s rare that we found something from a full-fledged web hosting service.
One server location
Although the server looked and worked fine for us. But there aren’t any data centers located around the world other than one.
But in the competitive hosting world offering more than one data center is generally looked at plus point for many.
Paid Backups
Backups are necessary in case your site malfunction or lands in technical issues. You can easily retrieve the data from the site backups.
Almost every other hosting provider offers an option for automatic backup but WinHost seems to miss that. And only allow you to backup data for a price.
Especially, when they charge users with the $2.95 per month which is 2/3rd of the price of their cheapest hosting package.
No real-time support
There are times when you require knowledge about the technical issues on your site. Being able to talk with someone is a must. Be it on the phone or chat.
Sadly the features are not included in the hosting packages.
WinHost review summary
We know there are certain disadvantages of WinHost hosting. Despite being an affordable windows hosting. At least have a try choosing WinHost once for your website.
Indeed while having just one server location WinHost offers great performance to the end-users.
Our WinHost review is generated from a user perspective with working experience with the features, support availability, value and server uptime stats.
The sole purpose of reviewing WinHost (windows hosting) is generally unbiased to help you and others find better windows hosting services at an affordable price.
Winhost is one of the leading windows hosting providers in the industry. Its reputation has emerged as an inexpensive windows hosting provider with the customers.
Winhost is ideal for people having a small business, individuals or ASP.net developers.
We would certainly recommend this windows hosting from WinHost that carries 30 days money-back guarantee if you sign up now.
FAQS:-
When did WinHost setup?
Winhost incorporated its full-fledged windows hosting services in the year 2000. They are a group of professionals in windows server development.
How many hosting plans are offered by WinHost?
At present there are 3 web hosting plans offered:
Basic
Max
Ultimate
Why WinHost limit their database size?
Winhost offer databases up to 1 GB of size in most cases. In another way, if you require more space that means your website will not be suitable for the shared hosting environment. Hence you will need to upgrade.
What’s the windows server OS from Winhost?
Winhost uses the windows server 2008 and server 2012. You can pick the desired one of your choice.
What’s the WinHost server hardware specification?
Winhost uses 100% DELL servers in cooperation with multiple Intel Xenon processors coupled with 32 GB of RAM, RAID 10 and 1000 Mbits internet bandwidth of the connection.
How many clients/are websites being hosted by WinHost?
The figure is not definite but WinHost host around 50,000 websites with an ever-increasing monthly growth rate about 500/month.
How do I cancel the account with Winhost?
If you cancel the account by any chance. You need to contact Winhost by raising a support ticket. If there are any used funds in your account they will straightway refund you the money.
What’s the general waiting time for WinHost support?
In mere circumstances when you need to contact the support the general waiting time is about 30 minutes.
Do we recommend the WinHost service?
Winhost became one of the golden partners of Microsoft that offer dedicated windows hosting service. The server’s configurations and specification receive constant updates. WinHost is one of the inexpensive windows hosting model that starts with $4.95 per month and an extra two-month free service is obtained by clicking on our link.
The post WinHost Hosting Review in 2019 appeared first on Letohost.
https://ift.tt/2LDMXob
0 notes
Text
Program Filezilla

Program Filezilla Connect
Program Like Filezilla
Filezilla Download 64 Bit Windows
Download Filezilla For Windows 10
Filezilla Client Download
Home
Community Q&A
»
Learning Corner
»
Website
Billing(8)
Cube Cart(2)
Databases(20)
Drupal(10)
General Server Setup / Management(32)
Google Tools(8)
htaccess(1)
Joomla(14)
Magento(1)
Microsoft Publisher(1)
New Customers(12)
php(1)
Security(1)
SSL(10)
Typo3(2)
WordPress(17)
»
FTP and File Management
FTP and File Management
2. How to Connect to SFTP using FileZilla
4. How to Split a File Using 7-Zip
6. How to Upload a File Using Notepad++
8. Replacing your Primary Domain with Another Website
10. Moving Files Using FileZilla
12. Compress/Zip a File Using 7-Zip
13. Using Filezilla to Connect to Your Account via FTP
15. How do I FTP with Internet Explorer 8?
17. How do I use Google's Cache to Restore a Web Page?
18. How do I Generate a cPanel Backup using an Automated Script?
20. How do I Connect Securely to my Website via FTP?
21. How can I restore a backup copy of a file on my server?
23. How to Reset Your FTP Password
25. How to Find a File in the File Manager
»
Editing a File With Filezilla
FileZilla FTP program includes adware in Windows installer JC Torres - Mar 29, 2021, 1:04am CDT Although a proprietary closed-source operating system, Windows also plays host to a suite of popular. FileZilla FTPS Tutorial FileZilla is a File Transfer Protocol program available for free. Installing FileZilla 1. Follow this link to download FileZilla. Select 'save this file to disk' option when download window opens. Save this file to your desktop. If you don’t have option to choose where to save the download then the file will be. How to Connect to FTP Server Using FileZilla. The quickest and easiest way to establish a connection between a local machine (the computer you are connecting from) and a remote server (the computer/server you are connecting to) using FileZilla is through Quickconnect. FileZilla is typically used for uploading / downloading files between the server and your local computer, but can also be used for editing files. In this tutorial we will show you how to modify a file using the FileZilla FTP client. FileZilla is a free open-sourced FTP client that can be downloaded here.
Tutorial on how to publish a file to your website's web server using FTP
by Christopher Heng, thesitewizard.com
Program Filezilla Connect
The process of transferring a file from your computer to your website is often referred to as 'uploading' that file or 'publishing' it.For web hosts that supportFTP (short for 'File Transfer Protocol') or SFTP (a secure form of the File Transfer Protocol), you need a programcalled an 'FTP client' to transfer the file.
This tutorial deals with how you can transfer a file to your web server using afree FTP client known as FileZilla.Versions for Windows, Linux and Mac OS X are available. I will describe the Windows version of this program, but if you useanother operating system, chances are that it works very similarly.
Download and Install FileZilla
First, go to the FileZilla download page and obtain the appropriateversion for your system. For Windows, get the Setup version; at the time I wrote this, it's the one labelled '(recommended)' under the Windows section.
Once you have downloaded the program, you will have to install it. Go to your desktop and doubleclick the file that you have justdownloaded. Follow the instructions to install it to your hard disk.
Preliminary Steps
Before you can upload any file to your site, you will also need some information from your web host.In particular, you will need to find out the following:
The name of the FTP server for your website. For example, your host may tell you that your FTP hostname is 'ftp.example.com'.
Your user id or login username for your FTP account.
Your password for your FTP account.
The directory where you need to place your files so that they can be seen by a web browser visiting your site. For example, your host maytell you to place the files in a subdirectory called 'www' or 'public_html' or even the default directory that you see when you log intoyour FTP site.
If your web host tells you that you do not have FTP access, you cannot use this tutorial. You will haveto use whatever method the web host has designated for you to upload your files, such as a file manager inyour web hosting account's control panel.

Steps to Uploading or Publishing a File to Your Web Server
For the purpose of this tutorial, I will assume that you wish to upload a file called 'feedback.php'. Everytime you see 'feedback.php'mentioned, you can substitute that name with the name of the file you actually wish to upload. FileZilla does not restrict youto uploading only files of that name. You can upload images (eg, GIF, JPG, PNG, etc), HTML files, video clips, music files(eg MP3 files, WAV files, MIDI files), Perl scripts, PHP scripts, entire directories (ie, folders) containing files,and so on. For the curious: I use 'feedback.php' as the example file because this guide was originally written to helpthose who use my free Feedback Form Wizardto upload the generated form to their website.
Program Like Filezilla
If you see a dialog box with the title 'Site Manager' when you start up FileZilla, go to the next step.If not, click the 'File' menu followed by the 'Site Manager' item on that menu. A dialog box will appear.
Click the 'New Site' button. This creates a new item under 'My Sites' (or 'My FTP Sites' dependingon which version of FileZilla you are using) called 'New site' (or 'New FTP site' in older versions)
Rename 'New site' (or whatever the initial name was) to the name of your site. By default, thekeyboard cursor would have been placed in the name portion of 'New site' allowing you to change itimmediately. If you have lost the cursor because you accidentally clicked somewhere else in the dialogbox, you can get it back by simply clicking once on the name. Note that this name can be anything you wish.It is not required for accessing your site. However, you will probably make your life easier if you changeit to your site's name rather than some random string of characters.
On the right side of the dialog box, under the tab 'General', enter the name of your FTP server in the'Host' input box. For example, if your web host told you that your FTP hostname is 'ftp.example.com',enter 'ftp.example.com' into the space provided.
Leave the 'Port' entry box alone. If your web host tells you to connect using SFTP, click the drop-downbox for the 'Protocol' field, and select 'SFTP - SSH File Transfer Protocol'. If they tell you to connect with FTP,choose 'FTP - File Transfer Protocol'. If they allow both, select the SFTP entry, because that will encrypt yourconnection, hopefully protecting your password from being intercepted by others.
Use your mouse and select 'Normal' from the drop down list box for 'Logon Type'. This will enable the 'User' and'Password' boxes for the next step.
Enter your user id or your login name (or whatever your web host calls it) into the 'User' input box, and your passwordinto the 'Password' input box. Note that this information is automatically saved onto your computer and will be re-used thenext time you run FileZilla, so you do not have to re-enter them again. (It also means that you should not use FileZillain this way on computers that others may have access to, such as those found in an Internet cafe or a public library.)
Click the 'Connect' button. FileZilla will proceed to log into your server. If it is successful, you will see adirectory listing of your website's account on the right hand side of the FileZilla window. I shall refer tothis as the Remote Site pane. The left hand side shows the directories and files on your own computer. This isthe Locate Site pane.
If your web host told you to only upload in a specific subdirectory on the web server, such as in the 'www' or 'public_html'directory, change to that directory by doubleclicking its name in the folder portion of Remote Site pane.FileZilla will open that folder accordingly and show you its contents.
Next, locate the file that you wish to upload in the Local Site pane. Both window panesbehave mostly like Windows Explorer windows, so navigating them should not be unduly hard. Once you have located thefile you wish to upload, say 'feedback.php', drag that file to the Remote Site pane. Another way is to right-clickthe file (that is, click the right mouse button while the pointer is hovering over the filename) and select 'Upload'.
The file will then be transferred to the folder that is currently open on the Remote Site pane,so make sure you have changed to the appropriate directory before initiating the upload.
If a file of the same name already exists on your web host's computer, FileZilla will pop up a dialog box askingyou what to do. Click the checkbox 'Apply to current queue only' to put a tick in it, followed by the 'OK' button,and the program will proceed to overwrite the existing file. On the other hand, if you realised that you have madea mistake and tried to transfer the wrong file, click the 'Cancel' button to abort the transfer.
Note that you can also upload entire directories (folders) by selecting that folder and dragging it to theRemote site pane. When you do so, FileZilla will automatically transfer the folder and its contents.In addition, if you want to upload everything in the Local site pane, you can avoid the hassle of individuallyuploading them by selecting everything in one go, then right clicking the selection and clicking'Upload'. FileZilla will proceed to tranfer your entire selection, probably a few files at a time.
For those who don't know how to select everything in one go, first click one file or folder in the Local sitepane. Then hold down the Ctrl key (on your keyboard) and type 'a'. This causes everything there tobe selected. (Note that Mac users may have to hold down the Cmd key instead.) You can also select multipleindividual files for uploading by holding down the Ctrl key on your keyboard while clicking those files with the mouse.(I have no idea what the equivalent for this on a Mac is.)
As FileZilla proceeds to transfer the file or files to your site, you should be able to see the progress inthe bottommost window pane in FileZilla. When the upload has completed, you can disconnect from your website. Dothis by clicking the 'Server' menu followed by the 'Disconnect' item.
Congratulations! You have successfully uploaded one or more files to your website using FileZilla.
Copyright 2005-2020 by Christopher Heng. All rights reserved. Get more free tips and articles like this,on web design, promotion, revenue and scripting, from https://www.thesitewizard.com/
Filezilla Download 64 Bit Windows
Do you find this article useful? You can learn of new articles and scripts that are published onthesitewizard.comby subscribing to the RSS feed. Simply point your RSS feed reader or a browser that supports RSS feeds athttps://www.thesitewizard.com/thesitewizard.xml.You can read more about how to subscribe toRSS site feeds from my RSS FAQ.
This article is copyrighted. Please do not reproduce or distribute this article in whole or part, in any form.
It will appear on your page as:
Download Filezilla For Windows 10
Copyright © 2005-2020 by Christopher Heng. All rights reserved. thesitewizard™, thefreecountry™ and HowToHaven™ are trademarks of Christopher Heng. This page was last updated on 19 February 2020.
Filezilla Client Download
0 notes
Text
How to Install Joomla on Windows 10 WSL With Nginx
How to Install Joomla on Windows 10 WSL With Nginx
This post shows how to install Joomla on Windows 10 WSL (Windows Subsystem for Linux) with Nginx HTTP server on Ubuntu 18.04 | 20.04. Joomla is a free, open-source and powerful web content management system which is used for publishing web content on websites. It is allow you to build mobile-ready and user-friendly websites and powerful online applications. It is written in PHP programming…

View On WordPress
0 notes
Text
SEO Strategy 101: 12 Tips for a Flawless SEO
Seeking a winning SEO strategy? When it comes to advertising your business online, few forms of marketing are as vital as SEO or Search Engine Optimization. Getting your website to rank on the first page of Google can bring you substantial amounts of organic and directed traffic, yielding you substantial sales in the process.
Curious as to what a good SEO strategy entails? Then read on. Here are 17 SEO tips and tricks to help you facilitate a flawless campaign.
1. Research Your Keywords
One of the most important aspects of SEO is keyword usage. If you want to enter the ballgame, so to speak, you need to make use of keywords that are relevant to your business or brand.
Now, you could just use the first keywords that come to mind. For instance, if you’re a plumber in Nashville, you could just use something to the effect of “Nashville plumber” or “plumber in Nashville”. Note, though, that these are high-competition keywords and are going to take a lot of time (and effort) to rank for.
While, yes, you should be using keywords such as these, you should also be using less generalized keywords. In particular, you should be using long-tail keywords.
How do you find relevant long-tail keywords? The answer is keyword research. Keyword research is typically facilitated by research tools like SEMRush or Ahrefs or Google Keyword Planner.
These tools can cost you a bit of money (Ahrefs and SEMRush cost hundreds of dollars a month). Note, however, that they can make all the difference in your SEO campaign.
By helping you identify never-considered keywords, they can assist you in targeting a new group of internet users. For instance, instead of helping you find people who are looking for a Nashville plumber in general, they could help you find people who are looking for an emergency plumber in Nashville or a drain specialist in Nashville.
Keyword research is, well, key. Take it seriously and your SEO campaign is almost sure to thrive.
2. Write Guest Posts
Perhaps the most important aspects of an SEO strategy is getting backlinks. In most cases, backlinks are what separates the haves from the have-nots. The more and higher quality of backlinks you have, the greater chance your website has of ranking on the first page for relevant keywords.
The problem lies in getting appropriate backlinks (it’s not easy). Perhaps the simplest way to get them is to write guest posts for other websites. This way, you can attach a link within your post, a link that leads back to your website and, therefore, provides you with a backlink.
Note, when doing this, you need to find sites that have some authority and which are relevant to your niche. So, if you’re a transmission repair shop, for instance, you might consider writing a guest post for a manufacturer of transmission-related parts.
Search engines will see the relation between your website and the guest post website and will determine your website to have some authority in your niche. The more authority your website is deemed to have, the higher your website will rank over time.
3. Build Relationships
Writing guest posts might be the easiest way to obtain new backlinks, at least in the short-term. However, if you really want to nab backlinks, you’re going to have to build relationships with others in your industry or geographical area.
The more and stronger relationships you build, the greater chance there will be of others linking to your site. In fact, you might even be able to forge agreements in which local businesses link to your site in exchange for something else. Sometimes it’s as simple as giving backlinks to each other.
The point is, the more ingratiated you become in your industry or niche, the easier backlinks will come. In the long-term, these backlinks might even start to come organically. That’s when you begin to dominate your sphere.
4. Create a Google My Business Profile
In this day and age, SEO doesn’t only happen on one’s website. When it comes to small businesses, it occurs on Google My Business as well.
Google My Business listings show toward the top of every local business search. For instance, if someone were to look for “electricians in Omaha”, a Google My Business window would pop up listing the most prominent electricians in Omaha. In most cases, the top 3 businesses are listed, making them the most prominent for the keyword entered.
Your goal should be to break into the top 3 of this list. This is known as the 3-pack and it’s sought after by any respectable SEO specialist.
To land your business in the 3-pack, you have to create and curate a Google My Business profile. This involves updating your business data, uploading business-related photographs, and posting to the platform on a regular basis.
The more active you are on Google My Business, the better chance you’ll have of ranking in the top 3. So get on it and get active. Exposure and increased sales await.
5. Get Citations
Google My Business is just one (though the most important) of the entities known as local citations. Local citations are essentially business listings upon which you leave your business’ name, address, and phone number. The more citations you have, the more credibility you’ll gain with Google, and the higher your ranking will be.
The key to local citations is to use consistent NAP (Name, Address, Phone). If you use inconsistent NAP, you’ll confuse search engines, causing your ranking to plummet.
So, if your business name is “Ray’s Burgers”, your address is “123 Fake Street, Nashville, Tennessee”, and your phone number is “555-555-5555”, you need to list those 3 elements in exactly the same way every time you create a citation. This is true whether you’re listing on a site like YellowPages or in a guest post on someone else’s site.
The most important citations are Google My Business, Facebook, and Yelp. Note, though, that you should also obtain citations that are unique to your industry or geography.
Chamber of commerce sites are usually easy places to obtain citations. You might also try to have your business information listed in a local publication.
6. Be Active on Social Media
Though social media marketing is quite a bit different from SEO marketing, there is some overlap between the two. Namely, in order to thrive in SEO, you have to send out social signals. In other words, you have to, at the very least, consistently signal your activity on social media platforms.
So, set up a Facebook, and a Twitter, and a LinkedIn. You might even consider setting up an Instagram. Then, just sporadically make updates to these various platforms, sharing your blog and posting new statuses.
Social signals are far from the most important aspect of SEO but every little bit helps. As such, if you want to beat your competition, you’re advised to get social.
7. Make Use of Schema Markup
Google is getting more complex by the day. One of the ways in which this is exemplified is in the budding importance of schema markup.
Schema markup describes an underlying form of data. This data characterizes the website, informing Google as to its particular identity and traits. Simply put, if you want to be at the top of the Google search rankings, you need to prioritize schema markup.
There are a few different ways to implement schema markup. One way is to hardcode it into your website. Note, though, that this is risky, particularly for those who have never coded before.
The better option is to use a plugin on WordPress or Joomla or whatever other content management system your website exists on. These plugins cost a little money but enable you to update schema markup in a matter of seconds. In fact, many of them allow you to auto-assign schema markup, making the process as efficient as possible.
8. Install an SSL Certificate
One of the newer aspects of a top tier SEO strategy is the aspect of the SSL certificate (Secure Sockets Layer). This is an entity that ensures security between two corresponding computer networks. It’s helpful not only for security purposes but for proving a website’s credibility to search engines.
As such, if you want your website to rank high on search engines, you need to install an SSL certificate. These certificates are often free with different forms of hosting. Note, however, that they can also be purchased for as little $20.
9. Make Your Website Responsive
At this juncture, there’s really no other option. Your website has to be responsive. If it’s not, search engines won’t take it seriously, and it will be relegated to the depths of search engine purgatory.
What does it mean to make a website responsive and why is it important to a strong SEO strategy? It means making it equally as visible on phones and tablets as it is desktop computers or laptops. In other words, you need to create your website so that it “responds” to different interfaces.
If you have a web designer (or if you’re versed in the process), you need to make the change sooner rather than later. If you don’t have a web designer (and if you’re not versed in the process), you would be wise to hire an online marketing strategist.
10. Optimize Load Speed
Load speed is one of the many factors that search engines take into account when gauging a website’s ranking. As such, you must ensure that your website is loading as quickly as possible.
There is a lot that goes into this, so you’ll want to study up elsewhere. That said, some of the most important measures include avoiding large images, keeping the use of videos to a minimum, using good hosting, making use of a content delivery network (CDN), and caching your user data.
To gauge the speed of your website, you can use online tools such as these ones from Google. Other tools you might consider using include GTMetrix and UpTrends.
11. Create Content
Perhaps the most important aspect of a strong SEO strategy is creating content. If you don’t create content on a regular basis, your website will fall behind others in its niche or industry. The only way you can overcome a lack of content is by obtaining an unbelievable number of very-high-quality backlinks.
The most important aspect of SEO content creation is the creation of written content. Blog posts, white papers, and other such documents will enable you to plug new keywords into your website, allowing for increased exposure on all search engines.
Note, though, that you shouldn’t stop at just written content. Videos are becoming ever-more important in the world of SEO, with search engines assigning them increasingly more value.
The best practice is to establish a content publishing schedule. You should be uploading at least one piece of content weekly. This content should offer direct value to the consumer and should be relevant to your business or brand.
For instance, if you’re an auto mechanic, you should write articles about engine repair or brake repair or tire installation or the like. These articles will not only help the reader, but they will also prove your legitimacy within your industry.
12. Optimize Your Web Design
The last thing to do is to implement proper web design. The easier your website is to navigate, the greater your SEO will be in the long-run.
Why is this? Because Google takes into account factors such as the time that visitors spend on your website, and whether or not they click through to another page. As such, the easier your website is to navigate, the better its user-related metrics will be, and the higher it will rank.
Unless you have extensive experience with web design, you’re advised to utilize the services of a professional web designer. He or she will make your website as functional and user-intuitive as possible.
Need Help With Your SEO Strategy?
Are you still struggling with your SEO strategy? Need a little help with it? If so, we here at 316 Strategy Group are the people to see.
We’ve carried out SEO campaigns for a bevy of different brands and businesses throughout Omaha, Des Moines, Kansas City, Nashville and beyond. Regardless of the nature of your business, our team can help you create a winning SEO strategy.
Contact us now to get the process started!
The post SEO Strategy 101: 12 Tips for a Flawless SEO appeared first on 316 Strategy Group.
source https://316strategygroup.com/seo-strategy/#utm_source=rss&utm_medium=rss source https://316strategygroup.blogspot.com/2020/09/seo-strategy-101-12-tips-for-flawless.html
0 notes
Video
youtube
Hello everyone, In this "how to" video, I walk you through the Joomla Installation process on Windows 10 Operating system. Easy video on How to install Joomla 3.0 or Joomla 4 on Windows 10 Install XAMPP on Windows 10 https://ift.tt/2Xsl9GC This content is also available in black & white https://ift.tt/2QsWakY Get latest version of Joomla from https://ift.tt/2fvsXVK Disclaimer: This video description contains few affiliate links, that means anything you buy through these links, I get commission from these websites, but that does not cost you anything extra. How cool is that! by NicheHow
0 notes