#Mac Virtual Display
Explore tagged Tumblr posts
Visit Tumblr Blog
Explore Tumblr blogs with no restrictions, modern design and the best experience.
Last Seen Tumblr Blogs


Fun Fact
The Tumblr office adopted Tommy, an 11-year-old Pomeranian.
Text
Apple Vision Pro Review: Deep Dive
Is the Apple Vision Pro Worth Selling Your Kidney For? (Spoiler Alert: Probably Not)
Pros: 1. Sharpest, best-looking micro-OLED displays: 4K resolution per eye: This results in incredibly sharp visuals, surpassing even high-end TVs. Micro-OLED technology: Offers vibrant colors, deep blacks, and a wide contrast ratio. Foveated rendering: Focuses computing power on the area you’re directly looking at, improving performance and efficiency. HDR support: Creates realistic visuals…

View On WordPress
#App selection#Apple#Apple ecosystem#Apple vision pro#AR Headset#Battery life#Comfort#Display quality#Eye and hand tracking#Eyes on the outside#Field of view#Mac Virtual Display#Mixed Reality#Passthrough#Price#review#Technology#VR Headset
0 notes
Text
An Extended Tutorial on Installing Dramatical Murder RE:Connect
{Author's note: Reddit has banned the subreddit Dramatical Murder, I posted a hefty guide on how to install the Re:Connect game, a semi-sequel / DLC. So I put it here on tumblr, this was from the subreddit.}
Hi everyone, I'm EniaCat! 🐾
Many people are struggling to install Dramatical Murder Re:Connect on Windows, so I’ve created this detailed guide to help you through the process.
(Note: English isn’t my first language, so please bear with me!)
For Mac Users: I don’t have a Mac, but you can refer to this Tumblr post that explains how to play the game on Mac using Wineskin: blonmac.tumblr.com/dmmdsetup2.
Where to Download the Game
DMMD Re:Connect with English Patch: Link: aarinfantasy.com/forum/f16/t176668-dramatical-murder-re-connect.html (Note: You’ll need to create an account to access the forum.)
If you see Japanese text in the CONFIG menu after starting the game, quit and restart it as an administrator.
Alternate Download Link: Link: mkproduction.home.blog/2019/05/29/dramatical-murder-reconnect-english/
This version has an English patch but may still display some Japanese text in the pause menu or settings.
Step-by-Step Installation Guide
Change Your System Region
Go to Control Panel → Region → Administrative Tab → Change System Locale → Select Japanese (Japan).
Important: Do NOT enable the "Beta: Use Unicode UTF-8 for worldwide language support" checkbox. This can cause text glitches in the game.
Restart your computer when prompted.
Install the Game
Download and extract the game files (look for the MW5 blog zip file).
Install UltraISO software and use it to mount the DMMdrc.iso file to a virtual drive.
Go to the Tools menu → Mount to Virtual Drive → Select the ISO file → Click Mount.
Open the mounted drive and run setup.exe. Follow these steps during installation:
Click the button with (N)> to proceed (this means "Next").
Select the circle next to (A) to agree to the terms, then click (N)> again.
Choose your installation folder and proceed.
Uncheck the box with Japanese text to skip installing "soft battery runtime."
Finish the installation by clicking the middle button.
Apply the English Patch
Open the English patch folder and move its files to the game’s installation folder:
Place the video files in the DX sub-folder.
Place the patch files in the main game folder (same folder as DMMdrc.exe).
Extract the crack file (crack.rar) and place the crack .exe file in the same folder as DMMdrc.exe.
Run the crack .exe file as an administrator to start the game.
Fix Potential Issues
If the game crashes on startup:
Right-click the game’s desktop shortcut → Select Properties → Under Target, change SdActi.exe to DMMdrc_crack.exe.
Restart your PC and set your system region back to your country, then to Japan again.
Display Settings and Resolution Fixes
If the game window is too large, off-center, or zoomed in:
Press F to set the game to its original resolution (1024x576).
Adjust settings in the Config menu:
Change to full-screen mode by clicking the first button under "Display."
Turn OFF automatic aspect ratio (buttons marked ON/OFF).
Set to regular display (button below the ON/OFF toggle).
For windowed mode, keep automatic aspect ratio OFF and regular display ON.
Final Notes
If you’ve followed all the steps, your game should now be working! 🎉
The menus (and pause menu, if using the Aarinfantasy patch) should display in English.
I hope this guide helps new users enjoy Dramatical Murder Re:Connect! Have fun! 💙 - EniaCat
25 notes
·
View notes
Text

Viruses so far have been really disappointing on the 'disable the internet' front, and time is running out. When Linux/Mac win in a decade or so the game will be over.
Network [Explained]
Transcript Under the Cut
[Megan looking at a large screen with many green and red squares. The squares have writing in them and lines connecting them.]
[Side view. The screen is a huge LCD connected to a wireless router.] Cueball: Pretty, isn't it? Megan: What is it?
Cueball: I've got a bunch of virtual Windows machines networked together, hooked up to an incoming pipe from the net. They execute email attachments, share files, and have no security patches. Cueball: Between them they have practically every virus.
Cueball: There are mail trojans, warhol worms, and all sorts of exotic polymorphics. A monitoring system adds and wipes machines at random. The display shows the viruses as they move through the network. Growing and struggling.
[Cueball walks past the girl and touches the monitor.] Megan: You know, normal people just have aquariums. Cueball: Good morning, Blaster. Are you and W32.Welchia getting along? Cueball: Who's a good virus? You are! Yes, you are!
60 notes
·
View notes
Text
So, I played the Riffins for the first time since I dunno. The first serious time on the new computer, definitely.
I have a bunch posts worth of screenshot backlog for all of my saves, I think, so in theory I could start posting again now. It's really just a matter of doing it.
What follows is some geeking that may interest nobody, but this is just how I roll.
The first silly thing is that I now have screenshots in 16:10 aspect ratio. On my old computer, I ran Windows at a low resolution partly for performance and partly because I could keep the 4:3 aspect ratio, i.e. a much narrower display for the same height. My reasoning is that when you post pics, either on Wordpress or here, the width of the image determines the size you see. A wider aspect ratio gets sized down to the width of the dashboard you're looking at, and everything is smaller. In my current setup. I pretty much have to run at a higher screen resolution, and it looks awfully nice honestly. Sims 3 doesn't have any 4:3 aspect ratio options for modern computer resolutions. I may see if I can hack it in the options file. If I can't, it'll be reeeealy obvious when I move on to the new gameplay 🤷♀️.
For technical nerds, if in fact there are any reading this, I'm experimenting with playing the game on Codeweavers Crossover, a distribution of wine, which in turn is an implementation of Windows API for Mac users. I have traditionally played the game on a Windows virtual machine in Parallels. Running an entire second operating system in order to play one game is a bit much, but you do what you can do. I have messed around in Mac 64-bit, and it does really super smoothly for a new game, but it doesn't support core mods (no ErrorTrap or UntranslatedKey), and existing saves (at least modded ones) have not for me without crashing.
I tried Sims with Crossover on my old Intel Mac (man that thing was so top-of-the-line six years ago), and it ran delightfully fast and crashed within 10 minutes. Crossover has done a lot of updates to its 32-bit support since then, but only for the newer Mac architecture. Now that I have one of these fancy Apple Silicon doohickies, I tried again. The play was not as dizzyingly fast as it was on Intel, with the advantage that it played smoothly with all mods for an entire session of about 1.5 hours. Sooooo.... maybe this will work? I don't want to jinx it. I do have Parallels+Windows to run some other stuff if this doesn't cut it.
I'm not even going to try Reshade. It's too exciting that this no-Windows approach might actually work at all. Plus with the higher resolution and the lack of Windows, the game just looks better to me anyway.
I haven't tried to play the Samples yet with all their weird skintones and custom everything. The decades history challenge might even be worse in that regard. The Riffins at least run in an EA world. We. Shall. See.
11 notes
·
View notes
Text

Technology never stands still, and software updates are a crucial part of keeping our devices secure, efficient, and packed with new features. The latest updates for Windows, macOS, iOS, and Android have brought a wave of improvements and innovations. Whether you’re a business professional, a tech enthusiast, or an everyday user, staying informed about these updates ensures that you make the most of your devices. Let’s dive into the latest developments across the major operating systems!
Windows: The Evolution Continues
Microsoft's Windows operating system continues to evolve, with its latest update focusing on performance, security, and AI integration. The company has been investing heavily in AI-powered tools, bringing efficiency and automation to everyday computing tasks. Windows remains the dominant operating system for businesses and professionals due to its flexibility, compatibility, and extensive software ecosystem.
Key Updates in Windows:
Copilot AI Integration: Windows has embedded AI-powered features to assist with tasks like document summarization and smart recommendations, making workflow automation seamless.
Enhanced Security: Advanced phishing protection, ransomware mitigation, and cloud-based security improvements make Windows safer than ever.
Taskbar & Start Menu Enhancements: Users can now customize their taskbar and Start Menu with increased flexibility, allowing a more personalized experience.
Gaming Optimization: Auto-HDR, Direct Storage, and latency reduction technology enhance gaming performance on Windows devices.
Seamless Android Integration: Improved support for Android apps via the Microsoft Store allows better cross-device experiences.
Better Virtual Desktop Management: New features enhance multitasking and organization, making it easier to switch between work and personal desktops.
Improved Multi-Monitor Support: Enhancements for better handling of multiple displays increase productivity for professionals using multi-screen setups.
Cloud-Based Backup and Sync: Windows now offers more robust cloud integration, ensuring that files and settings remain consistent across devices.
Why Upgrade?
If you're looking for better efficiency, security, and AI-powered assistance, the latest Windows update is a must-have. Businesses can particularly benefit from improved automation, enhanced security measures, and more seamless device integrations that enable remote and hybrid work setups.

macOS: A Blend of Performance and Productivity
Apple’s macOS has introduced new features that enhance user experience, security, and productivity. The latest update focuses on seamless integration with Apple’s ecosystem, improved AI capabilities, and better energy efficiency. Mac users enjoy a refined and intuitive user experience, making it a preferred choice for creative professionals and developers.
Key Updates in macOS:
Refined UI & System Performance: Smoother animations, more responsive applications, and better battery efficiency provide an enhanced user experience.
Continuity Upgrades: Improved Handoff between Mac, iPhone, and iPad makes workflows seamless, enabling users to transition between devices effortlessly.
Password & Security Boosts: Stronger encryption, multi-layered authentication, and autofill enhancements ensure better security.
Universal Control Enhancements: Mac users can now use a single mouse and keyboard to control multiple Apple devices with greater precision.
Better Gaming Experience: Apple Silicon-powered Macs now support more AAA games with improved MetalFX, making macOS more gaming-friendly.
Improved Automation Features: New tools streamline repetitive tasks, improving workflow automation for enterprises and small businesses.
Better Cloud Integration: Enhanced iCloud capabilities allow users to manage and sync data more efficiently across Apple devices.
Optimized Video Conferencing Tools: New enhancements to FaceTime and third-party conferencing apps improve communication for remote workers.
Why Upgrade?
For those invested in Apple’s ecosystem, this update enhances the overall experience while improving efficiency and security. The AI-powered automation tools embedded in macOS further elevate business productivity, making it easier to streamline repetitive tasks and optimize workflows.
Apple's iOS
update has brought a host of new features,focusing on personalization, security,and AI-driven enhancements.iOS continues to provide a smooth and reliable mobile experience, integrating cutting-edge technology for both personal and professional use.
Key Updates in iOS:
Interactive Widgets: More powerful widgets that allow direct interaction and better usability.
Lock Screen Customization: Users now have more control over lock screen aesthetics and functionality.
Smarter Siri & AI Features: Improved Siri responses, better AI-powered suggestions, and enhanced voice recognition.
Better Privacy Controls: Enhanced app tracking protection and email privacy features offer greater security.
New Messaging Features: Edit sent messages, improved FaceTime functionalities, and a better user interface for iMessage.
Advanced Automation Features: Businesses can now leverage AI-powered automation tools to optimize workflow processes within mobile applications.
More Efficient Battery Management: Intelligent battery optimizations extend device lifespan and improve overall power efficiency.
Cross-Device Collaboration: Enhanced AirDrop and Continuity features make working across Apple devices even more seamless.
Why Upgrade?
From security to personalization, iOS offers a smoother, smarter experience for iPhone users. Businesses using iOS-powered mobile applications can benefit from enhanced automation features, making iPhones even more integral to modern work environments.
Android: More Control, More Efficiency
Google’s Android update continues to refine user control, security, and customization. Android remains the top mobile operating system, providing users with a highly customizable and versatile experience across a wide range of devices.
Key Updates in Android:
Material You UI Enhancements: More customization options for widgets and themes, making Android devices more visually appealing.
Smarter Battery Optimization: AI-driven power management ensures longer battery life and better device performance.
Privacy Dashboard: A centralized space to monitor app permissions and usage.
Advanced AI Features: Smarter voice recognition, contextual assistance, and improved Google Assistant capabilities.
Seamless Cross-Device Experience: Better compatibility with tablets, wearables, and smart home devices.
AI-Powered Automation Tools: New features optimize business processes, allowing enterprises to automate customer interactions and workflows
Better Multitasking Features: Enhanced split-screen and picture-in-picture support for productivity applications.
5G Optimization & Network Improvements: Faster and more reliable connectivity, making Android devices more future-proof.
Why Upgrade?
For Android users, the latest update provides greater control, security, and seamless integration across devices. Businesses relying on Android applications can take advantage of AI-powered automation tools to enhance efficiency, making Android devices even more powerful for professional use.

How KSoftTechnologies Enhances Your Digital Experience
At KSoftTechnologies, we specialize in helping businesses adapt to evolving technologies. Our expertise in automation solutions for small businesses, process automation services, and custom software development with AI ensures seamless digital transformation. Whether you need business automation consulting, workflow automation for enterprises, or AI-powered automation tools, we provide end-to-end software implementation that drives efficiency and productivity.
Why Choose KSoftTechnologies?
Customized AI Solutions: We build tailored AI-driven software to automate workflows and optimize performance.
Expert Business Automation Consulting: Our team provides strategic guidance to improve operational efficiency.
Seamless Software Implementation: From analysis to deployment, we ensure smooth automation solutions for businesses.
Cross-Platform Optimization: Our solutions are designed to work seamlessly across Windows, macOS, iOS, and Android.
Continuous Support & Maintenance: We offer dedicated support to keep your business running smoothly.
Conclusion: Should You Update Now?
Updating your operating system ensures better security, improved performance, and access to the latest features. Whether you use Windows, macOS, iOS, or Android, staying up-to-date allows you to experience cutting-edge advancements in technology. Check your device settings for updates and take advantage of these new enhancements today!
For businesses looking to optimize processes, KSoftTechnologies offers cutting-edge automation solutions to help you stay ahead in the digital world. Contact us to explore how we can streamline your operations with innovative technology!
#app development services#erp development#web and mobile app development company#digital consulting#android native mobile development#ecommerce website development company#custom erp
1 note
·
View note
Text

I still have some asks to do, but I really wanna talk about the suit, Mac can we talk about the suit, I've been dying to talk to you guys about the suit so-!
Basically, it's made from unstable molecule fabric similar to the Fantastic Four's costumes. This material is virtually indestructible, can open up to allow Miguel natural use of his web glands and talons, and offers a degree of protection to his body. It doesn't quite act like a suit like Peter's does, where if you pull back the material, it'd stretch and snap back. It's more similar in the way a symbiote works, kinda like a second skin.
With future tech, he can pretty much turn it "on" and "off" where it looks like it "dissolves" off him in a sense. I like the concept art where it dissolves to look like he's covered in webs so, yoink, I'm taking that.
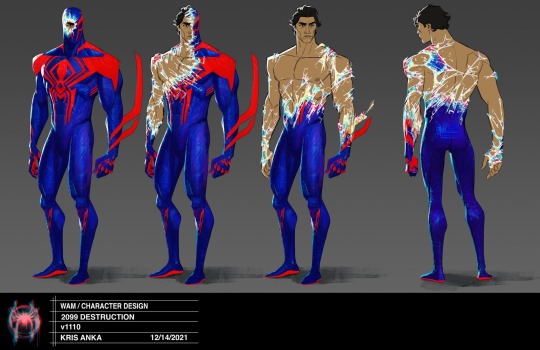
So, when he bought this at a Day of The Dead festival, it didn't have a cape. He actually put that on himself. Made of the same stuff from his suit, as well as a web-like cloth material made of light byte. What is light byte?? I'll keep it real with you, chief, I dunno, but he says it helps him glide.
And yeah, he is in fact naked underneath to put the mystery to rest. There's not really any room for clothes under that thing, but he can wear clothes on top of it, which he does. With this material being nearly indestructible, it does have it's flaws. For example, when Miles shocked him, it didn't mess with the suit particles as much as it did the display. This suit is basically like wearing a TV screen, and it interferes with the adaptive ability of the suit. He can't use his talons or spin his webs. The pathway for the web to exit will be closed off, and his talons will just puncture the suit on his fingers.
This is at least how I think it works, if it makes sense.
#「 ɪ ʜᴀᴅ ᴛʜᴇ ᴄʀᴀᴢɪᴇꜱᴛ ᴅʀᴇᴀᴍ...ᴛᴀʟᴏɴꜱ ᴏɴ ᴍʏ ꜰɪɴɢᴇʀꜱ... || ʜᴇᴀᴅᴄᴀɴᴏɴꜱ 」#|| Aurora asked me how it worked and well this is just how I think
5 notes
·
View notes
Text
Arturia Matrix-12 Download
Tech Specs (MAC & Windows)
Software Type:Music Software
Platform:, MAC & Windows
Upgrade/Full Version:Full Unlocked
Download/Boxed:Download
License Type:Lifetime Activation
Format: Standalone, VST, VST3, AU
Hardware Requirements – PC:Intel / AMD Multi-core CPU, 4GB RAM minimum
OS Requirements – OSX : OS X 10.8 or later M1& M2
Arturia Matrix 12 V Virtual Synth Plug-in at a Glance:
The Matrix 12 story, in all its glory
Arturia models it, to a tee
Unleash your creativity: the sky’s the limit!
The Matrix 12 story, in all its glory
The 1980s were an important – and interesting – decade in the synth world. Polyphony was becoming de rigueur and digital synthesis was gaining a foothold with the Yamaha DX-7 and various digital samplers, while stripped-down synths like the Juno 106 and Korg Poly 6 were making synthesis available to the masses. The stage was set for Tom Oberheim – who had been designing some of the best-sounding synths for over a decade – to introduce a no-holds-barred analog synth. And so the Oberheim Matrix 12 was unleashed upon the world in 1985. It was, indeed, an all-out assault on the state of the art, with glorious sonics and tantalizing modulation possibilities, but its near-five-grand price tag put it out of reach for all but a few fortunate souls. Around 1000 units were produced, many of which are still making music to this day.
Arturia models it, to a tee
When it comes to modeling vintage analog synths, many of us immediately think of Arturia – and with good reason. Their proprietary True Analog Emulation technology (TAE) is truly amazing, and is no doubt a critical component in some of the finest virtual synths we’ve heard. For the Matrix 12 V, Arturia modeled not only the tonal aspects of the original two oscillators and their waveforms, but the 15 filter modes as well. They knew that the Matrix 12’s famously rich, complex sound was forged by its multiple filter modes and by the numerous modulation sources and destinations on tap. With nearly endless modulation-routing possibilities, you can sculpt wonderfully organic sounds not possible with other synthesizers.
Unleash your creativity: the sky’s the limit!
The Matrix-12 V is, just like its hardware predecessor, a multitimbral instrument. In Multi mode, each of the 12 notes can voice a different sound. These sounds can then be split on different zones of your keyboard, transposed individually, played unison – you get the idea! And Matrix 12 V’s elegant software interface makes configuring all this a cinch. While the original Matrix 12 was an amazing synthesis achievement, Arturia upped the ante by adding a new effects chain for additional sound processing. They also doubled the allowable number of modulations from 20 to 40, giving you even more creative options. Factor in the ability to control all of Matrix 12 V’s parameters via MIDI, letting you perform automation in your DAW, and you’ve got a total beast of a soft synth.
Arturia Matrix 12 V Virtual Synth Plug-in Features:
Multitimbral; 12-note polyphonic
Redesigned preset browser
Resizeable user interface for HD displays
Two oscillators, each with:
Triangle, sawtooth, and variable-width pulse wave with PWM
Oscillator 1 may be frequency modulated
Oscillator 2 equipped with white noise generator
Single 15-mode filter with:
Four Lowpass, three Highpass, and two Bandpass modes
Notch and Phase Shift modes
Four additional Combo filter modes
Powerful modulation matrix with 27 sources and 47 destinations
Mod sources include:
Five Envelopes and five LFOs
Four Ramp and three Track generators
Velocity, Pressure, and Keyboard Follow
Two insert effect slots with six studio-grade effects to choose from
Arturia’s amazing-sounding True Analog Emulation technology (TAE)
2 notes
·
View notes
Text
Lexicon PCM Total Bundle LIBRARIES
Lexicon PCM Total Bundle Mac &windows

Dive into the realm of audio excellence with the Lexicon PCM Native Total Plug-in Bundle. This comprehensive package unveils the same groundbreaking algorithms that have adorned chart-topping records over the past four decades. With a total of fourteen legendary reverbs and effects (seven of each), this bundle enriches your digital audio workstation (DAW) with indispensable ingredients for creating hits. The creative possibilities are boundless as you harness this powerful arsenal, leveraging its graphical real-time display to fuel your inspiration and enhance your workflow. Elevate your productions with access to the renowned reverbs and effects used by world-class studios and post-production houses, all within the Lexicon PCM Native Total Plug-in Bundle.
Step into a world of mythical reverbs in your studio with the Lexicon PCM Native Reverb Plug-in Bundle. Take command of seven world-class Lexicon reverbs, backed by Lexicon's more than 35 years of industry leadership in digital reverb and effects. Immerse yourself in the finest sounds through hundreds of remarkable presets. Compatible as a VST, AU, or RTAS plug-in, the PCM Native Reverb Plug-in Bundle features a visual EQ section, savable presets, and full automation support. Brace yourself for exceptional reverb quality as you integrate the Lexicon PCM Native Reverb Plug-in Bundle into your creative toolkit.
Unleash jaw-dropping effects with Lexicon’s PCM Native Effects Plug-in Bundle. This collection offers seven top-tier professional algorithms, carefully selected from Lexicon's storied history of industry-leading effects. From pitch shifting and chorus to random delays and multi-voice effects, PCM Native Effects equips you with the tools to craft truly inspiring mixes within your DAW. Experience the pinnacle of sonic quality and cutting-edge functionality. Sweetwater's dream comes true as classic Lexicon sounds are at your fingertips in plug-in format.
Experience the grand lineage of Lexicon quality with the PCM Native Effects Plug-in Bundle. Since the 1970s, Lexicon has been synonymous with world-class digital reverb and effects. The top music and post-production studios globally rely on Lexicon for the professional polish that defines their products. Whether you're tuning in to the radio or watching a Hollywood film, the unmistakable imprint of Lexicon reverb and effects is everywhere. Infuse your studio's virtual rack with the genuine Lexicon vibe, courtesy of the PCM Native Effects Plug-in Bundle."
#music production#VST plugins#audio software#virtual instruments#music technology#digital audio workstation#sound design#music creation#plugin collection#audio effects#instrument libraries#music software#music plugins#production tools#audio engineering#software instruments#music studio#sound production#creative tools#audio processing#music mixing#virtual studio technology#sound manipulation#music composition#professional audio#audio plugins#music resources#production essentials#plugin bundles#music gear
3 notes
·
View notes
Note
about the whole uh hellish destrauration saga. 1 - is toyhouse desaturating it for everyone or just for you? Because i have literally seen someone on TH posting about having that issue with one of their images but when i looked at the same image it was totally fine & how it should look. So, it could just be a your computer/browser problem (which sucks) 2 - Part 2 of that is if it is mostly just on your end with TH, you could try clearing cache / cookies & it might start displaying properly for you? Citation needed about that but it probably won't hurt. 3 - Generally just i'm so sorry you're dealing with this is seems like a kind of actual hell. Sending virtual hugs or just good vibes if you'd prefer.
As far as I could tell, no one I could ask directly had problems with it, but none of them had a Mac so I just assumed it was that 😭 especially after a few people in the tags of the post agreed with me! I don't know what's happening!
Tried clearing everything and it still didn't work 😔 which sucks cause the character I'm checking with it looks SO ashy and washed out when Toyhouse gets it wrong 😔
I think I've seen the forum post you're talking about though! And the images look different both on my computer (mac, as we all know) and my phone (android), so I'm not sure what that means either
I've sent pngs to people to upload on their own and they look fine 😭 it's only when I do it! What the hell!
Thank you for trying to help though I really really appreciate it! Honestly if I could just fix the base character refs on toyhouse I would be fine, but the fact that I can't and if anyone is looking at my characters they're looking at this is NOT helping my brain move past the issue at all 😭
#theres so many people in the tags of the post making fun of me because 'every monitor is different'#except i upload my pngs and people on Every monitor said it looked bad#to the point where people were SHOCKED to see the originals#so its not just affecting me its the files themselves that are getting messed with#+ now i have tons of art of my characters that dont fit their colors and i never bothered to notice 😭😭😭#ooohgjg ive been going through it#ask#not art#mimicsapprentice#i had to mute the post every time i look theres another 1000 notes and its stressing me out#so if someones posted a solution to the toyhouse thing i havent seen jt
4 notes
·
View notes
Text
Exploring Ancient Greece

🎯 Explore the captivating island of Ios with our interactive map! Discover the stunning beaches, ancient ruins, and charming streets of the capital. Join us on a virtual journey through this Greek paradise and be inspired to plan your own adventure. Watch the video to uncover the top attractions, create your own itinerary, and get ready for an unforgettable trip to Ios. Immerse yourself in the beauty of ancient Greece (Ελλάδα) with Tomas Polasek. A 27-Minute 4K Travel Video in Ios (Ἴος), Greece #TouchGreece Timeline:00:00 - Chora07:42 - Mylopotas beach09:26 - Gialos beach10:01 - Tzamaria beach10:28 - Koumbara beach11:59 - Skarkos hill12:56 - Loretzena beach13:46 - Tomb of Homer14:40 - Diamoudia beach15:18 - Plakoto beach16:38 - Agia Theodoti beach17:29 - Paleokastro (Venetian castle)20:19 - Psathi beach22:21 - Agios Ioannis (church)22:52 - Kalamos beach24:51 - Manganari beach26:26 - Departure from the island Editorial Note: All opinions, reviews, and recommendations are expressed by the author. In the list below, you will find links to all the assets we have used, including footage, music, and elements. We believe in transparency, and it is important to note that some of the links included are affiliate links. This means that if you choose to make a purchase through these links, we may receive a small commission at no additional cost to you. Your support is greatly appreciated, as it helps us continue creating engaging content. Throughout our exploration, we will provide you with valuable product recommendations that can enhance your travel experience. For those interested in capturing stunning aerial footage, we suggest theDJI Mavic 3 Pro as the best overall drone. If you're on a budget but still want a high-quality compact drone, the DJI Mini 2 SE is a great choice. And for those seeking an exhilarating first-person view experience, the DJI FPV Combo is the ideal option. In addition to drones, we also recommend the Sony A95K as the best smart TV overall, perfect for immersing yourself in captivating visuals. If you're looking for a budget-friendly option, the Sony X80K provides excellent value for money. For your editing needs, we suggest utilizing the Davinci Resolve editing software, which is available in both a free version and a more advanced Studio version. To ensure optimal viewing, the Apple Studio Display is an exceptional choice. To support your creative endeavors, we recommend the Apple Mac Studio as a reliable desktop option. For efficient navigation and control, the Logitech MX Master 3S mouse and Logitech MX Mechanical Mini keyboard are highly recommended. And for storing your valuable files, the SAMSUNG T7 portable SSD offers both reliability and convenience. Camera & Edit: Tomáš PolášekMusic:Music by Zero-projectwww.zero-project.grDimitris Papageorgiou - Utidanos - PrayerMetamorphosis - MetamorphosisEden Temple of Light (Sappheiros Remix) - Electus by Sappheiros is licensed under a Creative Commons CC BY 3.0 License ( CC Audio Library:Rameses B - Angel Whisperer ft. Myth (FREE) by Rameses B is licensed under a Creative Commons License. Rameses B - Every Cloud (FREE) by Rameses B is licensed under a Creative Commons License. #TouchGreece #TouchOfWorld #FotoTravelinfo #TomasPolasek Read the full article
1 note
·
View note
Text
Five Tips to Use Skype Call Recorder for Mac & Record Video from Screen
In today’s digital-first world, recording Skype calls and screen videos has become more than just a convenience—it’s a necessity. Whether you're a business professional conducting virtual meetings, an educator delivering online lessons, or a content creator looking to repurpose conversations, having the right tools to record Skype calls and screen activity on Mac is essential.
In this blog, we’ll walk you through five simple yet powerful tips to use a Skype call recorder for Mac and effectively record video from your screen—without technical headaches or costly software.
1. Choose the Right Skype Call Recorder for Mac
Before you hit that record button, the first and most important step is choosing the right screen recorder that works seamlessly on Mac. Not all tools are built the same—some offer high-quality video and audio output, while others are bloated with features you may never use.
Flonnect is a great choice for Mac users. It works directly from your browser with no software installation required. You can record Skype calls, screen activity, and even include webcam and audio—all in one simple click.
✅ Pro Tip: Choose a recorder that offers both internal and external audio capture, so you get both sides of your Skype conversation clearly.
2. Test Your Audio and Video Settings Before You Start
One of the most common mistakes users make when recording Skype calls or screen videos is not checking their settings. Before you start your call or screen recording session, take a moment to:
Select the correct microphone and speaker
Adjust your webcam angle and lighting
Test the recording quality with a quick trial run
This ensures that your recording will be clear, professional, and usable. Poor audio can ruin even the most informative conversation.
✅ Pro Tip: Always keep your Mac’s system sound and microphone settings aligned with the screen recorder you are using.
3. Use Screen Region Selection to Focus on Key Content
When recording video from your screen, you may not want to capture the entire display—especially if you’re sharing sensitive data or multiple open windows. Most advanced screen recorders (including Flonnect) allow you to select a specific region or window to record.
This keeps your recording clean and distraction-free. For example, you can focus only on the Skype call window instead of recording your entire desktop clutter.
✅ Pro Tip: Use “Window Capture” if you’re only recording Skype. Use “Full Screen” when demonstrating workflows or tutorials.
4. Enable Webcam Overlay for Personal Connection
If you're recording a Skype interview, webinar, or a tutorial, consider enabling the webcam overlay. This allows your face to appear in a small corner of the recording while the main screen content stays visible.
This technique is especially effective for:
Teachers explaining concepts visually
YouTubers sharing reaction content
Professionals giving walkthroughs or demos
Adding your webcam creates a human touch and boosts engagement—viewers are more likely to stay tuned when they can see your expressions and gestures.
✅ Pro Tip: Position your webcam window where it doesn’t block any important part of the screen. Bottom-right corner usually works best.
5. Save and Export Your Recordings Efficiently
Once you’re done recording your Skype call or screen activity, it’s crucial to save your file in the right format and optimize it for sharing. Many recorders will let you export your video in common formats like MP4 or WebM, which are ideal for uploading to YouTube, sharing via email, or embedding on a website.
Make sure to:
Rename your file with a descriptive title
Save it in a dedicated folder for easy access
Trim any unnecessary parts before sharing
✅ Pro Tip: Use basic editing tools (Flonnect offers simple trimming) to remove silences, lags, or off-topic discussions.
Final Thoughts
Recording Skype calls and screen videos on Mac doesn’t need to be complicated. With the right tool and a few simple tips, you can create high-quality recordings for meetings, tutorials, or online content.
Flonnect offers a powerful, easy-to-use solution that works directly from your browser—no installations, no clutter. Whether you're recording a business call or capturing your screen for a tutorial, Flonnect makes it easy, fast, and reliable.
👉 Start recording with Flonnect today and never miss a moment that matters!
0 notes
Text
With so much happening while we are on the move, being able to have access to our photos, documents, and email through a cloud service can be a blessing. And Apple devices’ users get for free 5GB of storage linked to their Apple ID with their Macs, iPhone, iPads or iPods. This tool called iCloud make possible not only to have an updated backup but also to keep all devices in sync. But how to make the best of it? To help you out on it, you will find below 15 tips and tricks to get more out of your iCloud service Make sure it will work One of the biggest mistakes of those using iCloud is to think that it will set itself up on all your devices as soon as you turn them on. Unfortunately, this isn’t how it works. You will need to active the service on your Mac or mobile devices, and ensure that the items you want are synced, just for starters. Turn it into a more friendly virtual folder To make iCloud looks like a more friendly virtual folder, follow these steps: go to iCloud System Preferences and turn on Documents & Data. Then, open the Finder and tap Command + Shift + G. Type ~/Library in the dialogue box. Scroll down the Mobile Documents, where you will be able to drop down your own files and folders from now on. Make sure your Reading List works To make sure that your Reading Lists feature is functioning properly, ensure that Safari is checked in your iCloud settings on your Mac, or that Bookmarks is checked in your iPhone or iPad. It will make them all sync correctly. Free up storage space If your 5G storage space is running low, go to Settings >> iCloud >> Storage >> Manage Storage. There you will be able to see what is taking your space and decide what you might want to delete. And this is just one way to free up storage space in your iCloud. Manual backup If you haven’t been away from a power source or of a Wi-Fi connection for a while, you might want to backup your files manually. In this scenario, tap Back Up Now (located below your toggle switch) and your backup will be started as soon as you are connected to a Wi-Fi connection. Understand what is on your backup Not everything that you have in your devices will be backed up, as you can imagine. Here is what will and won't really be saved for you (if you set it correctly): Yes: The most recent 1,000 photos from your Photo Stream, but only for 30 days; No: the music you sync; No: purchased music, movies, TV shows, apps, and books (only a link to them in iTunes Store, App Store, and iBookstore, respectively, is saved) Be also aware that iCloud storage space is used for iCloud Backup, iCloud Drive, iCloud Photo Library beta, iCloud Mail, and data from apps. Remember that there is a limit to the file size It isn’t only on the storage space limit that you need to keep one eye. There is also a limit to the size of the files themselves, which can't be more than 15 GB each. They can be of any kind, though. Use the extra limit to send large files If you are using the Yosemite's version of Mail and need to send an attachment of more than 40 MB that shouldn’t be shrunk (as in a photo that would lose its quality if you do so), now you can do it with iCloud and Mail Drop features. As iCloud can handle files up to 5GB, your attachment will be “temporarily” stored there while you send it. You will get a warning message the first time you do it, but just ignore it, click on Send and you check the Mail Drop button on the display option you will get. Enable two-step verification to increase security Of course, it sounds very concerning that all your precious data is out there in the cloud available to anybody hack it. But it shouldn’t worry you much. Apple has a very secure system, and some of the best security apps for iPhone and iPad in the market, rest assured. Still, the company suggests that you enable a two-step verification process, so you can decrease the chances of having your Apple ID hacked. After following a few steps, every time you try to log in your Apple ID, you will receive a four-digit code on your trusted device for verification.
Managing iCloud Family Sharing Now is possible to link more than one iCloud account to a single payment method and make the app, music or book purchased available to download for the entire family. All you need to do is go to Settings >> iCloud menu, and look for a family section. There, you will be able to manage your family members, so they will all be associated with the main device and payment method. Generating strong passwords with iCloud Keychain If you are running out of ideas for strong passwords and have been unable to do effective research online, you can use iCloud Keychain to get some suggestions. When you are asked to add a password to a website (assuming here that you are navigating on the site with your Safari app), tap on the password field and you will see the option “Suggest a Password” above your keyboard. A pop-up menu will show up with a randomly-generated password for you. How to disable Find My Phone (and Activation Lock) If you need to restore your Apple device, you will need to disable Find My Phone first – it will disable Activation Lock as well. And you still can do it even if you don’t have your iPhone, iPad or iPod on you through iCloud. Just open any web browser and go to icloud.com. Then enter your Apple ID and click on Find My Phone. Now, enter your Apple password again, and click on All devices >> Offline device you want to remove >> Remove from account. Final Thoughts iCloud is a powerful tool offered by Apple for free to their clients. If you learn how to make the best of it, you will have plenty of resources in your hands. And if you feel that 5GB is just not enough, just pay extra space and enjoy the freedom of having access to all your files and data anywhere you go and of syncing all your devices together. Diana Beyer is experienced and self-driven media expert who is passionate about writing. Her purpose is to share values amid those interested. She is always seeking to discover new ways for personal and professional growth. Connect with Diana though Twitter or visit her blog.
0 notes
Text
VJ software
FREE
Krita for concept creation
Inkscape for vector design
OpenToonz and Pencil2D Animation
Blender for 3D animation
Natron for compositing
OBS Studio for live streaming
ShareX for screencasting
OpenShot Video Editor for streamlined video editing.
VPT – Toolkit free projection mapping tool. Have to learn it, for creating shows, comes with all the essentials you need, like OSC, midi, audio analysis. Built using C++ if you are a creative coder this can be your tool of choice to create mind-blowing shows.
Synthesia Live – Live Visuals - good for audio-reactive generative visuals. Free
NOT FREE
Resolume - widely used easy for beginners - Resolme Arena for video mapping, LED installs - good starting place
Modul8 - for Mac - easy connects with MadMapper for video projection - can control lights etc
MixEmergency - connects to Serato series of software. Easy, can send and receive high definition video streams, can mix video between computers, easily change between Video DJs, mix with 3 or more decks
VUO – Interactive Media for creating new media installations. VUO is similar to creative coding tools like Processing, OpenFrameworks, TouchDesigner, etc. It comes with easy to use modules that can get you started with a variety of interactive video projects without any coding.
Painting with Light – Video Art for generating content on the fly. video mapping tool for static and moving images through any video projector onto 3D physical objects.
NotchVFX – Real Time Graphics a real-time production software. Works with a media server - make motion graphics, real-time tracking, virtual worlds and a whole lot more. Real time/live.
VDMX live video input, quartz compositions, custom layout, audio analysis for live visuals, audio-reactive content, music events
Arkaos full-blown VJ software inc projection mapping, musicians like it, inks directly with Pioneer Pro DJ network.
CoGe VJ – VJ Tool limit is the computing power of your machine/graphics card. connects with software like Quartz, IFS generator, VUO image generators, Syphon sources for live camera and other inputs.
VVVV – Interactive Media - toolkit, a node based software that opens up the creative abilities of your hardware. Allowing you to create just about anything you can visualize. Live data input, motions tracking, OpenCV, multi-screen projection. Create live media environments.
Sparck – Immersive Content - immersive interactive spatial augmented reality installation, can project real-time generated virtual content. It helps you to turn your world into a 360° VR environment no matter the shape of your surfaces.
Smode Studio – Interactive Media Server VJ software along with a media server. Control visuals using Audio, Midi, OSC and display directly or use the power of Smode with spout to run visuals into your VJ software
MPM - open source framework for 3D projection mapping using multiple projectors. It contains a basic rendering infrastructure and interactive tools for projector calibration.
Visution – Projection Mapping versatile video projection mapping software. Allows interaction by pixel rather than other tools which restrict you with grid points. The good part is Mapio2 allows you to throw virtually any video format into your media playlist. For multi-screen setups, projection mapping and permanent installs with a show mode and autostart.
Vioso – Projection Mapping - to align multi projection set ups
Scalable Display – Auto Projection Alignment & Blending uses a camera to automatically wrap and align projectors up to 16 from a single PC. For a permanent installation, this can be very useful, reducing on-site visits and provide robust software to align and wrap your image.
Edge – Media Server - for video mapping. Use this for permanent installations for advertising, museums, retail and other places where you need a robust solution. Edge C is a video server, Edge DS is for digital signage
Mapstard – Media Server This is a timeline controlled video server, not really for live VJing. For controlled shows, where you have pre-defined content to play. DMX functionalities allow timeline control.
Dataton Watchout – Media Server Works on a network of computers connecting your main machine to control slave machines. Allowing you to connect as many projectors as your hardware can handle. Easily create timeline shows, similar to using video editing tools. This is a great option for corporate shows where you need to run content on cue. Watchout display output only works if you buy their dongle.
Millumin – can be used as a media server, can load 3D models for mapping, control light fixtures, connect with external controllers, timeline your show and much more.
Ai Server – Media Server Integrates with leading hardware and software that run behind the console for large scale setups, permanent installs. Integrates with NotchVFX for your real-time shows.
Disguise – Media Server
D3 media server for light shows, do the whole show with this.
Hippotizer – Media Server
Hippotizer - media server for pixel mapping to projection mapping, small scale to large scale
Comes from https://limeartgroup.com/the-mega-list-of-vj-software-and-tools/
Malika Maria
Starting creative coding - what kit do I need?
0 notes
Text
0 notes
Text
0 notes
Text
0 notes