#NGINX reverse Proxy
Explore tagged Tumblr posts
Visit Tumblr Blog
Explore Tumblr blogs with no restrictions, modern design and the best experience.
Last Seen Tumblr Blogs


Fun Fact
The KCSC sent more than 20K requests to delete posts related to prostitution and porn to Tumblr from January to June 2017.
Text
Nginx Reverse Proxy For Flask Application.
To set up Nginx as a reverse proxy for a Flask application, you’ll need to configure Nginx to forward incoming requests to your Flask application’s server. Here’s a step-by-step guide to help you set up nginx reverse proxy for your Flask application. Install Nginx For Ubuntu/Debian: sudo apt-get install nginx For CentOS/RHEL: sudo yum install nginx Configure the Nginx server block Open the…
View On WordPress
0 notes
Text
Boost Your Website with Nginx Reverse Proxy
Hi there, enthusiasts of the web! 🌐
Have you ever wondered how to speed up and protect your website? Allow me to provide to you a little tip known as Nginx reverse proxy. I promise it will revolutionise the game!

What’s a Reverse Proxy Anyway?
Consider a reverse proxy as the security guard for your website. It manages all incoming traffic and ensures seamless operation by standing between your users and your server. Do you want to go further? Take a look at this fantastic article for configuring the Nginx reverse proxy.
Why You’ll Love Nginx Reverse Proxy
Load Balancing: Keep your site running smoothly by spreading traffic across multiple servers.
Extra Security: Protect your backend servers by hiding their IP addresses.
SSL Termination: Speed up your site by handling SSL decryption on the proxy.
Caching: Save time and resources by storing copies of frequently accessed content.
Setting Up Nginx Reverse Proxy
It's really not as hard to set up as you may imagine! On your server, you must first install Nginx. The configuration file may then be adjusted to refer to your backend servers. Want a detailed how-to guide? You just need to look at our comprehensive guide on setting up a reverse proxy on Nginx.
When to Use Nginx Reverse Proxy
Scaling Your Web App: Perfect for managing traffic on large websites.
Microservices: Ideal for routing requests in a microservices architecture.
CDNs: Enhance your content delivery by caching static content.
The End
It's like giving your website superpowers when you add a Nginx reverse proxy to your web configuration. This is essential knowledge to have if you're serious about moving your website up the ladder. Visit our article on configuring Nginx reverse proxy for all the specifics.
Hope this helps! Happy coding! 💻✨
2 notes
·
View notes
Photo
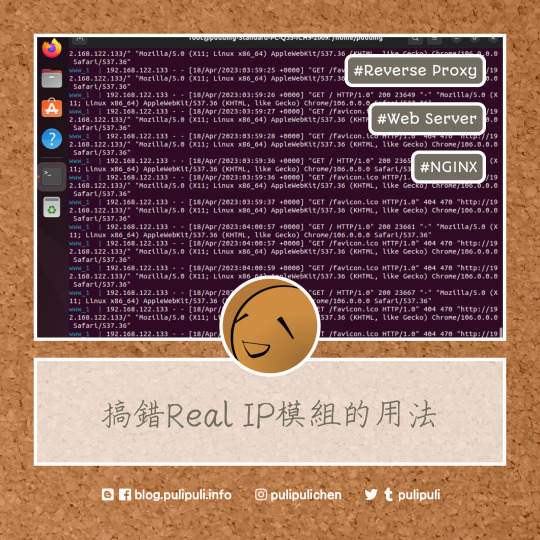
看看網頁版全文 ⇨ 如何取得使用者的IP?從反向代理伺服器、網頁伺服器到程式語言來看 / How to Get the User's IP? From Reverse Proxy Server, Web Server to Programming Language https://blog.pulipuli.info/2023/04/blog-post_18.html 看來目前是做不到「真的透明」的反向代理伺服器了。 ---- # 真實IP / The "Real IP"。 網路服務中加入反向代理伺服器的人,通常都會有這個問題:「怎麼取得使用者真實的IP?」。 如果你使用PHP,那我們通常會用$_SERVER["REMOTE_ADDR"]來取得使用者的IP位置。 但如果該伺服器位於反向代理伺服器的後頭,那$_SERVER["REMOTE_ADDR"]抓到的會是反向代理伺服器的IP,並非來自使用者真實的IP。 為此,使用NGINX架設反向代理伺服器的教學中,大多會建議在反向代理伺服器的NGINX中加入以下設定,將使用者的IP包裝在X-Real-IP中。 [Code...] 如此一來,後端伺服器(backend,或說是上游伺服器 upstream)的PHP程式碼便能在 $_SERVER["HTTP_X_READ_IP"]取得使用者真實的IP (192.168.122.1)。 再回來看到這張網路架構圖。 在取得使用者IP的這個問題上,可以把整體架構分成四個角色:。 - 使用者 (Client) :這裡真實IP給的例子是192.168.122.1。 - 反向代理伺服器 (Reverse Proxy):使用NGINX架設。該伺服器的IP是192.168.122.133。 - 網頁伺服器 (Web Server):提供網頁內容的真實網頁,可以用Apache架設,也可以用NGINX架設。IP是192.168.122.77。 - PHP:產生網頁的程式語言。該程式語言用來辨別使用者IP的主要方式是$_SERVER["REMOTE_ADDR"]。但如果反向代理伺服器有設定X-Real-IP的話,也可以用$_SERVER["HTTP_X_REAL_IP"]取得使用者的IP。 當我們在討論「如何取得使用者IP」的問題時,一定要搞清楚我們討論的角色是哪一層。 到底是後端的程式語言PHP或ASP.NET?還是網頁伺服器的Apache或NGINX?還是我們想要在前端的反向代理伺服器實作這個功能?。 理想上,如果能在反向代理伺服器就將使用者的真實IP傳遞給後端的網頁伺服器跟程式語言,而且能夠讓後端伺服器誤以為請求就是來自使用者本人,那應該是最理想的做法。 但目前的結論是:做不到。 以下讓我們從前端到後端一一來看看要怎麼做。 ---- 繼續閱讀 ⇨ 如何取得使用者的IP?從反向代理伺服器、網頁伺服器到程式語言來看 / How to Get the User's IP? From Reverse Proxy Server, Web Server to Programming Language https://blog.pulipuli.info/2023/04/blog-post_18.html
0 notes
Note
I just pulled this 2009 hp out of the dumpster what do i do with it. It has ubuntu.

if it's that old, probably wipe and reinstall. If you're doing ubuntu again first uninstall snap but there's a lot of neat self-hosting stuff you can do with an old PC.
I have a little RasPi in my basement which runs an RSS Feed aggregator(FreshRSS), some calendars(Radicale) and notes(Joplin) so they're synced between all my devices.
If the computer has the storage and a little bit of power for processing things you could also run something to sync all your photos (Immich) and files (Nextcloud, which also does images but i like Immich better for it) between ur devices so you can avoid having to use paid services which may or may not be selling your data or whatever.
You can have it run a self hosted VPN such as WireGuard which you can port forward so you can use it from anywhere, or you can use a service like Tailscale which doesn't require port forwarding, but it's not something you host yourself, they have their own servers.
You can also put all the services behind a reverse proxy (nginx Proxy Manager, NOT nginx, i mean it's good but it's much harder) and be able to access it through a proper domain with SSL(a vpn will already do this though) instead of whatever 192.168.whatever, again, only accessible by people On That VPN.
All things are available (and usually encouraged) to run through docker, and they often even have their own compose files so it's not too much setup. (it's maintenence to update things though)
Also have fun and play tuoys. Old computers run modern versions of linux much better than windows. just open it up see what u can do with it, get used to it, try to customize the desktop to how you like it, or try another one (Ubuntu comes with GNOME. please try another one). See what works and what doesn't (hardware will likely be the issue if something doesn't work though, not linux itself). Something like Plasma or Cinnamon works just like a normal windows computer but there's still a bit of that "learning how to use a computer" that you don't really get after using the same version of windows for 10 years.
22 notes
·
View notes
Text
Fighting my server rn. I've got some nextcloud docker container running, and nginx should do a reverse-proxy to it but it just doesn't seem to do it for some reason. I can access it perfectly fine via hostname:8080 on other devices but for some reason not from the server itself, where I have to use 127.17.0.1:8080 but even a reverse proxy to that doesn't do it. Honestly no fucking clue what's wrong. And if I can't fix it I guess I'll have to go back to not using a container
9 notes
·
View notes
Text
whyyyy does it take so long to make an initial connection to this nginx reverse proxy
#entirely internal btw#with pihole handling the dns records and wireguard for vpn access#this wasn't an issue when the reverse proxy was on my laptop#just now that it's on a dedicated machine#linux#debian#networking#home network#self-hosted
5 notes
·
View notes
Text
Setting Up nginx/1.24.0 (Ubuntu) on Ubuntu 24.04 – A Step-by-Step Guide
If you're planning to deploy a web application or website on a VPS, installing nginx/1.24.0 (Ubuntu) is an excellent choice for speed, scalability, and resource efficiency. As a high-performance web server and reverse proxy, NGINX is trusted by some of the world’s most visited websites. For users running Ubuntu 24.04, Vultr’s guide simplifies the installation process, making it easy even for those new to server administration.
Ubuntu 24.04, the latest long-term support (LTS) release, offers enhanced security and performance updates, making it the ideal foundation for hosting modern web applications. The nginx/1.24.0 (Ubuntu) version brings new improvements and bug fixes that enhance stability and compatibility, ensuring your web server runs efficiently under high loads.
The Vultr documentation offers a comprehensive step-by-step tutorial that walks you through updating your system, installing the latest version of NGINX from Ubuntu’s default repositories, and verifying the installation to ensure nginx/1.24.0 is running correctly. You’ll also learn how to configure the firewall, manage the NGINX service, and create virtual hosts to serve multiple domains from a single server.
One of the key strengths of using NGINX on Ubuntu 24.04 is its ease of customization. Whether you’re looking to serve static content, use it as a reverse proxy, or build a load balancer, nginx/1.24.0 provides the flexibility to adapt to a variety of use cases.
For developers and DevOps professionals seeking a reliable deployment environment, combining nginx/1.24.0 (Ubuntu) with Vultr’s cloud infrastructure delivers powerful performance with minimal overhead. The Vultr platform ensures quick provisioning and scalability, while the guide ensures your NGINX installation is optimized and secure.
0 notes
Text

Enhancing ARMxy Performance with Nginx as a Reverse Proxy
Introduction
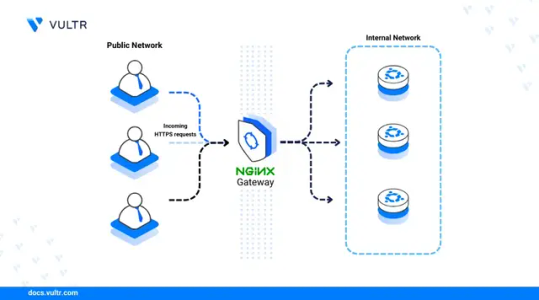
Nginx is a high-performance web server that also functions as a reverse proxy, load balancer, and caching server. It is widely used in cloud and edge computing environments due to its lightweight architecture and efficient handling of concurrent connections. By deploying Nginx on ARMxy Edge IoT Gateway, users can optimize data flow, enhance security, and efficiently manage industrial network traffic.
Why Use Nginx on ARMxy?
1. Reverse Proxying – Nginx acts as an intermediary, forwarding client requests to backend services running on ARMxy.
2. Load Balancing – Distributes traffic across multiple devices to prevent overload.
3. Security Hardening – Hides backend services and implements SSL encryption for secure communication.
4. Performance Optimization – Caching frequently accessed data reduces latency.
Setting Up Nginx as a Reverse Proxy on ARMxy
1. Install Nginx
On ARMxy’s Linux-based OS, update the package list and install Nginx:
sudo apt update sudo apt install nginx -y
Start and enable Nginx on boot:
sudo systemctl start nginx sudo systemctl enable nginx
2. Configure Nginx as a Reverse Proxy
Modify the default Nginx configuration to route incoming traffic to an internal service, such as a Node-RED dashboard running on port 1880:
sudo nano /etc/nginx/sites-available/default
Replace the default configuration with the following:
server { listen 80; server_name your_armxy_ip;
location / {
proxy_pass http://localhost:1880/;
proxy_set_header Host $host;
proxy_set_header X-Real-IP $remote_addr;
proxy_set_header X-Forwarded-For $proxy_add_x_forwarded_for;
}
}
Save the file and restart Nginx:
sudo systemctl restart nginx
3. Enable SSL for Secure Communication
To secure the reverse proxy with HTTPS, install Certbot and configure SSL:
sudo apt install certbot python3-certbot-nginx -y sudo certbot --nginx -d your_domain
Follow the prompts to automatically configure SSL for your ARMxy gateway.
Use Case: Secure Edge Data Flow
In an industrial IoT setup, ARMxy collects data from field devices via Modbus, MQTT, or OPC UA, processes it locally using Node-RED or Dockerized applications, and sends it to cloud platforms. With Nginx, you can:
· Secure data transmission with HTTPS encryption.
· Optimize API requests by caching responses.
· Balance traffic when multiple ARMxy devices are used in parallel.
Conclusion
Deploying Nginx as a reverse proxy on ARMxy enhances security, optimizes data handling, and ensures efficient communication between edge devices and cloud platforms. This setup is ideal for industrial automation, smart city applications, and IIoT networks requiring low latency, high availability, and secure remote access.
0 notes
Text
How to Deploy Keycloak on Ubuntu VPS
Here’s a clear and detailed how-to guide for how to deploy Keycloak on Ubuntu VPS. This guide uses Keycloak in standalone mode with PostgreSQL as the database and NGINX as a reverse proxy with SSL. What is Keycloak? Keycloak is an open-source identity and access management (IAM) solution developed by Red Hat. It provides authentication, […] The post How to Deploy Keycloak on Ubuntu VPS first…
0 notes
Text
#HướngDẫnCàiNginxTrênUbuntu2204 #CấuHìnhPort80Và443 #Thuecloud
#HướngDẫnCàiNginxTrênUbuntu2204 #CấuHìnhPort80Và443 #Thuecloud — Hướng Dẫn Cài Đặt Nginx Trên Ubuntu 22.04 – Mở Port 80 & 443 Cho HTTPS Nginx là một trong những web server mạnh mẽ, hiệu suất cao và tiết kiệm tài nguyên, đồng thời đóng vai trò như reverse proxy, load balancer hoặc cache server cho các ứng dụng web hiện đại. Bài viết này sẽ hướng dẫn bạn từng bước cài đặt Nginx trên Ubuntu 22.04,…
0 notes
Text
So, I don’t have a lot of brain-juice to spare lately. Mostly because I’ve been reeling from the existential crisis of turning forty … uh, TOMORROW (as of posting this), and I’ve been adjusting to a different position at work, which also comes with longer hours. But, with the limited juice I have, and the start of a tiny vacation from work, I went ahead and hashed out the things I would need to do to:
1: move my website to my own server
2: enable Anubis in order to protect against all AI scrapers
And I’ve done that! In a miraculously short amount of time.
This website will no longer be hosted on Github, where everything you write is being scraped by Copilot, and it’ll also no longer be subject to “action” fees once you reach into the 2000+ actions (this website does a lot of stuff). This also means that I won’t be actively pushing my site to Neocities, but honestly? Having this place hosted on my own server basically lifts every and all restrictions. Including the ability to install and host Anubis as a way to protect against AI.
Neocities is great, but I do have my doubts about the owner and his stance on the grand-theft of all things for corporate greed and the destruction of the arts, but for a measly 6 dollars a month to run a server, I can now do … whatever the hell I want.
But, it’s not just important to protect against AI scrapers in order to retain your work and the things you do as your own, and not something for Google or Sam Altman to make a profit off of, but also because, sometimes, when these bots hit yours servers, it is effectively a DDoS. And, I don’t know how many people know, but bandwidth exploding from aggressive bots trying to steal everything you’ve ever done WILL eventually incur charges upon you, that could be astronomical.
If you’re reading this though, you’ve already had your http request passed through Anubis, and you are not AI.
Congratulations.
My only stipulation about Anubis are the instructions on getting everything running. In that, they’re pretty bare-bones, and it took me putting on my thinking cap to get past that.
Things I’ll note for others who potentially want to build against AI using Anubis.
1: You have to actually download the package and put it on your server first, and if you constantly forget things (like me), or are new to these sorts of things, you might have forgotten/don’t know how to do this. Just setup FileZilla with some SSH privileges and drop the package into your root folder.
2: In the setup instructions on the Anubis website, it mentions an example where you’re building Anubis to protect a Gitea server. This threw me for a loop, because I was like, “Uh, well, what if I’m just protecting a website?? What do I input??” And this was clarified by the developer themselves … you just write whatever. So, mine is “nova.”
3: Reverse-proxying is a super advanced thing that regular users have probably zero experience with, but, basically, get rid of your default Nginx server configuration, and make sure you’ve already got your SSL running via certbot, and follow everything on the page via Nginx configuration to the T. You’ll need the upstream, and in my case, I created a secondary config file in sites-available where my site is running on port 3000, that the actual config (that proxies Anubis) points to.
Convoluted! But, actually, pretty simple, once you’ve wrapped your head around it.
I could probably confidently walk you through it, if you’d like to do exactly what I just did.
Otherwise, onward! To the future!
… and being forty, I guess.
Source: Original Post
Posted via Python, written by @daemon_nova
0 notes
Text
why the fuck does disabling proxy_buffering (nginx) speed up the connection from 3xRTT (round trip time) to 2xRTT (fastest possible with a reverse proxy). why is there an entire round trip for proxy buffering?? there's no way it's actually taking that long just to buffer.. right?
1 note
·
View note
Link
#autoSSL#Automation#cloud#configuration#containerization#DevOps#Docker#HTTPS#Let'sEncrypt#Linux#networking#NGINX#proxyserver#reverseproxy#Security#self-hosted#servermanagement#systemadministration#TLS#Traefik#webserver
0 notes
Text
SSL Cert Automation
SSL/TLS certificates are absolutely vital to the web. Yes, even your homelab, even if everything is local-only. I wholeheartedly recommend buying a domain for your homelab, as they can be had for ~$5/yr or less depending on the TLD (top-level domain) you choose. Obviously a .com domain is going to be more expensive, but others like .xyz are super affordable, and it makes a lot of things a whole lot easier. I recommend Cloudflare or Porkbun as your registrar; I've also used Namecheap and they're good but lack API access for small accounts. And please, PLEASE for the love of god DO NOT USE GODADDY. EVER.
First of all, why is cert automation even important? Most certificates you will purchase are issued for a one year period, so you only need to worry about renewal once a year, that's not too bad right? Well, that's all changing very soon. With issuers like Letsencrypt ending expiry emails, and the push to further shorten cert lifetime, automation is all the more needed. Not to mention Letsencrypt is free so there is very little reason not to use them (or a similar issuer).
"Okay, you've convinced me. But how???" Well, I'm glad you asked. By far the absolute easiest way is to use a reverse proxy that does all the work for you. Simply set up Caddy, Traefik, Nginx Proxy Manager, etc. and the appropriate provider plugin (if you're using DNS challenge, more on that later), and you're good to go. Everything you host will go through the proxy, which handles SSL certificate provisioning, renewal, and termination for you without needing to lift a finger. This is how a lot of people do it, and there's nothing wrong with doing it this way. However, it may not be the best solution depending on the complexity of your lab.
If you know a thing or two about managing SSL certificates you might be thinking about just running your own certificate authority. That does make it easier, you can make the certs expire whenever you want! Woo, 100 year certificates! Except not really, because many browsers/devices will balk at certificates with unrealistic lifetimes. Then you also have to install the cert authority on any and all client devices, docker containers, etc. It gets to be more of a pain than it's worth, especially when getting certs from an actual trusted CA is so easy. Indeed I used to do this, but when the certs did need to be renewed it was a right pain in the ass.
My lab consists of 6 physical computers, 3 are clustered with each other and all of them talk to the others for various things. Especially for the proxmox cluster, having a good certificate strategy is important because they need to be secure and trust each other. It's not really something I can reasonably slap a proxy in front of and expect it to be reliable. But unfortunately, there's not really any good out of the box solutions for exactly what I needed, which is automatic renewal and deployment to physical machines depending on the applications on each that need the certs.
So I made one myself. It's pretty simple really, I have a modified certbot docker container which uses a DNS challenge to provision or renew a wildcard certificate for my domain. Then an Ansible playbook runs on all the physical hosts (or particularly important VMs) to update the new cert and restart the application(s) as needed. And since it's running on a schedule, it helps eliminate the chance of accidental misconfiguration if I'm messing with something else in the lab. This way I apply the same cert to everything, and the reverse proxy will also use this same certificate for anything it serves.
The DNS challenge is important, because it's required to get a wildcard cert. You could provision certs individually without it, but the server has to be exposed to the internet which is not ideal for many backend management type stuff like Proxmox. You need to have API access to your registrar/DNS provider in order to accomplish this, otherwise you need to add the DNS challenge manually which just defeats the whole purpose. Basically certbot request a certificate, and the issuer says, "Oh yeah? If you really own this domain, then put this random secret in there for me to see." So it does, using API access, and the issuer trusts that you own the domain and gives you the requested certificate. This type of challenge is ideal for getting certs for things that aren't on the public internet.
This sure was a lot of words for a simple solution, huh. Well, more explanation never hurt anyone, probably. The point of this post is to show that while SSL certificates can be very complicated, for hobby use it's actually really easy to set up automation even for more complex environments. It might take a bit of work up front, but the comfort and security you get knowing you can sit back and not worry about anything and your systems will keep on trucking is pretty valuable.
0 notes
Text
How to Deploy Your Full Stack Application: A Beginner’s Guide

Deploying a full stack application involves setting up your frontend, backend, and database on a live server so users can access it over the internet. This guide covers deployment strategies, hosting services, and best practices.
1. Choosing a Deployment Platform
Popular options include:
Cloud Platforms: AWS, Google Cloud, Azure
PaaS Providers: Heroku, Vercel, Netlify
Containerized Deployment: Docker, Kubernetes
Traditional Hosting: VPS (DigitalOcean, Linode)
2. Deploying the Backend
Option 1: Deploy with a Cloud Server (e.g., AWS EC2, DigitalOcean)
Set Up a Virtual Machine (VM)
bash
ssh user@your-server-ip
Install Dependencies
Node.js (sudo apt install nodejs npm)
Python (sudo apt install python3-pip)
Database (MySQL, PostgreSQL, MongoDB)
Run the Server
bash
nohup node server.js & # For Node.js apps gunicorn app:app --daemon # For Python Flask/Django apps
Option 2: Serverless Deployment (AWS Lambda, Firebase Functions)
Pros: No server maintenance, auto-scaling
Cons: Limited control over infrastructure
3. Deploying the Frontend
Option 1: Static Site Hosting (Vercel, Netlify, GitHub Pages)
Push Code to GitHub
Connect GitHub Repo to Netlify/Vercel
Set Build Command (e.g., npm run build)
Deploy and Get Live URL
Option 2: Deploy with Nginx on a Cloud Server
Install Nginx
bash
sudo apt install nginx
Configure Nginx for React/Vue/Angular
nginx
server { listen 80; root /var/www/html; index index.html; location / { try_files $uri /index.html; } }
Restart Nginx
bash
sudo systemctl restart nginx
4. Connecting Frontend and Backend
Use CORS middleware to allow cross-origin requests
Set up reverse proxy with Nginx
Secure API with authentication tokens (JWT, OAuth)
5. Database Setup
Cloud Databases: AWS RDS, Firebase, MongoDB Atlas
Self-Hosted Databases: PostgreSQL, MySQL on a VPS
bash# Example: Run PostgreSQL on DigitalOcean sudo apt install postgresql sudo systemctl start postgresql
6. Security & Optimization
✅ SSL Certificate: Secure site with HTTPS (Let’s Encrypt) ✅ Load Balancing: Use AWS ALB, Nginx reverse proxy ✅ Scaling: Auto-scale with Kubernetes or cloud functions ✅ Logging & Monitoring: Use Datadog, New Relic, AWS CloudWatch
7. CI/CD for Automated Deployment
GitHub Actions: Automate builds and deployment
Jenkins/GitLab CI/CD: Custom pipelines for complex deployments
Docker & Kubernetes: Containerized deployment for scalability
Final Thoughts
Deploying a full stack app requires setting up hosting, configuring the backend, deploying the frontend, and securing the application.
Cloud platforms like AWS, Heroku, and Vercel simplify the process, while advanced setups use Kubernetes and Docker for scalability.
WEBSITE: https://www.ficusoft.in/full-stack-developer-course-in-chennai/
0 notes
Note
Did you hear about readallcomics getting taken down??
I did not... it looks like the other sites most people talk about are still up. The fact that it is a NGINX error which is a reverse proxy error and pretty much 0 reports of any legal action, it could also just be a server error. But who knows?
1 note
·
View note