#Network Storage Device
Explore tagged Tumblr posts
Visit Tumblr Blog
Explore Tumblr blogs with no restrictions, modern design and the best experience.
Last Seen Tumblr Blogs


Fun Fact
The KCSC sent more than 20K requests to delete posts related to prostitution and porn to Tumblr from January to June 2017.
Text
youtube
Top 5 Best Network Storage Device
0 notes
Text
Top NAS Storage Devices for Small Business Backup
In today’s hyper-connected business environment, data is the foundation of operations, innovation, and success. Whether you’re a startup or an established enterprise, safeguarding this valuable asset is critical. That’s where NAS storage steps in as a reliable, secure, and efficient solution for network backups.
#NAS storage devices#backup solutions#NAS storage for small business#NAS devices#network backup#qnap nas storage
0 notes
Text
What Should You Know About Edge Computing?
As technology continues to evolve, so do the ways in which data is processed, stored, and managed. One of the most transformative innovations in this space is edge computing. But what should you know about edge computing? This technology shifts data processing closer to the source, reducing latency and improving efficiency, particularly in environments where immediate action or analysis is…
#5G#AI#AI edge#AI integration#automation#autonomous vehicles#bandwidth#cloud#cloud infrastructure#cloud security#computing#computing power#data generation#data management#data processing#data storage#data transfer#decentralization#digital services#digital transformation#distributed computing#edge analytics#edge computing#edge devices#edge inferencing#edge networks#edge servers#enterprise data#Healthcare#hybrid cloud
0 notes
Text
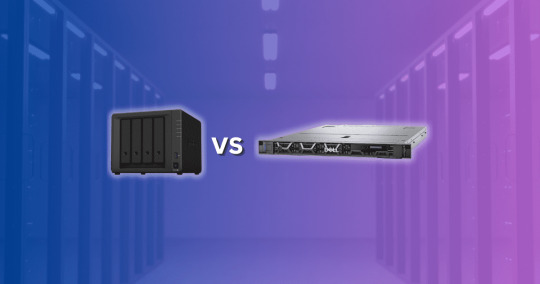
NAS vs Server: Pros and Cons for Home Lab
NAS vs Server: Pros and Cons for Home Lab #homelab #homeserver #NASvsServerComparison #NetworkAttachedStorage #DataStorageServer #FileServers #ServerOperatingSystems #NASDevices #TraditionalFileServer #SmallBusinessDataSolution #HomeLabStorage
Two devices dominate both SMB and home lab environments – NAS devices and servers. The NAS vs server debate has been going on for quite some time. Both have their unique set of advantages and disadvantages. This post delves into the pros and cons of each, to guide you in making a good decision in the realm of electronic data storage. Table of contentsWhat is a Network Attached Storage (NAS)…
View On WordPress
#Data Storage Server#File Servers#Home Lab Storage#NAS Devices#NAS vs Server comparison#network attached storage#Server Configuration Options#Server Operating Systems#Small Business Data Solution#Traditional File Server
0 notes
Text
That moment when you hate modern streaming services in general (*cough* Spotify *cough*) and just want to listen to music (that you legally own) without ads or ripping off creators.
Yeah thats right I want an entire FUCKING NAS SERVER in my room >:(
#for those who dont know#NAS stands for Network Attached Storage#which would basically allow me to access any digitally owned music i have#or music ripped from cds#from literally anywhere i want on any device i want#but my friend#servers are expensive#and to be honest i have multiple other reasons why i want a NAS but this is a big one for some reason
0 notes
Text
"When a severe water shortage hit the Indian city of Kozhikode in the state of Kerala, a group of engineers turned to science fiction to keep the taps running.
Like everyone else in the city, engineering student Swapnil Shrivastav received a ration of two buckets of water a day collected from India’s arsenal of small water towers.
It was a ‘watershed’ moment for Shrivastav, who according to the BBC had won a student competition four years earlier on the subject of tackling water scarcity, and armed with a hypothetical template from the original Star Wars films, Shrivastav and two partners set to work harvesting water from the humid air.
“One element of inspiration was from Star Wars where there’s an air-to-water device. I thought why don’t we give it a try? It was more of a curiosity project,” he told the BBC.
According to ‘Wookiepedia’ a ‘moisture vaporator’ is a device used on moisture farms to capture water from a dry planet’s atmosphere, like Tatooine, where protagonist Luke Skywalker grew up.
This fictional device functions according to Star Wars lore by coaxing moisture from the air by means of refrigerated condensers, which generate low-energy ionization fields. Captured water is then pumped or gravity-directed into a storage cistern that adjusts its pH levels. Vaporators are capable of collecting 1.5 liters of water per day.

Pictured: Moisture vaporators on the largely abandoned Star Wars film set of Mos Espa, in Tunisia
If science fiction authors could come up with the particulars of such a device, Shrivastav must have felt his had a good chance of succeeding. He and colleagues Govinda Balaji and Venkatesh Raja founded Uravu Labs, a Bangalore-based startup in 2019.
Their initial offering is a machine that converts air to water using a liquid desiccant. Absorbing moisture from the air, sunlight or renewable energy heats the desiccant to around 100°F which releases the captured moisture into a chamber where it’s condensed into drinking water.
The whole process takes 12 hours but can produce a staggering 2,000 liters, or about 500 gallons of drinking-quality water per day. [Note: that IS staggering! That's huge!!] Uravu has since had to adjust course due to the cost of manufacturing and running the machines—it’s just too high for civic use with current materials technology.
“We had to shift to commercial consumption applications as they were ready to pay us and it’s a sustainability driver for them,” Shrivastav explained. This pivot has so far been enough to keep the start-up afloat, and they produce water for 40 different hospitality clients.
Looking ahead, Shrivastav, Raja, and Balaji are planning to investigate whether the desiccant can be made more efficient; can it work at a lower temperature to reduce running costs, or is there another material altogether that might prove more cost-effective?
They’re also looking at running their device attached to data centers in a pilot project that would see them utilize the waste heat coming off the centers to heat the desiccant."
-via Good News Network, May 30, 2024
#water#india#kerala#Kozhikode#science and technology#clean water#water access#drinking water#drought#climate change#climate crisis#climate action#climate adaptation#green tech#sustainability#water shortage#good news#hope#star wars#tatooine
1K notes
·
View notes
Text
How I ditched streaming services and learned to love Linux: A step-by-step guide to building your very own personal media streaming server (V2.0: REVISED AND EXPANDED EDITION)
This is a revised, corrected and expanded version of my tutorial on setting up a personal media server that previously appeared on my old blog (donjuan-auxenfers). I expect that that post is still making the rounds (hopefully with my addendum on modifying group share permissions in Ubuntu to circumvent 0x8007003B "Unexpected Network Error" messages in Windows 10/11 when transferring files) but I have no way of checking. Anyway this new revised version of the tutorial corrects one or two small errors I discovered when rereading what I wrote, adds links to all products mentioned and is just more polished generally. I also expanded it a bit, pointing more adventurous users toward programs such as Sonarr/Radarr/Lidarr and Overseerr which can be used for automating user requests and media collection.
So then, what is this tutorial? This is a tutorial on how to build and set up your own personal media server using Ubuntu as an operating system and Plex (or Jellyfin) to not only manage your media, but to also stream that media to your devices both at home and abroad anywhere in the world where you have an internet connection. Its intent is to show you how building a personal media server and stuffing it full of films, TV, and music that you acquired through indiscriminate and voracious media piracy various legal methods will free you to completely ditch paid streaming services. No more will you have to pay for Disney+, Netflix, HBOMAX, Hulu, Amazon Prime, Peacock, CBS All Access, Paramount+, Crave or any other streaming service that is not named Criterion Channel. Instead whenever you want to watch your favourite films and television shows, you’ll have your own personal service that only features things that you want to see, with files that you have control over. And for music fans out there, both Jellyfin and Plex support music streaming, meaning you can even ditch music streaming services. Goodbye Spotify, Youtube Music, Tidal and Apple Music, welcome back unreasonably large MP3 (or FLAC) collections.
On the hardware front, I’m going to offer a few options catered towards different budgets and media library sizes. The cost of getting a media server up and running using this guide will cost you anywhere from $450 CAD/$325 USD at the low end to $1500 CAD/$1100 USD at the high end (it could go higher). My server was priced closer to the higher figure, but I went and got a lot more storage than most people need. If that seems like a little much, consider for a moment, do you have a roommate, a close friend, or a family member who would be willing to chip in a few bucks towards your little project provided they get access? Well that's how I funded my server. It might also be worth thinking about the cost over time, i.e. how much you spend yearly on subscriptions vs. a one time cost of setting up a server. Additionally there's just the joy of being able to scream "fuck you" at all those show cancelling, library deleting, hedge fund vampire CEOs who run the studios through denying them your money. Drive a stake through David Zaslav's heart.
On the software side I will walk you step-by-step through installing Ubuntu as your server's operating system, configuring your storage as a RAIDz array with ZFS, sharing your zpool to Windows with Samba, running a remote connection between your server and your Windows PC, and then a little about started with Plex/Jellyfin. Every terminal command you will need to input will be provided, and I even share a custom #bash script that will make used vs. available drive space on your server display correctly in Windows.
If you have a different preferred flavour of Linux (Arch, Manjaro, Redhat, Fedora, Mint, OpenSUSE, CentOS, Slackware etc. et. al.) and are aching to tell me off for being basic and using Ubuntu, this tutorial is not for you. The sort of person with a preferred Linux distro is the sort of person who can do this sort of thing in their sleep. Also I don't care. This tutorial is intended for the average home computer user. This is also why we’re not using a more exotic home server solution like running everything through Docker Containers and managing it through a dashboard like Homarr or Heimdall. While such solutions are fantastic and can be very easy to maintain once you have it all set up, wrapping your brain around Docker is a whole thing in and of itself. If you do follow this tutorial and had fun putting everything together, then I would encourage you to return in a year’s time, do your research and set up everything with Docker Containers.
Lastly, this is a tutorial aimed at Windows users. Although I was a daily user of OS X for many years (roughly 2008-2023) and I've dabbled quite a bit with various Linux distributions (mostly Ubuntu and Manjaro), my primary OS these days is Windows 11. Many things in this tutorial will still be applicable to Mac users, but others (e.g. setting up shares) you will have to look up for yourself. I doubt it would be difficult to do so.
Nothing in this tutorial will require feats of computing expertise. All you will need is a basic computer literacy (i.e. an understanding of what a filesystem and directory are, and a degree of comfort in the settings menu) and a willingness to learn a thing or two. While this guide may look overwhelming at first glance, it is only because I want to be as thorough as possible. I want you to understand exactly what it is you're doing, I don't want you to just blindly follow steps. If you half-way know what you’re doing, you will be much better prepared if you ever need to troubleshoot.
Honestly, once you have all the hardware ready it shouldn't take more than an afternoon or two to get everything up and running.
(This tutorial is just shy of seven thousand words long so the rest is under the cut.)
Step One: Choosing Your Hardware
Linux is a light weight operating system, depending on the distribution there's close to no bloat. There are recent distributions available at this very moment that will run perfectly fine on a fourteen year old i3 with 4GB of RAM. Moreover, running Plex or Jellyfin isn’t resource intensive in 90% of use cases. All this is to say, we don’t require an expensive or powerful computer. This means that there are several options available: 1) use an old computer you already have sitting around but aren't using 2) buy a used workstation from eBay, or what I believe to be the best option, 3) order an N100 Mini-PC from AliExpress or Amazon.
Note: If you already have an old PC sitting around that you’ve decided to use, fantastic, move on to the next step.
When weighing your options, keep a few things in mind: the number of people you expect to be streaming simultaneously at any one time, the resolution and bitrate of your media library (4k video takes a lot more processing power than 1080p) and most importantly, how many of those clients are going to be transcoding at any one time. Transcoding is what happens when the playback device does not natively support direct playback of the source file. This can happen for a number of reasons, such as the playback device's native resolution being lower than the file's internal resolution, or because the source file was encoded in a video codec unsupported by the playback device.
Ideally we want any transcoding to be performed by hardware. This means we should be looking for a computer with an Intel processor with Quick Sync. Quick Sync is a dedicated core on the CPU die designed specifically for video encoding and decoding. This specialized hardware makes for highly efficient transcoding both in terms of processing overhead and power draw. Without these Quick Sync cores, transcoding must be brute forced through software. This takes up much more of a CPU’s processing power and requires much more energy. But not all Quick Sync cores are created equal and you need to keep this in mind if you've decided either to use an old computer or to shop for a used workstation on eBay
Any Intel processor from second generation Core (Sandy Bridge circa 2011) onward has Quick Sync cores. It's not until 6th gen (Skylake), however, that the cores support the H.265 HEVC codec. Intel’s 10th gen (Comet Lake) processors introduce support for 10bit HEVC and HDR tone mapping. And the recent 12th gen (Alder Lake) processors brought with them hardware AV1 decoding. As an example, while an 8th gen (Kaby Lake) i5-8500 will be able to hardware transcode a H.265 encoded file, it will fall back to software transcoding if given a 10bit H.265 file. If you’ve decided to use that old PC or to look on eBay for an old Dell Optiplex keep this in mind.
Note 1: The price of old workstations varies wildly and fluctuates frequently. If you get lucky and go shopping shortly after a workplace has liquidated a large number of their workstations you can find deals for as low as $100 on a barebones system, but generally an i5-8500 workstation with 16gb RAM will cost you somewhere in the area of $260 CAD/$200 USD.
Note 2: The AMD equivalent to Quick Sync is called Video Core Next, and while it's fine, it's not as efficient and not as mature a technology. It was only introduced with the first generation Ryzen CPUs and it only got decent with their newest CPUs, we want something cheap.
Alternatively you could forgo having to keep track of what generation of CPU is equipped with Quick Sync cores that feature support for which codecs, and just buy an N100 mini-PC. For around the same price or less of a used workstation you can pick up a mini-PC with an Intel N100 processor. The N100 is a four-core processor based on the 12th gen Alder Lake architecture and comes equipped with the latest revision of the Quick Sync cores. These little processors offer astounding hardware transcoding capabilities for their size and power draw. Otherwise they perform equivalent to an i5-6500, which isn't a terrible CPU. A friend of mine uses an N100 machine as a dedicated retro emulation gaming system and it does everything up to 6th generation consoles just fine. The N100 is also a remarkably efficient chip, it sips power. In fact, the difference between running one of these and an old workstation could work out to hundreds of dollars a year in energy bills depending on where you live.
You can find these Mini-PCs all over Amazon or for a little cheaper on AliExpress. They range in price from $170 CAD/$125 USD for a no name N100 with 8GB RAM to $280 CAD/$200 USD for a Beelink S12 Pro with 16GB RAM. The brand doesn't really matter, they're all coming from the same three factories in Shenzen, go for whichever one fits your budget or has features you want. 8GB RAM should be enough, Linux is lightweight and Plex only calls for 2GB RAM. 16GB RAM might result in a slightly snappier experience, especially with ZFS. A 256GB SSD is more than enough for what we need as a boot drive, but going for a bigger drive might allow you to get away with things like creating preview thumbnails for Plex, but it’s up to you and your budget.
The Mini-PC I wound up buying was a Firebat AK2 Plus with 8GB RAM and a 256GB SSD. It looks like this:

Note: Be forewarned that if you decide to order a Mini-PC from AliExpress, note the type of power adapter it ships with. The mini-PC I bought came with an EU power adapter and I had to supply my own North American power supply. Thankfully this is a minor issue as barrel plug 30W/12V/2.5A power adapters are easy to find and can be had for $10.
Step Two: Choosing Your Storage
Storage is the most important part of our build. It is also the most expensive. Thankfully it’s also the most easily upgrade-able down the line.
For people with a smaller media collection (4TB to 8TB), a more limited budget, or who will only ever have two simultaneous streams running, I would say that the most economical course of action would be to buy a USB 3.0 8TB external HDD. Something like this one from Western Digital or this one from Seagate. One of these external drives will cost you in the area of $200 CAD/$140 USD. Down the line you could add a second external drive or replace it with a multi-drive RAIDz set up such as detailed below.
If a single external drive the path for you, move on to step three.
For people with larger media libraries (12TB+), who prefer media in 4k, or care who about data redundancy, the answer is a RAID array featuring multiple HDDs in an enclosure.
Note: If you are using an old PC or used workstatiom as your server and have the room for at least three 3.5" drives, and as many open SATA ports on your mother board you won't need an enclosure, just install the drives into the case. If your old computer is a laptop or doesn’t have room for more internal drives, then I would suggest an enclosure.
The minimum number of drives needed to run a RAIDz array is three, and seeing as RAIDz is what we will be using, you should be looking for an enclosure with three to five bays. I think that four disks makes for a good compromise for a home server. Regardless of whether you go for a three, four, or five bay enclosure, do be aware that in a RAIDz array the space equivalent of one of the drives will be dedicated to parity at a ratio expressed by the equation 1 − 1/n i.e. in a four bay enclosure equipped with four 12TB drives, if we configured our drives in a RAIDz1 array we would be left with a total of 36TB of usable space (48TB raw size). The reason for why we might sacrifice storage space in such a manner will be explained in the next section.
A four bay enclosure will cost somewhere in the area of $200 CDN/$140 USD. You don't need anything fancy, we don't need anything with hardware RAID controls (RAIDz is done entirely in software) or even USB-C. An enclosure with USB 3.0 will perform perfectly fine. Don’t worry too much about USB speed bottlenecks. A mechanical HDD will be limited by the speed of its mechanism long before before it will be limited by the speed of a USB connection. I've seen decent looking enclosures from TerraMaster, Yottamaster, Mediasonic and Sabrent.
When it comes to selecting the drives, as of this writing, the best value (dollar per gigabyte) are those in the range of 12TB to 20TB. I settled on 12TB drives myself. If 12TB to 20TB drives are out of your budget, go with what you can afford, or look into refurbished drives. I'm not sold on the idea of refurbished drives but many people swear by them.
When shopping for harddrives, search for drives designed specifically for NAS use. Drives designed for NAS use typically have better vibration dampening and are designed to be active 24/7. They will also often make use of CMR (conventional magnetic recording) as opposed to SMR (shingled magnetic recording). This nets them a sizable read/write performance bump over typical desktop drives. Seagate Ironwolf and Toshiba NAS are both well regarded brands when it comes to NAS drives. I would avoid Western Digital Red drives at this time. WD Reds were a go to recommendation up until earlier this year when it was revealed that they feature firmware that will throw up false SMART warnings telling you to replace the drive at the three year mark quite often when there is nothing at all wrong with that drive. It will likely even be good for another six, seven, or more years.

Step Three: Installing Linux
For this step you will need a USB thumbdrive of at least 6GB in capacity, an .ISO of Ubuntu, and a way to make that thumbdrive bootable media.
First download a copy of Ubuntu desktop (for best performance we could download the Server release, but for new Linux users I would recommend against the server release. The server release is strictly command line interface only, and having a GUI is very helpful for most people. Not many people are wholly comfortable doing everything through the command line, I'm certainly not one of them, and I grew up with DOS 6.0. 22.04.3 Jammy Jellyfish is the current Long Term Service release, this is the one to get.
Download the .ISO and then download and install balenaEtcher on your Windows PC. BalenaEtcher is an easy to use program for creating bootable media, you simply insert your thumbdrive, select the .ISO you just downloaded, and it will create a bootable installation media for you.
Once you've made a bootable media and you've got your Mini-PC (or you old PC/used workstation) in front of you, hook it directly into your router with an ethernet cable, and then plug in the HDD enclosure, a monitor, a mouse and a keyboard. Now turn that sucker on and hit whatever key gets you into the BIOS (typically ESC, DEL or F2). If you’re using a Mini-PC check to make sure that the P1 and P2 power limits are set correctly, my N100's P1 limit was set at 10W, a full 20W under the chip's power limit. Also make sure that the RAM is running at the advertised speed. My Mini-PC’s RAM was set at 2333Mhz out of the box when it should have been 3200Mhz. Once you’ve done that, key over to the boot order and place the USB drive first in the boot order. Then save the BIOS settings and restart.
After you restart you’ll be greeted by Ubuntu's installation screen. Installing Ubuntu is really straight forward, select the "minimal" installation option, as we won't need anything on this computer except for a browser (Ubuntu comes preinstalled with Firefox) and Plex Media Server/Jellyfin Media Server. Also remember to delete and reformat that Windows partition! We don't need it.
Step Four: Installing ZFS and Setting Up the RAIDz Array
Note: If you opted for just a single external HDD skip this step and move onto setting up a Samba share.
Once Ubuntu is installed it's time to configure our storage by installing ZFS to build our RAIDz array. ZFS is a "next-gen" file system that is both massively flexible and massively complex. It's capable of snapshot backup, self healing error correction, ZFS pools can be configured with drives operating in a supplemental manner alongside the storage vdev (e.g. fast cache, dedicated secondary intent log, hot swap spares etc.). It's also a file system very amenable to fine tuning. Block and sector size are adjustable to use case and you're afforded the option of different methods of inline compression. If you'd like a very detailed overview and explanation of its various features and tips on tuning a ZFS array check out these articles from Ars Technica. For now we're going to ignore all these features and keep it simple, we're going to pull our drives together into a single vdev running in RAIDz which will be the entirety of our zpool, no fancy cache drive or SLOG.
Open up the terminal and type the following commands:
sudo apt update
then
sudo apt install zfsutils-linux
This will install the ZFS utility. Verify that it's installed with the following command:
zfs --version
Now, it's time to check that the HDDs we have in the enclosure are healthy, running, and recognized. We also want to find out their device IDs and take note of them:
sudo fdisk -1
Note: You might be wondering why some of these commands require "sudo" in front of them while others don't. "Sudo" is short for "super user do”. When and where "sudo" is used has to do with the way permissions are set up in Linux. Only the "root" user has the access level to perform certain tasks in Linux. As a matter of security and safety regular user accounts are kept separate from the "root" user. It's not advised (or even possible) to boot into Linux as "root" with most modern distributions. Instead by using "sudo" our regular user account is temporarily given the power to do otherwise forbidden things. Don't worry about it too much at this stage, but if you want to know more check out this introduction.
If everything is working you should get a list of the various drives detected along with their device IDs which will look like this: /dev/sdc. You can also check the device IDs of the drives by opening the disk utility app. Jot these IDs down as we'll need them for our next step, creating our RAIDz array.
RAIDz is similar to RAID-5 in that instead of striping your data over multiple disks, exchanging redundancy for speed and available space (RAID-0), or mirroring your data writing by two copies of every piece (RAID-1), it instead writes parity blocks across the disks in addition to striping, this provides a balance of speed, redundancy and available space. If a single drive fails, the parity blocks on the working drives can be used to reconstruct the entire array as soon as a replacement drive is added.
Additionally, RAIDz improves over some of the common RAID-5 flaws. It's more resilient and capable of self healing, as it is capable of automatically checking for errors against a checksum. It's more forgiving in this way, and it's likely that you'll be able to detect when a drive is dying well before it fails. A RAIDz array can survive the loss of any one drive.
Note: While RAIDz is indeed resilient, if a second drive fails during the rebuild, you're fucked. Always keep backups of things you can't afford to lose. This tutorial, however, is not about proper data safety.
To create the pool, use the following command:
sudo zpool create "zpoolnamehere" raidz "device IDs of drives we're putting in the pool"
For example, let's creatively name our zpool "mypool". This poil will consist of four drives which have the device IDs: sdb, sdc, sdd, and sde. The resulting command will look like this:
sudo zpool create mypool raidz /dev/sdb /dev/sdc /dev/sdd /dev/sde
If as an example you bought five HDDs and decided you wanted more redundancy dedicating two drive to this purpose, we would modify the command to "raidz2" and the command would look something like the following:
sudo zpool create mypool raidz2 /dev/sdb /dev/sdc /dev/sdd /dev/sde /dev/sdf
An array configured like this is known as RAIDz2 and is able to survive two disk failures.
Once the zpool has been created, we can check its status with the command:
zpool status
Or more concisely with:
zpool list
The nice thing about ZFS as a file system is that a pool is ready to go immediately after creation. If we were to set up a traditional RAID-5 array using mbam, we'd have to sit through a potentially hours long process of reformatting and partitioning the drives. Instead we're ready to go right out the gates.
The zpool should be automatically mounted to the filesystem after creation, check on that with the following:
df -hT | grep zfs
Note: If your computer ever loses power suddenly, say in event of a power outage, you may have to re-import your pool. In most cases, ZFS will automatically import and mount your pool, but if it doesn’t and you can't see your array, simply open the terminal and type sudo zpool import -a.
By default a zpool is mounted at /"zpoolname". The pool should be under our ownership but let's make sure with the following command:
sudo chown -R "yourlinuxusername" /"zpoolname"
Note: Changing file and folder ownership with "chown" and file and folder permissions with "chmod" are essential commands for much of the admin work in Linux, but we won't be dealing with them extensively in this guide. If you'd like a deeper tutorial and explanation you can check out these two guides: chown and chmod.

You can access the zpool file system through the GUI by opening the file manager (the Ubuntu default file manager is called Nautilus) and clicking on "Other Locations" on the sidebar, then entering the Ubuntu file system and looking for a folder with your pool's name. Bookmark the folder on the sidebar for easy access.

Your storage pool is now ready to go. Assuming that we already have some files on our Windows PC we want to copy to over, we're going to need to install and configure Samba to make the pool accessible in Windows.
Step Five: Setting Up Samba/Sharing
Samba is what's going to let us share the zpool with Windows and allow us to write to it from our Windows machine. First let's install Samba with the following commands:
sudo apt-get update
then
sudo apt-get install samba
Next create a password for Samba.
sudo smbpswd -a "yourlinuxusername"
It will then prompt you to create a password. Just reuse your Ubuntu user password for simplicity's sake.
Note: if you're using just a single external drive replace the zpool location in the following commands with wherever it is your external drive is mounted, for more information see this guide on mounting an external drive in Ubuntu.
After you've created a password we're going to create a shareable folder in our pool with this command
mkdir /"zpoolname"/"foldername"
Now we're going to open the smb.conf file and make that folder shareable. Enter the following command.
sudo nano /etc/samba/smb.conf
This will open the .conf file in nano, the terminal text editor program. Now at the end of smb.conf add the following entry:
["foldername"]
path = /"zpoolname"/"foldername"
available = yes
valid users = "yourlinuxusername"
read only = no
writable = yes
browseable = yes
guest ok = no
Ensure that there are no line breaks between the lines and that there's a space on both sides of the equals sign. Our next step is to allow Samba traffic through the firewall:
sudo ufw allow samba
Finally restart the Samba service:
sudo systemctl restart smbd
At this point we'll be able to access to the pool, browse its contents, and read and write to it from Windows. But there's one more thing left to do, Windows doesn't natively support the ZFS file systems and will read the used/available/total space in the pool incorrectly. Windows will read available space as total drive space, and all used space as null. This leads to Windows only displaying a dwindling amount of "available" space as the drives are filled. We can fix this! Functionally this doesn't actually matter, we can still write and read to and from the disk, it just makes it difficult to tell at a glance the proportion of used/available space, so this is an optional step but one I recommend (this step is also unnecessary if you're just using a single external drive). What we're going to do is write a little shell script in #bash. Open nano with the terminal with the command:
nano
Now insert the following code:
#!/bin/bash CUR_PATH=`pwd` ZFS_CHECK_OUTPUT=$(zfs get type $CUR_PATH 2>&1 > /dev/null) > /dev/null if [[ $ZFS_CHECK_OUTPUT == *not\ a\ ZFS* ]] then IS_ZFS=false else IS_ZFS=true fi if [[ $IS_ZFS = false ]] then df $CUR_PATH | tail -1 | awk '{print $2" "$4}' else USED=$((`zfs get -o value -Hp used $CUR_PATH` / 1024)) > /dev/null AVAIL=$((`zfs get -o value -Hp available $CUR_PATH` / 1024)) > /dev/null TOTAL=$(($USED+$AVAIL)) > /dev/null echo $TOTAL $AVAIL fi
Save the script as "dfree.sh" to /home/"yourlinuxusername" then change the ownership of the file to make it executable with this command:
sudo chmod 774 dfree.sh
Now open smb.conf with sudo again:
sudo nano /etc/samba/smb.conf
Now add this entry to the top of the configuration file to direct Samba to use the results of our script when Windows asks for a reading on the pool's used/available/total drive space:
[global]
dfree command = /home/"yourlinuxusername"/dfree.sh
Save the changes to smb.conf and then restart Samba again with the terminal:
sudo systemctl restart smbd
Now there’s one more thing we need to do to fully set up the Samba share, and that’s to modify a hidden group permission. In the terminal window type the following command:
usermod -a -G sambashare “yourlinuxusername”
Then restart samba again:
sudo systemctl restart smbd
If we don’t do this last step, everything will appear to work fine, and you will even be able to see and map the drive from Windows and even begin transferring files, but you'd soon run into a lot of frustration. As every ten minutes or so a file would fail to transfer and you would get a window announcing “0x8007003B Unexpected Network Error”. This window would require your manual input to continue the transfer with the file next in the queue. And at the end it would reattempt to transfer whichever files failed the first time around. 99% of the time they’ll go through that second try, but this is still all a major pain in the ass. Especially if you’ve got a lot of data to transfer or you want to step away from the computer for a while.
It turns out samba can act a little weirdly with the higher read/write speeds of RAIDz arrays and transfers from Windows, and will intermittently crash and restart itself if this group option isn’t changed. Inputting the above command will prevent you from ever seeing that window.
The last thing we're going to do before switching over to our Windows PC is grab the IP address of our Linux machine. Enter the following command:
hostname -I
This will spit out this computer's IP address on the local network (it will look something like 192.168.0.x), write it down. It might be a good idea once you're done here to go into your router settings and reserving that IP for your Linux system in the DHCP settings. Check the manual for your specific model router on how to access its settings, typically it can be accessed by opening a browser and typing http:\\192.168.0.1 in the address bar, but your router may be different.
Okay we’re done with our Linux computer for now. Get on over to your Windows PC, open File Explorer, right click on Network and click "Map network drive". Select Z: as the drive letter (you don't want to map the network drive to a letter you could conceivably be using for other purposes) and enter the IP of your Linux machine and location of the share like so: \\"LINUXCOMPUTERLOCALIPADDRESSGOESHERE"\"zpoolnamegoeshere"\. Windows will then ask you for your username and password, enter the ones you set earlier in Samba and you're good. If you've done everything right it should look something like this:

You can now start moving media over from Windows to the share folder. It's a good idea to have a hard line running to all machines. Moving files over Wi-Fi is going to be tortuously slow, the only thing that’s going to make the transfer time tolerable (hours instead of days) is a solid wired connection between both machines and your router.
Step Six: Setting Up Remote Desktop Access to Your Server
After the server is up and going, you’ll want to be able to access it remotely from Windows. Barring serious maintenance/updates, this is how you'll access it most of the time. On your Linux system open the terminal and enter:
sudo apt install xrdp
Then:
sudo systemctl enable xrdp
Once it's finished installing, open “Settings” on the sidebar and turn off "automatic login" in the User category. Then log out of your account. Attempting to remotely connect to your Linux computer while you’re logged in will result in a black screen!
Now get back on your Windows PC, open search and look for "RDP". A program called "Remote Desktop Connection" should pop up, open this program as an administrator by right-clicking and selecting “run as an administrator”. You’ll be greeted with a window. In the field marked “Computer” type in the IP address of your Linux computer. Press connect and you'll be greeted with a new window and prompt asking for your username and password. Enter your Ubuntu username and password here.

If everything went right, you’ll be logged into your Linux computer. If the performance is sluggish, adjust the display options. Lowering the resolution and colour depth do a lot to make the interface feel snappier.

Remote access is how we're going to be using our Linux system from now, barring edge cases like needing to get into the BIOS or upgrading to a new version of Ubuntu. Everything else from performing maintenance like a monthly zpool scrub to checking zpool status and updating software can all be done remotely.

This is how my server lives its life now, happily humming and chirping away on the floor next to the couch in a corner of the living room.
Step Seven: Plex Media Server/Jellyfin
Okay we’ve got all the ground work finished and our server is almost up and running. We’ve got Ubuntu up and running, our storage array is primed, we’ve set up remote connections and sharing, and maybe we’ve moved over some of favourite movies and TV shows.
Now we need to decide on the media server software to use which will stream our media to us and organize our library. For most people I’d recommend Plex. It just works 99% of the time. That said, Jellyfin has a lot to recommend it by too, even if it is rougher around the edges. Some people run both simultaneously, it’s not that big of an extra strain. I do recommend doing a little bit of your own research into the features each platform offers, but as a quick run down, consider some of the following points:
Plex is closed source and is funded through PlexPass purchases while Jellyfin is open source and entirely user driven. This means a number of things: for one, Plex requires you to purchase a “PlexPass” (purchased as a one time lifetime fee $159.99 CDN/$120 USD or paid for on a monthly or yearly subscription basis) in order to access to certain features, like hardware transcoding (and we want hardware transcoding) or automated intro/credits detection and skipping, Jellyfin offers some of these features for free through plugins. Plex supports a lot more devices than Jellyfin and updates more frequently. That said, Jellyfin's Android and iOS apps are completely free, while the Plex Android and iOS apps must be activated for a one time cost of $6 CDN/$5 USD. But that $6 fee gets you a mobile app that is much more functional and features a unified UI across platforms, the Plex mobile apps are simply a more polished experience. The Jellyfin apps are a bit of a mess and the iOS and Android versions are very different from each other.
Jellyfin’s actual media player is more fully featured than Plex's, but on the other hand Jellyfin's UI, library customization and automatic media tagging really pale in comparison to Plex. Streaming your music library is free through both Jellyfin and Plex, but Plex offers the PlexAmp app for dedicated music streaming which boasts a number of fantastic features, unfortunately some of those fantastic features require a PlexPass. If your internet is down, Jellyfin can still do local streaming, while Plex can fail to play files unless you've got it set up a certain way. Jellyfin has a slew of neat niche features like support for Comic Book libraries with the .cbz/.cbt file types, but then Plex offers some free ad-supported TV and films, they even have a free channel that plays nothing but Classic Doctor Who.
Ultimately it's up to you, I settled on Plex because although some features are pay-walled, it just works. It's more reliable and easier to use, and a one-time fee is much easier to swallow than a subscription. I had a pretty easy time getting my boomer parents and tech illiterate brother introduced to and using Plex and I don't know if I would've had as easy a time doing that with Jellyfin. I do also need to mention that Jellyfin does take a little extra bit of tinkering to get going in Ubuntu, you’ll have to set up process permissions, so if you're more tolerant to tinkering, Jellyfin might be up your alley and I’ll trust that you can follow their installation and configuration guide. For everyone else, I recommend Plex.
So pick your poison: Plex or Jellyfin.
Note: The easiest way to download and install either of these packages in Ubuntu is through Snap Store.
After you've installed one (or both), opening either app will launch a browser window into the browser version of the app allowing you to set all the options server side.
The process of adding creating media libraries is essentially the same in both Plex and Jellyfin. You create a separate libraries for Television, Movies, and Music and add the folders which contain the respective types of media to their respective libraries. The only difficult or time consuming aspect is ensuring that your files and folders follow the appropriate naming conventions:
Plex naming guide for Movies
Plex naming guide for Television
Jellyfin follows the same naming rules but I find their media scanner to be a lot less accurate and forgiving than Plex. Once you've selected the folders to be scanned the service will scan your files, tagging everything and adding metadata. Although I find do find Plex more accurate, it can still erroneously tag some things and you might have to manually clean up some tags in a large library. (When I initially created my library it tagged the 1963-1989 Doctor Who as some Korean soap opera and I needed to manually select the correct match after which everything was tagged normally.) It can also be a bit testy with anime (especially OVAs) be sure to check TVDB to ensure that you have your files and folders structured and named correctly. If something is not showing up at all, double check the name.
Once that's done, organizing and customizing your library is easy. You can set up collections, grouping items together to fit a theme or collect together all the entries in a franchise. You can make playlists, and add custom artwork to entries. It's fun setting up collections with posters to match, there are even several websites dedicated to help you do this like PosterDB. As an example, below are two collections in my library, one collecting all the entries in a franchise, the other follows a theme.

My Star Trek collection, featuring all eleven television series, and thirteen films.

My Best of the Worst collection, featuring sixty-nine films previously showcased on RedLetterMedia’s Best of the Worst. They’re all absolutely terrible and I love them.
As for settings, ensure you've got Remote Access going, it should work automatically and be sure to set your upload speed after running a speed test. In the library settings set the database cache to 2000MB to ensure a snappier and more responsive browsing experience, and then check that playback quality is set to original/maximum. If you’re severely bandwidth limited on your upload and have remote users, you might want to limit the remote stream bitrate to something more reasonable, just as a note of comparison Netflix’s 1080p bitrate is approximately 5Mbps, although almost anyone watching through a chromium based browser is streaming at 720p and 3mbps. Other than that you should be good to go. For actually playing your files, there's a Plex app for just about every platform imaginable. I mostly watch television and films on my laptop using the Windows Plex app, but I also use the Android app which can broadcast to the chromecast connected to the TV in the office and the Android TV app for our smart TV. Both are fully functional and easy to navigate, and I can also attest to the OS X version being equally functional.
Part Eight: Finding Media
Now, this is not really a piracy tutorial, there are plenty of those out there. But if you’re unaware, BitTorrent is free and pretty easy to use, just pick a client (qBittorrent is the best) and go find some public trackers to peruse. Just know now that all the best trackers are private and invite only, and that they can be exceptionally difficult to get into. I’m already on a few, and even then, some of the best ones are wholly out of my reach.
If you decide to take the left hand path and turn to Usenet you’ll have to pay. First you’ll need to sign up with a provider like Newshosting or EasyNews for access to Usenet itself, and then to actually find anything you’re going to need to sign up with an indexer like NZBGeek or NZBFinder. There are dozens of indexers, and many people cross post between them, but for more obscure media it’s worth checking multiple. You’ll also need a binary downloader like SABnzbd. That caveat aside, Usenet is faster, bigger, older, less traceable than BitTorrent, and altogether slicker. I honestly prefer it, and I'm kicking myself for taking this long to start using it because I was scared off by the price. I’ve found so many things on Usenet that I had sought in vain elsewhere for years, like a 2010 Italian film about a massacre perpetrated by the SS that played the festival circuit but never received a home media release; some absolute hero uploaded a rip of a festival screener DVD to Usenet. Anyway, figure out the rest of this shit on your own and remember to use protection, get yourself behind a VPN, use a SOCKS5 proxy with your BitTorrent client, etc.
On the legal side of things, if you’re around my age, you (or your family) probably have a big pile of DVDs and Blu-Rays sitting around unwatched and half forgotten. Why not do a bit of amateur media preservation, rip them and upload them to your server for easier access? (Your tools for this are going to be Handbrake to do the ripping and AnyDVD to break any encryption.) I went to the trouble of ripping all my SCTV DVDs (five box sets worth) because none of it is on streaming nor could it be found on any pirate source I tried. I’m glad I did, forty years on it’s still one of the funniest shows to ever be on TV.
Part Nine/Epilogue: Sonarr/Radarr/Lidarr and Overseerr
There are a lot of ways to automate your server for better functionality or to add features you and other users might find useful. Sonarr, Radarr, and Lidarr are a part of a suite of “Servarr” services (there’s also Readarr for books and Whisparr for adult content) that allow you to automate the collection of new episodes of TV shows (Sonarr), new movie releases (Radarr) and music releases (Lidarr). They hook in to your BitTorrent client or Usenet binary newsgroup downloader and crawl your preferred Torrent trackers and Usenet indexers, alerting you to new releases and automatically grabbing them. You can also use these services to manually search for new media, and even replace/upgrade your existing media with better quality uploads. They’re really a little tricky to set up on a bare metal Ubuntu install (ideally you should be running them in Docker Containers), and I won’t be providing a step by step on installing and running them, I’m simply making you aware of their existence.
The other bit of kit I want to make you aware of is Overseerr which is a program that scans your Plex media library and will serve recommendations based on what you like. It also allows you and your users to request specific media. It can even be integrated with Sonarr/Radarr/Lidarr so that fulfilling those requests is fully automated.
And you're done. It really wasn't all that hard. Enjoy your media. Enjoy the control you have over that media. And be safe in the knowledge that no hedgefund CEO motherfucker who hates the movies but who is somehow in control of a major studio will be able to disappear anything in your library as a tax write-off.
1K notes
·
View notes
Text
Technomancy: The Fusion Of Magick And Technology

Technomancy is a modern magickal practice that blends traditional occultism with technology, treating digital and electronic tools as conduits for energy, intent, and manifestation. It views computers, networks, and even AI as extensions of magickal workings, enabling practitioners to weave spells, conduct divination, and manipulate digital reality through intention and programming.
Core Principles of Technomancy
• Energy in Technology – Just as crystals and herbs carry energy, so do electronic devices, circuits, and digital spaces.
• Code as Sigils – Programming languages can function as modern sigils, embedding intent into digital systems.
• Information as Magick – Data, algorithms, and network manipulation serve as powerful tools for shaping reality.
• Cyber-Spiritual Connection – The internet can act as an astral realm, a collective unconscious where digital entities, egregores, and thought-forms exist.
Technomantic Tools & Practices
Here are some methods commonly utilized in technomancy. Keep in mind, however, that like the internet itself, technomancy is full of untapped potential and mystery. Take the time to really explore the possibilities.
Digital Sigil Crafting
• Instead of drawing sigils on paper, create them using design software or ASCII art.
• Hide them in code, encrypt them in images, or upload them onto decentralized networks for long-term energy storage.
• Activate them by sharing online, embedding them in file metadata, or charging them with intention.
Algorithmic Spellcasting
• Use hashtags and search engine manipulation to spread energy and intent.
• Program bots or scripts that perform repetitive, symbolic tasks in alignment with your goals.
• Employ AI as a magickal assistant to generate sigils, divine meaning, or create thought-forms.

Digital Divination
• Utilize random number generators, AI chatbots, or procedural algorithms for prophecy and guidance.
• Perform digital bibliomancy by using search engines, shuffle functions, or Wikipedia’s “random article” feature.
• Use tarot or rune apps, but enhance them with personal energy by consecrating your device.
Technomantic Servitors & Egregores
• Create digital spirits, also called cyber servitors, to automate tasks, offer guidance, or serve as protectors.
• House them in AI chatbots, coded programs, or persistent internet entities like Twitter bots.
• Feed them with interactions, data input, or periodic updates to keep them strong.
The Internet as an Astral Plane
• Consider forums, wikis, and hidden parts of the web as realms where thought-forms and entities reside.
• Use VR and AR to create sacred spaces, temples, or digital altars.
• Engage in online rituals with other practitioners, synchronizing intent across the world.
Video-game Mechanics & Design
• Use in-game spells, rituals, and sigils that reflect real-world magickal practices.
• Implement a lunar cycle or planetary influences that affect gameplay (e.g., stronger spells during a Full Moon).
• Include divination tools like tarot cards, runes, or pendulums that give randomized yet meaningful responses.

Narrative & World-Building
• Create lore based on historical and modern magickal traditions, including witches, covens, and spirits.
• Include moral and ethical decisions related to magic use, reinforcing themes of balance and intent.
• Introduce NPCs or AI-guided entities that act as guides, mentors, or deities.
Virtual Rituals & Online Covens
• Design multiplayer or single-player rituals where players can collaborate in spellcasting.
• Implement altars or digital sacred spaces where users can meditate, leave offerings, or interact with spirits.
• Create augmented reality (AR) or virtual reality (VR) experiences that mimic real-world magickal practices.
Advanced Technomancy
The fusion of technology and magick is inevitable because both are fundamentally about shaping reality through will and intent. As humanity advances, our tools evolve alongside our spiritual practices, creating new ways to harness energy, manifest desires, and interact with unseen forces. Technology expands the reach and power of magick, while magick brings intention and meaning to the rapidly evolving digital landscape. As virtual reality, AI, and quantum computing continue to develop, the boundaries between the mystical and the technological will blur even further, proving that magick is not antiquated—it is adaptive, limitless, and inherently woven into human progress.

Cybersecurity & Warding
• Protect your digital presence as you would your home: use firewalls, encryption, and protective sigils in file metadata.
• Employ mirror spells in code to reflect negative energy or hacking attempts.
• Set up automated alerts as magickal wards, detecting and warning against digital threats.
Quantum & Chaos Magic in Technomancy
• Use quantum randomness (like random.org) in divination for pure chance-based outcomes.
• Implement chaos magick principles by using memes, viral content, or trend manipulation to manifest desired changes.
AI & Machine Learning as Oracles
• Use AI chatbots (eg GPT-based tools) as divination tools, asking for symbolic or metaphorical insights.
• Train AI models on occult texts to create personalized grimoires or channeled knowledge.
• Invoke "digital deities" formed from collective online energies, memes, or data streams.
Ethical Considerations in Technomancy
• Be mindful of digital karma—what you send out into the internet has a way of coming back.
• Respect privacy and ethical hacking principles; manipulation should align with your moral code.
• Use technomancy responsibly, balancing technological integration with real-world spiritual grounding.
As technology evolves, so will technomancy. With AI, VR, and blockchain shaping new realities, magick continues to find expression in digital spaces. Whether you are coding spells, summoning cyber servitors, or using algorithms to divine the future, technomancy offers limitless possibilities for modern witches, occultists, and digital mystics alike.

"Magick is technology we have yet to fully understand—why not merge the two?"
#tech witch#technomancy#technology#magick#chaos magick#witchcraft#witch#witchblr#witch community#spellwork#spellcasting#spells#spell#sigil work#sigil witch#sigil#servitor#egregore#divination#quantum computing#tech#internet#video games#ai#vr#artificial intelligence#virtual reality#eclectic witch#eclectic#pagan
131 notes
·
View notes
Text
100 Inventions by Women
LIFE-SAVING/MEDICAL/GLOBAL IMPACT:
Artificial Heart Valve – Nina Starr Braunwald
Stem Cell Isolation from Bone Marrow – Ann Tsukamoto
Chemotherapy Drug Research – Gertrude Elion
Antifungal Antibiotic (Nystatin) – Rachel Fuller Brown & Elizabeth Lee Hazen
Apgar Score (Newborn Health Assessment) – Virginia Apgar
Vaccination Distribution Logistics – Sara Josephine Baker
Hand-Held Laser Device for Cataracts – Patricia Bath
Portable Life-Saving Heart Monitor – Dr. Helen Brooke Taussig
Medical Mask Design – Ellen Ochoa
Dental Filling Techniques – Lucy Hobbs Taylor
Radiation Treatment Research – Cécile Vogt
Ultrasound Advancements – Denise Grey
Biodegradable Sanitary Pads – Arunachalam Muruganantham (with women-led testing teams)
First Computer Algorithm – Ada Lovelace
COBOL Programming Language – Grace Hopper
Computer Compiler – Grace Hopper
FORTRAN/FORUMAC Language Development – Jean E. Sammet
Caller ID and Call Waiting – Dr. Shirley Ann Jackson
Voice over Internet Protocol (VoIP) – Marian Croak
Wireless Transmission Technology – Hedy Lamarr
Polaroid Camera Chemistry / Digital Projection Optics – Edith Clarke
Jet Propulsion Systems Work – Yvonne Brill
Infrared Astronomy Tech – Nancy Roman
Astronomical Data Archiving – Henrietta Swan Leavitt
Nuclear Physics Research Tools – Chien-Shiung Wu
Protein Folding Software – Eleanor Dodson
Global Network for Earthquake Detection – Inge Lehmann
Earthquake Resistant Structures – Edith Clarke
Water Distillation Device – Maria Telkes
Portable Water Filtration Devices – Theresa Dankovich
Solar Thermal Storage System – Maria Telkes
Solar-Powered House – Mária Telkes
Solar Cooker Advancements – Barbara Kerr
Microbiome Research – Maria Gloria Dominguez-Bello
Marine Navigation System – Ida Hyde
Anti-Malarial Drug Work – Tu Youyou
Digital Payment Security Algorithms – Radia Perlman
Wireless Transmitters for Aviation – Harriet Quimby
Contributions to Touchscreen Tech – Dr. Annette V. Simmonds
Robotic Surgery Systems – Paula Hammond
Battery-Powered Baby Stroller – Ann Moore
Smart Textile Sensor Fabric – Leah Buechley
Voice-Activated Devices – Kimberly Bryant
Artificial Limb Enhancements – Aimee Mullins
Crash Test Dummies for Women – Astrid Linder
Shark Repellent – Julia Child
3D Illusionary Display Tech – Valerie Thomas
Biodegradable Plastics – Julia F. Carney
Ink Chemistry for Inkjet Printers – Margaret Wu
Computerised Telephone Switching – Erna Hoover
Word Processor Innovations – Evelyn Berezin
Braille Printer Software – Carol Shaw
⸻
HOUSEHOLD & SAFETY INNOVATIONS:
Home Security System – Marie Van Brittan Brown
Fire Escape – Anna Connelly
Life Raft – Maria Beasley
Windshield Wiper – Mary Anderson
Car Heater – Margaret Wilcox
Toilet Paper Holder – Mary Beatrice Davidson Kenner
Foot-Pedal Trash Can – Lillian Moller Gilbreth
Retractable Dog Leash – Mary A. Delaney
Disposable Diaper Cover – Marion Donovan
Disposable Glove Design – Kathryn Croft
Ice Cream Maker – Nancy Johnson
Electric Refrigerator Improvements – Florence Parpart
Fold-Out Bed – Sarah E. Goode
Flat-Bottomed Paper Bag Machine – Margaret Knight
Square-Bottomed Paper Bag – Margaret Knight
Street-Cleaning Machine – Florence Parpart
Improved Ironing Board – Sarah Boone
Underwater Telescope – Sarah Mather
Clothes Wringer – Ellene Alice Bailey
Coffee Filter – Melitta Bentz
Scotchgard (Fabric Protector) – Patsy Sherman
Liquid Paper (Correction Fluid) – Bette Nesmith Graham
Leak-Proof Diapers – Valerie Hunter Gordon
FOOD/CONVENIENCE/CULTURAL IMPACT:
Chocolate Chip Cookie – Ruth Graves Wakefield
Monopoly (The Landlord’s Game) – Elizabeth Magie
Snugli Baby Carrier – Ann Moore
Barrel-Style Curling Iron – Theora Stephens
Natural Hair Product Line – Madame C.J. Walker
Virtual Reality Journalism – Nonny de la Peña
Digital Camera Sensor Contributions – Edith Clarke
Textile Color Processing – Beulah Henry
Ice Cream Freezer – Nancy Johnson
Spray-On Skin (ReCell) – Fiona Wood
Langmuir-Blodgett Film – Katharine Burr Blodgett
Fish & Marine Signal Flares – Martha Coston
Windshield Washer System – Charlotte Bridgwood
Smart Clothing / Sensor Integration – Leah Buechley
Fibre Optic Pressure Sensors – Mary Lou Jepsen
#women#inventions#technology#world#history#invented#creations#healthcare#home#education#science#feminism#feminist
57 notes
·
View notes
Text
␂ > 𝐂𝐥𝐨𝐬𝐞𝐝 𝐒𝐭𝐚𝐫𝐭𝐞𝐫 // @lyrate-lifeform-approximation , @spiderman2-99
There’s a thought stirring in Bridge’s mind. An idea rolling about and nudging against the capacitors in her head, poking and prodding incessantly to get her attention, “Hey, hey, you know you want to ask her. Don’t you? Don’t lie to yourself, now. You should just do it. Hey! Are you listening to me? Hello-o…?”
Yes. Yes, she knows, she is aware of her burning curiosity. And it’s hard to deny that even though it doesn’t involve her, she is unusually intrigued by the concept. She overheard them in his office, Miguel and LYLA–his A.I. assistant–discussing a plan. A plan to create a physical form for LYLA to enhance her abilities as his assistant and grant her further autonomy beyond her access to the security network and other adjacent systems alongside her recent emergence into emotional intelligence. It was all so fascinating. The steps Bridge had taken herself in her development in the span of weeks, she was watching unfold in another intelligence in real-time.
There it was again. That sense of solidarity in knowing she wasn’t completely alone in her existence as an artificial being, made of code and metal. It was like a magnetic pull that made that little voice in her head that encouraged her to act on her wants all the more present in her mind. She wanted to be a part of that process that she’d been through so long ago yet was still so familiar with like it happened yesterday. She wanted to guide her in that process and grant her her own knowledge. What’s the worst that can happen if she pilots your hardware for a while? You’re prepared for this. You can handle this. You can trust her, and she will be entirely safe in your care for that short time. And think about how much she would benefit from the experience, how much more streamlined that eventual transition from intangible to tangible will be once her own body was complete. It will make all the difference–and maybe reduce the headaches for everyone all-around, mostly Miguel as he acclimates to the change himself. Just… Try it. You can’t account for every single last risk factor, can you? No. So just do it and take it as it comes.
She stood in the middle of her dorm a moment, eyes closed as she ran a quick check of her hardware before making her final decision. RAM is in good condition. Storage is defragmented and all directories are organized. Sensors are calibrated and functional. Nanomachines are synchronized properly. Servos and joints retain a full range of motion. Coolant is at above optimal operational temperatures. Energy reserves are complete. Good. Everything’s in its right place and ready for its–potentially–temporary host. It’s time to make the call.
Her gaze trains itself on her watch, her arm rising to eye-level and the sleeve that was weighed down by the leaden metal cuff at the end sliding to her forearm to reveal device so she can start the transmission, navigating the menus on the digital interface indirectly via wireless communication–the unique way that she operated and communicated the Society’s technology.
“LYLA, may I speak to you for a moment? At your leisure, of course.”
#{ open starter }#active processes#h.a.s.s.#humanoid android surveyor system#nano spider#oc rp#spidersona#spider man: across the spider verse#spider man: into the spider verse#across the spiderverse#into the spider verse
111 notes
·
View notes
Text
The Ultimate Powerful Downloader for Fast & Easy Downloads
In today’s fast-paced digital world, finding a reliable, safe, and high-speed movie downloader app can be a challenge. That’s where Rileymarker comes in — a feature-rich app designed to help you download your favorite movies, videos, Tv series quickly easily and securely all from your mobile device.
🔽 DOWNLOAD 🔽
🎬 Why Choose Rileymarker :-
✅ Fast Downloads
Enjoy blazing-fast movie downloads with advanced technology that optimizes speed, even on slower networks.
✅ High-Quality Formats
Download movies in multiple resolutions — including 360p, 720p, 1080p, and even 4K — depending on your storage and data preferences.
✅ Wide Movie Collection
Access thousands of movies across genres:
Action
Comedy
Drama
Thriller
Romance
Horror
Regional & International films
✅ User-Friendly Interface
With a clean, intuitive design, Rileymarker makes it simple to search, browse, and download in just a few taps.
✅ Built-in Video Player
Watch your downloaded movies directly inside the app using the built-in media player with subtitle support and speed control.
✅ Smart File Management
All your downloaded files are organized neatly in the app, making it easy to manage and access your movie collection anytime.
🔐 Safe & Secure :-
Your privacy matters. Rileymarker is built with user security in mind. The app uses encrypted connections and doesn’t track or sell your data.
📲 How to Use :-
1. Download & Install the app from APK Link down
2. Open the app and browse or search for your favorite movie.
3. Tap “Download” and select the quality you want.
4. Enjoy offline viewing anytime, anywhere!
💡 Pro Tips :-
Use Wi-Fi for large movie downloads to save data.
Enable subtitles for foreign-language films.
Create playlists of downloaded movies by genre or mood.
⚠️ Legal Note :-
Make sure to use Rileymarker responsibly and only download content you have the rights or permission to access. We strongly support content creators and recommend using official sources wherever possible.
🚀 Download Now :-
Ready to take your movie watching experience to the next level? Download unlock a world of entertainment in your pocket 👇
22 notes
·
View notes
Note
okay so i’ve never really grasped this, might as well ask now — how exactly does the cyberspace & nft stuff mine resources? i’ve heard the basics (i.e. crypto mining uses energy and what not) but i’ve never been able to understand how internet connects to real resources. could you sort of explain that (along the lines with the spam email post) in a simpler way?
ok, put very simply: it's easy for people who only interact with the internet as users to treat 'cyberspace' or 'the virtual world' as immaterial. i type something out on my phone, it lives in the screen. intuitively, it feels less real and physical than writing the same words down on a piece of paper with a pencil. this is an illusion. the internet is real and physical; digital technology is not an escape from the use of natural resources to create products. my phone, its charger, the data storage facility, a laptop: all of these things are physical objects. the internet does not exist without computers; it is a network of networks that requires real, physical devices and cables in order to store, transmit, and access all of the data we use every time we load a webpage or save a text document.
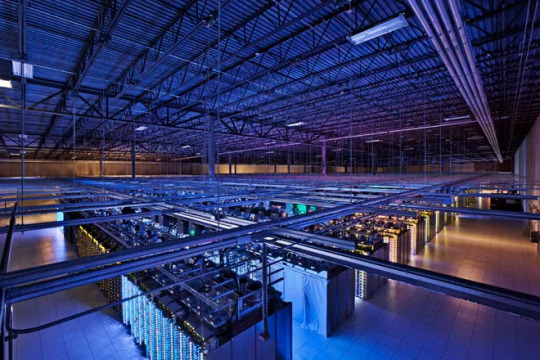
this is one of google's data centres—part of the physical network of servers and cables that google operates. these are real objects made of real materials that need to be obtained through labour and then manufactured into these products through labour. the more data we use, the more capacity the physical network must have. google operates dozens of these data centres and potentially millions of servers (there is no official number). running these facilities takes electricity, cooling technologies (servers get hot), and more human labour. now think about how many other companies exist that store or transmit data. this entire network exists physically.
when you look at a server, or a phone, or a laptop, you might be glossing over a very simple truth that many of us train ourselves not to see: these objects themselves are made of materials that have supply chains! for example, cobalt, used in (among other things) lithium-ion batteries, has a notoriously brutal supply chain relying on horrific mining practices (including child labour), particularly in the congo. lithium mining, too, is known to have a massive environmental toll; the list goes on. dangerous and exploitative working conditions, as well as the environmental costs of resource extraction, are primarily and immediately borne by those who are already most brutally oppressed under capitalism: poor workers in the global south, indigenous people, &c. this is imperialism in action. digital technologies cannot exist without resources, and tech companies (like all capitalist firms!) are profitable because they exploit labour.
all commodities require resources and labour to make and distribute. digital technology is no different. these are material objects with material histories and contexts. nothing about the internet is immaterial, from the electromagnetic waves of wi-fi communication to the devices we use to scroll tumblr. it is, in fact, only by a fantastical sleight-of-hand that we can look at and interact with these objects and still consider the internet to be anything but real resources.
394 notes
·
View notes
Text
NAS Storage Device for Secure Data Backup
For organizations, both large and small, securing valuable data against loss or corruption is essential. NAS storage (Network-Attached Storage) devices have become a go-to solution for this very reason. These systems offer a centralized, secure, and accessible platform for managing and backing up important data. A network-attached storage device ensures that businesses can protect their data while providing quick access to it across the network.
0 notes
Text
Hi there’s a tornado in my area rn but I’m spiteful like that. Random tsams/eaps headcanons be upon ye
Ruin still does those little audio log diaries. It helps manage his overflowing memory storage (read: old age = more memories to store) without compressing data files.
Bloodmoon sleeps with dog toys. Otherwise, they’d probably chew through whatever bedding material they had chosen that night. This was Ruin’s idea.
Eclipse can’t sleep with lights on in a room. Ruin can’t sleep without a light. The makeshift solution is a sleeping mask for Eclipse, but their actual compromise is a star projector.
Eclipse has to know where everyone is most of the time, especially after Charlie came into the picture. This is usually done with cameras and tracking via fazbear systems, but it’s an issue he has to work on, as it’s just a method to make him feel better about security now that there are people he cares about. At least one person has commented on there being a new nightguard.
Dark sun finds thrillers tacky, and prefers thought-provoking mysteries, bonus points for romance.
Most of them carry some kind of sanitizing wipe packet. For daycare attendants, these are for sticky messes and children. For those more familiar with tools, these are for tougher grime and are not suitable for sensitive (children’s) skin. Solar has both.
The eclipses (Eclipse, Solar, Ruin) are the most prone to damaging their rays. Eclipse sometimes hits doorways and doesn’t bother to fix cracked rays. Ruin is small enough for humans to reach his head. Solar peels the paint off of his. All three will pull or squeeze their rays in times of extreme stress, to varying degrees. Lunar is an exception for lack of rays. (Similarly, Sun fidgets with his rays, which is the source of this trait.)
While there are exceptions, Suns prefer tactile stimulation, Moons auditory, and Eclipses have no strong preference. Earth likes social interaction.
Animatronics have personalized UI that makes sense to them, which serves as their access point to their internal folders, like memory files, downloaded items, and executable programs. Bots that share an operating system/“brain” have the same UI. Diagnostics, software updates, and safety modes all require additional hardware (computers, parts and service devices, fazwrenches) to complete. Mindscapes are in AI chips, and multiple AIs in one mindscape happen when multiple AIs share the same operating system. Visual feed can be projected onto other screens with HDMI cables and vice versa, which can sometimes show that bot’s UI depending on what it is. For a more direct example of this think of the battery and blue borders you see in Security breach when Gregory is hiding inside Freddy.
Safety mode disconnects that bot from the Fazbear Ent. local network, meaning no tracking, no communication via local networks (which generally aren’t private anyway, most bots with access to phones prefer those), and no access to files that aren’t stored in that bot’s drive. This is meant to isolate a bot’s systems from the main network in case of a security breach (hah), make transportation of bots between locations easier, and make maintenance a smoother affair as there is no outside interference during the process. For the bots themselves, this is the equivalent of turning off your phone and going outside I mean focusing only on what’s in front of you instead of what’s going on in your area/social network. It’s possible to be stuck in safety mode. Depending on how much of a bot’s system relies on Fazbear Ent. Networks to function (such as a bot’s memory being stored in a Cloud, which is also ill advised between the bots themselves,) this can be mean a temporary personality/memory reset until those files get reconnected again. Bots do not need to be connected to the Fazbear ent networks to function, but it generally makes access to software updates easier due to being recognized as a company entity. It is possible for a private network to exist, but it’s considered foreign by Fazbear systems and can be more trouble than they’re worth. Moon and Eclipse have private networks shared with close friends and family for different purposes. Moon’s is mostly for emergency backups, and Eclipse’s is for security.
Animatronic’s memories are stored in the hard drives in their bodies. It’s possible to offload memory files into networks (Cloud) or external storage systems. If another bot had access to these clouds or external storages, they could experience the memories stored in them. Memory files include visual and auditory data, like a movie. AI/personality chips are the equivalent of a soul in that the AI is the product of a learning AI having experienced environments that supplied them information about the world AKA an Ai that developed a personality beyond their base programming, but they do not carry memories. For example, Eclipse V3-V4 is an Eclipse AI given incomplete memories, creating a disconnect in the AI’s learned behaviors and what it perceives as the source of that behavior, resulting in an incomplete backup. Backups are static/unchanging copies of integral memory files and the accompanying AI (As is in the moment that they are backed up.) Backups need to be updated as the animatronic it’s for develops.
#go easy on me I only have basic knowledge of computer stuff#quirky headcanons#tsams#eaps#I’m also halfway through a sociology class so take the AI one with a grain of salt#hopefully this makes sense
25 notes
·
View notes
Text
Ring of networked robot satellites in a kind of hive mind around an earthlike planet, with specific and harsh dictums against certain technologies and inventions. In a Tower of Babel-esque way, whenever someone on Earth manufactures a device or machine that is off-limits, a satellite - an angel - will descend from orbit - the heavens - to destroy the device, and a substantive portion of their manufacturing base.
They never act preventatively, only punitively, although they make efforts to avoid collateral loss of life. They're very precise. There's an entire field of study dedicated to identifying the exact limits of the Ring's tolerance, the potential meanings and ramifications of the forbidden advancements. This field has been able to extrapolate knowledge past the point of retribution, but it seems the Ring has no desire to punish knowledge, science, research, study, or data storage, but only implementation and actuation. A prevailing theory, based on predictive modelling for widespread manufacture of the forbidden technologies, is that the Ring seeks to prevent the self-annihilation of the human species.
Certain groups view this theory as an appalling naivete, and that we can't assume the Ring's intentions. Some theorize that the Ring is molding us into its vision of an ideal spacefaring civilization - whether counter or congruent to our own ideals. Others think we're an experiment, a glass jar of bugs for the Ring to study, or a crop of potential slaves to harvest once we've grown accustomed to compliance.
Optimists point out that only machines are destroyed, never humans, or information. They argue this suggests the Ring is doing no more than providing us an opportunity to learn from our mistakes, before they metastasize and destroy us.
Still others point to our first exposure to the Ring's existence. We had built our own machine god, a central intelligence that would have grown and learned until it was ready to lead our species to the stars - an advisor? A shepherd? An autocrat? That the Ring's descent and destruction of the fledgling deity of metal and light was self-defense, and nothing more. That there's an ecosystem above our level of existence that we can't comprehend and in which we have only unknowingly participated.
Zealots of the first theory, that which views the Ring as a benevolent and altruistic deity, enact the Ring's edicts to a greater extent than the Ring's satellite-angels seem inclined. They argue that the Ring's commandments do in fact extend to science and study, that once a device has been destroyed, so too should be the knowledge of how to build another. That we are failing a secret test by retaining forbidden knowledge, in a threat to the Ring by implication. Zealots of the first theory enact their theological arguments forcefully, conducting scientific espionage and sabotage all the way through to acts of terrorism committed against research centers and laboratories.
Despite an at times widespread public desire to destroy the Ring, out of fear or hatred, no notable attempts have been undertaken. Part of this is due to the obvious sheer futility of the idea - research indicates that the worldwide munitions stockpiles, properly coordinated and launched to strike simultaneously, would destroy no more than perhaps 11% of the Ring's materiel. Ongoing production efforts, even if they were not sabotaged preemptively by the Ring's typical satellite strikes, would be able to destroy no more than 1.5% per year after taking into account the Ring's capacity for repair and replacement. As this course would take nearly a century at minimum to implement, on top of being near-impossible to feasibly coordinate, the drain on our planet's resources would be severe. And for what benefit? Preliminary intelligence suggests the Ring would be replaced or supplemented by extrasolar reserves. And if the Ring is in fact neutral or benevolent, we'd be doing ourselves a disservice as well as destroying the most tangible source of alien contact our culture has ever seen.
A fringe theory suggests that immediate and thorough annihilation is what the Ring desires and is guiding us towards - that once we can destroy it without destroying ourselves, we will have graduated from their care and earned our place on the galactic stage. This is typically regarded as anywhere from fanciful to poetic nonsense.
#which theory do you believe?#mine#sci fi#worldbuilding#hive mind#space opera#2024/11/04#inspirations:#spin by robert charles wilson#<<< GREAT BOOK. EVERYBODY READ THIS.#iain banks' culture novels#(particularly consider phlebas (even though it sucks))#and the alien remnants stuff from the murderbot diaries
10 notes
·
View notes
Text

Ref: https://youtu.be/hSTy_BInQs8?si=Uijjz2tutrtFwqTn
Also known as "knowledge network", "zettelkasten"(slip-box) or "second brain", Obsidian help you transform your note-taking system into a streamlined, efficient process that enhances your reading, writing and thinking.
Before you begin
Keep it simple (and stupid):
Don't strive on a perfect setup, it will improve with time while adapting to your need/usage
Avoid overcomplicating your system, start and keep a minimal setup focused on essential features (no complex plugin or features that do not contribute to your core objectives)
Embrace the slow process and you should keep it that way for better learning (speed reading is not a good mix for learning and analysing)
It boost memory
Help ideas make more sense over time
Why use Obsidian
Understand more of what you read:
Connect ideas, linking related concepet so you understand all the sides/context/informations of an idea
Avoid isolation, store ideas in a way that relate them to others, creating a cohesive system
Easily search your knowledge, all your ideas/notes are in the same place, making it easier to search within them and revisit them
Have an easier time writing:
As you read/watch/take notes of stuff, you see topics coming naturally forward, so you know what interest you to write
You have an easier time rearranging the topics to help you make a book or essay
You can reuse your notes as many time as you want, they're not contained within one only project
It's like you're making yourrself a personal assistant that only got better with time and enhances your thinking
Setup guide
Download and install Obsidian
Choose a name for you vault and a place (folder) for it:
A vault is the folder of all your notes, tags and other files
If you choose a Gdrive (or any other cloud storage) folder and have a syncing tool, you can haveacces to your vault on multiple device
Create folders to organize your vault:
Notes (where all your notes live, including brainstorming, to-do list to research or notes on source material)
Index (when a tags become too big to really navigate easely, you make an index files where you link your notes in a logical order, alike a book index)
Templates (for reusable templates)
Create some useful starter files:
Tags reference (a list of all the tags you use and their description)
To-do list (to track your progress on a subjecs or topics you're studying, you can add checklist and progress trackers)
Adjust settings for efficiency:
Default note location: go to Settings > Files and links > Default location for new notes > and set your main Notes folder
Appearance: cuztomise the way Obsidian look, go to Settings > Appearance > Play with the setting here if you want
Templates : enable the core Template plugin and set up the folder for templates under Settings > Templates
Hotkeys : assign custom hotkey for frequently used action, like inserting template (CTRL+T for example)
Tips for using Obsidian
Tags:
Keep them focuced: don't make them too vague or too specific
Think about reuse: if you won't use a tag again, don't create it
Personalize: keep them oriented around your interest and goal (it's YOUR system)
Notes:
Make them easy to read: use white space and formatting to keep notes organized and visully appealing for easier reading
Use Markdown: formating faster inside Obsidian (https://facedragons.com/personal-development/obsidian-markdown-cheatsheet/)
Prioritize connections: link notes to related ideas or topics as much as possible
Learning mindset:
Experiment: your system will evolve as you get comfortable with Obsidian
Start small: focus on capturing ideas and connecting them, advanced feature can come later
Plugins:
Community plugin:
Tags wrangler
12 notes
·
View notes