#Not a tutorial this is just how I usually draw
Explore tagged Tumblr posts
Visit Tumblr Blog
Explore Tumblr blogs with no restrictions, modern design and the best experience.
Last Seen Tumblr Blogs


Fun Fact
Tumblr Inc. is funded by 13 investors.
Text
Ok here's a little thing i thought would fun for any artists to show off their progress at learning art (plus I'm nosey🤭).
Show off the oldest drawings you did (or the oldest that you can still find), the first things you were confident enough to upload online, and your most recent drawings and talk about them and show off how much you've progressed :)

Probably gonna end up missing some people, but I'm tagging a bunch of cool artists I follow/am mutuals with and am nosey to see how they started out, but no pressure :)
@fantasticalleigh, @thlayli-ra, @heelhausen, @stupidmarkzone, @2ndcitynightmare, @punk-o-ween, @normallypassingby, @tvheit, @seasonal-depression-of-punk
And if you wanna have a look at my old stuff, I've got it below =)
Oldest Drawings I Can Find
Of course, the first is an OC. Never did anything with her tho. Notice the lack of forehead and elbows, the arms that barely reach the hips, how indishtinguishable each part of the body is from one another. They're a perfectly smooth pole. and of course those wings. This is the first thing in my first proper sketchbook when I decided I was gonna start taking art more seriously. This would have been when i started secondary in 2014 at 11 years old. And I can't find anything from before that, since I never kept anything in a proper book/folder.
Second image is another of the first drawings in the book. It was my first closeup of a face, and also my first time drawing anime. I know I'm not the only artist who was desperate to learn to draw an anime-style as a kid. I remember doing this while on holiday, trying to follow an online tutorial, taking about 4 hours to get the outcome I did, and getting so frustrated that I couldn't get it to look right, that I was almost brought to tears. I'm pretty sure this was one of those "I'm never drawing again! >:(" moments, lol. Looking back, it was a pretty good first attempt. But I guess I was always a bit of a perfectionist, lol. Funnily enough, while I carried the anime eyes forward in my art style for years, to this day, I still can't draw a proper full anime style character.


First Drawings I Uploaded Online
I put these on insta to show my mates from school. The first picture was an attempt at a close up face with the new brush markers i'd got for christmas. This was 2017 just before i turned 14. Pretty sure I copied the design from an art tutorial book, that was supposed to be hyper-realistic (another christmas present). But I just couldn't bring that to life so just did what I could. Also, first time I used a signature. My signature's very different nowadays cos it's based on my tumblr username and not me actual name. But yeah. I was tryna get more professional I guess.
Second pic is the first full body piece I uploaded a few days later. Again, used the drawing books trying to learn how to draw flowy clothes. Think it was a book about drawing anime clothes that I used for this (another christmas present). By this point, each body part could move seperately and had joints. Also note the anime eyes, cos my simpler-but-still-anime-inspired eyes were something I stuck with a long ass time. This was the style I drew most often, and could usually do without having references (but obviously for this drawing specifically, I had the reference for the clothes). Had a lot of trouble with perspective, so all my characters faced forward, and later they would always face a 3/4 angle. And they could never lean or reach forwards cos I just couldn't get that to look right.


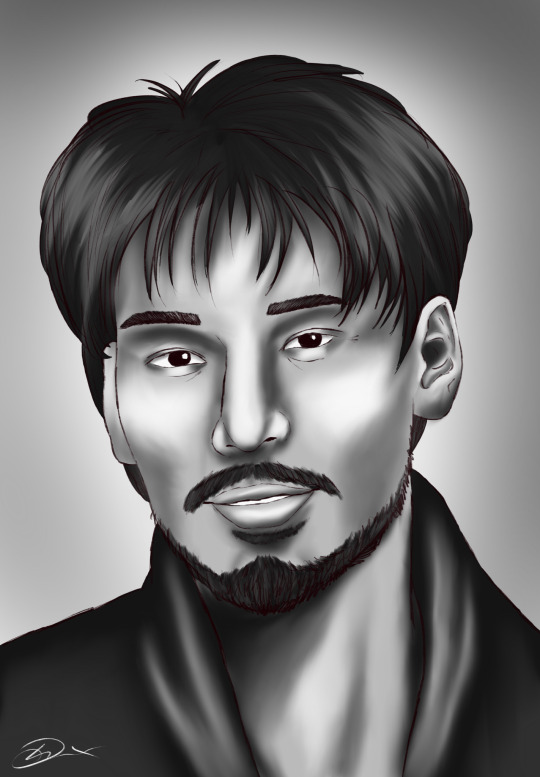
Most Recent Pieces
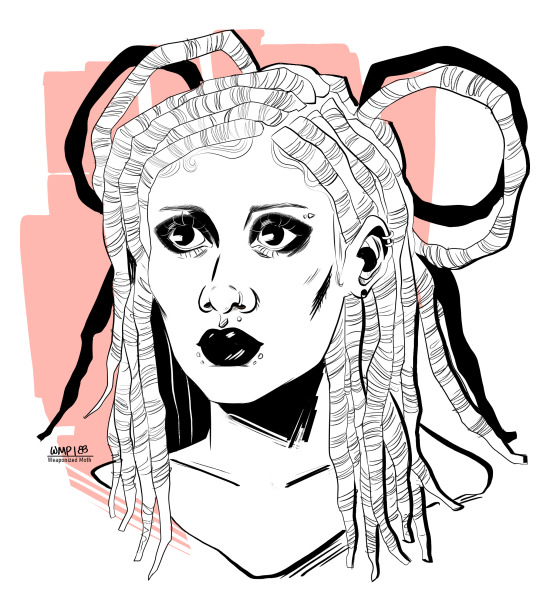
The most most recent is on the left, being my most recent closeup of a face. Still has a cartoonish edge with the lineart but much more realistic. And I'm fucking with this semi-realistic look atm. Tbh I dunno if i'd have the patience for the tiny details in hyperrealism. Also, fun story, in 2021 when I was doing my a-levels, I did an art piece that we were free to do in any style we wanted, and my teacher saw mine and was like “I wish you’d done it as realism instead of a cartoon style :(“ but it was actually my best attempt at realism and she hadn’t even realised. So I dunno, maybe I’m not cut out for realism 😂😂 I like my style rn tho so who cares
Then I got my most recent drawing of a (almost) full body. I got joints and decent hands and proportions and more body details.
Also this last year is the first time I've really got into digital. I always used to just do pen and paper. I even got a cheap drawing tablet, but couldn't get used to drawing on one surface and the image being up on a seperate screen. So I could never get the lines right. I did draw on my old ipad for a while which was easier, but the stylus was one of those with the thick rubber ball on the end, rather than a fine nib. Again, I had trouble cos I couldn't tell where it would register the contact with the screen and draw the line, which made it hard to do details. I got a new ipad a little while back that supports apple pencil, so I got one for it. And it's so much easier now that I've got a fine nib and can see where I'm drawing. I'm in love with drawing digital atm.

But yeah. That's how i've drawn over the years. Mental to see how much my style has changed and improved :) makes me feel better when I get frustrated with a drawnig and think I'm shit. Cos I know I'm getting better with each new drawing, even if it's only baby steps.
First: Now:


#figured this would be a good bit of fun#plus i'm really nosey to see how other people started out drawing#cos just out of the people I follow/am mutuals with. there's a lot of variety in art styles#it's always cool seeing where people began :)#my art
44 notes
·
View notes
Note
hey, i just checked out your nixie island and like... how? you've probably been asked this before, but how on earth did you get so good at it? did you follow tutorials for terraforming? follow inspiration pictures? i always get really stuck terraforming and end up spending hours on one small chunk. how fast do you usually work on things? like.. just how!
hi, thank you for visiting nixie🍃 its def a hard question to answer, bc the main thing is just practice i think? ive done so many islands in this game its only natural i’d get better and better at making my ideas come to live, i promise you i did not start out like that at all! however i do have a few things ive actively done, since i also like challenges in themes and terraforming projects. So i can at least share that!
• making a plan ahead of time, a drawing or just in your mind(or an inspo picture from anothers island maybe) - and having a focus point! like if you wanna make a viewpoint you set up the whole build around that one tree in the distance that you wanna be able to see in the end and make sure you build everything else around it with that goal in mind(in general doing a small test build of layout before commiting has helped me a lot)
• checking out da’s with the kind of terraforming you want and looking at the creators maps! it can be hard to see how a build is made by just walking on an island but you can see a lot of the actual layout from the dream address map! for example on nixie i did a sunken landbridge..
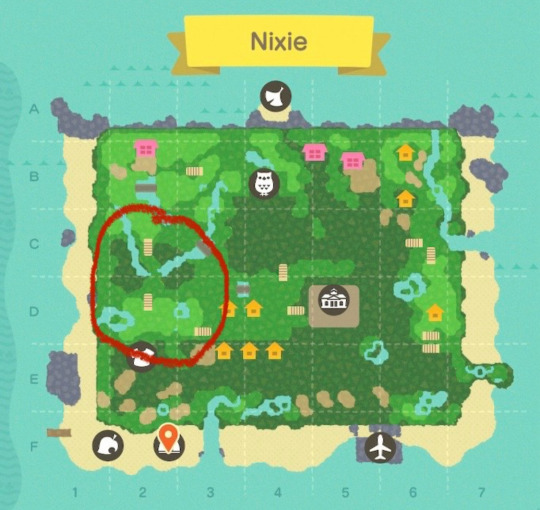
so if you wanted to do a similar thing you could take inspiration directly from the way i made the double inclines or maybe the amount of space needed or whatever gives you trouble? (for my first forest island i had to do this for a sunken pathway bc i just couldnt picture exactly how much space i needed to clear in order to fit in everything)
but also just give it a go without holding back! you can always take it down again after all? all my final posts never reveal how many times i had to redo an area or that one time i ran out of space and had to move the entire build two spaces forward and almost ragequit animal crossing😅 it really is something you can practice and everyone works differently! and for massive builds and stuff like that, there were likely a lot more struggle than it seems behind it✨
#i like talking about these more nerdy parts of the game#but really there is no right or wrong way! its just trial and error! like any creative thing really#thank you for the ask#reply
35 notes
·
View notes
Note
hii sky skywerse !!! i really enjoy your art, and i was wondering if you had any tips /advice on how you choose colours for your drawings, or just use colour in general :) thanks !!
I usually paint in greyscale first, just thinking about the light source and values. Then I lay down base flat colours using layer blending modes like multiply, overlay, or colour (mostly those three), and after that I just go wild with gradient maps and colour adjustments until it looks right?? I also lighten/darken areas as I render to push the contrast more! I think this guy's tutorial is the closest to my current process:
youtube
And here’s a little timelapse of me drawing Rose from like a year ago! My process has changed a bit since then, but the overall approach is still pretty much the same??? So yeahhh,,,
Starting in greyscale honestly saves a ton of time, so I definitely recommend learning to work that way,,, Work smarter, not harder, am I rightttt
43 notes
·
View notes
Note
I wanted to ask, how long have you been animating for? You're a big inspiration of mine and as someone who's trying to get better at animations I love to watch yours!
Actually, not that long ago. I started last year with the Hamilton video on my yt channel and only recently started watching tutorials on how to animate frame by frame ^^! They’ve been really useful, if I had to recommend any it would be the ones talking about the 12 principals of animation.
Technically I made a few animations in stop motion with my dolls when I was like 7 and then some gacha life ones when I was 10 but that’s about it.
I don’t have any ground breaking advice, I usually just keep modifying things randomly until they look how I want them to, either drawings or animatics (˚▽˚).
23 notes
·
View notes
Text
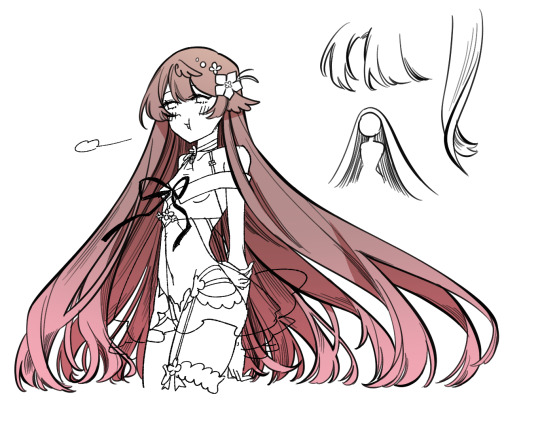
Tch so no vid for reblogs, got it. This is the second vid to This post about how I draw long hair
With this softer brush I mainly change my hand force while drawing to make the differences in lining, therefore added more to the "soft and flowy" of the hair.
And the final results!

#dollya ask#dollya art#Not a tutorial this is just how I usually draw#And remember to thanks Dollya#She being bald for education purpose
154 notes
·
View notes
Text

Pre-X1 Zero (and X) doodle, and yes I was too lazy to properly draw his hand
"Zero-senpai! I got us ice-cream for a mission well-done!"
"Geez, this rookie is so strange"
#this started out as me practicing drawing heads and naturally it became Zero#megaman x#mega man x#rockman x#my art#fanart#doodle#i don't usually spell jeez as 'geez' but my brain hasn't been great the last few days#at least I'm uploading this the same time as on bsky#i promise to have more proper illustrations soon#migraines are a bitch#anyway if anyone knows how to search for japanese art tutorials tell me because tiktok just shows english videos when i search in japanese#because heads are hard to draw well
13 notes
·
View notes
Text
My OC, Uni-T.
#her name is unity love but that's not her actual name#she doesn't know how human names work#neither of them do#they just named themselves things#her stage name is universe thunderstorms#so to her it makes sense#oc art#original character#my art#I spent like three hours making this cause I wanted to paint it in a really cute painterly way#failed miserably as usual no matter how many tutorials I watch my tools just suck and I have a serious children's hospital level+#color theory problem that doesn't go away#so I got neck pain for nothing#and this was supposed to be a FUN drawing for me to TEST stuff out#never test things#I wish I knew how to paint tbh#sighhhhhhhhhhhhhhhhhhhhhhhhhhhhh#wmp.txt
7 notes
·
View notes
Text
Idk if this is just me, but most (art) tutorials make me want to gnaw on drywall. However, watching artists create in their natural environment is like drinking from a cool natural spring.
#light's spot#i think it's usually that art tutorials tend to#a) sound very haughty and pushy and say if it's any other way then it *wrong*#b) tend to be very centered towards a static drawing style#like...#idk watching yt shorts or whatever has me so mad every time I see people talk about character weight#*yes* I know it's for a static style *but* it shouldn't discount styles that let charactrrs lean or be caricatures of real life#meanwhile I watched like 2 episodes of Drawfee and I just kinda... picked up on how they posed their figures abd did thumbnails etc#they got it all on screen and u can see tgeir whole thought process#idk this is just preference but istg#and this is coming from a guy who's not the best at art#and self-taught themselves based on Skeletons and Furries to take this with a grain of salt ig 👀#spot q
9 notes
·
View notes
Text
art trade wtih DizzyD00dles on DA:

I used a tutorial for the eyes, link here: https://www.deviantart.com/killingnightmare01/art/GIMP-wolf-cat-eye-tutorial-READ-THE-DESCRIPTION-547774518
#i don't usually do art trades but it was the perfect oppurtunity to draw eyes and test out some lighting techniques#definetly had a lot of fun just toying around with the lighting and colors here#it might be a bit messy but i think thats the beauty of art sometimes#ive learned that in order to make good art#i have to stop making it look realistic#which is why i forced myself to not use black or any dark or grey colors in this artwork#i tried to mainly use bright reds and hot pinks#i think i couldve done the fur pattern better tho#but i just dont really know how to do that yet#i tried searching up tutorials n stuff but i wanted to get this artwork out relatively quickly so ye :P#thanks for reading the tags btw#i know that not many people do that#wanted to let you know that i do appreciate that :)#but yeah that was it for the commentary tags#now im just going to put tags that describe the artwork#starting.....now:#cat#pink cat#strawberry#strawberries#digital art
1 note
·
View note
Text
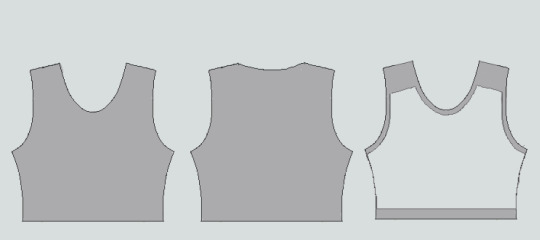
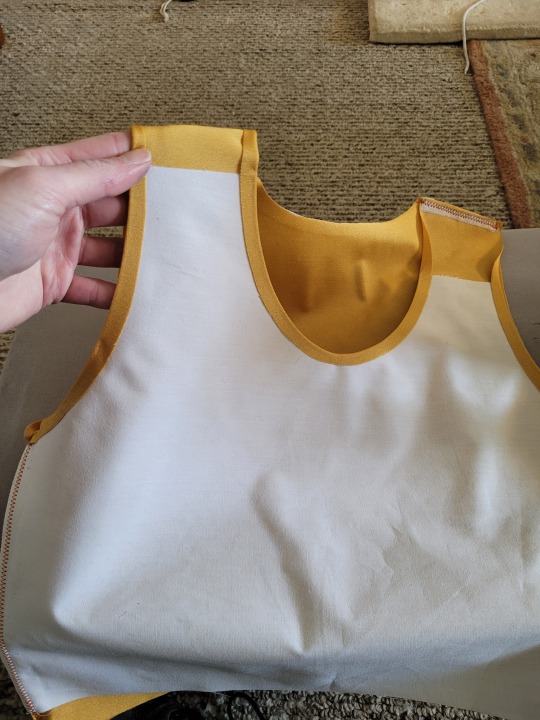
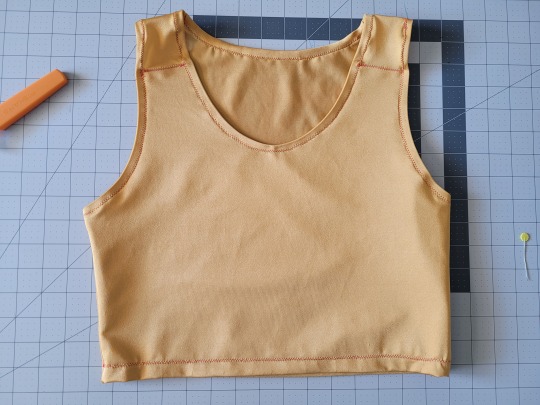
How to Make Your Own Binder that Fits Well and Looks Good
A while back I was in need of some new binders and thought hey, I bet I can make one way cheaper than buying it from somewhere (especially cus some of the ones I’ve bought in the past didn’t really fit right). Except when I started looking for a binder patterns online, I was very surprised that I really… couldn’t find many that looked very nice lol. Most of them had really wrinkled necklines, or didn't bind well, or just overall looked weird. A lot of the patterns also required a serger, which I don't have.
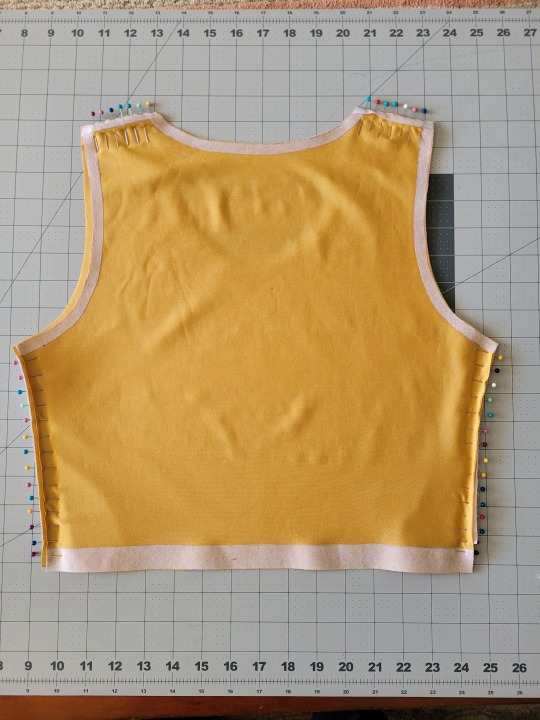
So I just said fuck it and made my own pattern! And it ended up being relatively easy! And the binders fit REALLY WELL and are comfortable to wear, even for long periods. The neckline doesn't show under shirts with loose collars, and the bottom hem doesn't gap or stick out. Here's me wearing one:
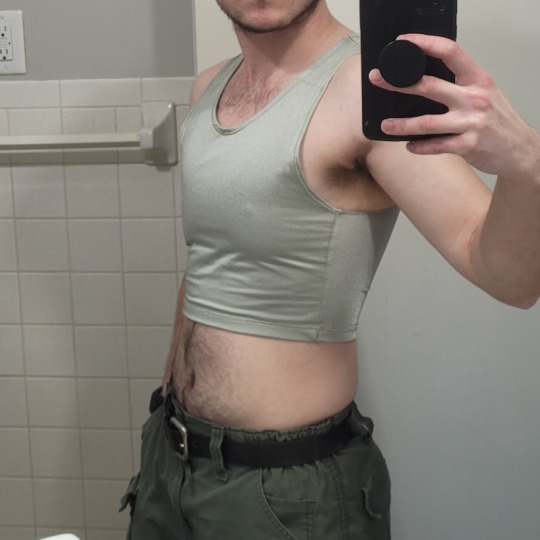
(plus I was able to make myself 5 of them for a total of like ~$50.)
So I figured I could throw together a guide to help out anyone else who wanted to make their own binder but was dissatisfied with the patterns available!
Disclaimer: This tutorial is going to assume a baseline level of sewing experience, and also will require access to a sewing machine. It is not a complicated pattern, but it will most likely require some tweaking and adjustments after you make the first one. Don’t be afraid to make alterations to make it fit better!
This tutorial is for a gc2b-style half-tank binder. It could be altered to be a full-tank binder, but all instructions will be for the half-tank design.
Materials needed:
Stretchy fabric, probably listed as 'athletic fabric' (I use this kind from Joann’s. Most athletic stretch fabrics should work, look for around 80% nylon/20% spandex blends)
Stiff fabric (I use this shirting cotton because I like how lightweight it is. If you want something a little stiffer with more structure, you can use a cotton or cotton/poly blend twill like this. gc2b binders use twill for theirs.)
Lightweight fusible interfacing (I use this kind) (get FUSIBLE not sew-in)
Fusible webbing like Pellon Wonder-Web (this is technically optional but it WILL make your life easier when you’re sewing - just make sure to get the kind with the paper backing!!!)
“But kiwisoap thats 4 whole kinds of materials, surely I don’t need that many!” Ok sure, you can probably get by without the fusible web and interfacing, but consider: they are both dirt cheap (im talking like $1-2/yard), they will make it much easier to sew the final product, and will give you an overall better-looking result. This tutorial is written with the assumption that you’ll use them.
"How much fabric will I need?" Measure the circumference of your chest below your armpits. Add 6 inches just to be safe. This is the yardage of stretch fabric you’ll need, and should give you enough material to make at least 3 binders without much excess left over. You will need around half as much stiff fabric.
Other supplies:
Big Paper (for drawing the pattern)
Flexible measuring tape
Sewing machine
Iron
Pins
Step 1: Measuring
You will need 4 main measurements for this pattern.

A) Measure the circumference of your chest just below your armpits, then divide the number in half. This will be the widest part of the pattern.
B) Measure from the top of your shoulder down to where you want the binder to end. For most folks, this will usually be around the natural waist (narrowest part of the torso), about 3-6 inches above the belly button. This will be the overall height of the pattern.
C) Measure the distance from below your armpit to where you want the binder to end. This will determine where the arm hole starts.
D) Measure the circumference of your waist where you want the binder to end, then divide the number in half.
So for example, after dividing A and D in half, my measurements are 17", 15", 7", and 14.5".
Next:
Subtract one inch from measurement A - This will help provide some compression. You might need to take it in even further depending on how it fits, but one inch is a safe starting point. I take mine in around 1.5 inches.
Subtract half an inch from measurement D. This will help prevent the bottom edge of the binder from gapping. Again, you may need to take it in more or less, depending on your own body.
Add 1.5 inches to measurement B and one inch to measurement C. This is to account for the hems and armhole placement.
This makes my final measurements
A = 16"
B = 16.5"
C = 8"
D = 13.5"
From here on out, we are only going to be working with the measurements that we have added/subtracted to, NOT the ones we initially took.
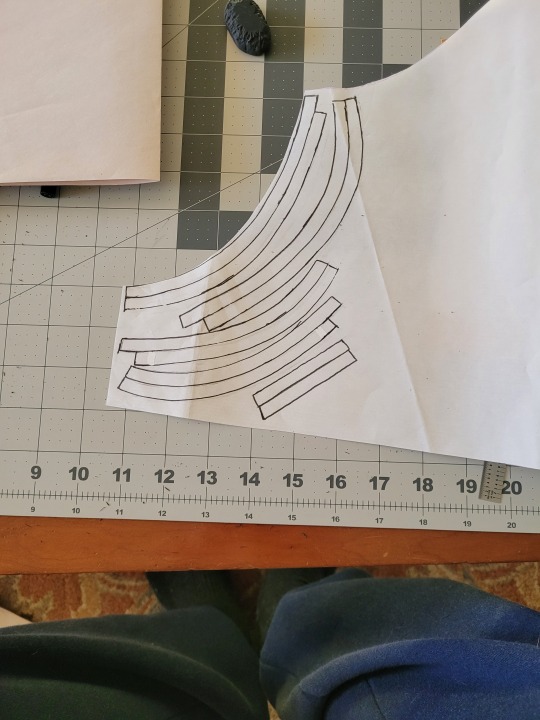
Step 2: Drawing the Pattern
You will need a piece of paper large enough to accommodate the entire pattern. This may involve taping multiple pieces together, or using a piece of newsprint, etc.
I recommend folding the paper in half to ensure that you get a symmetrical pattern. However, this means you will need to divide measurements A and D in half again, or else you’ll end up with a pattern that’s twice as wide as it should be!
Also note: the pattern is drawn with the seam allowance built in! You don’t need to add any seam allowance.
To draw the pattern:
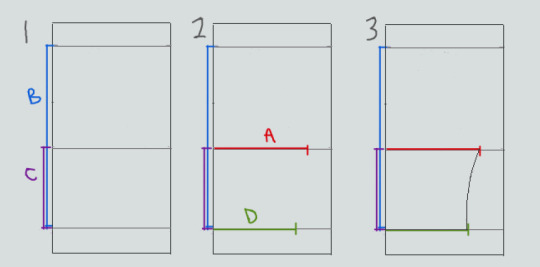

Begin with your folded paper. Measure and mark B and C on the paper, and draw a line extending across the paper. These will be your guidelines.
Measure and mark A and D along the middle and bottom guidelines, respectively. Remember, the paper is folded, so you only use half of the measurement for A and D.
Draw a loose curve connecting the endpoints of A and D. If needed, you can also just draw a straight line between the two.
Mark the opening for the neck hole. Depending on your size, it will measure around 6-8 inches across at the top (remember to divide this in half for the folded paper) and about 5-6.5 inches deep. (mine is 6.5" across and 5.5" deep) Draw a curve to connect the two points. This part will take some tweaking and adjusting to get it to look right lol.
Measure the width of the strap - this should be somewhere between 2.5 - 4 inches wide. They will end up about 1/2” to 3/4” narrower once you sew them. Draw the line at a slight angle, as shown.
Connect the endpoint of the strap to the endpoint of line A with a curve like in the diagram.
This will be the pattern for the front piece.
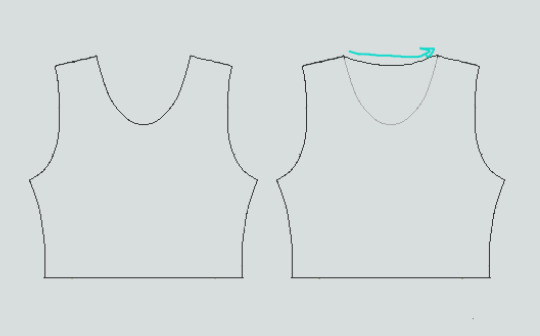
To make the back piece, trace the front pattern, but make a very shallow curve for the neckline instead of a steep one, as shown:
The last piece is the stiff front panel. This is what provides the flattening effect of the binder. To make the pattern, trace the front pattern again. Trim 3/8” in on the sleeves and neckline, and 3/4” to 1” along the bottom. This gives a flatter hem. Then trim the straps shorter by a few inches. This helps the binder lay flatter along the shoulders.
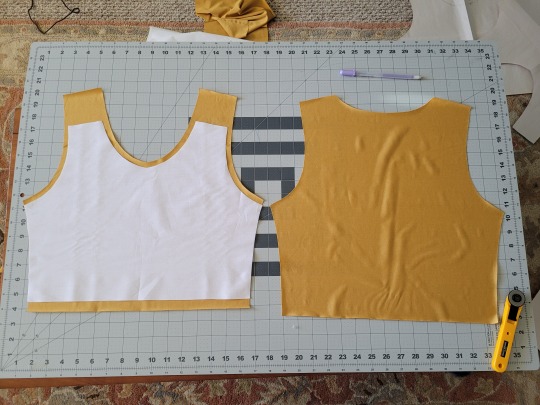
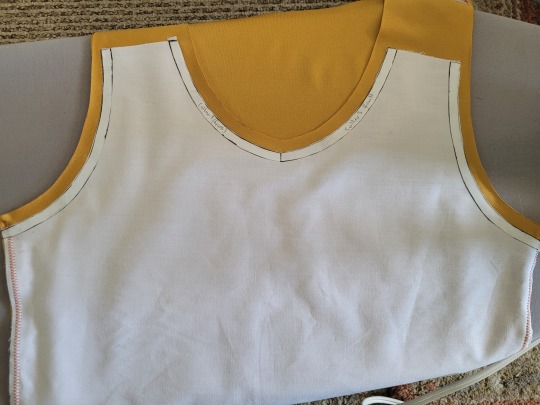
When you're done, you should have 3 pattern pieces that look approximately like this (stiff panel shown overlaid on the stretch fabric to show how it fits together).
NOTE: If you want more compression or just want to make it a bit sturdier, you can add a second panel of stretch fabric to the back piece. Just use the bottom half of the back pattern (from the widest part down to the bottom hem) to cut out another piece of stretch fabric. Attach it to the back piece with a strip of fusible webbing and a zig-zag stitch along the top.
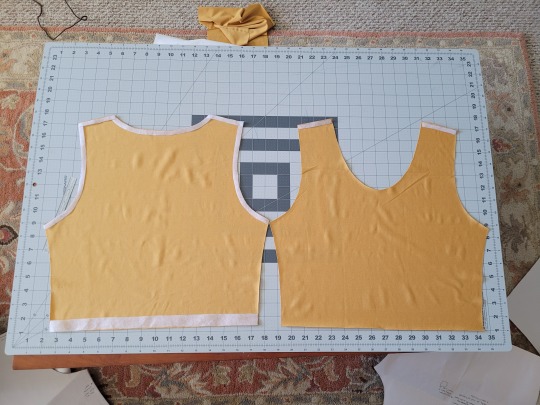
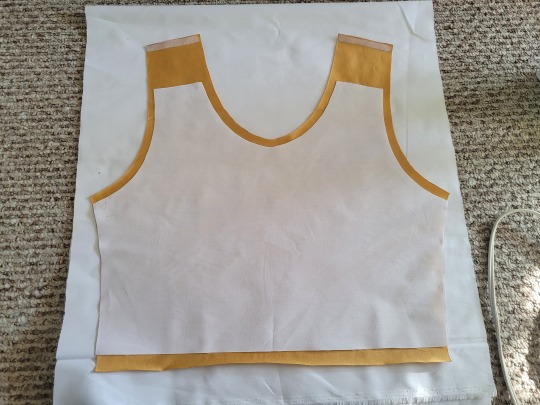
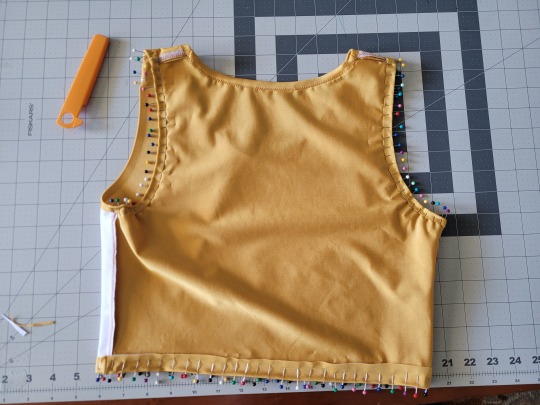
Step 3: Putting It All Together
Once you’ve made the patterns and cut out the pieces of fabric, you should have something that looks like this:
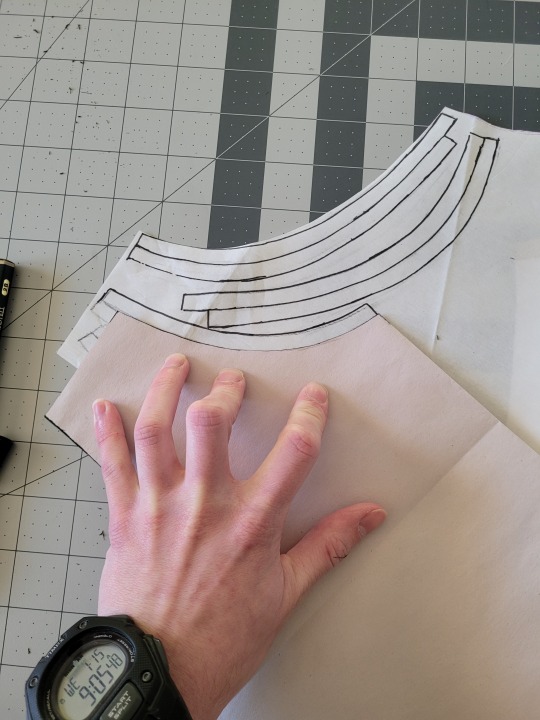
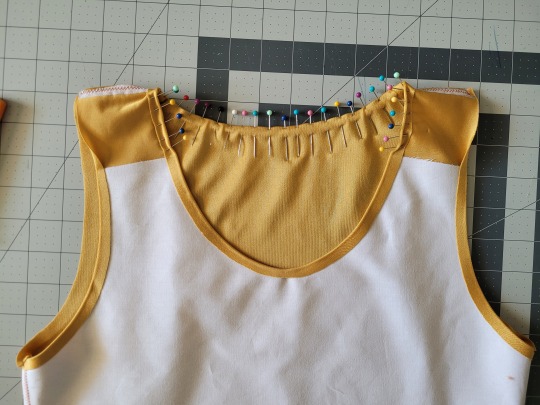
The next step is adding interfacing and fusible webbing. Use your pattern to cut out 3/8" strips to fit on the top of the straps for both pieces, and to the neckline, sleeves, and bottom hem of the back piece, as shown:
If you want to add it to the bottom hem of the front piece, it will help keep that hem flat when sewing it down later, but it's not essential.
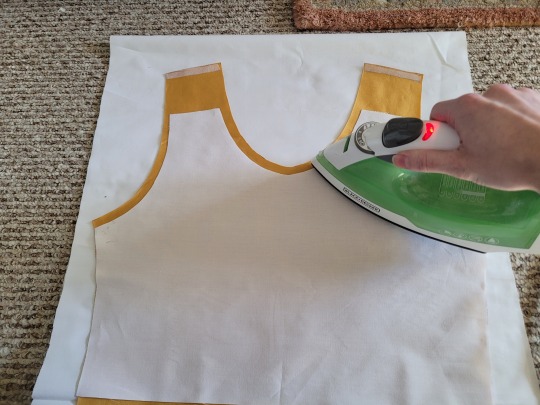
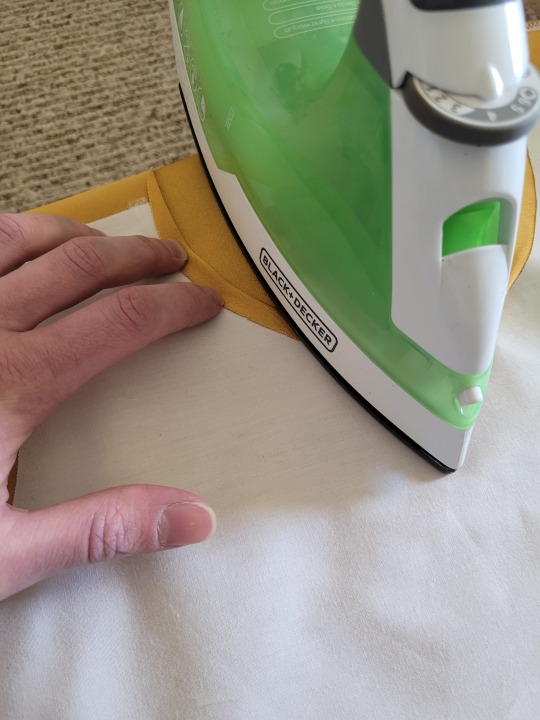
If you choose to also use fusible webbing (WHICH I RECOMMEND), you will apply it to the stiff front panel similarly to how the interfacing was applied, ~3/8” strips along the neckline, sleeves, and top of the straps. Cut out two strips for the neckline and sleeves, because we'll use those later too.
Iron the strips onto the front panel as shown:

Once it's on, just peel off the paper, position it webbing-side down on the stretch fabric, and iron it to fuse the two pieces together so everything stays in place while you sew. THIS MAKES IT WAY EASIER TO SEW.
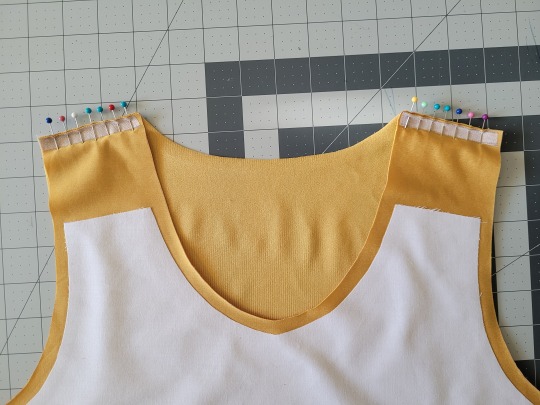
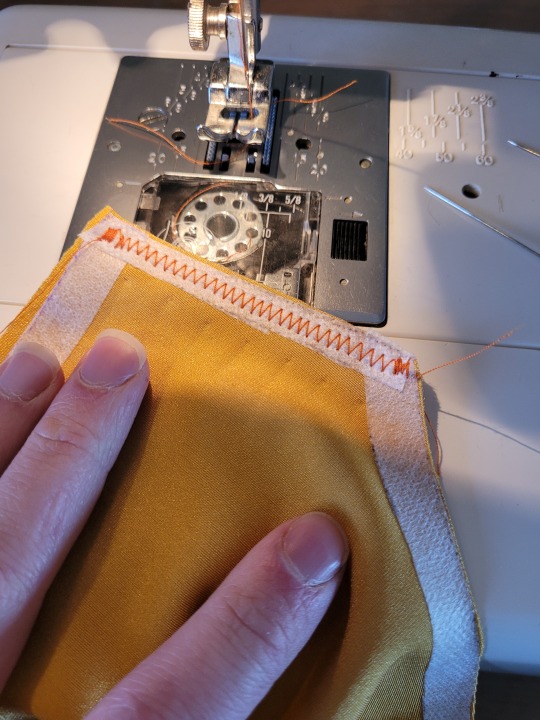
After the stiff front panel is fused to the stretch fabric, you’ll sew the straps of the front and back pieces together, then join the pieces along the sides. Pin the hell out of it to keep everything in place -this type of material is VERY prone to puckering.
When sewing, USE A ZIGZAG STITCH. A straight stitch will NOT WORK for stretch fabric. I adjust mine to 1.3mm long and 3.5mm wide which has worked well. If your machine doesn’t let you adjust stitch length or width, well. That sucks, I don’t really have any advice.
After you sew the front and back pieces together, you can add more fusible webbing to the front panel to help hold the hem down flat and prevent it from puckering while you sew it. Just add the strip, peel the paper off, then fold the hem over and iron it down. This part isn’t really necessary, but it does make the hems look nicer. If nothing else, I would recommend adding it to the neckline.
After that, you just fold & pin all the hems and sew them up with a zigzag stitch, then go over the raw edge at the top of the stiff panel (where we cut the straps shorter).
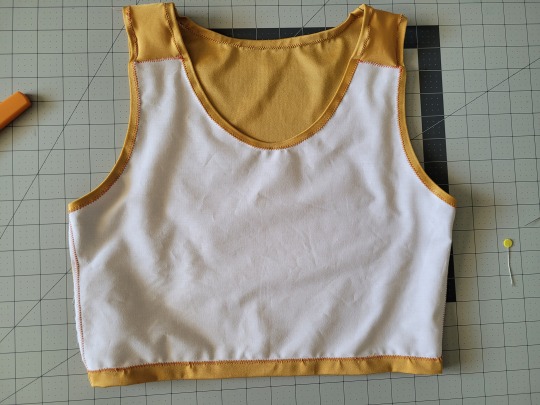
And that’s it! You’re done! And now you can make your own binders whenever you want!
And hey! If you used this tutorial and wanna throw me a dollar or two on ko-fi, I wouldn't complain.
2K notes
·
View notes
Note
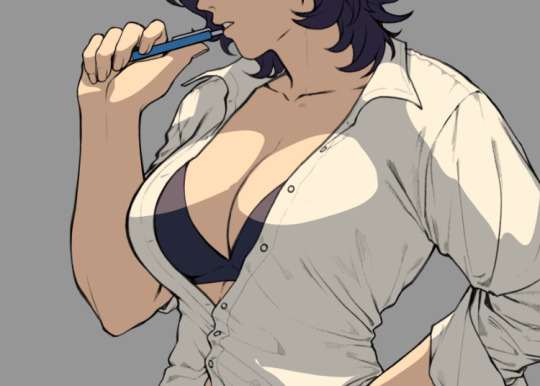
Heya! Person who went/goes over gender swap?? Female version?? Of Ratiorine, or just the way you draw women in general here. I'm an artist (not really but I do draw and paint from time to time) I just wanted to ask, (sorry if this is really silly or inappropriate) How do you draw breasts semi realistically?? Or just draw them the way you do. I honestly don't know how to draw human anatomy at all, I just kinda wing it but breasts, male chest alongside legs and hands are a STRUGGLE for me. (Been slowly getting better) YET BREASTS ARE ALWAYS JUST NOT LOOKING RIGHT AND IT MAKES ME WANT TO SOB They're always very anime looking in a very very bad way (because I grew up watching mostly anime and using old anime drawing tutorial books) No need to respond/answer if you don't want to! Just wanted to ask!
breasts are affected a lot by the angle of the shoulders and the pull of gravity, which are both pretty daunting factors for learning artists
i'd recommend anatomy studying but that's not what you asked for(tell me if anyone's interested), so i'll take the opportunity to draw more fem!ratio
behold, a booba tutorial with veritas ratio. only open if youre interested in boobs
breasts don't really have a fixed form, so they're tricky to make them look natural. as i mentioned, i consider the gravity and angle of the shoulders, as well as clothing when drawing them

i'll go over an easy method to paint them. for demonstration, i unbuttoned ratio's shirt. for educational purposes.

i like to use shaded tones as base color and add light afterwards

with some lassoing and glow layer (overlay/add/anything that works) it already looks fairly alright, but i'm gonna do some blurring to make it look better
i blurred and erased around the edges to make the light blend in more naturally to the lineart and the shirt

i added a little bit of redness around the edges of the light to make it look more like flesh as well as reflected lights (the blue circles), they'll give clearer indications on where the breast starts and ends
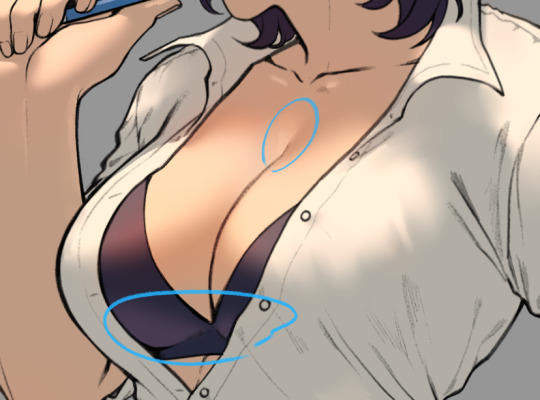
i usually end the details here when i don't feel like going for high quality render

and there it is, a pair of shiny boobs
im not sure how to lay out the higher quality render process, i haven't really figured it out enough to explain it to someone else yet
anyways i like how this one turned out, so i'll try fancying it up tomorrow, i'll post it when im done
2K notes
·
View notes
Text
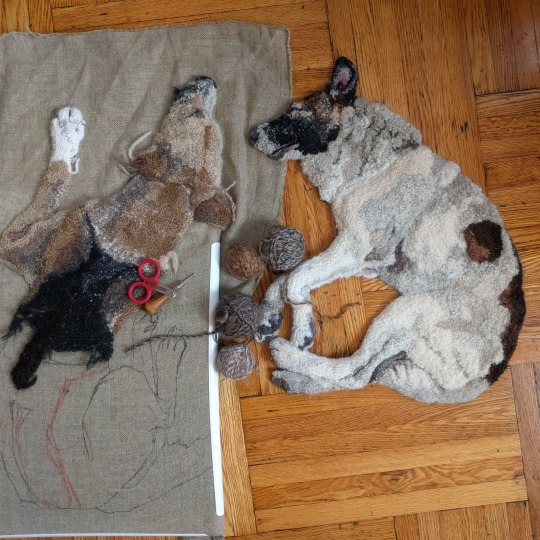
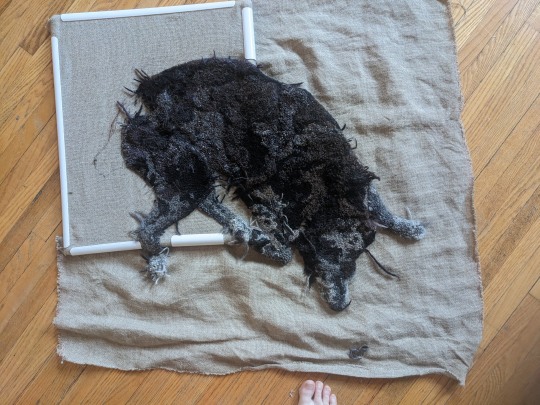
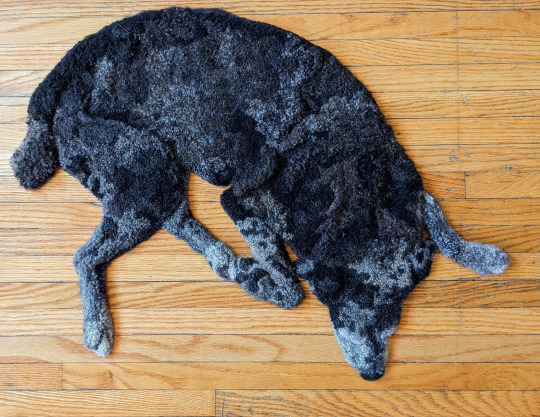
Hooking rugs that look like dogs
Here's how I do it:
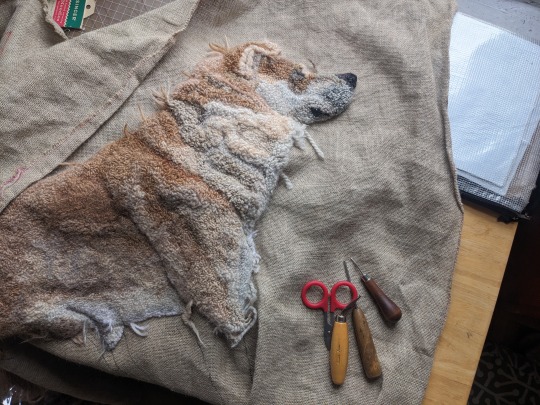
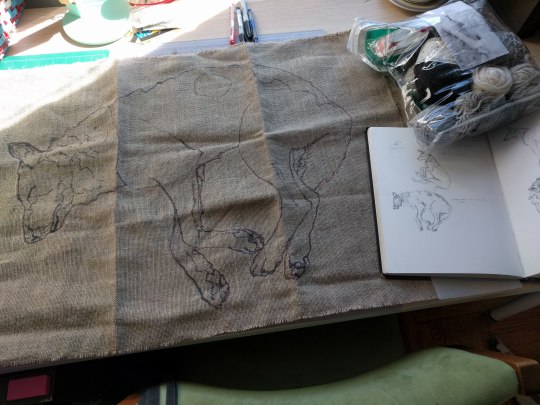
The process I use is called rug hooking (not latch hook or punch needle or tufting, though it is the forerunner of the latter two techniques). Rugs are hooked by pulling loops of fabric strips or yarn through the holes of a base fabric with a coarse open weave, like burlap, or linen, or rug warp. The loops are pulled through the fabric with a squat-handled hook whose business end is shaped like a crochet hook. There are no knots and the loops aren't sewed down in any way. The whole thing stays put just by the tension of all those loops packed together in the weave of the foundation fabric.
This isn't a true detailed tutorial but a walk-through of my particular process. The same information is on my web page, emilyoleary.com .
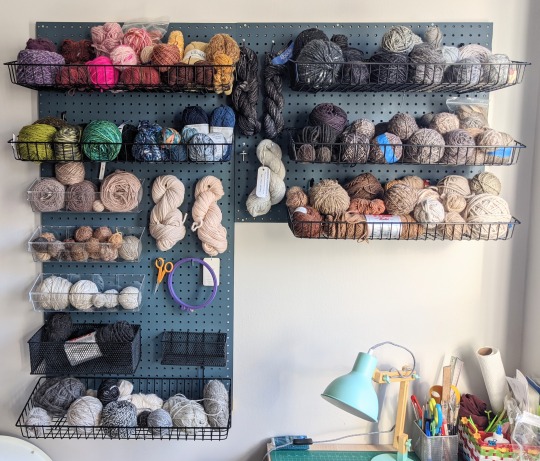
I hook with yarn, rather than with cut strips of wool fabric, which is what many rug hookers use. I can get a looser, more organic distribution of loops with yarn than I could with wool strips, which are hooked in neat lines.
Mostly I use wool yarn. In terms of yarn weight, I can use DK, worsted, or Aran. If I'm using thicker yarn, I leave more holes un-hooked; if I'm using finer yarn, I hook more densely or double up lengths of it. I particularly like using single ply yarns (like Brown Sheep Lamb's Pride or Malabrigo Worsted). I don't keep count, but I think I usually use around two dozen types and colors of yarn per dog.
This is my yarn wall in my apartment. Mostly brown and gray yarn!
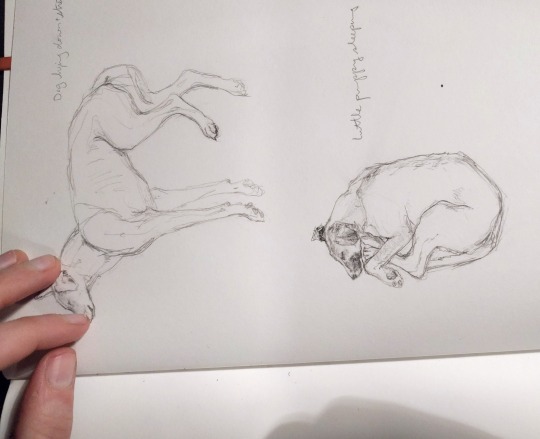
I start from a small drawing in my sketchbook, then I head to FedEx office to use a copy machine, blowing up the drawing repeatedly and experimenting with how big the dog rug should be.
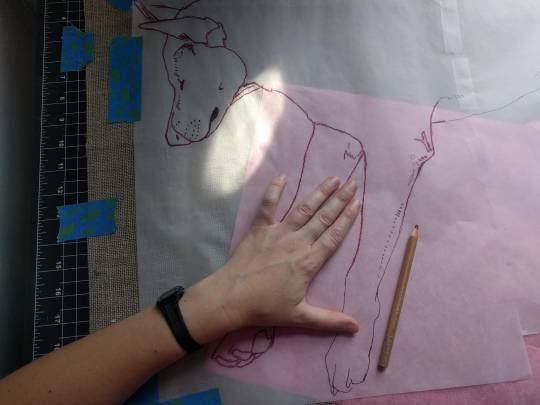
After transferring the image onto my linen, I immediately go over it with Sharpie, because the Saral is really difficult to see and really easy to rub off.
The rug is held taut by a PVC quilting frame that I set on my lap.
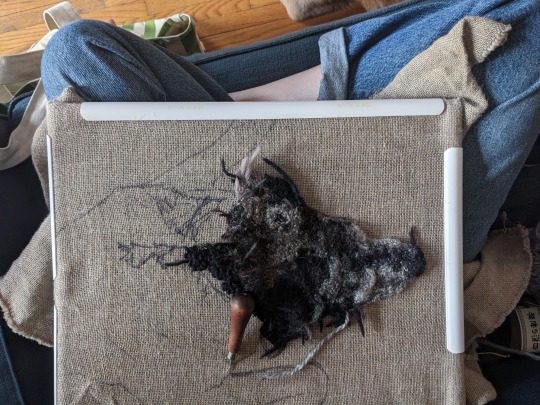
I push my hook down through the fabric with my right hand and my left hand stays below the fabric and guides the yarn while I pull it up and through with the hook. Not every hole in the fabric is hooked. Hooking every hole would make the rug too dense. I do hook pretty densely, though-- If you pick up one of my rugs you’ll see they have a slight curl to them, which is because they’re hooked pretty tight. I'm using all different weights and types of yarn, so it's a challenge to keep the overall tension even.
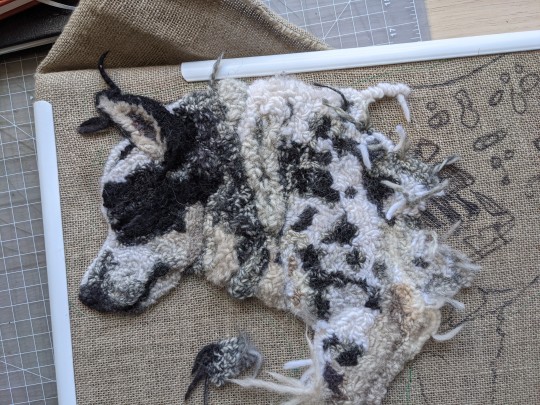
I hook my loops at varying heights to create a very low relief. Sometimes I trim the loops to make them fluffier or wispier or to shape a particular part. I look at a reference photo while I work and pull out and redo sections a lot.
My q-snap frame can accommodate the growing dog rug. I have extenders to make it bigger and I can clamp around my hooking.
The back of a rug looks like lines of little stitches. The lines are little worm trails snaking around because lines of hooking are not supposed to cross over each other. It's important to start a new length of yarn rather than cross over a stitch you already made! I read this when I first started and took it to heart. It makes it much easier to undo and redo hooking if you have to (and I redo sections A Lot). It also keeps the back from getting too bulky and resulting in uneven wear on the back of a functional rug that gets floor use.
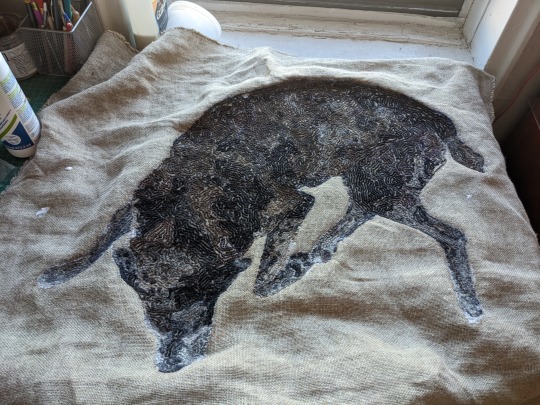
When I’m done hooking everything I turn the rug over and brush watered-down Sobo glue on the edges of the dog, making sure to get one or two of the outermost lines of hooking. I do a couple coats of this thinned out glue. I'm careful not to use so much that it seeps to the front of the rug. When the glue is dry I cut the rug out, but I don't cut so close that the loops don't have any linen to keep them in.

It generally takes me at least several months to finish one dog rug. My hooking frame and yarn bag are very portable (though bulky) so I can hook out and about at coffee shops or the library or a brewery if there's enough space and light.
Hooking in the wild makes me an ambassador for making things in general and rug hooking in particular. I answer people's questions and always emphasize how relatively easy it is to get started hooking. Sometimes I get anxious that other people will hook rugs that look like mine but better, but I think that working in a traditional medium means you should share your knowledge for the good of the craft.
9K notes
·
View notes
Text
Had a few folks interested in how I made the patches I posted for Solarpunk Aesthetic Week, so I thought I'd give y'all my step-by-step process for making hand-embroidered patches!

First, choose your fabric and draw on your design. You can use basically any fabric for this - for this project I'm using some felt I've had lying around in my stash for ages.

Next, choose your embroidery floss. For my patches I split my embroidery floss into two threads with 3 strands each, as pictured. You can use as many strands in your thread as you prefer, but for the main body of my patches I prefer 3 strands.
Next you're going to start filling your design using a back stitch.

First, put in a single stitch where you want your row to start.

Poke your needle up through the fabric 1 stitch-length away from your first stitch.

Poke your needle back down the same hole your last stitch went into so they line up end-to-end.
Repeat until you have a row of your desired length (usually the length of that colour section from one end to the other). Once you have your first row, you're going to do your next row slightly offset from your first row so that your stitches lay together in a brick pattern like this:

Make sure your rows of stitches are tight together, or you'll get gaps where the fabric shows through.
Rinse and repeat with rows of back stitch to fill in your patch design.

When you're almost to the end of your thread, poke your needle through to the back of the fabric and pull the thread under the back part of the stitching to tuck in the end. Don't worry if it looks messy - no one's gonna see the back anyway.
This next step is fully optional, but I think it makes the patch design really pop. Once your patch is filled in, you can use black embroidery floss to outline your design (or whatever colour you want to outline with - it's your patch, do what you want). I use the full thread (6 strands, not split) of embroidery floss to make a thicker outline.

I use the same back stitch I used to fill the piece to make an outline that adds some separation and detail. You could use most any 'outlining' stitch for this, but I just use back stitch because it's just easier for me to do.
Once you're finished embroidering your patch, it's time to cut it out!

Make sure to leave a little border around the edge to use for sewing your patch on your jacket/bag/blanket/whatever, and be careful not to accidentally cut through the stitches on the back of the patch.
If you have a sturdy enough fabric that isn't going to fray, you can just leave it like this. If not, I recommend using a whip stitch/satin stitch to seal in the exposed edges (I find that splitting your embroidery floss into 3-strand threads works best for this).

And then you're done! At this point you can put on iron-on backing if you want, or just sew it on whatever you wanna put it on. Making patches this way does take a long time, but I feel that the results are worth it.
Thanks for reading this tutorial! I hope it was helpful. If anyone makes patches using this method, I'd love to see them! 😁
#solarpunk aesthetic week#sewing#tutorial#sew on patch#punk diy#diy punk#punk aesthetic#handmade#solarpunk#handcrafted#embroidery#embroidered patch#how to#how to make a patch
18K notes
·
View notes
Text
Shen Yuan should be surprisingly good at makeup. Like, we all know that Shen Jiu could draw eyeliner sharper than Cheng Luan, but Shen Yuan had a meimei.
Imagine she has a school dance or something, and maybe a mean girl at school said something that made Shen-mei decide she was going to wear makeup for the school dance.
Now, of course, Shen Yuan and his geges make sure to tell her that the girl was just mean, and she's beautiful when she's comfortable and happy, not because of makeup etc etc it's all very good intentioned.
Even so, she says, she still wants to wear makeup.
So she buys some, and starts practicing. She's ... Not the best. Shen Yuan finds her crying in the bathroom with crooked eyeliner, mascara transfer marks on her cheeks, foundation and concealer in the wrong shade, contour that looks like a 5'o'clock shadow, overfilled brows, blush that won't blend...
He helps her take off the cakey makeup and bundles her into the living room, comforting warm drinks in hand. They spend the night watching makeup tutorials.
Step-by-step Shen Yuan learns along with his meimei how to do a full face of makeup.
The school dance goes perfectly, Shen-mei was the most beautiful resplendent girl in the school and had a wonderful time with her friends.
Shen Yuan and Shen-mei don't stop watching makeup videos and doing makeup on each other though, it becomes a shared hobby. Every few weeks, even into adulthood, they'd meet up, turn on some makeup influencer and take out their makeup brushes.
It was their special thing, something that just the two of them shared.
Cut to post-transmigration, during a visit for planning the 'garden', Shang Qinghua idly asks Cucumber-bro how he manages to draw the huadian perfectly every single time.
(I don't know the correct term, I tried looking for the proper terminology because what I believe Shen Qingqiu wears is some sort of scholar's mark? But I couldn't find anything. Please let me know if anyone knows the correct term!)
Shen Yuan shrugs and goes 'not like it's hard, you probably just suck.'
This leads to an argument wherein Shen Yuan decides to demonstrate his superiority.
They did forget that there was a Peak Lords meeting, and so Shen Qingqiu strolls in with flawless eyeliner, lips, huadian, the whole combo, and Shang Qinghua walks in with a red face and smudged eyeliner (it does look good though, fits his messy vibes).
Liu Qingge feels a little faint when he watches Shen Qingqiu absentmindedly press his fan to his lips, leaving lipstick marks on the fan. (SY wonders why at that moment, the System lets him know that his fan has leveled up.)
Luo Binghe is trying to figure out a way to get Shizun to teach him to do makeup... The thought of Shizun taking the brush to his lips, concentration furrowing his brows, letting Luo Binghe admire his face even more unabashedly then usual ...
Qi Qingqi changes her tune faster because she has to know how Shen Qingqiu got his eyelashes so perfect.
#shen yuan#shen mei#svsss#svsss au#cumplane#shang qinghua#pre-transmigration#shen qingqiu#shen jiu#luo binghe#bingqiu#liu qingge#qi qingqi#liushen
2K notes
·
View notes
Note
OUGHHGDHGHDK PLEASE YOUR BRUSH SETTINGS, I NEED TO KNOW HOW YOU MAKE USUCH AMAZING ART I CANT. AND HOW DO YOU DRAW THE HAIR??? ITS LITERALLY SO FLOWY AND AMAZING GOD I CANT STOP LOOKING AT YOUR WORKS!!!! TYSM ILY HAVE A GREAT DAY
Thank you~~ It's always lovely to see people praising me for doing the things I like and confident that I'm good at, and long hair is one of them : D! I've said before I only use two original brushes from Clip Studio Paint, you can see the details here and here on my previous ask. I should warn you though, that the only thing I changed is the stabilization since my hands are SHAKY AS F-
I did two time-lapses to show how I draw long hair with my two main brushes since I don't think I have enough vocabulary to explain it in words. Hope this helps!
Since Tumblr only allows one vid per post, please check the reblog for the second vid with softer brush
P/s: Okay no vids for reblogs, got it, here's the second vid.
#dollya ask#dollya art#Not a tutorial this is just how I usually draw#And remember to thanks Dollya#She being bald for education purpose
61 notes
·
View notes
Text
-> just a something small

thinking about boyfie!Sukuna with creative gf!reader.
“Don’t move,” you said, brow furrowed as you traced yet another swirl of henna onto Sukuna’s already tattoo-covered arm.
“I’m literally not moving.”
“You breathed. I felt it.”
He stared at you, unimpressed. “That’s usually encouraged.”
You didn’t respond. You were too busy drawing a stick man, very deliberately, right inside one of his thick, black tattoo bands. It looked comically out of place. Like someone had graffitied a caveman onto the ceiling of the Sistine Chapel.
You sat back proudly. “Look at him. Living his best life.”
Sukuna tilted his head to examine the stick figure. “He has no face.”
“He’s minimalistic. Don’t be rude.”
He said nothing, which in Sukuna-language meant “this is ridiculous but I’m letting it happen because I love you or something.”
He didn’t mind being used as a canvas. That much had become clear. You’d started with henna, but the chaos had escalated over time.
One evening, while you were studying on the couch, you realised his hand was resting peacefully on your lap. Completely still. Completely unguarded.You grabbed a pen.“You’re doing something,” he said without looking.
“No I’m not.”
“You’re drawing on me.”
You were. A tiny cat on his thumb, a sunflower on his pinky, a suspicious-looking frog on the side of his hand.
He looked at them after five minutes of silence.“Why is this frog judging me.”
“He knows what you did.”
Later, you sat him down at the kitchen table like you were about to perform a very serious operation. You held up a bottle of pale pink nail polish.He glanced at it. Then at you. Then at his lighter.
“I’m repainting it,” you said. “Your personality is 90% violent and the other 10% is whatever colour your hair is. We’re leaning in.”
He didn’t even argue. Just pushed the lighter across the table like a defeated man handing over a family heirloom. You worked in silence for a bit, tongue between your teeth. “You’re very precise,” he said.
“I trained under the ancient masters of DIY TikTok.”
“I have no idea what that means.”
“Good. That’s how I maintain my mystery.”
You didn’t stop there. Oh no. Next was Labubu. Your slightly terrifying big-eared plush toy. One morning, Sukuna walked into the living room to find you sewing tiny pink thread onto its head.“What’s happening.”
“He’s becoming you.”
Your Labubu now had angry little eyebrows, a tiny scar, and black ink marker tattoos all over his felt arms. You handed it to Sukuna.
“He’s your plush clone. Be gentle. He’s moody.”
Sukuna stared at it. “It looks like it’s planning murder.”
“Just like you.”
He didn’t argue. That meant you were right.
You found a DIY jacket tutorial and decided Sukuna needed a makeover. He was napping. You were in a creative mood. Dangerous combination. You ironed on three patches, one of which said “Menace to Society,” and drew a snake on the sleeve in fabric marker.
When he woke up, you showed him.He blinked at the jacket. Then at you.“I was asleep for twenty minutes.”
“You trusted me. That was your first mistake.”
He was a man of very few words. You were a woman of… too many. Somehow, that balanced. He let you paint his lighter, design his hoodie, and vandalise his body with henna frogs. He let you stitch thread into a plushie’s forehead and call it bonding. He let you use his hands as notebooks when your own were full.
And in return, you kissed his scar without asking, drew hearts on his knuckles, and said stuff like, “You’re the calmest chaos I’ve ever met.”
He didn’t smile often. But sometimes you caught the edge of one when he thought you weren’t looking. Especially when the stick man got a little cape.
“Don’t,” he warned when he saw you giggling.
“He’s a hero, Sukuna.”
“You need supervision.”
“You are my supervision.”
That shut him up. Mostly because it was true.
#ᶻz 𝐂𝐇𝐄𝐑𝐁𝐈𝐈#jjk#anime#jujutsu kaisen#ryomen sukuna#sukuna#sukuna x you#sukuna x y/n#jjk sukuna#sukuna x reader#jjk ryomen#jujutsu kaisen ryomen
630 notes
·
View notes