#PHP7.2
Explore tagged Tumblr posts
Visit Tumblr Blog
Explore Tumblr blogs with no restrictions, modern design and the best experience.
Last Seen Tumblr Blogs


Fun Fact
Tumblr has been providing a Korean-language service since 2013.
Text
Install/enable gd extension on php
sudo apt-get install php7.0-gd
you can just change the php version as needed. if you are running php 7.2 just use the code
sudo apt-get install php7.2-gd
Also restart apache after the command sudo service apache2 restart
0 notes
Text
Instalar GLPI en un servidor Ubuntu 18.04 LTS

Instalar GLPI en un servidor Ubuntu 18.04 LTS. GLPI es un paquete de gestión TI especifico para los departamentos de tecnología de cualquier empresa u organización, también está recomendado para comercios al por menor relacionados con la informática (permite el seguimiento de las reparaciones). El software se desarrolla en PHP, MySQL/MariaDB y Apache. Ofrece una gran cantidad de funciones, entre las que destacamos el inventario de hardware (computadores, monitores, software, impresoras, etc...), y las entradas / salidas de maquinas, junto con el seguimiento de las reparaciones. GLPI facilita el trabajo diario de los administradores, por ejemplo: en el seguimiento de trabajos genera notificaciones por correo electrónico, también permite crear una base de datos con toda la información de la topología de la red. A continuación vemos las principales características de GLPI (son muchas más): Inventario de computadoras, periféricos, impresoras de red y componentes asociados a través de una interfaz con OCS Inventory o FusionInventory. Gestión de problemas en diversos entornos a través de tickets, gestión de tickets, asignación, programación de tickets, etc... Gestión de licencias (compatible con ITIL). Asignación de equipos por área geográfica a usuarios y grupos. Información comercial y financiera (compras, garantía, etc...) Gestión del estado del equipo. Gestionar las solicitudes de asistencia de cualquier maquina del inventario. Interfaz de usuario para los tickets de soporte. Gestión comercial, de contratos y documentación de los artículos del inventario. Reserva de equipos. Gestión de preguntas frecuentes (FAQ). Excelente generador de informes: hardware, red e intervenciones técnicas (soporte). Soporte multilingüe para más de 70 idiomas. Puedes ampliar la información en este articulo anterior. En este instalaremos nuestro propio servidor GLPI sobre Ubuntu 18.04 LTS server.
Instalar GLPI en un servidor Ubuntu 18.04 LTS
Comenzamos instalando LAMP en nuestro servidor, para ello primero actualizamos el sistema e instalamos Apache. sudo apt update sudo apt install apache2 Una vez concluya la instalación de Apache, comprobamos el estado del firewall de Ubuntu (por defecto UFW). sudo ufw app list Ejemplo de salida valido... Available applications: Apache Apache Full Apache Secure OpenSSH Nos aseguramos que Apache Full habilita el tráfico en los puertos 80 y443. sudo ufw app info "Apache Full" En el caso de que no veas los puertos abiertos, ejecuta lo siguiente. sudo ufw allow in "Apache Full" Ahora instalamos el servidor MySQL. sudo apt install mysql-server Aseguramos la instalación. sudo mysql_secure_installation Lo que vamos a hacer es: Configurar la contraseña de root. Eliminar usuarios anónimos. Deshabilitar el inicio de sesión remoto para el usuario root. Borrar la base de datos demo y los accesos. Puedes configurar una password especifica o no, es tu decisión (normalmente como root, pulsa "Y"). En el resto de preguntas responde siempre "Y", esto eliminará los usuarios anónimos y la base de datos de prueba, deshabilitará los inicios de sesión remotos, y cargará las nuevas reglas para que MySQL aplique inmediatamente los cambios que hemos realizado. La base de datos ya esta configurada y lista para ser usada. Nos falta iniciarla (normalmente ya debería estar iniciada), y hacer que arranque con el sistema. systemctl start mysql systemctl enable mysql Creamos una base de datos para GLPI. #Nombre de la base de datos mysql> create database glpi; #Usuario y password mysql> grant all privileges on glpi.* to 'usuario'@'localhost' identified by 'tu_password'; mysql> flush privileges; mysql> exit Reiniciamos MySQL. systemctl restart mysql Para poder instalar nuestro servidor GLPI, solo nos falta PHP (por defecto se instala php 7.2 en su ultima versión). Realmente GLPI necesita pocos módulos. sudo apt install php libapache2-mod-php php-mysql php-gd Si el servidor es exclusivo para GLPI con el comando anterior es suficiente, si te planteas alojar otras aplicaciones o sitios web... instalamos php con más módulos. sudo apt install -y php libapache2-mod-phpsudo php-xml php-zip php-mysql php-curl php-mbstring php-json php-gd php-intl php-mcrypt php-xsl php-soap php-common php-readline php-cli php-opcache php-iconv php-sqlite3 Una vez instalado, reiniciamos Apache. systemctl restart apache2 Como punto final, actualizamos y reiniciamos el sistema. sudo apt update sudo apt upgrade reboot Instalamos GLPI en el servidor Debes asegurarte de instalar la ultima versión estable, hoy la "9.4.3". Antes de descargar el código fuente del software, revisa que versión está disponible en ese momento, pagina de descargas. wget https://github.com/glpi-project/glpi/archive/9.4.3.tar.gz Descomprimimos el archivo en /var/www, y accedemos al directorio. tar -xvzf glpi-9.4.3.tar.gz -C /var/www/ cd /var/www/glpi/ Concedemos los permisos necesarios. chmod -R 777 config/ chmod -R 777 files/ Ya estamos listos... Desde tu navegador web favorito accedemos a la instalación gráfica de GLPI. http://IP-del-Servidor/glpi Vemos como concluir la instalación de GLPI de forma gráfica (con imágenes de ejemplo reales). Al acceder por primera vez al servidor, te indica que selecciones tu lenguaje predeterminado.

Seleccionar el idioma en GLPI Quieres instalar o actualizar GLPI?, en nuestro caso instalar.

Instalar o actualizar GLPI Antes de comenzar la instalación se verifica que el sistema es compatible.

Verificar la compatibilidad de GLPI con el sistema Al pulsar en continuar nos solicita ingresar los datos de la base de datos, son los siguientes: Servidor SQL: Normalmente "localhost" o "localhost:3306". Usuario SQL: Nombre de usuario de la base de datos. Contraseña SQL: La password que insertamos al crear la base de datos.

Configurar la base de datos de GLPI Seleccionamos o creamos una base de datos para GLPI. Nosotros ya la generamos anteriormente, así que la seleccionamos.

Seleccionar o crear una base de datos para GLPI Solicita permiso para recopilar estadísticas de uso, el SI o el NO... es tu decisión. Ten cuidado, por defecto esta marcada la opción "Si enviar".

Recopilar estadísticas de uso Llegado este punto la instalación a concluido, en pantalla nos imprime los usuarios y passwords predeterminados de la aplicación. No olvides modificar estos datos inmediatamente. Administrador: glpi / glpi Técnico: tech / tech Usuario normal: normal / normal Solo lectura: post-only / postonly Usuarios y contraseñas predeterminados en GLPI Al intentar acceder a GLPI nos aparece la pantalla de login, inserta los datos predeterminados que vimos en la pantalla anterior.

Pantalla de acceso a GLPI Al acceder a GLPI por primera vez podrás observar dos advertencias, una te indica que modifiques las contraseñas por defecto, y la otra que por motivos de seguridad borres el archivo "install.php" contenido en la carpeta "install". Por ejemplo: rm glpi/install/install.php

Acceder por primera vez a GLPI Por ultimo, y para concluir este articulo, vemos una imagen con datos ya rellenados en GLPI.

Demo de GLPI Espero que este articulo sea de utilidad, puedes ayudarnos a mantener el servidor con una donación (paypal), o también colaborar con el simple gesto de compartir nuestros artículos en tu sitio web, blog, foro o redes sociales. Read the full article
#/var/www/#accederaGLPI#actualizarGLPI#Apache#apachefull#característicasdeGLPI#GLPI#hardware#InstalarGLPI#install.php#lamp#lts#mysql#navegadorweb#php#php7.2#servidorGLPI#servidorMySQL#ubuntu#Ubuntu18.04#Ubuntu18.04LTSserver
0 notes
Text
Install php7.2-gd extension in your armhf/arm32 Architectured Machine/Docker container
Step 1: Install gdebi
apt-get install gdebi
Note:gdebi will look for all the dependencies of the .deb file, and will install them before attempting to install the .deb file
Step 2: Download & Install php-common
$curl -o php-common.deb http://ports.ubuntu.com/pool/main/p/php-defaults/php-common_60ubuntu1_all.deb $curl -o php7.2-common.deb http://ports.ubuntu.com/pool/main/p/php7.2/php7.2-common_7.2.3-1ubuntu1_armhf.deb
$ gdebi php-common.deb $ gdebi php7.2-common.deb
Step 3: Download & Install php7.2-gd
Reference:https://ubuntu.pkgs.org/18.04/ubuntu-main-armhf/php7.2-gd_7.2.3-1ubuntu1_armhf.deb.html
$ curl -o php7.2-gd.deb http://ports.ubuntu.com/pool/main/p/php7.2/php7.2-gd_7.2.3-1ubuntu1_armhf.deb
$ gdebi php7.2-gd.deb
Step 4: Edit php.ini
Note: Check phpinfo() to get the exact path of your php.ini Note: The default path of gd.so extension is /usr/lib/php/20170718/gd.so
vim php.ini extensions=/usr/lib/php/20170718/gd.so
Step 5: Restart/Reload Apache server
service apache2 reload/restart
1 note
·
View note
Text
How to Innstall Linux , Nginx , MySQL, PHP(LEMP stack) Ubntu 18.04
How to Innstall Linux , Nginx , MySQL, PHP(LEMP stack) Ubntu 18.04
We can identify The LEMP software stack as a bunch of software. Mostly it uses to serve dynamic web pages and web applications. This LEMP stated for Linux operating system, comes up with the Nginx web server. Normally pronounce the Ngine as the engine, that’s why it uses as an E. Here’s the Backend use to create a database in MySQL, and PHP handled its dynamic processing.
Here we willing to…
View On WordPress
0 notes
Text
The new features in PHP 7.2
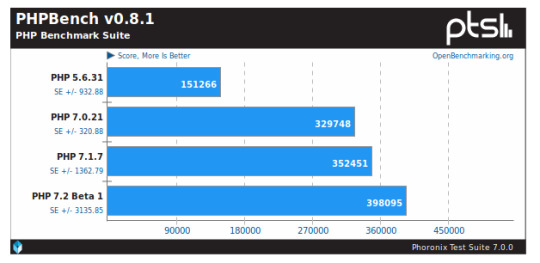
PHP 7.2 introduces again some performance improvement. According to the benchmark published by Michael Larabel, PHP 7.2 is 20% faster than 7.0 and 10% faster than 7.1 The 30th November 2017 is scheduled the relase of PHP 7.2. This new version becomes after 6 months of testing with 3 alpha, 3 beta, and 6 RC versions. In this post, I’ll present some of the new features.
Performance
As we known, PHP 7 introduced a big performance improvement compared with PHP 5. The benchmarks reported an average improvement of 2x for the execution time and a great reduction of the memory consumption (10x in some cases).
This performance boost took PHP to be one of the fast interpreted language in the world (see Figure below).
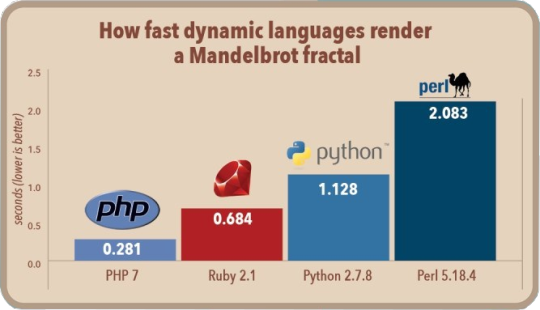
PHP 7.2 introduces again some performance improvement. According to the benchmark published by Michael Larabel, PHP 7.2 is 20% faster than 7.0 and 10% faster than 7.1
Object type
PHP 7.2 introduces the usage of the object type. This new scalar type can be used to represent PHP objects.
The introduction of the object type fills a previous PHP gap by adding object as scalar type of the language. This new type can be useful in all cases where we need to handle objects of different classes.
Read more...
0 notes
Text
WHY UPGRADE YOUR SITE TO PHP 7.X
PHP is a widely-used open source general-purpose scripting language that is especially suited for web development and can be embedded into HTML which is why most of the Content Management Systems like WordPress, Magento, Drupal, Joomla etc use PHP. It is not just limited to such site, but a lot of Opensource applications like SugarCRM, osTickets, etc use PHP for their application. TD Web Services provides over 1 Click 400+ PHP Based Applications/scripts within our Business Hosting.
WHY UPGRADE TO PHP 7.2?
1. IT’S CRAZY FAST
Stats! Stats! Stats! will give us tangible results. Just don’t take our word for it. PHP Performance tests were done on a Tyan 2U server with AMD EPYC 7601 processor and running Ubuntu 17.10 with the Linux 4.13 kernel.
2. MORE CONTROL OVER TYPE DECLARATIONS
PHP doesn’t require you to declare your variable type, it takes it automatically. This helps to code faster but also results in errors; because it doesn’t always catch if you’re mixing things up. With PHP 7, you can override the assumptions and declare your own variable with some super useful new techniques, giving you more control and cleaner code.
3. BETTER ERROR HANDLING
All PHP developers dread White Screen of Death. Previously PHP will stop working as soon as it encounters an error. With PHP 7 it enable you to write exceptions for some of the errors and catch those exceptions. This will not allow the script to shut itself down. Your website or application will keep on working.
4. MANY OTHER FEATURES
There are a lot of other features, like support for emoji’s, new operators, better security with CSPRNG (basically using OS’s Random Number Generator – used for Salting of passwords).
Know more...
0 notes
Text
Why Upgrade Your Site to PHP 7.x
PHP is a widely-used open source general-purpose scripting language that is especially suited for web development and can be embedded into HTML which is why most of the Content Management Systems like WordPress, Magento, Drupal, Joomla etc use PHP. It is not just limited to such site, but a lot of Opensource applications like SugarCRM, osTickets, etc use PHP for their application. TD Web Services provides over 1 Click 400+ PHP Based Applications/scripts within our Business Hosting.
Why Upgrade to PHP 7.2?
1. It’s Crazy Fast
Stats! Stats! Stats! will give us tangible results. Just don’t take our word for it. PHP Performance tests were done on a Tyan 2U server with AMD EPYC 7601 processor and running Ubuntu 17.10 with the Linux 4.13 kernel.
2. More control over type declarations
PHP doesn’t require you to declare your variable type, it takes it automatically. This helps to code faster but also results in errors; because it doesn’t always catch if you’re mixing things up. With PHP 7, you can override the assumptions and declare your own variable with some super useful new techniques, giving you more control and cleaner code.
3. Better Error Handling
All PHP developers dread White Screen of Death. Previously PHP will stop working as soon as it encounters an error. With PHP 7 it enable you to write exceptions for some of the errors and catch those exceptions. This will not allow the script to shut itself down. Your website or application will keep on working.
4. Many Other Features
There are a lot of other features, like support for emoji’s, new operators, better security with CSPRNG (basically using OS’s Random Number Generator – used for Salting of passwords).
Know more...
0 notes
Text
Why toUpgrade your WordPress Website to PHP 7.2
While WordPress still supports PHP5, the PHP project continues to evolve. PHP 7.2 was recently released and while it is not a huge update like PHP 7.0 was, but there are some interesting new feature and there are some important deprecations you should be aware of.
In this article, I will share some important highlights of what is new, and what to look out for when you update your sites and code to PHP 7.2. If you’re still on PHP 5.6 or PHP 7.0, you will want to do so before the end of the year, when security support for both ends.
What is PHP?
PHP (recursive acronym for PHP: Hypertext Preprocessor) is a widely-used open source general-purpose scripting language that is especially suited for web development and can be embedded into HTML. Any website can use PHP, but WordPress was actually built with it, meaning every single WordPress site uses it.
I will share some important highlights of what is new, and what to look out for when you update your sites and code to PHP 7.2. If you’re still on PHP 5.6 or PHP 7.0, you will want to do so before the end of the year, when security support for both ends.
Why you should upgrade to PHP 7.2?
Improved Performance
We’ve been hearing since PHP7 turned out about how much speedier it is than PHP5. PHP7 tends to run WordPress 200 percent – 500 percent times quicker than PHP5. We know moving far from PHP5 bodes well for execution reasons, it’s an easy decision, yet are there any changes in execution redesigning from a more established form of PHP7 to the most recent? Indeed, there are. Beginning tests on PHP 7.2 alpha demonstrated 18-22 percent enhancements in execution versus PHP 7.1.
Cryptography
Cryptography is not easy and is best left to specialists. Having a standard toolset should make it easier for us to do cryptography right. The PHP extension Libsodium has become that standard and is now being added to PHP itself. Having this as part of PHP has already led to increased scrutiny of the code, which is what you want with an encryption library, and will lead to more.
Deprecations To Be Aware Of
PHP 7.2 has deprecated a few functions. there are many functions but important changes are e function create_function() has been deprecated. This function is pretty useless in modern PHP. It does something similar to what a closure does, creates a function without a name that is limited in its use, but with a lot less power and increased security concerns. Using create_function() when you can use an anonymous function, which we’ve had since 2009, instead doesn’t make much sense.
Know more
0 notes
Text
Why toUpgrade your WordPress Website to PHP 7.2
While WordPress still supports PHP5, the PHP project continues to evolve. PHP 7.2 was recently released and while it is not a huge update like PHP 7.0 was, but there are some interesting new feature and there are some important deprecations you should be aware of.
In this article, I will share some important highlights of what is new, and what to look out for when you update your sites and code to PHP 7.2. If you’re still on PHP 5.6 or PHP 7.0, you will want to do so before the end of the year, when security support for both ends.
What is PHP?
PHP (recursive acronym for PHP: Hypertext Preprocessor) is a widely-used open source general-purpose scripting language that is especially suited for web development and can be embedded into HTML. Any website can use PHP, but WordPress was actually built with it, meaning every single WordPress site uses it.
I will share some important highlights of what is new, and what to look out for when you update your sites and code to PHP 7.2. If you’re still on PHP 5.6 or PHP 7.0, you will want to do so before the end of the year, when security support for both ends.
Why you should upgrade to PHP 7.2?
Improved Performance
We’ve been hearing since PHP7 turned out about how much speedier it is than PHP5. PHP7 tends to run WordPress 200 percent – 500 percent times quicker than PHP5. We know moving far from PHP5 bodes well for execution reasons, it’s an easy decision, yet are there any changes in execution redesigning from a more established form of PHP7 to the most recent? Indeed, there are. Beginning tests on PHP 7.2 alpha demonstrated 18-22 percent enhancements in execution versus PHP 7.1.
Cryptography
Cryptography is not easy and is best left to specialists. Having a standard toolset should make it easier for us to do cryptography right. The PHP extension Libsodium has become that standard and is now being added to PHP itself. Having this as part of PHP has already led to increased scrutiny of the code, which is what you want with an encryption library, and will lead to more.
Deprecations To Be Aware Of
PHP 7.2 has deprecated a few functions. there are many functions but important changes are e function create_function() has been deprecated. This function is pretty useless in modern PHP. It does something similar to what a closure does, creates a function without a name that is limited in its use, but with a lot less power and increased security concerns. Using create_function() when you can use an anonymous function, which we’ve had since 2009, instead doesn’t make much sense.
Read more..
0 notes
Link
Learn PHP in easy and simple steps starting from basic to advanced concepts with example, enables you to create dynamic web pages and learn how PHP can help you develop various web applications.
0 notes
Text
Why you should upgrade to PHP 7.2?
Improved Performance
We’ve been hearing since PHP7 turned out about how much speedier it is than PHP5. PHP7 tends to run WordPress 200 percent – 500 percent times quicker than PHP5. We know moving far from PHP5 bodes well for execution reasons, it’s an easy decision, yet are there any changes in execution redesigning from a more established form of PHP7 to the most recent? Indeed, there are. Beginning tests on PHP 7.2 alpha demonstrated 18-22 percent enhancements in execution versus PHP 7.1.
Cryptography
Cryptography is not easy and is best left to specialists. Having a standard toolset should make it easier for us to do cryptography right. The PHP extension Libsodium has become that standard and is now being added to PHP itself. Having this as part of PHP has already led to increased scrutiny of the code, which is what you want with an encryption library, and will lead to more.
Deprecations To Be Aware Of
PHP 7.2 has deprecated a few functions. there are many functions but important changes are e function create_function() has been deprecated. This function is pretty useless in modern PHP. It does something similar to what a closure does, creates a function without a name that is limited in its use, but with a lot less power and increased security concerns. Using create_function() when you can use an anonymous function, which we’ve had since 2009, instead doesn’t make much sense.
Other Small Things
PHP7 enhanced write implying by including scalar compose insights. Likewise, return composes for capacities were included. This is an extraordinary change and makes interfaces significantly more express in what they do. This new form of PHP includes a bland protest compose clue and return write. Any protest will breeze through this test. I don’t love this component. It bodes well since other fundamental composes are bolstered. I simply feel like you ought to be progressively somewhat more particular. Which is fine, if it’s a stdClass protest. However, there was at that point a sort imply for that.
Talking about not in affection. You would now be able to put a comma after the last capacity contention. This could make for cleaner git diffs in the event that you generally put contentions all alone line.
The little thing that I am entirely upbeat about is an adjustment in how intently a strategy abrogating a technique for its parent class signature must match.
This makes it simpler to broaden classes from different libraries that were composed because of more established forms of PHP. It fixes issues I’ve keep running into previously and needed to make a few bargains that didn’t help my code so as to determine.
Not Huge, But Better And More Secure
PHP 7.2 is an improvement, but not groundbreaking. That said, having encryption as part of the standard library in PHP is pretty exciting. As PHP7 evolves, we as developers, get more interesting tools to work with and the reasons for ending PHP5 support in WordPress grows.
Know more about PHP7.2
0 notes
Text
WHY TO UPGRADE YOUR WORDPRESS WEBSITE TO PHP 7.2
While WordPress still supports PHP5, the PHP project continues to evolve. PHP 7.2 was recently released and while it is not a huge update like PHP 7.0 was, but there are some interesting new feature and there are some important deprecations you should be aware of.
In this article, I will share some important highlights of what is new, and what to look out for when you update your sites and code to PHP 7.2. If you’re still on PHP 5.6 or PHP 7.0, you will want to do so before the end of the year, when security support for both ends.
WHAT IS PHP?
PHP (recursive acronym for PHP: Hypertext Preprocessor) is a widely-used open source general-purpose scripting language that is especially suited for web development and can be embedded into HTML. Any website can use PHP, but WordPress was actually built with it, meaning every single WordPress site uses it.
I will share some important highlights of what is new, and what to look out for when you update your sites and code to PHP 7.2. If you’re still on PHP 5.6 or PHP 7.0, you will want to do so before the end of the year, when security support for both ends.
WHY YOU SHOULD UPGRADE TO PHP 7.2?
IMPROVED PERFORMANCE
We’ve been hearing since PHP7 turned out about how much speedier it is than PHP5. PHP7 tends to run WordPress 200 percent – 500 percent times quicker than PHP5. We know moving far from PHP5 bodes well for execution reasons, it’s an easy decision, yet are there any changes in execution redesigning from a more established form of PHP7 to the most recent? Indeed, there are. Beginning tests on PHP 7.2 alpha demonstrated 18-22 percent enhancements in execution versus PHP 7.1.
CRYPTOGRAPHY
Cryptography is not easy and is best left to specialists. Having a standard toolset should make it easier for us to do cryptography right. The PHP extension Libsodium has become that standard and is now being added to PHP itself. Having this as part of PHP has already led to increased scrutiny of the code, which is what you want with an encryption library, and will lead to more.
DEPRECATIONS TO BE AWARE OF
PHP 7.2 has deprecated a few functions. there are many functions but important changes are e function create_function() has been deprecated. This function is pretty useless in modern PHP. It does something similar to what a closure does, creates a function without a name that is limited in its use, but with a lot less power and increased security concerns. Using create_function() when you can use an anonymous function, which we’ve had since 2009, instead doesn’t make much sense.
Know more
0 notes
Text
How to Innstall Linux , Nginx , MySQL, PHP(LEMP stack) Ubntu 18.04
New Post has been published on https://trendyport.com/how-to-innstall-linux-nginx-mysql-phplemp-stack-ubntu-18-04/
How to Innstall Linux , Nginx , MySQL, PHP(LEMP stack) Ubntu 18.04
0 notes
Text
Installing Nginx, MySQL, PHP (LEMP) Stack on Ubuntu 18.04
Ubuntu Server 18.04 LTS (TunzaDev) is finally here and is being rolled out across VPS hosts such as DigitalOcean and AWS. In this guide, we will install a LEMP Stack (Nginx, MySQL, PHP) and configure a web server.
Prerequisites
You should use a non-root user account with sudo privileges. Please see the Initial server setup for Ubuntu 18.04 guide for more details.
1. Install Nginx
Let’s begin by updating the package lists and installing Nginx on Ubuntu 18.04. Below we have two commands separated by &&. The first command will update the package lists to ensure you get the latest version and dependencies for Nginx. The second command will then download and install Nginx.
sudo apt update && sudo apt install nginx
Once installed, check to see if the Nginx service is running.
sudo service nginx status
If Nginx is running correctly, you should see a green Active state below.
● nginx.service - A high performance web server and a reverse proxy server Loaded: loaded (/lib/systemd/system/nginx.service; enabled; vendor preset: enabled) Active: active (running) since Wed 2018-05-09 20:42:29 UTC; 2min 39s ago Docs: man:nginx(8) Process: 27688 ExecStart=/usr/sbin/nginx -g daemon on; master_process on; (code=exited, status=0/SUCCESS) Process: 27681 ExecStartPre=/usr/sbin/nginx -t -q -g daemon on; master_process on; (code=exited, status=0/SUCCESS) Main PID: 27693 (nginx) Tasks: 2 (limit: 1153) CGroup: /system.slice/nginx.service ├─27693 nginx: master process /usr/sbin/nginx -g daemon on; master_process on; └─27695 nginx: worker process
You may need to press q to exit the service status.
2. Configure Firewall
If you haven’t already done so, it is recommended that you enable the ufw firewall and add a rule for Nginx. Before enabling ufw firewall, make sure you add a rule for SSH, otherwise you may get locked out of your server if you’re connected remotely.
sudo ufw allow OpenSSH
If you get an error “ERROR: could find a profile matching openSSH”, this probably means you are not configuring the server remotely and can ignore it.
Now add a rule for Nginx.
sudo ufw allow 'Nginx HTTP'
Rule added Rule added (v6)
Enable ufw firewall.
sudo ufw enable
Press y when asked to proceed.
Now check the firewall status.
sudo ufw status
Status: active To Action From -- ------ ---- OpenSSH ALLOW Anywhere Nginx HTTP ALLOW Anywhere OpenSSH (v6) ALLOW Anywhere (v6) Nginx HTTP (v6) ALLOW Anywhere (v6)
That’s it! Your Nginx web server on Ubuntu 18.04 should now be ready.
3. Test Nginx
Go to your web browser and visit your domain or IP. If you don’t have a domain name yet and don’t know your IP, you can find out with:
sudo ifconfig | grep -Eo 'inet (addr:)?([0-9]*\.){3}[0-9]*' | grep -Eo '([0-9]*\.){3}[0-9]*' | grep -v '127.0.0.1'
You can find this Nginx default welcome page in the document root directory /var/www/html. To edit this file in nano text editor:
sudo nano /var/www/html/index.nginx-debian.html
To save and close nano, press CTRL + X and then press y and ENTER to save changes.
Your Nginx web server is ready to go! You can now add your own html files and images the the /var/www/html directory as you please.
However, you should acquaint yourself with and set up at least one Server Block for Nginx as most of our Ubuntu 18.04 guides are written with Server Blocks in mind. Please see article Installing Nginx on Ubuntu 18.04 with Multiple Domains. Server Blocks allow you to host multiple web sites/domains on one server. Even if you only ever intend on hosting one website or one domain, it’s still a good idea to configure at least one Server Block.
If you don’t want to set up Server Blocks, continue to the next step to set up MySQL.
4. Install MySQL
Let’s begin by updating the package lists and installing MySQL on Ubuntu 18.04. Below we have two commands separated by &&. The first command will update the package lists to ensure you get the latest version and dependencies for MySQL. The second command will then download and install MySQL.
sudo apt update && sudo apt install mysql-server
Press y and ENTER when prompted to install the MySQL package.
Once the package installer has finished, we can check to see if the MySQL service is running.
sudo service mysql status
If running, you will see a green Active status like below.
● mysql.service - MySQL Community Server Loaded: loaded (/lib/systemd/system/mysql.service; enabled; vendor preset: enabled) Active: active (running) since since Wed 2018-05-09 21:10:24 UTC; 16s ago Main PID: 30545 (mysqld) Tasks: 27 (limit: 1153) CGroup: /system.slice/mysql.service └─30545 /usr/sbin/mysqld --daemonize --pid-file=/run/mysqld/mysqld.pid
You may need to press q to exit the service status.
5. Configure MySQL Security
You should now run mysql_secure_installation to configure security for your MySQL server.
sudo mysql_secure_installation
If you created a root password in Step 1, you may be prompted to enter it here. Otherwise you will be asked to create one. (Generate a password here)
You will be asked if you want to set up the Validate Password Plugin. It’s not really necessary unless you want to enforce strict password policies for some reason.
Securing the MySQL server deployment. Connecting to MySQL using a blank password. VALIDATE PASSWORD PLUGIN can be used to test passwords and improve security. It checks the strength of password and allows the users to set only those passwords which are secure enough. Would you like to setup VALIDATE PASSWORD plugin? Press y|Y for Yes, any other key for No:
Press n and ENTER here if you don’t want to set up the validate password plugin.
Please set the password for root here. New password: Re-enter new password:
If you didn’t create a root password in Step 1, you must now create one here.
Generate a strong password and enter it. Note that when you enter passwords in Linux, nothing will show as you are typing (no stars or dots).
By default, a MySQL installation has an anonymous user, allowing anyone to log into MySQL without having to have a user account created for them. This is intended only for testing, and to make the installation go a bit smoother. You should remove them before moving into a production environment. Remove anonymous users? (Press y|Y for Yes, any other key for No) :
Press y and ENTER to remove anonymous users.
Normally, root should only be allowed to connect from 'localhost'. This ensures that someone cannot guess at the root password from the network. Disallow root login remotely? (Press y|Y for Yes, any other key for No) :
Press y and ENTER to disallow root login remotely. This will prevent bots and hackers from trying to guess the root password.
By default, MySQL comes with a database named 'test' that anyone can access. This is also intended only for testing, and should be removed before moving into a production environment. Remove test database and access to it? (Press y|Y for Yes, any other key for No) :
Press y and ENTER to remove the test database.
Reloading the privilege tables will ensure that all changes made so far will take effect immediately. Reload privilege tables now? (Press y|Y for Yes, any other key for No) :
Press y and ENTER to reload the privilege tables.
All done!
As a test, you can log into the MySQL server and run the version command.
sudo mysqladmin -p -u root version
Enter the MySQL root password you created earlier and you should see the following:
mysqladmin Ver 8.42 Distrib 5.7.22, for Linux on x86_64 Copyright (c) 2000, 2018, Oracle and/or its affiliates. All rights reserved. Oracle is a registered trademark of Oracle Corporation and/or its affiliates. Other names may be trademarks of their respective owners. Server version 5.7.22-0ubuntu18.04.1 Protocol version 10 Connection Localhost via UNIX socket UNIX socket /var/run/mysqld/mysqld.sock Uptime: 4 min 28 sec Threads: 1 Questions: 15 Slow queries: 0 Opens: 113 Flush tables: 1 Open tables: 106 Queries per second avg: 0.055
You have now successfully installed and configured MySQL for Ubuntu 18.04! Continue to the next step to install PHP.
6. Install PHP
Unlike Apache, Nginx does not contain native PHP processing. For that we have to install PHP-FPM (FastCGI Process Manager). FPM is an alternative PHP FastCGI implementation with some additional features useful for heavy-loaded sites.
Let’s begin by updating the package lists and installing PHP-FPM on Ubuntu 18.04. We will also install php-mysql to allow PHP to communicate with the MySQL database. Below we have two commands separated by &&. The first command will update the package lists to ensure you get the latest version and dependencies for PHP-FPM and php-mysql. The second command will then download and install PHP-FPM and php-mysql. Press y and ENTER when asked to continue.
sudo apt update && sudo apt install php-fpm php-mysql
Once installed, check the PHP version.
php --version
If PHP was installed correctly, you should see something similar to below.
PHP 7.2.3-1ubuntu1 (cli) (built: Mar 14 2018 22:03:58) ( NTS ) Copyright (c) 1997-2018 The PHP Group Zend Engine v3.2.0, Copyright (c) 1998-2018 Zend Technologies with Zend OPcache v7.2.3-1ubuntu1, Copyright (c) 1999-2018, by Zend Technologies
Above we are using PHP version 7.2, though this may be a later version for you.
Depending on what version of Nginx and PHP you install, you may need to manually configure the location of the PHP socket that Nginx will connect to.
List the contents for the directory /var/run/php/
ls /var/run/php/
You should see a few entries here.
php7.2-fpm.pid php7.2-fpm.sock
Above we can see the socket is called php7.2-fpm.sock. Remember this as you may need it for the next step.
7. Configure Nginx for PHP
We now need to make some changes to our Nginx server block.
The location of the server block may vary depending on your setup. By default, it is located in /etc/nginx/sites-available/default.
However, if you have previously set up custom server blocks for multiple domains in one of our previous guides, you will need to add the PHP directives to each server block separately. A typical custom server block file location would be /etc/nginx/sites-available/mytest1.com.
For the moment, we will assume you are using the default. Edit the file in nano.
sudo nano /etc/nginx/sites-available/default
Press CTRL + W and search for index.html.
Now add index.php before index.html
/etc/nginx/sites-available/default
index index.php index.html index.htm index.nginx-debian.html;
Press CTRL + W and search for the line server_name.
Enter your server’s IP here or domain name if you have one.
/etc/nginx/sites-available/default
server_name YOUR_DOMAIN_OR_IP_HERE;
Press CTRL + W and search for the line location ~ \.php.
You will need to uncomment some lines here by removing the # signs before the lines marked in red below.
Also ensure value for fastcgi_pass socket path is correct. For example, if you installed PHP version 7.2, the socket should be: /var/run/php/php7.2-fpm.sock
If you are unsure which socket to use here, exit out of nano and run ls /var/run/php/
/etc/nginx/sites-available/default
... location ~ \.php$ { include snippets/fastcgi-php.conf; # # # With php-fpm (or other unix sockets): fastcgi_pass unix:/var/run/php/php7.2-fpm.sock; # # With php-cgi (or other tcp sockets): # fastcgi_pass 127.0.0.1:9000; } ...
Once you’ve made the necessary changes, save and close (Press CTRL + X, then press y and ENTER to confirm save)
Now check the config file to make sure there are no syntax errors. Any errors could crash the web server on restart.
sudo nginx -t
nginx: the configuration file /etc/nginx/nginx.conf syntax is ok nginx: configuration file /etc/nginx/nginx.conf test is successful
If no errors, you can reload the Nginx config.
sudo service nginx reload
8. Test PHP
To see if PHP is working correctly on Ubuntu 18.04, let’s a create a new PHP file called info.php in the document root directory. By default, this is located in /var/www/html/, or if you set up multiple domains in a previous guide, it may be located in somewhere like /var/www/mytest1.com/public_html
Once you have the correct document root directory, use the nano text editor to create a new file info.php
sudo nano /var/www/html/info.php
Type or paste the following code into the new file. (if you’re using PuTTY for Windows, right-click to paste)
/var/www/html/info.php
Save and close (Press CTRL + X, then press y and ENTER to confirm save)
You can now view this page in your web browser by visiting your server’s domain name or public IP address followed by /info.php: http://your_domain_or_IP/info.php
phpinfo() outputs a large amount of information about the current state of PHP. This includes information about PHP compilation options and extensions, the PHP version and server information.
You have now successfully installed PHP-FPM for Nginx on Ubuntu 18.04 LTS (Bionic Beaver).
Make sure to delete info.php as it contains information about the web server that could be useful to attackers.
sudo rm /var/www/html/info.php
What Next?
Now that your Ubuntu 18.04 LEMP web server is up and running, you may want to install phpMyAdmin so you can manage your MySQL server.
Installing phpMyAdmin for Nginx on Ubuntu 18.04
To set up a free SSL cert for your domain:
Configuring Let’s Encrypt SSL Cert for Nginx on Ubuntu 18.04
You may want to install and configure an FTP server
Installing an FTP server with vsftpd (Ubuntu 18.04)
We also have several other articles relating to the day-to-day management of your Ubuntu 18.04 LEMP server
Hey champ! - You’re all done!
Feel free to ask me any questions in the comments below.
Let me know in the comments if this helped. Follow Us on - Twitter - Facebook - YouTube.
1 note
·
View note
Text
Why toUpgrade your WordPress Website to PHP 7.2
While WordPress still supports PHP5, the PHP project continues to evolve. PHP 7.2 was recently released and while it is not a huge update like PHP 7.0 was, but there are some interesting new feature and there are some important deprecations you should be aware of.
In this article, I will share some important highlights of what is new, and what to look out for when you update your sites and code to PHP 7.2. If you’re still on PHP 5.6 or PHP 7.0, you will want to do so before the end of the year, when security support for both ends.
What is PHP?
PHP (recursive acronym for PHP: Hypertext Preprocessor) is a widely-used open source general-purpose scripting language that is especially suited for web development and can be embedded into HTML. Any website can use PHP, but WordPress was actually built with it, meaning every single WordPress site uses it.
I will share some important highlights of what is new, and what to look out for when you update your sites and code to PHP 7.2. If you’re still on PHP 5.6 or PHP 7.0, you will want to do so before the end of the year, when security support for both ends.
Why you should upgrade to PHP 7.2?
Improved Performance
We’ve been hearing since PHP7 turned out about how much speedier it is than PHP5. PHP7 tends to run WordPress 200 percent – 500 percent times quicker than PHP5. We know moving far from PHP5 bodes well for execution reasons, it’s an easy decision, yet are there any changes in execution redesigning from a more established form of PHP7 to the most recent? Indeed, there are. Beginning tests on PHP 7.2 alpha demonstrated 18-22 percent enhancements in execution versus PHP 7.1.
Cryptography
Cryptography is not easy and is best left to specialists. Having a standard toolset should make it easier for us to do cryptography right. The PHP extension Libsodium has become that standard and is now being added to PHP itself. Having this as part of PHP has already led to increased scrutiny of the code, which is what you want with an encryption library, and will lead to more.
Deprecations To Be Aware Of
PHP 7.2 has deprecated a few functions. there are many functions but important changes are e function create_function() has been deprecated. This function is pretty useless in modern PHP. It does something similar to what a closure does, creates a function without a name that is limited in its use, but with a lot less power and increased security concerns. Using create_function() when you can use an anonymous function, which we’ve had since 2009, instead doesn’t make much sense.
Know more...
0 notes