#PersistentStorage
Explore tagged Tumblr posts
Visit Tumblr Blog
Explore Tumblr blogs with no restrictions, modern design and the best experience.
Last Seen Tumblr Blogs


Fun Fact
The most popular pages on Tumblr are about Minecraft, GIFs, and David J. Peterson.
Text
As organizations look to modernize infrastructure and migrate legacy virtual machines (VMs) to container-native environments, Red Hat OpenShift Virtualization emerges as a powerful solution. A crucial step in this migration journey is configuring and managing storage for virtual machines effectively — especially when orchestrated through Ansible Automation Platform.
Why Storage Configuration Matters in VM Migration
Virtual machines, unlike containers, are tightly coupled with persistent storage:
VM disks can be large, stateful, and performance-sensitive.
Improper storage configuration can result in data loss, slow I/O, or failed migrations.
OpenShift Virtualization relies on Persistent Volume Claims (PVCs) and StorageClasses to attach virtual disks to VMs.
🎯 Key Objectives of Storage Configuration
Ensure Data Integrity – Retain disk states and OS configurations during migration.
Optimize Performance – Choose appropriate backends (e.g., block storage for performance).
Enable Automation – Use Ansible playbooks to consistently define and apply storage configurations.
Support Scalability – Configure dynamic provisioning to meet demand elastically.
🔑 Types of Storage in OpenShift Virtualization
Persistent Volumes (PVs) and Claims (PVCs):
Each VM disk maps to a PVC.
StorageClass defines how and where the volume is provisioned.
DataVolumes (via Containerized Data Importer - CDI):
Automates disk image import (e.g., from an HTTP server or PVC).
Enables VM creation from existing disk snapshots.
StorageClasses:
Abstracts the underlying storage provider (e.g., ODF, Ceph, NFS, iSCSI).
Allows admins to define performance and replication policies.
How Ansible Automates Storage Setup
The Ansible Automation Platform integrates with OpenShift Virtualization to:
Define VM templates with storage requirements.
Automate DataVolume creation.
Configure PVCs and attach to virtual machines.
Manage backup/restore of volumes.
This reduces human error, accelerates migration, and ensures consistency across environments.
✅ Best Practices
Pre-Migration Assessment:
Identify VM disk sizes, performance needs, and existing formats (QCOW2, VMDK, etc.).
Use Templates with Embedded Storage Policies:
Define VM templates that include PVC sizes and storage classes.
Enable Dynamic Provisioning:
Choose storage backends that support automated provisioning.
Monitor I/O Performance:
Use metrics to evaluate storage responsiveness post-migration.
Secure Storage with Access Controls:
Define security contexts and role-based access for sensitive VM disks.
🚀 Final Thoughts
Migrating virtual machines to Red Hat OpenShift Virtualization is not just a lift-and-shift task—it’s an opportunity to modernize how storage is managed. Leveraging the Ansible Automation Platform, you can configure, provision, and attach storage with precision and repeatability.
By adopting a thoughtful, automated approach to storage configuration, organizations can ensure a smooth, scalable, and secure migration process — laying the foundation for hybrid cloud success.
For more info, Kindly follow: Hawkstack Technologies
#OpenShiftVirtualization#RedHatOpenShift#AnsibleAutomation#VMMigration#HybridCloud#PersistentStorage#CloudInfrastructure#OpenSourceTech#DevOpsAutomation#ITModernization#KubeVirt#DataVolumes#StorageManagement#RHCE#InfrastructureAsCode
0 notes
Text
Mastering Data Mobility: Unveiling the Power of Docker Volumes

Docker volume is a storage mechanism that is used for persistent data storage generated by Docker containers.
All volumes are managed by Docker and stored in a dedicated directory on your host, usually /var/lib/docker/volumes for Linux systems.
These are the uses of Volume:
Decoupling containers from storage
Attach Volume to a container
Share volume (storage/data) among different containers
On Deleting container volume do not delete
Commands of Docker Volume
create: it is used to create new volumes.
ls: It is used to list all the volumes in a namespace.
inspect: It is used to know more about any of the volumes.
rm: It is used to remove any volume if it is no longer required.
prune: It is used to remove all unused volumes.
Examples to Implement Docker Volume
You can start a container with a volume by setting the -v flag when you call docker run.
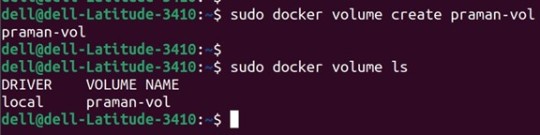
1. Create a new volume named ‘praman-vol’ and list it as below.
docker volume create praman-vol
docker volume ls
Output:
2. Check all details of this volume using the ‘inspect’ command as below:
Command:
docker volume inspect my-vol Output:

3. Now, mount this volume to a container using the ‘-v’ flag and connect to the container using the ‘docker exec’ command, create a new test file ‘test.txt’. Stop and delete this container and create a new container and connect the same volume to this container. Again, execute this new container and check if the file is available or not in this newly created container as below
Commands:
docker run -itd -v praman-vol:/root --name wilsh-harvi alpine sleep 2000
docker exec -it wilsh-harvi sh
/ # cd /root
~ # echo “Welcome to praman” > test.txt
~ # cat test.txt
~ # exit
docker container stop wilsh-harvi
docker container rm wilsh-harvi
docker run -itd --mount source=praman-vol,target=/etc/ --name wilsh-harvi2 alpine sleep 2000
docker exec -it wilsh-harvi2 sh
/ # cat /etc/test.txt
/ # exit
Output:

Explanation: In the above snapshot, we can see that the file is available even after the first container got destroyed.
4. If we want to see the above file without mounting it to any container then we have to browse the ‘Mountpoint’ of the volume as below:
Command:
sudo cat /var/lib/docker/volumes/praman-vol/_data/test.txt
Output:

5. If this volume is no longer required and can be deleted; we can do so using the ‘rm’ command as below:
Command:
docker volume rm praman-vol
Output:

6. If there are multiple volumes that need to be deleted, we use the ‘prune’ command to delete all unused volumes at once as below:
Command:
docker volume prune
Output:

Explanation: In the above example, we have created 4 new volumes and did not attach any container to them it so we can use the ‘prune’ command to delete all the three volumes at once.
Advantages of Docker Volume
We can share volumes among multiple containers safely; backup and migration of volumes are also easy.
Allows sharing data among multiple containers.
We can attach volumes on both types of containers, whether it is a Linux and Windows container.
Conclusion
To conclude, in this article, we discussed how to create and inspect a Volume and mount it to multiple Docker Containers. This proves to be very helpful when you want shared access to files and directories among multiple Docker Containers.
Credit – Sachin Auti
MetricsViews Pvt. Ltd.
MetricsViews specializes in building a solid DevOps strategy with cloud-native including AWS, GCP, Azure, Salesforce, and many more. We excel in microservice adoption, CI/CD, Orchestration, and Provisioning of Infrastructure - with Smart DevOps tools like Terraform, and CloudFormation on the cloud.
www.metricsviews.com
#DockerVolumes#VolumeManagement#ContainerData#PersistentStorage#DockerStorage#DataContainers#VolumeMounting#ContainerVolumes#StorageSolutions#DockerPersistence
0 notes
Text
🔄 Backing Up and Restoring Kubernetes Block and File Volumes – No-Code Guide
Kubernetes has become a foundational platform for deploying containerized applications. But as more stateful workloads enter the cluster — like databases and shared storage systems — ensuring data protection becomes critical.
This no-code guide explores how to back up and restore Kubernetes block and file volumes, the differences between storage types, and best practices for business continuity and disaster recovery.
📌 What Is Kubernetes Volume Backup & Restore?
In Kubernetes, Persistent Volumes (PVs) store data used by pods. These volumes come in two main types:
Block Storage: Raw devices formatted by applications (e.g., for databases).
File Storage: File systems shared between pods (e.g., for media files or documents).
Backup and restore in this context means protecting this stored data from loss, corruption, or accidental deletion — and recovering it when needed.
Block vs 📂 File Storage: What's the Difference?
FeatureBlock StorageFile StorageUse CaseDatabases, apps needing low latencyMedia, documents, logsAccessSingle node accessMulti-node/shared accessExampleAmazon EBS, OpenStack CinderNFS, CephFS, GlusterFS
Understanding your storage type helps decide the right backup tool and strategy.
🔒 Why Backing Up Volumes Is Essential
🛡️ Protects critical business data
💥 Recovers from accidental deletion or failure
📦 Enables migration between clusters or cloud providers
🧪 Supports safe testing using restored copies
🔧 Common Backup Methods (No Code Involved)
1. Snapshots (for Block Volumes)
Most cloud providers and storage backends support volume snapshots, which are point-in-time backups of storage volumes. These can be triggered through the Kubernetes interface using storage plugins called CSI drivers.
Benefits:
Fast and efficient
Cloud-native and infrastructure-integrated
Easy to automate with backup tools
2. File Backups (for File Volumes)
For file-based volumes like NFS or CephFS, the best approach is to regularly copy file contents to a secure external storage location — such as object storage or an offsite file server.
Benefits:
Simple to implement
Granular control over which files to back up
Works well with shared volumes
3. Backup Tools (All-in-One Solutions)
Several tools offer full platform support to handle Kubernetes volume backup and restore — with user-friendly interfaces and no need to touch code:
Velero: Popular open-source tool that supports scheduled backups, volume snapshots, and cloud storage.
Kasten K10: Enterprise-grade solution with dashboards, policy management, and compliance features.
TrilioVault, Portworx PX-Backup, and Rancher Backup: Also offer graphical UIs and seamless Kubernetes integration.
✅ Backup Best Practices for Kubernetes Volumes
🔁 Automate backups on a regular schedule (daily/hourly)
🔐 Encrypt data at rest and in transit
🌍 Store backups in a different location/region from the primary cluster
📌 Use labels to categorize backups by application or environment
🧪 Periodically test restore processes to validate recoverability
♻️ How Restoration Works (No Coding Required)
Restoring volumes in Kubernetes depends on the type of backup:
For snapshots, simply point new volumes to an existing snapshot when creating them again.
For file backups, use backup tools to restore contents back into the volume or re-attach to new pods.
For full-platform backup tools, use the interface to select a backup and restore it — including associated volumes, pods, and configurations.
Many solutions provide dashboards, logs, and monitoring to confirm that restoration was successful.
🚀 Summary: Protect What Matters
As Kubernetes powers more business-critical applications, backing up your block and file volumes is no longer optional — it’s essential. Whether using built-in snapshots, file-based backups, or enterprise tools, ensure you have a backup and recovery plan that’s tested, automated, and production-ready.
Your Kubernetes environment can be resilient and disaster-proof — with zero code required.
For more info, Kindly follow: Hawkstack Technologies
#Kubernetes#K8s#DevOps#CloudNative#PersistentStorage#StatefulApps#KubernetesStorage#VolumeBackup#DisasterRecovery#DataProtection#PlatformEngineering#SRE#CloudSecurity#OpenSourceTools#NoCodeOps
0 notes
Photo

Got webinar?
0 notes
Photo

Attending #HPEAspire? Join us in 15 minutes!
0 notes
Link
LEARN -> Peristent Storage for Kubernetes
0 notes