#VolumeMounting
Explore tagged Tumblr posts
Visit Tumblr Blog
Explore Tumblr blogs with no restrictions, modern design and the best experience.
Last Seen Tumblr Blogs


Fun Fact
Tumblr’s website traffic is steadily declining.
Text
Mastering Data Mobility: Unveiling the Power of Docker Volumes

Docker volume is a storage mechanism that is used for persistent data storage generated by Docker containers.
All volumes are managed by Docker and stored in a dedicated directory on your host, usually /var/lib/docker/volumes for Linux systems.
These are the uses of Volume:
Decoupling containers from storage
Attach Volume to a container
Share volume (storage/data) among different containers
On Deleting container volume do not delete
Commands of Docker Volume
create: it is used to create new volumes.
ls: It is used to list all the volumes in a namespace.
inspect: It is used to know more about any of the volumes.
rm: It is used to remove any volume if it is no longer required.
prune: It is used to remove all unused volumes.
Examples to Implement Docker Volume
You can start a container with a volume by setting the -v flag when you call docker run.
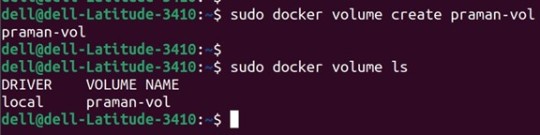
1. Create a new volume named ‘praman-vol’ and list it as below.
docker volume create praman-vol
docker volume ls
Output:
2. Check all details of this volume using the ‘inspect’ command as below:
Command:
docker volume inspect my-vol Output:

3. Now, mount this volume to a container using the ‘-v’ flag and connect to the container using the ‘docker exec’ command, create a new test file ‘test.txt’. Stop and delete this container and create a new container and connect the same volume to this container. Again, execute this new container and check if the file is available or not in this newly created container as below
Commands:
docker run -itd -v praman-vol:/root --name wilsh-harvi alpine sleep 2000
docker exec -it wilsh-harvi sh
/ # cd /root
~ # echo “Welcome to praman” > test.txt
~ # cat test.txt
~ # exit
docker container stop wilsh-harvi
docker container rm wilsh-harvi
docker run -itd --mount source=praman-vol,target=/etc/ --name wilsh-harvi2 alpine sleep 2000
docker exec -it wilsh-harvi2 sh
/ # cat /etc/test.txt
/ # exit
Output:

Explanation: In the above snapshot, we can see that the file is available even after the first container got destroyed.
4. If we want to see the above file without mounting it to any container then we have to browse the ‘Mountpoint’ of the volume as below:
Command:
sudo cat /var/lib/docker/volumes/praman-vol/_data/test.txt
Output:

5. If this volume is no longer required and can be deleted; we can do so using the ‘rm’ command as below:
Command:
docker volume rm praman-vol
Output:

6. If there are multiple volumes that need to be deleted, we use the ‘prune’ command to delete all unused volumes at once as below:
Command:
docker volume prune
Output:

Explanation: In the above example, we have created 4 new volumes and did not attach any container to them it so we can use the ‘prune’ command to delete all the three volumes at once.
Advantages of Docker Volume
We can share volumes among multiple containers safely; backup and migration of volumes are also easy.
Allows sharing data among multiple containers.
We can attach volumes on both types of containers, whether it is a Linux and Windows container.
Conclusion
To conclude, in this article, we discussed how to create and inspect a Volume and mount it to multiple Docker Containers. This proves to be very helpful when you want shared access to files and directories among multiple Docker Containers.
Credit – Sachin Auti
MetricsViews Pvt. Ltd.
MetricsViews specializes in building a solid DevOps strategy with cloud-native including AWS, GCP, Azure, Salesforce, and many more. We excel in microservice adoption, CI/CD, Orchestration, and Provisioning of Infrastructure - with Smart DevOps tools like Terraform, and CloudFormation on the cloud.
www.metricsviews.com
#DockerVolumes#VolumeManagement#ContainerData#PersistentStorage#DockerStorage#DataContainers#VolumeMounting#ContainerVolumes#StorageSolutions#DockerPersistence
0 notes
Text
Deploying Text Generation Web UI on a Kubernetes Cluster
In this blog post, we'll walk through the process of deploying a text generation web UI using the Docker image atinoda/text-generation-webui on a Kubernetes cluster. We'll cover everything from creating a Persistent Volume Claim (PVC) to setting up a Kubernetes Service for port forwarding.
Prerequisites
A running Kubernetes cluster
kubectl installed and configured to interact with your cluster
Step 1: Create a Namespace
First, let's create a namespace called text-gen-demo to isolate our resources.
kubectl create namespace text-gen-demo
Step 2: Create a Persistent Volume Claim (PVC)
We'll need a PVC to store our data. Create a YAML file named text-gen-demo-pvc.yaml with the following content:
apiVersion: v1 kind: PersistentVolumeClaim metadata: name: text-gen-demo-pvc namespace: text-gen-demo spec: accessModes: - ReadWriteOnce resources: requests: storage: 100Gi storageClassName: standard
Apply the PVC:
kubectl apply -f text-gen-demo-pvc.yaml
Step 3: Deploy the Pod
Create a YAML file named text-gen-demo-pod.yaml with the following content:
apiVersion: v1 kind: Pod metadata: name: text-gen-demo-pod namespace: text-gen-demo labels: app: text-gen-demo spec: containers: - name: text-gen-demo-container image: atinoda/text-generation-webui ports: - containerPort: 7860 - containerPort: 5000 - containerPort: 5005 env: - name: TORCH_CUDA_ARCH_LIST value: "7.5" volumeMounts: - name: text-gen-demo-pvc mountPath: /app/loras subPath: loras - name: text-gen-demo-pvc mountPath: /app/models subPath: models volumes: - name: text-gen-demo-pvc persistentVolumeClaim: claimName: text-gen-demo-pvc
Apply the Pod:
kubectl apply -f text-gen-demo-pod.yaml
Step 4: Create a Service
Create a YAML file named text-gen-demo-service.yaml with the following content:
apiVersion: v1 kind: Service metadata: name: text-gen-demo-service namespace: text-gen-demo spec: selector: app: text-gen-demo ports: - name: "webui" protocol: TCP port: 7860 targetPort: 7860 - name: "api" protocol: TCP port: 5000 targetPort: 5000 - name: "api-stream" protocol: TCP port: 5005 targetPort: 5005
Apply the Service:
kubectl apply -f text-gen-demo-service.yaml
Step 5: Port Forwarding
Finally, let's set up port forwarding to access the web UI locally.
kubectl port-forward svc/text-gen-demo-service 7860:7860 -n text-gen-demo
You should now be able to access the web UI at http://localhost:7860.
Troubleshooting
If you encounter issues with port forwarding, make sure:
The pod is running and healthy (kubectl get pods -n text-gen-demo)
The service is correctly configured (kubectl describe svc text-gen-demo-service -n text-gen-demo)
The service has endpoints (kubectl get endpoints text-gen-demo-service -n text-gen-demo)
Conclusion
You've successfully deployed a text generation web UI on a Kubernetes cluster! You can now interact with the web UI locally and generate text as needed.
0 notes
Text
Open Sourcing our Kubernetes Tools
At Tumblr, we are avid fans of Kubernetes. We have been using Kubernetes for all manner of workloads, like critical-path web requests handling for tumblr.com, background task executions like sending queued posts and push notifications, and scheduled jobs for spam detection and content moderation. Throughout our journey to move our 11 year old (almost 12! 🎂) platform to a container-native architecture, we have made innumerable changes to how our applications are designed and run. Inspired by a lot of existing Kubernetes APIs and best practices, we're excited to share with the community some of the tools we've developed at Tumblr as our infrastructure has evolved to work with Kubernetes.
To help us integrate Kubernetes into our workflows, we have built a handful of tools of which we are open-sourcing three today! Each tool is a small, focused utility, designed to solve specific integration needs Tumblr had while migrating our workflows to Kubernetes. The tools were built to handle our needs internally, but we believe they are useful to the wider Kubernetes community.
github.com/tumblr/k8s-sidecar-injector
github.com/tumblr/k8s-config-projector
github.com/tumblr/k8s-secret-projector
k8s-sidecar-injector
Any company that has containerized an application as large and complex as Tumblr knows that it requires a tremendous amount of effort. Applications don't become container-native overnight, and sidecars can be useful to help emulate older deployments with colocated services on physical hosts or VMs. To reduce the amount of fragile copy-paste code by developers adding in sidecars to their Deployments and CronJobs, we created a service to dynamically inject sidecars, volumes, and environment data into pods as they are launched.
The k8s-sidecar-injector listens to the Kubernetes API for Pod launches that contain annotations requesting a specific sidecar to be injected. For example, the annotation injector.tumblr.com/request=sidecar-prod-v1 will add any environment variables, volumes, and containers defined in the sidecar-prod-v1 configuration. We use this to add sidecars like logging and metrics daemons, cluster-wide environment variables like DATACENTER and HTTP_PROXY settings, and volumes for shared configuration data. By centralizing configuration of sidecars, we were able to reduce complexity in CronJobs and Deployments by hundreds of lines, eliminated copy-paste errors, and made rolling out updates to shared components in our sidecars effortless.
An example sidecar ConfigMap is below, which adds a logging container, a volume from a logger-config ConfigMap, and some environment variables into the Pod.
--- apiVersion: v1 kind: ConfigMap metadata: name: example-sidecars namespace: kube-system labels app: k8s-sidecar-injector data: logger-v1: | name: logger-v1 containers: - name: logger image: some/logger:2.2.3 imagePullPolicy: IfNotPresent ports: - containerPort: 8888 volumeMounts: - name: logger-conf mountPath: /etc/logger volumes: - name: logger-conf configMap: name: logger-config env: - name: DATACENTER value: dc01 - name: HTTP_PROXY value: http://my-proxy.org:8080/ - name: HTTPS_PROXY value: http://my-proxy.org:8080/
This configuration will add the logger container into each pod with the annotation injector.tumblr.com/request: logger-v1, with a ConfigMap projected as a volume in /etc/logger. Additionally, every container in the Pod will get the DATACENTER=dc01 and HTTP_PROXY environment variables added, if they were not already set. This has allowed us to drastically reduce our boilerplate configuration when containerizing legacy applications that require a complex sidecar configuration.
k8s-config-projector
Internally, we have many types of configuration data that is needed by a variety of applications. We store canonical settings data like feature flags, lists of hosts/IPs+ports, and application settings in git. This allows automated generation/manipulation of these settings by bots, cron jobs, Collins, and humans alike. Applications want to know about some subset of this configuration data, and they want to be informed when this data changes as quickly as possible. Kubernetes provides the ConfigMap resource, which enables users to provide their service with configuration data and update the data in running pods without requiring a redeployment. We wanted to use this to configure our services and jobs in a Kubernetes-native manner, but needed a way to bridge the gap between our canonical configuration store (git repo of config files) to ConfigMaps. Thus, was k8s-config-projector born.
The Config Projector (github.com/tumblr/k8s-config-projector)[github.com/tumblr/k8s-config-projector] is a command line tool, meant to be run by CI processes. It combines a git repo hosting configuration data (feature flags, lists of hostnames+ports, application settings) with a set of "projection manifest" files that describe how to group/extract settings from the config repo and transmute them into ConfigMaps. The config projector allows developers to encode a set of configuration data the application needs to run into a projection manifest. As the configuration data changes in the git repository, CI will run the projector, projecting and deploying new ConfigMaps containing this updated data, without needing the application to be redeployed. Projection datasources can handle both structured and unstructured configuration files (YAML, JSON, and raw text/binary).
An example projection manifest is below, describing how a fictitious notification application could request some configuration data that may dynamically change (memcached hosts, log level, launch flags, etc):
--- name: notifications-us-east-1-production namespace: notification-production data: # extract some fields from JSON - source: generated/us-east-1/production/config.json output_file: config.json field_extraction: - memcached_hosts: $.memcached.notifications.production.hosts - settings: $.applications.notification.production.settings - datacenter: $.datacenter - environment: $.environment # extract a scalar value from a YAML - source: apps/us-east-1/production/notification.yaml output_file: launch_flags extract: $.launch_flags
After processing by the config projector, the following ConfigMap is generated, which can then be posted to a Kubernetes cluster with kubectl create -f <generatedfile>.
kind: ConfigMap apiVersion: v1 metadata name: notifications-us-east-1-production namespace: notification-production labels: tumblr.com/config-version: "1539778254" tumblr.com/managed-configmap: "true" data: config.json: | { "memcached_hosts": ["2.3.4.5:11211","4.5.6.7:11211","6.7.8.9:11211"], "settings": { "debug": false, "buffer": "2000", "flavor": "out of control", "log_level": "INFO", }, "datacenter": "us-east-1", "environment": "production" } launch_flags: "-Xmx5g -Dsun.net.inetaddr.ttl=10"
With this tool, we have enabled our applications running in kubernetes to receive dynamic configuration updates without requiring container rebuilds or deployments. More examples can be found here.
k8s-secret-projector
Similar to our configuration repository, we store secure credentials in access controlled vaults, divided by production levels. We wanted to enable developers to request access to subsets of credentials for a given application without needing to grant the user access to the secrets themselves. Additionally, we wanted to make certificate and password rotation transparent to all applications, enabling us to rotate credentials in an application-agnostic manner, without needing to redeploy applications. Lastly, we wanted to introduce a mechanism where application developers would explicitly describe which credentials their services need, and enable a framework to audit and grant permissions for a service to consume a secret.
The k8s-secret-projector operates similarly to the k8s-config-projector, albeit with a few differences. The secret projector combines a repository of projection manifests with a set of credential repositories. A Continuous Integration (CI) tool like Jenkins will run the k8s-secret-projector against any changes in the projection manifests repository to generate new Kubernetes Secret YAML files. Then, Continuous Deployment can deploy the generated and validated Secret files to any number of Kubernetes clusters.
Take this file in the production credentials repository, named aws/credentials.json:
{ "us-east-1": { "region": "us-east-1", "aws": { "key": "somethignSekri7T!", }, "s3": { "key": "passW0rD!", }, "redshift": { "key": "ello0liv3r!", "database": "mydatabase" } }, "us-west-2": { "region": "us-west-2", "aws": { "key": "anotherPasswr09d!", }, "s3": { "key": "sueprSekur#", } } }
We need to create an amazon.yaml configuration file containing the s3.key and aws.key for us-east-1, as well as a text file containing our region. The projection manifest below will extract only the fields we need, and output them in the format desired.
name: aws-credentials namespace: myteam repo: production data: # create an amazon.yaml config with the secrets we care about - name: amazon.yaml source: format: yaml json: aws/credentials.json jsonpaths: s3: $.us-east-1.s3.key aws: $.us-east-1.aws.key region: $.us-east-1.region # create a item containing just the name of the region we are in - name: region source: json: aws/credentials.json jsonpath: $.us-east-1.region
Projecting this manifest with the above credentials results in the following Kubernetes Secret YAML file:
apiVersion: v1 kind: Secret metadata: labels: tumblr.com/managed-secret: "true" tumblr.com/secret-version: master-741-7459d1abcc120 name: aws-credentials namespace: myteam data: region: dXMtZWFzdC0x # region decoded for clarity: us-east-1 amazon.yaml: LS0tCnMzOiAicGFzc1cwckQhIgphd3M6ICJzb21ldGhpZ25TZWtyaTdUISIKcmVnaW9uOiB1cy1lYXN0LTEK # amazon.yaml decoded for clarity: # --- # s3: "passW0rD!" # aws: "somethignSekri7T!" # region: us-east-1
In addition to being able to extract fields from structured YAML and JSON sources, we gave it the ability to encrypt generated Secrets before they touch disk. This allows Secrets to be deployed in shared Kubernetes environments, where users are colocated with other users, and do not feel comfortable with their Secret resources being unencrypted in etcd. Please note, this requires decryption by your applications before use. More details on how the encryption modules work can be found here.
For more examples of how to use this, check out examples here!
What's Next
We are excited to share these tools with the Kubernetes open source community, and we hope they can help your organization adopt container-native thinking when managing application lifecycle like they helped Tumblr. Feature enhancements and bug fixes are welcome! And, shameless plug: if you are interested in Kubernetes, containerization technology, open source, and scaling a massive website with industry leading technologies and practices? Come join us!.
- @pipefail
96 notes
·
View notes
Text
Many people around the world look for ways to build container images in Kubernetes without the need to mount the docker socket or perform any other action that compromises security on your cluster. With the increased need, a famous software engineer, Jessie Frazelle saw the need to introduce Img image builder. This is an open-source, daemon-less, and unprivileged Dockerfile and OCI compatible container image builder. Img is a wrapper around the open-source BuildKit, a building technology embedded within Img. There are many features associated with the img image builder. Some of them are: Img CLI, a responsive CLI that provides a set of commands similar to Docker CLI commands when dealing with container image building, distribution, and image manipulation. Rootless Builds: img can be run without requiring the –privileged Docker flag or the equivalent privileged: true security context in Kubernetes. BuildKit: defined as one of the next generation build engines for container images. Parallel Build Execution: BuildKit assembles an internal representation of the build steps as a Directed Acyclic Graph (DAG), which enables it to determine which build steps can be executed in parallel. Cross-Platform/OS Builds: it’s possible to build images for different combinations of architecture and OS on a completely different platform In this guide, we will take a deep dive into how to build container images on Kubernetes using img image builder. Setup Pre-requisites This guide will work best if you have a Kubernetes cluster set up. Below is a list of dedicated guides to help you achieve this: Install Kubernetes Cluster on Rocky Linux 8 with Kubeadm & CRI-O Install Kubernetes Cluster on Ubuntu using K3s Deploy Kubernetes Cluster on Linux With k0s Run Kubernetes on Debian with Minikube This guide will demonstrate how to build container images from Dockerfile using img image builder in Kubernetes with Github. So, you will also need: Access to Kubernetes cluster with permissions to create, list, update and delete pods, jobs, and services Github repository with a Dockerfile: we will use the repo URL as the path of the Dockerfile Dockerhub account: to be able to authenticate and push the Docker image. #1. Configure Build Contexts For this guide, we will use a private GitHub repository as our build context. We need to configure it with the required Dockerfile. The URL to my private git repository used in this article is: https://github.com/computingforgeeks/kubernetes-demo In the repository, I will create a Dockerfile with the contents below: FROM ubuntu ENTRYPOINT ["/bin/bash", "-c", "echo hello"] Now obtain a Personal Access Token to your git account. #2. Create the Img Pod Manifest We will have two containers: Git-sync: an init container to clone the private git repository img: that builds the docker image and pushes it to docker hub These two containers share a volume git-repo mounted as emptyDir at /repo Create a manifest for the pod. vim pod.yml Add the below lines to the manifest: apiVersion: v1 kind: Pod metadata: labels: run: img name: img annotations: container.apparmor.security.beta.kubernetes.io/img: unconfined spec: securityContext: runAsUser: 1000 initContainers: - name: git-sync image: k8s.gcr.io/git-sync:v3.1.5 volumeMounts: - name: git-repo mountPath: /repo env: - name: GIT_SYNC_REPO value: "https://github.com/computingforgeeks/kubernetes-demo.git" ##Private repo-path-you-want-to-clone - name: GIT_SYNC_USERNAME value: "computingforgeeks" ##The username for the Git repository - name: GIT_SYNC_PASSWORD value: "ghp_JilxkjTT5EIgJCV........" ##The Personal Access Token for the Git repository - name: GIT_SYNC_BRANCH value: "master" ##repo-branch - name: GIT_SYNC_ROOT value: /repo - name: GIT_SYNC_DEST value: "hello" ##path-where-you-want-to-clone
- name: GIT_SYNC_ONE_TIME value: "true" securityContext: runAsUser: 0 containers: - image: r.j3ss.co/img imagePullPolicy: Always name: img resources: workingDir: /repo/hello command: ["/bin/sh"] args: - -c - >- img build -t docker.io//helloworld . && img login -u -p && img push docker.io//helloworld volumeMounts: - name: cache-volume mountPath: /tmp - name: git-repo mountPath: /repo volumes: - name: cache-volume emptyDir: - name: git-repo emptyDir: restartPolicy: Never In the above file, replace the values appropriately. You can also notice that the destination folder for git-sync is the working directory for img. If you are using a public git repository, you may not be required to provide the Personal Access Token for the Git repository. #3. Run img image builder in Kubernetes Using the manifest, run the pod using the command: kubectl apply -f pod.yml Now follow the image build and push process with the command: kubectl logs img --follow Output: From the above output, we are safe to conclude that the image has been successfully pushed to DockerHub #4. Pull and Test the Image You can now pull and test the image using: 1. Docker Ensure that Docker is installed on your system. The below guide can help you achieve this: How To Install Docker CE on Linux Systems Now run a container with the image using the command: docker run -it / For example: docker run -it klinsmann1/helloworld:latest Sample output: 2. Kubernetes The image pushed can still be used on Kubernetes. Pull and test the image as below; $ vim deploy.yml apiVersion: apps/v1 kind: Deployment metadata: name: hello-world spec: selector: matchLabels: app: hello replicas: 1 template: metadata: labels: app: hello spec: containers: - name: hello-world image: klinsmann1/helloworld:latest Apply the manifest: kubectl apply -f deploy.yml Check the status of the deployment: $ kubectl get pods NAME READY STATUS RESTARTS AGE hello-world-7f68776d79-h4h4z 0/1 Completed 1 (4s ago) 6s img 0/1 Completed 0 13m Verify if the execution was successful. $ kubectl logs hello-world-7f68776d79-h4h4z --follow hello The end! We have successfully walked through how to build container images on Kubernetes using img image builder. I hope this was significant to you.
0 notes
Link
こんにちは!スタンディングデスクを導入して快適な開発環境と運動不足の両方を解消できるようになったのではと感じている、広告技術部のUT@mocyutoです。 今回は半年ほどEKSを運用して秒間3万リクエストのトラフィックをさばくほどになりました。 秒間3万は広告システムだと割とあるとは思いますが、kubernetesでも運用��きているので紹介しようと思います。 対象のEKSで構築したサービスは広告の配信サーバです。 広告配信サーバの要件として、まず50ms以内にレスポンスを返さなければいけません。 構築したk8sのレスポンスタイムの99パーセンタイルは10msほどで返せています。 以下は必要最小限のクラスタの構成図です。 全体像 API 弊社のサーバサイドはほぼGoで作られているので、例に漏れずGoで作られています。 pod構成はAPI、fluentd、envoyの サイドカーパターン です。 弊社ではプロキシにenvoyを利用するのが一般的になってきました。 これはenvoyを使うことでトラフィックのメトリクスを可視化しやすくなるからです。 envoyを利用するとredisなどの通信も挟むことができますが、envoyのroutingコントロールを手で運用する(手でyamlを書く)のがつらすぎるので、 本サービスではAPIのHTTPエンドポイントのリクエストレスポンスのみにenvoy を適用しています。 また、APIから参照するデータストアはRedisだけになっており、 local cacheとsingleflightを組み合わせて負荷を下げることで安定的にデータを参照できています。 オートスケール 以前spotインスタンスでECSを構成したものを記事で紹介しましたが、今回もfrontのAPIはspotインスタンスで構成しています。 tech.gunosy.io オートスケールには、一般的なcluster autoscaler とHorizontal Pod Autoscalerを使っています。 また、spot運用のため、node termination handlerによる通知でgracefulに停止するようにしています。 cluster autoscalerはpodがpendingになってからスケールするという性質上スケールが遅いので、CPUのターゲットしきい値は60%にすることでトラフィックの急増に耐えています。 また、リクエストの波がピーク時と閑散期で3倍ほどあるので、1pod増えた際のスケール幅を増やすため、インスタンス一台に対してpodが5台くらいになるようにpodサイズを指定しています。 また以下がdeploymentのyamlサンプルです。 kind: Deployment spec: replicas: 1 strategy: rollingUpdate: maxSurge: 1 maxUnavailable: 1 template: spec: containers: - name: front-api volumeMounts: - mountPath: /tmp name: cache-volume readinessProbe: httpGet: path: /ping port: 8081 lifecycle: preStop: exec: command: ["sh", "-c", "sleep 15"] - name: fluent volumeMounts: - mountPath: /tmp name: cache-volume lifecycle: preStop: exec: command: ["/bin/sh", "-c", "while wget -q --spider http://127.0.0.1:8081/ping; do sleep 1; done"] - name: envoy command: ["envoy", "-c", "/etc/envoy/envoy.yaml"] volumeMounts: - mountPath: /etc/envoy name: envoy-config-volume readOnly: true readinessProbe: httpGet: path: /ping port: 8080 lifecycle: preStop: exec: command: ["/bin/sh", "-c", "curl -s -XPOST 127.0.0.1:9901/healthcheck/fail; sleep 10"] volumes: - name: cache-volume emptyDir: {} - name: envoy-config-volume configMap: name: envoy-config 弊社ではenvoyを利用していますが、特にプロキシを挟む用途がなければenvoyのコンテナを使わなくても問題ありません。 ログ処理 ログの転送にはfluentdを利用しており、アプリケーションのpodにはfluentdのサイドカーを利用し、そのログを別のfluent aggregatorのstatefulsetに転送しています。 statefulsetはonDemandを利用しています。 理由としてはaggregatorが頻繁に生き死にすることでログの欠損の可能性が増えることを避けたいのと、 AWSのEBSが同一AZのインスタンスにしかつかず、spotのインスタンスの偏りが発生した際にEBSが紐付かなくなり立ち上がらないなどのケアのためです。 アプリケーションのpodでは、ステートレスにするためflush buffer timeを1秒にしてaggregatorに流しています。 また、上のyamlで記載しているようにappのコンテナより先に死なないようにpreStopでapiの死活を監視し、appコンテナが死んでからfluentのコンテナが落ちるようになっています。 appとfluentコンテナのログの受け渡しはemptyDirを介して渡しています。 aggregatorはbufferをある程度貯めるのでログの欠損をさせないようにstatefulsetにしています。 またトラフィックが多いので、コスト削減のためリクエスト数に応じてシャードによる課金額が増えるKinesis+lambdaでRedisに投入するのではなくfluent pluginを作成して直接Redisに書き込みを行っています。 この変更によってk8sクラスタ内で処理が完結するので、ローカルでのテストが実施しやすくなりました。 また、一部の必須ではないログはアプリケーション側で間引くことでログのS3費と転送料を減らしてコスト削減しています。 各リソースの関係 CI CIには現在skaffoldを使っておりimageの作成からkubectl applyまでをskaffoldが担ってくれています。 弊社ではCI-imageを各種作っているので、CircleCIのdeployの設定でも以下だけでdeployできるようになっています。 gunosyのpublic repositoryで作成しているので参考にしていただければと思います。 Gunosy · GitHub docker: - image: gunosy/ci-skaffold:1.0.1 steps: - checkout - setup_remote_docker - run: name: docker login command: $(aws ecr get-login --no-include-email) - run:-cluster - run: --label skaffold.dev/run-id="static",skaffold.dev/docker-api-version="static",app.kubernetes.io/managed-by="skaffold",skaffold.dev/tag-policy="static" 現在はskaffoldを利用していますが、canary deployなどを実行する際は、Argo Rolloutsやサービスメッシュなどを導入する必要があります。 が、初手はこれで十分かと思います。 また、kube-systemなどクラスタ全体に関わる設定はterraformで管理し、各アプリ周辺のyamlやDockerfileはアプリのレポジトリで管理しています。 kube-system ALBを利用しているので alb-ingress-controller を利用しています。 また監視にはdatadogを使っているので、datadog-agent をdaemonsetとして稼働させています。 詰まると言われるDNS周りですが、CoreDNS のHPA運用にしており今のところ特に問題なく稼働しています。 現在広告チームのEKSの同一クラスタに3サービス稼働しており、うち2サービスは秒間1万リクエストを越えています。 それらのリソースが食い合わないように各サービスごとにASGは分けており、 自分たちが管理するデータプレインをそれぞれ分けることで独立性を保っています。 まとめ 以上の構成で5xxはほぼ発生しない安定運用が実現できています。 せっかく書いたのですが、意外に普通の構成のことしか書いていませんでした。 逆に普通の構成でもかなりのリクエストをさばけるということをお伝えすることができたかと思います。 k8s導入の参考になれば幸いです。
0 notes
Text
Kubernetes 1.16 released
Finally it’s the weekend. Peace and quiet to indulge yourself in a new Kubernetes release! Many others have beat me to it, great overviews are available from various sources.
The most exciting thing for me in Kubernetes 1.16 is the graduation of many alpha CSI features to beta. This is removes the friction of tinkering with the feature gates on either the kubelet or API server which is pet peeve of mine and makes me moan out loud when I found out something doesn't work because of it.
TL;DR
All these features have already been demonstrated with the HPE CSI Driver for Kubernetes, it starts about 7 minutes in, I’ve fast forwarded it for you.
At the Helm
Let’s showcase these graduated features with the newly released HPE CSI Driver for Kubernetes. Be warned, issues ahead. Helm is not quite there yet on Kubernetes 1.16, a fix to deploy Tiller on your cluster is available here. Next issue up is that the HPE CSI Driver Helm chart is not yet compatible with Kubernetes 1.16. I’m graciously and temporarily hosting a copy on my GitHub account.
Create a values.yaml file:
backend: 192.168.1.10 # This is your Nimble array username: admin password: admin servicePort: "8080" serviceName: nimble-csp-svc fsType: xfs accessProtocol: "iscsi" storageClass: create: false
Helm your way on your Kubernetes 1.16 cluster:
helm repo add hpe https://drajen.github.io/co-deployments-116 helm install --name hpe-csi hpe/hpe-csi-driver --namespace kube-system -f values.yaml
In my examples repo I’ve dumped a few declarations that I used to walk through these features. When I'm referencing a YAML file name, this is where to find it.
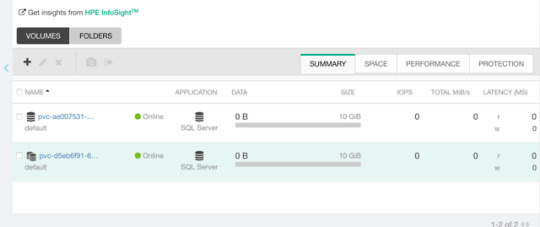
VolumePVCDataSource
This is a very useful capability when you’re interested in creating a clone of an existing PVC in the current state. I’m surprised to see this feature mature to beta before VolumeSnapshotDataSource which has been around for much longer.
Assuming you have an existing PVC named “my-pvc”:
apiVersion: v1 kind: PersistentVolumeClaim metadata: name: my-pvc-clone spec: accessModes: - ReadWriteOnce resources: requests: storage: 32Gi dataSource: kind: PersistentVolumeClaim name: my-pvc storageClassName: my-storageclass
Let’s cuddle:
$ kubectl create -f pvc.yaml persistentvolumeclaim/my-pvc created $ kubectl create -f pvc-clone.yaml persistentvolumeclaim/my-pvc-clone created $ kubectl get pvc NAME STATUS VOLUME CAPACITY STORAGECLASS AGE my-pvc Bound pvc-ae0075... 10Gi my-storageclass 34s my-pvc-clone Bound pvc-d5eb6f... 10Gi my-storageclass 14s
On the Nimble array, we can indeed observe we have a clone of the dataSource.
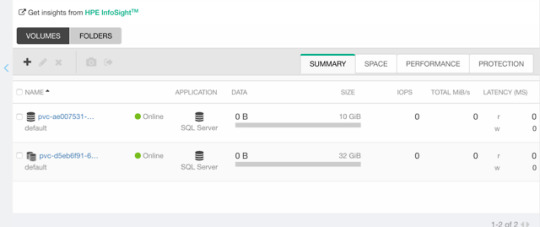
ExpandCSIVolumes and ExpandInUsePersistentVolumes
This is indeed a very welcome addition to be promoted. Among the top complaints from users. This is stupid easy to use. Simply edit or patch your existing PVC to expand your PV.
$ kubectl patch pvc/my-pvc-clone -p '{"spec": {"resources": {"requests": {"storage": "32Gi"}}}}' persistentvolumeclaim/my-pvc-clone patched $ kubectl get pv NAME CAPACITY CLAIM STORAGECLASS AGE pvc-d5eb6... 32Gi default/my-pvc-clone my-storageclass 9m25s
Yes, you can expand clones, no problem.
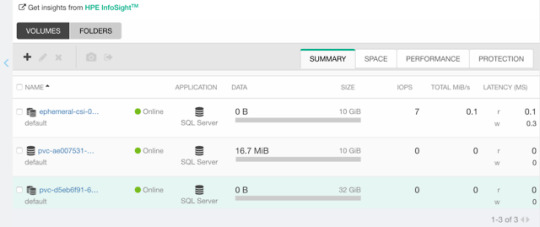
CSIInlineVolume
On of my favorite features of our legacy FlexVolume is the ability to create Inline Ephemeral Clones for CI/CD pipelines. Creating a point in time copy of a volume, do some work and/or tests on it and dispose of it. Leave no trace behind.
If this is something you’d like to walk through, there’s a few prerequisite steps here. The Helm chart does not create the CSIDriver custom resource definition (CRD). It need to be applied first:
apiVersion: storage.k8s.io/v1beta1 kind: CSIDriver metadata: name: csi.hpe.com spec: podInfoOnMount: true volumeLifecycleModes: - Persistent - Ephemeral
Next, the current behavior (subject to change) is that you need a secret for the CSI driver in the namespace you’re deploying to. This is a oneliner to copy from “kube-system” to your current namespace.
$ kubectl get -nkube-system secret/nimble-secret -o yaml | \ sed -e 's/namespace: kube-system//' | \ kubectl create -f-
Now, assuming we have deployed a MariaDB and have that running elsewhere. This example clones the actual Nimble volume. In essence, the volume may reside on a different Kubernetes cluster or hosted on a bare-metal server or virtual machine.
For clarity, the Deployment I’m cloning this volume from is using a secret, I’m using that same secret hosted in dep.yaml.
apiVersion: v1 kind: Pod metadata: name: mariadb-ephemeral spec: spec: containers: - image: mariadb:latest name: mariadb env: - name: MYSQL_ROOT_PASSWORD valueFrom: secretKeyRef: name: mariadb key: password ports: - containerPort: 3306 name: mariadb volumeMounts: - name: mariadb-persistent-storage mountPath: /var/lib/mysql volumes: - name: mariadb-persistent-storage csi: driver: csi.hpe.com nodePublishSecretRef: name: nimble-secret volumeAttributes: cloneOf: pvc-ae007531-e315-4b81-b708-99778fa1ba87
The magic sauce here is of course the .volumes.csi stanza where you specify the driver and your volumeAttributes. Any Nimble StorageClass parameter is supported in volumeAttributes.
Once, cuddled, you can observe the volume on the Nimble array.
CSIBlockVolume
I’ve visited this feature before in my Frankenstein post where I cobbled together a corosync and pacemaker cluster running as a workload on Kubernetes backed by a ReadWriteMany block device.
A tad bit more mellow example is the same example we used for the OpenShift demos in the CSI driver beta video (fast forwarded).
Creating a block volume is very simple (if the driver supports it). By default volumes are created with the attribue volumeMode: Filesystem. Simply switch this to Block:
apiVersion: v1 kind: PersistentVolumeClaim metadata: name: my-pvc-block spec: accessModes: - ReadWriteOnce resources: requests: storage: 32Gi volumeMode: Block storageClassName: my-storageclass
Once cuddled, you may reference the PVC as any other PVC, but pay attention to the .spec.containers stanza:
apiVersion: v1 kind: Pod metadata: name: my-pod spec: containers: - name: ioping image: hpestorage/ioping command: [ "ioping" ] args: [ "/dev/xvda" ] volumeDevices: - name: data devicePath: /dev/xvda volumes: - name: data persistentVolumeClaim: claimName: my-pvc-block
Normally you would specify volumeMounts and mountPath for a PVC created with volumeMode: Filesystem.
Running this particular Pod using ioping would indeed indicate that we connected a block device:
kubectl logs my-pod -f 4 KiB <<< /dev/xvda (block device 32 GiB): request=1 time=3.71 ms (warmup) 4 KiB <<< /dev/xvda (block device 32 GiB): request=2 time=1.73 ms 4 KiB <<< /dev/xvda (block device 32 GiB): request=3 time=1.32 ms 4 KiB <<< /dev/xvda (block device 32 GiB): request=4 time=1.06 ms ^C
For competitors who landed on this blog in awe looking for Nimble weaknesses, the response time you see above is a Nimble Virtual Array running on my five year old laptop.
So, that was “it” for our graduated storage features! I'm looking forward to Kubernetes 1.17 already.
Release mascot!
I’m a sucker for logos and mascots. Congrats to the Kubernetes 1.16 release team.
0 notes
Text
Train models and run notebooks on AWS cheaper and simpler than with SageMaker

Oleg Polosin
Sep 18, 2018

Spotty is a tool that drastically simplifies training of deep learning models on AWS.
Why will you ❤️ this tool?
it makes training on AWS GPU instances as simple as training on your local computer
it automatically manages all necessary AWS resources including AMIs, volumes, snapshots and SSH keys
it makes your model trainable on AWS by everyone with a couple of commands
it uses tmux to easily detach remote processes from SSH sessions
it saves you up to 70% of the costs by using AWS Spot Instances
To show how it works let’s take some non-trivial model and try to train it. I chose one of the implementations of Tacotron 2. It’s a speech synthesis system by Google.
Clone the repository of Tacotron 2 to your computer:
git clone https://github.com/Rayhane-mamah/Tacotron-2.git
Docker Image
Spotty trains models inside a Docker container. So we need to either find a publicly available Docker image that satisfies the model’s requirements or create a new Dockerfile with a proper environment.
This implementation of Tacotron uses Python 3 and TensorFlow, so we could use the official Tensorflow image from Docker Hub. But this image doesn’t satisfy all the requirements from the “requirements.txt” file. So we need to extend the image and install all necessary libraries on top of it.
Copy the “requirements.txt” file to the “docker/requirements-spotty.txt” file and create thedocker/Dockerfile.spotty file with the following content:

Here we’re extending the original TensorFlow image and installing all other requirements. This image will be built automatically when you start an instance.
Spotty Configuration File
Once we have the Dockerfile, we’re ready to write a Spotty configuration file. Create aspotty.yaml file in the root directory of your project.
Here you can find the full content of this file. It consists of 4 sections: project, container, instances, and scripts. Let’s look at them one by one.
Section 1: Project
This section contains the following parameters:
name: name of the project. This name will be used in the names of all AWS resources created by Spotty for this project. For example, it will be used as a prefix for EBS volumes, or in the name of the S3 bucket that helps to synchronize the project’s code with the instance.
syncFilters: synchronization filters. These filters will be used to skip some directories or files when synchronizing the project’s code with a running instance. In the example above we’re ignoring PyCharm configuration, Git files, Python cache files, and training data. Under the hood, Spotty is using these filters with the “aws s3 sync” command, so you can get more information about them here: Use of Exclude and Include Filter.
Section 2: Container
This section describes a Docker container for your project:
projectDir: a directory inside the container where the local project will be synchronized once an instance is started. Make sure that either it’s a subdirectory of a volume mount path (see below) or it exactly matches a volume mount path, otherwise, all remote changes to the project’s code will be lost once the instance is stopped.
volumeMounts: defines directories inside a container where EBS volumes should be mounted. EBS volumes themselves will be described in the instances section of the configuration file. Each element of this list describes one mount point, where the name parameter should match the corresponding EBS volume from the instance section (see below), and the mountPath parameter specifies a volume’s directory inside a container.
file: a path to the Dockerfile that we created before. The Docker image will be built automatically once the instance is started. As an alternative approach, you could build the image locally and push it to Docker Hub, then you can directly specify the image by its name using the image parameter instead of the file parameter.
ports: ports that should be exposed by the instance. In the example above we opened 2 ports: 6006 for TensorBoard and 8888 for Jupyter Notebook.
Read more about other container parameters in the documentation.
Section 3: Instances
This section describes a list of instances with their parameters. Each instance contains the following parameters:
name: name of the instance. This name will be used in the names of AWS resources that were created specifically for this instance. For example, EBS volumes and an EC2 instance itself. Also, this name can be used in the Spotty commands if you have more than one instance in the configuration file. For example, spotty start i1.
provider: a cloud provider for the instance. At the moment Spotty supports only “aws” provider (Amazon Web Services), but Google Cloud Platform will be supported in the near future as well.
parameters: parameters of the instance. They are specific to a cloud provider. See parameters for an AWS instance below.
AWS instance parameters:
region: AWS region where a Spot Instance should be launched.
instanceType: type of an EC2 instance. Read more about AWS GPU instances here.
volumes: a list of EBS volumes that should be attached to the instance. To have a volume attached to the container’s filesystem, the name parameter should match one of the volumeMounts names from the container section. See the description of an EBS volume parameters below.
dockerDataRoot: using this parameter we can change a directory where Docker stores all images including our built image. In the example above we make sure that it’s a directory on an attached EBS volume. So next time the image will not be rebuilt again, but just loaded from the Docker cache.
EBS volume parameters:
size: size of the volume in GB.
deletionPolicy: what to do with the volume once the instance is stopped using the spotty stop command. Possible values include: “create_snapshot” (default), “update_snapshot”, “retain” and “delete”. Read more in the documentation: Volumes and Deletion Policies.
mountDir: a directory where the volume will be mounted on the instance. By default, it will be mounted to the “/mnt/<ebs_volume_name>” directory. In the example above, we need to explicitly specify this directory for the “docker” volume, because we reuse this value in the dockerDataRoot parameter.
Read more about other AWS instance parameters in the documentation.
Section 4: Scripts
Scripts are optional but very useful. They can be run on the instance using the following command:
spotty run <SCRIPT_NAME>
For this project we’ve created 4 scripts:
preprocess: downloads the dataset and prepares it for training,
train: starts training,
tensorboard: runs TensorBoard on the port 6006,
jupyter: starts Jupyter Notebook server on the port 8888.
That’s it! The model is ready to be trained on AWS.
Spotty Installation
Requirements
Python ≥3.5
Installed and configured AWS CLI (see Installing the AWS Command Line Interface)
Installation
1. Install the Spotty using pip:
pip install -U spotty
2. Create an AMI with NVIDIA Docker. Run the following command from the root directory of your project (where the spotty.yaml file is located):
spotty aws create-ami
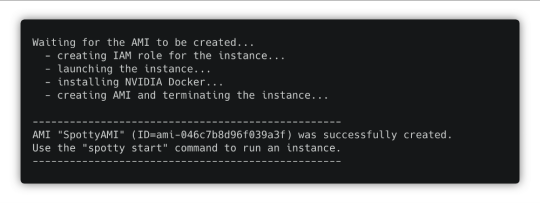

In several minutes you will have an AMI that can be used for all your projects within the AWS region.
Model Training
1. Start a Spot Instance with the Docker container:
spotty start
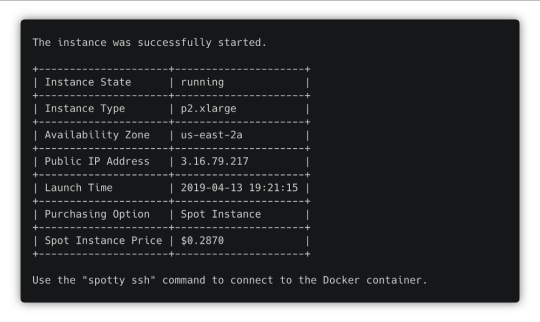

Once the instance is up and running, you will see its IP address. Use it to open TensorBoard and Jupyter Notebook later.
2. Download and preprocess the data for the Tacotron model. We already have a custom script in the configuration file to do that, just run:
spotty run preprocess
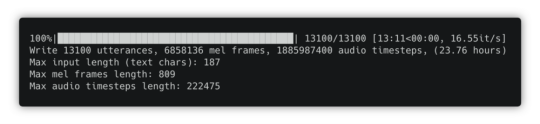

Once the data is processed, use the Ctrl + b, then x combination of keys to close the tmux pane.
3. Once the preprocessing is done, train the model. Run the “train” script:
spotty run train

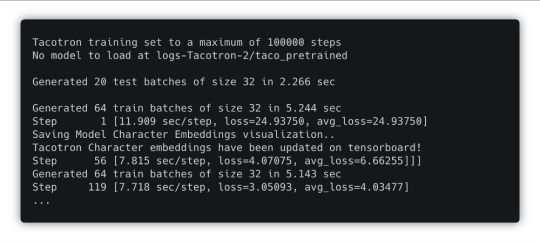
You can detach this SSH session using the Ctrl + b, then d combination of keys. The training process won’t be interrupted. To reattach that session, just run the spotty run train command again.
TensorBoard
Start TensorBoard using the “tensorboard” script:
spotty run tensorboard
TensorBoard will be running on the port 6006. You can detach the SSH session using the Ctrl + b, then d combination of keys, TensorBoard will still be running.
Jupyter Notebook
You also can start Jupyter Notebook using the “jupyter” script:
spotty run jupyter
Jupyter Notebook will be running on the port 8888. Open it using the instance IP address and the token that you will see in the command output.
Download Checkpoints
If you need to download checkpoints or any other files from the running instance to your local machine, just use the download command:
spotty download -f 'logs-Tacotron-2/taco_pretrained/*'
SSH Connection
To connect to the running Docker container via SSH, use the following command:
spotty ssh
It uses a tmux session, so you can always detach it using the Ctrl + b, then d combination of keys and attach that session later using the spotty ssh command again.
Don’t forget to stop the instance once you are done! Use the following command:
spotty stop
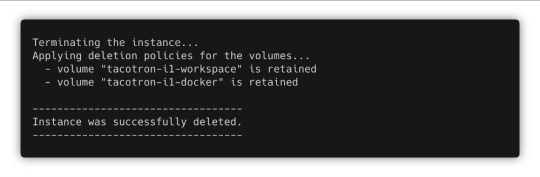

In the example above we used the “retain” deletion policy for our volumes, so Spotty will just terminate the instance and won’t touch the volumes. But it could automatically create snapshots if we would use “create_snapshot” or “update_snapshot” deletion policies.
Conclusion
Using Spotty is a convenient way to train deep learning models on AWS Spot Instances. It will save you not just up to 70% of the costs, but also a lot of time on setting up an environment for your models and notebooks. Once you have a Spotty configuration for your model, everyone can train it with a couple of commands.
If you enjoyed this post, please star the project on GitHub, click the 👏 button and share this post with your friends.
DataTau published first on DataTau
0 notes
Text
Learn Docker: Execute docker commands inside of a docker container
I've seen a lot of people ask the question, how to execute docker inside of a docker container and there can actually be a use case for that.
The most obvious use case for me was a Jenkins container, that needs to execute docker commands in order to build and push the image in docker repo in its build jobs.
There are 3 ways to do it:
get a ready Jenkins image with docker pre-installed
install docker yourself in the Jenkins official image (by adjusting the Dockerfile and rebuilding the image)
use docker installed on the host where the container is running. -> This is the option I have used
In order to get the docker from host into the container, you need to mount the docker installation path on the host into the Jenkins container.
apiVersion: extensions/v1beta1 kind: Deployment metadata: name: jenkins spec: template: spec: containers: - image: jenkins name: jenkins ... volumeMounts: - mountPath: /var/run/docker.sock name: docker-sock ... volumes: - name: docker-sock hostPath: path: /var/run/docker.sock
Now when this Jenkins container starts you will have docker commands available inside.
#docker#docker tutorial#docker tutorial for beginners#devlife#devops#coding#code#programming#programmer#developer#software development#software developer#docker container#youtube channel#docker blog#learn docker
0 notes
Link
This has been on my todo list since August, and I accdently wiped out my install this week, so its super motivated me to get something in place.
Is it perfect? no
Is it insecure? Probably
Does it work? yesssssss
cat openldap-backup-cronjob.yaml --- apiVersion: v1 kind: PersistentVolumeClaim metadata: name: openldap-backup-pvc namespace: openldap spec: accessModes: - ReadWriteMany storageClassName: nfs-client resources: requests: storage: 5Gi --- apiVersion: batch/v1beta1 kind: CronJob metadata: name: openldapbackup-cron-job namespace: openldap spec: schedule: "0 */12 * * *" failedJobsHistoryLimit: 5 successfulJobsHistoryLimit: 2 jobTemplate: spec: template: spec: restartPolicy: OnFailure containers: - name: openldapsql-backup env: - name: LDAP_ADMIN_PASSWORD valueFrom: secretKeyRef: name: openldap key: LDAP_ADMIN_PASSWORD image: osixia/openldap:1.2.4 command: - "/bin/sh" args: - "-c" - "ldapsearch -x -H ldap://openldap -b dc=gavinmogan,dc=com -D \"cn=admin,dc=gavinmogan,dc=com\" -w \"${LDAP_ADMIN_PASSWORD}\" | tee /backup/backupOn`date +%Y-%m-%d-%H-%M`.dump > /dev/null" volumeMounts: - mountPath: "/backup" name: backup-volume volumes: - name: backup-volume persistentVolumeClaim: claimName: openldap-backup-pvc
via The Nameless Site
0 notes
Text
how to get onto a k8s node from a pod
run a busybox deployment:
★ kubectl run busybox --image busybox -- sleep 99999
edit it and add the below things related to: • securityContext (run as root user with privilege escalation) • volumeMounts & volumes (mount the root file system into the pod) • hostNetwork (via the network the k8s node is on)
★ kubectl edit deploy busybox apiVersion: extensions/v1beta1 kind: Deployment metadata: labels: run: busybox name: busybox namespace: default spec: replicas: 1 selector: matchLabels: run: busybox strategy: rollingUpdate: maxSurge: 1 maxUnavailable: 1 type: RollingUpdate template: metadata: creationTimestamp: null labels: run: busybox spec: containers: - args: - sleep - "99999" image: busybox imagePullPolicy: Always name: busybox resources: {} terminationMessagePath: /dev/termination-log terminationMessagePolicy: File . . securityContext: allowPrivilegeEscalation: true runAsUser: 0 volumeMounts: - mountPath: /rootfs name: rootfs volumes: - hostPath: path: / type: "" name: rootfs hostNetwork: true . . dnsPolicy: ClusterFirst restartPolicy: Always schedulerName: default-scheduler securityContext: {} terminationGracePeriodSeconds: 30
exec into your pod and you'll see this directory called rootfs in the root of the pod:
★ kubectl get pods NAME READY STATUS RESTARTS AGE busybox-5c7f574bd4-96h84 1/1 Running 0 12m ★ kubectl exec -it busybox-5c7f574bd4-96h84 /bin/sh / # ls -l total 40 drwxr-xr-x 2 root root 12288 Jul 31 20:20 bin drwxr-xr-x 5 root root 360 Sep 26 15:14 dev drwxr-xr-x 1 root root 4096 Sep 26 15:14 etc drwxr-xr-x 2 nobody nogroup 4096 Jul 31 20:20 home dr-xr-xr-x 395 root root 0 Sep 26 15:14 proc drwx------ 1 root root 4096 Sep 26 15:14 root drwxr-xr-x 23 root root 4096 Sep 12 06:04 rootfs <-------- THIS GUY dr-xr-xr-x 12 root root 0 Aug 27 11:16 sys drwxrwxrwt 2 root root 4096 Jul 31 20:20 tmp drwxr-xr-x 3 root root 4096 Jul 31 20:20 usr drwxr-xr-x 1 root root 4096 Sep 26 15:14 var
hmmm, what's this?
/ # chroot rootfs root@k8s-node-12345678-2:/#
:O
root@k8s-node-12345678-2:/# ls -l total 88 drwxr-xr-x 2 root root 4096 May 25 06:16 bin drwxr-xr-x 3 root root 4096 Sep 12 06:04 boot drwxr-xr-x 15 root root 3780 Sep 24 09:05 dev drwxr-xr-x 99 root root 4096 Sep 21 06:56 etc drwxr-xr-x 12 root root 4096 Mar 12 2018 home lrwxrwxrwx 1 root root 33 Sep 12 06:04 initrd.img -> boot/initrd.img-4.15.0-1023-azure lrwxrwxrwx 1 root root 33 Sep 12 06:04 initrd.img.old -> boot/initrd.img-4.15.0-1022-azure drwxr-xr-x 22 root root 4096 Mar 9 2018 lib drwxr-xr-x 2 root root 4096 Jan 26 2018 lib64 drwx------ 2 root root 16384 Jan 26 2018 lost+found drwxr-xr-x 2 root root 4096 Jan 26 2018 media drwxr-xr-x 3 root root 4096 Mar 9 2018 mnt drwxr-xr-x 3 root root 4096 Mar 9 2018 opt dr-xr-xr-x 402 root root 0 Aug 27 11:16 proc drwx------ 4 root root 4096 Aug 28 13:38 root drwxr-xr-x 31 root root 1300 Sep 11 08:26 run drwxr-xr-x 2 root root 12288 May 25 06:16 sbin drwxr-xr-x 2 root root 4096 Nov 30 2017 snap drwxr-xr-x 3 root root 4096 Mar 9 2018 srv dr-xr-xr-x 12 root root 0 Aug 27 11:16 sys drwxrwxrwt 8 root root 4096 Sep 26 15:17 tmp drwxr-xr-x 10 root root 4096 Jan 26 2018 usr drwxr-xr-x 13 root root 4096 Jan 26 2018 var lrwxrwxrwx 1 root root 30 Sep 12 06:04 vmlinuz -> boot/vmlinuz-4.15.0-1023-azure lrwxrwxrwx 1 root root 30 Sep 12 06:04 vmlinuz.old -> boot/vmlinuz-4.15.0-1022-azure
:O :O :O
root@k8s-node-12345678-2:/# docker ps -a CONTAINER ID IMAGE COMMAND CREATED STATUS PORTS NAMES 90172dd0edd8 busybox@sha256:cb63aa0641a885f54de20f61d152187419e8f6b159ed11a251a09d115fdff9bd "sleep 99999" 20 minutes ago Up 20 minutes k8s_busybox_busybox-5c7f574bd4-96h84_default_cf6dae51-c19e-11e8-87c4-000d3a389f22_0
so remember that anyone with k8s api perms to create pods can dew it.
★ kubectl delete deploy busybox
0 notes
Text
Welcome to this guide on how to clone a private Git Repository in Kubernetes with user authentication. May at times, we have config variables that keep being updated regularly by developers and thus need to update the environment in our containers. This problem can be solved by creating a pod with multiple containers sharing a volume. Git can be used to store the data and each time the code is updated, the data is pulled to the volume. Git-sync is a sidecar container that perfectly clones a git repo and keeps it synchronized with the upstream. It can be configured to pull one time or regularly as per your preferences. It allows one to pull over SSH or via HTTPS (with or without authentication) Now let’s dive in and see how we can clone a private Git Repository in Kubernetes with user authentication. Getting Started This guide requires one to have a Kubernetes cluster already set up. There are many methods one can use to set up a Kubernetes cluster. Some of them are demonstrated in the guides below: Install Kubernetes Cluster on Rocky Linux 8 with Kubeadm & CRI-O Install Kubernetes Cluster on Ubuntu using K3s Deploy Kubernetes Cluster on Linux With k0s Run Kubernetes on Debian with Minikube With a cluster set up, proceed as below. Using Git-sync to Clone Git Repository in Kubernetes There are two methods here i.e using HTTPS which works with or without authentication and using SSH which requires SSH keys. In this guide, we will run two containers in a pod: Nginx webserver Git-sync as an init container to clone the private Git Repository. Create the deployment manifest. In this guide, we will generate an Nginx template and modify it to accommodate git-sync ## Generate deployment YAML file ## kubectl create deployment --image=nginx nginx --dry-run=client -o yaml >nginx-deployment.yml ## Generate Pod creation YAML file ### kubectl run nginx-helloworld --image nginx --restart=Never --dry-run=client -o yaml >nginx-helloworld-pod.yml You will have a YAML file with the below lines. $ cat nginx-deployment.yml apiVersion: apps/v1 kind: Deployment metadata: creationTimestamp: null labels: app: nginx name: nginx spec: replicas: 1 selector: matchLabels: app: nginx strategy: template: metadata: creationTimestamp: null labels: app: nginx spec: containers: - image: nginx name: nginx resources: status: Let’s create a namespace called “demo” for these tasks $ kubectl create ns demo namespace/demo created Let’s set the current context to the demo namespace $ kubectl config set-context --current --namespace demo Context "Default" modified. Option 1. Clone a Private Repository Using HTTPS For git-sync to clone the private git repo over HTTPS, you need to have the repository’s username and a Personal Access Token. Proceed and modify your deployment file vim nginx-deployment.yml Paste and modify the contents below accordingly. apiVersion: apps/v1 kind: Deployment metadata: name: nginx-deployment labels: app: nginx spec: selector: matchLabels: app: nginx template: metadata: labels: app: nginx spec: containers: - image: nginx name: nginx-helloworld ports: - containerPort: 80 volumeMounts: - mountPath: "/usr/share/nginx/html" name: www-data initContainers: - name: git-sync image: k8s.gcr.io/git-sync:v3.1.5 volumeMounts: - name: www-data mountPath: /data env: - name: GIT_SYNC_REPO value: "https://github.com/computingpost/hello-world-nginx.git" ##Private repo-path-you-want-to-clone - name: GIT_SYNC_USERNAME value: "computingpost" ##The username for the repository - name: GIT_SYNC_PASSWORD value: "ghpsdhkshkdj_kndk...." ##The Personal Access Token for the repository
- name: GIT_SYNC_BRANCH value: "master" ##repo-branch - name: GIT_SYNC_ROOT value: /data - name: GIT_SYNC_DEST value: "hello" ##path-where-you-want-to-clone - name: GIT_SYNC_PERMISSIONS value: "0777" - name: GIT_SYNC_ONE_TIME value: "true" securityContext: runAsUser: 0 volumes: - name: www-data emptyDir: Option 2. Clone a Private Repository using SSH Ensure that you already have SSH keys generated from your server and copied to the GIT HOST. Verify if you can connect via SSH $ ssh -T [email protected] The authenticity of host 'github.com (140.82.121.3)' can't be established. ECDSA key fingerprint is SHA256:p2QAMXNIC1TJYWeIOttrVc98/R1BUFWu3/LiyKgUfQM. Are you sure you want to continue connecting (yes/no/[fingerprint])? yes Warning: Permanently added 'github.com,140.82.121.3' (ECDSA) to the list of known hosts. Hi computingpost/hello-world-nginx! You've successfully authenticated, but GitHub does not provide shell access. Obtain the host keys for the Git server ssh-keyscan YOUR_GIT_HOST > /tmp/known_hosts For example. ssh-keyscan github.com > /tmp/known_hosts With the keys, create the secrets as below: kubectl create secret generic git-creds \ --from-file=ssh=$HOME/.ssh/id_rsa \ --from-file=known_hosts=/tmp/known_hosts Verify if the secret has been deployed. $ kubectl get secret NAME TYPE DATA AGE default-token-nz74s kubernetes.io/service-account-token 3 72m git-creds Opaque 2 11s Edit the YAML to be able to run git-sync as an init container that clones a private Git Repository. vim nginx-deployment.yml The will contain the below lines. apiVersion: apps/v1 kind: Deployment metadata: name: nginx-deployment labels: app: nginx spec: selector: matchLabels: app: nginx template: metadata: labels: app: nginx spec: containers: - image: nginx name: nginx-helloworld ports: - containerPort: 80 volumeMounts: - mountPath: "/usr/share/nginx/html" name: www-data initContainers: - name: git-sync image: k8s.gcr.io/git-sync:v3.1.5 volumeMounts: - name: www-data mountPath: /data env: - name: GIT_SYNC_REPO value: "[email protected]:computingpost/hello-world-nginx.git" ##repo-path-you-want-to-clone - name: GIT_SYNC_BRANCH value: "master" ##repo-branch - name: GIT_SYNC_SSH value: "true" - name: GIT_SYNC_ROOT value: /data - name: GIT_SYNC_DEST value: "hello" ##path-where-you-want-to-clone - name: GIT_SYNC_PERMISSIONS value: "0777" - name: GIT_SYNC_ONE_TIME value: "true" securityContext: runAsUser: 0 volumes: - name: www-data emptyDir: - name: git-secret secret: defaultMode: 256 secretName: git-creds # your-ssh-key Run the Application In the above configuration files, we have an init container named git-sync that clones a repository to /data which is a volume mount called www-data. This volume is shared between the two containers. Deploy the manifest. kubectl create -f nginx-deployment.yml Verify if the pod has been created: ###First run $ kubectl get pods NAME READY STATUS RESTARTS AGE nginx-helloworld 0/1 Init:0/1 0 7s #Second run $ kubectl get pods NAME READY STATUS RESTARTS AGE nginx-helloworld 0/1 PodInitializing 0 10s #Third run $ kubectl get pods NAME READY STATUS RESTARTS AGE nginx-helloworld 1/1 Running 0 13s If you want to use persistent volume claim instead, you need to update your manifest as below.
volumes: - name: my-pv-storage persistentVolumeClaim: claimName: mypv-claim Now you should have your file cloned to /data/hello and /data share the same volume with /usr/share/nginx/html verified as below: $ kubectl exec --stdin --tty nginx-helloworld -- /bin/bash # ls -al /usr/share/nginx/html/hello/ .git README.md index.html My cloned git repo HelloWord-Computingpost has the files above. Delete the pods and secret using the command: kubectl delete all --all -n demo kubectl delete ns demo Conclusion. That marks the end of this guide. We have successfully walked through how to clone a private Git Repository in Kubernetes With User Authentication. Futhermore I have demonstrated how a public repository can be cloned via HTTPS without authentication. I hope this was significant.
0 notes
Text
Connecting to Mongo with a self signed CA on a JVM in Kubernetes
At $WORK, we're creating an internal platform on top of Kubernetes for developers to deploy their apps. Our Ops people have graciously provided us with Mongo clusters that all use certificates signed by a self-signed certificate authority. So, all our clients need to know about the self-signed CA in order to connect to Mongo. For Node or Python, it's possible to pass the self-signed CA file in the code running in the application.
But, things are a little more complicated for Java or Scala apps, because configuration of certificate authorities is done at the JVM level, not at the code level. And for an extra level of fun, we want to do it in Kubernetes, transparently to our developers, so they don't have to worry about it on their own.
err, wha? telling the JVM about our CA
First off, we had to figure out how to tell the JVM to use our CA. And luckily since all the JVM languages use the same JVM, it's the same steps for Scala, or Clojure, or whatever other JVM language you prefer. The native MongoDB Java driver docs tell us exactly what we need to do: use keytool to import the cert into a keystore that the JVM wants, and then use system properties to tell the JVM to use that keystore. The keytool command in the docs is:
$ keytool -importcert -trustcacerts -file <path to certificate authority file> \ -keystore <path to trust store> -storepass <password>
The path to the existing keystore that the JVM uses by default is $JAVA_HOME/jre/lib/security/cacerts, and its default password is changeit. So if you wanted to add your self signed CA to the existing keystore, it'd be something like
$ keytool -importcert -trustcacerts -file ssca.cer \ -keystore $JAVA_HOME/jre/lib/security/cacerts -storepass changeit
(Even this very first step had complications. Our self signed CA was a Version 1 cert with v3 extensions, and while no other language cared, keytool refused to create a keystore with it. We ended up having to create a new self-signed CA with the appropriate version. Some lucky googling led us to that conclusion, but of particular use was using openssl to examine the CA and check its versions and extensions:)
$ openssl x509 -in ssca.cer -text -noout // Certificate: // Data: // Version: 3 (0x2) // Serial Number: ... // ... // X509v3 extensions: // X509v3 Subject Key Identifier: ... // X509v3 Key Usage: ... // X509v3 Basic Constraints: ...
Another useful command was examining the keystore before and after we imported our self signed CA:
$ keytool -list -keystore /path/to/keystore/file
as you can look for your self-signed CA in there to see if you ran the command correctly.
Anyway, once you've created a keystore for the JVM, the next step is to set the appropriate system properties, again as out lined in the docs:
$ java \ -Djavax.net.ssl.trustStore=/path/to/cacerts \ -Djavax.net.ssl.trustStorePassword=changeit \ -jar whatever.jar
Since the default password is changeit, you may want to change it... but if you don't change it, you wouldn't have to specify the trustStorePassword system property.
handling this in kubernetes
The above steps aren't too complicated on their own. We just need to make sure we add our CA to the existing ones, and point the JVM towards our new and improved file. But, since we'll eventually need to rotate the self-signed CA, we can't just run keytool once and copy it everywhere. So, an initContainer it is! keytool is a java utility, and it's handily available on the openjdk:8u121-alpine image, which means we can make a initContainer that runs keytool for us dynamically, as part of our Deployment.
Since seeing the entire manifest at once doesn't necessarily make it easy to see what's going on, I'm going to show the key bits piece by piece. All of the following chunks of yaml belong to in the spec.template.spec object of a Deployment or Statefulset.
spec: template: spec: volumes: - name: truststore emptyDir: {} - name: self-signed-ca secret: secretName: self-signed-ca
So, first things first, volumes: an empty volume called truststore which we'll put our new and improved keystore-with-our-ssca. Also, we'll need a volume for the self-signed CA itself. Our Ops provided it for us in a secret with a key ca.crt, but you can get it into your containers any way you want.
$ kubectl get secret self-signed-ca -o yaml --export apiVersion: v1 data: ca.crt: ... kind: Secret metadata: name: self-signed-ca type: Opaque
With the volumes in place, we need to set up init containers to do our keytool work. I assume (not actually sure) that we need to add our self-signed CA to the existing CAs, so we use one initContainer to copy the existing default cacerts file into our truststore volume, and another initContainer to run the keytool command. It's totally fine to combine these into one container, but I didn't feel like making a custom docker image with a shell script or having a super long command line. So:
spec: template: spec: initContainers: - name: copy image: openjdk:8u121-alpine command: [ cp, /usr/lib/jvm/java-1.8-openjdk/jre/lib/security/cacerts, /ssca/truststore/cacerts ] volumeMounts: - name: truststore mountPath: /ssca/truststore - name: import image: openjdk:8u121-alpine command: [ keytool, -importcert, -v, -noprompt, -trustcacerts, -file, /ssca/ca/ca.crt, -keystore, /ssca/truststore/cacerts, -storepass, changeit ] volumeMounts: - name: truststore mountPath: /ssca/truststore - name: self-signed-ca mountPath: /ssca/ca
Mount the truststore volume in the copy initContainer, grab the file cacerts file, and put it in our truststore volume. Note that while we'd like to use $JAVA_HOME in the copy initContainer, I couldn't figure out how to use environment variables in the command. Also, since we're using a tagged docker image, there is a pretty good guarantee that the filepath shouldn't change underneath us, even though it's hardcoded.
Next, the import step! We need to mount the self-signed CA into this container as well. Run the keytool command as described above, referencing our copied cacerts file in our truststore volume and passing in our ssCA.
Two things to note here: the -noprompt argument to keytool is mandatory, or else keytool will prompt for interaction, but of course the initContainer isn't running in a shell for someone to hit yes in. Also, the mountPaths for these volumes should be separate folders! I know Kubernetes is happy to overwrite existing directories when a volume mountPath clashes with a directory on the image, and since we have different data in our volumes, they can't be in the same directory. (...probably, I didn't actually check)
The final step is telling the JVM where our new and improved trust store is. My first idea was just to add args to the manifest and set the system property in there, but if the Dockerfile ENTRYPOINT is something like
java -jar whatever.jar
then we'd get a command like
java -jar whatever.jar -Djavax.net.ssl.trustStore=...
which would pass the option to the jar instead of setting a system property. Plus, that wouldn't work at all if the ENTRYPOINT was a shell script or something that wasn't expecting arguments.
After some searching, StackOverflow taught us about the JAVA_OPTS and JAVA_TOOL_OPTIONS environment variables. We can append our trustStore to the existing value of these env vars, and we'd be good to go!
spec: template: spec: containers: - image: your-app-image env: # make sure not to overwrite this when composing the yaml - name: JAVA_OPTS value: -Djavax.net.ssl.trustStore=/ssca/truststore/cacerts volumeMounts: - name: truststore mountPath: /ssca/truststore
In our app that we use to construct the manifests, we check if the developer is already trying to set JAVA_OPTS to something, and make sure that we append to the existing value instead of overwriting it.
a conclusion of sorts
Uh, so that got kind of long, but the overall idea is more or less straightforward. Add our self-signed CA to the existing cacerts file, and tell the JVM to use it as the truststore. (Note that it's the trustStore option you want, not the keyStore!). The entire Deployment manifest all together is also available, if that sounds useful...
0 notes
Text
Heptio Comes Out of Stealth Mode with a Kubernetes Configuration Tool, ksonnet
Conveying the Kubernetes holder coordination is going to get a great deal less demanding, as indicated by Craig McLuckie, the establishing individual from the Kubernetes open source extend. McLuckie, who began the venture at Google alongside Joe Beda, helped to establish Heptio six months back with Beda to make Kubernetes more open. The organization flown out of stealth mode at the GlueCon create meeting a month ago with its dispatch of the ksonnet Kubernetes setup instrument.
ksonnet was intended to help computerize the demonstrating and administration of complex Kubernetes arrangements "in a way that is anything but difficult to share and reuse," said Daniel Lopez, CEO and fellow benefactor, Bitnami, which was a piece of the group working together on ksonnet, alongside Box, Microsoft, and holder programming supplier Deis (which Microsoft is procuring).
Past Good Engineering
McLuckie clarified that Kubernetes was made by framework engineers, for framework engineers. Accordingly, it has been hard for designers who are not no-nonsense frameworks specialists to get entrance.
Kubernetes is a stage with a colossal measure of potential is still truly new, said Sam Ghods, Box administrations planner and prime supporter, and a supporter of ksonnet. "When you have the stage, you require methods for connecting with that stage. Ksonnet is quite recently the subsequent stage forward in working with this stage."
On his blog, Beda recognized that Kubernetes, which is currently overseen by the Cloud Native Computing Foundation, can be scary. "Specifically, new clients are regularly confronted with a 'mass of YAML' while arranging frameworks running on Kubernetes," he said.
"We see ksonnet as not only the code that gets sent," he clarified, "however the whole experience of how I creator it, how would I work with it, how would I work crosswise over groups."
The Experience Breakdown
There are two pieces to the ksonnet encounter. To begin with, ksonnet offers a configurable, wrote templating framework for the Kubernetes application designer. "It's a library of space particular assistants for managing the Kubernetes API in Jsonnet that gives you constructing pieces to work with," Beda clarified. Jsonnet is an information templating dialect for designing JSON information.
Beda offers a relationship: There is the JavaScript dialect, then there are systems that enable you to utilize JavaScript structuredly. The ksonnet library (ksonnetlib) is an approach to utilize Jsonnet structuredly to build Kubernetes designs.
The second piece that flew under the radar at Gluecon, however was gotten down on about Twitter is the incorporation of a Visual Studio Code augmentation for Jsonnet. ksonnet incorporates a VSCode expansion and a straightforward site for experimentation.
"This gives all of you the stuff you anticipate from a present day improvement condition like help capacities," said Beda, "to truly make it simpler to creator these things without using duplicate/glue all over the place, as is what is going on how."
"You can begin with a group gave format and rapidly alter it to bolster your requirements," he stated, "parameterize out things that change from condition to condition, and tie it over into your most loved bundle administration instrument (like Deis Helm)."
The Jsonnet Connection
Jsonnet is "an absolutely utilitarian, Turing-finish dialect that is perfect with JSON," clarified Beda. Dave Cunningham, Google design publicly released the Jsonnet venture and Beda said there are many individuals who are utilizing it to oversee Kubernetes setups. They are doing as such, he stated, with changing degrees of progress. The following is a case of code for a bourbon sharp in Jsonnet:
{
mixed drinks: {
"Bourbon Sour": {
fixings: [
{ kind: "Whiskey", qty: 1.5 },
{ kind: "Lemon Juice", qty: 1 },
{ kind: "Gomme Syrup", qty: 0.5 },
],
decorate: "Lemon Peel",
served: "Straight Up",
},
"Bourbon Sour With Egg":
self["Whiskey Sour"] + {
Fixings: super.ingredients
+ [{ kind: "Egg White", qty: 0.5 }],
},
},
}
Jsonnet was enlivened by roused by Google Configuration Language (GCL), which is the manner by which most gatherings inside Google depict the organization's Borg setups. GCL is as yet inward to Google since it has a few bugs that haven't been worked out, Beda clarified.
So there's a parallel between Google's Borg and Kubernetes and GCL and Jsonnet, he clarified. Jsonnet is super valuable, however like a great deal of dialects, you can utilize it structuredly or an unstructured way.
In case you're utilizing Jsonnet in an unstructured way, Beda stated, you don't see all the power and composability that you need. Ksonnet encourages you utilize Jsonnet is a valuable way. One of the huge points of interest you escape utilizing ksonnet is a level of piece that individuals experience serious difficulties some time recently.
Consolidating components was blunder inclined and took a considerable measure of code, making what numerous clients have portrayed as "The Wall of YAML." The ksonnetlib makes it simpler to have distinctive groups depict diverse components and afterward join them together in organized routes easily. For instance, this is the code for a similar bourbon acrid in ksonnet:
Log group:
logTailer::
util.mapContainers(
function(podContainer)
podContainer +
container.volumeMounts([
logTailerVolumeMount
])
) +
deployment.mixin.podSpec.volumes(
logTailerVolume)
Application Team:
nearby nginxContainer =
container.default(
"nginx", "nginx:1.13.0") +
container.ports(
containerPort.named("http", 80));
deployment.default(
"nginx", nginxContainer) +
deployment.mixin.spec.replicas(3) +
sidecar.logTailer
Here is yield:
apiVersion: applications/v1beta1
kind: Deployment
metadata:
name: nginx
namespace: default
spec:
reproductions: 3
layout:
spec:
compartments:
– picture: "nginx:1.13.0"
name: nginx
ports:
– containerPort: 80
name: http
volumeMounts:
– mountPath:/var/applogs
name: logTailerVolume
volumes:
– name: logTailer
persistentVolumeClaim:
claimName: logTailerVolumeClaim
Past the Whiskey Sour: Box
Box was an early connector of Kubernetes. As its utilization of Kubernetes has extended, it got significantly harder to deal with all the setup, Ghods said. Box as of late propelled their own particular framework extend: the kube-applier. The organization's architects jumped at the opportunity to work with Heptio and are excited with ksonnet.
"At Box our esteem is to give programming," he said. "Our clients need us to keep running on their favored administration and Kubernetes gives us that adaptability to enable Box to keep running on any stage." And ksonnet is making it less demanding for engineers to get that going.
Since Kubernetes can be run anyplace, the determinations are exceptionally strong and utilizing articles can be overpowering for new clients, he clarified. Ksonnet makes making Kubernetes protests substantially simpler, which makes it a considerable measure less demanding to begin and to use as a rule.
As you have increasingly Kubernetes objects running your framework, Ghods clarified, the difficulty ends up noticeably exponential. Ksonnet abstracts the difficulties away and makes reusable code.
"This makes it path less demanding for application engineers to compose and deal with the particulars for Kubernetes design," he said. "It's helping us begin to build up a standard for creating Kubernetes protests in a way that is significantly more usable than it is today."
Surprisingly, he clarified, a designer can keep in touch with one particular in ksonnet and have that application chip away at any cloud Kubernetes keeps running on. "It doesn't make a difference where the application is situated, in AWS, uncovered metal, IBM Cloud, Google Cloud, Open Stack, it doesn't make a difference."
Decisive Configuration
"The pipeline and toolchain is being created right now," Ghods said.
Box propelled the kube-applier simply a month ago, which conveys explanatory arrangement to Kubernetes. It fundamentally takes Kubernetes questions and synchronizes them to the Kubernetes API server. What's more, that really works as one with ksonnet.
The new stream is an engineer composes and produce determinations from JSON in ksonnet, then kube-applier can get the JSON dialect and apply it to the API server so it can run it wherever it should be run.
"So it makes it truly simple for engineers to compose specs and convey them to the API server," said Ghods. "Every one of the pieces are becoming alright."
0 notes
Text
KubernetesのConfig&Storageリソース(その2)
from https://thinkit.co.jp/article/14195
Config&Storageリソース
前回、利用者が直接利用するConfig&Storageリソースは3種類あることを紹介し、そのうちのSecretとConfigMapを解説しました。今回は、残る1種類であるPersistentVolumeClaimについて解説しますが、PersistentVolumeClaimを理解するために必要となるPersistentVolume、Volumeについても取り上げます。
5種類に大別できるKubernetesのリソース
リソースの分類内容Workloadsリソースコンテナの実行に関するリソースDiscovery&LBリソースコンテナを外部公開するようなエンドポイントを提供するリソースConfig&Storageリソース設定・機密情報・永続化ボリュームなどに関するリソースClusterリソースセキュリティやクォータなどに関するリソースMetadataリソースリソースを操作する系統のリソース
VolumeとPersistentVolumeとPersistentVolumeClaimの違い
Volumeは既存のボリューム(ホストの領域、NFS、Ceph、GCP Volume)などをYAML Manifestに直接指定することで利用可能にするものです。そのため、利用者が新規でボリュームを作成したり、既存のボリュームを削除したりといった操作を行うことはできません。また、YAML ManifestからVolumeリソースを作成するといった処理も行いません。
一方でPersistentVolumeは、外部の永続ボリュームを提供するシステムと連携して、新規のボリュームの作成や、既存のボリュームの削除などを行うことが可能です。具体的には、YAML ManifestなどからPersistent Volumeリソースを別途作成する形になります。
PersistentVolumeにもVolumeにも同じプラグインが用意されています。例えばGCPやAWSのボリュームサービスでは、Persistent VolumeプラグインとVolumeプラグインの両方が用意されています。Persistent Volumeプラグインの方ではVolumeの作成と削除といったライフサイクルを処理することが可能(PersistentVolumeClaimを利用すればDynamic Provisioningも可能)ですが、Volumeプラグインの場合はすでにあるVolumeを利用することだけが可能です。
PersistentVolumeClaimは、その名のとおり作成されたPersistentVolumeリソースの中からアサインするためのリソースになります。Persistent Volumeはクラスタにボリュームを登録するだけなので、実際にPodから利用するにはPersistent Volume Claimを定義して利用する必要があります。また、Dynamic Provisioning機能(あとで解説します)を利用した場合は、Persistent Volume Claimが利用されたタイミングでPersistent Volumeを動的に作成することが可能なため、順番が逆に感じられるかもしれません。
Volume
Kubernetesでは、Volumeを抽象化してPodと疎結合なリソースとして定義しています。Volumeプラグインとして、下記のような様々なプラグインが提供されています。下記のリスト以外にもあるので、詳細は「https://kubernetes.io/docs/concepts/storage/volumes/」を確認して下さい。
EmptyDir
HostPath
nfs
iscsi
cephfs
GCPPersistentVolume
gitRepo
PersistentVolumeとは異なり、Podに対して静的に領域を指定するような形になるため、競合などに注意してください。
EmptyDir
EmptyDirはPod用の一時的なディスク領域として利用可能です。PodがTerminateされると削除されます。

EmptyDirのイメージ図
リスト1:EmptyDirを指定するemptydir-sample.yml
apiVersion: v1 kind: Pod metadata: name: sample-emptydir spec: containers: - image: nginx:1.12 name: nginx-container volumeMounts: - mountPath: /cache name: cache-volume volumes: - name: cache-volume emptyDir: {} $ kubectl apply -f emptydir-sample.yml
HostPath
HostPathは、Kubernetes Node上の領域をコンテナにマッピングするプラグインです。typeにはDirectory、DirectoryOrCreate、File、Socket、BlockDeviceなどから選択します。DirectoryOrCreateとDirectoryとの差は、ディレクトリが存在しない場合に作成して起動するか否かの違いです。

[HostPathのイメージ図
リスト2:HostPathを使用するhostpath-sample.yml
apiVersion: v1 kind: Pod metadata: name: sample-hostpath spec: containers: - image: nginx:1.12 name: nginx-container volumeMounts: - mountPath: /srv name: hostpath-sample volumes: - name: hostpath-sample hostPath: path: /data type: DirectoryOrCreate $ kubectl apply -f hostpath-sample.yml
PersistentVolume(PV)
PersistentVolumeは、永続化領域として確保されるVolumeです。前述のVolumeはPodの定義内に直接書き込む形で接続を行っていましたが、Persistent Volumeはリソースとして個別に作成してから利用します。すなわち、YAML Manifestを使ってPersistent Volumeリソースを作成する必要があります。
また、PersistentVolumeは厳密にはConfig&StorageリソースではなくClusterリソースに分類されますが、今回は説明の都合上この章で説明しています。
PersistentVolumeの種類
PersistentVolumeは、基本的にネットワーク越しでディスクをアタッチするタイプのディスクとなります。シングルノード時のテスト用としてHostPathが提供されていますが、PersistentVolumeとしては実用的ではありません。PersistentVolumeはPluggableな構造となっており、一例として下記のようなものがあります。下記のリスト以外にもあるので、詳細は「https://kubernetes.io/docs/concepts/storage/persistent-volumes/」を確認して下さい。
GCE Persistent Disk
AWS Elastic Block Store
NFS
iSCSI
Ceph
OpenStack Cinder
GlusterFS
PersistentVolumeの作成
PersistentVolumeを作成する際には、下記のような項目を設定します。
ラベル
容量
アクセスモード
Reclaim Policy
マウントオプション
Storage Class
PersistentVolumeごとの設定
リスト3:PersistentVolumeを作成するpv_sample.yml
apiVersion: v1 kind: PersistentVolume metadata: name: sample-pv labels: type: nfs environment: stg spec: capacity: storage: 10G accessModes: - ReadWriteMany persistentVolumeReclaimPolicy: Retain storageClassName: slow mountOptions: - hard nfs: server: xxx.xxx.xxx.xxx path: /nfs/sample $ kubectl create -f pv_sample.yml
作成後に確認すると、正常に作成できたためBoundステータスになっていることが確認できます。
リスト4:PersistentVolumeの状態を確認
$ kubectl get pv NAME CAPACITY ACCESSMODES RECLAIMPOLICY STATUS CLAIM STORAGECLASS REASON AGE sample-pv 10Gi RWX Retain Bound 6s
以下、PersistentVolumeの設定項目について解説します。
ラベル
Dynamic Provisioningを使わずにPersistentVolumeを作成していく場合、PersistentVolumeの種類がわからなくなってしまうため、type、environment、speedなどのラベルをつけていくことをお勧めします。ラベルをつけていない場合、既存のPersistentVolumeの中から自動的に割り当てを行う必要が生じるため、ユーザの意志によるディスクのアタッチが困難になります。

ラベルをつけなかった場合
一方でラベルをつけておくと、PersistentVolumeClaimでボリュームのラベルを指定できるで、スケジューリングを柔軟に行えます。

ラベルをつけた場合
容量
容量を指定します。ここで注意するべきポイントは、Dynamic Provisioningが利用できない環境では、小さめのPersistentVolumeも用意することです。例えば下の図のよう状況で、PersistentVolumeClaimからの要求が3GBだった場合、用意されているPersistent Volumeの中から最も近い容量である10GBのものが割り当てられることになります。

PersistentVolumeClaimとPersistentVolumeの実際の容量の相違
アクセスモード
アクセスモードは3つ存在しています。
PersistentVolumeのアクセスモード
モード内容ReadWriteOnce(RWO)単一ノードからRead/WriteされますReadOnlyMany(ROX)単一ノードからWrite、複数ノードからReadされますReadWriteMany(RWX)複数ノードからRead/Writeされます
PersistentVolumeによって、サポートしているアクセスモードは異なります。またGCP、AWS、OpenStackで提供されるブロックストレージサービスでは、ReadWriteOnceのみサポートされています。詳細は、https://kubernetes.io/docs/concepts/storage/persistent-volumes/を確認して下さい。
Reclaim Policy
Reclaim Policyは、PersistentVolumeを利用し終わった後の処理方法(破棄するか、再利用するかなど)を制御するポリシーです。
Retain
PersistentVolumeのデータも消さずに保持します
また、他のPersistentVolumeClaimによって、このPersistentVolumeが再度マウントされることはありません
Recycle
PersistentVolumeのデータを削除(rm -rf ./*)し、再利用可能時な状態にします
他のPersistentVolumeClaimによって再度マウントされます。
Delete
PersistentVolumeが削除されます
GCE、AWS、OpenStackなどで確保される外部ボリュームの際に利用されます
マウントオプション
PersistentVolumeの種別によっては、追加でマウントオプションを指定することが可能です。詳しくは各Persistent Volumeの仕様を確認して下さい。
Storage Class
Dynamic Provisioningの場合にユーザがPersistentVolumeClaimを使ってPersistentVolumeを要求する際に、どういったディスクが欲しいのかを指定するために利用されます。Storege Classの選択=外部ボリュームの種別選択となります。
例えばOpenStack Cinderの場合には、ボリュームを切り出す際に、どのバックエンド(Ceph、ScaleIO、Xtremioなど)か、どのゾーンかなどを選択可能です。
リスト5:Storage Classを指定するstorageclass_sample.yml
apiVersion: storage.k8s.io/v1 kind: StorageClass metadata: name: sample-storageclass parameters: availability: test-zone-1a type: scaleio provisioner: kubernetes.io/cinder
PersistentVolume Pluginごとの設定
今回はNFSの例にしましたが、実際の設定項目はPersistentVolume Pluginごとに異なります。例えばspec.nfsは、GlusterFS Pluginを利用した場合には利用されません。
https://thinkit.co.jp/sites/default/files/main_images/14195_main.jpg
0 notes
Text
TensorFlow in Kubernetes in 88 MB
TensorFlow is a brute. It manages machine learning calculations, it utilizes Bazel to be assembled, it utilizes gRPC, and so on., yet let's be realistic, you are biting the dust to play with machine learning. Gone ahead, you know you need to! Particularly in mix with Docker and Kubernetes. At Bitnami, we cherish applications, so we needed to!
TensorFlow + Kubernetes + Docker + Machine learning = Awesomeness.
You simply need to include bi-modular in there and you will hit trendy expression bingo.
Jokes aside, TensorFlow is an open source library for machine learning. You can prepare information models and utilize those models to foresee or induce data. I didn't delve into TensorFlow itself, yet I hear it is utilizing some progressed neural systems methods. NN have been around for some time, yet because of computational unpredictability, they were not to a great degree valuable passed two or three layers and several dozen neurons (20 years back in any event :) ). When you have prepared a system with a few information, you can utilize that system (otherwise known as model) to foresee comes about for information not utilized as a part of the preparation informational collection. As a side note, I am almost certain we will soon observe a commercial center of TF models.
The Inception model is a TensorFlow model prepared utilizing the ImageNet library. With that model, you give it a picture and TensorFlow (TF) discloses to you what that picture is. In March a year ago, there was a blog about how to run the beginning model in Kubernetes. Extraordinary! But that with taking everything in account… what is depicted in the blog is presently broken!
So I will share a couple of goodies about experimenting with your initial TensorFlow model (the Inception model) and running it in Kubernetes utilizing a 88 MB Docker picture. On the off chance that you are sufficiently gutsy to make sense of what is broken with the first blog entry, you will wind up with a ~4.2 GB picture, and I think it is far too huge and strange.
We are taking a shot at this at Bitnami to build up a generation Helm Chart for TensorFlow and utilize it with our serverless arrangement Kubeless.
You can discover our (Tomas Pizzaro @tompizmor and I ) WIP ideal here.
The Build
We took after the general form guidelines however supplanted the base picture with our own minideb, a moderate Debian Docker picture. We likewise put the Bazel construct directions in the Dockerfile, which enables us to manufacture TensorFlow with a solitary Docker fabricate. It works awesome in the event that you give enough RAM to Docker and utmost the nearby assets utilized by Bazel.
fabricate - t tensorflow - f Dockerfile.minideb .
You can run this picture, however it is BIG (~4.2 GB), and it doesn't serve any real prepared information show, so it is pointless in itself. This is quite recently running the TF serving server.
The fabricate procedure is not as much as perfect and we will incorporate it with our inward mechanized toolchain, yet for the time being it will do.
To make this simpler and on the grounds that I decline to pull a 4.2 GB picture each time I need to run this, we did a super awful hacky thing. We simply did a ldd on the TensorFlow serving twofold, replicated the double and libraries out of the picture, duplicated them into a negligible compartment in view of minideb, and got a 88MB picture:
docker pull bitnami/tf-server-slim:0.0.1
docker pictures | grep tf-server
bitnami/tf-server-thin 0.0.1 1f09190e5b3e 2 hours prior 88.6 MB
Stacking the Inception Model in Kubernetes
To stack the Inception display, we chose to utilize a Kubernetes PVC and a Kubernetes Job. That way, we seed the PVC with the model. The Job is quite recently twisting the Inception show and staying it into the PVC. You can attempt the greater part of this on minikube.
apiVersion: v1
kind: PersistentVolumeClaim
metadata:
name: seed
spec:
accessModes:
- ReadWriteOnce
assets:
demands:
capacity: 500Mi
-
apiVersion: bunch/v1
kind: Job
metadata:
name: seed-initiation
spec:
layout:
metadata:
name: seed-initiation
spec:
compartments:
- name: seed
picture: bitnami/minideb-extras:jessie
order: ["/canister/sh"]
args: ["- c", "twist - o/seed/initiation v3-2016-03-01.tar.gz http://download.tensorflow.org/models/picture/imagenet/beginning v3-2016-03-01.tar.gz && compact disc/seed/&& tar - xzf origin v3-2016-03-01.tar.gz && rm commencement v3-2016-03-01.tar.gz"]
volumeMounts:
- name: seed
mountPath:/seed
restartPolicy: Never
volumes:
- name: seed
persistentVolumeClaim:
claimName: seed
Beginning the TF server
Since we have the Inception demonstrate information in a PVC, we can run the TF serving server as an arrangement and utilize an init-holder to stack the model before serving it.
apiVersion: augmentations/v1beta1
kind: Deployment
metadata:
name: tensorflow-serving
spec:
reproductions: 1
format:
metadata:
marks:
application: tf
spec:
initContainers:
- name: stack show
picture: bitnami/tf-server-slim:0.0.1
charge: ['/serving/bazel-container/tensorflow_serving/illustration/inception_saved_model', '- - checkpoint_dir=/seed/beginning v3', '- - output_dir=/serving/origin export']
volumeMounts:
- name: show
mountPath: "/serving/beginning fare"
- name: seed
mountPath: "/seed"
compartments:
- name: serving
picture: bitnami/tf-server-slim:0.0.1
volumeMounts:
- name: show
mountPath: "/serving/beginning fare"
volumes:
- name: seed
persistentVolumeClaim:
claimName: seed
- name: display
emptyDir: {}
Utilizing the TF Inception Model
Since the Inception model is being served, you can uncover the arrangement through a Kubernetes administration and run the customer to utilize it.
kubectl uncover organization tensorflow - port=9000 - type=NodePort
Furthermore, locally on your machine, run the customer compartment (really greater than the server since we have not yet thinned down the Python customer completely) and stream a picture to the server (take note of that the gushing uses Python grpc).
$ docker run - rm - it - v ~/Downloads/:/tmp \
- net=host \
- entrypoint=/canister/bash \
bitnami/tf-customer slim:0.0.1
# bazel-canister/tensorflow_serving/illustration/inception_client \
- server=192.168.99.100:32006 \
- image=/tmp/labrador.jpg
0 notes
Text
Kubernetes: How to Share Disk Storage Between Containers in a Pod
One of the prescribed procedures to build up a containerized application is utilizing stateless holders, implying that information created in one demand to the application in the compartment is not recorded for use in different solicitations. Nonetheless, certifiable applications do require stateful conduct for some of their holders: information produced in one demand ought to be recorded some place in the compartment to be accessible for use in different solicitations.
Great 3-level Applications
For basic applications, the choice over which compartments are stateless and which are stateful can be effectively made. For instance, a basic 3-level web application may have three compartments:
first holder is for the introduction level (a web server), stateless
second holder is for the application rationale level, stateless
third holder is for the tireless level (database), stateful
Records in a holder are transient; so when a compartment crashes and gets restarted, the progressions to the documents will be lost. Subsequently, a stateful compartment ought to store its information in an industrious stockpiling. For a persevering stockpiling, Kubernetes gives a constant volume, another Kubernetes building square, which has its own lifecycle autonomous of a unit's lifecycle. It can be characterized definitively and connected to a few cases in the meantime.
In spite of the fact that, in the case above, you can utilize a solitary unit for the greater part of the holders, the principle reason for a case is to bolster co-found, co-oversaw aide projects, for example, an application server and nearby store, or application server and log watcher. Subsequently, it is more sensible to execute the case application utilizing three cases: one unit for every level. Units with stateless holders can be effectively imitated utilizing, for instance, Kubernetes replication controllers or copy sets, to deal with a high load for the application.
Kubernetes gives distinctive sorts of volumes and every volume sort is actualized as a module. Current modules incorporate Google Cloud Platform volume, AWS Elastic Block Storage volume, Ceph square gadget, have way (a document or catalog from the host hub's filesystem mounted into a case), and exhaust dir. Discover more points of interest in the Kubernetes docs.
Genuine Applications
The time has come to come back to true applications. Sometimes, you have to make a few sections of the application stateful, keeping different parts stateless. Now and then, it is not a trifling undertaking to decouple the application parts into holders attempting to make all compartments stateless.
Another fascinating case is the point at which you have to co-find at least two compartments on a similar host, so they can have a similar record or index. You may need to do this, for instance, to enhance execution: it is not sensible to send an enormous measure of information over the system between holders. Likewise, you might need to keep that information private for the predefined compartments just, while giving a solitary stateless element to the outer clients. For such compartments, you can utilize a Kubernetes case and share information between holders utilizing Kubernetes volume.
Illustration: Pod with Two Containers
In this illustration, we will make a Kubernetes unit that runs two compartments. These two compartments have an appended volume, which they can use to share their information.
Step 1. How about we make a unit definition. Make another document `two-containers.yaml` with the accompanying substance:
apiVersion: v1
kind: Pod
metadata:
name: two-holders
spec:
volumes:
- name: shared-information
emptyDir: {}
holders:
- name: first
picture: nginx
volumeMounts:
- name: shared-information
mountPath:/usr/share/nginx/html
- name: second
picture: debian
volumeMounts:
- name: shared-information
mountPath:/case information
summon: ["/receptacle/sh"]
args:
- "- c"
- >
while genuine; do
date >>/unit information/index.html;
resound Hello from the second compartment >>/unit information/index.html;
rest 1;
done
In this document, we characterize a volume named `shared-data` and its sort is `emptyDir`. The principal holder runs nginx server, has the mutual volume mounted to the catalog `/usr/share/nginx/html`. The second compartment depends on the Debian picture and has the mutual volume mounted to the index `/unit data`. The second compartment executes the accompanying summon:
while genuine; do
date >>/unit information/index.html;
resound Hello from the second compartment >>/unit information/index.html;
rest 10;
done
This charge in an unending circle composes the present date and time to the document `index.html` situated in the mutual volume and afterward holds up 10 seconds before proceeding with the circle once more.
0 notes