#Photo tutorial
Explore tagged Tumblr posts
Visit Tumblr Blog
Explore Tumblr blogs with no restrictions, modern design and the best experience.
Last Seen Tumblr Blogs


Fun Fact
Celebrities use Tumblr as well.
Text
Ocker’s Circular Cast-On.
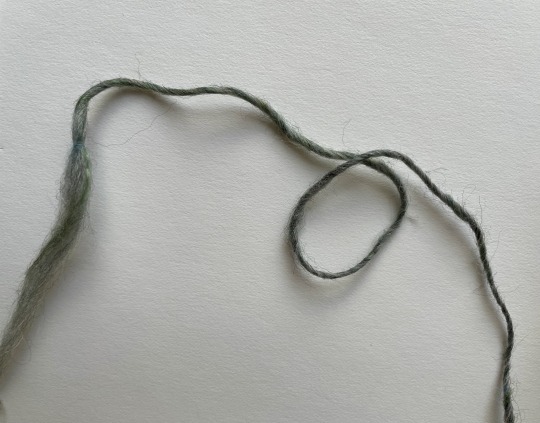
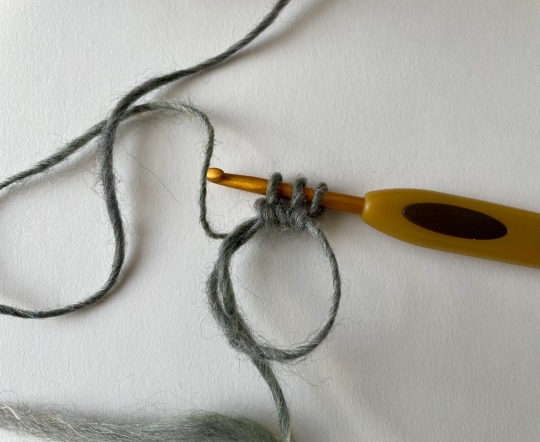
Make a loop near the yarn end. (I have the tail under the loop here, but I don’t think this is vital.)
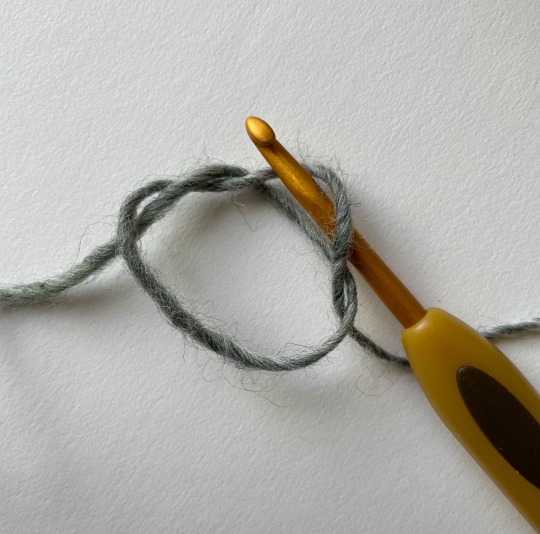
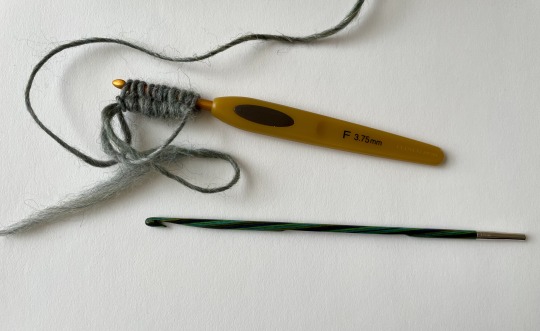
Using a crochet hook, *chain one into the loop with the working yarn. (The first chain looks the worst, having no firm structure yet, but only temporarily.)
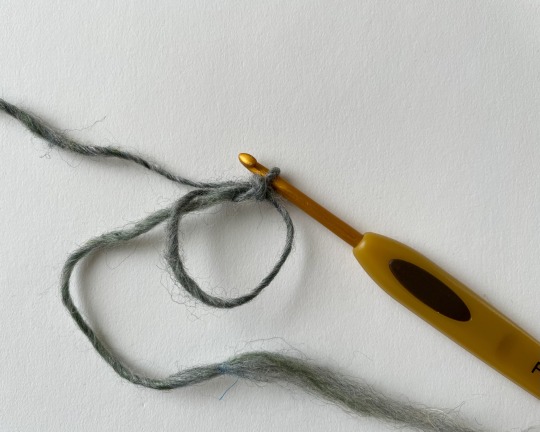
Chain one into the new chain stitch. Leave the stitch on the crochet hook and continue.*
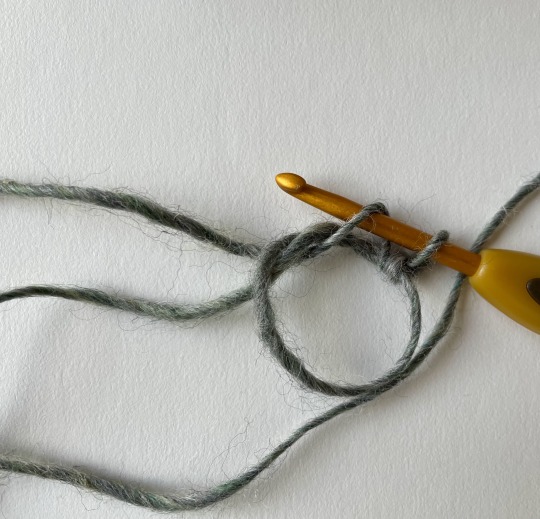
Repeat * to * until you have the number of stitches you need.
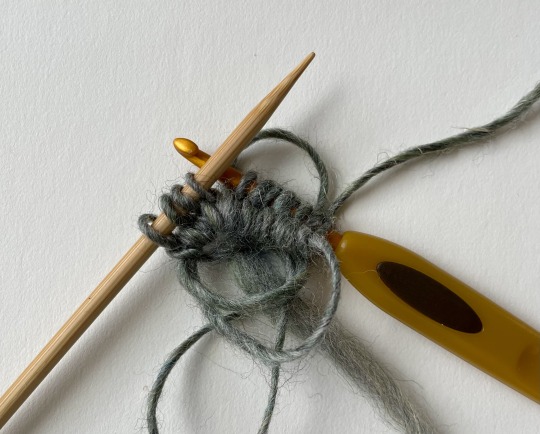
Transfer stitches to DPNs (or another knitting needle as called fro by whatever you’re working on; sometimes I use this cast-on as a really short/gathered cast-on for flat knitting, and in those cases, the pattern instructions will call for you to work flat). Incidentally, this step can be made much easier if you’ve got crochet hooks that are built like a straight smooth stick, with no ergonomics or ornamentation—you can just slide the stitches off the non-hooked end to transfer to the relevant needle.
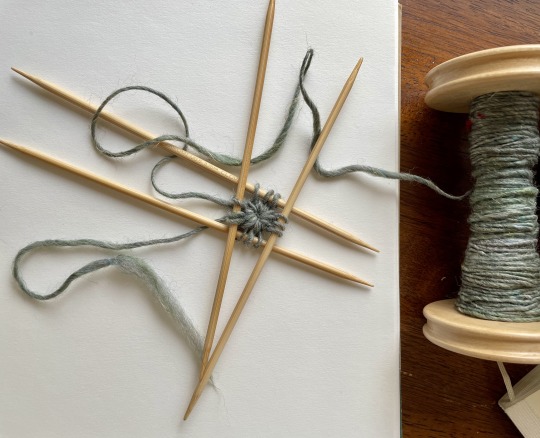
Once that’s done, pull the tail drawstring-style (be kind of gentle with a delicate yarn) to draw the center together, and you’ve got a nice beginning for work from the center out!
(I’m going to pull mine apart. You may be able to see why. It’s completely unfinished yarn, but it’s been on the bobbin so long the twist is pretty inert.)
#this was not supposed to be a tutorial! I had a green circular cast-on I took a few pictures of#but I only took pictures of three of the steps and you couldn’t see how the loop was made#Yarn#knit#knitting#ocker’s circular cast-on#handspun yarn#handspun#terrible tutorial#cast on tutorial#Photo tutorial
29 notes
·
View notes
Text
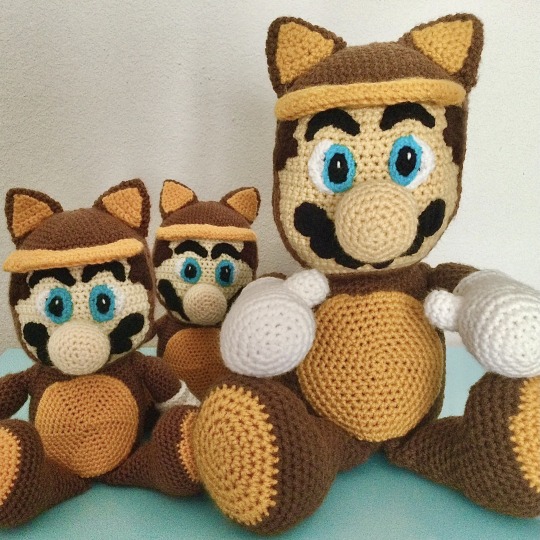

My original Tanooki Mario design came out pretty big in worsted weight yarn, measuring 19” from ear to toe. When I updated the pattern I did it in sport weight instead, measuring 11.5” in length. They all turned out really cute.
Etsy | Ravelry
#tanooki mario#crochet#amigurumi#pattern#tanooki#super mario#crochet pattern#super mario bros#amigurumi pattern#designed by jbcrochetwizard#doll designer#nintendo#tanuki#doll#textile#art doll#string art#plushie#nintendo fanart#diy crochet#photo tutorial
3 notes
·
View notes
Text
Go make yourself a Christmas sheep!
#needle felting#sheep#wool#tutorial#free tutorial#photo tutorial#christmas sheep#baa la la la la#the cozy cuttlefish#new post
6 notes
·
View notes
Text
Play Time
#edges in knitting#hat knitting#hats#knitting#loop knitting#new patterns#photo tutorial#photography#planning#playful#playing#wool#yarn
0 notes
Text
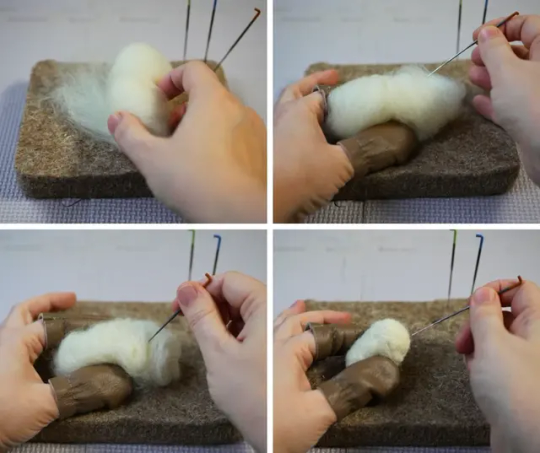
Needle Felt Siffrin Build Log: (oct 6 - nov 20, 2024)


Credits goes wholely to @insertdisc5 for creating ISAT and siffrin's design! I am just here to attempt to make cool fanart (and get more people to play isat.. my devious plans are going great so far :3) As always, this isn't a tutorial- it is just a log about how i go about approaching a sculpture and I hope this collection of resources can help others make their own sifs!!
PSA: this has some spoilers for endgame CGs/sprites on my references image board ( also might see it in the backgrounds of my process pics). And bc this is needle felting, you will see some sharp needles! beware!
my inspiration was the intro cutscene where Sif eats the star, so my main goal was to adhere to the style of ISAT as closely as possible while transfering it to 3D space. And I knew i also wanted to try making the cloak for stopmotion purposes, so my process was tailored towards having control over the fabric with wire inlaid within the cloak (more on that later).
I ended up not sticking eyebrows on top of siffrin's bangs lol but anyways, first order of business is Gather Reference! v important. pureref is free and an awesome program. I also do some sketches to visualize the pose and important details i wanted to include in the sculpt.
behold the isat wiki gallery page! tawnysoup wrote an awesome ISAT style guide that absolutely rings true in 3d space too!! adrienne made a sif hair guide here!! (sorry i couldnt find the original link, but it's on the wiki). It says ref komaeda hair so that's what i looked at, along with other adjacent hairstyles! I also like doing drawovers on in progress photos to previs shapes n stuff to get a better idea of the end result.
Also if you're like me and struggle with translating stuff into 3D space, take a look at how people make 3d models and figurines! sketchfab is also a great resource! I looked at the link botw model by Christoph Schoch here for hair ref. (I used Maya, but there's a blender version too ! you can pose characters too if your model has been rigged!)


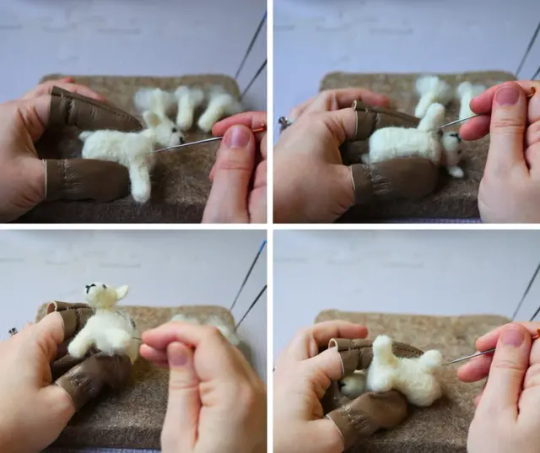
Face:
Started off blocking out the main shapes of eyelids and iris, and then filling in the colour details in the iris and the star highlights before moving onto adding thin black outlines and eyelashes. I didn't take many in-progress photos cause i kept ripping stuff out to redo them many many times, sorry!! This eye took about 3 hrs bc i just wasn't happy with it!! Sometimes it do be the vibe to give up, go to bed and see how it looks in the morning (more often than naught, it looks fine and it was the "dont trust yourself after 9pm" speaking)

The Mouth:
Couldn't decide if i even wanted to add a mouth as per usual with all my humanoid sculptures.. but i did some drawover tests first to see what expression i liked and to try to visualize it from multiple angles. (I was also testing the placement of stars on the hat brim here)

And then I redid the mouth like 3 times cause the angle just wasn't right (this went on for about the course of a week yay!)
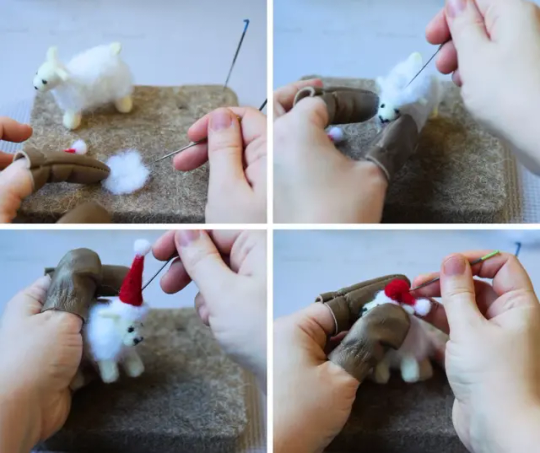
Hair: woe baldfrin be upon ye


I made the hair strands individually first, and then since Sif has some of the hair at the back dyed black, i covered some of the tips with black wool (manually) (I think it would go much faster if i just took a marker to it, but hahaha i love pain and detailing!! )
And then the rest of it was positioning strands with sewing pins layer by layer, always looking at it from different multiple angles- sometimes tailoring the angle or swoop of individual hair flippies. At one point I thought the back looked too cluttered, but the hat covers a lot of it anyways!! yay for hiding mistakes! (imo this is a similar process to how cosplayers style wigs, but on a smaller scale and the same level of time consuming)
As always, look to your reference for guides, and I always do a whole bunch of drawovers over in progress photos to ascertain what was working and what wasn't.
Hat:
A trick to get a super pointy tip, make another tip seperately while keeping the connection point unfelted, and then combine the two to make super pointy hat!! (this also helps if you made the hat too short and need it to be taller. ask me how i know)

The embroidery on the hat brim was done in a hoop and then invisible stitched to the felted top portion. Technically you don't need a hoop but it helps keep the fabric tension, so you avoid puckers in your embroidery. You can also use iron-on stabilizer if your fabric is loose weave or particularly thin. this is the tutorial i used for the stars embroidery! particularly the fly stitch one, french knots, and the criss-cross stitches. highly recommend needlenthread for embroidery stitches and techniques! i learned all my embroidery from this single site alone.

For fabric, I think I used a polycotton i had in my stash,, unsure of the actual fiber content bc i bought it a long time ago. I used DMC Satin floss which was nice and subtle shiny but frayed a lot so it was kind of a pain to stitch with... but keep a short thread length and perservere through it!! After the embroidery was done, I folded up the raw edges and invisible sewed it to the top portion of the hat.
General shape:
Ok general structure of the body is this: wire armature body covered with black wool -> cloak lining & wire cage -> edge of lining is invisibly sewn to the main cloak at the hem -> head

Don't be afraid to mess around with the pattern, it's essentially a pizza with a slice taken out of it to form a steep cone shape!! Use draft paper before cutting into felt to save material! (i think i made like 3 cloaks before i was happy with the shape lol).
You can also hide the seam of the cloak and collars by gently messing up the fibers of the felt with your fingers or a felting needle btw! you can also sandpaper the seams according to Sarah Spaceman in this vid (highly recommend them for their in depth cosplay/crafting builds holy smokes), though since sif cloak is at such a smol scale, I just blended the seam with my felting needle.
For the lining wire cage section, I sewed in wire around the cloak, so the main rotation point is at the top neck area under the collar. These paddles are used to keep whatever pose I need the cloak to be in for stopmotion purposes. Then after the wire is done, I invisibly sewed the lining to the cloak at the hem (same technique as the hat brim to the lining there).
In hindsight, I should've used a thinner fabric for the lining, but i only had sheer white in my stash so had to go with double felt, thus resulting in a really bulky lining but oh well!

Heels:
started with the general boot shape, then tacking on the diamond shape heel stack and also diamond shape sole bc we're committed to the bit here. I skewer the boot onto the armature which also conveniently hides the connection point into the base to keep the whole thing upright and also I can rotate the boot to tweak the angle if needed.

Pins:
I kinda just trial and error'd jewellery wire with pliers into the pin shapes. They're itty bitty!! had a whole bunch of fails before i got two nice ones. A hot tip is to use needle nose pliers and wrap the wire around the tip to get a smooth circle shape!

Base:
I smoothed out the edge of a circular wood base with a dremel, and then used wood stainer to get the black colour. It ended up kinda looking like I took a sharpie to it, but whatever.... now i have a whole ass can of black wood stainer........ I then made a rough mountain of black wool and stuck the feet armature in. And now he's standing!!

Normally at this point when I'm done felting everything, to get a smooth finish, I'd take a small pair of scissors and carefully snip away any flyaway fibers, but this time, I just left them fluffy cause i think that's what sif would do :3c
Photoshoot:
Normally I do shoots using daylight but it was winter so the sun was nonexistent. So I broke out the home lighting setup aka dollarstore posterboard for a nice smooth background, and then hit it with the overhead Fill, side Fill 2, and Rim light, and use white paper/posterboard for bounce light if one side feels too dark. But if things are overexposed, you can move the light sources away until the harshness dims down. I'm using a Olympus mirrorless camera (handed down to me by my sibling so i dont remember the model exactly), which can connect to my phone as a remote so I can avoid shaking the camera when i take photos. Pretty nifty for stopmotion purposes! (yes my camera stand is a stack of notebooks, a tissuebox and some eva foam under the lens, don't judge me)


Stopmotion animation:
I'm still figuring stopmo out on my part, but my process was straight ahead animation ... move the cloak a cm, take a pic.... move another cm, click.... and repeat until i get a version I was happy with. My ref was the cloak animation from Gris (beautiful game btw). The 2d star animation was also done straight ahead using procreate, exported in png with a transparent background, and finally stitched together with the stopmotion footage in photoshop.

My turnarounds are also stopmotion! also secret hack, the turntable is a fidget spinner sticky tacked to a cake platter.
And i think that's all! i mainly wanted to share how I go about thinking about taking a 2d concept and moving it to 3D. I also didn't go in depth into how to actually do the needle felting bc I don't think I''d be very helpful I'm a very good teacher by telling yall to just keep stabbing until it looks right (i'm self taught for this hobby),,, if anyone wants it though, i can share a bunch of tutorials and other felters' process that helped me learn more needle felting!
Hopefully this was helpful to someone! Feel free to send asks if ya got any questions or if anything needs clarification! Or show me your works! I love seeing other people's crafts :3
here have a cookie for making it this far 🥐
#in stars and time#siffrin#isat#isat siffrin#isat fanart#needle felt#soft sculpture#know that i am devouring all the nice words yall leave in the tags/comments of my posts :holding back tears:#I hesitate to call this a tutorial bc this is just how i fumble my way through crafting anything lmao#the only reason I know how long I worked on a project are timestamps on wip photos and however long the day's video essay or letsplay is#sorry time is immaterial when i get into crafting mode#reason why this log is so late is bc after i finish a project i'm perpetually hit with the ray of 'i dont ever want to look at this again'#hence why photos never get edited#AND THIS POST SAT IN MY DRAFTS FOR 2 MONTHS DUE TO BLOODBORNE BRAINROT SORRY#done is better than perfect!!!#sorry i dont control the braincell#sorry for using a million exclaimation points! i am not good at this.. conveying my anxiety in written form!!! my toxic trait
1K notes
·
View notes
Text


More photos from my digital camera (7.2 megapixels)
#thought it had been a while#one of my favourite shirts#my girlfriend bought this crt tv#so she could watch sewing curtains tutorials#on a vhs#it’s super nostalgic I haven’t tapped on a screen and heard the ding in so long#y2k#y2k aesthetic#y2k style#y2k nostalgia#y2k icons#2000s web#old web#2000s#early 2000s#2000s internet#crt tv#vintage games#digital camera photo#digital camera
932 notes
·
View notes
Note
¿oodrías hacer un tutorial de cómo difuminar el marco de las fotos tipo así, por favor?

holii, ahí te grabe uno. no se si me explique bien, pero de esa manera es muy fácil para mi. solo le pones filtros a una foto de color, los que le puse son para difuminarlos (depende del gusto de cada uno de como ajustarlos) luego le pones la foto arriba y con la flechita de al lado del candado la superpones y ya esta.
(ignoren lo de capcut 💔💔)
si no quieres que la foto quede tan visible, por así decirlo, le bajas la opacidad (lo marcado en rojo)

espero que te sea de ayuda. cualquier duda que tengas, puedes escribirme por aquí o por mi ig 👊🏻!!
#fakeland#rp moodboard#tropical moodboard#kpop moodboard#tropical#kpop#moodboard#random moodboard#argentina#brasil#my edit#photo edit#editblr#edit#short bios#kpop bios#messy bios#messy icons#messy layouts#messy moodboard#instagram#tutorial
299 notes
·
View notes
Text
📸🎞️✂️
✨✌🏻~Hi Link Click fandom! 🙃✨
Sooo I was planning to just study the show's artstyle after finding a cool tutorial on youtube but it suddenly evolved into this artwork. Now I can angst about the future season & the fact that time travel is depressing 💙
(Also I wanted LG's clothes to be less boring so I tweaked them a little 🙃 Totally not because I forgot lol)
(tutorial from yt here 🥰)
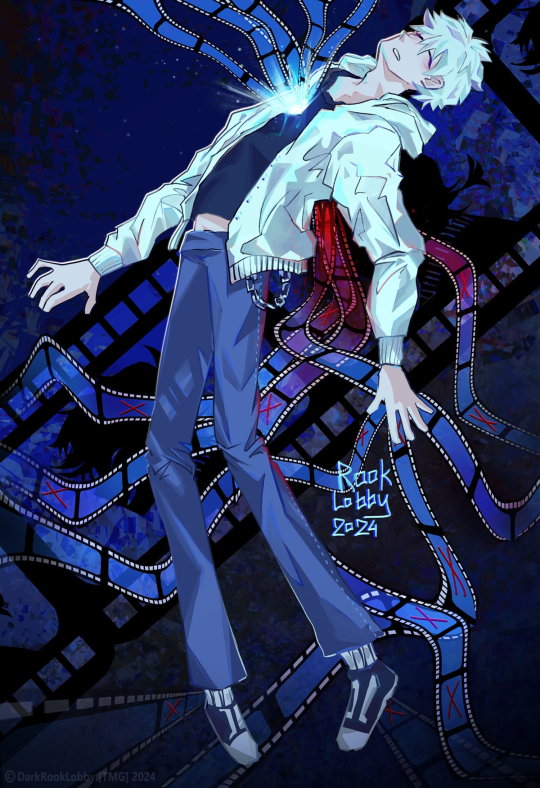
#link click#shiguang daili ren#shiguang dailiren#lu guang#cheng xiaoshi#donghua#lg#cxs#link click fanart#yingdu chapter#hopefully released soon! lol#film#film photography#frame#photo#fanart#rook lobby#dark rook lobby#2024#digital art#illustration#tutorial#art tutorial#used a tutorial from youtubeeee#guide#time travel#ok so despite the fact cheng xiaoshi is in the background only#shiguang#:3#sgdlr
273 notes
·
View notes
Text
"One often meets his destiny on the road he takes to avoid it."

I finally charged my tablet and now im unstoppable. So have a little off screen scene from chapter 1 of TDSB
#tim drake#batfam fanart#the drakes spoiled brat#sunny art#trash tim au#tim drake fanart#a little treat#a few crackers waiting on the pot#experiementing with some lighting shit#aka I watched a render tutorial#gave up#found new funky shit#also yes I did NOT draw those hands#thank god for pinterest photos#batman#dc#batman dc#batfam#batfamily
164 notes
·
View notes
Text


Elloth Granny Square, a free crochet pattern designed by K.A.M.E. Crochet on Ravelry.
Written pattern, photo tutorial, and video tutorial are all available. This is a great pick for group projects!
#crochet#full pattern#crochet pattern#free crochet pattern#fiber art#fiber crafts#photo tutorial#video tutorial#granny square#flowers
55 notes
·
View notes
Note
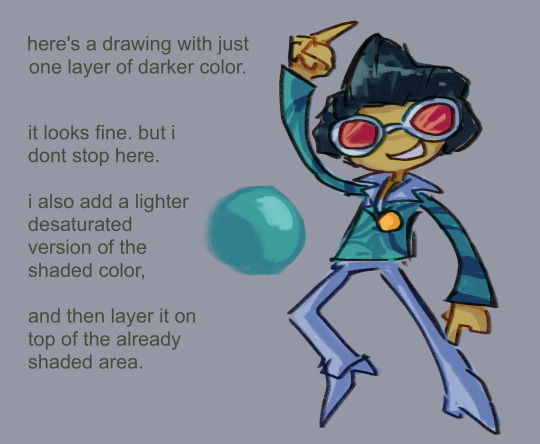
Can I ask How do you color and render your art? I frickin love the way you choose colors esp for lighting and bounce light, it's really pretty
thanks so much :) this took a little bit because i'm not a teacher. but hope you can understand some concepts i put out.
I'm going to go over mostly on how I shade/render. Picking out initial base colors is something that just comes with practice, preference, and from someone more eloquent.

The top is what 'not' to do. The bottom is generally what i do.
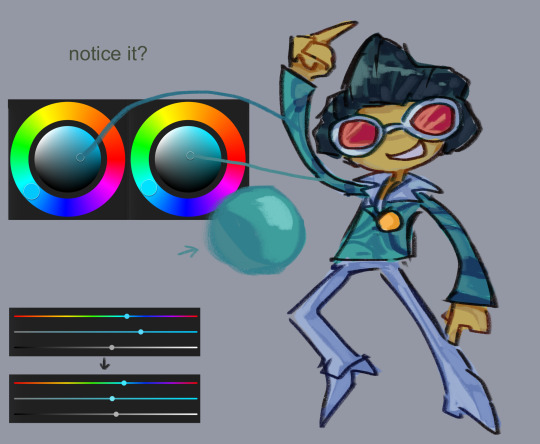
below is another example


i could do more. i meant to do more. but every other tip/tutorial i tried doing seemed like i was teaching abc's. I realized i don't know exactly what was being asked. I do have a few general tips though.
my process usually goes: Sketch, lineart, coloring, filtering/post processing.
'Post processing' can be a lot of things like; Painting over the drawing(fixing errors or adding details), or adding a noise filter, adding an overlaying photo. And/or changing the colors with gradient maps.
If you use a program that supports gradient maps then use them. they can be your best friend. Especially when colors don't look cohesive or just how you want them to.
Experiment with layer modes. At the moment I'm really into Pin-Light and Luminosity. Like I said, experiment. This is included in post-processing.
Use more than one shading color for each section. Go darker, go lighter while using that color picking method. Ex: It's usually darker under the neck than the side of the face. So use a darker color than the face.
if anythings confusing or you'd like something more specific then you're more than welcome to ask.
#the hard part about this was putting down base colors without shading. i usually do it as im just coloring everything else#my art#art tips#art tutorial#honestly i didnt know what to add exactly. are these too confusing. or too simple. or are they fine. i didnt want to be too long.#because what i do isnt majorly complicated. and the actual complicated parts come from practice and talk that would need to happen irl.#i messed up the photos me n my stupid baka life#thats why u check your posts
103 notes
·
View notes
Text
IM TEACHING MYSELF HOW TO RECOLOR MANGA PANELS AND MAKE GRAPHICS IM SO EXCITEDDDD

#purple reo 😊#i’m sososososo excited for these upcoming series u guys omg#gonna try a new theme out for tbp since vgl is already done and i don’t wanna go back lol#actually i might recolor hiori IDK YET#i might post a tutorial if anyone wants to learn how recolor photos/make png dividers/change text color#blue lock#bllk#mikage reo
94 notes
·
View notes
Text
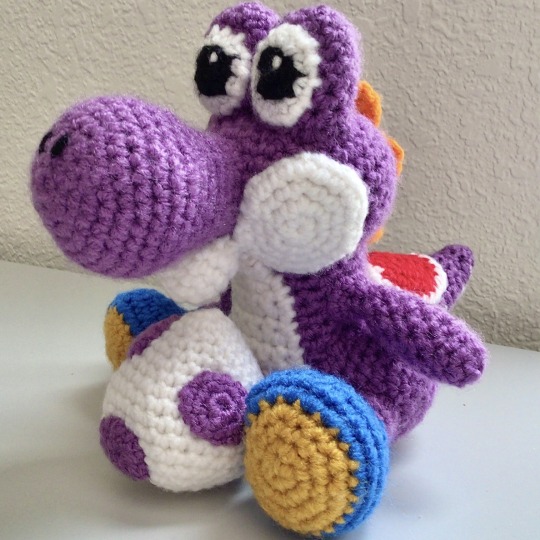
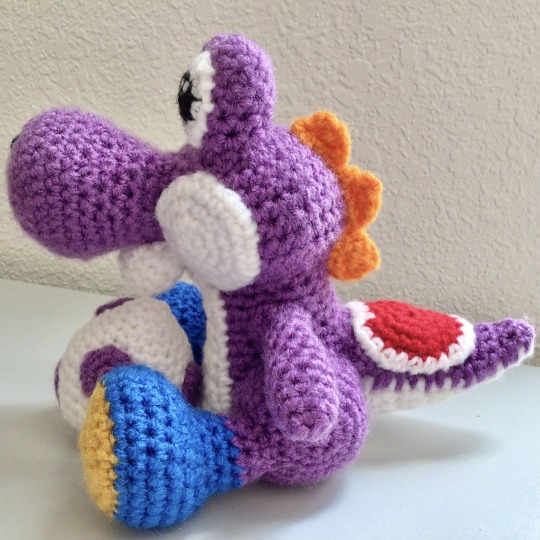
Purple Yoshi! 💜🦖
Crochet doll pattern is available on Etsy and Ravelry.
#yoshi#dinosaur#amigurumi#plushie#yarn yoshi#amigurumi artist#designer#yoshi doll#crochet dinosaur#dinosaur pattern#nerdy crochet#amigurumi pattern#crochet#nerd crafts#fan art#gamers4life#super mario#crochet pattern#photo tutorial
11 notes
·
View notes
Text
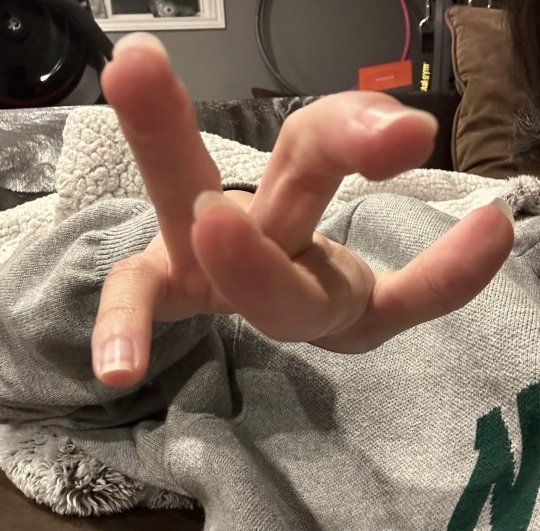
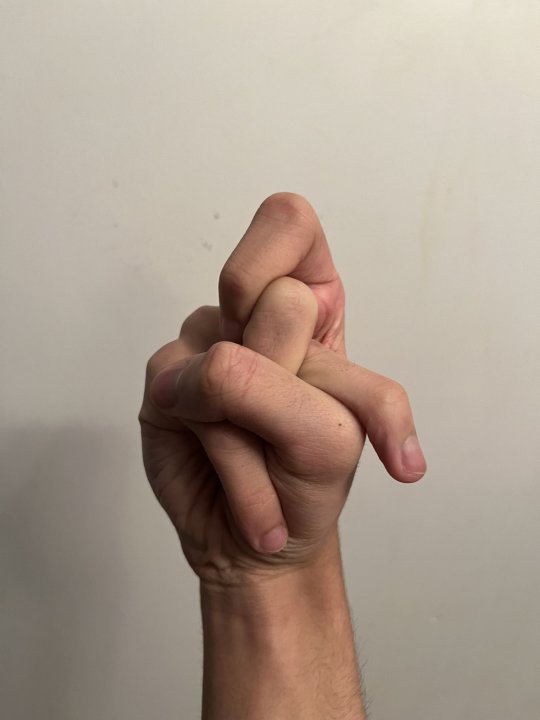
some hand references i found on xwitter. feel free to practice
#artists on tumblr#hands art#hand reference#reference#tutorials & references#art reference#hands#reference photos#reference pictures#укртумбочка#український tumblr#укр тумбочка#украрт#арткозацтво
377 notes
·
View notes
Note
I can't express how much I LOVE the way you draw hands! They are just absolutely amazing and so SO expressive. Do you have any advice on how to improve? (other than the obvious, "practice", lol)
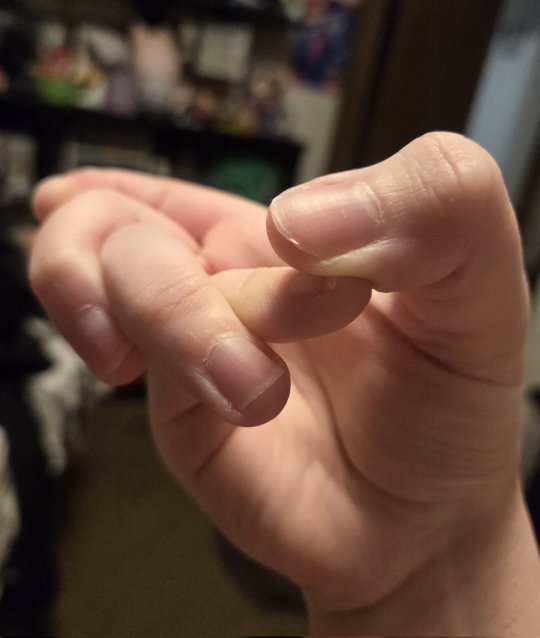
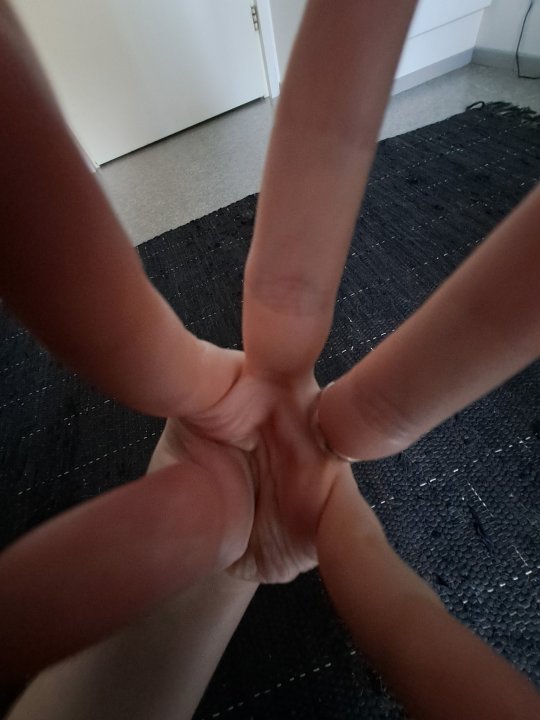
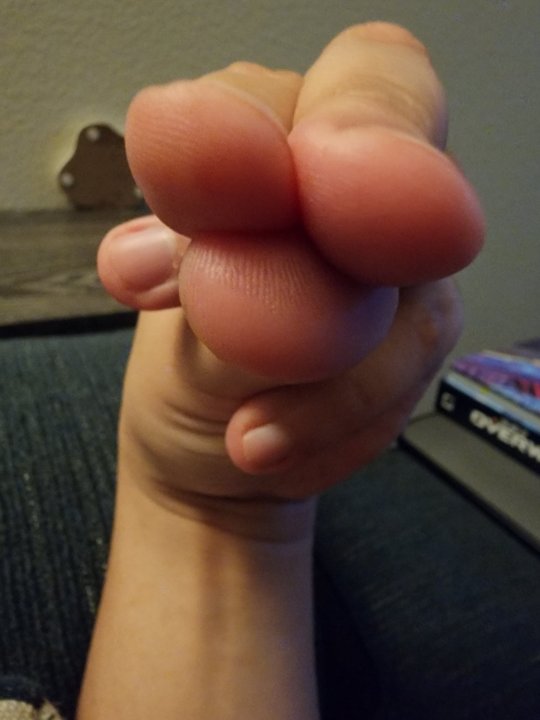
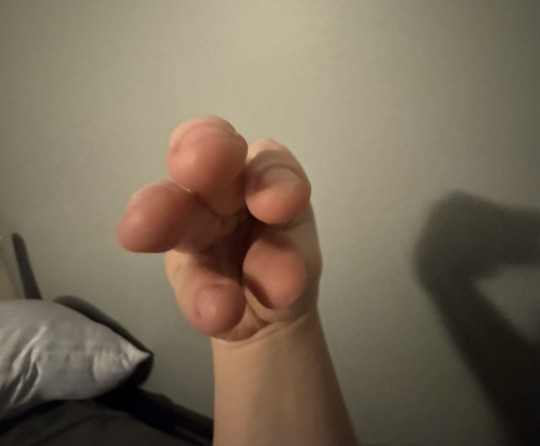
THANK YOU!! Hands are my #1 favorite thing to draw and i love using them and touching to enhance the feeling of a drawing so that makes me so happy to hear!! lol not the dreaded 'just practice' - I tried to put together an impromptu example for you: I’ve always loved drawing hands and include them in my art a lot but I can say for certain that there was a huge boost in my abilities when i started tracing from real life images to better understand the way fingers curve and deform around objects, especially - I’ll take a reference picture or two, trace, figure out which looks better and then try to re-draw it:
You want to draw a character holding a bottle? Alright, find an object that’s about the size you want, get your camera (a shitty res phone camera will do in my case), and get to it!
I like to do some variations because sometimes things just look *goofy* when you have simpler lines depicting them, so here’s 4 different ones:
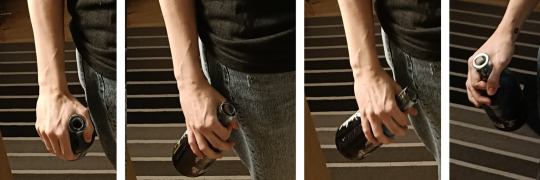
Alright, next step - rough lines over to see how it translates to 2d:
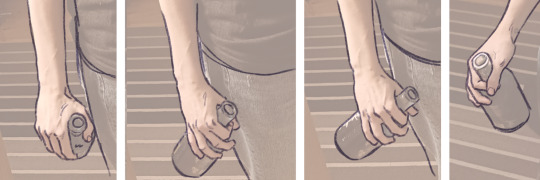
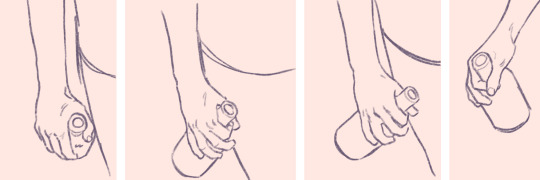
#1 looks goofy so that one's out - I like #2 the best but the grip'll translate better if I close the grip of the two first fingers, so I'll do that (or retake the picture) and then re-do it on my own while eyeballing the reference i just made (I usually just draw the lines for hands directly but if i'm having trouble i break it down into rough shapes first) :

Think of it kind of like building a neat little reference library in your own brain - next time I want to draw a hand holding a bottle I can think back on this and what I picked up :)
Thanks again, hope this helps!
#Art tutorial#I guess???#my phone camera is filled with weird reference photos of myself for this exact purpose lol#Not the *best* hand I've ever drawn but I figured the example worked better w something that would be difficult (:#my art
71 notes
·
View notes
Text
Oh my god oh my god oh my god
There's a Vash and Wolfwood dog papercraft
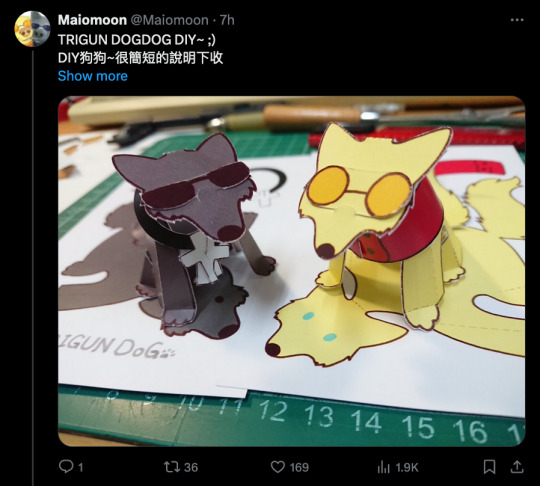
#Trigun#I know that op shows a lot of tools at the beginning of the tutorial#But this is a SUPER basic papercraft if you want to give it a go!#I highly recommend cardstock if you can#But you can get away with it if it's all you got#I don't think regular paper will stand up as well#Matte photo paper would probably be the best but that shit's expensive#I'm going to work on a couple modifications for my version#Either double-sided printing or two layers...#I think the former#Anyway#The moment this awful migraine is gone#I KNOW WHAT I'M DOING#(As it may be apparent I'm a papercraft addict and I'm totally willing to give anyone advice if they need it!)#(I'm still working on the Trigun foxes btw just working Vash and Wolfwood yin yang kitties first)#I LOVE that this is glue-free tbh#I'm so fucking messy at gluing
256 notes
·
View notes