#Step-by-Step Guide: How to File Your ITR
Explore tagged Tumblr posts
Visit Tumblr Blog
Explore Tumblr blogs with no restrictions, modern design and the best experience.
Last Seen Tumblr Blogs


Fun Fact
Tumblr.com is the 103rd most visited website in the world.
Text
How to File Your ITR for AY 2024–25 Before the Deadline

Hate it or love it—tax season always shows up on time.
As the new financial year is approaching, it’s time to get serious about your Income Tax Return (ITR). Whether you are a salary earner, a freelancer, or a business person, ITR filing is not only a statutory obligation but a financial hygiene check that keeps your money related matters clean and compliant. Here in this blog, we’re going to walk you through all that you must know before you get your ITR filed accurately and fearlessly for FY 2024-25.
#How to File Your ITR for AY 2024–25 Before the Deadline#File Your ITR for AY 2024–25 Before the Deadline#File Your ITR for AY 2024–25#Step-by-Step Guide: How to File Your ITR for AY 2024–25#Step-by-Step Guide: How to File Your ITR
0 notes
Text
Your Complete Guide to Manpower Supply Services in the UAE with World Star- manpowersupply.ae

Introduction: The Power of a Reliable Workforce in the UAE
In the rapidly evolving UAE business landscape, having access to the right workforce is the foundation of success. Whether it’s construction in Dubai, manufacturing in Sharjah, or oil & gas projects in Abu Dhabi, every industry depends on reliable manpower. That’s where manpower supply companies like World Star – manpowersupply.ae, a leading labour supply company in UAE, step in to streamline staffing needs across the Emirates.
What Are Manpower Supply Services?
Manpower supply refers to providing skilled and semi-skilled human resources to companies on a temporary, contractual, or project basis. A manpower supply company acts as a bridge between businesses and workers, handling sourcing, screening, and onboarding for roles like:
Electricians
Welders
Fabricators
Scaffolders
Helpers
These services are critical in sectors such as construction, oil & gas, marine, and manufacturing, where workforce demands often fluctuate.
How Do Manpower Supply Agencies Operate?
A manpower agency like World Star functions as a complete HR partner for businesses. Their responsibilities include:
Candidate Sourcing & Screening: Matching job roles with qualified workers through thorough vetting.
Payroll & Compliance Management: Managing salaries, taxes, and benefits while ensuring labour law compliance.
Onboarding & Documentation: Ensuring workers are ready to contribute from day one.
Flexible Workforce Scaling: Adding or removing manpower based on project stages or seasonal needs.
This allows businesses to reduce hiring costs, focus on core activities, and remain fully compliant with UAE labour laws.
Why Is Manpower Supply Important in the UAE?
The UAE’s rapid urban development and infrastructure growth fuel the need for manpower. Cities like Dubai, Abu Dhabi, Sharjah, Ajman, Fujairah, Ras Al Khaimah, and Umm Al Quwain have growing demand for construction and industrial workers. Hence, a trusted manpower supply company in UAE becomes an indispensable partner for large-scale projects.
Benefits of Partnering with a Manpower Supply Company
Partnering with a reliable manpower supply company like World Star – manpowersupply.ae offers several key advantages:
Access to Pre-Screened Talent
Quick Mobilization of Workforce
Reduced HR Burden
100% Labour Law Compliance
Cost-Efficiency for Short-Term or Long-Term Projects
Availability of Specialized Tradespeople Across UAE
Whether you’re seeking manpower supply in Dubai, labour supply in Sharjah, or employment services in Ajman, working with a vetted agency guarantees peace of mind.
Legal & Regulatory Requirements for Manpower Agencies in UAE
To operate a legitimate manpower supply company in UAE, certain legal compliances are required:
Trade License: Registration under the correct business activity (e.g., manpower services).
Labour License: Mandatory for agencies supplying 20 or more workers under the Contract Labour Act.
GST Registration: Required if turnover exceeds the exempt limit. The applicable SAC code is 99851 for manpower supply.
ESI & PF Registration: Ensures social security for workers.
Business Activity Code (ITR): 16007: Must be used when filing tax returns for manpower agencies.
World Star ensures all regulatory requirements are met, offering clients full transparency and risk-free staffing.
Industries That Rely on Manpower Supply Services
The demand for manpower in UAE spans various industries, including:
Construction & Real Estate Development
Manufacturing & Assembly Units
Oil & Gas Operations
Marine & Shipyard Industries
Electrical & Infrastructure Projects
World Star – manpowersupply.ae offers specialized staffing for each of these sectors, making them a premier employment services provider in Sharjah and beyond.
What Sets World Star – manpowersupply.ae Apart?
Since 2008, World Star has built a reputation as one of the most reliable manpower supply companies in UAE by offering:
Skilled & Verified Workforce
Compliance-Ready Documentation
On-Time Mobilization
Dedicated Account Managers
Operations Across Dubai, Sharjah, Abu Dhabi, and More
Affordable & Transparent Pricing
Their ability to deliver consistent results makes them a top choice for manpower supply in Fujairah, labour supply in Ajman, and across the Emirates.
Conclusion: Partner with the Best in UAE Manpower Supply
Whether you’re a contractor in Dubai or an industrial firm in Sharjah, having the right manpower partner is key to operational success. World Star – manpowersupply.ae is your go-to source for flexible, affordable, and compliant manpower solutions across UAE.
Serving all 7 Emirates
Years of Industry Experience
Trusted by Top Companies
Competitive Rates
Expert Workforce – Anytime, Anywhere
Contact Us
Visit: www.manpowersupply.ae
Call: +971 0507778779 | +971 067677770
Email: [email protected]
Get in touch today to discuss your labour supply needs. Let’s build your workforce, the World Star way.
#Manpower Catering Supply#Manpower Catering Supply Companies#Manpower Catering Supply in UAE#Manpower Catering Supply Companies in UAE#Labour Catering Supply in Dubai#Manpower Catering Supply Company in UAE
1 note
·
View note
Text
Understanding Tax Refunds: JJ Tax made it easy
Handling tax refunds can seem overwhelming, but having a clear grasp of the process can make it straightforward. This newsletter aims to demystify tax refunds by covering key aspects: eligibility criteria, claiming procedures and tracking your refund status.
What is a Tax Refund?
A tax refund represents the amount returned to taxpayers who have overpaid their taxes over the fiscal year. This situation arises when the total tax deducted or paid exceeds the actual tax liability determined based on their income.
In India, tax payments are made through TDS (Tax Deducted at Source), advance tax, or self-assessment tax. When the total tax paid or deducted surpasses your tax liability as calculated in your Income Tax Return (ITR), the excess amount is refunded. This mechanism ensures taxpayers are reimbursed for any overpayments.
Who is Eligible for a Tax Refund?
Eligibility for a tax refund depends on various factors:
Excess Tax Payments If your TDS or advance tax payments exceed your tax liability, you’re eligible for a refund. This often applies to salaried employees, freelancers, and individuals with taxable investment income.
Claiming Deductions If you claim deductions under sections like 80C, 80D, etc., and these deductions lower your tax liability below the total tax paid, a refund may be due.
Filing an Income Tax Return Only those who file their Income Tax Return can claim a refund. The return must accurately reflect your income, deductions, and tax payments to establish if a refund is warranted.
Losses to Set Off If you have losses from previous years or the current year that can be carried forward and set off against current year income, you might be eligible for a refund if these losses reduce your tax liability.
Who is Not Eligible for a Tax Refund?
Certain situations or individuals may not qualify for a tax refund:
Income Below Taxable Threshold If your total income is below the taxable limit, a refund may not be applicable.
Salary Below Government Criteria Individuals earning below the minimum threshold specified by the Government of India may not qualify for a refund.
No Overpayment If your tax payments match your tax liability or you haven’t overpaid, a refund will not be available.
Non-Filers or Incorrect Filers Those who fail to file their Income Tax Return or file it incorrectly will not be eligible for a refund. Proper filing is essential for initiating the refund process.
Invalid Deductions Claims for deductions that do not meet tax regulations or lack valid documentation may result in a refund rejection.
Incorrect Bank Details If the bank account information provided in your ITR is incorrect or incomplete, the refund may not be processed.
How to Claim Your Tax Refund
Here’s a step-by-step guide to claiming your tax refund:
File Your Income Tax Return (ITR) Access the Income Tax Department’s e-filing portal. Choose the correct ITR form based on your income sources and eligibility. Accurately complete all required details, including income, deductions, and tax payments.
Verify Your ITR Verify your ITR using Aadhaar OTP, net banking, or by sending a signed ITR-V to the Centralised Processing Centre (CPC). Verification must be completed within 120 days of filing your ITR.
ITR Processing The Income Tax Department will process your return, assess your tax liability, and determine the refund amount. This process can take a few weeks to several months.
Refund Issuance After processing, the refund will be credited directly to your bank account. Ensure your bank details are accurate and up-to-date in your ITR.
Update Bank Account Details (if needed) If your bank details change after filing your ITR, promptly update them on the e-filing portal to ensure correct refund crediting.
How to Check Your ITR Refund Status for FY 2024-2025
To check your refund status, follow these steps:
Visit the Income Tax E-Filing Portal Go to the official Income Tax Department e-filing website.
Access the 'Refund Status' Section Navigate to the ‘Refund Status’ page, typically under the ‘Services’ tab or a similar heading.
Enter Required Details Input your PAN (Permanent Account Number) and the assessment year for your filed return.
Review the Status The portal will show the status of your refund, including whether it has been processed, approved, or if further action is needed.
Track Refund Processing Keep an eye on any updates or notifications from the Income Tax Department regarding your refund.
Understanding the tax refund process can simplify the experience. By following these steps and staying informed about your eligibility, you can make sure that you have a smooth process and quickly receipt of any excess tax payments. For expert guidance and personalized assistance, consult with JJ Tax. Visit our website or contact us today to get the support you need for all your tax-related queries.
JJ Tax
2 notes
·
View notes
Text
GeM Registration and Annual Compliance for Companies: A Comprehensive Guide
In the evolving landscape of government procurement in India, the Government e-Marketplace (GeM) has emerged as a game-changer for businesses seeking to offer goods and services to government buyers. With a vision of transparency, efficiency, and ease of doing business, GeM has revolutionized how vendors interact with public sector units and departments. For companies aiming to tap into this vast market, GeM registration and annual compliance are essential steps.
What is GeM?
The Government e-Marketplace (GeM) is an online platform launched by the Government of India in 2016 under the Ministry of Commerce and Industry. It facilitates the procurement of goods and services required by various government departments, organizations, and public sector undertakings (PSUs). GeM brings transparency and eliminates the traditional red-tape associated with government procurement, enabling fair competition and cost efficiency.
Why Should Companies Register on GeM?
GeM provides companies with access to an extensive market of government buyers. Here are a few benefits:
Access to Government Tenders: Only GeM-registered sellers can participate in bids floated on the platform.
Prompt Payments: GeM ensures timely payments through secure channels, a major advantage over traditional procurement systems.
Level Playing Field: Whether a startup, MSME, or a large enterprise, GeM offers equal opportunities.
Reduced Marketing Cost: Since the platform connects you directly with buyers, you save on marketing and intermediary costs.
GeM Registration Process
The GeM registration process is relatively straightforward and can be completed online. Here's a step-by-step outline:
Create an Account: Visit the GeM portal and register as a seller.
Upload Documents: You’ll need to upload key documents including:
PAN and Aadhaar of the authorized person
Udyam Registration or Company Incorporation Certificate
GSTIN details
Bank account details
Profile Verification: GeM verifies your company’s profile through various internal checks.
Catalogue Upload: Once registered, sellers can list products or services they wish to offer.
Approval and Live Listing: After GeM's review, your listings go live and become accessible to government buyers.

Annual Compliance for GeM-Registered Companies
Registering on GeM is just the beginning. To remain active and eligible for government contracts, companies must adhere to certain annual compliance norms.
1. Profile Updation
Companies must regularly update their profile details such as:
Turnover figures
Tax returns (ITR and GST)
Contact and bank information
Product/service catalog updates
Failure to keep the profile updated may result in suspension or delisting.
2. Performance Reviews
GeM tracks the performance of sellers based on:
Timely delivery
Quality of goods/services
Buyer feedback
Grievance redressal rate
Consistently poor performance can lead to blacklisting or a lower ranking in search results.
3. Timely Renewal of Documents
Licenses, certificates, and financial documents must be renewed and uploaded annually. This includes:
Updated GST and ITR filings
Renewed MSME/Udyam certificates (if applicable)
Financial statements or audit reports
4. Product and Service Refresh
Each year, companies are advised to review and update their product listings to:
Remove discontinued items
Add new offerings
Update pricing as per market trends
5. Compliance with GeM Policies
The GeM portal frequently updates its policies. Sellers are required to comply with new regulations, which may include sustainability norms, packaging standards, or service-level agreements (SLAs).
Conclusion
For companies looking to build a sustainable revenue stream from government contracts, GeM registration is an essential step. However, it does not end with registration—annual compliance is crucial to maintaining credibility, improving rankings, and ensuring uninterrupted business with government departments.
Staying compliant not only secures your position on the platform but also enhances your reputation as a reliable vendor. With India’s government procurement volume increasing year on year, businesses that proactively manage their GeM profiles stand to gain significantly.
0 notes
Text
Business Visa Documents for Tech Professionals – Step-by-Step Guide (2025)
With increasing global business travel, especially among Indian professionals, business visas have become an essential document for international success. Whether you're heading to the US for a client meeting or to Europe for a project review, the online business visa application process makes it faster and more accessible than ever.
In this guide, we simplify how to apply for a business visa online in 2025, covering documentation, steps, payment methods, timelines, and pro tips—so you can focus on your global goals, not the paperwork.

What is a Business Visa?
A business visa allows foreign nationals to enter another country temporarily for non-employment professional purposes. Common reasons include:
Attending business meetings or negotiations
Participating in trade fairs, exhibitions, or conferences
Onsite client visits or product installations
Technical training or project planning sessions
Unlike work permits, business visas do not allow salaried employment in the host country.
Why Apply Online?
Most countries have moved to digital visa systems, allowing applicants to complete the process from home. Key benefits include:
24/7 access to online application portals
Real-time tracking of application status
Faster processing in some cases
Online document uploads and payments
Reduced paperwork and in-person visits
Popular destinations like the USA, UK, Germany, Singapore, and Canada offer full or partial online business visa applications.
Step-by-Step Guide to Business Visa Online Application
Step 1: Identify the Right Visa Type
Visit the official embassy website or visa portal of the country you’re traveling to and select the correct visa category (e.g., Business Visitor, B1, Schengen Business).
Step 2: Register Online
Create an account on the official immigration or visa portal (e.g., UKVI, US Travel Docs, VFS Global, etc.).
Step 3: Fill Out the Visa Application Form
Complete the online application carefully. Ensure all entries—name, passport number, travel dates—match your documents.
Step 4: Upload Required Documents
Scan and upload the necessary files in the specified format:
Passport (bio page and all used pages)
Passport-size photograph (as per country specs)
Invitation letter from host company
Cover letter from Indian employer
Financial documents (bank statements, ITR)
Proof of travel (flight/hotel booking)
Travel insurance (if required)
Step 5: Pay Visa Fees Online
Make the payment via debit/credit card or internet banking. Keep a digital and printed copy of the payment receipt.
Step 6: Schedule Biometrics/Interview (If Required)
Some countries still require a biometric appointment or in-person interview. Book your slot online after form submission.
Step 7: Submit Application and Track Status
Once submitted, you’ll receive an acknowledgment. Use your reference number to track the visa status online.
Estimated Visa Fees (Approx. 2025 Rates in INR)
Country
Visa Fee (INR)
USA (B1 Visa)
₹14,000
UK (6-Month Visa)
₹11,100
Schengen Visa
₹8,000
Canada
₹9,500
Singapore
₹2,500
Australia
₹10,000
Note: Additional charges may apply for biometrics, courier, and premium services.
Common Mistakes to Avoid in Online Applications
Using incorrect file formats (JPEG instead of PDF)
Uploading blurry or cropped documents
Entering inconsistent dates or job details
Leaving sections blank (even optional fields may help your case)
Submitting without reviewing the final form carefully
Pro Tips for a Smooth Online Application
Use a professional email address for registration
Save your login credentials for future tracking
Use a PDF merger or file compressor if required by the portal
Double-check the photo specifications (size, background, format)
Apply at least 4–6 weeks in advance of travel
When to Use a Visa Consultant
While applying online is more accessible, professional visa consultants are extremely helpful if:
You're applying for the first time
Your purpose of travel is technical or complex
You need help drafting strong cover/invitation letters
You want someone to review and verify your documents
You have a history of past rejections
Conclusion
The online business visa application process has simplified international travel for professionals. With the right documents, attention to detail, and timely submission, your visa journey can be stress-free.
Whether you're expanding partnerships or attending global summits, the digital visa route puts global opportunities within your reach.
#business visa online application#apply business visa online India#business visa 2025 guide#visa process for professionals#online visa application steps#global business travel visa#business visa documents online
0 notes
Text
How to File Your Income Tax Return in Ahmedabad – A Complete Beginner’s Guide
Introduction
Filing your income tax return is a crucial financial responsibility for every taxpayer in India, including those residing in Ahmedabad. Whether you are a salaried individual, a business owner, or a professional, understanding the process of Income Tax Return Filing in Ahmedabad can save you from penalties and help you claim rightful refunds. This comprehensive beginner’s guide will walk you through every step of filing your Income Tax Return (ITR) efficiently and accurately.

What is Income Tax Return Filing?
Income Tax Return Filing is the process of submitting your income details, tax payments, and deductions to the Income Tax Department of India. This declaration enables the government to assess your tax liability and ensures transparency in your financial dealings. Filing your ITR is mandatory if your income exceeds certain thresholds or if you meet specific criteria set by the tax authorities.
In Ahmedabad, a bustling economic hub, Income Tax Return Filing has become increasingly streamlined due to digital advancements, allowing taxpayers to file returns conveniently online.
Who Needs to File an Income Tax Return in Ahmedabad?
The following categories of taxpayers in Ahmedabad are required to file their Income Tax Returns:
Individuals (residents and NRIs) with a total income above ₹2.5 lakh (below 60 years of age).
Senior citizens aged 60-80 years with an income above ₹3 lakh.
Super senior citizens aged 80 years and above with an income of over ₹5 lakh.
Companies, LLPs, and partnership firms, regardless of income or loss.
Individuals claiming tax refunds.
Residents owning foreign assets or earning foreign income.
Taxpayers who want to carry forward losses under the capital gains or business heads.
Those with significant bank deposits, foreign travel expenses, or high electricity bills, as per the Income Tax rules.
Documents Required for Income Tax Return Filing in Ahmedabad
Proper documentation is essential for hassle-free Income Tax Return Filing in Ahmedabad. The required documents vary depending on your income source:
For Salaried Individuals:
PAN Card (Permanent Account Number)
Aadhaar Card
Form 16 (issued by the employer)
Salary slips
Form 26AS (Tax Credit Statement)
Bank account details
Investment proofs for claiming deductions (e.g., under Section 80C)
For Self-Employed and Business Owners:
Profit and Loss account
Balance sheet
Books of accounts related to transactions
TDS certificates (Form 16A, 16B, or 16C)
Bank statements
GST returns (if applicable)
Step-by-Step Process for Income Tax Return Filing in Ahmedabad
Filing your ITR online is now the most preferred and convenient method. Here’s a detailed step-by-step guide to help you file your return correctly:
Step 1: Register/Login on the Income Tax e-Filing Portal
Visit the official Income Tax Department e-filing website and log in using your PAN as the User ID and your password.
Step 2: Select the Assessment Year
Choose the correct assessment year (for example, AY 2025-26 for FY 2024-25).
Step 3: Choose the Appropriate ITR Form
Select the ITR form based on your income sources. Standard forms for individuals include ITR-1 (Sahaj), ITR-2, ITR-3, etc.
Step 4: Fill in Income and Deduction Details
Enter your income details, tax payments, and deductions accurately. Validate the pre-filled information such as PAN, Aadhaar, and bank details.
Step 5: Validate and Compute Tax
Cross-verify your details with Form 26AS and other tax statements. Compute your tax liability and claim deductions under applicable sections like 80C, 80D, etc.
Step 6: Submit and E-Verify Your Return
Submit the ITR online and complete the verification process using an Aadhaar OTP, net banking, EVC, or by sending a signed physical copy of ITR-V to the CPC, Bengaluru, within 30 days.
Step 7: Download Acknowledgment
After successful submission, download the ITR-V acknowledgment for your records.
Important Deadlines and Penalties
Due Dates for Filing ITR in Ahmedabad:
For individuals and non-audit cases: 31st July of the assessment year.
For taxpayers requiring an audit (businesses with turnover above the threshold): 31st October.
Penalties for Late Filing:
₹1,000 if income is below ₹5 lakh.
₹5,000 if income is above ₹5 lakh (if filed after due date but before 31st December).
Interest under Section 234A on tax due.
Loss of certain tax benefits and inability to carry forward losses.
Possible scrutiny by the Income Tax Department.
Tips for Smooth Income Tax Return Filing
Keep all your documents organized before starting the filing process.
Use the pre-filled data option on the Income Tax e-filing portal to minimize errors.
Double-check all income and deduction details against Form 26AS.
File your return well in advance of the due date to avoid last-minute issues.
If unsure, consult a certified Income Tax Consultant in Ahmedabad for expert guidance.
Conclusion
Filing an Income Tax Return in Ahmedabad is a straightforward process when you understand the requirements and follow the correct steps. Filing your ITRs timely and accurately not only keeps you compliant with the law but also ensures you can claim refunds and carry forward losses efficiently. Whether you are a salaried employee or a business owner, leveraging online portals and expert advice can make your tax filing experience smooth and stress-free.
0 notes
Text
How to Schedule and Prepare for VFS Appointments for Business Visas
Professional advice on booking, documentation, and attending VFS appointments confidently

Introduction
For most Indian professionals applying for business visas to countries like the UK, Canada, Schengen nations, or Australia, scheduling a VFS (Visa Facilitation Services) appointment is a critical step. While the process may seem technical, with the right preparation, you can move through it smoothly and confidently. This guide explains how to schedule your VFS appointment, what documents to prepare, and how to present yourself during the visit.
Step 1: Understand Why VFS Is Important
VFS Global acts as a bridge between visa applicants and the respective embassies or consulates. For business visa applications, VFS handles:
Appointment booking
Document collection and verification
Biometrics (fingerprints and photo)
Passport submission and return tracking
Missing your appointment or submitting incomplete paperwork can delay your travel or result in rejection.
Step 2: Booking Your VFS Appointment
✔️ Visit the Official VFS Website
Go to the official VFS Global site for your destination country. Do not use third-party portals or agents unless officially registered.
✔️ Choose the Right Visa Type
Select “Business Visa” as the category. You will be asked to provide basic personal information, your passport number, and intended travel dates.
✔️ Select a Convenient Time and Center
Pick a time slot at a nearby VFS center. Early morning slots are usually less crowded. Book at least 15–20 days in advance to avoid last-minute rushes.
Step 3: Prepare Your Documents for Submission
Business visa applications must be supported with both originals and copies of critical documents. Common requirements include:
Printed appointment confirmation letter
Passport (original + photocopies)
Business Cover Letter from your employer
Invitation Letter from the overseas organization
Bank statements, ITRs, and financial proofs
Photographs (as per country specifications)
Completed visa application form (printed and signed)
Organize documents neatly in order. Use labeled folders or transparent files for a clean, professional presentation.
Step 4: What to Expect at the VFS Center
On the day of the appointment:
Arrive 15–30 minutes early
Dress professionally
Carry a government-issued ID (for verification)
Security checks are mandatory at entry
Submit your documents in the designated order
Biometrics (photo and fingerprints) will be captured
A receipt will be provided for tracking your application
Note: Some centers offer premium services like document scanning, SMS tracking, and courier return—use them if you're short on time.
Step 5: After the Appointment
You can track your application online using your receipt number. The passport is usually returned in 5 to 15 working days, depending on the destination and season.
Tips for a Smooth VFS Experience
Double-check your documents before the visit
Be polite and cooperative with VFS staff
Don't staple or clip papers; use paperclips if needed
Carry extra passport-size photos, just in case
Avoid applying close to weekends or holidays
Conclusion
VFS appointments are a key part of your business visa journey. By preparing thoroughly and understanding the process, you increase your chances of a smooth submission and timely approval. With organized documents and confident presence, your business travel plans will stay firmly on track.
Click Here
1 note
·
View note
Text
How to File ITR Online: A Step-by-Step Guide
The easiest way to complete ITR filing is through the Income Tax Department’s portal. First, register or log in at incometax.gov.in. Navigate to “e-File” > “Income Tax Return.” Choose the relevant assessment year and form (usually ITR-1 for salaried). Fill in your details manually or use pre-filled data. Verify income, deductions, and taxes paid. Submit and e-verify through Aadhaar OTP or net banking. Once e-verified, you’ll get an acknowledgment (ITR-V). Save it. Filing online reduces errors and speeds up refund processing. No physical paperwork is needed, making it beginner-friendly and efficient.
#finance#buisness#investment#commerce#mutual funds#personal finance#money#financial planning#income tax return#income tax
0 notes
Video
youtube
How to File ITR-1 Online for FY 2024–25 | Senior Citizen | Old vs New Ta...
How to File ITR-1 Online for FY 2024–25 | Senior Citizen | Old vs New Tax Regime|ITR-1 FY24-25LIVE! #itr1 #incometax #cadeveshthakur @cadeveshthakur 📢 Complete Guide to Filing ITR-1 Online for Senior Citizens (FY 2024–25 | AY 2025–26) If you're a senior citizen (aged 60+) or filing ITR for your parents or elders, this video is your one-stop solution to file Income Tax Return using ITR-1 Sahaj form for Assessment Year 2025–26 (Financial Year 2024–25). We also help you choose between the Old Tax Regime and New Tax Regime with a clear, step-by-step comparison of tax liability! ✅ 👇 Follow Playlist for Income Tax Return (ITR) Filing FY 2024-25 | Complete Guide https://www.youtube.com/playlist?list=PL1o9nc8dxF1R4FZlmK-5tIighYB0vxu3L 🎯 What this video covers: 🔹 Who can file ITR-1 Sahaj (eligibility criteria) 🔹 Income details required for senior citizens 🔹 Important documents checklist 🔹 Step-by-step filing on the Income Tax Portal 🔹 Comparison of Tax Liability – Old vs New Regime 🔹 Tax slabs and deductions explained (80C, 80D, 80TTB etc.) 🔹 Common mistakes to avoid 🔹 Which regime is better for senior citizens? 🔹 How to file ITR-1 online correctly with zero errors! Index 00:00 to 00:48 Introduction 00:49 to 03:48 Computation as per New Tax Regime 03:49 to 06:27 Computation as per Old Tax Regime 06:28 to 21:05 How to file ITR1 online for FY 2024-25 🧓 Specially curated for: ✔️ Senior Citizens (60 years and above) ✔️ Super Senior Citizens (80 years and above) ✔️ Children filing ITR on behalf of their parents ✔️ Taxpayers confused between Old & New Regime 📌 Must Watch Before You File ITR This Year! 👉 Don’t forget to LIKE, SHARE & SUBSCRIBE for more tax-saving content! 🔖 Tags / Hashtags for SEO #ITR1Filing2025 #SeniorCitizenTax #IncomeTaxIndia #TaxRegimeComparison #ITRforParents #IncomeTaxReturn #OldVsNewTaxRegime #ITR1FilingStepByStep #IncomeTax2025 #SahajFormITR1 #AY2025_26 #OnlineITRFiling #IndianTaxSystem #TaxTipsIndia #SeniorCitizenFinance #IncomeTaxPortal #TaxDeductionsIndia #Form16Filing #ITRHelp2025 #FileITROnline #TaxPlanningIndia #OldRegimeVsNewRegime Remember, our community is more than just a channel—it’s a family. Let’s connect, learn, and grow together! Hit that Subscribe button, tap the notification bell, and let’s spread financial wisdom one click at a time. 🚀 Remember, knowledge empowers us all! Let’s learn together and navigate the complex world of finance with curiosity and diligence. Thank you for being part of the cadeveshthakur community! 🙌 Disclaimer: The content shared on this channel is purely for educational purposes. As a Chartered Accountant, I strive to provide accurate and insightful information related to GST, income tax, accounting, and tax planning. However, please note that the content should not be considered as professional advice or a substitute for personalized consultation. If you found this video helpful, don’t forget to LIKE 👍, SHARE ↗️ it with your friends, and SUBSCRIBE 🔔 to my channel, cadeveshthakur, for regular updates on GST, accounting, finance, and the latest market insights. ✨ Press the Bell Icon 🔔 so you never miss an update and get notified the moment I upload a new video packed with valuable information just for you! Your support helps me create more content to simplify complex topics and keep you informed. Thank you! 😊
0 notes
Text
How to File Income Tax Return Online in India (2025 Guide)

Filing your Income Tax Return (ITR) is an annual financial responsibility for all earning individuals and businesses in India. With advancements in digital infrastructure, the Government of India has made the process of filing an ITR more streamlined and user-friendly. In 2025, e-filing continues to be the most efficient method to report your income, claim deductions, and pay any outstanding taxes.
This comprehensive guide will walk you through the process of filing your Income Tax Return online in India, making tax season less daunting and more manageable.
📋 What is an Income Tax Return?
An Income Tax Return is a form used to declare your income, expenses, exemptions, and tax liabilities to the Income Tax Department of India. Every individual or entity earning income during a financial year is required to file an ITR, depending on their total income and category.
Filing your ITR on time ensures you remain compliant with the law, avoid penalties, and are eligible to claim tax refunds, if applicable.
🧾 Documents Required for ITR Filing
Before you begin filing your Income Tax Return, gather the following documents:
PAN Card
Aadhaar Card
Form 16 from your employer (for salaried individuals)
Form 26AS (Tax Credit Statement)
Bank account details
Investment proof for deductions under sections like 80C, 80D, etc.
Details of capital gains, rental income, and business income if applicable
🖥️ Step-by-Step Process to File ITR Online in 2025
Step 1: Register/Login to the Income Tax e-Filing Portal
Visit the official portal: https://www.incometax.gov.in Use your PAN as your User ID to log in. First-time users will need to register.
Step 2: Choose the Right ITR Form
The ITR form you select depends on your income sources. Here are common ones:
ITR-1 (Sahaj) – For salaried individuals with income up to ₹50 lakh
ITR-2 – For individuals with capital gains or foreign assets
ITR-3 – For professionals or those with business income
ITR-4 (Sugam) – For presumptive income under sections 44AD/ADA
Step 3: Prefill and Verify Details
After selecting the form, most of your data (PAN, salary, TDS, bank details) will be auto-filled. Cross-check every detail carefully to avoid errors.
Step 4: Declare Income and Claim Deductions
Add any additional income (interest, rental, freelance work, etc.) and claim deductions under various sections such as:
80C – Investments in PPF, ELSS, LIC, etc.
80D – Health insurance premiums
80E – Interest on education loan
80G – Donations to charities
Step 5: Calculate Tax Liability
Once all income and deductions are filled, the system auto-calculates your tax liability. If you owe taxes, pay them using the “e-Pay Tax” facility.
Step 6: Submit and E-Verify Your Return
After final review, submit your Income Tax Return. Then complete e-verification using one of the following methods:
Aadhaar OTP
Net banking
Bank account EVC
Demat account verification
E-verification is mandatory for your ITR to be processed.
⏰ Important Deadlines for FY 2024-25
Due Date for Individuals: July 31, 2025
With Audit (Businesses/Professionals): October 31, 2025
Filing after the due date attracts late fees and interest.
✅ Benefits of Filing Income Tax Return
Claim refunds on excess TDS paid
Serve as proof of income for loans or visa applications
Avoid penalties for non-compliance
Carry forward capital losses
Build a clean financial record
🔚 Conclusion
Filing your Income Tax Return online in India has become a fast, paperless process thanks to government digital initiatives. By following the right steps and ensuring accurate declarations, you can file your ITR with ease and on time. Whether you're a salaried employee, freelancer, or business owner, staying tax-compliant not only saves you from penalties but also unlocks a host of financial advantages.
Start early, verify all details, and file your Income Tax Return before the deadline to enjoy a stress-free tax season in 2025.
0 notes
Text
ITR-1 Return Filing: A Simple Guide for Salaried Individuals
Filing your Income Tax Return (ITR) is an essential annual financial responsibility for every taxpayer in India. Among various ITR forms, ITR-1 Return Filing is the most commonly used form, especially by salaried individuals. Known as Sahaj, ITR-1 is designed for resident individuals with a straightforward income structure.
Who Can File ITR-1 Return?
You can opt for ITR-1 Return Filing if:
You are a resident individual (not HUF or company)
Your total income is up to ₹50 lakh
Your income sources include salary/pension, one house property, and other sources (like interest from savings)
You have agricultural income (up to ₹5,000)
However, ITR-1 is not applicable if you have:
Capital gains
Income from business or profession
More than one house property
Foreign income or foreign assets
How to File ITR-1 Return Online?
With digital convenience, you can now easily file ITR-1 Return online through the official Income Tax e-filing portal:
Register/Login on the Income Tax e-Filing portal (https://www.incometax.gov.in)
Go to e-File > Income Tax Return
Choose the assessment year and select ITR-1 form
Pre-filled data will appear—verify and fill in remaining details
Validate and submit the return
Verify your ITR using Aadhaar OTP, EVC, or by sending a physical copy to CPC Bangalore
Benefits of Filing ITR-1 on Time
Avoid penalties and interest under Section 234F
Claim TDS refunds, if eligible
Required for visa processing and loan applications
Maintain clean tax records
Common Mistakes to Avoid
Not matching Form 26AS or AIS data
Providing incorrect bank account details
Filing under the wrong ITR form
Missing the verification step after submission
Conclusion
For salaried taxpayers, ITR-1 Return Filing offers a simple and hassle-free way to stay compliant with tax laws. With the ease of online submission, anyone can file ITR-1 return online in just a few clicks. Don’t wait for the last date—filing early ensures accuracy and peace of mind. If you’re unsure, consult a tax expert or use professional ITR filing services to make the process even smoother.

0 notes
Text
Loan Against Property Online Apply Guide – Best Banks, Fast Approval & Lowest Interest in India

Why let your property sleep when it can help you fund your dreams?
In today’s fast-paced financial world, people often look for solutions that are quick, low-cost, and flexible. Whether you're planning a child’s wedding, managing medical expenses, expanding your business, or covering education costs, a Loan Against Property (LAP) can be a smart choice.
This guide is designed to help salaried and self-employed individuals understand everything about Loan Against Property in India — from interest rates and eligibility to how to apply online easily in 2025.
What is Loan Against Property (LAP)?
A Loan Against Property (LAP) is a secured loan where you pledge your residential, commercial, or industrial property as collateral to avail funds. The biggest advantage? You continue owning the property while utilizing its value for your needs.
Whether you're looking for an online loan against property or want an instant loan against property through a bank/NBFC, this guide will simplify your journey.
Why Are People Choosing LAP in 2025?
Lower interest rates compared to personal loans
High loan amount (up to 70% of property value)
Flexible tenure (up to 15–20 years)
Used for multiple purposes – medical, education, wedding, business
Both salaried and self-employed can apply
Types of Loan Against Property in India
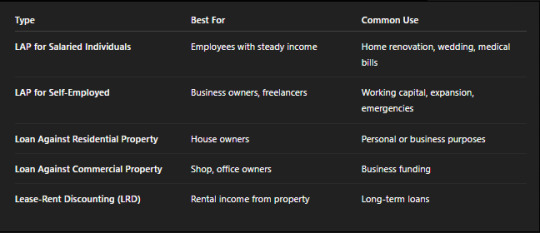
Current Interest Rates (2025 Update)

Note: Rates may vary based on applicant profile, property type, and tenure.
Who is Eligible? | LAP Eligibility Criteria
For Salaried Individuals:
Age: 21–60 years
Minimum salary: ₹25,000/month
Permanent employment with a reputed company
Clear ownership of property
For Self-Employed Individuals:
Age: 25–65 years
Minimum business vintage: 3 years
Regular ITR filings
Property should be in the applicant’s or firm’s name
If you're wondering “how to apply for a loan against property for salaried individuals”, we cover it step-by-step below.
Documents Required to Apply for LAP

How to Apply for a Loan Against Property Online?
Applying for a fast loan against property is now easier than ever. Here’s a step-by-step guide:
Apply for a Loan Against Property Online in 2025:
Visit the lender's official site (e.g., HDFC, Bajaj, SBI)
Select the “Loan Against Property” option
Fill out the online LAP application form
Upload the required documents digitally
Get a pre-approval in 10–30 mins (instant loan against property)
Final approval after physical verification
Disbursal within 3–7 working days
Platforms also provide instant loans against property for emergency needs.
Real-Life Use Cases
Ravi (Salaried, Gurgaon): Took a ₹15 lakh LAP for daughter’s wedding. Easy EMIs, property still owned.
Priya (Self-employed, Bangalore): Applied for a loan against property for medical expenses after a sudden surgery. Received disbursal in 4 days.
Rohit (IT Professional): Used a loan against property for home expenses, including renovation and appliance upgrades.
This shows how people are using LAP for both personal and professional purposes.
Expert Tip:
“Don’t sell your property in an emergency. Use LAP to unlock its value and still retain ownership.”
Understanding LAP Terms (With Clarity)
LAP Loan Against Property: Simply means a loan backed by your property
Salaried LAP Meaning: A LAP product tailored for salaried professionals
Immediate Loan Against Property: Shorter documentation, faster disbursal—ideal for urgent medical or home needs
Loan Against Property Knowledge: Always verify the loan-to-value ratio, interest rate, and foreclosure charges before signing
LAP vs Personal Loan – Which is Better?
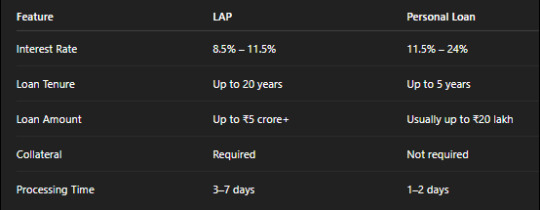
Verdict:
Choose LAP if you need a high loan amount, a longer repayment period, and have property to pledge.
Choose a Personal Loan if you need quick funds, have no collateral, and need a smaller short-term loan.
Procedure of Loan Against Property
Check your property eligibility and ownership status
Choose the best lender as per interest rate and LTV
Fill LAP application form online/offline
Submit documents and wait for verification
Get a sanction letter and property valuation
Disbursal done post-signing agreement
The procedure of loan against property remains largely the same across banks and NBFCs.
FAQs on Loan Against Property in India
1. What is the maximum amount I can get through LAP?
You can get up to 60–75% of your property's market value, depending on the lender.
2. Can I apply for LAP even if I have an existing home loan?
Yes, provided your repayment track record is good and your property has sufficient equity.
3. How fast can I get a loan against property?
Many lenders offer immediate loan against property approval in 24–48 hours with digital applications.
4. Is LAP available for self-employed individuals with irregular income?
Yes. You may need to provide GST returns, business proof, and ITRs. Some lenders offer loans against property for self-employed individuals for medical expenses as well.
5. Is the CIBIL score important for LAP approval?
Yes, ideally above 700 is preferred. However, since it’s a secured loan, the chances of approval are still higher than unsecured loans.
Final Thoughts
Whether you are salaried or self-employed, a loan against property in India can be your safety net and opportunity creator in 2025. From planning your dream wedding to funding a startup or handling sudden medical bills, LAP gives you freedom without losing ownership of your property.
And with growing options to apply for LAP online, digital approvals, and fast loan against property schemes, the process has never been smoother.
#online loan against property#lap loan#instant loan against property#apply for lap#fast loan against property#apply for loan against property online#how to raise loan against property#how to apply for loan against property for salaried individuals#lap loan against property#salaried lap meaning#loan against property for salaried individuals for home expenses#loan against property lap india#loan against property for self employed individuals for medical expenses#how to apply for lap#loan against property for salaried individuals for medical expenses#immediate loan against property#procedure of loan against property#loan against property features for self employed individuals#loan against property knowledge
1 note
·
View note
Text
Annual Filing for LLP: Everything You Need to Know

Starting an Annual Filing for LLP in India has benefits – a flexible form of organization, limited liability, and a lighter compliance burden than a private limited company. But to be clear: “lighter” does not mean “no.” Like every other registered entity, an LLP needs to file annual documents every financial year to maintain its compliance obligations and to avoid penalties.
So, whether you're an entrepreneur balancing several tasks or a first-time LLP partner confused about filing deadlines, this is a guide for you. We’ll walk you through LLP annual filings in everyday English.
Why Filings Matter for LLPs
Think of annual compliance for an LLP as a health check. It's evidence to the Government of India that your business exists, is operational, and transparent about what it's doing. Missing compliance notwithstanding, the potential penalties put the risk of your LLP being struck off the register.
Don’t be alarmed – once you understand the what and when for filings, it is all very easy.
Two Annual Filings Every LLP Must Make
Unlike companies that have multiple returns to file, LLPs generally only have two filings per year:
1. Form 11 – Statement of Account & Solvency
This is similar to saying, Here you go, government, this is what we own, we would owe, and how solvent we are."
Due Date: every May 30
What it includes:
A list of all partners
Each partner's contribution obligations
A declaration of solvency (meaning that your LLP can pay its debts)
A statement of assets and liabilities
A statement of income and expenditure
Form 11 must be filed even if your LLP did not conduct any business for the year. It is compulsory.
2. Form 8 - Statement of Account & Solvency (I know the name is confusing!)
This form is more or less your LLP's financial report card. It is a status of financials for the Ministry of Corporate Affairs (MCA).
Due Date: every October 30
What it includes:
Balance sheet
Profit and loss statement
Disclosure of contingent liability (if any)
A declaration signed by two designated partners confirming that everything is correct.
Note: If your annual turnover in the preceding year exceeds ₹40 Lakhs or your capital exceeds ₹25 Lakhs, then you must have your books audited by a Chartered Accountant before you file Form 8.
Income Tax Return for LLPs
Yes, we are not done yet. Aside from the MCA filings, we still have to file our Income Tax Return (ITR) with the Income Tax Department.
Form needed: ITR-5
When is it due?
Without audit: 31st July
With audit: 31st October
This is standard for all businesses and includes your income, expenses, deductions, and taxes owing.
What Happens When You File Late:
Let’s face it — sometimes it just happens. But when it comes to LLP filings, it can get expensive quite fast.
Late filing fees:
₹100 per day per form. Yes — with absolutely no upper limit on the total. So if you’re 100 days late on two forms, at ₹20,000.
Other implications:
You can’t file other forms until the past dues are filed.
Can make it difficult to acquire loans or investments — no investor wants to invest in an entity that’s in non-compliance.
How to file those forms: the step-by-step
You can do this online, and it is very simple to do, assuming you are comfortable with filing digital forms.
Step 1: Get your documents ready
For both Form 11 and Form 8, you will need:
Books of accounts
List of partners and their contributions
PAN and digital signatures of the Designated Partners
Financial Statements (audited or not, as the case may be)
Step 2: Log in to the MCA Portal
Visit www.mca.gov.in and log in with the details provided.
Step 3: Complete Forms
Download the forms you need (either Form 11 or Form 8), fill them out offline, taking help of the MCA utility, and upload them on the portal.
Step 4: Attach DSC (Digital Signature Certificate)
Both Forms must be signed by a minimum of two designated partners with a valid DSC.
Step 5: Pay Fees
Fees vary as per your LLP’s total contribution amount — you would pay between ₹50 to ₹600.
Common Traps
There are always a few traps that LLPs — especially new LLPs — tend to fall into:
Assuming nil turnover means no filings....wrong!. Every LLP must file Form 11 and Form 8 regardless of turnover.
Forgetting to employ a digital signature...only DSC accepted. Scanned signatures will not work.
Partner details do not match....make sure your partner information is consistent with what was registered.
Hold off on audit (if applicable) - Don’t wait until October for the audit - if obliged by your financials.
How can Kanakkupillai help?
Let's face it - you didn't start your LLP to get overwhelmed with paperwork - that's our job!
We can help your business, from collecting all the right documents to ensuring the form is filled out correctly and lodged on time, safely with Kanakkupillai.
Final Thoughts
Annual filing for LLPs isn't as tough as it appears, once you know what's required. Just keep organized, keep deadlines, and keep your records on file.
Form 11 is filed by May 30
Form 8 is filed by October 30
ITR is filed by July 31 or October 31, depending on the auditing
And if you are unsure, do not hesitate to seek help. A little assistance right now can allow you to avoid a big penalty (and a lot of stress). Here is to keeping your LLP healthy, happy, and compliant!
Need help with your LLP annual filing?
Check out Kanakkupillai.com — chaste compliance experts for businesses in India.
0 notes
Text
Tax Guide for Freelancers & Self-Employed Pros in India
Confused about taxes as a freelancer? Here’s everything you need to know about ITR, GST, deductions & more — simplified just for you!
💸 How Is Freelance Income Taxed?
Freelance income — whether from project fees, hourly gigs, or contracts — falls under “Profits and Gains from Business or Profession” as per Indian tax laws.
Your tax liability depends on your total annual income, and here’s what you need to look out for:
🔹 GST (Goods & Services Tax)
Mandatory if income exceeds ₹20 lakhs (₹10 lakhs for special category states).
Standard GST rate for most services: 18%.
🔹 Presumptive Taxation – Section 44ADA
If your income is under ₹50 lakhs, you can declare 50% of your gross receipts as taxable income.
Saves time and effort!
🔹 Tax Audit
Required if income exceeds ₹50 lakhs (or ₹75 lakhs if less than 5% of income is in cash).
🔹 TDS (Tax Deducted at Source)
If clients pay you over ₹30,000 in a financial year, they deduct 10% TDS.
💡 Deductions & Expenses Freelancers Can Claim
Here are common expenses you can deduct to save tax:
Office Rent & Maintenance
Office Supplies & Equipment (with depreciation)
Internet & Phone (work-related portion)
Travel for business
Professional fees (CA, lawyer, etc.)
Tax-Saving Investment Options
Use these sections to reduce your taxable income:
Section 80C: Life insurance, ELSS, PPF – up to ₹1.5L
Section 80D: Health insurance premiums
Section 80E: Interest on education loans
Section 80G: Charitable donations
Section 80GG: Rent paid (no HRA)
Section 80TTA: Savings account interest (₹10,000 max)
Section 80U: For individuals with disabilities
Section 80CCD: NPS contributions
Section 44ADA: Flat 50% income declaration for freelancers (if income < ₹50L)
Filing ITR as a Freelancer – Made Simple
Which ITR Form to Use?
ITR-3: If not opting for presumptive scheme\
ITR-4: If using Section 44ADA
Step-by-Step ITR Filing:
Calculate your gross income
Note your deductible business expenses
Choose the correct ITR form
Log in to the e-Filing Portal
Fill details, upload docs, calculate tax
E-verify using Aadhaar OTP or EVC
Save your data as you go
✅ Final Thoughts
Being a successful freelancer in India means more than doing great work — it’s also about knowing your taxes. From income classification to deductions, staying compliant is key.
Want expert help? 👉 Book your FREE 15-min consultation with Uniqey by JJ Tax. 📧 Write to us at [email protected] to make the most of your freelance income
Visit https://uniqey.in/
Download the Uniqey by JJ TAX
0 notes
Text
Step-by-Step Guide to File Income Tax Return: A Simplified Approach
Filing an Income Tax Return (ITR) is a crucial task for every taxpayer in India. Whether you are an individual, a business owner, or a professional, it is important to ensure that your tax returns are filed accurately and on time to avoid penalties and legal consequences. In this blog, we will take you through a step-by-step guide to filing your Income Tax Return, while also exploring the importance of a project report for loans, especially when you're applying for a bank loan or schemes like Mudra Loan, PMEGP, and CMEGP.
Step 1: Understand the Right ITR Form to Use
The first step to filing your Income Tax Return is selecting the appropriate form. Different forms cater to different types of income and taxpayers. For example:
ITR-1 (Sahaj): For individuals earning income from salary, pension, or other sources such as interest.
ITR-2: For individuals and Hindu Undivided Families (HUFs) who have income from more than one house property or capital gains.
ITR-3: For individuals and HUFs with income from business or profession.
ITR-4 (Sugam): For taxpayers with income under the presumptive taxation scheme (for small businesses, professionals, etc.).
Choosing the right Income Tax Return form is essential, as filing the wrong form may lead to errors, resulting in penalties or a delayed processing of your return.
Step 2: Gather All Necessary Documents
Before filing your Income Tax Return, make sure you have all the required documents. These include:
Form 16: A certificate provided by your employer, showing the amount of tax deducted at source (TDS).
Form 26AS: A consolidated statement that contains details of taxes paid and deducted by others on your behalf.
PAN Card: Required for identification in the tax system.
Aadhaar Card: For linking with your PAN for verification purposes.
Bank Statements: To verify interest income and other financial transactions.
Investment Proofs: Documents for claiming deductions under various sections like 80C, 80D, etc.
Having all these documents organized will make your Income Tax Return filing process faster and hassle-free.
Step 3: Calculate Your Total Income
Next, you need to calculate your total income from all sources, such as:
Salary or Wages: Include the income from your employer or any freelance work.
Business or Professional Income: If you have a business or offer professional services, include this income.
Other Income: Include income from investments, rental properties, and capital gains (from stocks or real estate).
Once you have the total income, apply any exemptions or deductions you’re eligible for, such as:
Section 80C: For investments in life insurance, PPF, EPF, etc.
Section 80D: For premiums paid for medical insurance.
Section 10: For exemptions such as House Rent Allowance (HRA).
After claiming all deductions, you’ll arrive at your taxable income.
Step 4: Calculate Your Tax Liability
Now that you have your taxable income, you need to apply the relevant tax slabs to calculate your tax liability. For example, the tax rates for individuals below the age of 60 years are:
Up to ₹2.5 lakh: Nil
₹2.5 lakh to ₹5 lakh: 5% of the amount exceeding ₹2.5 lakh
₹5 lakh to ₹10 lakh: 20% of the amount exceeding ₹5 lakh
Above ₹10 lakh: 30% of the amount exceeding ₹10 lakh
Additionally, there are cesses and surcharges that may apply to your tax calculation.
Step 5: File Your Income Tax Return Online
Once you’ve calculated your tax liability and gathered all required documents, the next step is to file your Income Tax Return online. Here's how to do it:
Log in to the Income Tax e-filing portal using your PAN and password.
Choose the correct ITR form based on your income sources.
Fill in the details: Enter your income details, tax deductions, and taxes already paid (e.g., TDS from Form 16).
Review your ITR to ensure all information is correct.
Submit the ITR: Once satisfied with the entered data, submit the form online.
After submission, you’ll receive an acknowledgment (ITR-V) that you should save for your records.
Step 6: Verify Your Income Tax Return
Verification is a vital part of the Income Tax Return process. There are several ways to verify your filed return:
Aadhaar OTP: If your Aadhaar is linked to your PAN, you can use an OTP sent to your mobile number.
EVC (Electronic Verification Code): Use an EVC from your bank or demat account.
Send the ITR-V: If you're unable to verify online, print and sign the ITR-V form, and send it to the Income Tax Department.
Verification ensures that your Income Tax Return is processed correctly.
Step 7: Track Your Income Tax Return Status
Once your Income Tax Return is filed and verified, it will be processed by the Income Tax Department. You can check the status of your return on the e-filing portal. If there are discrepancies, you will receive a notification from the tax department. You may also receive a refund if you’ve paid more tax than required, or you’ll be asked to pay any pending dues.
Project Reports for Loans: The Key to Success
For entrepreneurs and business owners, applying for a bank loan often requires submitting a detailed project report. This is where various types of project reports, such as the PMEGP Project Report, CMEGP Project Report, and Mudra Loan Project Report, come into play. These reports provide banks with an in-depth look at your business idea, financial feasibility, and market potential.
Project Report for Bank Loan
A project report for bank loan helps demonstrate the viability of your business plan. It typically includes the following:
Business idea and objectives
Market research and analysis
Financial projections (capital requirements, revenue forecasts, etc.)
Repayment schedules and strategies
These reports are crucial when applying for a loan from a bank, as they help lenders assess the risks and potential of your business.
PMEGP Project Report & CMEGP Project Report
For government schemes such as PMEGP (Prime Minister’s Employment Generation Programme) and CMEGP (Chief Minister’s Employment Generation Programme), specific project reports are required. These should outline:
Feasibility of the project
Financial viability and ROI (Return on Investment)
A clear plan for creating employment opportunities
A well-prepared PMEGP Project Report or CMEGP Project Report increases your chances of securing government-backed funding for your business.
Mudra Loan Project Report
If you're applying for a Mudra Loan, you will need a Mudra Loan Project Report that includes:
A comprehensive detailed project report for bank loan
Business analysis, including cost structures, market demand, and cash flow projections
This report is critical for obtaining loans under the Mudra Yojana, which supports small-scale enterprises.
Detailed Project Report & Feasibility Report
A detailed project report (DPR) offers a thorough insight into your business plan, including all necessary technical, operational, and financial details. Similarly, a feasibility report assesses whether your business idea is practical and profitable in the current market environment. Both reports are crucial when applying for large loans or seeking venture capital.
Conclusion
Filing your Income Tax Return is an important legal responsibility, and following this step-by-step guide ensures that you complete the process smoothly and without errors. Along with tax filing, businesses and entrepreneurs must also prepare detailed project reports for loan applications, whether for Mudra Loans, PMEGP, or CMEGP schemes. By understanding both tax filing and loan application processes, you can manage your finances effectively and take advantage of government schemes and funding options.For additional information or assistance, please contact us at +91-8989977769.
0 notes
Text
Business Visa Documents for Tech Professionals – Step-by-Step Guide (2025)
For Indian tech professionals traveling abroad for client meetings, system installations, or short-term projects, getting the business visa paperwork right is essential. A rejected visa can delay your assignment and cost your company time and money.
This blog offers a clear, step-by-step approach to preparing your business visa documents in 2025, specifically for IT engineers, developers, consultants, and project managers.

Why Documentation Is Crucial
In business visa applications, incomplete or inconsistent documents are the top reasons for rejection. Embassies want to be sure your trip is:
For a temporary and non-employment purpose
Fully funded and planned
Clearly supported by your employer and the host company
Step 1: Confirm the Right Visa Type
Before anything else, check which visa applies to your destination:
USA – B1 Business Visa
UK – Standard Visitor Visa (Business)
Schengen (Germany, France, etc.) – Short-Term Business Visa
Canada – Business Visitor Visa
Singapore, UAE – Business Visit Visa
Australia – Subclass 600 (Business Stream)
Each country has slightly different document requirements and processes.
Step 2: Prepare Personal Identification Documents
These confirm your identity and eligibility to travel:
Valid passport (minimum 6 months validity)
Recent passport-sized photos (as per country-specific guidelines)
Completed visa application form
Travel insurance (mandatory for Schengen and recommended for others)
Proof of residence address (like Aadhaar or utility bill, if requested)
Step 3: Collect Company and Work Documents
Your Indian employer must support your visit through proper documentation.
From your company in India:
Cover letter stating your role, reason for travel, and who will bear the costs
Employment proof – salary slips, ID card, appointment letter
Company registration certificate (if self-employed)
From the host company abroad:
Invitation letter on official letterhead, including:
Full name, passport number, job title of the visitor
Purpose and timeline of the visit
Project name or task description
Host company address and contact info
Clear statement of non-employment and no salary offered
Step 4: Gather Financial Documents
You must show you’re financially stable and will return to India.
Personal bank statements (last 3–6 months)
Income Tax Returns (ITRs) for the past 1–2 years
Salary slips or audited financials (if self-employed)
Tentative flight and hotel bookings (optional but helpful)
Pro tip: Ensure names match across all documents, especially in bank and company paperwork.
Step 5: Optional but Helpful – Project or Technical Files
Embassies often appreciate detailed documentation of what you’ll be doing abroad:
Project plan or meeting agenda
Site visit itinerary or checklist
Technical documents or implementation guide
Registration proof for trade shows or conferences (if applicable)
These add depth and show your visit has a legitimate and time-bound goal.
Step 6: Review and Double-Check
Before submission, review your full application set for:
Date consistency between cover letter, invitation, and itinerary
Matching job titles in both Indian and host company letters
Proper formatting and language (avoid typos, vague language)
Passport validity and proper signatures where needed
Also, ensure all documents are in English, or translated if required by the embassy.
Common Mistakes to Avoid
Using terms like “working” instead of “project visit” or “technical supervision”
Submitting generic or outdated invitation letters
Not attaching financials or relying only on employer sponsorship
Waiting too late to start the process – always begin 4–6 weeks before travel
Booking non-refundable flights before visa approval
Conclusion
Getting your business visa approved is more about how well you present your intent and credibility than just filling out a form. For tech professionals, it’s vital to highlight your role as a temporary visitor for technical or business purposes, not a worker seeking employment.The better prepared your documents, the smoother your visa journey.
0 notes