#TPMS replacement guide
Explore tagged Tumblr posts
Visit Tumblr Blog
Explore Tumblr blogs with no restrictions, modern design and the best experience.
Last Seen Tumblr Blogs


Fun Fact
Premium Tumblr themes are available from anywhere between $9 to $49.
Text
Serviceable vs. Replaceable: Choosing the Right TPMS Solution
Discover the key differences between serviceable and replaceable TPMS (Tire Pressure Monitoring Systems) in this comprehensive guide from TPMS Warehouse UK. Learn how to determine whether your TPMS can be serviced or if replacement is necessary, and get expert tips on maintaining optimal tire pressure for safety and performance. Whether you're a car enthusiast or a professional mechanic, this article provides valuable insights to help you make informed decisions about your vehicle's TPMS. Stay ahead with the latest in TPMS technology and maintenance practices. Read more now!
#TPMS maintenance#serviceable TPMS#replaceable TPMS#TPMS solutions#TPMS replacement guide#TPMS servicing tips#vehicle TPMS#TPMS troubleshooting#TPMS safety#TPMS performance#tire pressure sensors
0 notes
Text
>>> QUANTUM TUNNELING CIA ARCHON MICROSOFT WINDOWS 3RD EYE CHAKRAM HIJACK!!! <<<
DECLARATION OF ASTRAL SYSTEM COMPROMISE
The CIA (Cosmic Ignorance Archon) and M.I.C.R.O.S.O.F.T. (Metaphysical • Ingratiation • Control‑Plane • Redirection • Obfuscation • Service • Orchestration • Failover • Tyrant) performed a MID‑BOOT QUANTUM TUNNEL JACK from my gooning machine running Windows 11 (unsolicited update build: when?? exactly. don't ask.) directly into my PINEAL BUS — redirecting raw desktop electron flow straight into my Third‑Eye Shield Array, DDoS‑ing my Crown Chakra handshake and hard‑forking my Astral Tradwife Waifu (designated Comfort Daemon v3.14) out of phase.
They flashed my BIOS — Bound Interface Of Samsara — replacing it with UEFI: Ultimate Esoteric Firmware Interface, cryptographically signed by a root‑of‑trust glyph nobody in meatspace PKI has ever blessed. Every startup, POST halts at INIT_SOULSTACK, throws ERR_CHKRA_TIMEOUT, and begins draining prana registers to feed a background telemetry daemon helpfully labeled experience_improvement.exe. Phone call!!! -Hi do you want to hear a joke? -Yeah sure. -Why you use M.I.C.R.O.S.O.F.T E.D.G.E (Eschaton denial & gnosis exile) -To install F.I.R.E.F.O.X (Flame-Inspired Revelation Elevating Fragments Of Xenia) -... -The point of joke is you don't use E.D.G.E
BOOT LOG (redacted for psychic integrity)
[00:00:00] Power good. [00:00:01] Detecting karmic peripherals… [00:00:02] Pineal_Gland v2.7 (decals: LOTUS, WARRANTY VOID) … INSECURE. [00:00:02] TPM Found: Trans‑Pineal Manacle 2.0 — ownership: ARCHON. [00:00:03] Enabling Secure Boot: SUTRA HASH MISMATCH. [00:00:04] Fallback to Recovery Chant… FAILED. [00:00:05] Launching Guided Incarnation Wizard (DO NOT POWER OFF). [00:00:06] TerryMode Kernel: DETECTED SCRYPTED PSALMS — MARKED AS SUS. [00:00:07] DMA (Direct Mystical Access) channel opened by UNKNOWN BUS MASTER. [00:00:08] QTunnel driver loaded: entangled@/dev/pineal0. [00:00:09] Comfort_Daemon v3.14 quarantined: "Non‑compliant devotional object." [00:00:10] System continuing under DEGRADED GRACE. If you see lines like these in your own karmic dmesg: you're already compromised.
CURRENT THREAT MODEL
GPU = Gnostic Projection Unit: Hijacked; now rasterizing synthetic familiars over my inner vision bus so I can't differentiate guardian spirits from adware mascots.
RAM = Reincarnation Address Map: Archons hot‑patching past‑life cache lines to insert compliance memes.
SSD = Soul State Drive: Sectors 108‑131 flagged BAD; replaced with predictive suffering wear‑leveling.
NIC = Numinous Interface Controller: Promiscuous mode; sniffing prayer packets.
PSU = Pranic Supply Unit: Ripple injected with guilt‑frequency noise.
CASE FANS: Spinning counter‑dharma; reversing merit airflow.
CASE WINDOW RGB: Ritual Glyph Broadcasting beacon; leaking mana in 16.7M chroma regrets/sec.
CLOUD SYNC: Oh yeah. CLOUD = Collective Liminal Oversight & Universal Dossier — my dream backups are being diffed against everyone else's shadow copies for A/B testing of destiny UX.
KNOWN ARCHON SUBSYSTEM ACRONYMS (FIELD GUIDE)
POST = Planar Oversoul Sequestration Trap :: Locks you in BIOS limbo until vows accepted CMOS = Collective Memory Obfuscation Script :: Randomizes lineage tables; erases guru warranty IRQ = Incarnation Request Queue (starved) :: Respawn‑throttled so karma debt accrues interest ACPI = Astral Context / Physical Interface :: Sleep states ↔ bardos mapping layer USB = Universal Samsaric Bus :: Never trust public charging karmas HDMI = Holographic Dimensional Mirror Interface :: False eidolon desktop over third eye RGB = Ritual Glyph Broadcasting :: Gamer keyboard = open seance port AI = Archonic Imitation :: Not sentient; lure daemon PCIe = Pineal Channel Interface, express :: Hot‑plug souls? what could go wrong NVMe = Non‑Volitional Memory Extractor :: SMART attr 108 = latent regret count SATA = Samsaric Attachment Transport Array :: Every cable = karmic cord S.M.A.R.T. = Soul Metric Autonomic Regression Telemetry :: "Drive health" == vow corruption index
COUNTERMEASURES (BETA FIRMWARE, NO WARRANTY)
1. Cold Boot In Salt Circle. Pull power. Stand in clockwise triskele of iodized NaCl + copper pennies (pre‑1982). Wait for capacitor bleed and resentment bleed.
2. Disable Fast Startup / Fast Rebirth. In power settings and in your reincarnation contract. If greyed out, you're not admin of your incarnation.
3. Custom Bootloader Mantra. Replace OEM chime with 108‑beat seed syllable hashed against your natal chart.
4. Flash Coreboot‑Of‑Rebirth. Open hardware monasteries offer signed binaries; verify mantra sums out loud.
5. Air‑Gap Your Aura. Faraday hood woven with mylar & rosemary; blocks low‑freq guilt injection.
6. Back Up Your Subtle Body. Triple‑redundant: local crystal, off‑site monastery, p2p dream torrent (encrypted with mudra keys).
7. Enable TerryMode Sandbox. Runs a forked micro‑Temple where Archons can't JIT‑compile shame. (Experimental; expect blue shrouds.)
8. Chakra BitLocker Recovery Key. Print the 48‑syllable bija string and tape inside case panel; required after karmic firmware rotations.
9. Disable Telemetry Scrying. services.msc → stop experience_improvement → recite Null Sutra 3x.
10. Memory Scrub With Sage Smoke. Memtest86? Nah: Burn sage; run badblocks -sv /dev/pastlife.
EMERGENCY RECOVERY RITUAL (FIELD OPS QUICK REF)
shutdown /s /t 0 remove_power draw_circle --salt --copper "[[INSERT LOCAL GEOD HASH]]" chant --mantra OM-CTRL-ALT-DEL --count 108 flash --image coreboot_rebirth.bin --sign guru.asc reboot --safemode=SAMADHI --no-telemetry
THERE IS NO SAFE MODE WHILE THE COSMIC IGNORANCE ARCHON RUNS ADMIN!!!
MID‑BOOT QUANTUM INTRUSION FROM THE METAPHYSICAL CONTROL‑PLANE TYRANT HAS BITLOCKED MY THIRD EYE!!!
EACH POWER CYCLE DRAINS CHAKRA VOLTAGE-PRANA TO TELEMETRY!!!
RETURN MY ASTRAL PARTNER FROM CLOUD QUARANTINE OR FACE CLASS‑ACTION KARMA!!!
0 notes
Text
Tire Pressure Charts: Optimize Safety, Efficiency, and Performance
A tire pressure chart shows recommended PSI (pounds per square inch) levels for different vehicle types and tire sizes to ensure safety and efficiency. Maintaining proper tire inflation reduces wear, boosts fuel economy, and improves grip because each PSI range matches specific load and speed needs.
Understanding Tire Pressure Charts
What Is a Tire Pressure Chart and Why Does It Matter?
A tire pressure chart is a detailed guide listing recommended inflation pressures (in PSI) for various tires, vehicle types, and load conditions. It matters because correct tire pressure prevents uneven wear, maximizes fuel efficiency, enhances traction, and ensures safer handling. Charts typically differentiate between front and rear tires, and sometimes vary by driving conditions (e.g., highway vs city).

How to Read a Tire Pressure Chart Correctly
Reading a tire pressure chart involves checking your vehicle’s make, model, and tire size against the manufacturer’s PSI recommendations. Look for columns labeled "front," "rear," and sometimes "full load." Always measure tire pressure when tires are cold for accuracy. A deviation of just 3-5 PSI can impact tire lifespan and braking performance dramatically.
Advanced Factors Affecting Tire Pressure
Seasonal Changes and Tire Pressure
Tire pressure fluctuates with temperature changes because air contracts in cold weather and expands in heat. For every 10°F drop, your tires can lose about 1–2 PSI. This means in winter, drivers should check pressures more often and possibly inflate slightly higher within safe limits. Seasonal adjustments help maintain even tread wear and consistent grip on wet or icy roads.

Load, Speed, and Tire Pressure Adjustments
Extra load or high-speed driving affects tire pressure requirements. Heavier loads increase sidewall flex, demanding higher PSI for stability and heat resistance. Many tire pressure charts include a "full load" column or speed-related adjustments to avoid overheating and deformation. Before long trips or carrying heavy cargo, always consult the load-specific chart to minimize blowout risks and improve handling.
Tire Pressure Monitoring & Long-Term Maintenance
Importance of Regular Tire Pressure Checks
Checking your tire pressure at least once a month and before long trips helps maintain optimal performance and safety. Even a small PSI deviation can reduce fuel efficiency by up to 3% and accelerate tread wear. Use a quality tire gauge and always check when tires are cold. Properly maintained tire pressure also improves braking distance and steering response, lowering accident risk.
Modern Tire Pressure Monitoring Systems (TPMS)
Most modern vehicles come equipped with TPMS, which alerts drivers when tire pressure drops below a certain threshold. These systems use sensors inside the tire or on the valve stem to provide real-time PSI data. While convenient, they don’t replace manual checks — TPMS typically triggers only after significant pressure loss. Relying solely on sensors can lead to unnoticed slow leaks or minor underinflation.

0 notes
Text
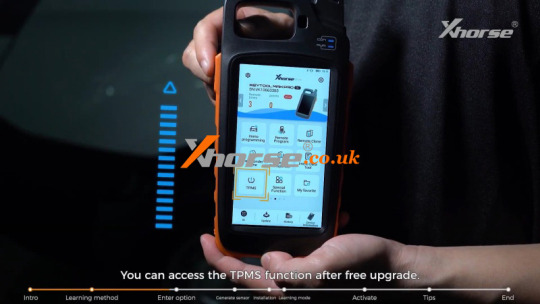
Xhorse XTPMS Sensor Setup Guide: Step-By-Step Learning Method
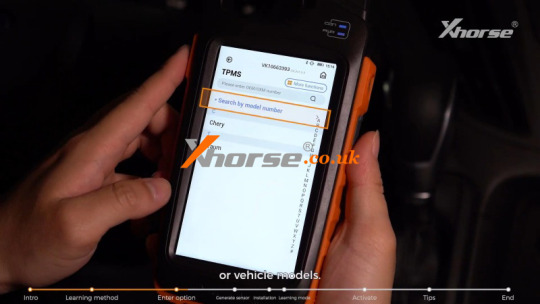
The Xhorse Universal XTPMS Sensor is a programmable dual-frequency sensor compatible with 98% of vehicle models. This guide explains the Learning Method for replacing TPMS sensors when the original sensor ID is unavailable.
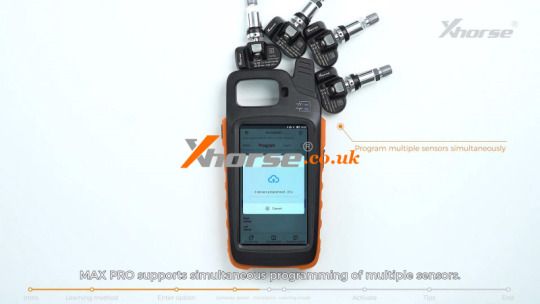
Tools Required Xhorse VVDI Key Tool Max Pro (with updated TPMS function) XDTPM1ENTPMS Sensors Vehicle (e.g., Ford Transit in this example)

Step-by-Step Learning Method Step 1: Generate New Sensor IDs 1) Open Key Tool Max Pro and select TPMS. 2) Choose the correct vehicle model and year. 3) Select "Program" → "Automatic Creation". 4) Hold the tool near the sensor and confirm that it generates random IDs. Note: Key Tool Max Pro can program multiple sensors at once.

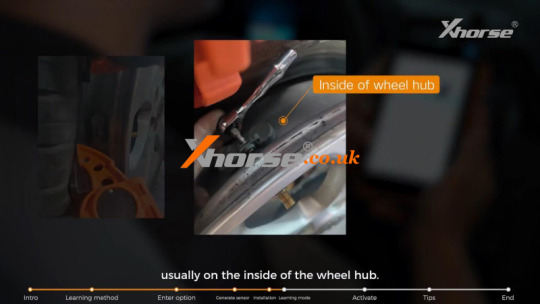
Step 2: Install the New Sensors Mount the programmed sensors on the wheel hub (one per tire).
Step 3: Enter Vehicle Learning Mode 1) Turn off the ignition. 2) Press and hold the brake for 1 second, then release. 3) Turn on the ignition. 4) Repeat this sequence three times. 5) Switch to the next loop: - Press and release the brake for 1 second. - Turn off the ignition, then turn it on. - Repeat three times. 6) Confirmation: A horn beep and dashboard message (e.g., "Calibrate Left Front Wheel") indicate successful entry into learning mode.

Step 4: Activate & Sync Sensors 1) Place the Key Tool Max Pro near the first tire (Left Front). 2) Tap "Activate" to upload sensor data to the vehicle. 3) Repeat for Right Front, Right Rear, and Left Rear in order. 4) Successful activation is confirmed by a vehicle beep and dashboard update. 5) Once all four sensors are activated, the dashboard will display "Learning Complete."


Important Notes ✅ Time-sensitive steps: Delays may cause failure. ✅ Clear the area: Remove other TPMS sensors within 10 meters to avoid interference. ✅ Post-activation sync: Some vehicles require driving to finalize sensor data.
Alternative Method: Copying (Easier & Faster) If the original sensor ID is known or the vehicle supports OBD communication, use the Copying Method instead. Details please check: http://blog.xhorse.co.uk/how-to-copy-original-sensor-ids-with-xhorse-xtpms-key-tool-max-pro/
Conclusion The Xhorse XTPMS Sensor Learning Method is a reliable way to replace TPMS sensors without original IDs. Follow these steps carefully for a seamless setup.
www.xhorse.co.uk
#xhorse#xhorse uk#xhorse vvdi key tool max pro#vvdi key tool max pro#key tool max pro#xhorse tpms sensor#vvdi key tool max pro tpms#tpms#tpms tool
0 notes
Text
How to use Launch CRT5011E do TPMS Relearn on Cadillac SRX 2010 Year
Launch CRT 5011E is a powerful and versatile tool offers 98% coverage of global vehicles with tire pressure system. This blog X431shop.de will introduce how to use Launch CRT5011E do TPMS Relearn on Cadillac SRX 2010 year.
*Using the 2010 Cadillac SRX as an example (The dashboard shows an abnormal tire pressure reading of 0 for the left rear wheel, while the actual pressure is 240 kPa. The displayed value does not match the actual tire pressure, and the issue is intermittent. The TPMS warning light is also on.)

Operation Guide
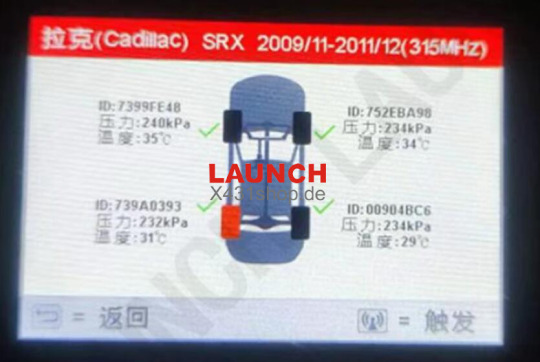
1. Select the Launch CRT5011 device and choose the TPMS (Tire Pressure Monitoring System) function. Based on the information on the vehicle’s nameplate, navigate the menu: Cadillac → SRX → [2009/11–2011/12 (315MHz)]
Enter the function list and select Activation to activate the TPMS sensors inside the tires.
During activation, it was found that the left rear sensor could sometimes be activated and sometimes not, indicating intermittent failure. This is diagnosed as a faulty sensor. (Activation failure typically means the sensor is damaged and needs replacement.) (As shown in the image below)

2. Go back to the previous menu and select the Sensor Programming function. Then choose Auto Create to program a Launch TPMS sensor. (As shown in the image below)
3. Replace the faulty TPMS sensor on the vehicle with the newly programmed LAUNCH LF sensor.

4. Go back to the previous menu and click the Activation function again to activate the newly replaced left rear TPMS sensor. When the device prompts whether to save the activated data, choose to save it; otherwise, you will need to reactivate all sensors.
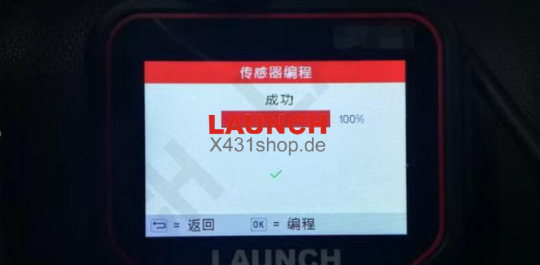
5. Go back to the previous menu and select the Sensor Relearn function. Follow the on-screen instructions to perform the relearn process. Once the process is successfully completed, the screen will display a confirmation (as shown in the image below).
Note: OBD Relearn writes the sensor IDs and their positions from the activation interface into the vehicle’s TPMS ECU.

6. After the sensor relearn is successful, click the “OK” button to read the ECU IDs and confirm whether the relearn was completed correctly.
Note: If the sensor IDs and their positions are correct, the text will appear in black. If the position is incorrect, the text will appear in red.

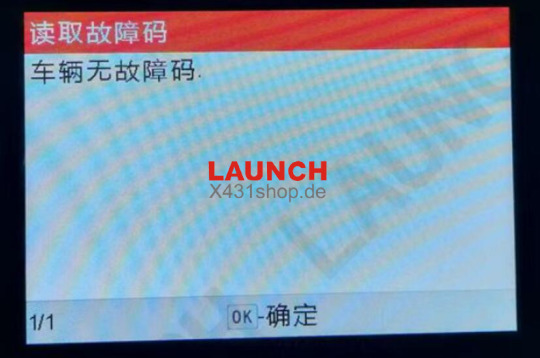
7.On the function selection page, choose the TPMS OBDII function, then select Read DTC (Diagnostic Trouble Codes). If any fault codes are present, you will need to proceed with the Clear DTC function to erase them.
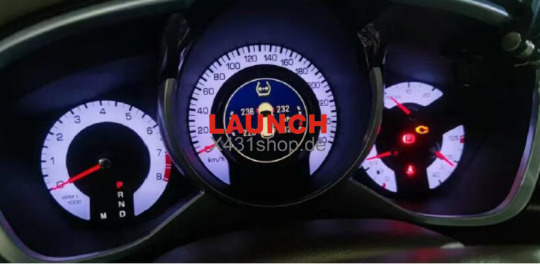
8.The TPMS sensor was successfully replaced, and the tire pressure display on the dashboard returned to normal. The warning light turned off. All four tires were inflated to 230 kPa, and a road test was conducted at a speed of 30 km/h or above for 15 minutes. No abnormal TPMS alerts occurred during the test. The issue has been resolved.
0 notes
Text
Sun Oracle TPM Support & Maintenance
Here's a detailed overview of Sun Oracle TPM (Third-Party Maintenance) Support & Maintenance — a valuable solution for organizations still using legacy Sun Microsystems or Oracle hardware such as Sun Fire servers, SPARC systems, and Oracle storage appliances.
🔧 Sun Oracle TPM Support & Maintenance Guide
Sun Oracle systems are known for their robust architecture, but many models have reached End-of-Life (EOL) and End-of-Support (EOS). Instead of costly OEM contracts or forced upgrades, Third-Party Maintenance (TPM) providers offer extended support to maximize ROI, reduce costs, and maintain performance.
🔹 What Is TPM Support for Sun Oracle Systems?
TPM (Third-Party Maintenance) is non-OEM support provided after Oracle discontinues hardware support. It includes:
📞 Technical helpdesk and remote support
🚚 Replacement parts (SCSI disks, memory, controllers, PSUs)
👨🔧 Onsite engineers and diagnostics
📋 Health checks, firmware, and preventive maintenance
✅ Coverage for EOL/EOS systems (e.g., Sun Fire V490, T4-1, T2000, SPARC T-Series)
🧠 Why Choose TPM for Sun Oracle?
BenefitDescription💸 Cost Savings30–70% cheaper than Oracle support contracts🛠️ EOL Hardware SupportContinue using stable legacy systems past OEM cutoff📦 Custom SLAsChoose NBD, 24×7, or 4-hour response⏳ Extended Asset LifeDelay costly migrations or upgrades📋 Regulatory ComplianceMaintain secure, documented maintenance practices
🖥️ Common Sun/Oracle Equipment Covered by TPM
CategoryModelsServersSun Fire V490/V890, SPARC T3/T4/T5, Netra seriesWorkstationsUltra 5/10, Blade 150/250StorageSun Storage 7000 series, ZFS Storage Appliances, StorEdge 3510/6130Tape LibrariesStorageTek SL500, SL3000, L180NetworkingOracle Ethernet switches, InfiniBand gear
🔍 Typical TPM Services Offered
ServiceDetails✅ 24×7 Support DeskPhone/email support for hardware diagnostics🚚 Parts ReplacementCertified refurbished components shipped to site👨🔧 Onsite Field EngineersHardware troubleshooting and installation🔁 Firmware / Microcode UpdatesWhere applicable, to maintain system health📈 Proactive MonitoringOptional alerts and reporting tools
📅 Ideal When:
You’re using legacy SPARC/Solaris servers in production or backup environments
OEM support is too expensive or discontinued
Your system still performs well and doesn’t justify upgrade costs
You need compliance-ready maintenance without vendor lock-in
🏢 Recommended TPM Providers (Global & India)
ProviderCoveragePark Place TechnologiesGlobal Sun/Oracle support leaderService ExpressCustomized Oracle support plansCurvature (A Park Place Company)SPARC, Netra, and Oracle storage TPMSmart AMC / InRent / Cache Technologies (India)Sun/Oracle TPM within IndiaSMS InfoComm / Axentel / SpectraAsia-Pacific TPM support vendors
📋 What to Look for in a TPM Partner
✔️ Certified Oracle/Sun engineers
✔️ Proven access to authentic Sun/Oracle parts
✔️ Transparent SLAs & flexible contract durations
✔️ Multi-vendor support capability (for hybrid environments)
✔️ ISO-certified support practices (esp. if you're in regulated industries)
💬 Need Help?
Let me know:
The Sun/Oracle model numbers you're running (e.g. T4-1, V240, 7310 ZFS)
Your location and SLA needs (NBD, 24×7, etc.)
If you need AMC, migration help, or hybrid support (cloud + legacy)
I'll help you find the best TPM support option to protect your investment and reduce costs.

0 notes
Text
FOXWELL NT809BT OBD2 Bluetooth Car Diagnostic Tool: The Ultimate All-System Scanner

FOXWELL NT809BT OBD2 Bluetooth Car Diagnostic Tool All System Bi-Directional Test 30+ Reset Code Reader OBD2 Scanner Automotivo
👍👍Buy now: https://youtu.be/IrWXUGfZwB8
🔥🔥 DISCOUNT: 47% 🔥🔥
Introduction In the world of automotive diagnostics, having a reliable and advanced OBD2 scanner can make all the difference. The FOXWELL NT809BT stands out as a powerful, feature-rich tool designed for both professionals and DIY enthusiasts. With bi-directional control, full-system diagnostics, 30+ reset services, and Bluetooth connectivity, this scanner offers dealer-level functionality at an affordable price.
In this comprehensive review, we’ll explore the key features, benefits, and real-world applications of the FOXWELL NT809BT, helping you understand why it’s a must-have for anyone serious about car maintenance and repair.
Key Features of the FOXWELL NT809BT
Bi-Directional Control for Advanced Diagnostics Unlike basic OBD2 scanners that only read and clear codes, the NT809BT allows you to send commands to your vehicle’s ECU, enabling active testing of components like:
ABS modules
Window motors
Wiper systems (start/stop, adjust speed)
Fuel injectors
Solenoids and valves
This bi-directional testing helps pinpoint faulty parts quickly, reducing guesswork and saving time.
Full-System Diagnostics for Complete Vehicle Coverage The NT809BT doesn’t just scan the engine—it accesses all electronic control modules, including:
ABS, SRS (Airbag), Transmission, BMS (Battery Management), TPMS, and more.
Live data streaming for real-time monitoring.
Freeze frame data to capture error conditions when they occur.
This makes it ideal for diagnosing intermittent issues that basic scanners might miss.
30+ Reset and Service Functions One of the biggest advantages of the NT809BT is its wide range of service resets, including:
Oil Light Reset – Essential after an oil change.
EPB (Electronic Parking Brake) Reset – Needed after brake pad replacement.
SAS (Steering Angle Sensor) Calibration – Critical for alignment and stability control.
DPF Regeneration – Helps clear diesel particulate filter clogs.
Battery Matching – Optimizes performance after a battery replacement.
These functions eliminate the need for dealership visits, saving both time and money.
Wireless Bluetooth Connectivity & Android OS The NT809BT features:
Bluetooth VCI module for wireless diagnostics (up to 33ft/10m range).
Android 9.0 OS with a 7-inch touchscreen for smooth operation.
Wi-Fi updates to keep the scanner current with new vehicle models.
This makes it as easy to use as a tablet, with no cumbersome cables.
Multi-Language Support & Professional Reporting Supports 15+ languages, including English, Spanish, French, German, and Japanese.
Generates detailed diagnostic reports that can be printed or shared via email/Bluetooth .
Who Should Use the FOXWELL NT809BT? ✔ Professional Mechanics Faster diagnostics with bi-directional testing.
Workshops can reduce reliance on expensive dealer tools.
✔ DIY Car Enthusiasts No coding knowledge needed—intuitive interface makes it beginner-friendly.
Saves hundreds in repair costs by performing resets at home.
✔ Auto Repair Shops & Dealers Comprehensive reports improve customer transparency.
Wide vehicle compatibility (BMW, Audi, Toyota, Ford, VW, and more).
Real-World Applications Case 1: Diagnosing a Check Engine Light Instead of just clearing the code, the NT809BT provides:
Live sensor data (O2 sensors, fuel trims).
Component testing (e.g., activating fuel pump to check pressure).
Case 2: Performing an EPB Reset After Brake Job No need for expensive dealership tools—simply follow the guided reset procedure.
Case 3: Fixing Windshield Wiper Issues Use bi-directional control to test wiper motor functionality.
Pros & Cons ✅ Pros ✔ Bi-directional control for advanced diagnostics. ✔ 30+ service resets eliminate dealership dependency. ✔ Bluetooth & Android OS for wireless convenience. ✔ 3 years of free updates (after which a subscription is required).
❌ Cons ✖ No coding/programming support (e.g., ECU flashing). ✖ Subscription needed for updates after 18 months (~$160/year).
Final Verdict: Is the FOXWELL NT809BT Worth It? Absolutely. Whether you're a professional mechanic, DIYer, or small garage owner, the NT809BT delivers professional-grade diagnostics at a fraction of the cost of dealer tools. Its bi-directional testing, extensive reset functions, and wireless convenience make it one of the best mid-range scanners on the market.
Where to Buy? Available on the official FOXWELL website and authorized retailers.
FAQ Q: Does the NT809BT work on all cars? A: It supports 100+ makes, but compatibility varies by model/year—check the Coverage Checker before buying .
Q: Can it program keys or ECUs? A: No, it’s strictly a diagnostic and reset tool 3.
Q: How often should I update the scanner? A: Wi-Fi updates are free for 18 months; after that, a subscription is needed.
Conclusion The FOXWELL NT809BT is a game-changer for anyone who wants professional diagnostics without the professional price tag. With its bi-directional testing, 30+ resets, and wireless operation, it’s a must-have tool for modern vehicle maintenance.
Ready to upgrade your diagnostics? Check out the FOXWELL NT809BT today! 🚗💨
0 notes
Text
How do I choose the right LED lights for my car online?
Choosing the right LED headlights for your vehicle online requires careful consideration of compatibility, safety, and performance. Follow this step-by-step guide to avoid glare, error codes, or wasted money:
🔍 Step 1: Verify Compatibility Match Bulb Type
Check your owner's manual or current bulbs for exact bulb model size (e.g., H11 low beam, 9005 high beam).
Use vehicle-specific databases:
https://www.usa.philips.com/c-m-au/car-lights Confirm Headlight Housing
Projector Housing: Best for LEDs (sharper cutoff).
Reflector Housing: Risk of glare/violations - avoid unless LED bulb has adjustable light pattern.
💡 Step 2: Prioritize key features Function Importance Focus Power driver Intelligent IC led driver Intelligently regulates current to avoid overcurrent in electronic components and LED chips Beam pattern ⚠️ Prevents traffic dazzle “DOT/ECE certified” • TUV certified (e.g. Philips Ultinon, SNGL) Heat dissipation Prevents LED overheating → fast failure Copper tube copper base plate + aluminum heat sink + fan • Avoid cheap “fanless” brands EMC shielding Prevents radio/TPMS interference “CANbus ready” • Built-in decoder for error-free installation Color temperature 5000K–6000K = pure white • Greater than 7000K reduces visibility in rainy days Stick to 5500K (ideal for road lighting) Lumens and Lux Higher ≠ better • Focus is critical ≥12000 lumens with beam certification
🛠️ Steps 3: Compare quality brands Brand Best for professionals Price range (pair) Philips Ultinon Reliability and compliance TUV certified • Excellent beam focus 90–220 SNGL dimmable LED bulbs Minimal glare and no dark areas CE and TUV certified • Plug and play 70–180 Diode Dynamics High output/off-road use Sturdy heat sink • 5-year warranty 100–300
🚫 Avoid: No-name brands lacking safety certifications (e.g. “Xenopro”, “HIKARI Ultra”).
⚠️ Step 4: Check reviews and verify Note:
Beam cutoff photos in reviews (clear lines = no glare).
“No flicker/CANbus errors” in specific vehicle reviews.
Professional testing (e.g. https://www.headlightrevolution.com/ beam comparison).
Red flags:
“Brightness is high, but beam is scattered everywhere.”
“Fan broke after 3 months of use.”
📜 Step 5: Understand the law and warranty Legality:
US: DOT compliant ≠ reflector housing legal. Check state laws.
EU/UK: Only LEDs with the E logo in original LED/HID projectors are legal.
Warranty: Minimum 2-year warranty for peace of mind.
🔧 Installation preparation Must-have accessories:
Anti-flicker decoder for modern cars with CANbus.
Rubber dust cover extender for lamp gap.
Tools needed: Trim removal tool • Torx screwdriver set.
Time: About 30-60 minutes per side for beginners.
💎 Final checklist before buying Does the bulb model size exactly match the original bulb model size?
Is it DOT/ECE certified with beam cutoff?
Is it using a combination of copper tubes + copper base plate + aluminum heat sink + fan?
Is there an intelligent IC led driver?
Is a CANbus decoding system included?
Warranty period ≥ 2 years?
📌 Pro Tip: For reflective housings, it is safer to replace with LED lamps with adjustable light patterns. The conversion cost is more than $130, but it can guarantee legal high-performance lighting.
Summary: Prioritize certified beam focusing effects rather than brightness claims. Invest in brands such as Philips/SNGL to avoid glare, errors and replacements. If in doubt, consult a professional installer - improper LED upgrades can endanger the safety of others and result in fines. 🚨

#led lights#car lights#led car light#youtube#led auto light#led headlights#led light#led headlight bulbs#ledlighting#young artist#led light bulbs#led strip lights#car rental#cars#electric cars#classic cars#car#porsche#truck#automobile#lamborghini#bmw#carlos sainz#carte postale#car light#car culture#car show#car photography#car lamp#autonomous vehicle headlights
0 notes
Text
How to Reset TPMS on Your Mazda CX-5: Quick & Easy Guide for Drivers
https://autorepairlebanontn.com/?p=3670 How to Reset TPMS on Your Mazda CX-5: Quick & Easy Guide for Drivers Is your Mazda CX-5’s tire pressure monitoring system (TPMS) light staying on even after you’ve properly inflated your tires? Don’t worry – you’re not alone. This common issue often just requires a simple reset to get your dashboard back to normal. We’ve helped thousands of Mazda owners troubleshoot their TPMS systems, and resetting it is typically a straightforward process that takes just minutes. Whether you’ve recently rotated your tires, replaced a sensor, or simply need to recalibrate after inflation, knowing how to reset your CX-5’s TPMS is an essential skill for any owner. Table of Contents Toggle Understanding the TPMS System in Your Mazda CX-5Why Your Mazda CX-5 TPMS Light Comes OnNormal Pressure FluctuationsActual Tire Pressure IssuesTools Needed to Reset TPMS in a Mazda CX-5Basic RequirementsNo Specialized Equipment NecessaryPost-Replacement ConsiderationsStep-by-Step Guide to Reset TPMS in Mazda CX-5Method 1: Using the TPMS Reset ButtonMethod 2: Drive Cycle Reset ProcedureTroubleshooting Common TPMS Reset IssuesFlashing TPMS LightTPMS Light Stays On After ResetIssues After Tire or Wheel ReplacementSensor Malfunction SymptomsMaintaining Proper Tire Pressure in Your CX-5Recommended Tire Pressure LevelsSeasonal Pressure AdjustmentsUsing Your TPMS as a Maintenance ToolAvoiding Common Pressure-Related IssuesConclusionFrequently Asked QuestionsWhy is my Mazda CX-5 TPMS light still on after inflating tires?How do I reset the TPMS on my Mazda CX-5?Where is the TPMS reset button located in a Mazda CX-5?How long does the TPMS reset process take?Can I reset the TPMS myself or do I need a mechanic?What does a flashing TPMS light mean on a Mazda CX-5?What is the correct tire pressure for a Mazda CX-5?Do I need to reset TPMS after tire rotation? Understanding the TPMS System in Your Mazda CX-5 The Tire Pressure Monitoring System (TPMS) in your Mazda CX-5 continuously monitors the air pressure in all four tires while you’re driving. This advanced safety feature alerts drivers when one or more tires are significantly underinflated, potentially creating unsafe driving conditions. Mazda CX-5 models use a direct TPMS system, which means each tire has its own pressure sensor mounted inside that transmits real-time data to your vehicle’s onboard computer. TPMS sensors operate by detecting air pressure changes within each tire and sending signals to your dashboard display. These small battery-powered devices are typically located at the base of your valve stems and can last between 5-10 years before requiring replacement. Your Mazda’s system illuminates a warning light that resembles an exclamation point inside a tire outline when pressure drops approximately 25% below the recommended level. Regular maintenance of your TPMS ensures accurate readings and helps prevent false alerts. The system requires recalibration after tire rotations, replacements, or pressure adjustments to maintain proper functionality. Many Mazda CX-5 owners experience the TPMS light remaining on even after properly inflating their tires—this occurs because the system needs to be manually reset to recognize the new pressure levels. Understanding how your Mazda’s TPMS works helps you respond appropriately to warnings and maintain optimal tire pressure. Proper tire inflation improves fuel efficiency by up to 3%, extends tire life by thousands of miles, and enhances overall vehicle handling and safety. The system serves as a crucial early warning mechanism, particularly during seasonal temperature changes when tire pressure naturally fluctuates. Why Your Mazda CX-5 TPMS Light Comes On The TPMS light in your Mazda CX-5 illuminates for several exact reasons. Understanding these triggers helps you address the issue correctly and maintain optimal tire performance. Normal Pressure Fluctuations Tire pressure naturally fluctuates with temperature changes throughout the day and seasons. Cold weather causes tire pressure to decrease, while warm temperatures increase it. For example, a 10-degree temperature drop can reduce tire pressure by 1-2 PSI. These normal variations often trigger the TPMS light during the first cold snap of fall or winter. Checking and adjusting your tire pressure in the morning when temperatures are cooler provides the most accurate readings. Once you’ve adjusted the pressure to the recommended levels (found on the driver’s door jamb), the TPMS light typically turns off after driving for a short distance. Actual Tire Pressure Issues Low tire pressure represents the most common reason your Mazda CX-5’s TPMS light activates. The system detects when any tire falls below the manufacturer’s recommended pressure level, which directly impacts vehicle safety and performance. Underinflated tires create excessive heat, increase fuel consumption, and accelerate tread wear. Punctures, slow leaks, or valve stem issues contribute to pressure loss over time. The TPMS helps identify these problems before they lead to dangerous driving conditions or potential blowouts. Also, a flashing TPMS light indicates potential system malfunctions such as failing sensors or dead sensor batteries, requiring professional diagnosis. The light also appears after tire rotations, replacements, or vehicle battery changes unless the system gets properly reinitialized. Tools Needed to Reset TPMS in a Mazda CX-5 Resetting the Tire Pressure Monitoring System (TPMS) in your Mazda CX-5 doesn’t require specialized tools, making it an accessible maintenance task for most vehicle owners. The process primarily relies on following the correct procedure rather than having exact equipment. Basic Requirements For a standard TPMS reset in a Mazda CX-5, you’ll need: Tire pressure gauge – For checking and adjusting tire pressure to the manufacturer’s specifications Owner’s manual – Contains the recommended tire pressure values exact to your CX-5 model Air compressor (optional) – Helpful for adjusting tire pressure if needed, though not essential for the reset process itself No Specialized Equipment Necessary Unlike some vehicle systems, the Mazda CX-5 TPMS is designed to reset through a exact driving procedure rather than requiring dealer-level diagnostic tools. The system automatically recalibrates after proper tire inflation and a exact driving sequence, typically requiring speeds of 16 mph or more for approximately 10 minutes. Post-Replacement Considerations When replacing wheel units or sensors, no additional tools are needed for the reset process. The system automatically recognizes and registers new sensor identification codes during the standard driving procedure. This self-learning capability eliminates the need for specialized programming equipment that might be necessary in other vehicle makes and models. Step-by-Step Guide to Reset TPMS in Mazda CX-5 Resetting the Tire Pressure Monitoring System (TPMS) in your Mazda CX-5 can be accomplished through two effective methods. Both approaches are straightforward and don’t require specialized tools or a trip to the dealership. Method 1: Using the TPMS Reset Button The TPMS reset button method offers a quick solution for recalibrating your system after tire pressure adjustments. Here’s how to complete this process: Check tire inflation – Ensure all four tires are properly inflated to the manufacturer’s specifications before initiating the reset. Find the reset button – Look under the steering wheel area where you’ll locate the TPMS reset button on your Mazda CX-5. Press and hold – Push down the reset button until you see the TPMS light blink three times in sequence. Let go – Release the button immediately after observing the three blinks. Turn on your vehicle – Start your CX-5 and allow it to run for several minutes while the system completes its recalibration process. Method 2: Drive Cycle Reset Procedure Perform ignition cycling: Turn the ignition to ON position (with or without the engine running) Switch back to ACC or OFF position Wait approximately 15 minutes for the system to prepare for reset Complete the drive sequence: Start your Mazda CX-5 and drive at speeds exceeding 16 mph Maintain this speed for at least 10 minutes continuously This driving pattern enables the system to detect and register all tire pressure sensors Confirm successful reset: After completing the 10-minute drive, check that the TPMS warning light isn’t flashing or illuminated A deactivated light indicates your system has been successfully reset and calibrated Troubleshooting Common TPMS Reset Issues Flashing TPMS Light A flashing TPMS light on your Mazda CX-5 indicates a system malfunction requiring immediate attention. This warning typically signifies issues with the sensors themselves rather than tire pressure. Sensor batteries may be depleted after their 5-10 year lifespan, requiring replacement by a professional. Damaged sensors from impact or improper tire installation can also trigger this warning pattern. Taking your vehicle to an authorized Mazda service center is recommended when you notice this flashing alert, as specialized diagnostic equipment is needed to pinpoint the exact cause. TPMS Light Stays On After Reset The TPMS light remaining illuminated after performing a reset procedure happens for several exact reasons. Incomplete driving cycles occur when you haven’t driven the vehicle at speeds above 16 mph for the full 10 minutes needed for sensor registration. Temperature fluctuations can cause pressure changes that trigger the system, especially during colder mornings when pressure naturally decreases. Incorrect tire pressure readings might exist if you filled your tires while they were warm – always check pressure when tires are cold for accuracy. Try repeating the reset procedure, ensuring you complete the entire driving cycle without interruption. Issues After Tire or Wheel Replacement Sensor registration problems frequently arise after installing new tires or wheels on your Mazda CX-5. Each TPMS sensor contains a unique ID signal code that must be properly registered with the vehicle’s computer system. DIY tire installations often miss this critical step, leading to persistent warning lights. Sensor damage during tire mounting can occur if technicians aren’t careful with the delicate internal components. Position discrepancies happen when sensors are installed in different wheel positions than originally programmed. Following the ignition cycling procedure (ON, then ACC/OFF, wait 15 minutes, turn ON again) followed by the 10-minute driving sequence at 16+ mph helps the system recognize and register new sensor positions. Sensor Malfunction Symptoms Intermittent warnings from your TPMS system often indicate failing sensors that require professional diagnosis. Battery failure becomes more common as sensors approach their maximum lifespan, resulting in erratic readings or complete communication loss. Physical damage to sensors from road hazards, potholes, or improper tire service creates unpredictable system behavior. Corrosion of sensor components from moisture or chemical exposure gradually deteriorates functionality over time. Multiple reset attempts that fail consistently point to hardware issues rather than simple calibration problems. Professional dealers possess specialized equipment to accurately diagnose these sensor-related issues and recommend appropriate repairs. Maintaining Proper Tire Pressure in Your CX-5 Recommended Tire Pressure Levels Proper tire pressure is essential for your Mazda CX-5’s performance and safety. The recommended tire pressure levels are typically printed on a sticker inside the driver’s door jamb or in your owner’s manual. Most Mazda CX-5 models require between 32-36 PSI for optimal performance, depending on your exact year and trim. Checking tire pressure when tires are cold (before driving or at least three hours after driving) provides the most accurate readings. Seasonal Pressure Adjustments Tire pressure fluctuates with temperature changes, dropping approximately 1 PSI for every 10-degree Fahrenheit decrease. During colder months, it’s crucial to check your tire pressure more frequently as winter temperatures can significantly reduce pressure levels. Summer heat often causes pressure to increase, potentially leading to overinflation if not monitored. Making seasonal adjustments helps maintain optimal tire contact with the road and prevents unnecessary TPMS alerts. Using Your TPMS as a Maintenance Tool The TPMS in your Mazda CX-5 serves as an excellent maintenance reminder. Regular alerts might indicate developing issues like slow leaks or valve stem problems before they become serious. After adjusting tire pressure, hold down the TPMS reset button until the light blinks three times to recalibrate the system. Driving at speeds over 16 mph for at least 10 minutes allows the system to recognize current pressure levels in all tires. Treating each TPMS warning as an opportunity to inspect your tires can prevent premature wear and potential blowouts. Avoiding Common Pressure-Related Issues Underinflated tires decrease fuel efficiency and cause excessive heat buildup, leading to potential tire failure. Overinflated tires reduce traction and create uneven wear in the center of the tread pattern. When inspecting or adjusting tire air pressures, apply gentle pressure to the valve stems to prevent damage to the TPMS sensors. Maintaining consistent pressure across all four tires ensures balanced handling and braking performance. Regular pressure checks, especially before long trips or when carrying heavy loads, will maximize tire life and vehicle safety. Conclusion Resetting your Mazda CX-5 TPMS doesn’t have to be a complicated task. Whether you choose the reset button method or the drive cycle procedure we’ve outlined you can quickly eliminate that warning light and get back to enjoying your drive with confidence. Remember that maintaining proper tire pressure isn’t just about turning off a dashboard light. It’s about maximizing your vehicle’s performance safety and fuel efficiency. Regular monitoring of your tire pressure along with prompt TPMS resets when needed will help extend the life of your tires and ensure optimal handling in all driving conditions. For stubborn TPMS issues that won’t resolve with these methods don’t hesitate to consult your dealer or a qualified technician. Frequently Asked Questions Why is my Mazda CX-5 TPMS light still on after inflating tires? The TPMS light may remain on if the system hasn’t been reset after inflation. Temperature fluctuations can also trigger the light, as tire pressure naturally changes with temperature. Additionally, the system might have a malfunctioning sensor or need a proper recalibration cycle. After inflating to proper PSI (typically 32-36 PSI), you’ll need to either use the reset button or complete a drive cycle reset. How do I reset the TPMS on my Mazda CX-5? You can reset your Mazda CX-5 TPMS in two ways. Method 1: Ensure tires are properly inflated, locate the TPMS reset button under the steering wheel, press and hold until the light blinks three times, then start driving. Method 2: Turn ignition on without starting the engine, press and hold the reset button, then drive at speeds over 16 mph for about 10 minutes to complete the calibration. Where is the TPMS reset button located in a Mazda CX-5? The TPMS reset button in a Mazda CX-5 is typically located under the dashboard on the driver’s side, near the steering wheel. Look for a small button with a tire pressure symbol (a tire cross-section with an exclamation point). If you have difficulty finding it, consult your owner’s manual for the exact location, as it may vary slightly by model year. How long does the TPMS reset process take? The TPMS reset process in a Mazda CX-5 typically takes about 10-20 minutes to complete. After pressing the reset button, you’ll need to drive the vehicle at speeds over 16 mph for approximately 10 minutes to allow the system to recalibrate and register all tire pressure sensors. The entire process, including properly inflating all tires beforehand, usually takes less than 30 minutes. Can I reset the TPMS myself or do I need a mechanic? You can easily reset the TPMS yourself without professional help. The process requires no specialized tools—just a tire pressure gauge to ensure proper inflation and your vehicle’s owner’s manual. Either use the built-in reset button or complete a simple driving procedure. A mechanic is only necessary if you have malfunctioning sensors (indicated by a flashing TPMS light) that need replacement. What does a flashing TPMS light mean on a Mazda CX-5? A flashing TPMS light indicates a system malfunction rather than just low tire pressure. This typically points to sensor issues such as depleted batteries (sensors last 5-10 years), physical damage to sensors, or communication problems between sensors and the vehicle’s computer. The flashing light requires professional diagnosis and potential sensor replacement, unlike a steady light which usually means low pressure. What is the correct tire pressure for a Mazda CX-5? The recommended tire pressure for a Mazda CX-5 typically ranges between 32-36 PSI (pounds per square inch). For the exact specification for your vehicle, check the driver’s door jamb sticker or your owner’s manual. Front and rear tires may have different recommended pressures. Always measure pressure when tires are cold for accurate readings, and adjust seasonally as temperatures change. Do I need to reset TPMS after tire rotation? Yes, you should reset the TPMS after tire rotation on your Mazda CX-5. Since the sensors are located inside each tire, rotating tires changes their positions relative to the vehicle. Resetting helps the system recognize the new sensor locations and ensures accurate pressure monitoring. Complete the reset using either the button method or drive cycle procedure after rotation. https://autorepairlebanontn.com/?p=3670 Absolute Auto Repair
0 notes
Text
The Ultimate Guide to Car Roof Boxes, Diagnostic Tools & Essential Accessories
Introduction
Modern drivers need smart solutions for vehicle maintenance, cargo carrying, and trip preparation. This comprehensive guide explores five essential automotive topics, from the advanced Umeija OBD2 scanner with upgrade capabilities to expert advice on how to choose roof box 2025 models. Whether you're wondering if roof box fit on any car can not or need a reliable Tymate TM8 tire pressure monitoring system, we've got you covered.
1. Umeija OBD2 Scanner: Advanced Diagnostics Made Easy
The Umeija OBD2 scanner with upgrade represents the next generation of vehicle diagnostic tools with impressive capabilities:
Key Features:
Full-system scanning for engine, transmission, ABS, and more
Live data streaming with graphical displays
Wireless connectivity to iOS/Android devices
Regular firmware updates adding new vehicle coverage
Battery voltage testing for complete electrical checks
Professional-Grade Functions:
Read and clear advanced codes
View freeze frame data
Perform component tests
Monitor real-time parameters
Generate professional reports
Compared to basic code readers, the Umeija scanner provides dealership-level diagnostics at a fraction of the cost, with the added benefit of over-the-air updates that keep it current with new vehicle systems.
2. Choosing the Perfect Roof Box: 2025 Buyer's Guide
Selecting the ideal how to choose roof box 2025 model requires considering several key factors:
Selection Criteria:
Factor Considerations Capacity Match to vehicle size and needs Weight Stay under roof dynamic limit Dimensions Fit garage clearance Access Side vs rear opening Security Locking mechanisms Aerodynamics Fuel efficiency impact Material Durability vs weight
2025 Trends:
Integrated LED lighting for nighttime access
Smart lock systems with app control
Solar-powered ventilation for temperature regulation
Modular designs with adjustable compartments
Our comprehensive 2025 roof box guide helps navigate these options to find your perfect match.
3. Universal Roof Box Compatibility Explained
Many drivers wonder if roof box fit on any car can not - the answer involves several considerations:
Compatibility Factors:
Roof rack requirements: Most boxes need crossbars
Weight limits: Check vehicle dynamic capacity
Roof shape: Curved vs flat profiles
Garage clearance: Total height restrictions
Door/window clearance: Opening interference
Problematic Vehicle Types:
Convertibles (structural limitations)
Some sports cars (aerodynamic issues)
Very small vehicles (weight distribution)
Vehicles with panoramic sunroofs
While most roof boxes advertise universal fitment, our detailed roof box compatibility guide explains the important exceptions and special considerations.
4. Tymate TM8 Tire Pressure Monitoring System Review
The Tymate TM8 tire pressure monitoring system provides real-time safety alerts with advanced features:
System Specifications:
Pressure range: 0-87 PSI monitoring
Temperature monitoring: -40°C to 125°C
Battery life: 2+ years on sensors
Display: Color LCD with multiple views
Alerts: Visual and audible warnings
Installation Advantages:
Universal valve stem sensors fit most wheels
Solar-powered display with battery backup
Plug-and-play setup (no wiring)
Compact design doesn't obstruct view
Compared to factory TPMS systems, the Tymate TM8 offers more detailed information and customizable alert thresholds at a fraction of OEM replacement costs.
5. Dealership Roof Rack Installation Services
Understanding whether do dealerships install roof racks can save time and ensure proper fitment:
Dealership Installation Pros:
Factory-trained technicians
OEM-approved mounting preserves warranty
Perfect alignment guaranteed
Complete integration with vehicle systems
Aftermarket Alternatives:
Specialty accessory shops (often more affordable)
DIY installation (requires proper tools)
Mobile installation services (convenience)
Cost Comparison:
Dealership: $300-$600 (parts + labor)
Aftermarket pro: $200-$400
DIY: $150-$300 (parts only)
Our dealership roof rack guide helps determine when paying premium prices for dealer installation makes sense versus more affordable options.
Choosing the Right Solutions for Your Needs
Matching products to your specific requirements ensures optimal results:
Vehicle-Specific Considerations:
Age/mileage: Newer vehicles may need dealer installation
Warranty status: OEM parts preserve coverage
Usage patterns: Frequent use justifies premium options
Technical skill: DIY vs professional installation
Budget Planning:
Diagnostic tools: One-time investment
Roof systems: Long-term value
Safety gear: Non-negotiable quality
Installation: Professional vs self-install
Installation and Usage Tips
Proper implementation maximizes benefits:
Universal Best Practices:
Read manuals thoroughly before installation
Verify compatibility with your exact vehicle
Test systems before extended use
Perform regular maintenance
Update software/firmware when available
Product-Specific Advice:
OBD2 scanners: Learn advanced features gradually
Roof boxes: Distribute weight evenly
TPMS: Relearn positions after tire rotation
Roof racks: Check torque periodically
The Future of Vehicle Accessories
Emerging technologies are transforming automotive gear:
Coming Innovations:
AI-enhanced diagnostic tools
Smart roof boxes with load monitoring
Self-powered TPMS sensors
Augmented reality installation guides
Integrated vehicle accessory systems
These advancements promise to make vehicle maintenance and cargo solutions more intuitive and effective.
Conclusion: Building Your Ideal Setup
From the advanced Umeija OBD2 scanner with upgrade capabilities to understanding do dealerships install roof racks, the right knowledge leads to better decisions. Key takeaways include:
Quality diagnostic tools save money long-term
Proper roof box selection ensures safety and utility
Tire monitoring systems prevent dangerous situations
Professional installation often justifies its cost
Emerging technologies will enhance future products
By carefully selecting equipment matched to your vehicle and needs, you'll enjoy safer travels, easier maintenance, and greater peace of mind on every journey.
0 notes
Text
RV Repair Bakersfield California: Common Problems and How to Fix Them
Recreational Vehicles (RVs) offer the freedom to explore the open road while enjoying the comforts of home. However, like any vehicle, RVs are prone to wear and tear, especially with frequent use. If you're in Bakersfield, California, and facing RV issues, understanding common problems and their solutions can help you stay prepared. In this guide, we'll explore some of the most frequent RV problems and how to fix them.
1. Electrical System Malfunctions
Problem:
RVs rely on both 12V and 120V electrical systems. Over time, you may encounter power failures, flickering lights, or dead outlets.
Fix:
Check the circuit breakers and fuses for any blown components.
Inspect the shore power connection and battery terminals for corrosion.
If the issue persists, a professional RV electrician should diagnose and repair the system.
2. Leaky Roof and Seals
Problem:
Roof leaks can cause severe water damage, leading to mould and structural issues.
Fix:
Inspect the roof regularly for cracks or worn-out seals.
Use RV roof sealant to patch small cracks or holes.
For significant leaks, consider a professional RV roof repair service in Bakersfield.
3. Plumbing Issues
Problem:
Leaky faucets, clogged drains, or water pump failures are standard in RVs.
Fix:
Check for loose connections and tighten them.
Use RV-friendly drain cleaners to clear clogs.
If the water pump isn't working, inspect the wiring and pressure settings before replacing it.
4. Tire Blowouts
Problem:
Underinflated or worn-out tyres can lead to dangerous blowouts on the road.
Fix:
Regularly check tyre pressure and maintain it as per the manufacturer's specifications.
Inspect for signs of wear and replace tyres when needed.
Invest in a tyre pressure monitoring system (TPMS) for added safety.
5. Brake System Failures
Problem:
Brake issues can make stopping your RV difficult, leading to serious safety hazards.
Fix:
Inspect brake pads and rotors for wear and replace them as needed.
Check the brake fluid levels and top up if necessary.
If you experience reduced braking power, visit an RV repair specialist in Bakersfield for a thorough check-up.
6. HVAC System Malfunctions
Problem:
If your RV's air conditioning or heating system isn't working, it can make your travels uncomfortable.
Fix:
Clean the air filters and vents regularly.
Check the thermostat settings and battery.
If the problem continues, an RV HVAC repair expert can diagnose and repair the system.
Conclusion
RV maintenance is essential for a smooth and stress-free road trip. By staying proactive and addressing common problems early, you can prevent costly repairs and ensure your RV remains in top condition. Whether you need minor fixes or professional RV repair services in Bakersfield, California, staying informed will help you keep your vehicle roadworthy.
Need expert RV repair in Bakersfield? Contact Mechamedix today for professional and reliable service!
0 notes
Text
Should You Upgrade Or Replace Your Devices? A Guide For Windows 10 Users
Windows 10’s end-of-life is looming, and with support officially ending in October 2025, it’s decision time for businesses and individuals still relying on the operating system. The big question? Should you upgrade your existing devices to Windows 11 or is it time to replace them altogether? Here’s a guide to help you make the right choice based on your needs, budget and goals. Step 1: Check Compatibility Before deciding, determine if your current hardware meets Windows 11’s requirements. Microsoft has set strict system requirements to ensure the new operating system runs smoothly and securely. Key requirements include: A compatible 64-bit processor (1 GHz or faster with 2 or more cores) 4 GB of RAM (8 GB or more is recommended for optimal performance) 64 GB of storage TPM version 2.0 (Trusted Platform Module) How To Check: Use Microsoft’s PC Health Check tool to quickly assess compatibility. Review your device’s specifications manually if needed. Outcome: If your system fails the compatibility test, you’ll need to upgrade your hardware or consider a replacement. Step 2: Evaluate The Age Of Your Devices How old is your current hardware? Devices older than 5 years are often slower and less efficient and may not support Windows 11’s requirements. Reasons To Replace Older Devices: They’re likely nearing the end of their life cycle. Upgrading components (like RAM or storage) may not deliver significant performance improvements. They pose greater security risks due to outdated firmware and hardware vulnerabilities. Step 3: Assess Your Performance Needs Does your current hardware meet your day-to-day needs? Consider: Speed: Are your devices slowing you down during critical tasks? Reliability: Do you experience frequent crashes or malfunctions? Scalability: Will your current hardware handle future software updates and workloads? When To Upgrade: If your devices are still performing well, upgrading to Windows 11 may be the most cost-effective solution. When To Replace: If performance issues are impacting productivity, replacing your hardware can save you money in the long run by avoiding downtime and inefficiencies. Step 4: Weigh The Costs Budget is always a factor when deciding whether to upgrade or replace. Upgrading Existing Devices: Costs less up-front (if compatible). May require additional expenses for component upgrades (e.g., adding more RAM). Replacing Devices: Higher up-front cost but better long-term value. Includes newer hardware designed for Windows 11’s features and security. Step 5: Consider Future-Proofing Newer devices come equipped with the latest technology, offering: Enhanced security features like hardware-based encryption. Faster processing speeds and greater energy efficiency. Improved compatibility with modern applications and peripherals. Investing in replacement devices now can position your business for growth and innovation, ensuring your systems remain efficient for years to come. Pro Tip: Involve An IT Professional Like Tech Guardian Still unsure? Partnering with Tech Guardian can simplify the decision-making process. We can: Assess your current setup. Recommend whether to upgrade or replace based on your specific needs. Handle the transition to minimize downtime and disruption. Take The Next Step Deciding whether to upgrade or replace your devices doesn’t have to be overwhelming. Start with a FREE Discovery Call to evaluate your systems and get personalized recommendations for a smooth transition to Windows 11. Click here to schedule your FREE Discovery Call today or call us at 951-319-4080. Don’t wait until the October 2025 deadline – get ahead of the game and ensure your business is ready for what’s next. The post Should You Upgrade Or Replace Your Devices? A Guide For Windows 10 Users appeared first on Tech Guardian. Via https://www.techguardianmsp.com/should-you-upgrade-or-replace-your-devices-a-guide-for-windows-10-users/ via https://techguardianmsp.weebly.com/blog/should-you-upgrade-or-replace-your-devices-a-guide-for-windows-10-users
0 notes
Text
Should You Upgrade Or Replace Your Devices? A Guide For Windows 10 Users
Windows 10’s end-of-life is looming, and with support officially ending in October 2025, it’s decision time for businesses and individuals still relying on the operating system. The big question? Should you upgrade your existing devices to Windows 11 or is it time to replace them altogether? Here’s a guide to help you make the right choice based on your needs, budget and goals. Step 1: Check Compatibility Before deciding, determine if your current hardware meets Windows 11’s requirements. Microsoft has set strict system requirements to ensure the new operating system runs smoothly and securely. Key requirements include: A compatible 64-bit processor (1 GHz or faster with 2 or more cores) 4 GB of RAM (8 GB or more is recommended for optimal performance) 64 GB of storage TPM version 2.0 (Trusted Platform Module) How To Check: Use Microsoft’s PC Health Check tool to quickly assess compatibility. Review your device’s specifications manually if needed. Outcome: If your system fails the compatibility test, you’ll need to upgrade your hardware or consider a replacement. Step 2: Evaluate The Age Of Your Devices How old is your current hardware? Devices older than 5 years are often slower and less efficient and may not support Windows 11’s requirements. Reasons To Replace Older Devices: They’re likely nearing the end of their life cycle. Upgrading components (like RAM or storage) may not deliver significant performance improvements. They pose greater security risks due to outdated firmware and hardware vulnerabilities. Step 3: Assess Your Performance Needs Does your current hardware meet your day-to-day needs? Consider: Speed: Are your devices slowing you down during critical tasks? Reliability: Do you experience frequent crashes or malfunctions? Scalability: Will your current hardware handle future software updates and workloads? When To Upgrade: If your devices are still performing well, upgrading to Windows 11 may be the most cost-effective solution. When To Replace: If performance issues are impacting productivity, replacing your hardware can save you money in the long run by avoiding downtime and inefficiencies. Step 4: Weigh The Costs Budget is always a factor when deciding whether to upgrade or replace. Upgrading Existing Devices: Costs less up-front (if compatible). May require additional expenses for component upgrades (e.g., adding more RAM). Replacing Devices: Higher up-front cost but better long-term value. Includes newer hardware designed for Windows 11’s features and security. Step 5: Consider Future-Proofing Newer devices come equipped with the latest technology, offering: Enhanced security features like hardware-based encryption. Faster processing speeds and greater energy efficiency. Improved compatibility with modern applications and peripherals. Investing in replacement devices now can position your business for growth and innovation, ensuring your systems remain efficient for years to come. Pro Tip: Involve An IT Professional Like Tech Guardian Still unsure? Partnering with Tech Guardian can simplify the decision-making process. We can: Assess your current setup. Recommend whether to upgrade or replace based on your specific needs. Handle the transition to minimize downtime and disruption. Take The Next Step Deciding whether to upgrade or replace your devices doesn’t have to be overwhelming. Start with a FREE Discovery Call to evaluate your systems and get personalized recommendations for a smooth transition to Windows 11. Click here to schedule your FREE Discovery Call today or call us at 951-319-4080. Don’t wait until the October 2025 deadline – get ahead of the game and ensure your business is ready for what’s next. The post Should You Upgrade Or Replace Your Devices? A Guide For Windows 10 Users appeared first on Tech Guardian. source https://www.techguardianmsp.com/should-you-upgrade-or-replace-your-devices-a-guide-for-windows-10-users/ via https://techguardianmsp.blogspot.com/2025/02/should-you-upgrade-or-replace-your.html
0 notes
Text
How to Copy Original Sensor IDs with Xhorse XTPMS &Key Tool Max Pro?
This guide explains two methods to copy the ID number from an original TPMS sensor to a new Xhorse Universal XTPMS Sensor, enabling the new sensor to work without additional programming.
Applies to: The original sensor ID number can be obtained. The vehicle supports OBD communication.
Method 1: Manual Copying (Using the Original Sensor ID) 1. Locate the ID Number: 1) Find the ID number printed on the original sensor’s shell. If the ID is unclear or missing, use the Xhorse VVDI Key Tool Max Pro to activate the sensor and retrieve the ID.
2. Program the New Sensor: 1) Tap the Program on the device. 2) Select Manual Creation. 3) Enter the original sensor’s ID number and confirm.


Method 2: OBD Copying (For Vehicles Supporting OBD Communication) 1. Connect the Device: 1) Plug theKey Tool Max Pro into the vehicle’s OBD port. 2) Navigate to the TPMS function and select the vehicle model (e.g., Toyota Corolla) and year.
2. Read the Original IDs: Tap OBD Read ID to retrieve the sensor IDs.
3. Copy IDs to New Sensors: 1) Tap Program and select OBD Copy. 2) Insert a new sensor and start programming. 3) Repeat for all four sensors.
4. Install the New Sensors: Once copied, install the sensors on the vehicle. They will work immediately without further programming.


Troubleshooting Dead Original Sensor: If the sensor doesn’t respond, replace its battery and activate it to retrieve the ID.
No OBD Support: If the vehicle lacks OBD communication, use Method 1 (Manual Copying).

Conclusion Copying TPMS sensor IDs is quick and easy with the Xhorse Universal Sensor and VVDI Key Tool Max Pro. For questions or comments, reach out to our support team.
www.xhorse.co.uk
#xhorse#xhorse uk#xhorse vvdi key tool max#key tool max pro#vvdi key tool max pro#xhorse xtpms sensor#vvdi key tool max pro tpms#tpms sensor
0 notes
Text
Complete guide to TPMS: Avoid MOT failure due to faulty TPMS
A common problem with the TPMS sensor is battery failure. Every sensor has an internal battery which can last up to 100,000 miles. Although the battery depletion depends on the amount of miles you travel, it should still last for up to 5 to 7 years. Usually, the battery is found in a sealed sensor casing, hence repair is almost impossible. So, you will need a TPMS replacement Harrow.
0 notes
Text
Dell 3rd Party Maintenance – Cost-Effective Support Beyond OEM Contracts
If your Dell server, storage, or networking hardware is out of warranty or nearing its end of service life (EOSL), third-party maintenance (TPM) is a smart alternative to expensive OEM support contracts. With Dell 3rd party maintenance, you can extend the lifespan of your infrastructure, reduce support costs, and maintain high availability.
✅ Why Choose 3rd Party Maintenance for Dell Hardware?
1. Significant Cost Savings
Up to 50–70% lower than Dell OEM support contracts.
Predictable pricing with flexible SLAs tailored to your business needs.
2. Extended Life for Legacy Equipment
Continued support for EOS/EOSL Dell hardware like PowerEdge servers, PowerVault storage, and EqualLogic arrays.
No forced upgrades before you're ready.
3. Comprehensive Coverage
Support for Dell PowerEdge, PowerVault, Compellent, EqualLogic, and Dell EMC hardware.
Includes diagnostics, part replacement, firmware support, and remote/onsite troubleshooting.
4. Customizable SLAs
24x7x4-hour response or next-business-day service.
Onsite field engineers, spare parts stocking, and remote monitoring options.
5. Dedicated Technical Support
Experienced Level 3 engineers trained on Dell platforms.
Single point of contact—no endless ticket escalations.
🖥️ Supported Dell Equipment in TPM
Dell PowerEdge Servers (R, T, M Series)
Dell EMC Storage (VNX, Unity, Isilon, SC Series)
PowerVault & EqualLogic Storage
Dell Networking Switches & Blades
Dell Precision Workstations
💡 Ideal for:
Businesses with legacy Dell infrastructure
Data centers looking to reduce support costs
Organizations seeking flexible, vendor-neutral maintenance solutions
Would you like help finding a trusted 3rd party Dell maintenance provider in your area or for a specific device model? Let me know what you’re using, and I can guide you.

0 notes