#Webhook Signal
Explore tagged Tumblr posts
Visit Tumblr Blog
Explore Tumblr blogs with no restrictions, modern design and the best experience.
Last Seen Tumblr Blogs


Fun Fact
Total funding amounts to $125.3M.
Text
SignalBotOne – Notification Webhooks for Signal
https://signalbot.one/
2 notes
·
View notes
Text
Best AI Crypto Trading Workflows Using Token Metrics API and MCP Server

In 2025, crypto traders are evolving beyond charts and price alerts. The most successful ones use AI-powered trading workflows—automated systems that pull real-time signals, evaluate momentum, and act faster than the market.
And at the heart of these workflows is the Token Metrics API and MCP Server—a powerful combination that turns any trading strategy into a smart, adaptable AI pipeline.
This article outlines the best AI crypto trading workflows developers and traders are using today, powered by real-time data, multi-agent prompts, and cross-platform compatibility.
🔄 What Is an AI Trading Workflow?
An AI trading workflow is a repeatable process where:
AI agents interpret real-time crypto data
Trading logic determines when to buy/sell
Automation tools execute decisions or send alerts
Token Metrics makes this possible by offering:
Real-time Trader Grades, Signals, and Moonshot alerts
A standardized API via the MCP Server
Compatibility with ChatGPT, Claude, Cursor IDE, Zapier, Coda, and more
Let’s explore how to build this step by step.
⚙️ Workflow 1: Narrative-Driven Trade Discovery
Goal: Discover tokens within hot sectors (e.g. AI, DePIN) with strong Trader Grades.
Step-by-Step:
Use /indices/theme/ai to pull AI-related tokens.
Filter by /grades/trader above 80.
Check /signals/bullish for momentum confirmation.
Execute trade or send Telegram alert.
Toolchain:
Claude or ChatGPT + Token Metrics MCP
Zapier or Botpress for automation
Optional: Trading API (CEX or DEX)
Example prompt:
“List DePIN tokens with Trader Grade above 85 and Bullish Signal in last 24h.”
⚙️ Workflow 2: Real-Time Moonshot Sniper
Goal: Buy low-cap altcoins that just fired a bullish signal and meet moonshot criteria.
Step-by-Step:
Query /moonshots/live
Filter by cap < $50M and Grade > 80
Confirm signal with /signals/bullish
Trigger execution via webhook or CLI agent
Ideal for:
Telegram bots
Autotrading agents
Signal dashboards
MCP Advantage: Run the same query in Claude, ChatGPT, or Windsurf—one protocol, many clients.
⚙️ Workflow 3: Rebalance Strategy Using Trader Grade Trends
Goal: Monitor your portfolio and rebalance when token momentum changes.
Step-by-Step:
Track tokens with /grades/trader and store weekly data
Detect downgrades over 3-day period
Trigger a portfolio rebalance or send alert
Stack:
Supabase (portfolio DB)
Token Metrics API
Tome/Coda for auto-updating reports
Optional AI Integration: Let Claude explain the reason behind grade drops using token fundamentals.
⚙️ Workflow 4: Daily Claude Assistant Briefing
Goal: Use Claude as a daily analyst that summarizes top opportunities.
Example prompt:
“Summarize today’s top 3 AI tokens by Trader Grade, Moonshot Grade, and Signal.”
Claude (connected via MCP Server) returns:
Tokens, scores, narratives
Brief explanation of movement
Sentiment data
You can ask follow-ups like:
“Which of these have bullish signals in the last 24 hours?”
Perfect for:
Teams
VC firms
Analysts
⚙️ Workflow 5: Alerts-as-a-Service
Goal: Let users set custom alert rules via frontend or agent.
What to Build:
UI with:
Price change threshold
Trader Grade trigger
Signal alert
Backend Flow:
Use /alerts/create to register rule
MCP Server standardizes trigger logic
Alert sent via:
Discord (via webhook)
SMS (via Twilio)
Email (via SendGrid)
Example Use Cases:
Token hits Trader Grade 90
Bullish Signal fired while cap < $25M
Top 10 index rebalance alert
🧠 Why Token Metrics Makes These Workflows Unique
Feature
Legacy Tools
Token Metrics MCP
Real-time AI grades
❌
✅
Sector & narrative filters
❌
✅
Bullish/Bearish signals
❌
✅
LLM compatibility
❌
✅ (Claude, GPT, etc.)
Single API key
❌
✅
Token Metrics doesn’t just offer data—it offers decisions.
🔐 Authentication and Access
All workflows require:
A single Token Metrics API key
Optional MCP Server access
Plans:
Plan
Monthly Calls
Ideal For
Free
5,000
Personal dashboards, basic bots
Advanced
50,000
Real-time apps, GPT plugins
Premium
500,000+
Autotrading systems, VC infra
Bonus: Save 10–35% by staking or paying with $TMAI.
📈 Bonus: Combine Workflows with Zapier or LangChain
You can:
Build no-code workflows with Zapier
Add memory and chaining via LangChain
Connect multiple agents across platforms (Slack, Discord, Telegram)
One stack. Infinite use cases.
🏁 Final Thoughts
AI crypto trading in 2025 is no longer experimental—it’s the new standard. Traders and developers are replacing spreadsheets and sentiment guesswork with live signal pipelines powered by Token Metrics.
Whether you're building:
A Claude assistant
An auto-rebalancing bot
A Moonshot discovery platform
A full-stack trading system
The Token Metrics API + MCP Server gives you the tools, data, and speed to win.
1 note
·
View note
Text
Connect TradingView Alerts to MT5 Automatically: A Step-by-Step Guide
Would you like to automatically link TradingView alerts to MetaTrader 5 (MT5) and make your life a little easier when it comes to your trading workflow? You're not the only one! Many traders appreciate the powerful charting tools provided by TradingView and are working through ways to execute trades automatically on MT5.
In this article, we will show you how to connect TradingView alerts to MT5 without manual work using automation tools like MetaConnector. Let’s get started!
✅ Why Automatically Connect TradingView to MT5?
TradingView does a great job at technical analysis and strategy building, while MT5 is widely used for executing trades across forex, indices, and stocks. Together, they become powerful trading tools because:
It removes the need to manually execute orders.
You can place trades faster.
You eliminate human error.
You can automate your trading strategies and alerts.
How to Automatically Connect TradingView Alerts to MT5
You can’t connect TradingView directly to MT5 without a bridge or third-party tool. But here’s how you can set it up easily using MetaConnector:
STEP 1: Create Alerts in TradingView
Open TradingView, and load your chart.
Click on the Alarm/Alert icon.
Set your condition (e.g., RSI change, price breaks).
In the alert message box, add any custom message similar to:
BUY EURUSD
When this message is read by MetaConnector, it will activate the trade commands on MT5.
Step 2: Use MetaConnector—The Smart Bridge Tool
Go to MetaConnector—a great bridge tool from Combiz Services Pvt Ltd. MetaConnector bridges TradingView alerts to MT5/MT4 in real-time.
Register and set up your account.
Connect your TradingView webhook to MetaConnector using the URL provided.
Connect your MT5 terminal by using the Expert Advisor (EA) from MetaConnector.
Map your alert message in TradingView to a buy/sell action on MT5 (Buy/Sell, SL, TP, Lot Size).
Step 3: Go Live with Automated Trading
Now that everything is connected:
Your TradingView alerts will automatically execute a live trade on MT5.
You can track everything and manage your account with your MetaConnector dashboard.
You can connect multiple accounts, which is perfect for copy trading and managing clients.
Key Features of MetaConnector
Real-time execution of orders
Compatible with any broker with MT4/MT5
Fast, secure integration
Compatible with any TradingView indicator or strategy
No programming required
Is Connecting TradingView to MT5 Safe and Legal?
Yes—using products like MetaConnector is definitely safe. It doesn't violate any broker rules, as it uses official APIs or Expert Advisors (EAs). It also operates within automation practices that are acceptable for both algo trading and copy trading.
Why Choose Combiz Services Pvt Ltd?
Combiz Services Pvt Ltd is a pioneer in India for automation in trading. Product solutions like MetaConnector and copy trading software are available to individuals & companies whether you are a beginner or experienced trader. If you are an individual trader or have a signal service, Combiz Services Pvt Ltd has you covered.
Check out 👉 www.metaconnector.combiz.org for your solutions today.
0 notes
Text
Use Meta Connector to Send TradingView Signals to MT5
Automation has changed the trading game in today's fast-paced trading climate. Many traders will use TradingViewfor charting and alerts while they execute trades on MetaTrader 5 (MT5). The question is, how can we connect both platforms? Meet Meta Connector. Meta Connector is the best way to send TradingViewalerts to MT5. This makes it an effective signal provider for traders who would like to automate strategies without writing code. What is Meta Connector? Meta Connector is a lightweight but effective piece of software that connects TradingView to MT5, allowing you to send signals, alerts, and trading instructions directly from TradingViewto the MT5 terminal using simple webhook technology. Now you will never have to check TradingView alerts and then enter your order in MT5. Meta Connector does that all for you. Why Use Meta Connector as a Signal Provider? Real-time signal execution Order on MT5 the moment your TradingView strategy sends an alert. No code required. You don't need to know Pine Script or how to use MT5 to program. Everything works with simple webhook settings. Secure and reliable Uses end-to-end communication and works with all brokers that support MT5. Ideal for Algo Trading Great for users implementing custom strategies, signal-based trading, or prop trading setups. How to use Meta Connector to send signals from TradingView to MT5 It is easy to set up Meta Connector by following the steps below: ✅ Step 1: Install Meta Connector Download and install the Meta Connector application on your machine. Meta Connector is compatible with Windows and all versions of MetaTrader 5. ✅ Step 2: Set up MT5 Open up your MT5 terminal, log in with your broker credentials, and confirm that a working internet connection is present. ✅ Step 3: Create a Webhook in TradingView Go to the chart that has the ongoing strategy or indicator active. Click on “Alerts” and configure the alert conditions. In the Webhook URL section, paste the URL from Meta Connector. In the message body, put in your signal format (e.g., BUY/SELL, symbol, SL/TP). ✅ Step 4: Open Meta Connector Make sure Meta Connector is running and successfully connected to MT5. Once your alert is triggered in TradingView, the trade will be executed on MT5 live! Use cases for Meta Connector ✅ Day traders triggering entries and exits with TradingView strategies ✅ Swing traders automating entry and exit ✅ Signal providers sending alerts to clients ✅ Prop firms that want a centralised, automated execution. Check the full guide on: Best TradingView to MT5 Signal Provider – Meta Connector Final Thoughts If you want to automate your trade from TradingView to MT5, then Meta Connector is by far the best, most efficient, and most user-friendly tool available. It takes no coding, is fast to execute, and is fully compatible with MT5. For any modern trader, this is a must-have tool. Start using Meta Connector today and level up your trading!
0 notes
Text
The Best Free App for Trading Signal Providers, Finfluencers, and Coaches
Automate your signals, showcase your stats, and build trust with a performance-first trading platform.
If you're a trader who provides signals to followers—whether you're a seasoned coach, a Discord community leader, or a finfluencer building your brand—NVSTly is the platform designed to take your signal service to the next level.

✅ Automate Your Signal Sharing Across Platforms
Signal delivery shouldn't be a manual hassle. NVSTly gives you multiple ways to track and share your trading signals—whether you’re active on Discord, using our app, or trading directly through your broker.
🟢 For Discord-Based Signal Providers
Our NVSTly Discord Bot was built with signal providers in mind. Once installed in your server, it can automatically detect, track, and publish your trade signals in real-time. Just type your trades or use the built-in commands, and the bot handles the rest:
Auto-logs the trade to your NVSTly profile
Updates your trade’s status as it progresses (e.g., average, partial, closed)
Instantly notifies your followers
Can also automatically share these tracked signals to other Discord servers & trading communities using webhook
📱 For Web & Mobile Users
Not on Discord? No problem. NVSTly’s web and mobile apps make it easy to manually input your trades. Whether you’re on the go or managing a premium signals channel elsewhere, you can:
Enter trade details quickly
Update prices and close trades at any time
Keep your followers informed without delay
Install the NVSTly mobile app on iOS App Store or Google Play for Android
🔗 Brokerage Integration = Full Automation
For the most seamless experience, NVSTly offers brokerage integrations (e.g., Webull) that allow your trades to be fully automated. Once connected:
Your trades are tracked the moment they’re executed
Followers get real-time notifications of your activity
You no longer need to lift a finger to share a signal
This is perfect for high-volume traders or signal providers managing multiple accounts.
📊 Transparent Performance That Builds Trust
In the world of signal trading, results matter more than followers. NVSTly is the only platform where your performance speaks for itself.
🌟 Trader Dashboards
Each trader's position has a public insights interface showcasing:
Most recent trades
Open and closed positions
PnL breakdowns and trade timelines
📈 In-Depth Stats & Analytics
Every trade you make contributes to a rich set of performance metrics displayed on trader dashboards:
Win rate
Average gain/loss
Average return
Long vs short ratio
Total gain and many more stats
No cherry-picking, no hiding losses. Just clean, honest data.
🏆 Compete on Global Leaderboards (Not for Clout—For Performance)
Forget follower counts and vanity metrics. NVSTly’s global leaderboards rank traders based purely on real performance.
As a signal provider:
Your success earns you visibility and credibility
Traders can discover and follow you organically
You can build a reputation that’s data-backed, not hype-driven
This makes NVSTly an amazing growth tool for any signal provider trying to stand out in a noisy market.
🔁 Social, Scalable, and Built for Signal-Based Trading
Whether you’re just getting started or managing a team of traders, NVSTly gives you tools to scale:
Let followers copy your trades in real time
Show off your trade history with one link
Gain real-time feedback and engagement from your audience
Track and share your results effortlessly with followers, to social media, & across Discord (and Telegram soon)
And with features like trade recaps, community feeds, and real-time alerts, NVSTly is more than a portfolio tracker—it’s a social investing platform designed for modern traders and educators.
🚀 Get Started Today
If you’re serious about sharing signals and growing your presence as a trusted trader, coach, or content creator—NVSTly is your new home.
✅ Start tracking trades ✅ Build your stats ✅ Climb the leaderboards ✅ Let your results speak louder than your reach
👉 Visit nvstly.com or invite our Discord bot to start automating your signals today.
0 notes
Text
SEO Depends on Site Health—And That Includes Cron Monitoring

When it comes to SEO, we often focus on content creation, keyword optimization, link building, and user experience. But beneath all of that lies a foundation that’s often ignored: site infrastructure and automation reliability. One of the most critical but overlooked components is cron job monitoring.
Cron jobs are automated tasks that power many behind-the-scenes SEO operations. When they silently fail, your site may still appear to function, but your SEO could be taking a serious hit. That’s why monitoring cron jobs with tools like WebStatus247 isn’t optional—it’s essential.
🛠 What Are Cron Jobs and Why Do They Matter for SEO?
A cron job is a time-based task scheduler in Unix-like systems. Web servers use cron jobs to automatically execute scripts at specific intervals—every hour, day, week, or custom frequency.
Here’s how they directly impact SEO:
Sitemap Automation: Keeping your sitemap updated and notifying search engines ensures faster indexing.
Cache Management: Clearing expired cache files helps maintain site speed.
Broken Link Checks: Regularly removing dead links improves crawlability and user trust.
Scheduled Content Publishing: Timely content updates signal fresh activity to search engines.
Image Optimization: Automatically resizing or compressing new uploads to maintain fast load times.
Without cron jobs doing these tasks, your site can gradually lose technical integrity—hurting everything from crawl budgets to page speed scores.
⚠️ Real-World Scenarios Where Cron Job Failures Hurt SEO
🔄 Sitemap Never Updates
Let’s say your sitemap.xml file hasn’t updated in weeks because the cron job failed. Google doesn’t know you’ve added 20 new blog posts. These pages stay unindexed—missing out on traffic, impressions, and ranking potential.
🧱 Broken Links Go Undetected
You have a cron job that runs a script to identify broken internal links. One day it silently fails. You continue publishing content, unaware that dozens of pages now link to 404 errors. Google starts lowering your site's quality score.
⏳ Sluggish Load Times
Your database cleanup cron job fails. As junk data builds up, your queries slow down and page load speed drops. This affects your Core Web Vitals, which are now a direct ranking factor in Google.
🕒 Missed Content Scheduling
You queue up posts for the next week—product updates, blog articles, promotional pages. But the publishing cron job crashes. Your audience sees no updates, and Google sees an inactive site.
✅ Why You Must Monitor Cron Jobs—Not Just Set Them
Setting up a cron job isn’t enough. They can:
Fail due to coding errors
Be interrupted by server issues
Get blocked by firewalls or security plugins
Conflict with other scripts
Be disabled during hosting migrations
And most importantly: they don’t usually alert you when something breaks. This is where WebStatus247 steps in.
🧩 How WebStatus247 Helps With SEO-Focused Cron Monitoring
WebStatus247 Cron Job Monitoring gives you full control and visibility over your automation stack. Features include:
🛑 Failure Detection: Get notified if a scheduled task doesn’t run or crashes.
📅 Custom Monitoring Intervals: Track hourly, daily, or even by-the-minute jobs.
📬 Real-Time Alerts: Receive instant alerts via email or SMS when things go wrong.
📈 Logging and Dashboards: View detailed logs to troubleshoot quickly and prevent repeat issues.
🔒 Secure Status URLs: Use simple HTTP or webhook pings for status confirmation.
By integrating this tool, you make sure your SEO tasks—especially technical SEO jobs—run like clockwork.
🔍 Technical SEO + Cron Jobs: A Perfect Pair
SEO experts and digital marketers know that technical SEO is just as critical as content. Google rewards websites that are fast, accessible, and technically sound.
Monitoring your cron jobs means you're doing the following:
Maintaining sitemap freshness
Avoiding broken or outdated links
Ensuring content freshness
Improving uptime and stability
Keeping page speed fast and lean
If you run backups, link audits, caching tasks, or image optimization via cron, these all contribute indirectly—but powerfully—to your SEO edge.
🧠 Final Thoughts: Don't Let Silent Failures Kill Your Rankings
SEO isn’t just about what's visible—it's also about the systems that support your site. If your background tasks aren’t monitored, they can quietly fail, and your rankings may drop before you even realize there’s a problem.
✅ WebStatus247 ensures that never happens.
0 notes
Text
Best API of Horse Racing for Betting Platforms: Live Odds, Data Feeds & Profits Unlocked

Discover the most accurate and profitable API of horse racing with live odds, betting data feeds, and fast integration. Ideal for UK/USA markets and fantasy apps.
Introduction: Why Accurate Horse Racing APIs Matter in 2025
In the competitive world of sports betting and fantasy gaming, milliseconds and margins matter. When it comes to horse racing, success hinges on real-time, trustworthy data and sharp odds. Whether you run a betting exchange, fantasy app, or affiliate site, using the right horse racing API can mean the difference between profit and failure.
The API of horse racing offered by fantasygameprovider.com is engineered to meet this demand—providing live horse racing odds, race entries, results, and predictive analytics that align perfectly with the betting industry’s needs.
What Is a Horse Racing API?
A horse racing API is a service that delivers structured, real-time horse racing data to apps, websites, and betting platforms. This includes:
Live race updates
Racecard entries & scratchings
Odds feed (fixed & fluctuating)
Final results with payout info
Jockey, trainer, and form data
These are typically delivered in JSON or XML formats, allowing seamless integration with sportsbooks, exchanges, or fantasy game engines.
📊 Who Needs Horse Racing APIs?
Audience
Use Case
Betting Sites
Deliver live odds, matchups, and payouts.
Fantasy Sports Platforms
Use live feeds to auto-update scores & leaderboards.
Betting Tipsters/Affiliates
Showcase predictive models based on fresh data.
Mobile Apps
Enable live race streaming with betting APIs.
Trading Bots
Automate wagers with low-latency horse racing data.
Why Choose FantasyGameProvider’s Horse Racing API?

Unlike basic feeds, our API is tailored for commercial use. Here's why it stands out:
Feature
FantasyGameProvider
Other APIs
Live Odds Feed
✅ Updated in <2s
⚠️ 5–15s delay
Global Racing
✅ UK, USA, AUS, HK
⚠️ Limited coverage
Data Format
✅ JSON + XML
⚠️ JSON only
Accuracy
✅ Enterprise-Grade (99.9%)
⚠️ Variable
Predictive Insights
✅ AI-Driven Models
❌ Not Included
Betting Integration
✅ Easy with Betfair, SBTech
⚠️ Manual setup required
Our horse racing odds API not only mirrors UK and USA live betting markets, but also lets you build automated bet triggers and smart notifications for sharp edge betting.
💸 How Betting Businesses Profit with Horse Racing APIs
If you're running a betting website or fantasy sports app, here's how the API of horse racing can boost your ROI:
Real-time updates = More active users
Faster odds delivery = Better arbitrage potential
Accurate results = Fewer payout disputes
Live data = Higher session times (ideal for monetizing with ads)
Custom alerts = VIP features for paid subscribers
Fantasygameprovider.com also allows white-label API integration to match your brand.
How to Choose the Right Horse Racing API – Checklist ✅
Make sure your API includes the following:
✅ Live odds feed with fast refresh rate (sub-2 seconds ideal)
✅ Coverage of all major race tracks (UK, USA, AUS)
✅ Reliable JSON & XML format
✅ Built-in historical data & form guide
✅ Scalable architecture for high traffic
✅ Supports Betfair, Oddschecker, and other exchanges
✅ Licensed data provider
Our API meets all these criteria and goes further by offering automated betting signals and predictive race modeling—key for next-gen apps.
Betfair API vs FantasyGameProvider: Which Is Better?
Feature
Betfair API
FantasyGameProvider
Odds Feed
Excellent (exchange-based)
Excellent (market + exchange)
Historical Data
Partial
Full form + performance stats
Developer Simplicity
Moderate
Plug-and-play REST endpoints
Support
Community-based
24/7 Support
Customization
Limited
High (webhooks, triggers, filters)
Pricing
Tiered
Affordable & negotiable plans
Conclusion: If you want full access to live odds, race data, and fast integration without the steep learning curve, fantasygameprovider.com offers better developer flexibility and betting UX.
Data Feeds You Get with Our Horse Racing API

Racecards & scratchings feed
Real-time results feed
Odds feed (fixed, fluctuating, exchange-compatible)
Form & stats feed
Track conditions feed
Horse/jockey/trainer history feed
Automated alerts for betting patterns
Formats available: JSON horse racing data & horse racing XML feed.
FAQs: Betting-Focused Horse Racing API Questions
Q1. Which is the most accurate horse racing API in 2025?
FantasyGameProvider offers 99.9% accuracy with sub-2-second update latency, ideal for professional and retail bettors alike.
Q2. Can I use this API for UK and USA horse racing?
Yes, our UK racing odds data and USA racing API are both available with full schedule and live result support.
Q3. Is your horse racing API suitable for Betfair automation?
Absolutely. Many of our clients use it to build Betfair trading bots using our odds feed and predictive race data.
Q4. Do you offer free trials or sandbox testing?
Yes. Developers can access a sandbox environment to test endpoints before committing.
Q5. What’s the difference between JSON and XML feeds?
JSON is faster and easier to integrate, while XML is preferred for legacy systems. We offer both to suit all tech stacks.
🚀 Start Winning with the Best API of Horse Racing
If you’re serious about building a winning betting platform, profitable tipster site, or a fantasy sports engine, you need the most accurate and commercial-ready API in the industry.
At fantasygameprovider.com, we give you everything:
✅ Live odds ✅ Fast results ✅ Race cards ✅ Predictive models ✅ Betfair compatibility ✅ Global reach (UK, USA, AUS, more)
👉 Ready to dominate the betting space with live horse racing data? Visit fantasygameprovider.com and request your API demo today.
#live cricket odds api#sports betting#betting#bettingapi#fantasygameprovider#Live odds#API of Horse Racing#UK racing odds data#Betfair#Real-time results feed#Betfair API
0 notes
Text
Integrating AI Call Transcription into Your VoIP or CRM System
In today’s hyper-connected business environment, customer communication is one of the most valuable assets a company possesses. Every sales call, support ticket, or service request contains rich data that can improve business processes—if captured and analyzed properly. This is where AI call transcription becomes a game changer. By converting voice conversations into searchable, structured text, businesses can unlock powerful insights. The real value, however, comes when these capabilities are integrated directly into VoIP and CRM systems, streamlining operations and enhancing customer experiences.
Why AI Call Transcription Matters
AI call transcription leverages advanced technologies such as Automatic Speech Recognition (ASR) and Natural Language Processing (NLP) to convert real-time or recorded voice conversations into text. These transcripts can then be used for:
Compliance and auditing
Agent performance evaluation
Customer sentiment analysis
CRM data enrichment
Automated note-taking
Keyword tracking and lead scoring
Traditionally, analyzing calls was a manual and time-consuming task. AI makes this process scalable and real-time.
Key Components of AI Call Transcription Systems
Before diving into integration, it’s essential to understand the key components of an AI transcription pipeline:
Speech-to-Text Engine (ASR): Converts audio to raw text.
Speaker Diarization: Identifies and separates different speakers.
Timestamping: Tags text with time information for playback syncing.
Language Modeling: Uses NLP to enhance context, punctuation, and accuracy.
Post-processing Modules: Cleans up the transcript for readability.
APIs/SDKs: Interface for integration with external systems like CRMs or VoIP platforms.
Common Use Cases for VoIP + CRM + AI Transcription
The integration of AI transcription with VoIP and CRM platforms opens up a wide range of operational enhancements:
Sales teams: Automatically log conversations, extract deal-related data, and trigger follow-up tasks.
Customer support: Analyze tone, keywords, and escalation patterns for better agent training.
Compliance teams: Use searchable transcripts to verify adherence to legal and regulatory requirements.
Marketing teams: Mine conversation data for campaign insights, objections, and buying signals.
Step-by-Step: Integrating AI Call Transcription into VoIP Systems
Step 1: Capture the Audio Stream
Most modern VoIP systems like Twilio, RingCentral, Zoom Phone, or Aircall provide APIs or webhooks that allow you to:
Record calls in real time
Access audio streams post-call
Configure cloud storage for call files (MP3, WAV)
Ensure that you're adhering to legal and privacy regulations such as GDPR or HIPAA when capturing and storing call data.
Step 2: Choose an AI Transcription Provider
Several commercial and open-source options exist, including:
Google Speech-to-Text
AWS Transcribe
Microsoft Azure Speech
AssemblyAI
Deepgram
Whisper by OpenAI (open-source)
When selecting a provider, evaluate:
Language support
Real-time vs. batch processing capabilities
Accuracy in noisy environments
Speaker diarization support
API response latency
Security/compliance features
Step 3: Transcribe the Audio
Using the API of your chosen ASR provider, submit the call recording. Many platforms allow streaming input for real-time use cases, or you can upload an audio file for asynchronous transcription.
Here’s a basic flow using an API:
python
CopyEdit
import requests
response = requests.post(
"https://api.transcriptionprovider.com/v1/transcribe",
headers={"Authorization": "Bearer YOUR_API_KEY"},
json={"audio_url": "https://storage.yourvoip.com/call123.wav"}
)
transcript = response.json()
The returned transcript typically includes speaker turns, timestamps, and a confidence score.
Step-by-Step: Integrating Transcription with CRM Systems
Once you’ve obtained the transcription, you can inject it into your CRM platform (e.g., Salesforce, HubSpot, Zoho, GoHighLevel) using their APIs.
Step 4: Map Transcripts to CRM Records
You’ll need to determine where and how transcripts should appear in your CRM:
Contact record timeline
Activity or task notes
Custom transcription field
Opportunity or deal notes
For example, in HubSpot:
python
CopyEdit
requests.post(
"https://api.hubapi.com/engagements/v1/engagements",
headers={"Authorization": "Bearer YOUR_HUBSPOT_TOKEN"},
json={
"engagement": {"active": True, "type": "NOTE"},
"associations": {"contactIds": [contact_id]},
"metadata": {"body": transcript_text}
}
)
Step 5: Automate Trigger-Based Actions
You can automate workflows based on keywords or intent in the transcript, such as:
Create follow-up tasks if "schedule demo" is mentioned
Alert a manager if "cancel account" is detected
Move deal stage if certain intent phrases are spoken
This is where NLP tagging or intent classification models can add value.
Advanced Features and Enhancements
1. Sentiment Analysis
Apply sentiment models to gauge caller mood and flag negative experiences for review.
2. Custom Vocabulary
Teach the transcription engine brand-specific terms, product names, or industry jargon for better accuracy.
3. Voice Biometrics
Authenticate speakers based on voiceprints for added security.
4. Real-Time Transcription
Show live captions during calls or video meetings for accessibility and note-taking.
Challenges to Consider
Privacy & Consent: Ensure callers are aware that calls are recorded and transcribed.
Data Storage: Securely store transcripts, especially when handling sensitive data.
Accuracy Limitations: Background noise, accents, or low-quality audio can degrade results.
System Compatibility: Some CRMs may require custom middleware or third-party plugins for integration.
Tools That Make It Easy
Zapier/Integromat: For non-developers to connect transcription services with CRMs.
Webhooks: Trigger events based on call status or new transcriptions.
CRM Plugins: Some platforms offer native transcription integrations.
Final Thoughts
Integrating AI call transcription into your VoIP and CRM systems can significantly boost your team’s productivity, improve customer relationships, and offer new layers of business intelligence. As the technology matures and becomes more accessible, now is the right time to embrace it.
With the right strategy and tools in place, what used to be fleeting conversations can now become a core part of your data-driven decision-making process.

#AI call transcription#VoIP integration#CRM integration#Speech-to-text software#Call transcription software#Real-time transcription#VoIP call recording#CRM automation#Customer call insights#Voice analytics#AI transcription for sales calls#Transcription in customer support#CRM call log automation#Automatic call summary#AI speech recognition tools#Sales call transcript analysis#Customer service call transcription#AI voice to text CRM#Call center compliance tools#Conversation intelligence software
0 notes
Text
Combining Azure Data Factory with Azure Event Grid for Event-Driven Workflows

Traditional data pipelines often run on schedules — every 15 minutes, every hour, etc. But in a real-time world, that isn’t always enough. When latency matters, event-driven architectures offer a more agile solution.
Enter Azure Data Factory (ADF) + Azure Event Grid — a powerful duo for building event-driven data workflows that react to file uploads, service messages, or data changes instantly.
Let’s explore how to combine them to build more responsive, efficient, and scalable pipelines.
⚡ What is Azure Event Grid?
Azure Event Grid is a fully managed event routing service that enables your applications to react to events in near real-time. It supports:
Multiple event sources: Azure Blob Storage, Event Hubs, IoT Hub, custom apps
Multiple event handlers: Azure Functions, Logic Apps, WebHooks, and yes — Azure Data Factory
🎯 Why Use Event Grid with Azure Data Factory?
BenefitDescription🕒 Real-Time TriggersTrigger ADF pipelines the moment a file lands in Blob Storage — no polling needed🔗 Decoupled ArchitectureKeep data producers and consumers independent⚙️ Flexible RoutingRoute events to different pipelines, services, or queues based on metadata💰 Cost-EffectivePay only for events received — no need for frequent pipeline polling
🧱 Core Architecture Pattern
Here’s how the integration typically looks:pgsqlData Source (e.g., file uploaded to Blob Storage) ↓ Event Grid ↓ ADF Webhook Trigger (via Logic App or Azure Function) ↓ ADF Pipeline runs to ingest/transform data
🛠 Step-by-Step: Setting Up Event-Driven Pipelines
✅ 1. Enable Event Grid on Blob Storage
Go to your Blob Storage account
Navigate to Events > + Event Subscription
Select Event Type: Blob Created
Choose the endpoint — typically a Logic App, Azure Function, or Webhook
✅ 2. Create a Logic App to Trigger ADF Pipeline
Use Logic Apps if you want simple, no-code integration:
Use the “When a resource event occurs” Event Grid trigger
Add an action: “Create Pipeline Run (Azure Data Factory)”
Pass required parameters (e.g., file name, path) from the event payload
🔁 You can pass the blob path into a dynamic dataset in ADF for ingestion or transformation.
✅ 3. (Optional) Add Routing Logic
Use conditional steps in Logic Apps or Functions to:
Trigger different pipelines based on file type
Filter based on folder path, metadata, or event source
📘 Use Case Examples
📁 1. File Drop in Data Lake
Event Grid listens to Blob Created
Logic App triggers ADF pipeline to process the new file
🧾 2. New Invoice Arrives via API
Custom app emits event to Event Grid
Azure Function triggers ADF pipeline to pull invoice data into SQL
📈 3. Stream Processing with Event Hubs
Event Grid routes Event Hub messages to ADF or Logic Apps
Aggregated results land in Azure Synapse
🔐 Security and Best Practices
Use Managed Identity for authentication between Logic Apps and ADF
Use Event Grid filtering to avoid noisy triggers
Add dead-lettering to Event Grid for failed deliveries
Monitor Logic App + ADF pipeline failures with Azure Monitor Alerts
🧠 Wrapping Up
Event-driven architectures are key for responsive data systems. By combining Azure Event Grid with Azure Data Factory, you unlock the ability to trigger pipelines instantly based on real-world events — reducing latency, decoupling your system, and improving efficiency.
Whether you’re reacting to file uploads, streaming messages, or custom app signals, this integration gives your pipelines the agility they need.
Want an infographic to go with this blog? I can generate one in your preferred visual style.
WEBSITE: https://www.ficusoft.in/azure-data-factory-training-in-chennai/
0 notes
Text
Integrating Webhooks with Popular Services: How to Connect to Slack, GitHub, and More
Hey, fellow tech enthusiasts!
It’s always cumbersome to manually sync data between your favorite services. So, integrating webhooks into your workflow can considerably augment automation and efficiency. Let's find out how to connect webhooks with popular services like Slack, GitHub, and more, as well as explore the basics of webhooks.
What Are Webhooks?
The term webhook was coined by Jeff Lindsay in 2007 from the computer programming term hook. A webhook is a method in web development of augmenting or altering the behavior of one application to deliver real-time data to another whenever a specific event occurs with custom callbacks. These callbacks may be managed, maintained, and modified by third-party users who don’t require being affiliated with the originating website or application.
It's as good as a messenger that transfers information from one service to another, allowing them to converse with each other flawlessly. Imagine it as your app’s style of giving a friendly jab to another app, conveying,” Hey, it just happened! Unlike conventional APIs, which need relentless polling to check for new data, webhooks push information automatically by webhooks, making them more effective and timelier.
Setting Up Webhooks for Slack:
After covering the basics of webhooks, let's march to set up a webhook for Slack!
Setting up webhooks for Slack is a powerful way to incorporate your application with the popular communication platform. Whenever a specific event occurs, a webhook is a callback URL that gets notifications from Slack, such as a new message or user update. Setting up a webhook in Slack needs your workspace settings.
Here is a step-by-step guide:
Create a new app for your workspace by navigating to the Slack API Portal.
Under the “integrations” tab, select Incoming Webhooks and click “Add New Webhook to Workspace.”
A webhook URL will be received that can be used to send notifications to your applications.
As per your need, this allows you to customize and extend Slack’s functionality.
For receiving signals from various services, this setup is mostly useful, ensuring the team always remains informed in real-time.
Connecting Webhooks to GitHub:
GitHub's webhook integration enables automatic notifications when events happen on GitHub, such as when someone opens a pull request or pushes a commit in a repository that your app can access.
To connect webhooks to GitHub, you'll need to follow these steps:
Go to your GitHub repository and click on "Settings."
Select "Webhooks" from the left-hand menu and click "Add webhook."
Insert the payload URL provided by the service you wish to notify (e.g. a Slack webhook URL).
Optionally, choose a data format in the Content type drop-down menu.
Select the webhook events (like pushes, pull requests, or issues) you want to receive.
Save the webhook and perform a test action to confirm it's working correctly.
This will allow you to receive notifications about events and updates on code changes, pull requests, and more, enhancing collaboration and response times by connecting with services like Slack in your GitHub repository.
Other Popular Integrations
Beyond Slack and Github, Webhooks provides a wide range of integration possibilities. Here are some remarkable examples:
One prominent example is Zapier, a platform that allows users to connect over 1,000 different web services, including Gmail, Google Drive, Mailchimp, and Trello, and apps like Microsoft Teams, Outlook Calender Google Calender, One Drive, and SharePoint. For automated file uploads and downloads, webhooks can also be integrated with Dropbox, Amazon S3, and other cloud storage services.
Gmail: To receive notifications for new emails, set up webhooks, enabling prompt responses.
Trello: Ensures you’re always abreast of project progress by receiving alerts for card movements or updates.
Facebook Apps: To receive real-time updates on user interactions, integrate webhooks that enhance engagement strategies.
HubSpot-A comprehensive AI-powered customer platform to automate sales workflows and integrate with customer relationship management (CRM).
Asana: To streamline team collaboration, connect with project management tools like Asana or Jira.
ChatGPT API: A turning point for webhooks:
The integration of the ChatGPT API has indeed manifested as a significant game changer for webhooks. In modern web development, the real-time notifications and updates enabled by webhooks have become increasingly decisive. The embracing of the ChatGPT API in webhooks acknowledges for more scalable and capable communication between applications, transforming the way developers build and integrate services. A new possibility has come to the fore due to the paradigm shift for real-time data exchange, user engagement, and automation, making webhooks a necessary tool for any modern web application. Because of this, the ChatGPT API has set a new benchmark for webhook-based integrations.
Tailored to your specific needs, you can create a cohesive and automated workflow by leveraging these integrations.
Conclusion:
The communication of your application can be transformed by embracing webhooks, leading to more proficient and responsive operations. Not binding by anything the possibilities are vast and impactful whether you're connecting Slack, GitHub, or other services.
Stay Ahead of the Curve:
At Coredge.io , we're vehement about assisting businesses in staying ahead of the curve when it comes to the latest tech trends. Whether you're looking to learn more about webhooks, APIs, or conversational AI, we've got you covered.
Follow us for more insights and updates on the world of tech!
0 notes
Text
How To Setup TradingView Custom Indicator Alerts: A Comprehensive Guide

TradingView has revolutionized trading with its intuitive charting tools, social features, and powerful indicators. Among these powerful features, TradingView Custom Indicator Alerts stand out for their ability to deliver timely notifications, helping traders react swiftly and strategically to market changes.
What are TradingView Custom Indicator Alerts?
TradingView Custom Indicator Alerts allow traders to set personalized notifications based on specific conditions defined within their custom indicators. These alerts can be delivered via email, SMS, or app notifications, ensuring traders never miss critical trading signals.
Benefits of Using Custom Indicator Alerts on TradingView
Real-time Notifications: Stay informed instantly when your indicator conditions are met.
Customizable Criteria: Define alerts based on tailored criteria from any indicator you use or create.
Improved Trading Efficiency: Reduce screen time by automating notifications, allowing more time for strategy analysis and decision-making.
Enhanced Trading Discipline: Stick to your trading plan by receiving precise alerts, avoiding emotional or impulsive trades.
How to Set Up TradingView Custom Indicator Alerts
Follow these simple steps to configure your custom indicator alerts:
Open TradingView Chart: Choose the chart and indicator you want alerts for.
Access Alert Configuration: Click on the Alert (clock) icon at the top right of the chart interface.
Define Alert Conditions: Select your custom indicator from the condition dropdown. Set specific conditions and threshold values triggering alerts.
Choose Notification Method: Select your preferred notification method—email, SMS, webhook, or app notification.
Confirm and Activate: Click ‘Create’ to activate the alert.
Best Practices for Custom Indicator Alerts
Clearly Define Criteria: Ensure your alert conditions are specific and aligned with your trading strategy.
Test and Refine: Regularly test your alerts to ensure reliability and effectiveness.
Combine Indicators: Integrate multiple indicators for robust and confirmed trading signals.
Avoid Overloading: Limit the number of alerts to manage focus and clarity.
Automating Your TradingView Alerts
To efficiently manage and automate your TradingView alerts, consider advanced alert management tools such as TV Alerts Manager. TV Alerts Manager simplifies the automation of TradingView custom indicator alerts, ensuring timely and efficient notification delivery, streamlining your trading experience.
Final Thoughts
TradingView Custom Indicator Alerts are an essential tool for traders aiming to boost trading precision, efficiency, and profitability. Leverage the full potential of custom alerts by integrating automation and effective management practices. For advanced alert management solutions, visit tvalertsmanager.com today.
0 notes
Text
Smarter Schalter für Gleichspannung: Der Shelly i4 DC im Detail

Wer sein Smart Home mit intelligenten Schaltern erweitern möchte, stößt schnell auf die Shelly-Serie. Mit dem Shelly i4 DC bietet Shelly eine spezielle Version des beliebten Shelly i4, die ausschließlich für Gleichspannung (DC) im Bereich von 5 bis 24V ausgelegt ist. Achtung: Im Gegensatz zur AC-Variante des Shelly i4, die für Netzspannung von 110 bis 240V geeignet ist, darf der Shelly i4 DC keinesfalls an Wechselspannung (AC) betrieben werden! https://youtu.be/XHFnV_hSHxE Dieses Gerät eignet sich ideal für Niederspannungsanwendungen, sei es zur Steuerung von Niedervolt-Schaltkreisen, Mikrocontroller-Systemen oder Gleichstrominstallationen in Fahrzeugen, Solaranlagen und Industrieumgebungen.
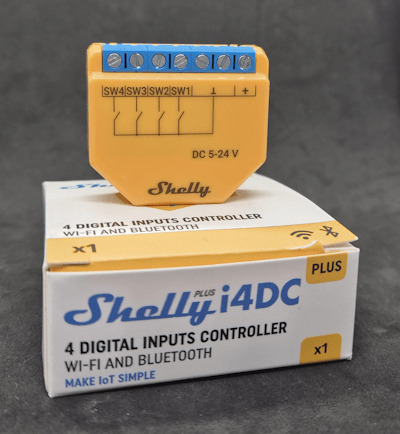
Shelly i4 DC

Shelly i4 DC - Schraubklemmen

Shelly i4 DC - Rückseite
Einsatzzweck des Shelly i4 DC
Der Shelly i4 DC besitzt vier Eingänge, die als digitale Schalter für Smart-Home-Systeme dienen. Er kann keine Verbraucher direkt schalten, sondern sendet die Schaltsignale über WLAN oder MQTT an andere Shelly-Geräte mit Relais wie den Shelly 1 Plus oder den Shelly 1PM Mini, der zusätzlich Strom, Spannung und Leistungsaufnahme messen kann. Durch diese Funktion eignet sich der Shelly i4 DC ideal für die folgenden Anwendungen: - Taster-Integration für Shelly-Relais Der Shelly i4 DC kann als externer smarter Taster für Shelly-Relais fungieren. Beispielsweise kann ein herkömmlicher Taster mit 12V oder 24V angeschlossen werden, dessen Signal dann über WLAN an ein Shelly 1 Plus oder Shelly 1PM Mini weitergeleitet wird. Damit lassen sich Lampen, Ventilatoren oder andere Verbraucher gezielt steuern – ohne direkte Verkabelung zwischen Schalter und Verbraucher. - Erweiterung für Mikrocontroller-Projekte (Arduino, ESP32) In Arduino- oder ESP32-Projekten kann der Shelly i4 DC als smarte Eingabe-Schnittstelle genutzt werden. Über MQTT oder Webhooks lassen sich Signale an den Mikrocontroller senden, um bestimmte Aktionen zu triggern, etwa das Aktivieren einer LED-Anzeige, das Speichern von Sensordaten oder das Starten eines Motors über ein externes Relais. - Smarte Steuerung in 12V- oder 24V-Systemen (Wohnmobile, Solaranlagen) In Wohnmobilen, Booten oder Solaranlagen gibt es oft Niederspannungs-Systeme mit 12V oder 24V. Der Shelly i4 DC kann dort als Taster-Schnittstelle eingesetzt werden, um beispielsweise über WLAN ein Shelly-Relais zu steuern, das die Beleuchtung schaltet oder eine Solarbatterie umschaltet. - Virtuelle Szenen-Steuerung mit Home Assistant & Co. Der Shelly i4 DC kann in Smart-Home-Systeme wie Home Assistant, ioBroker oder MQTT eingebunden werden, um komplexe Automatisierungen zu ermöglichen. Beispielsweise könnte ein Taster am Shelly i4 DC eine Lichtszene aktivieren, eine Jalousie fahren oder einen Alarm-Modus schalten – alles ohne direkt mit der jeweiligen Hardware verbunden zu sein.
Technische Daten
Der Shelly i4 DC ist ein smarter Eingangsschalter für Gleichspannung (5–24V) mit vier unabhängigen Eingängen. Er unterstützt WLAN (2,4 GHz) und Bluetooth 4.2 und ermöglicht die Steuerung von Smart-Home-Geräten über MQTT, Webhooks oder Skripting. Stand 16.02.2025 gibt es keine Gen3-Version, sondern nur die Gen2-Variante, die mit einem etwas älteren ESP32-U4WDH ausgestattet ist. Für die Hauptfunktion des Geräts – die Weiterleitung von Schaltsignalen – reicht die Rechenleistung jedoch vollkommen aus. KategorieTechnische DatenBetriebsspannung5–24V DCLeistungsaufnahmeEingänge4 digitale Taster-EingängeProzessor (MCU)ESP32-U4WDHSpeicher4 MB FlashKommunikationWLAN 2,4 GHz (802.11 b/g/n), Bluetooth 4.2RF LeistungUnterstützte ProtokolleMQTT, Webhooks, SkriptingGehäusegröße (HxBxT)37 × 42 × 16 mmGewicht17 gUmgebungstemperatur-20 °C bis 40 °CLuftfeuchtigkeit30 % bis 70 % RHMontageUnterputz, WanddoseAnschlussklemmen0,5–1,5 mm² Leiterquerschnitt, max. 0,4 Nm Drehmoment Die offizielle Dokumentation findest du unter https://www.shelly.com/de/products/shelly-plus-i4-dc dort gibt es derzeit auch die Möglichkeit einpaar Prozente zu sparen ;). Erweiterungsmöglichkeiten und Reset-Funktion Auf der Rückseite befindet sich die Schnittstelle für das bekannte Shelly AddOn. Über diese Erweiterung lassen sich analoge und digitale Sensoren anschließen und auswerten, wodurch der Funktionsumfang des Geräts erheblich erweitert werden kann.

Rückseite des Shelly i4 DC Ebenfalls auf der Rückseite befindet sich der Reset-Taster, mit dem das Gerät bei Bedarf neugestartet werden kann. Hält man die Taste länger gedrückt, wird der Shelly auf die Werkseinstellungen zurückgesetzt – praktisch, falls Probleme auftreten oder eine neue Konfiguration notwendig ist.
Vergleich mit dem Shelly i4 für Wechselspannung
Auf meinem Blog habe ich bereits den Shelly i4 AC der dritten Generation in verschiedenen Beiträgen vorgestellt. Dabei habe ich gezeigt, wie sich das Gerät in unterschiedliche Smart-Home-Umgebungen integrieren lässt und welche praktischen Einsatzmöglichkeiten es bietet. Falls du mehr über die bisherigen Anwendungen erfahren möchtest, findest du hier eine Übersicht der relevanten Beiträge: - Shelly i4 Gen3 im Test: Vier Eingänge, unendliche Möglichkeiten - Shelly i4 und Shelly Wall Switch: Intelligente Szenen für smarte Gerätesteuerung

Shelly i4 Version für Wechselspannung und Gleichspannung Ein wesentlicher Unterschied zwischen den beiden Varianten ist die Betriebsspannung: - Der Shelly i4 AC ist für Wechselspannungen zwischen 110 und 240V ausgelegt. - Der Shelly i4 DC hingegen arbeitet mit Gleichspannungen zwischen 5 und 24V und darf nicht an Wechselspannung betrieben werden. Zusätzlich gibt es den Shelly i4 für Wechselspannung bereits in der dritten Generation (Gen3). Diese neue Version ist optisch unter anderem daran zu erkennen, dass die Anschlussklemmen schwarz sind und mit Kreuzschrauben befestigt werden. Die DC-Variante gibt es bisher (Stand 16.02.2025) nur in der zweiten Generation (Gen2). Hier ist eine übersichtliche Tabelle mit den wesentlichen Unterschieden zwischen dem Shelly i4 AC und dem Shelly i4 DC: MerkmalShelly i4 AC (Gen3)Shelly i4 DC (Gen2)Betriebsspannung110–240V AC, 50/60 Hz5–24V DCStromverbrauchMicrocontroller (MCU)ESP-Shelly-C38FESP32-U4WDHFlash-Speicher8 MB4 MBAnschlussklemmenSchwarz, KreuzschraubenNeon Orange, SchlitzschraubenLeiterquerschnitt0.2–2.5 mm² / 24–14 AWG0.5–1.5 mm² / 20–16 AWGMax. Drehmoment der Klemmen0.4 Nm / 3.5 lbin0.4 Nm / 3.5 lbinAbisolierlänge6–7 mm5–6 mmGehäusefarbeOrangeNeon Orange (Pantone 2010C)Gewicht19 g17 gWLAN-Protokoll802.11 b/g/n802.11 b/g/nWLAN-Frequenzband2401–2483 MHz2400–2495 MHzBluetooth4.2 mit BLE4.2Bluetooth ReichweiteBis zu 10 m (indoor), 30 m (outdoor)Bis zu 10 m (indoor), 30 m (outdoor)MQTT-UnterstützungJaJaWebhooks (URL-Actions)20 mit 5 URLs pro Hook20 mit 5 URLs pro HookScriptingJaJaInterner TemperatursensorJaJa
Praktischer Einsatz: Fenster- und Türüberwachung mit Reed-Kontakten
Ein idealer Anwendungsfall für den Shelly i4 DC ist die Überwachung von Fenstern und Türen mithilfe von Reed-Kontakten. Diese magnetischen Sensoren erkennen, ob ein Fenster oder eine Tür geöffnet oder geschlossen ist. Durch den Anschluss der Reed-Kontakte an die Eingänge des Shelly i4 kann das Gerät den Status erfassen und über WLAN an ein Smart-Home-System wie Home Assistant, ioBroker oder MQTT weiterleiten. Mögliche Szenarien: - Smarte Alarmanlage: Bei einem unbefugten Öffnen wird eine Benachrichtigung an das Smartphone gesendet oder eine Sirene ausgelöst. - Lichtsteuerung: Das Licht im Raum schaltet sich automatisch an, wenn eine Tür geöffnet wird. - Fenster-Check für Heizungssteuerung: Falls ein Fenster geöffnet ist, wird die Heizung automatisch heruntergeregelt, um Energie zu sparen. Da der Shelly i4 DC ausschließlich mit Gleichspannung (5–24V) arbeitet, eignet er sich hervorragend für batteriebetriebene oder Niederspannungs-Überwachungssysteme. Damit bietet er eine einfache, aber leistungsstarke Möglichkeit zur smarten Fenster- und Türüberwachung. Für den Aufbau der kleinen Schaltung verwende ich nachfolgende Bauteile: - einen Shelly i4 DC* - vier Reed-Kontakte* - ein Universalnetzteil* - diverse Kabel Hinweis von mir: Die mit einem Sternchen (*) markierten Links sind Affiliate-Links. Wenn du über diese Links einkaufst, erhalte ich eine kleine Provision, die dazu beiträgt, diesen Blog zu unterstützen. Der Preis für dich bleibt dabei unverändert. Vielen Dank für deine Unterstützung!

Shelly i4 DC mit Universalnetzteil Wie funktioniert ein Reed-Kontakt? Ein Reed-Kontakt ist ein magnetisch gesteuerter Schalter in einer Glasröhre. Ohne Magnet bleibt der Kontakt offen. Nähert sich ein Magnet, ziehen sich die Metallzungen an und schließen den Stromkreis. Entfernt sich der Magnet, öffnet der Kontakt wieder. Perfekt für Tür-/Fensterüberwachung mit dem Shelly i4 DC.

Reed Kontakt als einfaches Bauteil Einrichtung in der Shelly Smart Control App Der Shelly i4 DC lässt sich, wie alle anderen Shelly-Geräte, bequem in der Shelly Smart Control App einrichten. Der Einrichtungsprozess unterscheidet sich nicht wesentlich von anderen Shelly-Geräten. Falls du eine detaillierte Anleitung sehen möchtest, schau dir mein Video zur Einrichtung des Shelly 2PM an – der Ablauf ist nahezu identisch! 🎥⬇️ https://youtu.be/SgIFZ1vCXxY Nutzung außerhalb des lokalen WLANs Möchtest du deinen Shelly außerhalb deines Heimnetzwerks betreiben, etwa in einem Wohnwagen, kannst du die Einbindung ins WLAN überspringen. Stattdessen lässt sich der Shelly auch über seine integrierte Web-Oberfläche steuern. Dazu einfach: - Mit dem vom Shelly bereitgestellten Access Point verbinden. - Im Browser die IP-Adresse 192.168.33.1 eingeben. So kannst du den Shelly direkt lokal konfigurieren und bedienen, ohne Internetverbindung. 🚀 Anschluss eines Reed-Kontakts an den Shelly Der Anschluss eines Reed-Kontakts am Shelly ist denkbar einfach: - Der Reed-Kontakt hat nur zwei Drähte, die nicht vertauscht werden können. - Ein Draht wird mit dem Minuspol (GND) des Shelly verbunden. - Der andere Draht kommt an einen der vier Eingänge (SW1–SW4).
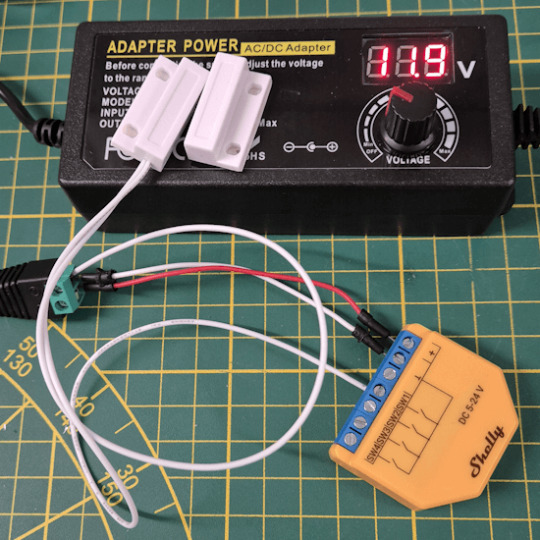
Shelly i4 DC mit Reed-Kontakt an SW1

Schaltung - Shelly i4 DC mit Reed-Kontakt In der Shelly-Software ist keine zusätzliche Konfiguration erforderlich – der Kontakt wird direkt erkannt und kann für Automationen genutzt werden. 🔧✅

Shelly i4 DC - Reed-Kontakt - ON
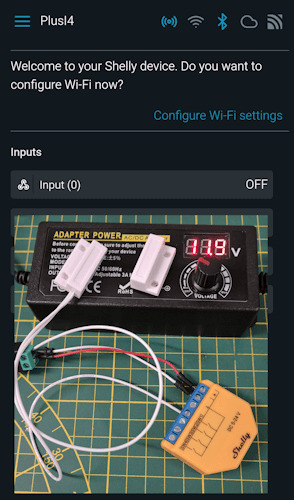
Shelly i4 DC - Reed-Kontakt - OFF Mit sollch einem Reed-Kontakt könnte man ebenso nun den bereits gezeigten smarten Briefkasten nachbauen, du bräuchtest, somit lediglich eine Stabile Spannung zwischen 5 und 24V neben diesem. Worauf muss man bei Reed-Kontakten achten? Reed-Kontakte sind empfindliche Schalter für geringe Ströme und sollten entsprechend vorsichtig eingesetzt werden. Hier sind die wichtigsten Punkte, die du beachten solltest: - Maximale Strom- und Spannungsbelastung - Reed-Kontakte sind nicht für hohe Ströme ausgelegt. Üblicherweise liegt die Belastungsgrenze im Milliampere- bis niedrigen Ampere-Bereich. - Zu hohe Ströme oder Spannungsspitzen können die Kontaktzungen verschweißen, sodass der Schalter dauerhaft geschlossen bleibt. - Einsatz mit Shelly i4 DC - Der Shelly arbeitet mit niedriger Spannung und minimalem Stromfluss, weshalb Reed-Kontakte hier sicher verwendet werden können. - Sie dienen lediglich als Eingabeschalter, sodass keine Last über den Kontakt selbst fließt. - Entprellung und Kontaktalterung - Mechanische Schwingungen beim Schließen des Kontakts können kurzzeitige Mehrfachschaltungen auslösen (Prellen). - Moderne Mikrocontroller und Smart-Home-Geräte wie der Shelly filtern diese Störungen meist automatisch. - Magnetposition beachten - Damit der Reed-Kontakt zuverlässig schaltet, muss der Magnet korrekt ausgerichtet sein. - Ein zu starker Magnet kann den Kontakt dauerhaft geschlossen halten.
Fazit und Ausblick
Der Shelly i4 DC ist eine leistungsstarke Ergänzung für Smart-Home-Systeme, insbesondere in Niederspannungsumgebungen wie Wohnwagen, Solaranlagen oder batteriebetriebenen Schaltungen. Durch die Möglichkeit, Taster oder Sensoren zu integrieren und Signale per WLAN oder MQTT weiterzugeben, lässt er sich vielseitig einsetzen. Da ich selbst keinen Wohnwagen habe und meine Solaranlage autark arbeitet, werde ich den Shelly in meinem nächsten Mikrocontroller-Projekt mit dem Arduino UNO R4 und dem "Plug and Make Kit" einsetzen. Ich bin gespannt, welche neuen Möglichkeiten sich dabei ergeben und werde die Ergebnisse im nächsten Beitrag vorstellen! 🚀 Read the full article
0 notes
Text
A Practical Guide To Using WhatsApp Business API
WhatsApp Business API has transformed how businesses communicate with their customers. Offering a scalable solution, this API empowers organizations to manage customer interactions efficiently and provides a comprehensive platform for automating communication, delivering notifications, and offering real-time customer support. Let’s delve into the key aspects of WhatsApp Business API and how businesses can leverage its potential.

Key Features of WhatsApp Business API
WhatsApp Business API brings several powerful features designed to enhance business communication and customer experience:
1. Automated Messaging: The API allows businesses to send quick replies, greetings, and away messages. By automating routine interactions, businesses can save time and improve response times for customer inquiries.
2. Rich Media Support: Beyond text-based messaging, the API supports multimedia content, allowing businesses to share images, videos, PDFs, and more. This feature makes it easier for businesses to provide detailed product information or share promotional content.
3. Analytics & Reporting: With built-in analytics, businesses can track message status, such as whether it was delivered or read. These insights help companies optimize their messaging strategies and improve customer engagement.
4. Customer Support: The API supports real-time assistance, allowing businesses to manage customer inquiries, complaints, and requests through messaging. Integrated ticketing systems make the process seamless.
5. Multi-Agent Support: Businesses can assign multiple users to manage a single account, ensuring customer queries are handled promptly, even in high-demand periods.
Acquiring WhatsApp Business API: Steps to Follow
To utilize WhatsApp Business API, businesses need to partner with a WhatsApp Business Solution Provider (BSP). The process generally involves:
1. Choosing a BSP: Depending on your business’s size and location, you’ll need to select a BSP that fits your needs. Pricing and support levels vary by provider and region.
2. Business Verification: You’ll need to submit official business verification documents to ensure authenticity. This is a critical step for businesses seeking to build trust with their customers.
3. Pricing: The cost of WhatsApp Business API depends on the BSP, volume of messages sent, and your region. Generally, the monthly cost ranges between ₹4,000 to ₹8,000.
Integration Process: How to Set Up WhatsApp API
Integrating WhatsApp Business API is straightforward, especially with the help of a BSP. The typical steps include:
1. Account Setup: Create a WhatsApp Business account with the help of your BSP and verify the business.
2. API Integration: Follow the BSP’s instructions to integrate the API into your business systems using REST APIs.
3. Configure Webhooks: Webhooks enable real-time automation of responses, streamlining communication with customers.
Promotional vs. Transactional Messages
WhatsApp Business API supports both promotional and transactional messaging:
Promotional Messages: These are marketing messages sent with customer consent, offering discounts or announcing new products.
Transactional Messages: Used for critical notifications such as order confirmations, shipment updates, and OTPs. These require pre-registered templates to avoid being marked as spam.
WhatsApp Blue Tick: Enhancing Credibility
The WhatsApp Blue Tick is a verification badge that appears next to a business's name, signaling that WhatsApp has verified the business. To get this badge:
- You must have a WhatsApp Business API account.
- Complete business verification.
- Submit a request for verification to WhatsApp.
- Only businesses that meet WhatsApp's standards for reputation and authenticity receive the blue tick.
WhatsApp Chatbots: A Game-Changer for Customer Support
A WhatsApp Chatbot is an AI-powered tool that allows businesses to handle customer inquiries without human intervention. By integrating a chatbot with the WhatsApp Business API, businesses can provide 24/7 support, automate order processing, and improve customer satisfaction.
Chatbots can be configured using predefined rules or AI for natural conversations, and pricing varies depending on complexity, ranging from ₹1,500 to ₹10,000 per month.
Estimated Costs for WhatsApp API Usage
- API Subscription: ₹4,000 to ₹8,000 per month.
- Message Charges: ₹0.20 to ₹0.70 per message in India, depending on the type of message (session or template).
- Blue Tick: Free but requires approval.
- Chatbot: ₹1,500 to ₹10,000+ depending on features.
In conclusion, the WhatsApp Business API offers powerful tools for businesses looking to enhance customer communication, automate processes, and build credibility through features like blue tick verification and chatbots. By leveraging these solutions, businesses can streamline their operations, provide better customer service, and engage audiences through personalized and scalable messaging. Although the costs associated with WhatsApp API, messaging, and chatbots can vary, investing in these tools offers significant potential for growth, especially in the Indian market.
There are many service providers, however, with careful planning and choosing the right service provider, businesses can unlock the full potential of WhatsApp business API. It is worth nothing that Dove Soft Ltd, a leading cloud communication solutions provider is known for its trusted & dynamic whatsapp platform for both transactional and promotional communication.
*the pricing mentioned in the article is only indicative, however, the actual prices may vary.
0 notes
Text

Challenge 50,000 fifty thousand dollars in management - prop company.
Challenge 50,000 fifty thousand dollars in management - prop company. The point is that you undergo training, pass an exam on the testnet of a leading exchange on commissions on MEXC futures, and after trading with small real money, you receive an amount from 1,000 to 50,000 US dollars to manage in order to earn profit. You will need to gradually confirm your qualifications so that I, as a guarantor and your risk manager, will be convinced of your competence and quality of trades (correctly executed trading operations in accordance with the trading instructions I transmit to you - a clear strategy, there is an example in the @dogestop challenge)
Download the book for free - my manual - instructions for careful trading of Bitcoin on futures, written by me back in 2018, but shortened and improved in essence - the very strategy of trading on the cryptocurrency exchange with the BTCUSDT trading pair, which allows you to learn to control emotions and risks and still force yourself not to be greedy and follow my rules established by gurus and experts in the field of making money trading with leverage (cross margin x21 - i.e. having 1000 dollars you make a purchase of 21000 minus costs (trading commission in in the amount of 0.01% of this amount, which is 2.1 dollars for opening and 2.1 for closing + a small spread - in a quiet market the spread on average differs by 5 dollars difference, in a mega-active market - quick losses and price rises, which is the main reason - knocking out stops, from 5 to even 20 dollars difference in price, i.e. with a bet of 21 thousand dollars this is + 20 dollars in a commission of 2.1% and you need to be prepared for this).
Course worth 10k USDT - free
The training course, for which the so-called trading gurus, ala Gerchik, pay from 7 to 20 thousand dollars, is provided completely free of charge for my referrals (those who have subscribed to my referral links for the challenge on the MEXC GATEIO GOODCRYPTO robot exchanges).
Statistics from screenshots - profitability 200-300% per month
I show you real reports from my trading deposits, where I trade orders for 5-10-20 and up to 2 million dollars and show positive statistics on the growth and expansion of the deposit. This is all true and real trading operations, which I confirm with official statistics from the exchange and which are stored in the exchange account forever and are available for online demonstration.
Trading robots Moonbot and GoodCrypto, moontrader, special scripts for browser trading (Python), hooks for TradingView transmitting signals from PineScript to Moonbot for trading automation (autotrading, instructions are given in the second test manual provided from one of the trading schools).
Ready-made strategies for moonbot and moontrader, which allow you to automate earnings and teach the client how to earn income from auto-trading cryptocurrency. These products are expensive to purchase - a moonbot costs 0.15BTC and a moontrader subscription costs $100 per month. But for beginners, I recommend GoodCrypto VISA payment, the cost is $299, lifetime license. The reason for preference is the official product with a guarantee, and not just a boxed version from the anonymous creators of moonbot and moontrader. You decide. I use both products, incl. Python scripts, webhooks and I hire programmers and traders to improve their trading algorithms and indicators.
Bonuses for registration and KYC up to $500 per 10k deposit and up to 100 per $1500 deposit. I am officially the chairman of the MEXC and GATEIO exchanges and provide my clients with amazing promotions and discounts - such as a deposit of 10k USDT MEXC + $500 discount on futures trading commission. There are similar promotions on GATEIO, which I regularly publish in my channel @dogestop
Since February 2024, I have been running a YouTube channel and podcast, links to which I provide in the channel and you can view unique author’s information from a trading expert, a professional in his field and a guru of both spot and futures algorithmic trading. My nickname on telegram is @niko21mln and on social networks YouTube, Tiktok, Instagram, Twitter, etc. 21mln (21mlns).
0 notes
Text
Google Search Central Ehemals Webmasters Web SEO Ressourcen
Inhaltverzeichnis
Tägliche Uptime-Berichte
Verwenden Sie Anfrage- Und Antwort-Header, Um Tief Zu Graben
Brauchen Sie Hilfe Bei Den Ersten Schritten Mit WordPress?
Nutzen Sie SMS, E-Mail, Sprache, Webhooks oder Integrationen mit Tools wie PagerDuty und Slack. Mit der Uptrends-Berichterstattung erhalten Sie die Daten, die Sie benötigen, um Problemstellen und Leistungstrends zu erkennen. Sie erhalten Diagramme und Daten, die Ihnen helfen, Leistungstiefs über Tage, Wochen und Monate zu erkennen. Wäre es nicht schön, wenn wir alle immer superschnelle Verbindungen hätten? Deshalb stellen wir sicher, dass Sie die Verbindungsgeschwindigkeit Ihres Tests drosseln können. Durch die Drosselung erhalten Sie eine bessere Darstellung der Leistung Ihrer Website über verschiedene Netzwerkverbindungen hinweg.
Eine hochwertige Hosting-Lösung kann dazu beitragen, all diese Probleme zu reduzieren und Ausfallzeiten zu vermeiden. Um dieses Tool nutzen zu können, müssen Sie sich für ein kostenloses Konto anmelden. Bei der Anmeldung werden Sie aufgefordert, die erste Website anzugeben, die Sie überwachen möchten. Sobald Sie eingeloggt sind, sehen Sie Ihre Website auf dem Dashboard.
Daher wird das Tool immer dann aktualisiert, wenn der Algorithmus zur Überprüfung des Google-Site-Scores geändert und veröffentlicht wird. Verwenden Sie unser Keyword-Ranking-Tool, um Ihre Position in den Suchmaschinen für jeden beliebigen Suchbegriff zu überprüfen. Sehen Sie sich die Platzierungen in bestimmten Städten oder Regionen sowie die Platzierungen für Mobilgeräte oder Desktops an. Der kostenlose Website-Geschwindigkeitstest von Uptrends gibt Ihnen eine Momentaufnahme davon, wie Ihre Desktop- oder mobilen Benutzer Ihre Website erleben. Sie erhalten alles, was Sie brauchen, um intelligente leistungsbezogene Entscheidungen über Ihre Website und deren Inhalt zu treffen.
Überschriften, Kopfzeilen oder h-Tags sind HTML-Elemente, die auf einer Webseite verwendet werden und auch für die Platzierung in Suchmaschinen sehr wichtig sind. Sie werden in absteigender Reihenfolge ihrer Bedeutung unterschieden, vom SEO-Haupttitel h1 bis zu den Unterüberschriften h2 bis h6. Überschriften-Tags ermöglichen im Wesentlichen die Benennung und Strukturierung verschiedener Inhaltsabschnitte. Wenn sie klar formuliert sind und hochrelevante Schlüsselwörter enthalten, dienen die Überschriften-Tags als positive SEO-Signale. Mit dem SEO-Site-Checkup von IONOS können Sie herausfinden, wie Ihre h-Tags aus Sicht der Suchmaschinen abschneiden und wo es Verbesserungspotenzial gibt.

Semrush.com bietet auch eine kostenlose Version von Webseitenverkehrsstatistiken an.
Bei fast allen guten Webhostern können Sie auch Ihre Betriebszeitstatistiken einsehen.
Sie sehen Tests für den Status der Betriebszeit, die Validierung von SSL-Zertifikaten, defekte Links und gemischte Inhalte.
Mit dem kostenlosen Website-Geschwindigkeitscheck können Sie aus 10 Standorten weltweit wählen (melden Sie sich an und erhalten Sie Zugang zu 233 Checkpoints).
Sie können auch nach Vertrauensmarken von bekannten Unternehmen wie Verisign, McAfee und PayPal Ausschau halten.
Seit mehr als einem Jahrzehnt durchforsten wir das gesamte Web und entwickeln professionelle SEO-Tools, um Menschen bei der Optimierung ihrer Websites zu helfen.
Auch die Seitenbeschreibungen, die sogenannten Meta-Descriptions, werden von unserem SEO-Checker erfasst. Sie erhalten wichtige Informationen über die Optimierung dieser Meta-Tags. Sie werden in den SERPS unterhalb des Seitentitels angezeigt und dienen dazu, den Inhalt der Seite kurz und informativ zusammenzufassen. Damit sind Meta-Description-Tags sowohl für eine gute Suchmaschinenoptimierung als auch für die Förderung von Klicks durch den Nutzer von Bedeutung. Sie sollten immer einzigartig sein und nicht mehr als 160 Zeichen enthalten, damit sie von der Suchmaschine nicht gekürzt werden, können aber Sonderzeichen enthalten, um das Interesse der Leser zu wecken. Unser SEO-Checker-Tool führt eine Meta-Beschreibungsanalyse durch und zeigt Ihnen zum Beispiel, wie viele Seiten auf Ihrer Website doppelte Beschreibungen oder gar keine Beschreibung haben.
Tägliche Uptime-Berichte
Ein weiteres kostenloses Tool, Down for Everyone or Just Me, zeigt Ihnen, ob Sie der Einzige sind, der Probleme mit Ausfallzeiten hat, oder ob alle ein Problem haben. Wenn Sie eine IP-Adresse anpingen, senden Sie ein "Signal" an sie. Wenn die IP-Adresse antwortet, wissen Sie, dass sie betriebsbereit ist. Sie sollten schnell mehrere Antworten erhalten, mit einer Zeitangabe neben jeder Antwort. Jeder, der eine Website besitzt und betreibt, hat entweder SEO-Tools verwendet oder von ihnen gehört, sie aber nicht auf der Website angewendet. SEO ist die gebräuchliche Abkürzung für Search Engine Optimization (Suchmaschinenoptimierung).
Bei größeren Problemen können Sie gegen eine geringe Gebühr eine zweite, detailliertere SEO-Audit-Checkliste erhalten. Mit der erweiterten Verfügbarkeitsüberwachung können Sie alle verschiedenen Aspekte Ihrer Webpräsenz verfolgen, und vergessen Sie nicht, Ihre APIs und Webanwendungen auf vollständige Interaktionen zu überwachen. Sie können das alles 30 Tage WordPress Templates lang kostenlos testen, ohne Kreditkarte und ohne jegliche Verpflichtung.

youtube
Verwenden Sie Anfrage- Und Antwort-Header, Um Tief Zu Graben
Testen Sie die Leistung, Funktionalität und Betriebszeit von Websites, Webanwendungen, Servern und APIs. Kostenlos für bis zu 250 Tests pro Monat von fünf gleichzeitigen Standorten aus. Der Website-Checker liefert nur Informationen darüber, ob Ihre Seite in Suchmaschinen wie Google sichtbar ist. Darüber hinaus erhalten Sie einen Überblick darüber, wie Ihre Seite in den Suchergebnissen angezeigt wird.
Ahrefs liefert uns detaillierte und tiefgehende Daten, die wir für strategische Entscheidungen benötigen. Google Search Central, ehemals Google Webmasters, ist dazu da, den richtigen Leuten zu helfen, Ihre Inhalte zu sehen, mit Ressourcen, die Ihre Website für die Google-Suche auffindbar machen. Er vereinfacht meine täglichen SEO-Optimierungen und -Berichte erheblich. Um Ausfallzeiten zu vermeiden, müssen Sie wissen, was die Ursache dafür ist. Um festzulegen, wie oft diese Tests durchgeführt werden, klicken Sie auf die hinzugefügte Website und dann auf die Schaltfläche Zuverlässigkeitsstatus.
HTTP-Statuscodes, die von Servern zurückgegeben werden, geben den Status der Website an. Sie sind dreistellig und beginnen in der Regel mit einer der fünf Zahlen 1 - 5. Sie kennen vielleicht 404-error ('Seite nicht gefunden') oder 200 ('OK'). Aber es gibt noch viele andere Statuscodes, die Ihnen vielleicht unbekannt sind. Werfen Sie einen Blick auf unseren Server-Status-Checker, um mehr über sie zu erfahren. Finden Sie potenzielle Kunden anhand der von ihnen verwendeten Technologien.
0 notes
Text
Revolutionizing Discord for Traders: The All-in-One Finance Bot

In today’s fast-paced financial markets, having quick access to real-time data, trade insights, and the ability to share trades with a like-minded community is invaluable. That’s where NVSTly’s Discord bot comes in. It’s more than just a bot — it’s a powerful tool for social trading, designed to help traders and investors track their trades, share insights, and collaborate with others in real-time, all within Discord.
What the NVSTly Discord Bot Does
NVSTly’s Discord bot is built with the goal of making financial data and trading insights easily accessible to the entire trading community on Discord. Whether you’re a seasoned trader or just starting, the bot helps you stay on top of your trades and market trends. Some of the key features of the bot include:
Real-Time Trade Tracking & Sharing: The bot tracks your trades and allows you to share them with others. Whether you’re trading stocks, options, forex, or cryptocurrencies, your trades are instantly shared with your followers and can be posted to social media or sent through Discord DMs or webhooks, fostering a transparent and collaborative environment.
Trader Stats & Performance Recaps: The bot generates visual reports of your trading performance, including win rates, total gains, and individual trade stats. You can view a trader’s daily, weekly, or monthly recaps, complete with details on stock tickers, options info, and profit/loss calculations.
Market Data & Charts: Get instant access to live market data, stock charts, and detailed information on tickers. The bot provides a variety of commands for stock price movements, charts, and other data, with plans to expand this to cover more markets in the future.
Comprehensive Coverage: The bot currently supports stocks, options, forex, and crypto for trade tracking and sharing. Futures markets are also planned for the future. While the bot supports these markets for trade tracking, data-related features like market sentiment analysis or earnings reports will be available in the future.
How the Bot Integrates with NVSTly’s Social Trading App
The NVSTly Discord bot is fully integrated with the NVSTly social trading app, creating a seamless experience for users across platforms. Traders can track their trades on the app, and the bot will automatically share those trades directly with their followers, via DMs, social media, or webhooks. This integration means that everything you do on the NVSTly app can be easily shared with your community in real-time via Discord, making it simple to stay connected with your trading network.
The bot doesn’t just show trades — it also gives users insights into their trading performance and connects them with other traders for discussions, tips, and strategies. With NVSTly’s unique social features, traders can collaborate, share strategies, and learn from each other in a dynamic and interactive environment.
What’s Next for the NVSTly Discord Bot?
The future of the NVSTly Discord bot is incredibly exciting, with plans to add even more features designed to elevate the trading experience. Some of the upcoming features include:
Expanded Market Coverage for Data Commands: In addition to stocks, the bot will soon offer data-related commands for crypto, forex, and futures markets. This will allow users to access even more comprehensive market data, including earnings reports, options flow, and more.
AI & Machine Learning Integration: NVSTly plans to integrate AI and machine learning to generate trade signals, analyze market trends, and even offer personalized trading tips. This will help traders refine their strategies and make more informed decisions.
Real-Time Alerts & Notifications: Users can already receive trade alerts sent directly to their DMs from traders they follow. In the future, users will also be able to set more customized alerts based on price targets or specific market activity.
Why the NVSTly Discord Bot is Perfect for Trading Communities
Discord has become a hub for traders and investors, and the NVSTly Discord bot takes full advantage of this by providing a platform where traders can interact, share trades, and learn from one another. The bot’s ability to instantly share trade recaps and stats creates an environment of transparency and collaboration. Traders can discuss strategies, ask questions, and even challenge each other to improve their performance.
By integrating market data, charts, and trade performance tracking, the bot offers a complete package for traders on Discord. It’s not just a tool for sharing trades — it’s a vital part of a thriving trading community.
Why NVSTly’s Discord Bot is the Fastest Growing Finance Bot on Discord
With its comprehensive features and seamless integration with the NVSTly app, the NVSTly Discord bot has quickly become the go-to tool for traders on Discord. What sets it apart from other finance bots is its focus on user engagement. The bot is not just about providing data — it’s about building a community of traders who can share their experiences, insights, and successes.
Traders have flocked to the NVSTly Discord bot because it provides real-time data, easy trade tracking, and powerful analytics — all in a user-friendly format. It’s no wonder it’s quickly becoming the fastest-growing finance bot on Discord.
On Track to be the Greatest Finance Bot on Discord
NVSTly is on track to become the greatest finance bot on Discord, if it’s not already. With plans for expanding market coverage, adding advanced AI-driven features, and constantly improving its user experience, the bot is poised to revolutionize the way traders use Discord.
By offering a comprehensive set of tools that integrate seamlessly with the NVSTly app, the bot is becoming an essential resource for traders who want to stay informed, track their performance, and engage with the trading community.
NVSTly is available for free on web, mobile devices (iOS & Google Play), and is fully integrated with Discord via a unique bot- the only of it’s kind and available to any server or trading community on Discord. Or feel free to join a community of over 45,000 investors & traders on our Discod server.
#crypto#cryptocurrency#finance#fintech#forex#futures#investing#investors#stock market#stocks#Discord#Discord Bot#Bots
1 note
·
View note