#Windows Preinstallation Environment
Explore tagged Tumblr posts
Visit Tumblr Blog
Explore Tumblr blogs with no restrictions, modern design and the best experience.
Last Seen Tumblr Blogs


Fun Fact
69% of Tumblr users are millennials.
Text
Creating a WinPE USB Drive: Fixing System Boot Issues
Learn how to create a WinPE USB drive to fix system boot issues and deploy Windows on multiple machines efficiently.
Creating a WinPE USB Drive Fixing System Boot Issues Windows Preinstallation Environment (WinPE) is a lightweight version of Windows, offering limited features that make it incredibly useful for system recovery, deployment, and maintenance tasks. Whether you’re looking to troubleshoot a system that refuses to boot, or you need to deploy Windows across multiple machines, creating a bootable WinPE…
#Windows#Windows 10#Windows 11#Windows Preinstallation Environment#Windows Server#Windows Server 2016#Windows Server 2019#Windows Server 2022#WinPE
1 note
·
View note
Text
in wake of yet another wave of people being turned off by windows, here's a guide on how to dual boot windows and 🐧 linux 🐧 (useful for when you're not sure if you wanna make the switch and just wanna experiment with the OS for a bit!)
if you look up followup guides online you're gonna see that people are telling you to use ubuntu but i am gonna show you how to do this using kubuntu instead because fuck GNOME. all my homies hate GNOME.
i'm just kidding, use whatever distro you like. my favorite's kubuntu (for a beginner home environment). read up on the others if you're curious. and don't let some rando on reddit tell you that you need pop! OS for gaming. gaming on linux is possible without it.
why kubuntu?
- it's very user friendly
- it comes with applications people might already be familiar with (VLC player and firefox for example)
- libreoffice already preinstalled
- no GNOME (sorry GNOME enthusiasts, let me old man yell at the clouds) (also i'm playing this up for the laughs. wholesome kde/gnome meme at the bottom of this post.)
for people who are interested in this beyond my tl;dr: read this
(if you're a linux user, don't expect any tech wizardry here. i know there's a billion other and arguably better ways to do x y and/or z. what i'm trying to do here is to keep these instructions previous windows user friendly. point and click. no CLI bro, it'll scare the less tech savvy hoes. no vim supremacy talk (although hell yeah vim supremacy). if they like the OS they'll figure out bash all by themselves in no time.)
first of all, there'll be a GUI. you don't need to type lines of code to get this all running. we're not going for the ✨hackerman aesthetics✨ today. grab a mouse and a keyboard and you're good to go.
what you need is a computer/laptop/etc with enough disk space to install both windows and linux on it. i'm recommending to reserve at least a 100gb for the both of them. in the process of this you'll learn how to re-allocate disk space either way and you'll learn how to give and take some, we'll do a bit of disk partitioning to fit them both on a single disk.
and that's enough babbling for now, let's get to the actual tutorial:
🚨IMPORTANT. DO NOT ATTEMPT THIS ON A 32BIT SYSTEM. ONLY DO THIS IF YOU'RE WORKING WITH A 64BIT SYSTEM. 🚨 (win10 and win11: settings -> system -> about -> device specifications -> system type ) it should say 64bit operating system, x64-based processor.
step 1: install windows on your computer FIRST. my favorite way of doing this is by creating an installation media with rufus. you can either grab and prepare two usb sticks for each OS, or you can prepare them one after the other. (pro tip: get two usb sticks, that way you can label them and store them away in case you need to reinstall windows/linux or want to install it somewhere else)
in order to do this, you need to download three things:
rufus
win10 (listen. i know switching to win11 is difficult. not much of a fan of it either. but support's gonna end for good. you will run into hiccups. it'll be frustrating for everyone involved. hate to say it, but in this case i'd opt for installing its dreadful successor over there ->) or win11
kubuntu (the download at the top is always the latest, most up-to-date one)
when grabbing your windows installation of choice pick this option here, not the media creation tool option at the top of the page:

side note: there's also very legit key sellers out there who can hook you up with cheap keys. you're allowed to do that if you use those keys privately. don't do this in an enterprise environment though. and don't waste money on it if your ultimate goal is to switch to linux entirely at one point.
from here it's very easy sailing. plug your usb drive into your computer and fire up rufus (just double click it).

🚨two very important things though!!!!!!:🚨
triple check your usb device. whatever one you selected will get wiped entirely in order to make space for your installation media. if you want to be on the safe side only plug in the ONE usb stick you want to use. and back up any music, pictures or whatever else you had on there before or it'll be gone forever.
you can only install ONE OS on ONE usb drive. so you need to do this twice, once with your kubuntu iso and once with your windows iso, on a different drive each.
done. now you can dispense windows and linux left and right, whenever and wherever you feel like it. you could, for example, start with your designated dual boot device. installing windows is now as simple as plugging the usb device into your computer and booting it up. from there, click your way through the installation process and come back to this tutorial when you're ready.
step 2: preparing the disks for a dual boot setup
on your fresh install, find your disk partitions. in your search bar enter either "diskmgr" and hit enter or just type "partitions". the former opens your disk manager right away, the latter serves you up with this "create and format hard disk partitions" search result and that's what you're gonna be clicking.

you'll end up on a screen that looks more or less like in the screenshot below. depending on how many disks you've installed this might look different, but the basic gist is the same. we're going to snip a little bit off Disk 0 and make space for kubuntu on it. my screenshot isn't the best example because i'm using the whole disk and in order to practice what i preach i'd have to go against my own advice. that piece of advice is: if this screen intimidates you and you're not sure what you're doing here, hands off your (C:) drive, EFI system, and recovery partition. however, if you're feeling particularly fearless, go check out the amount of "free space" to the right. is there more than 30gb left available? if so, you're free to right click your (C:) drive and click "shrink volume"

this screen will pop up:

the minimum disk space required for kubuntu is 25gb. the recommended one is 50gb. for an installation like this, about 30gb are enough. in order to do that, simply change the value at
Enter the amount of space to shrink in MB: to 30000
and hit Shrink.
once that's done your partitions will have changed and unallocated space at about the size of 30gb should be visible under Disk 0 at the bottom like in the bottom left of this screenshot (courtesy of microsoft.com):

this is gonna be kubuntu's new home on your disk.
step 3: boot order, BIOS/UEFI changes
all you need to do now is plug the kubuntu-usb drive you prepared earlier with rufus into your computer again and reboot that bad boy.
the next step has no screenshots. we're heading into your UEFI/BIOS (by hitting a specific key (like ESC, F10, Enter) while your computer boots up) and that'll look different for everyone reading this. if this section has you completely lost, google how to do these steps for your machine.
a good search term would be: "[YOUR DEVICE (i.e Lenovo, your mainboard's name, etc.)] change boot order"
what you need to do is to tell your computer to boot your USB before it tries to boot up windows. otherwise you won't be able to install kubuntu.
this can be done by entering your BIOS/UEFI and navigating to a point called something along the lines of "boot". from "boot order" to "booting devices" to "startup configuration", it could be called anything.
what'll be a common point though is that it'll list all your bootable devices. the topmost one is usually the one that boots up first, so if your usb is anywhere below that, make sure to drag and drop or otherwise move it to the top.
when you're done navigate to Save & Exit. your computer will then boot up kubuntu's install wizard. you'll be greeted with this:

shocker, i know, but click "Install Kubuntu" on the right.
step 4: kubuntu installation
this is a guided installation. just like when you're installing windows you'll be prompted when you need to make changes. if i remember correctly it's going to ask you for your preferred keyboard layout, a network connection, additional software you might want to install, and all of that is up to you.
but once you reach the point where it asks you where you want to install kubuntu we'll have to make a couple of important choices.

🚨 another important note 🚨
do NOT pick any of the top three options. they will overwrite your already existing windows installation.
click manual instead. we're going to point it to our unallocated disk space. hit continue. you will be shown another disk partition screen.
what you're looking for are your 30gb of free space. just like with the USB drive when we were working with rufus, make sure you're picking the right one. triple check at the very least. the chosen disk will get wiped.

click it until the screen "create a new partition" pops up.
change the following settings to:
New partition size in megabytes: 512
Use as: EFI System Partition
hit OK.
click your free space again. same procedure.
change the following settings to:
New partition size in megabytes: 8000 (*this might be different in your case, read on.)
Use As: Swap Area
hit OK
click your free space a third time. we need one more partition.
change the following settings to:
don't change anything about the partition size this time. we're letting it use up the rest of the resources.
Use as: Ext4 journaling system
Mount Point: /
you're done here as well.
*about the 8000 megabytes in the second step: this is about your RAM size. if you have 4gb instead type 4000, and so on.
once you're sure your configuration is good and ready to go, hit "Install Now". up until here you can go back and make changes to your settings. once you've clicked the button, there's no going back.
finally, select your timezone and create a user account. then hit continue. the installation should finish up... and you'll be good to go.
you'll be told to remove the USB drive from your computer and reboot your machine.
now when your computer boots up, you should end up on a black screen with a little bit of text in the top left corner. ubuntu and windows boot manager should be mentioned there. naturally, when you click ubuntu you will boot into your kubuntu. likewise if you hit windows boot manager your windows login screen will come up.
and that's that folks. go ham on messing around with your linux distro. customize it to your liking. make yourself familiar with the shell (on kubuntu, when you're on your desktop, hit CTRL+ALT+T).
for starters, you could feed it the first commands i always punch into fresh Linux installs:
sudo apt-get update
sudo apt-get upgrade
sudo apt-get install vim
(you'll thank me for the vim one later)
turn your back on windows. taste freedom. nothing sexier than open source, baby.
sources (mainly for the pictures): 1, 2
further reading for the curious: 1, 2
linux basics (includes CLI commands)
kubuntu documentation (this is your new best friend. it'll tell you everything about kubuntu that you need to know.
and finally the promised kde/gnome meme:

#windows#linuxposting#had a long day at work and i had to type this twice and i'm struggling to keep my eyes open#not guaranteeing that i didn't skip a step or something in there#so if someone linux savvy spots them feel free to point them out so i can make fixes to this post accordingly#opensource posting
122 notes
·
View notes
Text
achieving ACE in the windows preinstallation environment and spamming inputs on four keyboards so that this plays when you reboot
youtube
2 notes
·
View notes
Text
Well, I guess it falls to me to try and provide some more detailed and helpful advice then.
Personally, I recommend some variant of Ubuntu because that's the one I have most first-hand experience with and it's developed specifically to be newbie-friendly. Some people also swear by Linux Mint, although I'm a bit wary of it because the devs have previously allowed the download servers to be compromised and malicious code added to the install image, although that was a few years ago now. Valve are also working on a universal desktop version of the distro they created for the Steam Deck, but that's going to be extremely gaming-focused and is still a work in progress anyway.
Anyway, as far as installing goes you'll first need a USB memory stick and a boot disk creator app. Balena Etcher is the one I use but there's many others. Download whichever Linux distro you like the look of as an ISO, plug in the thumb drive, point the app at the relevant ISO file and thumb drive and let it go to work.
Once you've done that, reboot your PC, go into the BIOS and tell it to boot from the USB drive first. You should then be presented with a splash screen asking you whether you want to install your new OS or boot into it and try it out first. I highly recommend you do this so you can get a feel for whether you like the new interface. If you don't vibe with the first one you picked, there are numerous other options: Ubuntu in particular has a variant for every major desktop environment in existence.
Once you've decided on the one you like, boot back into Windows and back up everything. It probably won't matter as long as you pay attention while the installer is running but better safe than sorry. Once that's done, boot from the USB again and follow the installer's instructions. It will ask you if you want to install alongside Windows or overwrite it, and that' is obviously's going to be a judgement call on your part but I would hang on to it initially. There is also nothing to stop you buying a second SSD for your computer and installing Linux to that for extra redundancy if you don't mind spending the money, and it's not essential but it's worth considering because drives do fail sometimes.
Once you've done that, your next steps will depend on what you want to do with your PC but the basics should require very little tinkering. You probably have Firefox and LibreOffice preinstalled and apps like Discord, Steam or Spotify should be available through the package manager. Getting Windows-only apps like Photoshop to work on Linux requires a compatibility layer known as WINE, but I'm afraid that is not something I have relevant experience with. But that's why I suggested keeping the Windows partition as a backup.
Good luck. I hope this helps.
A boy can dream, can't he?
176K notes
·
View notes
Text
“How RHosting Helps Developers Run Heavy Software on Lightweight Devices”
In an era of digital nomadism and lean tech stacks, many developers prefer lightweight laptops and minimal setups. But development often demands heavy-duty software—IDEs like Visual Studio, data analysis tools, virtual machines, container platforms, and more. The dilemma? Lightweight devices often can’t handle the workload.
That’s where RHosting’s smart RDP solution becomes a game-changer.
🧠 The Challenge: Power-Hungry Tools on Underpowered Hardware
Developers often face:
Limited CPU/RAM on personal machines
High-latency or lag with traditional remote tools
Inability to run resource-intensive IDEs, emulators, or databases locally
Security risks when transferring sensitive code or client data
This makes coding on the go—or even from home—frustrating and inefficient.
🚀 The RHosting Solution: Power in the Cloud, Access Anywhere
RHosting turns any lightweight laptop or tablet into a development powerhouse by offloading compute-intensive tasks to high-performance cloud Windows servers.
Here’s how it works:
⚙️ 1. High-Performance Cloud Servers
Spin up a cloud-based Windows environment with:
Multi-core CPUs
Generous RAM and SSD storage
Preinstalled dev tools or full customization
GPU-accelerated options (on request)
This means you can run VS Code, Android Studio, Docker, Jupyter Notebooks, or even data-heavy scripts without taxing your personal device.
🔐 2. Secure, Low-Latency Remote Access
Unlike traditional RDP, RHosting uses proprietary protocols optimized for real-time responsiveness and security:
Encrypted sessions with MFA
Fast frame rendering, even on low bandwidth
Clipboard, file transfer, and peripheral support
Developers can code, debug, and deploy as if they were sitting in front of a powerful desktop—from a Chromebook or tablet.
🛠 3. Application-Level Access (Only What You Need)
RHosting lets users access only specific apps or environments, reducing distractions and security risks.
Example: A front-end dev can access Figma, a browser, and VS Code. A data engineer gets Jupyter, Python, and data folders—nothing more.
📂 4. Folder-Level Permissions for Teams
Collaborating on a project? You can assign custom access to codebases, test environments, and shared folders—great for dev teams, agencies, or open-source contributors.
💡 Ideal Use Cases
Freelance developers working across devices
Students and coding bootcampers without high-end laptops
Remote teams collaborating on shared codebases
Enterprise developers with strict security policies
🧩 Real World: A Developer’s Day with RHosting
Log in from a thin-and-light laptop
Launch a remote Windows server with all dev tools preloaded
Run a heavy build or simulate a test environment
Save work to cloud storage, shut down server to save costs
Resume from any device—no sync issues, no lag
🎯 Conclusion: Light Device, Heavy Performance
With RHosting, your hardware no longer limits your coding potential. Whether you're building the next big app or debugging legacy systems, you can access enterprise-grade compute power securely from anywhere.
So if you’re tired of hearing your laptop fans scream every time you hit “build,” it’s time to switch to RHosting—because the smartest developers know where to offload their load.
0 notes
Link
0 notes
Text
Windows RE(Windows Recovery Environment) OSの正常起動を妨げる問題を診断・修復するためのツールを提供する回復環境
Windows REとは:システム回復のための強力な救済環境 Windows Recovery Environment(通称:Windows REまたはWinRE)は、Windowsが正常に起動できなくなった際に自動的に起動する専用の回復環境です。 Windows Vistaから導入され、現在のWindows 11まで進化を続けているこの機能は、システムの問題を診断・修復するための多彩なツールセットを備えています。 Windows REは通常、メインのOSとは別のパーティション(多くの場合、Windows OSパーティションの直後)に格納されており、Windows本体が起動できない状況でも独立して動作することができます。 Windows PEを基盤とする回復環境 Windows REはWindows Preinstallation Environment (WinPE)…
0 notes
Text
How Does Dedicated Server Hosting Work?
A client is provided a physical server that is exclusively dedicated to him with dedicated server hosting. While in shared or virtual hosting, the resources are shared between different users, a dedicated server provides all the resources that comprise the CPU, the RAM, the storage space, the bandwidth that are solely assigned for usage. Here’s an overview of how it works:
How Does Dedicated Server Hosting Work?
1. Provisioning and Setup
Choosing Specifications: Hardware requirements including CPUs cores, RAM size, storage type (SSD/HDD), network bandwidth are chosen by the client according to requirements.
Operating System Installation: The preferred OS being Linux, Windows Server and others are preinstalled in the hosting provider’s server.

Alt Text: Image showing how a dedicated server allows full control over resources
Server Management Software: Some of the additional packages: Control panel (cPanel, Plesk), Database server (MySQL, MSSQL) can be also preset.
Initial Configuration: The hosting provider sets up the network access on the server, updates the necessary security issues, and secures the appropriate firewall.
2. Access and Control
Full Root/Administrator Access: Clients fully manage the Chicago dedicated server or any location. So they can implement applications, regulate exigent services, and modify settings.
Remote Management: Remote access is usually affirmed with SSH for Linux servers and a Remote Desktop Protocol for Windows-based servers.
Control Panels (Optional): cPanel is an example of how server management on various flavors can be done through a web-based graphical interface.
3. Performance and Resources
No Resource Sharing: Everything is calculated for one client – CPU, memory, and disk usage are thus concentrated on the client.
Scalability: Unlike cloud hosting, Chile dedicated servers or any place are a little more constricted. But they can be upgraded with increased hardware or load balancers.
4. Security and Monitoring
Isolated Environment: The risks resulting from other users are also absent on the Chicago dedicated server or any geographical location. The reason is the other clients are not served on the same server.

Alt text: Image representation to show how to secure a dedicated server
DDoS Protection and Firewalls: Web hosts who offer such services provide various security features to counteract cyber threats.
Monitoring Tools: Through the dashboard or some other tool, a Chile or any location’s dedicated server on which the bot runs (load, CPU usage, memory, overall network activity) can be checked.
5. Backup and Maintenance
Automated Backups: This should be noted that the hosting provider or client can set common backups to avoid this kind of dilemma.
Managed vs. Unmanaged Hosting:
Managed: The server management monitors updates, security patches, monitoring, and backup with the server provider’s assistance.
Unmanaged: The client is fully responsible for maintenance tasks.

Alt Text: Pictorial representation of the managed and unmanaged server hosting difference
6. Network and Bandwidth
High-Speed Connections: Data centers that are solely rented mostly offer large bandwidth for traffic without incurring a lag.
Dedicated IP Address: It is common that each server obtains its IP, which can be useful for a website, mail server or application hosting.
7. Cost and Use Cases
Higher Cost: As it gives an environment to use only by one client, dedicated hosting is more costly than shared or VPS hosting.
Use Cases: It is appropriate for loads that require a lot of resources. It also benefits game servers, active websites, SAAS solutions, and enterprise-level databases.
To sum up, with the help of dedicated server hosting, a client gains the maximal control, security, and performance provided by the possibility of using the entire server. The device is suitable for companies and/or organizations, that require high reliability, have a large workload or need a high level of data protection.
0 notes
Text
I wonder if Windows 11 will become more palatable by the time Windows 10 becomes obsolete. After hearing a bunch of horror stories about Win10, I thought I'd never use it, but after I got a new machine with it preinstalled, I just clicked NO ten times in a row, then went through the settings and toggled just as many things off. It was all good after that, pretty much a normal system for normal people with dignity, with no registry meddling required that I recall. I do get nag screens begging me to switch to Edge and connect my MS account, but they happen like once or twice a year, so I didn't look into how to turn it off forever. In some ways, it even felt like a step forward, with all the detailed permissions for apps.
It's a lot like turning off Best Stuff First or dodging invisible murdervirus-downloading hyperlinks on a free streaming website. It's creepy, like doing business in a sketchy establishment where I have to know the right words to avoid offending the mafia boss, but it's livable. I get the feeling someone in their management realizes how bad it would be to completely alienate all the privacy-loving nerds that make their product function at all. And if they have to put in more work than casual users to tailor the environment to their preferences, that's par for the course.
I got a laptop with Windows 11 for an IT course so I can get certified, and doing the first time device set-up for it made me want to commit unspeakable violence
Windows 11 should not exist, no one should use it for any reason, it puts ads in the file explorer and has made it so file searches are also web searches and this cannot be turned off except through registry editing. Whoever is responsible for those decisions should be killed, full stop.
Switch to linux, it's free and it's good.
145K notes
·
View notes
Text
Obțineți o licență gratuită pentru WinToHDD Professional, acest software vă permite să reinstalați cu ușurință sistemul de operare Windows fără a fi nevoie de o unitate de disc sau o unitate USB. Cu instrumentul universal de instalare Windows, WinToHDD Professional, puteți reinstala cu ușurință Windows, puteți instala Windows pe alte unități decât cea pe care este instalat sistemul dvs. de operare actual sau puteți clona o instalare Windows OS existentă pe o unitate diferită. Nume produs: WinToHDD Professional v6.5 Pagina oficiala: https://www.easyuefi.com/wintohdd/index.html Pagina promotionala: n / a Valabilitate licenta: pe viata Sistem de operare: Windows Deoarece nu mai avem o pagina promotionala, vom folosi direct serialul de mai jos pentru inregistrarea programului. Pentru a obtine licenta gratuita trebuie sa facem acesti pasi simpli: In primul rand vizitam pagina promotionala, apoi completam cu datele solicitate micul formular, ca in poza de mai jos: In scurt timp va sosi un mesaj in casuta de email ce va contine atat serialul pentru inregistrarea WinToHDD Professional v6.0, cat si link-ul pentru descarcare. 1. Instalare Windows fără CD/DVD sau unitate USB / WinToHDD Professional Instalare directă: Permite instalarea sau reinstalarea sistemului de operare Windows direct de pe hard disk, fără a fi necesare CD-uri, DVD-uri sau unități USB. Clonare Windows: Oferă opțiuni pentru a clona sistemul de operare Windows existent de pe un hard disk pe altul, păstrând toate setările și fișierele. 2. Multi-Instalare Windows Instalare pe mai multe unități: Permite instalarea sistemului de operare Windows pe mai multe unități de hard disk de pe același computer, util pentru configurări dual-boot sau multi-boot. 3. Creare de medii de recuperare Media de recuperare WinPE: Creează medii de recuperare bazate pe Windows Preinstallation Environment (WinPE), care pot fi folosite pentru a repara sau reinstala sistemul de operare în caz de probleme. 4. Interfață Utilizator Intuitivă Ușor de utilizat: Interfața este simplă și ușor de navigat, potrivită atât pentru utilizatori începători, cât și pentru cei avansați. Ghid pas cu pas: Oferă instrucțiuni pas cu pas pentru toate procesele de instalare și clonare, simplificând utilizarea software-ului. 5. Suport pentru multiple versiuni de Windows Compatibilitate largă: Suportă o gamă variată de versiuni de Windows, inclusiv Windows 10, 8.1, 8, 7, Vista, și XP, precum și edițiile de server Windows. 6. Operațiuni de clonare avansate Clonare sistem și partiție: Oferă opțiuni pentru clonarea întregului sistem de operare sau doar a anumitor partiții. Ajustare automată a dimensiunii partiției: Ajustează automat dimensiunea partiției pentru a se potrivi cu noul hard disk, asigurând o tranziție fără probleme. 7. Performanță și siguranță Stabilitate și performanță ridicată: Proiectat pentru a oferi o performanță fiabilă și stabilă, reducând riscul de erori în timpul procesului de instalare sau clonare. Protecția datelor: Asigură integritatea și securitatea datelor în timpul transferurilor și clonării.
0 notes
Text
Bloatware is Annoying: What You Can Do About It
Most computers these days will come with their fair share of bloatware, i.e. unwanted software that comes preinstalled on the operating system by the developers. While the developers do tend to get paid for including bloatware with their operating systems, there is often no need for it, leading users to question why it’s there and what to do about it. Bloatware is a Problem for Individuals and Companies The big problem with bloatware is that it takes up a lot of space without really offering anything to the user in return. Sometimes it can impact the system’s performance while also eating into your storage space, creating issues all around. Businesses also must realize that the solutions that tend to be bloatware are disruptive and better off being replaced by less intrusive solutions. After all, bloatware will often remind users of its presence, and it is often for services that you already have in some capacity. So, what do you do about it? Most Bloatware Can Be Removed Sometimes bloatware has a legitimate use, but more often than not, it has no real practical use in the workplace environment. For example, look at applications like Netflix, Solitaire, and Xbox-related apps, and you’ll see that there is no reason for them to be there on a work PC. While the process might differ, there is usually a way to remove it. How to Remove Bloatware from Windows 10 and 11 You can start the process of removing bloatware when you first get the computer. Rather than going through with the default installation, you can opt for a clean and customized version by deselecting all of the programs that are not related to the workplace. This is the best way to stop bloatware in its tracks—before you even install it in the first place. There are ways to remove bloatware through the Windows operating system, too. You can just right-click on the ones that are causing you so much distress and select “Uninstall” from the menu. If this option isn’t available, tools like Powershell and DISM (Deployment Image Servicing and Management) may be required, but if this is the case, we urge you to contact Reciprocal Technologies to make sure you do it the right way. Get Help from the Best in the Business Whether you want to remove bloatware or simply improve operations in some way, Reciprocal Technologies can help. Learn more by calling us today at 317-759-3972. from https://reciprocaltech.com
0 notes
Text
Windows ADK working for Windows 11 and Windows Server 2022
The Windows ADK and Windows PE add-on provide tools for customizing Windows images for large-scale deployment and testing system quality, performance, and applications running on it. Therefore, In this article, we shall discuss the new fix for Windows ADK working for Windows 11 and Windows Server 2022. Please see how to install Endpoint Configuration Manager on HyperV VM, and learn the…
#ADK#ADK|WinPE|MDT: Deploy Windows with WDS#Microsoft Windows#Uninstall Windows ADK and WinPE#VBScript is not working in WinPE#Windows 10#Windows 11#Windows ADK#Windows PE Known Issues#Windows Preinstallation Environment#Windows Server#Windows Server 2012#Windows Server 2016#Windows Server 2022#Windows Server 2025#WinPE
0 notes
Text
Tải về WinPE 10-8 Sergei Strelec (x86/x64/Native x86) 2021.07.21 – Bộ cứu hộ đa năng
Tải về WinPE 10-8 Sergei Strelec (x86/x64/Native x86) 2021.07.21 – Bộ cứu hộ đa năng WinPE 10-8 Sergei Strelec là đĩa khởi động Windows 10 và 8 PE dùng để bảo trì máy tính, đĩa cứng và phân vùng, sao lưu và khôi phục đĩa và phân vùng, chẩn đoán máy tính, khôi phục dữ liệu, cài đặt Windows. WinPE 10-8 Sergei Strelec x86 / x64 là phiên bản mới nhất của Windows Preinstallation Environment, nghĩa là…

View On WordPress
#Bộ cứu hộ đa năng#khởi động Windows 10 và 8 PE#Sergei Strelec ver 2021.07.21#Tải về WinPE 10-8 Sergei Strelec
0 notes
Text
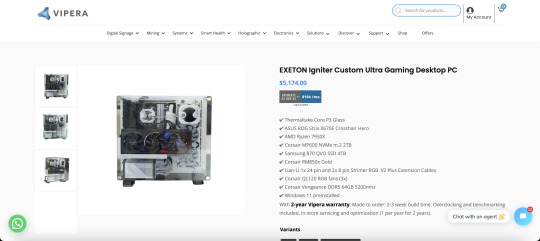
EXETON Igniter Custom Ultra Gaming Desktop PC by Vipera
In the dynamic realm of gaming and professional work, the EXETON Igniter Custom Ultra Gaming Desktop PC, exclusively offered by Vipera, emerges as a powerhouse designed for the ultimate immersive experience. This blog will delve into the detailed specifications, customization options, and exclusive features that make the EXETON Igniter a top choice for gamers, professionals, and IT enthusiasts.
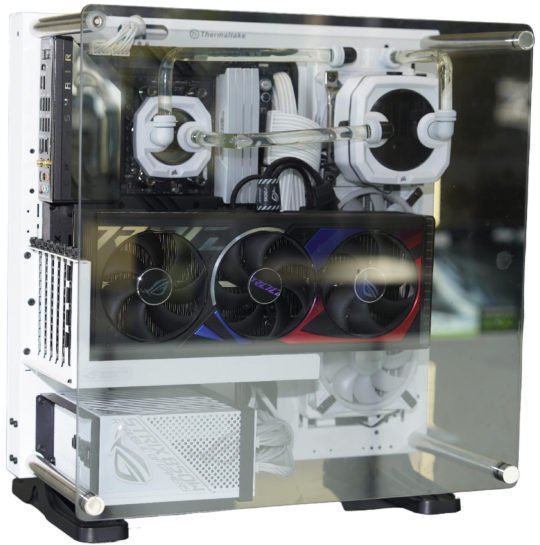
1. Exquisite Design: Thermaltake Core P3 Glass
The foundation of the EXETON Igniter is the sleek Thermaltake Core P3 Glass chassis, offering both aesthetic appeal and optimal cooling for a high-performance computing experience.
2. Motherboard Excellence: ASUS ROG Strix X670E Crosshair Hero
Powered by the ASUS ROG Strix X670E Crosshair Hero motherboard, the Igniter ensures stability and cutting-edge features for seamless gaming and professional work environments.
3. Processing Powerhouse: AMD Ryzen 7950X
At the core of the Igniter’s performance lies the AMD Ryzen 7950X processor, a true powerhouse delivering exceptional speed and multitasking capabilities.

4. Storage Dominance: Corsair MP600 NVMe m.2 2TB and Samsung 870 QVO SSD 4TB
Boasting storage dominance, the Igniter features a Corsair MP600 NVMe m.2 2TB for lightning-fast data access, coupled with a Samsung 870 QVO SSD 4TB for vast storage capacity.
5. Reliable Power Supply: Corsair RM850x Gold
Ensuring stability and efficiency, the Corsair RM850x Gold power supply provides the necessary energy to fuel the Igniter’s high-performance components.
6. Aesthetic Illumination: Lian-Li Strimer RGB V2 Plus Extension Cables
Elevating aesthetics, the Igniter includes Lian-Li Strimer RGB V2 Plus Extension Cables for a mesmerizing visual display within the system.

7. Optimal Cooling: Corsair QL120 RGB Fans (3x)
Cooling is paramount, and the Igniter excels with Corsair QL120 RGB fans, providing efficient airflow and a stunning visual display.
8. Next-Level Memory: Corsair Vengeance DDR5 64GB 5200MHz
With Corsair Vengeance DDR5 64GB RAM at 5200MHz, the Igniter ensures smooth multitasking and responsiveness, ideal for gaming and demanding workloads.
9. Future-Ready: Windows 11 Preinstalled
Keeping up with the latest advancements, the EXETON Igniter comes preinstalled with Windows 11, providing a secure and feature-rich operating system.
10. Vipera Exclusive Warranty and Support
Vipera takes pride in offering a 2-year warranty with the Igniter, including in-store servicing, overclocking, benchmarking, and optimization for a worry-free ownership experience.
11. Customization Unleashed: RED — SNOW — LIQUID SHADOW Variants
Tailoring to individual preferences, the EXETON Igniter comes in three stunning variants: RED, SNOW, and LIQUID SHADOW, allowing users to express their style.
12. GPU Options: Choose Your Power
Select your GPU with options like the MSI Suprim X 4080, Zotac AMP Extreme AIRO 4080, Gigabyte AORUS Master 4080, or ASUS Rog Strix 4080, offering a range of powerful graphics solutions for diverse user needs.
Conclusion: Your Gateway to Ultimate Performance
The EXETON Igniter Custom Ultra Gaming Desktop PC by Vipera is not just a computer; it’s a statement. Engineered for gamers, professionals, and IT enthusiasts, the Igniter blends style with substance, offering unparalleled performance, customization, and support. Dive into the world of the Igniter, where every detail is meticulously crafted to provide the ultimate computing experience.
M.Hussnain Visit us on social media: Facebook | Twitter | LinkedIn | Instagram | YouTube TikTok
#exeton#desktop pc#gaming#gaming pc#vipera#viperatech#ai#desktop#machine#graphic card#motherboard#customize pc
0 notes
Text
AOMEI Partition Assistant 10.2 Technician
AOMEI Partition Assistant 10.2 + WinPE: Your Ultimate Partition Management Solution. AOMEI Partition Assistant 10.2, bundled with the WinPE (Windows Preinstallation Environment) toolkit, is a comprehensive and powerful disk partition management software developed by AOMEI Technology. It offers a wide range of features to help you manage your hard drives and partitions effectively, ensuring data…

View On WordPress
0 notes