#ZIP 4 database Download
Explore tagged Tumblr posts
Visit Tumblr Blog
Explore Tumblr blogs with no restrictions, modern design and the best experience.
Last Seen Tumblr Blogs


Fun Fact
BuzzFeed published a report claiming that Tumblr was utilized as a distribution channel for Russian agents to influence American voting habits during the 2016 presidential election in Feb 2018.
Text
Boost Service Accuracy with the Precision of ZIP 4 Database Downloads
If you need to take your business to the next level, then you should go with the client’s data accuracy and delivery precision! It is vital to business success. Using a basic 5-digit ZIP Code may not be enough anymore in this fast-paced digital economy. Relying on a generic address or a client’s information is no longer enough. You need to introduce a robust solution that integrates deeper precision with faster, more reliable performance. Are you aiming to optimize the business operations, minimize risk, and enhance customer engagement? Integrate ZIP 4 database downloads into your database and make the best strategy.

Are you operating an e-commerce brand and trying to reduce delivery errors? Are you a marketer aiming for pinpoint-targeted campaigns? Download the data from the ZIP 4 database download tool and integrate it into your business. It can help you operate with greater speed, accuracy, and confidence. It integrates deeper precision for faster, more reliable performance.
Understand The Full ZIP+4 Code In The U.S.
To understand the ZIP+4 Database Download, you must first understand the structure of the ZIP+4 code. Let’s understand it by breaking down the full ZIP Code of Beverly Hills, CA, 90210-1234:
The initial five digits (e.g., 90210) specify the region, Sectional Center Facility (S.C.F.), and post office or delivery area.
The sixth and seventh digits (e.g., 12). lay down the smaller areas, including city, block, or large buildings.
The eighth and ninth digits (e.g., 34). Detect the exact locations, irrespective of streets, specific floors, or apartments. It points to more specific delivery areas.
It is a downloadable data set containing every ZIP+4 code along with detailed geographic and address-related metadata such as
9-digit ZIP Code (ZIP+4)
Street names and number ranges
City, state, and county
Delivery point type (residential, business, PO Box, etc.)
Latitude and longitude (in enhanced datasets)
Carrier route codes
Census tract or block group (in premium versions)
The above data is updated frequently based on population changes, construction, and delivery route optimization. It ensures that your customer addresses are fully standardized and validated! It fulfills the USPS-compliant requirements while ensuring no shipping errors and returns! It is valuable for high-volume mailers, e-commerce platforms, and fulfillment services. Integrate the ZIP+4 system and see how it can address granularity and delivery precision. Introduce the ZIP 4 database downloads to your CRM system and see how it enhances address granularity, delivery precision, and improves customer satisfaction.
Do you want to keep your logistics, marketing, and customer service ahead of the competition? You should turn to the ZIP 4 database downloads, as it can provide more refined data for your decision-making and mail service. The up-to-date ZIP+4 Database Download offers a robust solution that can transform your workflows from satisfactory to extraordinary.
If you are searching for an ultimate tool that requires location-based information, then the ZIP 4 database download tool can be a productive addition to your CRM system. It is a powerful resource that you can use to get robust solutions irrespective of your business. With the use of the US ZIP Plus 4 database downloads tool, you can create more specific delivery routes and improve address validation! It helps reduce shipping costs and avoid unnecessary delivery delays or wrong deliveries.
Try Datasheer,LLC’s ZIP 4 database downloads tool for a quick and accurate geolocation experience. It helps you rectify incorrect format addresses and find the correct five-digit and ZIP+4 codes. It will ultimately ensure precise deliverability.
0 notes
Text


Landscape Oil Paintings Collection - Part 1
Hello everyone, and Happy New Year! To kick off the year, I’m excited to share my first collection of stunning landscape oil paintings, inspired by the highly sought-after styles of the 19th century. During that time, landscape painting flourished, becoming the dominant genre and a celebrated pinnacle in art history—a legacy that continues to captivate us today.
💟A heartfelt thank you to @sims4luxury for graciously allowing me to recolor her stunning wall art. Your kindness, support, and help throughout this process have meant so much to me!
This is a recolor of Sims4Luxury's British Collection - Artwall #1: You must download @sims4luxury's mesh in order to see my recolor in your game! This is included in the ZIP file, so don't worry!
This is optional, but if you haven't done so already, please download the entire British Collection! It is truly a very beautiful set.
📌Collection Features:
This collection consists of 19 swatches of beautiful paintings
Custom thumbnails
In build mode, use keys '9' and '0' to increase/decease the paintings to desired size!
📌Credits:
All the original paintings were made available for public use under the public domain, in accordance with the open access policy.
Images sourced from the open-access databases of the National Gallery of Art and the Art Institute of Chicago.
CC creators used within my screenshots: @pinkbox-anye @casadutti @ts4novvvas @mxims @syboubou @cowbuild @kerriganhouse @aggressivekitty @sundays-sims @baumgarten-sims @mincts4 @ddaeng-sims
If I am forgetting anyone, I am so sorry! Please message me and I will add you to the list.🤍
⚠️Term of Use:
Do NOT re-upload and edit my textures or meshes and claim my creations as your own.
Do NOT put my CC behind paywalls.
You MAY include my CC in Sims 4 lot builds, but you must credit me and link directly to the object's post.
You MAY recolor my CC with permission first. Do not include my mesh in your .package file and do not change my original file! Make sure to also provide links to my original post.
📥DOWNLOAD (Available for FREE members on Patreon)
I'm still learning, so if you download, please let me know if you encounter any issues.
#ts4#ts4cc#sims 4#the sims 4#sims4#s4cc#sims4cc#simblr#maxis match#sims 4 cc#sims 4 custom content#sims#the sims 4 cc#sims 4 download#ts4 interior#*sarahelizasimscc#sarahelizasims#ts4 simblr#the sims 4 simblr
373 notes
·
View notes
Text


4 BG longsimple alpha edits in Afterglow
Almighty Hat's BG longsimple in Trapping's twists in Afterglow colours Download
BG longsimple tucked alpha in Afterglow colours Download
BG longsimple shorter alpha in Afterglow colours Download
BG longsimple soft silky alpha in Afterglow colours Download
this all started when I downloaded a really old sim off MTS to edit and saw it came with a hair which was an alpha edit of the BG longsimple hair which I hadn't seen before- said alpha edit is credited as 'original texture from some post on this forum, please claim credit for i have forgotten which one', and nobody did actually claim credit for it as far as I can tell. I liked it enough, even though it's imperfect, to make my own edit of it combining it with my BG longsimple default, which itself is an edit of Aquil's alpha.
Then I thought to look on the database which other alpha edits were availible, and picked out c0nan21's tucked alpha, TheDerangedSim's shorter alpha, and Almighty Hat's Trapping twists retexture. I edited the former two to match my default, but haven't edited the alpha or texture of the twists version at all, just recoloured it.
Everything's TF-EF, Afterglow naturals family binned in one package each, fully compressorized, no meshes required, BG compatible, and has a volatile base in the zip (exept for the twists as it's really no different to Hat's volatile texture).
note- the sims in the previews are wearing makeup hairlines.
Additional credits: Antoninko for the afterglow actions! check @the-afterglow-archive for more Afterglow ₊˚⊹♡
Buy me a coffee? I have a Ko-Fi!
#ts2#the sims 2#sims 2 cc#sims 2#ts2 cc#ts2 download#ts2cc#sims 2 download#ts2 simblr#afterglow hair#ts2 maxis hair#ts2 female hair#ts2 hair download#ts2 hair
281 notes
·
View notes
Text
Expert Advice: How to Install WordPress on Localhost Using XAMPP
As someone who’s built and scaled countless WordPress sites, I always recommend setting up a local environment before touching a live server. Whether you're testing themes, developing custom plugins, or just learning the ropes — installing WordPress on localhost using XAMPP is a must-have skill in your toolkit.
Let me walk you through it like I would with a junior dev on my team.
🔧 Step 1: Set Up Your Local Server with XAMPP
Start by downloading XAMPP from apachefriends.org. Choose the version that matches your OS.
Once installed:
Launch the XAMPP Control Panel.
Start Apache and MySQL — these are your local web server and database engine.
🧠 Pro Tip: If Apache doesn’t start, check for port conflicts (Skype and other apps love port 80).
📁 Step 2: Prepare WordPress Files
Download the latest version of WordPress from wordpress.org.
Then:
Extract the ZIP file.
Move the folder into your htdocs directory (usually C:\xampp\htdocs\ on Windows).
Rename it to something clean and relevant — I usually go with the project name (e.g., clientsite).
🗃 Step 3: Create a Database
Head to http://localhost/phpmyadmin.
Click on the Databases tab.
Create a new database (e.g., clientsite_db).
No need to create tables — WordPress will handle that during installation.
⚙️ Step 4: Install WordPress
Now go to http://localhost/clientsite in your browser.
Choose your language.
Enter your database details:
Database Name: clientsite_db
Username: root
Password: (leave blank)
Submit and run the installation.
Set your site title, admin username, and password. Keep these credentials secure — even on localhost.
🚀 Step 5: Log In and Start Building
Access your dashboard at http://localhost/clientsite/wp-admin.
From here, you’re in full control. Install themes, test plugins, build layouts — all without risking a live site.
🧠 Final Thoughts from a Pro
Running WordPress locally is a game-changer. It gives you the freedom to experiment, break things, and build confidently. I use this setup for everything from client prototypes to plugin testing.
👉 Want the full breakdown with screenshots and extra tips? Read the complete guide on our blog: How to Install WordPress on Localhost Using XAMPP — it’s written for creators who want to work smarter, not harder.
#how to install wordpress on localhost using xampp#how to install wordpress on localhost using xampp server#how to install wordpress on localhost xampp#how to install wordpress on xampp localhost#how to install wordpress on localhost xampp 2021#how to install wordpress on xampp localhost pdf#how to install wordpress on localhost using localwp#how to install wordpress on localhost wamp#how to install wordpress on localhost#how to install wordpress using xampp
0 notes
Text
Company Visitors Management System using PHP and MySQL

Company Visitor Management system is a web-based technology that will revolutionize the way your company manages visitors. Visitor Management system is more important to security guards or security company. This web application provides a way to effectively control record & track company visitor traffic.
Click: https://phpgurukul.com/company-visitor-management-system-using-php-and-mysql/
Project Modules
In CVMS we use PHP and MySQL database. This is the project which keep records of visitors who visited in the company. CVMS has one module i.e admin.
Dashboard: In this sections, admin can briefly view how many visitors visited in a particular period.
Department: In this section, admin can add and delete the deparment.
Visitors: In this section, admin adds new visitors by filling their information in add visitors sections and also view and manage visitor’s records. Admin also put visitors out time in the manage records section.
Search: In this bar, admin can search a particular person by their name and phone number.
Reports: In this section admin can generate visitor’s reports between two dates.
Admin can also update his profile, change password and recover password.
How to run the Company Visitors Management System (CVMS) Project
1. Download the zip file
2. Extract the file and copy cvms folder
3.Paste inside root directory(for xampp xampp/htdocs, for wamp wamp/www, for lamp var/www/html)
4. Open PHPMyAdmin (http://localhost/phpmyadmin)
5. Create a database with name cvmsdb
6. Import cvmsdb.sql file(given inside the zip package in SQL file folder)
7.Run the script http://localhost/cvms (frontend)
Credential for admin panel :
Username: admin
Password: Test@123
PHP Gurukul
Welcome to PHPGurukul. We are a web development team striving our best to provide you with an unusual experience with PHP. Some technologies never fade, and PHP is one of them. From the time it has been introduced, the demand for PHP Projects and PHP developers is growing since 1994. We are here to make your PHP journey more exciting and useful.
Email: [email protected] Website : https://phpgurukul.com
0 notes
Text
TicketGo Nulled Script 4.2.2

Download TicketGo Nulled Script for Free – The Ultimate Support Ticket System If you're looking for a reliable, efficient, and feature-rich support ticket management solution, the TicketGo Nulled Script is the perfect choice for your business or project. Whether you're running a digital agency, a tech startup, or an eCommerce store, TicketGo empowers you to manage customer support like a pro—without spending a dime. Now available for free download, this nulled script opens the door to premium features without the premium price tag. What is TicketGo Nulled Script? The TicketGo Nulled Script is a robust, fully-featured PHP-based support ticket system designed to streamline and automate your customer service workflows. It enables businesses to handle support queries, assign agents, prioritize tickets, and track progress through an intuitive dashboard. Best of all, you can download this premium-grade tool for free and integrate it easily into your existing system. Why Choose TicketGo Nulled Script? Support ticket systems are crucial for any service-based business. With the TicketGo Nulled Script, you get a polished, powerful backend with clean code, easy installation, and rich customization options. It’s a complete support system solution at zero cost—perfect for startups and developers who need professional tools without breaking the bank. Technical Specifications Language: PHP Database: MySQL Framework: Laravel Responsive Design: Fully mobile-optimized License: Nulled (No license required) Key Features & Benefits 1. Advanced Ticket Management Organize and manage support tickets with ease using the integrated dashboard. The system supports ticket categorization, priority tagging, and real-time updates to ensure efficient resolution. 2. Multi-Agent Support Assign different agents to specific tickets or departments. With the TicketGo Nulled Script, collaboration is seamless, boosting your team’s productivity. 3. Customizable Email Notifications Keep your users informed with automatic email alerts for ticket updates, agent responses, and ticket closures. You can customize templates to match your brand voice. 4. User-Friendly Interface The intuitive, clean design ensures a smooth user experience for both customers and agents. No steep learning curve—just plug and play. 5. Analytics & Reporting Gain insight into your support operations with built-in analytics. Monitor agent performance, ticket trends, and response times directly from the dashboard. Common Use Cases Freelancers: Manage client queries and feedback efficiently. Startups: Deliver professional-grade customer support from day one. eCommerce Platforms: Handle order-related issues and customer complaints systematically. Software Developers: Track bugs and feature requests from users. How to Install TicketGo Nulled Script Download the TicketGo Nulled Script zip file from our website. Extract the files and upload them to your server directory using FTP or cPanel. Create a MySQL database and import the included SQL file. Configure your .env file with the correct database credentials. Access your domain in the browser to complete the setup wizard. Frequently Asked Questions (FAQs) Is TicketGo Nulled Script safe to use? Yes, the version provided has been tested for malware and backdoors. However, it's always recommended to scan any file before installation. Do I need a license to use TicketGo? No. The TicketGo Nulled Script available on our platform is fully nulled and does not require any license for use. Can I use it for commercial projects? Absolutely! This script is ideal for both personal and commercial projects. Just install, configure, and start managing tickets professionally. Where can I download other helpful tools? We offer a wide range of nulled plugins to support your development and design needs. Looking for top-tier WordPress security? Check out the powerful iThemes Security Pro NULLED for complete protection of your WordPress site—absolutely free!
Conclusion With the TicketGo , you can build a high-functioning, client-friendly support system without the high costs. It’s the ideal solution for anyone seeking a streamlined, efficient way to handle support tickets while enjoying full control over the features and appearance. Download now and elevate your support game—no licenses, no subscriptions, just pure performance.
0 notes
Text
What are the steps to install OpenEMR for a clinic?
Introduction
Healthcare practitioners use OpenEMR as a strong open-source application that functions as an Electronic Medical Records (EMR) system together with practice management capabilities. The clinic needs to follow several vital steps to install OpenEMR, which we will describe in the following section. As a step-by-step guide, it will provide you with a straightforward path to set up OpenEMR while maximizing its available features.
Step 1: Download and Extract OpenEMR
1.Download OpenEMR
Users should retrieve the most up-to-date version of OpenEMR (openemr-7.0.2.zip) through Source Forge from the OpenEMR website.
You should enable your browser to allow downloading files without interruption.
2.Extract the OpenEMR Archive
Right-click and open the downloaded zip file through the Properties dialogue box available on your operating system.
The file extraction process depends on selecting "Unblock" in the Windows Properties box in order to prevent file blocking.
Extract the zip file to a folder on your computer (e.g., C:\OpenEMR).
3.Rename the Directory (Optional)
You should rename the directory to openemr if you wish to simplify its name.
Step 2: Download and Install XAMPP
1.Download XAMPP
Users should navigate to the Apache Friends official website and retrieve the newest version of Windows XAMPP from this page.
2.Install XAMPP
Launch the XAMPP installer through the download and execute the built-in instructions to perform the setup.
The default installation settings should remain selected unless you require custom modifications.
Step 3: Move OpenEMR to the XAMPP Directory
You need to place OpenEMR files at the XAMPP home directory.
1.Navigate to the XAMPP Directory
The XAMPP is typically located at C:\xampp\htdocs.
2.Move OpenEMR Files
After extracting the OpenEMR folder, you should cut it before placing it inside XAMPP's htdocs directory.
The openemr directory should be located at C:\xampp\htdocs\openemr.
Step 4: Configure XAMPP
1.Start XAMPP Services
Users should start the XAMPP Control Panel to begin the Apache and MySQL services.
2.Verify Services
The services must operate without producing any errors.
Step 5: OpenEMR Setup via Web GUI
Users can establish OpenEMR through the web.
1.Access OpenEMR Setup
You should access OpenEMR through the web browser by going to http://localhost/openemr.
2.Follow Setup Instructions
Multiple steps of the setup process installation include the creation of a new database and configuration tasks.
Check all file system permissions for correctness before continuing forward.
3.Create Database
When prompted, you will decide to either establish a new database or pick one from the existing collection.
Perform the necessary actions using the instructions provided by the interface.
4.Finalize Configuration
You must finish the setup operations by creating your first login details, including username and password.
Step 6: Clinic Setup
1.Enter Global Settings
Users should configure the application settings of OpenEMR through these steps to establish the interface theme and date/time presentation.
2.Enter Facility-Specific Settings
During setup, users must provide practice and business identifiers together with tax information and insurance numbers.
3.Create User Accounts
All users accessing OpenEMR need to receive accounts during the setup process.
4.Enter Contact Information
The user can add their contact information and business account contact details.
5.Practice Settings
Configure pharmacy and insurance company information, along with accepted document formats.
Step 7: External Data Loads
1.Load Codesets
The implementation of ICD10, RXNORM, and SNOMED and CQM_VALUSET codesets through import processes will enhance the clinical documentation system.
2.Calendar Configuration
The system requires configuration to define appointment types together with the providers' planned availability times.
Step 8: Useful Configurations
1.Customize Templates
Tailor notes templates to your practice’s needs.
2.Integrate with Other Systems
OpenEMR should be connected to lab systems, billing software, and telehealth platforms.
Troubleshooting Tips
The Apache server must possess correct permissions that allow file reading and writing operations in the OpenEMR directory.
Check MySQL settings to resolve any database connection issues by verifying proper database configuration.
Service disruptions of XAMPP require users to reset both Apache and MySQL components.
Real-World Examples and Case Studies
The clinic based in Vermont utilized OpenEMR Cloud on AWS, which resulted in a 70% reduction in server maintenance expenses while also enabling better scalability during busy patient periods.
A Texas-based large hospital decided to run OpenEMR on-premises for customized data security which delivered smooth integration with their hospital infrastructure.
Conclusion
To implement OpenEMR at a clinic, administrators need to follow multiple steps that start with software download and then proceed through configuration and clinic-specific setup. OpenEMR users can achieve operational streamlining and patient care improvement while maintaining regulatory standards through their robust features and by following the specified guidelines.
FAQs
Q1: What are the system requirements for installing OpenEMR on Windows?
Your system requirements for OpenEMR installation are Windows Server 2012 and later versions or Windows 10/11 together with XAMPP or WampServer and Apache HTTP Server running PHP 7.4 or higher with essential extensions alongside MySQL version 5.6 or above.
Q2: How do I troubleshoot common issues during OpenEMR installation?
Verify the system permissions while also checking for database configuration accuracy before restarting XAMPP service operations.
Q3: Can I use OpenEMR on other platforms besides Windows?
The OpenEMR system functions on Linux and macOS operating systems with server setups that include XAMPP and LAMP.
0 notes
Text
Batch Address Validation Tool and Bulk Address Verification Software
When businesses manage thousands—or millions—of addresses, validating each one manually is impractical. That’s where batch address validation tools and bulk address verification software come into play. These solutions streamline address cleansing by processing large datasets efficiently and accurately.

What Is Batch Address Validation?
Batch address validation refers to the automated process of validating multiple addresses in a single operation. It typically involves uploading a file (CSV, Excel, or database) containing addresses, which the software then checks, corrects, formats, and appends with geolocation or delivery metadata.
Who Needs Bulk Address Verification?
Any organization managing high volumes of contact data can benefit, including:
Ecommerce retailers shipping to customers worldwide.
Financial institutions verifying client data.
Healthcare providers maintaining accurate patient records.
Government agencies validating census or mailing records.
Marketing agencies cleaning up lists for campaigns.
Key Benefits of Bulk Address Verification Software
1. Improved Deliverability
Clean data ensures your packages, documents, and marketing mailers reach the right person at the right location.
2. Cost Efficiency
Avoiding undeliverable mail means reduced waste in printing, postage, and customer service follow-up.
3. Database Accuracy
Maintaining accurate addresses in your CRM, ERP, or mailing list helps improve segmentation and customer engagement.
4. Time Savings
What would take weeks manually can now be done in minutes or hours with bulk processing tools.
5. Regulatory Compliance
Meet legal and industry data standards more easily with clean, validated address data.
Features to Expect from a Batch Address Validation Tool
When evaluating providers, check for the following capabilities:
Large File Upload Support: Ability to handle millions of records.
Address Standardization: Correcting misspellings, filling in missing components, and formatting according to regional norms.
Geocoding Integration: Assigning latitude and longitude to each validated address.
Duplicate Detection & Merging: Identifying and consolidating redundant entries.
Reporting and Audit Trails: For compliance and quality assurance.
Popular Batch Address Verification Tools
Here are leading tools in 2025:
1. Melissa Global Address Verification
Features: Supports batch and real-time validation, international formatting, and geocoding.
Integration: Works with Excel, SQL Server, and Salesforce.
2. Loqate Bulk Cleanse
Strengths: Excel-friendly UI, supports uploads via drag-and-drop, and instant insights.
Ideal For: Businesses looking to clean customer databases or mailing lists quickly.
3. Smarty Bulk Address Validation
Highlights: Fast processing, intuitive dashboard, and competitive pricing.
Free Tier: Great for small businesses or pilot projects.
4. Experian Bulk Address Verification
Capabilities: Cleans large datasets with regional postal expertise.
Notable Use Case: Utility companies and financial services.
5. Data Ladder’s DataMatch Enterprise
Advanced Matching: Beyond address validation, it detects data anomalies and fuzzy matches.
Use Case: Enterprise-grade data cleansing for mergers or CRM migrations.
How to Use Bulk Address Verification Software
Using batch tools is typically simple and follows this flow:
Upload Your File: Use CSV, Excel, or database export.
Map Fields: Match your columns with the tool’s required address fields.
Validate & Clean: The software standardizes, verifies, and corrects addresses.
Download Results: Export a clean file with enriched metadata (ZIP+4, geocode, etc.)
Import Back: Upload your clean list into your CRM or ERP system.
Integration Options for Bulk Address Validation
Many vendors offer APIs or direct plugins for:
Salesforce
Microsoft Dynamics
HubSpot
Oracle and SAP
Google Sheets
MySQL / PostgreSQL / SQL Server
Whether you're cleaning one-time datasets or automating ongoing data ingestion, integration capabilities matter.
SEO Use Cases: Why Batch Address Tools Help Digital Businesses
In the context of SEO and digital marketing, bulk address validation plays a key role:
Improved Local SEO Accuracy: Accurate NAP (Name, Address, Phone) data ensures consistent local listings and better visibility.
Better Audience Segmentation: Clean data supports targeted, geo-focused marketing.
Lower Email Bounce Rates: Often tied to postal address quality in cross-channel databases.
Final Thoughts
Batch address validation tools and bulk verification software are essential for cleaning and maintaining large datasets. These platforms save time, cut costs, and improve delivery accuracy—making them indispensable for logistics, ecommerce, and CRM management.
Key Takeaways
Use international address validation to expand globally without delivery errors.
Choose batch tools to clean large datasets in one go.
Prioritize features like postal certification, coverage, geocoding, and compliance.
Integrate with your business tools for automated, real-time validation.
Whether you're validating a single international address or millions in a database, the right tools empower your operations and increase your brand's reliability across borders.
youtube
SITES WE SUPPORT
Validate Address With API – Wix
0 notes
Text
How to Use Apache JMeter for Performance Testing

1. Introduction
What is Apache JMeter?
Apache JMeter is an open-source tool designed for performance, load, and stress testing of web applications, APIs, databases, and more. It allows testers to simulate multiple users accessing an application simultaneously to measure its performance under different conditions.
Why Use JMeter for Performance Testing?
Free & Open-Source: No licensing costs.
User-Friendly GUI & Scripting Support: Suitable for beginners and advanced users.
Extensive Plugin Support: Allows for extended capabilities.
Supports Multiple Protocols: HTTP, FTP, JDBC, SOAP, and more.
Distributed Testing: Can generate a high load across multiple machines.
Common Use Cases for JMeter
Evaluating website and API performance under load.
Identifying server bottlenecks before deployment.
Stress testing to determine the breaking point of an application.
2. Installing Apache JMeter
Prerequisites
Java (JDK 8 or higher) installed. Verify using:
bash
java -version
JMeter Installation Package: Download from JMeter’s official site.
Installation Steps (Windows, macOS, Linux)
Extract the JMeter ZIP file into a directory.
Navigate to bin and launch JMeter:
Windows: Run jmeter.bat
macOS/Linux: Run ./jmeter
3. Understanding JMeter Components
Before running a test, it’s essential to understand JMeter’s building blocks:
Test Plan:
A test plan defines the structure of your performance test, including thread groups, samplers, listeners, and assertions.
Thread Group (Users & Load Simulation):
Defines number of virtual users (threads).
Specifies ramp-up time (gradual increase in users).
Controls loop count (number of test iterations).
Samplers (Types of Requests to Test)
JMeter supports different types of requests:
HTTP Request: Used for testing websites and REST APIs.
JDBC Request: Used for database performance testing.
FTP Request: Tests FTP servers.
Listeners (Result Analysis & Reports)
View Results Tree: Displays response details.
Aggregate Report: Provides overall test metrics.
Graph Results: Visual representation of response times.
Timers, Assertions, and Config Elements
Timers: Simulate realistic user wait times.
Assertions: Verify response correctness.
Config Elements: Store variables like base URL, login credentials.
4. Creating a Basic Performance Test
Step 1: Create a New Test Plan
Open JMeter → File → New Test Plan
Step 2: Add a Thread Group
Right-click on Test Plan → Add → Threads (Users) → Thread Group
Configure:
Number of Threads (Users): e.g., 100
Ramp-Up Period: e.g., 20 seconds
Loop Count: Infinite or fixed
Step 3: Add an HTTP Request Sampler
Right-click Thread Group → Add → Sampler → HTTP Request
Configure:
Server Name: example.com
Path: /login
Method: POST
Step 4: Add a Listener
Right-click Thread Group → Add → Listener → View Results Tree
Step 5: Run the Test & View Results
Click the Start (Green Play Button).
Observe the request-response details in View Results Tree.
5. Analyzing Performance Test Results
After running the test, it’s important to interpret the key performance metrics:
Metric Description Response Time Time taken to complete a request. Through put Requests processed per second. Error Rate Percentage of failed requests. Latency Time taken before the first response is received.
Example Report Interpretation:
High response times? Possible server bottleneck.
Low throughput? Needs performance optimization.
High error rate? Application may be failing under load.
6. Best Practices for Performance Testing with JMeter
1. Define Clear Test Objectives
What user load are you expecting?
What is the acceptable response time?
2. Simulate Real-World User Behavior
Use timers to avoid unrealistic rapid-fire requests.
Vary user interactions (e.g., login, browsing, checkout).
3. Monitor Server Performance
Use JMeter + APM tools (New Relic, Grafana, or AWS CloudWatch) to track CPU, memory, and database load.
4. Optimize JMeter Scripts for Large Tests
Avoid GUI Mode: Run tests in CLI mode (jmeter -n -t test.jmx).
Use Distributed Testing: Split the load across multiple machines.
5. Integrate JMeter with CI/CD Pipelines
Automate performance tests using Jenkins, GitHub Actions, or GitLab CI/CD.
7. Conclusion
Apache JMeter is a powerful tool for performance testing web applications, APIs, and databases. With a structured approach — defining test plans, running load tests, and analyzing results — developers and testers can identify bottlenecks and improve application scalability.
WEBSITE: https://www.ficusoft.in/software-testing-course-in-chennai/
0 notes
Text
How to Install XAMPP for Windows 10 - XAMPP WordPress For Beginners
To install XAMPP on Windows 10 and set it up for WordPress, follow these steps:
Step 1: Download XAMPP
Go to the official XAMPP website.
Click on the "XAMPP for Windows" button.
Once the installer is downloaded, locate the .exe file (usually in the Downloads folder).
Step 2: Install XAMPP
Double-click the .exe file to start the installation process.
Choose the components you want to install. For WordPress, you need at least Apache, MySQL, and PHP. These are selected by default, so you can leave them as is.
Choose the installation folder (default is usually fine).
Click "Next" and follow the prompts.
During installation, the installer may ask if you want to start the XAMPP Control Panel. Leave it checked and click "Finish."
Step 3: Start Apache and MySQL
Open the XAMPP Control Panel (it should have opened automatically, or you can search for it in the Start menu).
Click the "Start" button next to Apache (this will run the web server).
Click the "Start" button next to MySQL (this will start the database server).
Make sure both Apache and MySQL show "Running" in green.
Step 4: Install WordPress
Download the latest version of WordPress from the official WordPress website.
Extract the WordPress ZIP file.
Move the extracted folder (the WordPress folder) into the htdocs folder of your XAMPP installation (usually located at C:\xampp\htdocs).
Step 5: Create a Database for WordPress
Open your browser and go to http://localhost/phpmyadmin/.
In the phpMyAdmin dashboard, click on "Databases."
Create a new database for WordPress. Give it a name (e.g., wordpress_db) and click "Create."
Step 6: Configure WordPress
Open your browser and go to http://localhost/wordpress (or the folder name you chose).
The WordPress installation screen should appear.
Select your language and click "Continue."
On the next screen, enter your database details:
Database Name: The name you created (e.g., wordpress_db).
Username: root (default for XAMPP).
Password: Leave this blank (default for XAMPP).
Database Host: localhost (default).
Table Prefix: Leave as wp_ unless you want to change it.
Click Submit and then Run the Install.
Step 7: Complete the WordPress Setup
Fill in the site details (site title, admin username, password, and email).
Click "Install WordPress."
Once the installation is complete, you’ll see a success message. You can now log in to your WordPress dashboard at http://localhost/wordpress/wp-admin.
Final Notes
To stop your server, go to the XAMPP Control Panel and click "Stop" for Apache and MySQL.
If you need to make your local WordPress site public, you'll have to configure port forwarding or use a tool like Local by Flywheel or XAMPP for public access.
#installxampp#xamppforbeginners#xamppwindows10#wordpressinstallation#localserversetup#runwordpresslocally#xamppwordpress#webdevelopment#phpdevelopment#wordpressforbeginners#tutorial2025#localwordpress#xamppsetup#installingwordpress#wordpresssetup#beginnerfriendly#xamppguide#developmenttutorial#learnwordpress#wordpresslocally
0 notes
Text
ZIP+4 Explained: The Key Differences From Regular ZIP Codes
Ever wondered why some addresses have a basic five-digit ZIP Code, while others use the extended ZIP+4 format? The difference goes beyond technicalities—it plays a crucial role in ensuring mail and packages are delivered faster and with greater accuracy.
Whether you’re a business owner sending mail in bulk or simply curious about the postal system, understanding these differences is key. So, what sets them apart, and how does accessing a reliable ZIP 4 Database Download help optimize your addressing needs?
The Basics of ZIP Codes
Introduced in 1963, ZIP Codes (Zone Improvement Plan Codes) were designed to streamline mail sorting and delivery. The five-digit format represents:
The first digit: A broad geographic area in the U.S.
The next two digits: A regional postal center.
The final two digits: A specific post office or delivery zone.
For example, a ZIP Code like 30303 corresponds to central Atlanta. However, while this system improved efficiency, the need for more precise sorting soon emerged.
Enter ZIP+4 Codes
In 1983, the USPS introduced ZIP+4 Codes to further enhance accuracy. These codes expand the original format by adding a four-digit suffix. Here’s what each part does:
The extra four digits: Narrow delivery down to a specific building, floor, or department.
For instance, the ZIP+4 Code 30303-1234 pinpoints a specific segment within Atlanta. This level of detail helps postal workers process mail faster and ensures fewer delivery errors.
Why Does It Matter?
For individuals, the difference might seem minimal, but for businesses, the stakes are higher. Incorrect or incomplete addresses cost U.S. businesses billions annually in delayed or undeliverable mail. Using a ZIP 4 Database Download, such as those offered by specialized providers like ZIP-Codes.com, ensures addresses are verified and formatted correctly.
Benefits of ZIP+4 Codes Include:
Faster Deliveries: Enhanced accuracy means mail reaches its destination more quickly.
Lower Costs: Businesses often qualify for postal discounts by using ZIP+4 Codes.
Improved Data Analysis: Marketers and analysts can segment customer data geographically with greater precision.
How a ZIP 4 Database Download Can Help
Platforms like ZIP-Codes.com offer downloadable databases designed to integrate effortlessly with your CRM or shipping software. Equipped with features such as address validation and geocoding, these tools empower businesses to reduce errors, optimize workflows, and save valuable time.
Final Thoughts
The difference between ZIP Codes and ZIP+4 Codes is all about precision and efficiency. Whether you’re managing direct mail campaigns or ensuring timely deliveries, leveraging tools like a ZIP 4 Database Download can make all the difference. Don’t leave your addresses to chance—let advanced tools simplify your logistics today!
0 notes
Text
Part 4: How to use EF Core with MongoDb in Blazor Server Web Application
In part 4 of the series, I'm going to show you how to use EF Core with MongoDb in Blazor Server Web Application.
Articles in this series:
Part 1: Getting started with Blazor Server Web App Development using .NET 8
Part 2: How to implement Microsoft Entra ID Authentication in Blazor Server Web App in .NET 8
Part 3: How to implement Multilanguage UI in Blazor Server Web App in .NET 8
Part 4: How to use EF Core with MongoDb in Blazor Server Web Application
Part 5: How to show Dashboard with Radzen Bar and Pie Chart controls in in Blazor Server Web App
Part 6: How to support Authorization in Blazor server web app when using Microsoft Entra ID authentication
Part 7: How to implement Radzen Grid Control with dynamic paging, filtering, shorting in in Blazor Server Web App
Part 8: How to implement Data Entry form in Blazor server web app
Part 9: How to use SignalR to show real time updates in Blazor server web app
Entity Framework Core (EF Core) is a popular Object-Relational Mapper (ORM) framework for .NET applications. While primarily designed for relational databases, it has expanded its capabilities to support NoSQL databases, including MongoDB. This article will guide you through the process of using EF Core with MongoDB in your .NET 8 projects
Introduction
Before diving into the code, it's crucial to understand the nuances of using EF Core with MongoDB. Unlike relational databases, MongoDB is a NoSQL database, meaning it doesn't adhere to the traditional table-row structure. This introduces certain limitations and differences in how EF Core operates with MongoDB compared to relational databases.
In Part 1 of this series, I've explained the development environment setup for this article, that I will repeat here for the users who have not gone through it.
Before we start
In order to follow along with this articles, you will need:
.NET 8 SDK and .NET 8 Runtime installation
If you are planning to use Visual Studio 2022, make sure you have all latest updates installed (v17.8.2)
Install MongoDb Community Server, MongoDb Compass, and Mongodb version of Northwind database (Covered in this blog)
You may need Microsoft Azure (trial will also work) to setup Entra ID App in Azure and configure it to use
If you are fan of command line tools or want to know more about the tooling, see ASP.NET Core Blazor Tooling
How to setup MongoDB for development on windows
If you are not familiar with setting up MongoDB for development on windows, here is a quick walkthrough of what you will need:
Go to MongoDB download center and download MongoDB Community Server MSI package and install.
Next you will need MongoDB compass MSI and install it. You will need this tool to connect with your MongoDB Community Server and do the database administration related activities. If you are familiar with Microsoft SQL Server world, MongoDB compass is like SQL Server Management Studio of MongoDB world.
Next, download MongoDB Command line Database Tool which we will need to import an existing sample database.
We will be using a sample existing database called Northwind that I've downloaded from here
Import Northwind Mongodb Database
Open MongoDB Compass and connect to localhost:27017 which is a default port when you install MongoDB Server on windows.
Click on the databases in the left navigation and create a new database with name northwind and collection sample.
Go to github repository here in your browser, click on code in the top right and then download zip menu to download the zip file.
Extract MongoDB command line database tools zip file
Open mongo-import.sh inside the root folder and change the mongoimport keyword with the actual full path of mongoimport.exe that is part of MongoDb command line database tools zip file. The resulting line will look like below: "C:\temp\import\mongodb-database-tools\bin\mongoimport" -d "$1" -c "$collection" --type json --file "$file"
Open command prompt and go to root folder where you have mongo-import.sh file and run command ./mongo-import.sh northwind
If everything is done correctly, you will see console message that displays the json file name and the number of documents imported.
If you switch back to MongoDB Compass, select northwind database and click on the refresh at the top right corner of the sidebar, you will see collections like customers, employees etc.
We are going to use this sample database to build something interesting that makes sense and has a real-life use cases instead of just a sample table with a few fields.
Setting Up the Project
Create ASP.NET Core Blazor Server Web Application
Start visual studio and select create new project.
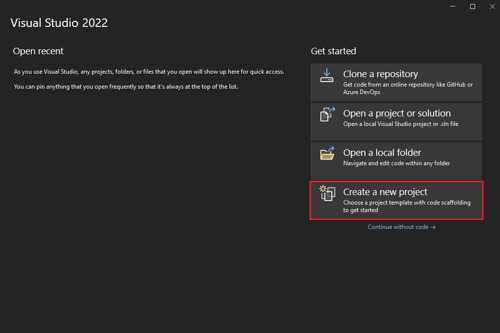
In the Create a new project window, type Blazor on the search box and hit Enter.
Select the Blazor Web App template and select Next.

In the Configure your new project window, enter BlazorAppPart4 as the project name and select Next.
In the Additional information window, select .NET 8.0 (Long Term Support) in the Framework drop-down if not already selected and click the Create button.
Build and run the application once so that you have your application url that you can copy from the browser and save it for later.
Add the nuget package
Open Tools > nuget package manager > Nuget package manager console and type following command:
install-package MongoDb.EntityFrameworkCore
view rawPackageManager.ps hosted with ❤ by GitHub
This will install all the necessary files needed for accessing northwind database that we created in MongoDb using Entity Framework Core Code First.
Add Model for Customer table
In the example northwind database, there is already a customers table with some data in it. We are going to display the first name and last name of the customer. So, let's create a folder in the root called Model and add new file called Customer.cs that contains following class definition.
using MongoDB.Bson;
using MongoDB.Bson.Serialization.Attributes;
using MongoDB.EntityFrameworkCore;
namespace BlazorAppPart4.Model
{
[Collection("customers")]
public class Customer
{
[BsonId]
public int Id { get; set; }
[BsonElement("last_name")]
public string? LastName { get; set; }
[BsonElement("first_name")]
public string? FirstName { get; set; } }}
view rawCustomer.cs hosted with ❤ by GitHub
Create Entity Framework Core AppDbContext class
Next, we are going to create a new class called AppDbContext that inherits from DbContext class of entity framework core. Add another cs file called AppDbContext.cs in the models folder and paste following code.
using Microsoft.EntityFrameworkCore;
namespace BlazorAppPart4.Model
{
public class AppDbContext: DbContext
{
public DbSet<Customer> Customers { get; init; }
public AppDbContext(DbContextOptions options) :
base(options)
{
}
protected override void OnModelCreating(ModelBuilder modelBuilder)
{
base.OnModelCreating(modelBuilder);
modelBuilder.Entity<Customer>();
}
}
}
view rawAppDbContext.cs hosted with ❤ by GitHub
Create Customer Repository
Next, we want to use repository pattern to ensure data access code is separate and testable. Add another folder in the root of your project called Repositories and add a new cs file called ICustomerRepository.cs with below code:
using BlazorAppPart4.Model;
namespace BlazorAppPart4.Repositories
{
public interface ICustomerRepository
{
Task<List<Customer>> GetAllAsync();
}
}
view rawICustomerRepository.cs hosted with ❤ by GitHub
Once you are done, add 1 more file called CustomerRepository.cs with below code:
using BlazorAppPart4.Model;
using Microsoft.EntityFrameworkCore;
namespace BlazorAppPart4.Repositories
{
public class CustomerRepository : ICustomerRepository
{
private readonly AppDbContext _db;
public CustomerRepository(AppDbContext db)
{
_db = db;
}
public async Task<List<Customer>> GetAllAsync()
{
return await _db.Customers.ToListAsync();
}
}
}
view rawCustomerRepository.cs hosted with ❤ by GitHub
Create AppSettings.json settings
The AppDbContext context will require MongoDb connectionstring and database name. It is recommended to create an application wide setting section in the AppSettings.json. Open your AppSettings.json and 'AppConfig' section from below. I'm showing my full AppSettings.json file for your reference:
{
"AppConfig": {
"Database": {
"ConnectionString": "mongodb://localhost:27017",
"DatabaseName": "northwind"
}
},
"Logging": {
"LogLevel": {
"Default": "Information",
"Microsoft.AspNetCore": "Warning"
}
},
"AllowedHosts": "*"
}
view rawAppSettings.json hosted with ❤ by GitHub
Create AppConfig class for settings
Add AppConfig.cs class in your project and then add below code in the class definition:
namespace BlazorAppPart4
{
public class AppConfig
{
public AppConfig() {
Database = new DbConfig();
}
public DbConfig Database { get; set; }
}
public class DbConfig { public string? ConnectionString { get; set; }
public string? DatabaseName { get; set;
}
}
}
view rawAppConfig.cs hosted with ❤ by GitHub
Configure Dependencies in Program.cs
Next, we want to configure dependency injection so that Repository and AppDbContext classes that we created in our project can be injected where required. Here is my Program.cs:
using BlazorAppPart4;
using BlazorAppPart4.Components;
using BlazorAppPart4.Model;
using BlazorAppPart4.Repositories;
using Microsoft.EntityFrameworkCore;
var builder = WebApplication.CreateBuilder(args);
// Add services to the container.
builder.Services.AddRazorComponents()
.AddInteractiveServerComponents();
var appConfig = builder.Configuration.GetSection("AppConfig").Get<AppConfig>();
if (appConfig == null)
{
throw new InvalidOperationException("Db connectionstring not found");
}
builder.Services.AddDbContext<AppDbContext>(options =>
options.UseMongoDB(appConfig.Database.ConnectionString ?? "", appConfig.Database.DatabaseName ?? ""));
builder.Services.AddTransient<ICustomerRepository, CustomerRepository>();
var app = builder.Build();
// Configure the HTTP request pipeline.
f (!app.Environment.IsDevelopment())
{
app.UseExceptionHandler("/Error", createScopeForErrors: true);
// The default HSTS value is 30 days. You may want to change this for production scenarios, see https://aka.ms/aspnetcore-hsts. app.UseHsts();
}
app.UseHttpsRedirection();
app.UseStaticFiles()
;app.UseAntiforgery();
app.MapRazorComponents<App>()
.AddInteractiveServerRenderMode();
app.Run();
view rawProgram.cs hosted with ❤ by GitHub
Please note on line 13 above, we are reading our AppSettings.json section called AppConfig and then convert it to AppConfig class object. On line 18, we are configuring Entity Framework Core MongoDb data access connection string. On line 21, we are resolving the customer repository. The other part of the file has no changes.
Show customers
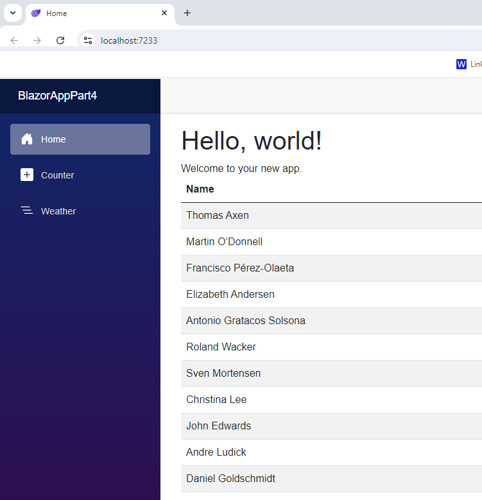
And finally, open Components/Pages/Home.razor and replace the content of the file with below:
@page "/"
@using BlazorAppPart4.Repositories
@using BlazorAppPart4.Model
@inject ICustomerRepository customerRepo
@rendermode RenderMode.InteractiveServer
<PageTitle>Home</PageTitle>
<h1>Hello, world!</h1>
Welcome to your new app.
@if(customers.Any())
{
<table class="table table-striped table-responsive">
<thead>
<th>Name</th>
</thead>
<tbody>
@foreach (var cust in customers)
{
<tr>
<td>
@cust.FirstName @cust.LastName
</td>
</tr>
}
</tbody>
</table>
}
else{
<p>No customers found</p>
}
@code {
List<Customer> customers;
protected override async Task OnInitializedAsync()
{
customers = await customerRepo.GetAllAsync();
}
}
view rawHome.razor hosted with ❤ by GitHub
Here is the output of the whole exercise
Conclusion
In this article, we covered the step by step tutorial of How to use EF Core with MongoDb in Blazor Server Web Application of the blazor web app development series.
Ready to unlock the full potential of Blazor for your product development? Facile Technolab, top Blazor Development Company in India providing Blazor development services can help you bring your vision of product mvp to reality.
0 notes
Text
Online Library Management System using Python Django and MySQL

Library management system is a project which aims in developing a computerized system to maintain all the daily work of library .This project has many features which are generally not available in normal library management systems like facility of user login and a facility of admin login .It also has a facility of admin login through which the admin can monitor the whole system. It has also a facility where student after logging in their accounts can see list of books issued and its issue date and return date.
Click: https://phpgurukul.com/online-library-management-system-using-python-django-and-mysql/
Project Modules
In this project we use Python, Django Framework and MySQL database and it has two modules i.e.
Admin and User
Admin
Admin Dashboard
Admin can add/update/ delete category
Admin can add/update/ delete author
Admin can add/update/ delete books
Admin can issue a new book to student and also update the details when student return book
Admin can search student by using their student ID
Admin can also view student details
Admin can change own password
Students-
Student can register yourself and after registration they will get studentid
After login student can view own dashboard.
Student can update own profile.
Student can view issued book and book return date-time.
Student can also view the available books in the library.
Student can also change own password.
Student can also recover own password.
How to run the Online Library management System Django Python
1. Download the zip file
2. Extract the file, copy library folder, and paste it on the desktop
3. Open MySQL Create a database olmspythondb then import the SQL File available in the SQL File Folder (For MySQL we used XAMPP server)
4. Open PyCharm and click on the terminal
5. Navigate the project folder using the cd command
cd project_path
For ex: cd C:\Users\ANUJ\OneDrive\Desktop\library\
6. Now Navigate to the olms folder
cd olms
7. Run the Project using the following command
python manage.py runserver
Click: https://phpgurukul.com/online-library-management-system-using-python-django-and-mysql/
1 note
·
View note
Text
Human Metapneumovirus (HMPV) – Testing Management System Using PHP and MySQL

Human Metapneumovirus (HMPV) Testing Management System is web based technology which brings up various diagnosis works online. Here patients are first allowed to register on the website and provide personal, test information. Once registered with their address and contact details, the patients may now see a variety of tests conducted by the lab. The patient will select the required test and book appointment after that lab center send a lab boy at registered address to collect a sample. After successful sample collection patient can track their test history using the name, order and registered mobile number. The Human Metapneumovirus (HMPV) Testing Management System allows admin to attach a copy of the report into the system and automatically shown on user side so user can downloads report.
Click here: https://phpgurukul.com/human-metapneumovirus-hmpv-testing-management-system-using-php-and-mysql/
Human Metapneumovirus (HMPV) — Testing Management System Project Modules
In NIPAH VIRUS Testing Management System we use PHP and MySQL database. It has two modules i.e.
Admin
User (Patient)
Admin Module
Admin is the super user of the website who can manage everything on the website. Admin can log in through the login page
Dashboard: In this section, the admin can see all detail in brief like the total, assigned and the sample collected and completed tests.
Phlebotomist: In this section, the admin can manage Phlebotomist (add, update, delete).
Testing: In this section, the admin can manage all the tests like assign the test to the Phlebotomist and updating the history.
Report: In this section, the admin can generate two types of report. One is between dates reports and the one is by search. Admin can search the report by order number, name and mobile number.
Notification: In this section, the admin will get a notification for every new test request (notification bell).
Admin can also update his profile, change the password and recover the password.
User (Patient) Module
User can visit the application through a URL.
Testing: This section divided into two parts. One is for new user and another one is for registered user. New user (First-time user) needs to provide personal and testing Information. A registered user only needs to provide test information; their personal information will be fetched from the database.
Test Report: In this section, Users can search their test report using order number, name and registered mobile number.
Dashboard: In this section, the User can see the in which State of how many tests are done.
How to run theHuman Metapneumovirus (HMPV) Testing Management Project using PHP and MySQL
1. Download the project zip file
2. Extract the file and copy hmpv-tms folder
3.Paste inside root directory(for xampp xampp/htdocs, for wamp wamp/www, for lamp var/www/Html)
4.Open PHPMyAdmin (http://localhost/phpmyadmin)
5. Create a database with the name hmpvtmsdb
6. Import hmpvtmsdb.sql file(given inside the zip package in SQL file folder)
7. Run the script http://localhost/hmpv-tms
*************************Admin Credential************************** Username: admin Password: Test@123
PHP Gurukul
Welcome to PHPGurukul. We are a web development team striving our best to provide you with an unusual experience with PHP. Some technologies never fade, and PHP is one of them. From the time it has been introduced, the demand for PHP Projects and PHP developers is growing since 1994. We are here to make your PHP journey more exciting and useful.
Email: [email protected] Website : https://phpgurukul.com
0 notes
Text
PHP CRUD Generator Nulled Script 2.3.1

Download PHP CRUD Generator Nulled Script for Free Looking for a powerful and intuitive way to generate PHP CRUD applications without writing endless lines of code? The PHP CRUD Generator Nulled Script is your go-to solution. This dynamic tool allows developers and non-developers alike to generate responsive, professional-grade PHP admin panels within minutes — completely free. What is PHP CRUD Generator Nulled Script? The PHP CRUD Generator Nulled Script is a premium tool designed to automate the creation of Create, Read, Update, and Delete (CRUD) functionalities in PHP projects. Whether you're building a back-office dashboard, managing databases, or creating dynamic web apps, this script simplifies your workflow by offering a visual interface that connects directly to your MySQL database. And now, thanks to the nulled version, you can enjoy all premium features without spending a dime. Technical Specifications Language Support: PHP 7.x and PHP 8.x Database: MySQL and MariaDB compatibility Framework Independent: Works with plain PHP or any framework Installation: One-click setup wizard Responsive: Bootstrap-based admin panel Key Features and Benefits 1. Visual CRUD Interface The script allows you to visually build CRUD operations using an intuitive UI. No coding is needed — simply select tables, define relationships, and generate ready-to-use PHP code instantly. 2. Time-Saving Automation Save hours of development time by letting the PHP CRUD Generator automate repetitive coding tasks. Focus on your app's logic while the tool handles the backend scaffolding. 3. Fully Customizable Output The generated code is clean, modular, and fully editable. You can tweak it to match your specific requirements or integrate it into your existing projects seamlessly. 4. Advanced Filters and Search Each generated CRUD interface comes equipped with advanced filtering, sorting, and search features to make data management a breeze. 5. Secure and Reliable While the script is nulled, it retains all security features found in the original version. You can trust it to manage your data efficiently and securely. Common Use Cases Admin dashboards for small to medium businesses Inventory and stock management systems Customer relationship management tools Educational portals and student record systems Personal or freelance PHP projects How to Install PHP CRUD Generator Nulled Script Installing the nulled version of PHP CRUD Generator is straightforward: Download the PHP CRUD Generator Nulled Script from our website. Extract the zip file and upload the contents to your server directory. Open your browser and navigate to the setup URL. Follow the step-by-step installation wizard and connect to your MySQL database. Select tables, configure settings, and generate your CRUD panels instantly. That’s it! Your admin panel is ready to use with full create, read, update, and delete capabilities. Frequently Asked Questions (FAQs) Is it safe to use the PHP CRUD Generator Nulled Script? Yes, the nulled script offered on our site is tested and free from malware. However, we recommend using it only for educational or personal projects unless you have appropriate licensing for commercial deployment. Can I use this script on multiple projects? Absolutely. The nulled version removes usage limitations, allowing you to implement it across as many projects as you like. Is technical support available? Support is not included with nulled versions. For troubleshooting, refer to community forums or consider purchasing the official version for full support. Does it work with the latest PHP version? Yes, the script is compatible with the latest PHP releases including PHP 8.x, ensuring seamless performance and security. Why Download From Us? Our platform offers high-quality, pre-tested nulled tools for developers. Not only do we provide the PHP CRUD Generator for free, but we also offer exclusive access to other top-rated tools like iThemes Security Pro NULLED, ensuring you get the best resources under one roof.
Need themes too? Check out the latest Enfold NULLED theme to build a stunning front end for your next project. Final Thoughts The PHP CRUD Generator Nulled Script is a game-changer for developers seeking efficiency, flexibility, and powerful admin capabilities. Download it now from our site and streamline your PHP development with ease — no extra cost, no hidden fees, just powerful performance for free.
0 notes
Text
How to Create a WordPress Website from Scratch
Building a website from scratch can seem like a daunting task, especially if you're new to web development. Fortunately, WordPress, one of the most popular content management systems (CMS), makes the process straightforward and accessible, even for beginners. In this guide, we'll walk you through the steps to create a professional WordPress website from scratch. Whether you're setting up a blog, an online store, or a portfolio site, this step-by-step guide will help you launch your WordPress websites efficiently.

Step 1: Define Your Website’s Purpose
Before diving into the technical aspects, it’s crucial to define the purpose of your website. Are you creating a blog, an online store, a business site, or a portfolio? Understanding your website’s goals will help you make informed decisions throughout the setup process, from choosing the right themes and plugins to organizing your content effectively.
Step 2: Choose a Domain Name and Hosting
Domain Name
Your domain name is your website's address on the internet (e.g., www.yourwebsite.com). It should be unique, easy to remember, and relevant to your site's content. Tools like Namecheap or GoDaddy can help you check the availability of your desired domain name and purchase it.
Hosting Provider
A hosting provider is where your website files are stored and accessed by visitors. Reliable hosting is crucial for your website's performance and security. Popular hosting providers include:
Bluehost: Great for beginners, offering easy WordPress integration.
SiteGround: Known for excellent customer service and performance.
WP Engine: Specializes in WordPress hosting with robust features.
Sign up for a hosting plan that suits your needs. Many hosts offer one-click WordPress installation, simplifying the setup process.
Step 3: Install WordPress
Most hosting providers offer easy, one-click WordPress installations. If your provider doesn’t, follow these steps:
Download WordPress from the official website (wordpress.org).
Upload the WordPress files to your hosting account using an FTP client like FileZilla.
Create a MySQL database via your hosting control panel.
Run the WordPress installation script by navigating to your domain name.
During installation, you'll need to enter your database details and create an admin account. Keep this information secure, as it grants full access to your website.
Step 4: Choose and Install a Theme
WordPress themes dictate your website's appearance and layout. The WordPress repository offers thousands of free themes, and there are premium themes available from marketplaces like ThemeForest.
Installing a Theme
Navigate to Appearance > Themes in your WordPress dashboard.
Click Add New to browse free themes from the WordPress repository.
Search for a theme that fits your website’s purpose, preview it, and click Install.
Activate the theme to apply it to your website.
Premium themes usually require downloading a zip file from the marketplace and uploading it via the Upload Theme button in the Themes section.
Step 5: Customize Your Theme
Once your theme is activated, you can customize it to match your branding and style. Navigate to Appearance > Customize to access the theme customizer. Here, you can:
Upload your logo
Modify colors and fonts
Set up your homepage and other pages
Adjust header and footer settings
Themes often come with their own set of customization options, so explore the settings to make your website unique.
Step 6: Install Essential Plugins
Plugins extend the functionality of your WordPress website. Here are some essential plugins to consider:
Yoast SEO: Helps optimize your website for search engines.
Contact Form 7: Allows you to create and manage contact forms.
WooCommerce: Turns your site into an online store.
Jetpack: Offers security, performance, and site management features.
Wordfence Security: Protects your site from malware and threats.
To install a plugin:
Navigate to Plugins > Add New in your WordPress dashboard.
Search for the plugin you need.
Click Install Now, then Activate once the installation is complete.
Step 7: Create Key Pages and Content
Start creating the essential pages for your website. Common pages include:
Home Page: The main landing page that welcomes visitors.
About Page: Provides information about you or your business.
Contact Page: Allows visitors to get in touch with you.
Blog Page: Displays your blog posts if you’re running a blog.
Shop Page: Showcases your products if you’re running an e-commerce site.
To create a page:
Navigate to Pages > Add New in your dashboard.
Enter a title and content for the page.
Click Publish to make the page live.
Use the built-in WordPress editor (Gutenberg) to add text, images, and other media to your pages.
Step 8: Configure Your Site Settings
Customize your WordPress settings to enhance your site’s performance and user experience. Key settings include:
General Settings: Set your site title, tagline, and timezone.
Reading Settings: Choose what your homepage displays (static page or latest posts).
Permalinks: Configure how your URLs are structured for SEO. Navigate to Settings > Permalinks and select the Post name option for a cleaner URL structure.
Step 9: Optimize for SEO
Search engine optimization (SEO) is crucial for driving traffic to your website. Here are some basic SEO practices:
Install an SEO plugin like Yoast SEO to guide you through on-page optimization.
Use keywords relevant to your content in titles, headers, and body text.
Optimize images by using descriptive filenames and alt text.
Create an XML sitemap to help search engines index your site (Yoast SEO can generate this for you).
Submit your sitemap to Google Search Console to monitor your site’s presence in Google search results.
Step 10: Secure Your Website
Website security is essential to protect your site from hackers and malware. Follow these steps to secure your WordPress site:
Use strong passwords for all user accounts.
Keep WordPress, themes, and plugins updated to the latest versions.
Install a security plugin like Wordfence or Sucuri.
Enable SSL to encrypt data between your site and visitors. Most hosting providers offer free SSL certificates.
Backup your site regularly using plugins like UpdraftPlus to prevent data loss.
Step 11: Launch Your Website
After you've set up and customized your WordPress website, it's time to launch. Before going live, perform a thorough review:
Test all links and forms to ensure they work correctly.
Preview your site on different devices to check for responsiveness.
Check for any errors or inconsistencies in design and content.
Once everything is in order, you can officially launch your website. Share it with your audience through social media, email newsletters, and other marketing channels.
Conclusion
Creating a WordPress websites from scratch is a manageable task, even for beginners, thanks to the platform's user-friendly interface and extensive resources. By following this step-by-step guide from VAW Agency, you can launch a professional and functional website that meets your needs and engages your audience. Remember, the key to a successful website is continuous improvement, so keep updating your content, optimizing for SEO, and enhancing your site's features as your needs evolve. Happy website building!
0 notes