#amazing tutorial
Explore tagged Tumblr posts
Visit Tumblr Blog
Explore Tumblr blogs with no restrictions, modern design and the best experience.
Last Seen Tumblr Blogs


Fun Fact
BuzzFeed published a report claiming that Tumblr was utilized as a distribution channel for Russian agents to influence American voting habits during the 2016 presidential election in Feb 2018.
Text
How It's Done (Full Video) - KPop Demon Hunters
#IT'S THE FULL SONG GUYS#OMIGOD THIS IS MY BIGGEST FIND#me looking through the netflix family magazine: huh a charm tutorial??#*opens it* OMIGOD IT IS A FULL SONG#THEY SING WHILE THEY FIGHT OMIGOD#we got a full song before the movie is even released this is amazing hahaha#how it's done#kpop demon hunters#kpop demon hunters song#kpop demon hunters video#huntrix#rumi#mira#zoey#videos in the palace#how its done#how its done song#Youtube#edit: netflix privated the youtube video we found it too fast LOL#ironic bc they technically were the ones to give us the link via the magazine
893 notes
·
View notes
Text

i would like to share this VERY handy tutorial on drawing cars by the ever-immaculate EtheringtonBrothers (twitter, instagram)
#tutorial#cars#etheringtonbrothers#knight rider#transformers#resources#tagging the two fandoms i can think of who might need this the most lmfao#thank you EB i would never be able to draw kitt without you o7 coupled with my gmod references of a kitt car model too of course#please check out their accounts they have so so so many good tutorials. absolutely phenomenal tutorials. on like Everything ever#i know cars are THE biggest pain in the ass to draw ever so here's where i learned it 👉👉#you still gotta do a bit of thinking but its amazing how much even just this one trick can do for you. it carries HARD
870 notes
·
View notes
Note
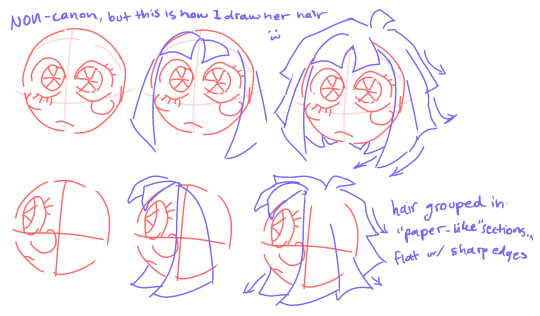
Can you give some tutorials on how to/how you draw Pomni? I struggle with drawing her hat. XD
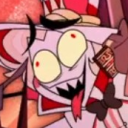
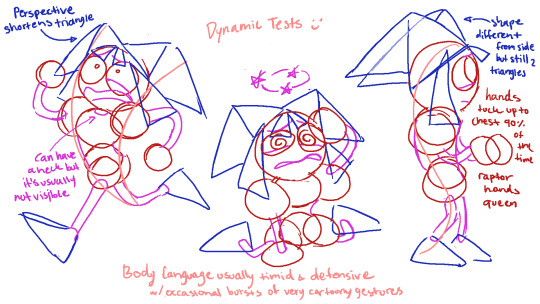
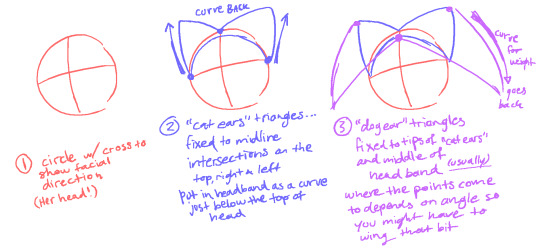
oh yeah of COURSE!!! :D i've waiting for this moment... literally! i've most of this sitting around for like, a month but, idk, i worried it'd be like, egotistical(????) to post a pomni tutorial unprompted..? but now i have been prompted so the floodgates shall open!!! >:D pomni be upon thee


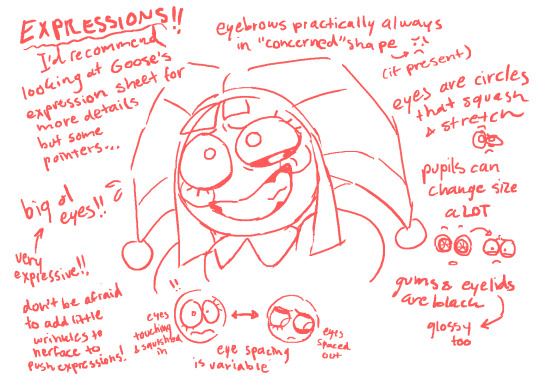
(here's goose's pomni expression sheet in case you haven't seen it yet)
and if you're interested in how i draw her with sharp teeth, i've already made a tutorial on that!! check it out here :D
#hope you don't mind the mess... ^-^;#this is a mix of studies from canon plus a couple parts where i explain how i adapt things into my own style#i think i indicated the differences clearly enough but still be mindful of those discrepancies#the amazing digital circus#tadc#pomni#my art#my tutorials#ask response
2K notes
·
View notes
Note
hii i hope this is ok to ask but i love how fucking HUGE you make curly look, do you have any advice on how to draw muscular frames? :o
thankies!! i love drawing him Robust-Looking <3
as far as advice goes, when it comes to anatomy i always recommend the channel proko on youtube, they have all kinds of videos about how to draw anatomy with each area of the body broken down. basically, if you're trying for anatomical accuracy with muscles and stuff, their vids are a great way to grasp how muscles work!
as far as general shapes and vibes though, i have a couple quick tips of my own <3
the biggest part, if you can imagine, is proportions. typically tutorials will tell you the average shoulder width for a person is about 2-3 heads wide, so if you're making someone Bigger and Beefier, you'll wanna go past that a bit. (and making a character's head smaller is gonna make their body look bigger by comparison, so if you wanna go crazy, shrank that thang)
For example, Daisuke (who i draw as lean, but still with some muscle, especially in his arms) is 4 heads wide at his shoulders, while beefcake curly over here is 5 (sometimes more depending on the drawing lol). something as simple as broadening the shoulders already gives a character a beefier-looking silhouette.

[ID: Simple rough sketches of Daisuke and Curly from Mouthwashing with colored circles showing how many heads wide their shoulder width is. Daisuke is four, Curly is five. end ID]
~~~~
"but what if i don't know how to draw the muscles and am not going for realism/don't feel confident enough in that yet? how do i give a muscular vibe without as much detail?" FEAR NOT it's super easy. here we use the power of SHAPES!!
i draw jimmy and curly with the same "skeleton" or base frame, so i think they're a good example of this next bit. despite having the same bones, i broaden the fleshy parts on curly's limbs (focusing on his shoulders cuz he has big ass shoulders) and keep his upper arms wide before tapering down into his hands (muscles tend to be largest at the base of the limb and get smaller up to the hands/feet but there's plenty of design exceptions). i carry that shape language down into his legs (which i emphasize with his fitted calf-height boots). meanwhile jimmy stays fairly squared, especially when fully clothed

[ID: Simple sketches of Jimmy and Curly from Mouthwashing with notes describing their shapes. Jimmy has a rectangle over his body and is noted as being "relatively rectangular" and the shapes of his limbs are mostly straight. Curly has a trapezoid over his body and has a "top heavy shape" with limb shapes that taper down and in. end ID]
~~~~
and honestly, a good hack to make a character read as more muscular or robust is to give them a buddy that contrasts that. once again, jimmy will assist.
even in a simple drawing like this, giving jimmy the opposite tapering to his limbs just emphasizes curly's hugelargeness by comparison. it also shows that you don't need a lot of detail or realism to convey Beefiness

[ID: Another, more simplified doodle of Jimmy and Curly, pointing out that Jim's limbs taper outwards while Curly's taper in. end ID]
~~~~
another final quick tip i have is: the neck makes a difference!
people with more muscle tend to have thicker necks (it's because of the muscles there, if you can believe it) and it's kinda become one of my fav bits of drawing curly lol. idk why <3 necks fun to draw <3 for him, i draw his neck starting at the very edges of his face and widening out at the bottom to match the shape of his head and to flow a bit more into his trap muscles, but you could go Even Further Beyond if you so Choose. i've found this is a surprisingly good way to convey Beefy Person Beefy even if you don't have as much anatomical knowledge.

[ID: Four bust sketches of Daisuke and Curly comparing their necks. The first two show them both facing forwards. Daisuke's neck is slimmer and straight, while Curly's neck meets the edges of his jaw and has a wider base with higher trap muscles. The second two shows them in profile, with the back of Daisuke's cranium sticking out past his neck, while Curly's is even with his neck, showing how thick is is from the side. end ID]
~~~~
in review we got:
widen shoulders relative to the head to convey a Broad silhouette
taper limbs inwards from base to extremities to emphasize the shape/size of the muscles
give em a less muscular buddy for contrast
thick necks help a lot in conveying a muscular build
and of course, i know i only used men in these examples, but these tips will work just fine regardless of a character's gender. please draw more beefy women ily <3
i hope this made sense and helps you and whoever else might see this uwu
if anyone has any questions about it i will. Try. to answer them. making these posts is oddly difficult lol
#fg's art#mouthwashing#just gonna use the one tag since this mostly has nothing to do with them lol#art tips with major#art tutorial#fg's answers#asks#cursing#WOW AN ART ADVICE QUESTION I ACTUALLY ANSWERED WITH A TUTORIAL. AMAZING. I THOUGHT IT COULDN'T BE DONE AKSDJHAKDJH#the part of me that loves helping people and teaching people art stuff#vs the part of me that finds it SO DIFFICULT TO GATHER MY THOUGHTS INTO A POST#it's hard <3 but we work <3
193 notes
·
View notes
Text

Fanart ive made of @burrotello AU 🫶 (and tadc/md lol) i love the designs and concept so much 😭😭
#my art#fanart#kryzuuna#murder drones#sdn#serial designation n#murder drones n#n md#tadc pomni#pomni#the amazing digital circus#the amazing digital fight club#its a bojack horseman reference btw#i tried my best at this old anime style but im still not really good at it 😔 i need tutorial
1K notes
·
View notes
Text


Reacting To The Craziest Smosh Pit Moments
#angela giarratana#amanda lehan canto#courtney miller#arasha lalani#smosh#smosh pit#smgifs#amazing amazing women#that bootleg comment killed me#i love a good slime tutorial#arangela#amarasha#courtgela
115 notes
·
View notes
Note
Hello, I hope you don't mind me asking, but I love your art style so much, and the way you draw Ragatha!!!
Would it be okay if I asked you for advice on how to draw Ragatha's hair?
Thank you!
It's perfectly fine to ask me for advice, but just so you know, I'm not the best at explaining my art processes tbh. I've never done an art tutorial or anything similar to that.
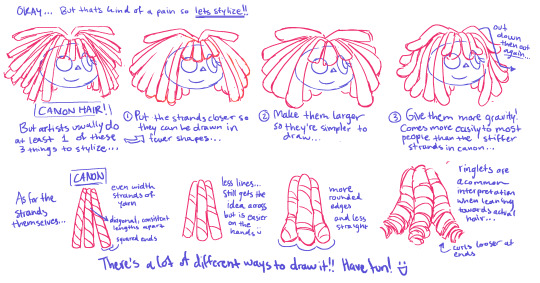
However, I tried making a small guide here on how to draw Ragatha's hair - well, how I draw it at least. It's sort of a rough sketch, but hopefully it'll be useful for you!
First off, I'd like to point out that when I began drawing her character, I used one of her official 2D artworks as reference to draw her hair, not her 3D model!
To be more specific, I used this one:
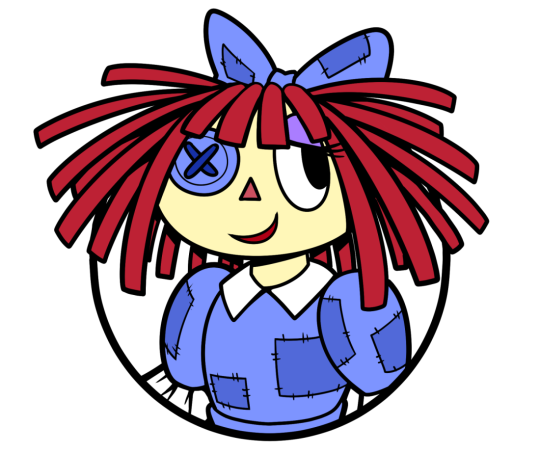
Another important thing to take into consideration is THE VOLUME her hair has.
If you have curly hair and it's long enough, you might know that to make it have that sweet sweet volume, you gotta style it in LAYERS! The same applies to Ragatha here, which you can actually see in the image above! If you wanna make her hair look voluminous, you need to draw it in layers (Assuming you'll be drawing it similarly to how it looks in canon - like dreadlocks)
Anyways, now onto the process!
1st step - Bangs
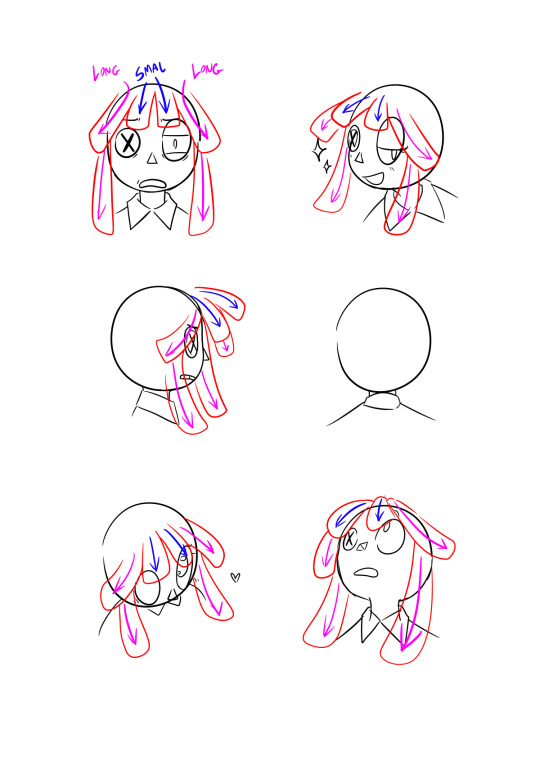
When drawing her hair, I will always start by drawing her bangs first. It helps me sort out where the other locks will be going for the most part.
I will always start by drawing the 4 locks that go on top of her forehead. The two in the middle will always be shorter than the ones on the sides, but that's just my preference.
Once that's done, I do the longer locks that go down along the sides of her face.
2nd step - Locks on top + bow
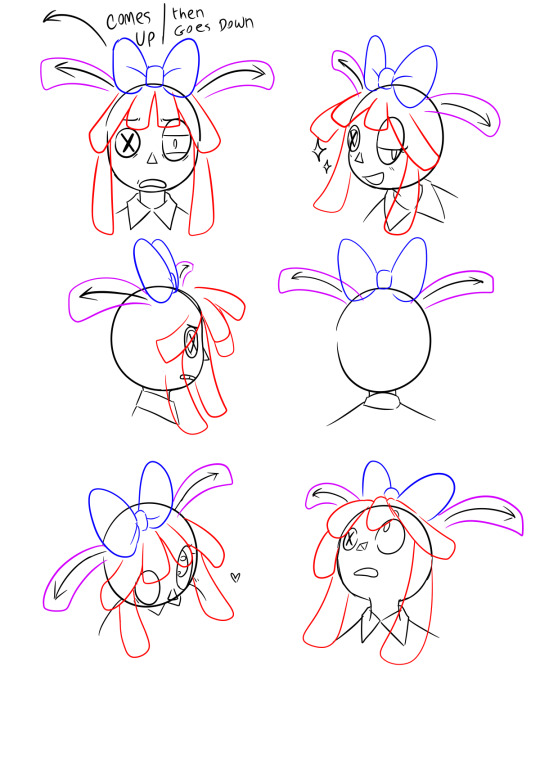
Bow is not mandatory, but I must admit it does make my life easier when i'm drawing her, because then i'll always know where to put the two locks she's got on top of her head - that being right where the bow begins - behind it.
3rd step - Superficial layer!
Once you get the two higher locks and the bangs done, this step becomes way easier. You just gotta fill the gap between them.
I'll normally draw 3 on each side, but of course that will depend on the thickness of the dreadlocks you're drawing. It's overall pretty simple.
I like making these 3 locks more droopy than the other 2 coming from behind the bow, but that's also just my own preference.
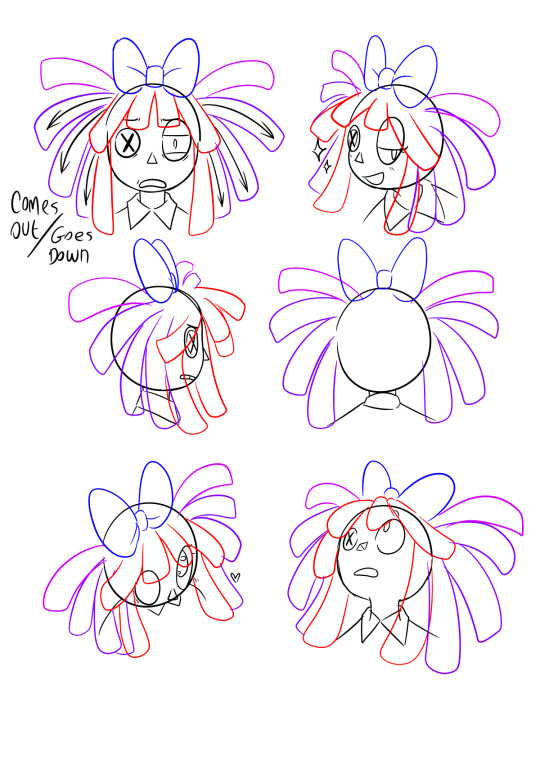
4th step - Secondary layer
As you can see in the two examples in the center, the shorter locks on top will sort of flow in the same way as the 2 smaller bangs in her front. They go up, then down.
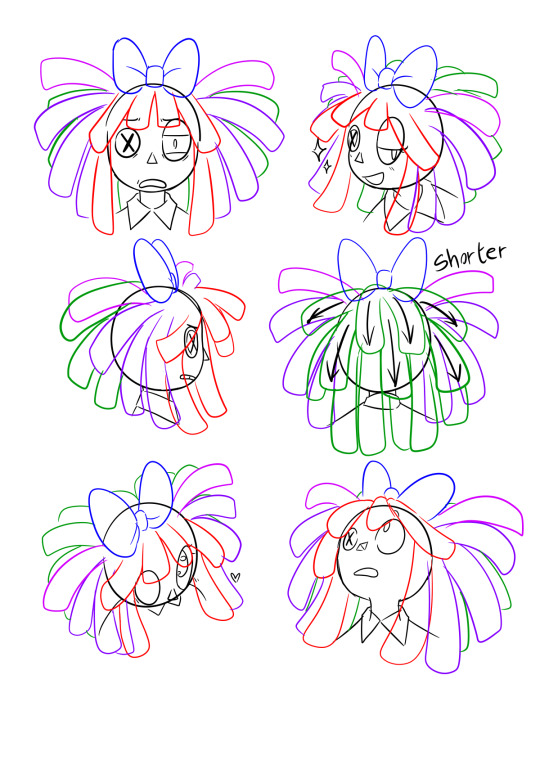
The longer ones that go behind her neck will just go straight down since they're longer and therefore heavier, just like the two long locks on each side of her face.
Clean up + fixing asymmetry
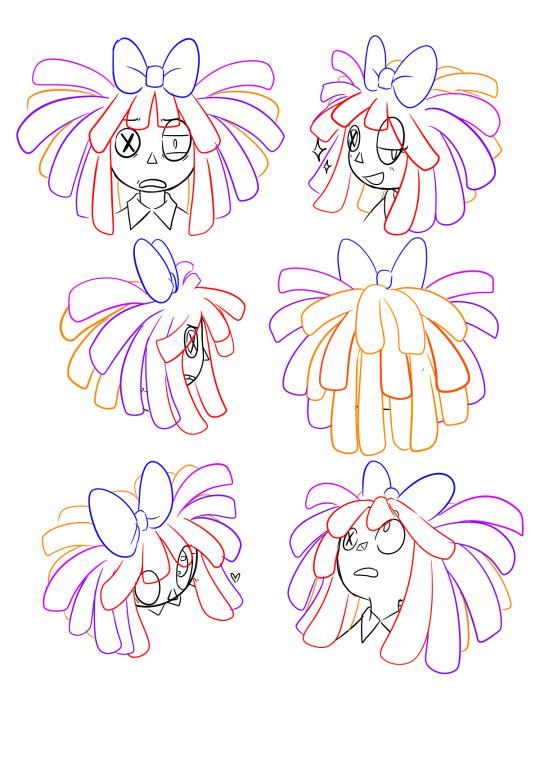
In the top left example, some of the locks were asymmetrical, so I fixed that after cleaning up the sketch. Mistakes like these tend to be very noticeable once you clean things up, so try keeping each side as symmetrical as you can to one another, especially if you're drawing her front view.
Anyway, that's pretty much it for my process! I feel like I could've elaborated a bit more and made this more organized, but at the same time I kind of have no idea what to do lol sorry
Still, I hope this helps you out somehow!
#miga answers#art tutorial i guess?#art advice#sounds more fitting ig#also i loved how the one in the top right turned out#i'm saving it for life as a reaction img#my art#tadc#the amazing digital circus#tadc ragatha#ragatha
496 notes
·
View notes
Note
Ziku, do you have any advice for the color technique? I really like how you apply shadows and lights.
My advice? start with grayscales.
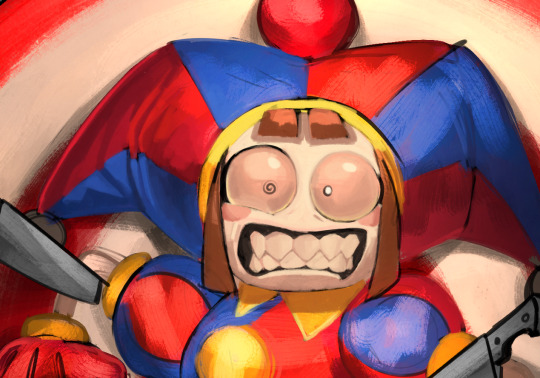
using grayscales helps you distinguish the proper lighting without having to worry about the colors. It's also why I'm able to do the 1-hour pomnis: I could place the colors after I'm done with the lighting placement.
my process is this:
I first start off using airbrush, softly shading areas that don't get hit with light often.
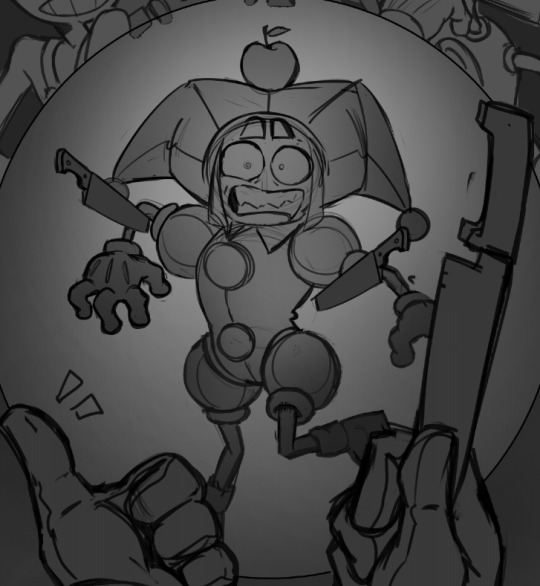
I then proceed to roughly put of where should light hit with a light shade of gray, and how it affects the surrounding area with darker greys. The closer a solid object is to another, the harder the edges of the shadows are. I embrace the imperfection of my strokes, and do not perfect them at this stage since it would be a waste of time.

fun fact: you can make hard edges look more defined by placing a very light shade of gray. This is how I achieve the illusion of lighting hitting something on my art :)
once I'm done with the values, I move to coloring. I keep the strokes as loose as I did the lighting placements, because again. Imperfections HELPS. Glossy things like eyes, teeth and the apple are colored a bit darker, to make the shine pop later.
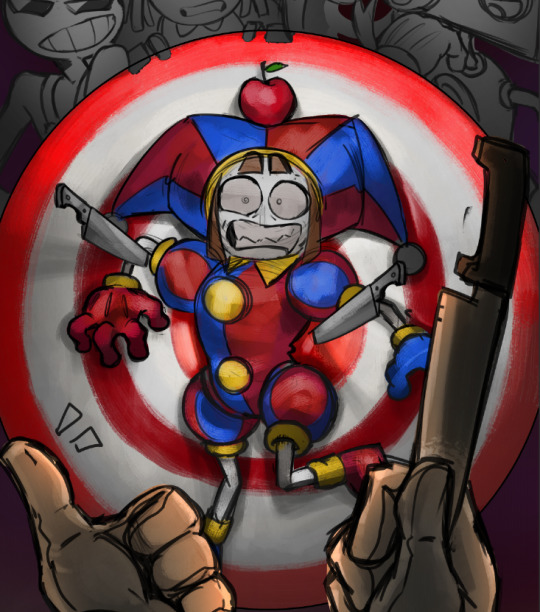
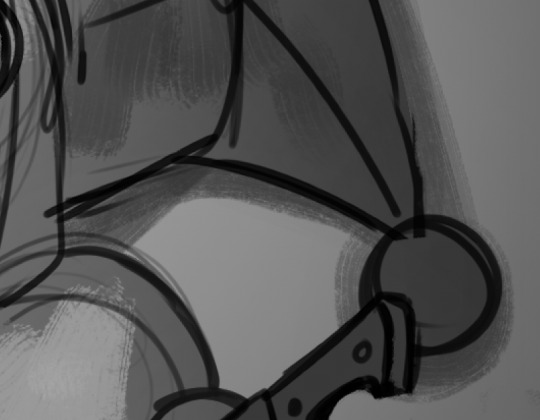
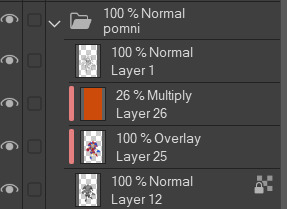
Apply a multiply layer above the colors between 15-30% depending (for this piece it's set to 26%), it's up to you if you want the multiply layer to be cooler colors, or warmer. I chose a saturated orange coloring for mine.

now this is my favorite part: glow dodge. Set to 100% and above every other layer except lineart, light dap it around using an airbrush where the light hits the most.

This part is mostly optional, since this is where I "clean up" the lineart by locking the layer, then color dropping the edges to "erase" most of the lines.
you don't have to do this, it's just easier for me for the rendering stage since it won't get in the way.
You can also go ahead and combine every layer (grayscales + colors + lineart and etc.) afterwards. This one is important.
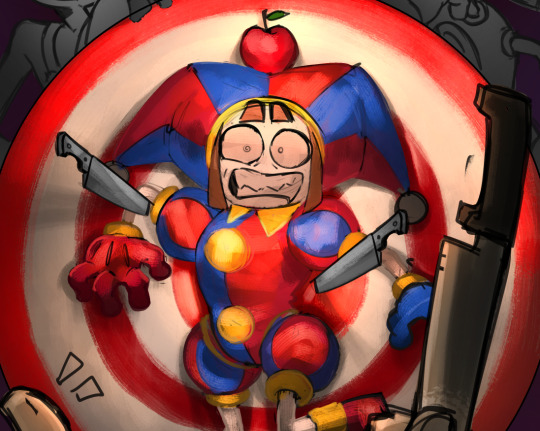
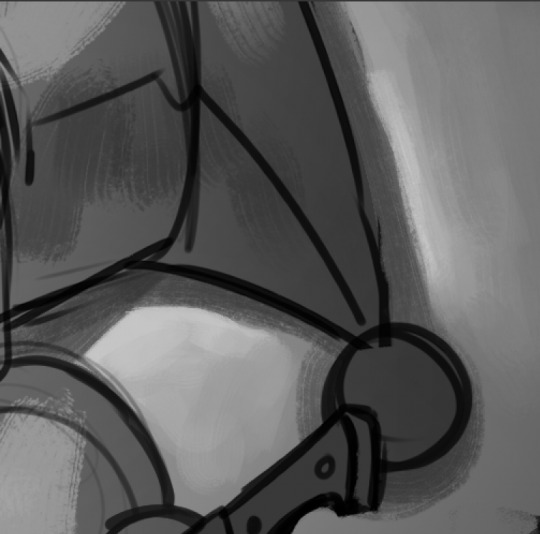
all that's left to do now... is to render your painting.
and you render,
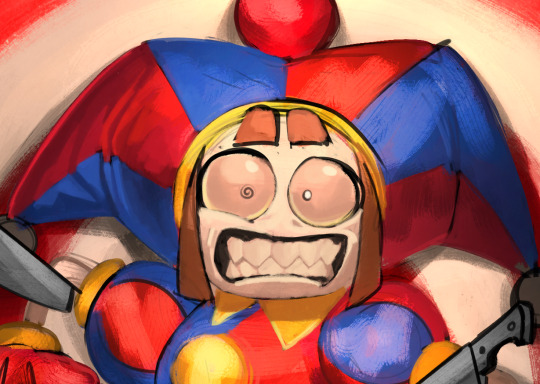
and you fucking trust the process even though Pomni looks like a stoned as fuck vampire with a receding hairline,
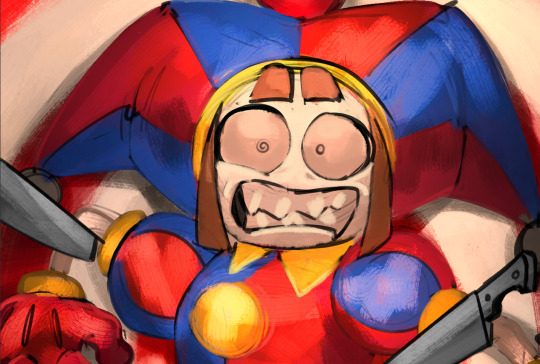
and you render. (and add more glow dodge for the glossy objects)

When I finish a painting, I actually apply a difference layer above it all to give it some flare,
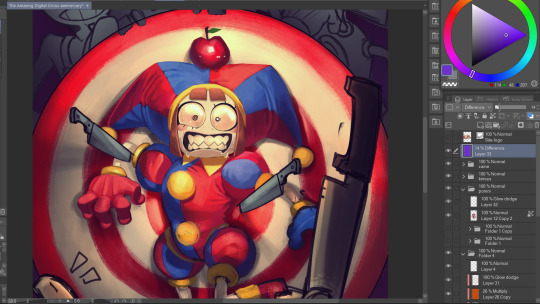
to which after that I'll do a render noise, chromatic aberration, tone curve and posterization for final touches.
That is all :)
#thanks for the ask!#ziku's insane rambles#tadc#pomni#tutorial-ish#the amazing digital circus#art wip#this is my tadc anniversary piece btw
285 notes
·
View notes
Text


STOP SCROLLING PLEASE! ♡ just a reminder to get off tumblr for a bit if you can and try be creative! even if you just scribble for five minutes ♡ this pic might help some other beginners to draw jax, so i wanted to share ♡ he’s just a few lines and circles ♡ i believe in you! do some art and drink some water if you can sweetheart ♡
#digital art#procreate app#jax tadc#art#how to draw#procreate art#artwork#art moots#tumblr moots#tadc jax#tadc fandom#tadc fanart#jax fanart#fanart#queer artist#australian artist#digital artist#fan art#artists on tumblr#learntodraw#drawing#drawing tutorial#how to draw jax#how to draw jax from tadc#the amazing digital circus#tadc#digital circus#be kind#love yourself#art therapy
57 notes
·
View notes
Text
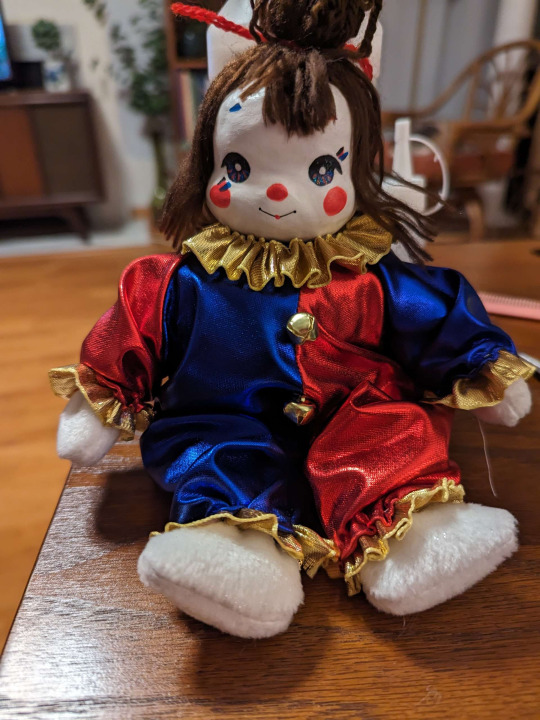
How I made my own vintage Pomni!
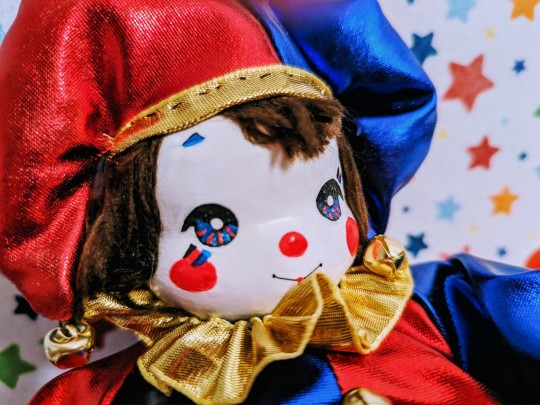
Based on this tutorial, with my own modifications and sewing pattern!
Let's begin!
Here's a total list of the things I used here.
Shiny fabric: blue and red
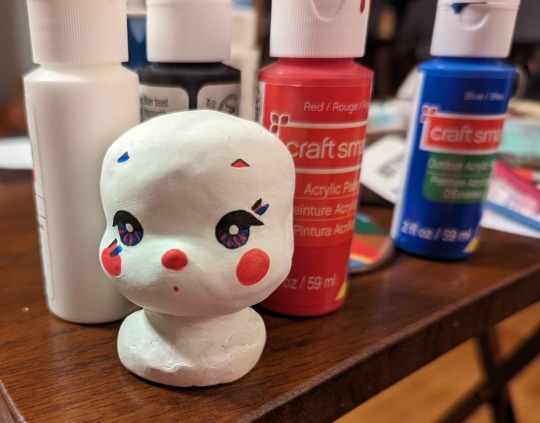
Acrylic paint. Colors: White,red,blue,black
Gold ribbon
White sculpey clay
Tin foil
Mod podge (for sealing the paint)
Jingle bells
Dark brown yarn
Glue
And depending on how you want to handle crafting the body you can either follow the original tutorial and make one out of any fabric you'd like, filling it with plastic beans and stuffing,
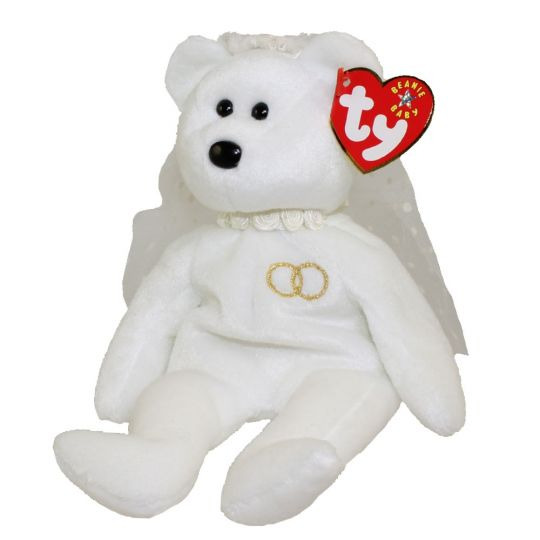
Or you can do what I did and cheat a little! I actually used the body of a beanie baby to save time. You'll find tons of these guys at the thrift store, usually for about a dollar each. The one I used for Pomni looked like this.
All I did was carefully undo the stitching on the bear's head and set Pomni's clay head in the opening!
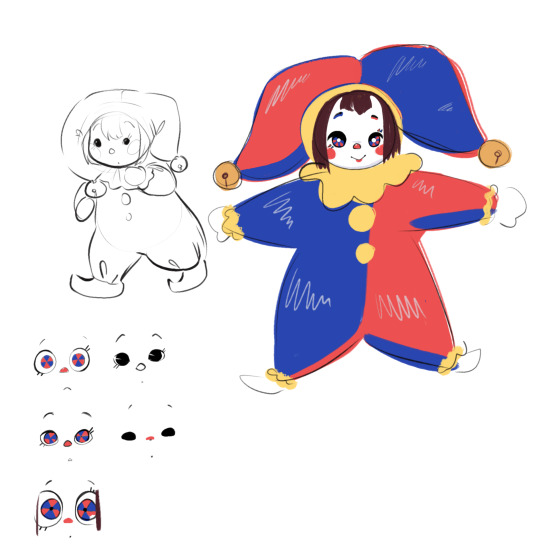
Now for the steps! The first thing I did was gather my materials and make a concept sketch.
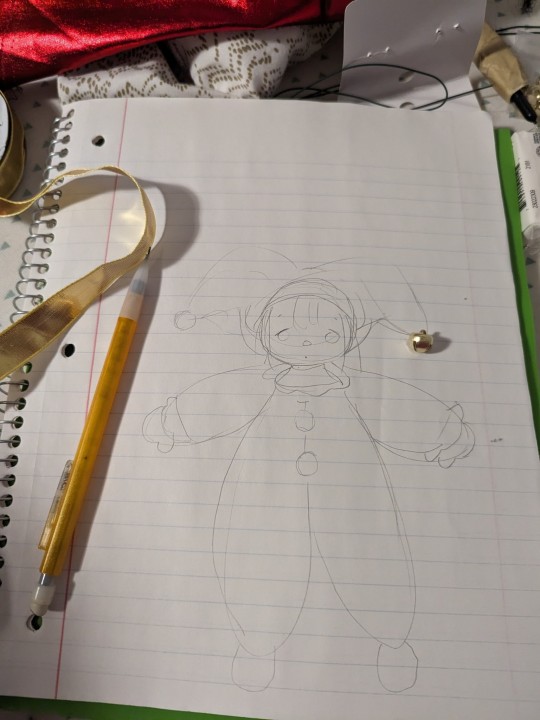
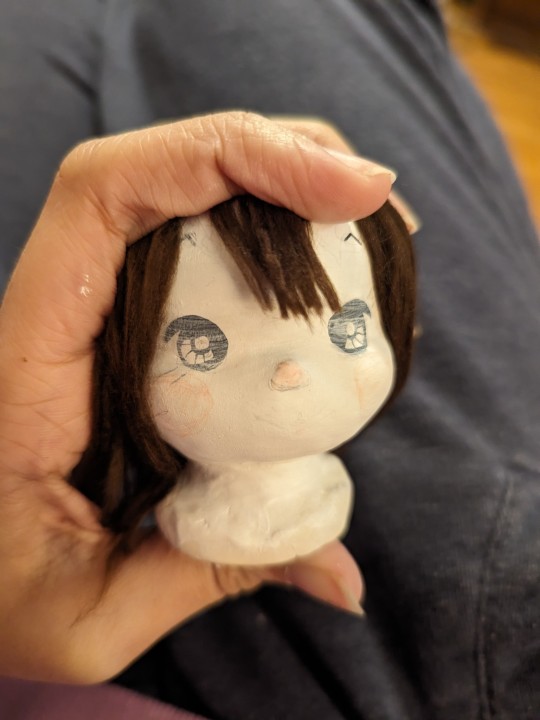
Then since I already had a body for Pomni, I rolled a ball of tin foil slightly smaller than I wanted the head to be, and covered it in sculpey clay. Then I molded the face into a nice cute shape! Don't worry if the back of the head is lumpy, you won't see it under the hat and hair.
Make sure to add a neck that tapers outwards at the bottom so the head stays in the neck hole of the plush body!
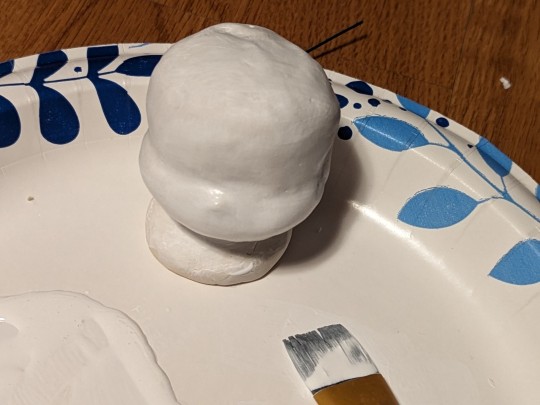
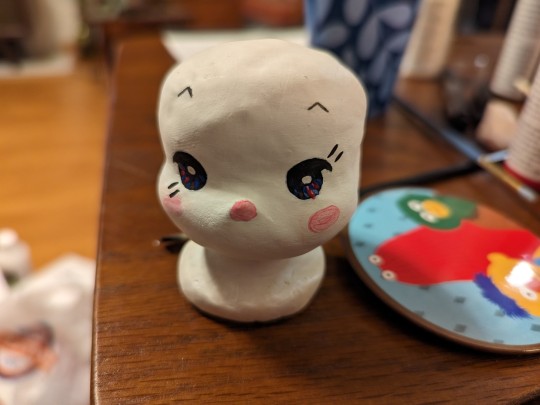
After baking the clay, I painted the head white and sketched out the face lightly with pencil before painting on the details. I even added a little bit of glitter to her eyes! Then when I was satisfied with the face, I sealed the paint with mod podge. It added a nice shine to her face which adds to the porcelain look!
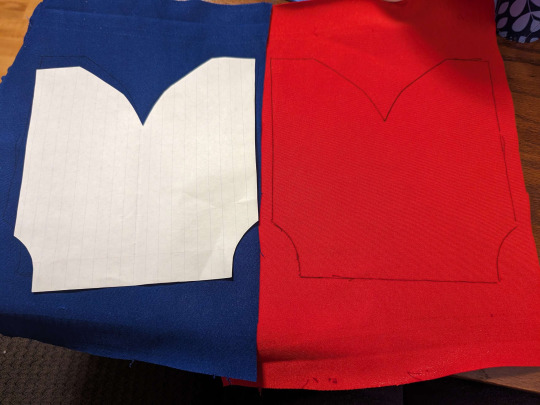
I'd bought a clown doll at a thrift store with a similar outfit to the one I wanted to make for Pomni, which I reverse engineered to make my own pattern! Here's In-progress Pomni wearing the other doll's outfit.
I cut out these patterns to use for the outfit.
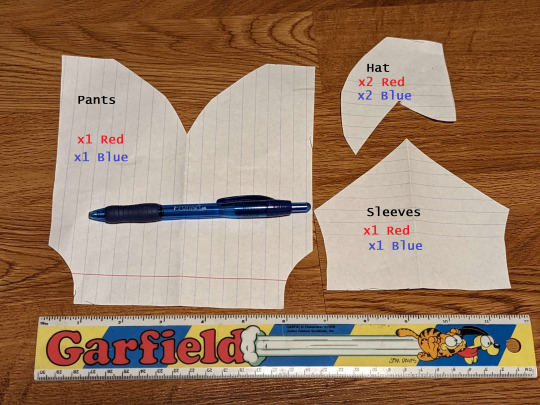

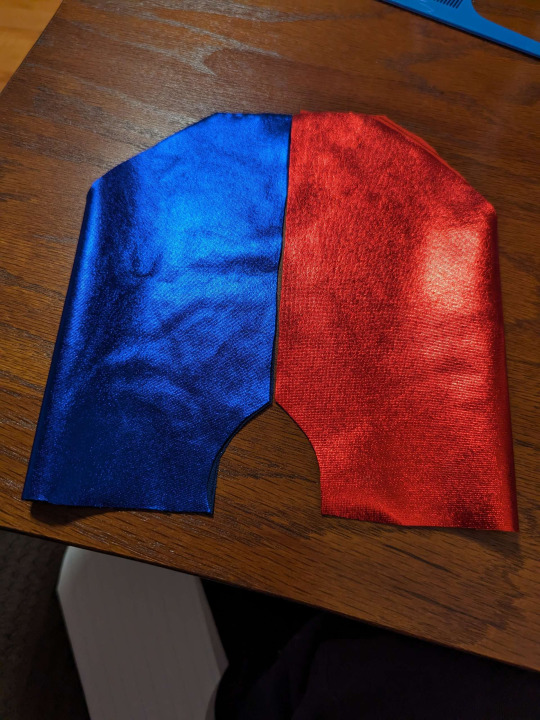
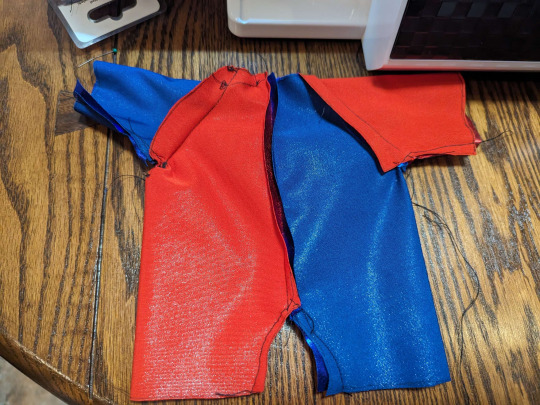
After cutting out the pants they should look like this when put together and folded. Turn them inside out and sew them together at the middle, including the crotch. Leave the top and the pant legs open.
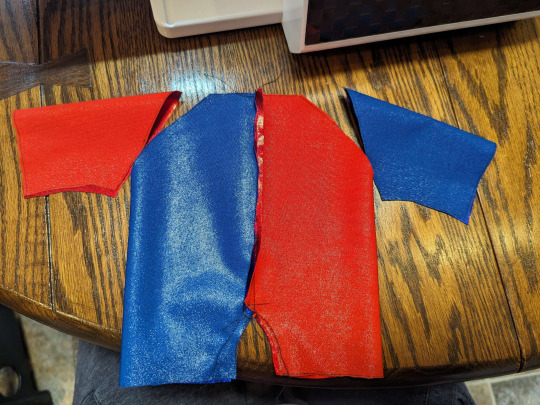
The sleeves should look like this cut out and folded. Make sure they're inside out just like the pants, and sew these at the sleeve openings at the top. Remember to leave the neck hole open!

Here's where we add the ribbon at the ends! Fold up the base of the pant legs and sleeves to hem the ends, and scrunch up the gold ribbon to sew around the borders while you're hemming them. It'll scrunch the ends a little bit, giving the outfit that poofy look.
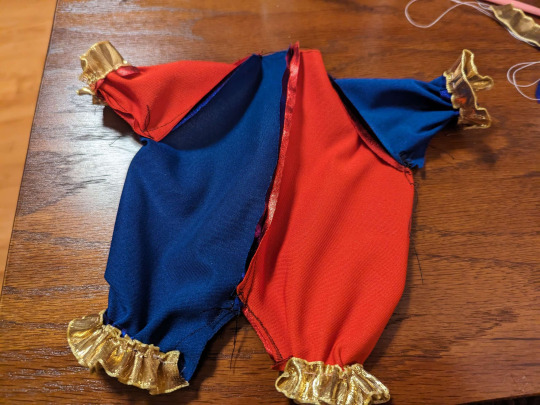
Then turn it inside out!
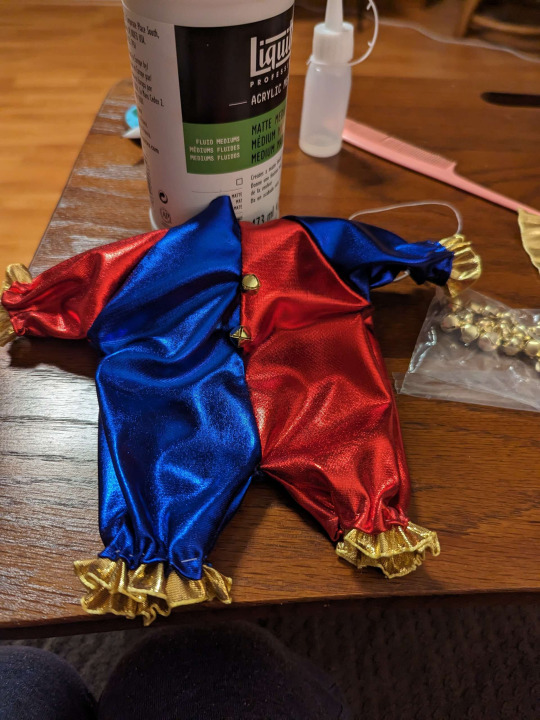
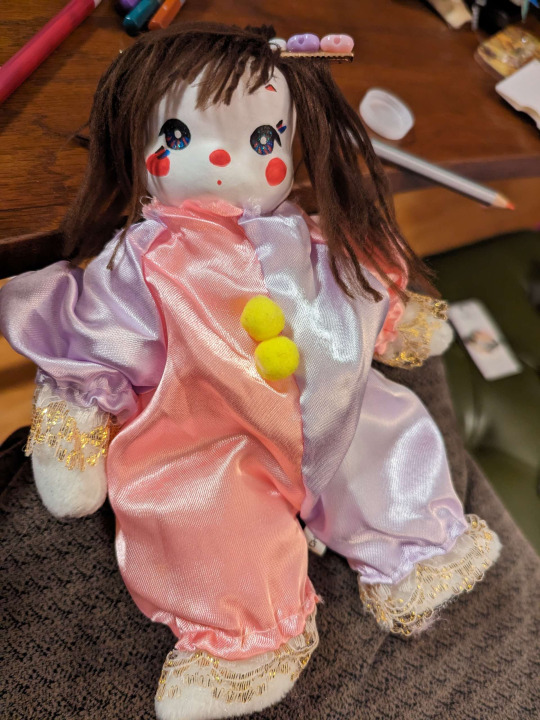
I sewed the bells on and put the outfit on pomni! Then I simply cut another piece of ribbon and made a little ruffle for her neck. It's not sewed to the outfit just so it's easier to take on and off.
For Pomni's hair I got the yarn and combed it out with a fine tooth comb until the texture became softer, and then used a flat iron on it (VERY briefly. just for a second!!!!) to straighten it out. For more tips on this look up yarn doll hair tutorials on youtube! Then I just glued it to her lil head and styled it like so.
I don't have any progress pics for the hat but it was pretty simple. Just cut out the shapes and sew them up!

Then add the hem with a ribbon folded in half, and the bells!
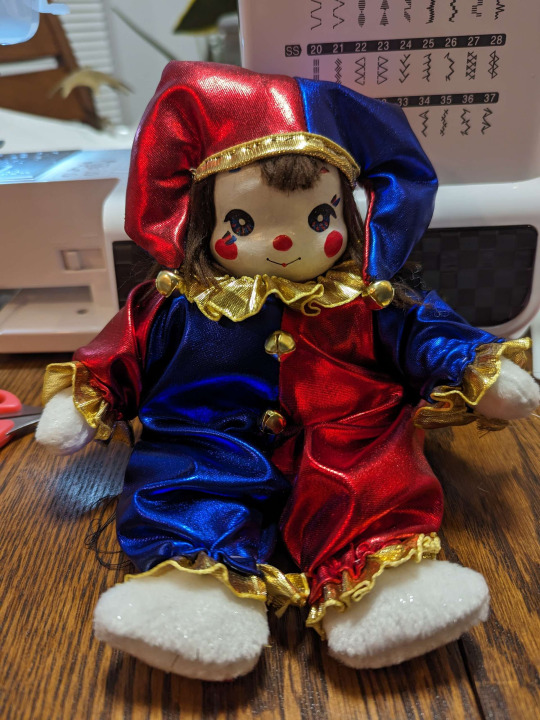
TADAA! A baby pompom for you!
517 notes
·
View notes
Text

just a bundle of ribbons and sadness...!! 🎭
inking her ribbons traditionally was such a pain but god it was worth it, like i dont think i draw enough Digital Circus art but i really should.
Gangle is my absolute fave, but tbh its hard to choose in this show... i need to draw her from ep 4 tho she was so fun there
(´▽`ʃ♡ƪ)
kofi // instagram // artfight // bluesky
#the amazing digital circus#gangle#tadc#tadc gangle#artists on tumblr#my art#traditional art#shoutout to gangle artists who have perfected drawing her whole design. and the one artist who drew a whole tutorial on her ribbons!#you guys are literal godsends!! o(^▽^)o
55 notes
·
View notes
Note
How do you draw Caine's head?
Here's a quick and simplified guide on how to draw The Puppetmaster's head!

Now, again: I'M NOT A TEACHER. You're gonna have to practice this multiple times for yourself (if you want to draw him), because even I didn't really get this right the first time.
I reached my current expertise due to me constantly drawing this guy lmfao I'm just THAT obsessed with him /hj
Hopefully this is a sufficient guide on how to draw this sigma giga chad mewmaster harlequin rizzler- 💥💥💥💥 (I suffer a horrible death)
#thanks for the ask!#tadc#tadc au#harlequin au#tadc harlequin au#the amazing digital circus#caine#tutorial
129 notes
·
View notes
Text
#cat#cats#cats of tumblr#cat lover#cat attack#cat_amazing#cat animals#cute cat#cat cute#pets and animals#pets animals#cute animals#animal lover#animals#cat burger tutorial#cat funny#Meow#kitties#kitty#kitty cat#trending cat#trending funny#trending#amazing video#Pets#Cat Dog#Cat Rat#Cat Rabbit
68 notes
·
View notes
Note
ooh wait do you have a tutorial on how you draw ragatha? i struggle so much with her hair its unreal

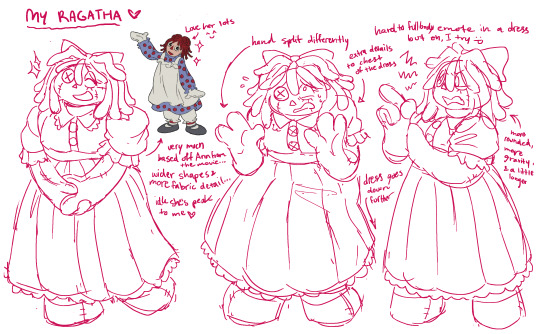
@lyradraws alright, so i feel i'm a bit less qualified for this one but yknow what, it's good practice and good reference for me as well so i gave it a go!! :D
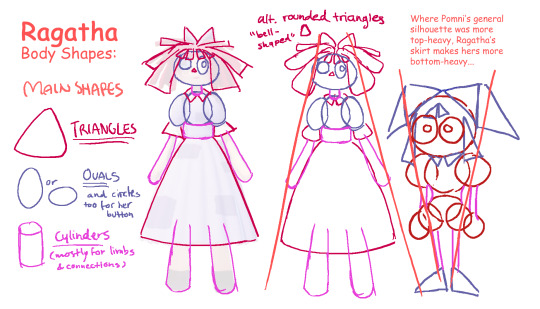
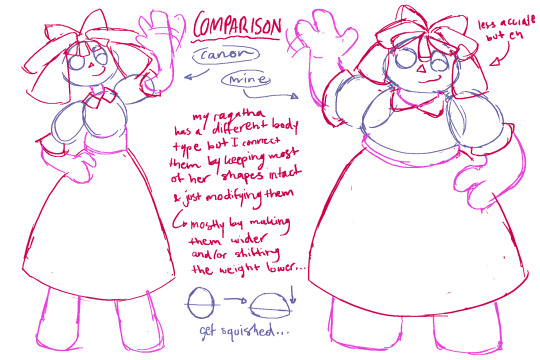
here is my unofficial guide to our darling ragatha <3 MAIN SHAPES:
CHARACTER ACTING:

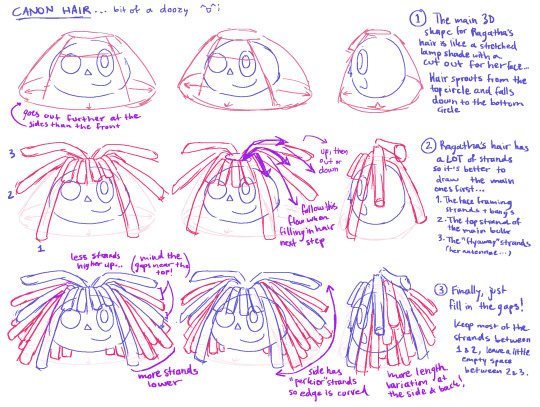
HAIR:
MISC:
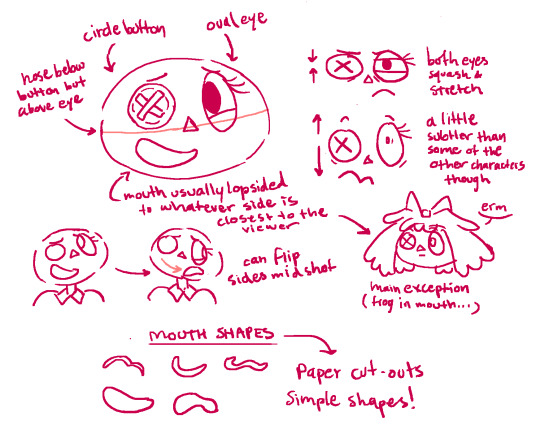
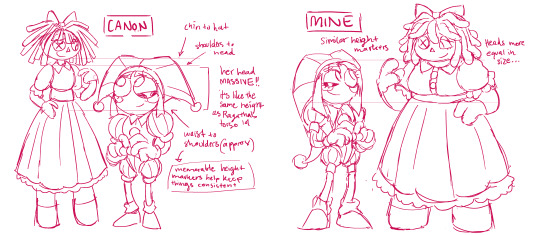
note sure what exactly was meant by comparison to pomni but hopefully this + the shape comparison at the beginning can help?
if you haven't seen it already, or you just want to revisit them, here are my pomni studies!! and also, an important note for IF i do any more of these: do NOT expect this level of detail for the other characters!! pomni and ragatha are my favorites so they get special treatment... if i do the rest it'll probably just be a couple slides of pointers but eh, who knows with me... (shrug)
#i hope you guys know you don't have read all my notes in these i just like yapping... ^-^;#the amazing digital circus#tadc#ragatha#pomni#my tutorials#my art#ask response
677 notes
·
View notes
Note
How do make my rentry move? Like, how do I make custom gifs for them?


Did you mean gif graphics? Well I've done some tutorials in the past and I'd like to link them to you ! ^_^
1st link ( basically a fade gif graphic idek ) && 2nd link ( animated gif graphics w clip mask )
Oh also i just sometimes do clip mask on gifs nowadays , cause i finally figured an easier way . tut under cut !

first , you gonna wanna open your photopickle( photopea JALP )
now , then you wanna load in your project / mask or whatever and then your gif like the usual .
let's use these resources as an example :

after you load both of them you gonna wanna drag the gif first on top of the mask . fair warning , the gif can often be either small or too large so you might wanna resize it .

go to the mask layer and do layer > raster mask > from transparency

it'll look something like this ^^ !!

after that you wanna drag that black & white thingy or WHATEVER IT IS CALLED to the gif folder and then unsee the mask

and tadaa it'll look something like this !! :3c easy right ? now you just add some stroke and it'll be alot nicer !
here are the results ! ^_^

now you don't have to struggle clip masking 100+ frames or 200+ OR MORE . enjoi the amazing tutorial by kiochisato and don't use the graphic without permanent credits that's all .

225 notes
·
View notes
Note
Here's a tutorial for changing tag colors: https://archiveofourown.org/works/53119543
THANK YOU!
Here is a clickable link for anyone who needs that - https://archiveofourown.org/works/53119543
and I shall tag @sorbusaucuparia to close the loop!
#mod remi#ao3 skins#ao3#archive of our own#y'all are amazing did you see how quickly that went#if there are more tutorials feel free to put them in the notes/reblogs!
184 notes
·
View notes