#if there are more tutorials feel free to put them in the notes/reblogs!
Explore tagged Tumblr posts
Visit Tumblr Blog
Explore Tumblr blogs with no restrictions, modern design and the best experience.
Last Seen Tumblr Blogs


Fun Fact
In Q3 of 2020, 31% of US users access the Tumblr app daily.
Note
Here's a tutorial for changing tag colors: https://archiveofourown.org/works/53119543
THANK YOU!
Here is a clickable link for anyone who needs that - https://archiveofourown.org/works/53119543
and I shall tag @sorbusaucuparia to close the loop!
#mod remi#ao3 skins#ao3#archive of our own#y'all are amazing did you see how quickly that went#if there are more tutorials feel free to put them in the notes/reblogs!
184 notes
·
View notes
Text
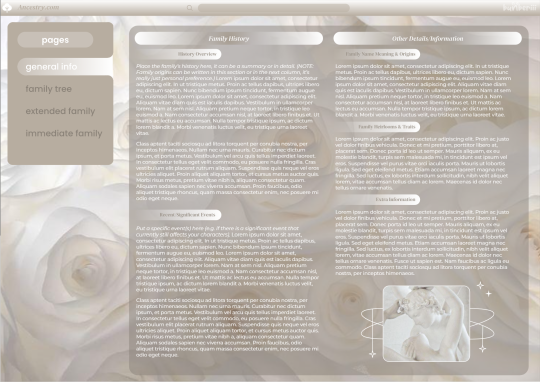
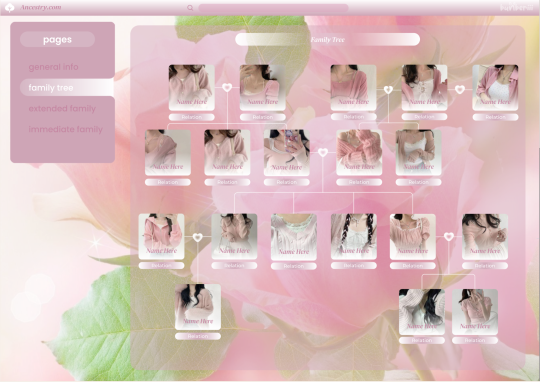
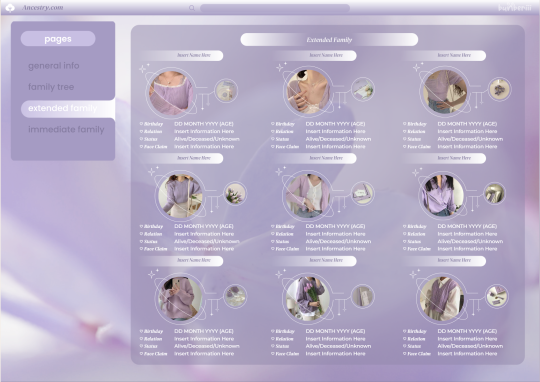

11. fam (family tree/oriented google template)
introducing "11. fam", a pastel flower/korean-style aesthetic in-depth google docs oc template for the planning and documenting of information for families within roleplays and creative writing. with many custom drawings such as icons, menus, a customisable family tree and much more, this document includes space for individual family members, collective family history, name meanings, fun facts, heirlooms and more (section names can be changed to fit your needs). this template is also available in four colour options: ivory/white, persona/pink, lilac/purple, and serenity/blue. feel free to edit this as much as you wish as long as you do not remove my credit.
notes/rules
editing and modifications are welcome once you purchase the template.
all drawings and images in this document are custom created (or in the case of the pictures, edited) by me. If you would like to take elements from this document, you will need to credit me as an inspiration or the creator of that element(s).
resizing or moving objects/images can throw off the document, so be careful.
do not remove my watermark/credits!
please like or reblog this post if you use my template! ♡
how to use
click the source link above
purchase the template via my payhip
follow the instructions on the downloaded note
once you receive access to the template, go to file → make a copy
how to edit
in order to most easily put in your own images, go to replace image then choose how you wish to replace it (either uploading a file or via the image's URL).
this document includes drawings. Double-click the drawing/image on the bottom left or top right corner, then click the edit tab. this will take you to a page where you can replace, edit or delete features of the image
for the custom-edited photos, I've linked a tutorial to how I created them in the zip file you'll receive after the purchase
#google doc#google doc template#google docs template#template#discord rp#family template#family tree#writing resources#creative writing resources#white aesthetic#flower aesthetic#blue aestheitc#pink aesthetic#purple aesthetic#aesthetic#pastel#pastel aesthetic#bun: original#bun: google docs
397 notes
·
View notes
Text
Tips and classes for Drawing and painting!
Hi!
The other day I saw a comment on Tumblr from someone who was just starting out in drawing and was using AI to help study their drawings. I decided to put together some resources that I know can help artists study and use as a reference without feeding this algorithm that is being so harmful to so many people in the artistic field.
Feel free to add more in the comments and reblogs!!!
Note: Some YouTube channels and profiles mentioned here I don't follow for so long or/and I didn't have time to analyze the content posted in full, but they were recommended by other people. Some channels/profiles are on these lists because of these recommendations or because they were useful with a post/video/tutorial at some point in my life. If there is any controversial/questionable conduct, I make it clear that I didn't know before posting! (We never know, right? hehehe)
LET'S GO:
1. You and your environment:
That's right, YOU. Your person and what you have available at home can be great references! Photos of family or friends, your pet, everyday objects that you barely pay attention to, the landscape around your house (even if it is not considered the most beautiful landscape or if it is just a wall), your food, the forgotten plant in the pot, your shoes, your clothes, your own body! They are physical objects, in YOUR hand, where you can rotate, position, arrange as you wish, and as a bonus you can do light studies on them with your cell phone's flashlight or natural daylight.
2. Follow your favorite artists and styles you like:
By following profiles of artists you like on social media, you can study their drawings, to understand how they do what they do, and, little by little, develop your art with your personality based on the styles you like!
Just be careful not to plagiarize! There's a difference in taking art from your artists to study, and keeping it for yourself and posting copies of other people's art or copying someone else's design! Study, understand and end up developing yours! DO NOT base your studies purely on the arts of others, but complement with them!
3. Follow photographers:
Photographer profiles are a treasure for anyone who likes to draw! There are photographers who capture images of people, animals, plants, landscapes, cities, etc. There are several categories! And different styles! Black and white, evidence in the shadows, play of colors and perspectives! It can be a fun exercise!
4. Follow model profiles:
Templates also provide good references. Today there is great variability in model profiles (if you know how to look well), and it can be a good exercise to design clothes and accessories on people! Study of fabric, movement, makeup and pigments in skin, hair, pose, among others
5. Media:
You can pause and take a screenshot of scenes you like from series, films, documentaries, cartoons, anime, or even take a panel from your favorite comic and draw it in your style, or study that image and try to copy it before applying in your style!
6. Pinterest:
The classic of classics! Great for references, using PHOTOS, of REAL people, animals, objects and landscapes. In addition, there are also several posts with drawing and painting tips, and even several mechanisms about various objects and elements, which can allow you to better understand the dynamics of what makes up your drawing, making your drawing, design and painting easier! There are even ready-made folders shared by other artists with several images, but you can make your own, in your own way! Mine have more than 60.000 pins!
7. Tumblr’s focused on tips for drawing and painting:
There are several names that we can mention and it is very easy to find these Tumblrs!
8. Follow artists here on tumblr:
These artists often share tips, techniques and brushes!
9. YouTube channels focused on drawing and painting:
There are several channels focused on art, tutorials, classes and drawing tips!
Some are: New Masters Academy; FZDSCHOOL; Proko; Alphonso Dunn; SamDoesArts; Marc Brunet; HABOOK; Brad's Art School; KeshArt; 조맹 Chommang_Drawing; NIRO; Sinix Design; Mmmmonexx; Draw like a Sir; fjordwind; Angel Ganev; Desenho Mestre; Pikat; One Pencil drawing; Bluebiscuits; SulaMoon; Uncomfortable; Bob Ross; Kevin Oil Painting; Fine Art Academy; Sycra; Moderndayjames; Kaycem; Tim Mcburnie - The Drawing Codex; Swatches; Ahmed Aldoori; Jordan Grimmer; Justin Donaldson
10. DAZ Studio:
It is a free program that allows you to model characters. You can customize and position the avatars however you see fit. You can even work with light incidence. You can also set up scenarios.
The free program already comes with some basic elements and on the website you can download more elements to compose your scene, such as other avatars, animals, objects, clothes, textures, among many others. However, it should be noted that some of these elements are paid. But the free basic elements already help A LOT in reference position, proportion, anatomy, scenery and study of light and shadow
11. Sketchfab:
It is a website that has several 3D elements generated by other artists. It has a free basic plan, with certain limitations, but it helps a lot when photos and other drawings are not enough for the pose you want!
12. PixelSquid:
It offers 3D models that can be useful for reference.
13. Floorplanner:
Allows you to create 2D and 3D house plans with a free account. This can help you with references to compose the scenario!
14.Dimensions:
It allows the notion of the dimension of different objects and figures.
15. Comparing Heights:
Website that allows you to compare heights between two figures
16. SculptGL:
Free basic 3D sculpting tool
17.Textures.com:
It has 3D molds and textures. There are free options in its gallery
18. Justsketch.me:
It has a free version with basic human models to create positions for reference. They are somewhat reminiscent of the articulated dolls used in the past.
19. Reference Angle:
Offers photographs of people that match the position of a 3D mold. You can select facial expressions
20. Photo reference X 3D model:
It gives you some 3D molds of human and animal skeletons and correlates the position you leave with photos
21.Bodies in motion:
Provides several stop motions of people moving. There is free and paid content
22. Sketchdaily:
A website that offers several reference photos for drawing, with different poses. You can select whether you want photos of structures, vegetation, animals, body parts, people and other specifications. One cool thing about this website is that you can choose to set a timer for the image, allowing you to leave it exposed for you to draw for 30 seconds to 1 hour (or not, you can choose to leave it without a timer).
23. Line-of-action:
It has an interface that is very similar to Sketchdaily, but the maximum time for displaying an image is 10 minutes. It has the categories of human figures, animals, hands & feet, faces & expressions and scenes & environment and basic shapes & still life.
24. Reference.pictures:
Site with several posed photos. However, there is paid content.
25. Croquis.cafe:
Various reference photos of people. Paid content
26. Pose tool:
Selection of multiple reference images that can be selected according to a filter
27. Clip Studio Tips:
Various digital drawing tips provided by the clip studio website itself
28. CecelyV:
Blog created by Cecely Valderrama (CecelyV) where she provides free tutorials
29. Drawawesome:
It has free content for artists
30.Will Kemp Art School:
A blog with free painting and drawing lessons
31. Blog Art Instruction:
Offers free art instruction. Created in 2007 by Ralph Serpe.
32. Draw Mix Paint:
Offers a series of tips, classes, videos and content focused on painting and drawing for free
33.The Dimensions of Colour:
Material created by David Briggs for coloring
34.Guide To Drawing:
A guide from Bill Martin
35.Artyfactory:
Offers some tutorials for free
36.Art Lessons Online:
This website has some free content
37. Ctrl+paint:
Offers a range of free and paid content
38. Drawspace:
It has free and paid drawing and painting courses
39. Paid classes:
Domestika
Sketchbook skool
Proko
Teacups
The Virtual Instructor
40. Color Palette Cinema:
Instagram account that creates and publishes palettes based on scenes from movies and series
41. Canvas color palettes:
Create color palettes from an image upload
I can do a drive collecting books for drawings too, but that's for another post or for someone's reblog hehe
#art#tips#art tips#drawing tips#drawing resources#digital art#artists on tumblr#anti ai#anti ai art#painting#clip studio art#canvas
27 notes
·
View notes
Text
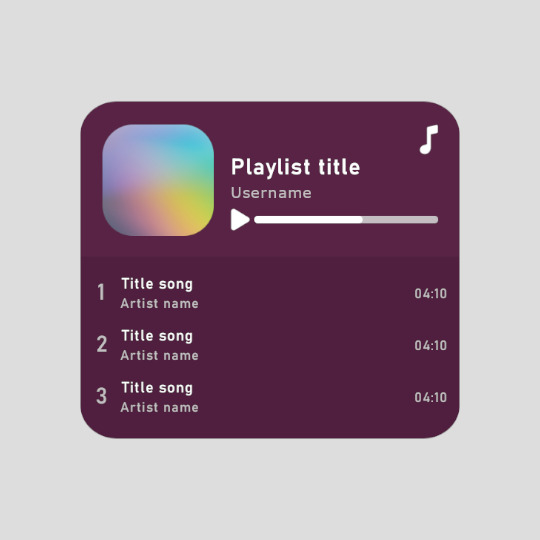
Playlist template for GIMP (XCF) ▬ by Joy from @creativexspirit
Like or reblog if you download. Feel free to add/delete/adjust some layers. Please don’t request as your own, respect my work. Don't hesitate to tag me if you use it! I would love to see your edits.
I made this after falling in love with this template by @danesdehaan and the amazing rolling effect added to it by @eddiediaaz. This template is however based on the look of embed spotify playlist. I have plans to share how I'm using this template to create a rolling playlist effect. Here is the tutorial to have a rolling playlist effect (gif tutorial) using AnimStack: click here.
Font used is Bahnschrift (already installed if you're on Windows 10+).
Icons used here are from icons8. (pls continue crediting them if you use the template!)
download: (x)
More XCFs here: (x)
More instructions under the cut.
This template is intended to be used as a base for a rolling playlist. Tutorial might come later on how I use it to do so, but for now, if you just want a static playlist of three songs: DELETE "GUIDE MASK SONG LIST FOR GIF" and the layers groups "Song 4" and "Song 5" inside the "Song" layers group.
I use GIMP 2.10 and some layers (or groups) are color coded:
Blue mark: change the color layer to another of your liking.
Orange mark: change the picture (here the playlist cover picture) by putting another picture in the layer group specified for this pic. (I created a group so you don't have to change the composite mode of your layer upon adding it to your image).
Red mark: change the text.
You have two options for the small icon in the upper right corner (icons from icons8) either a music note like in the preview or the Spotify logo. Choose either or none by toggling the visibility of the layers. Of course you're free to add your own logo as well, you do you.
If you have any more questions, I am an ask away!
10 notes
·
View notes
Text
As stated in my bio, I do NOT answer asks on this blog. Send them to my personal blog @levil0vesyou instead! DMs are fine tho
[Plain text: "As stated in my bio, I do not answer asks on this blog. Send them to my personal blog @levil0vesyou instead! DMs are fine though" End pt.]
Blog directory
So this is only my technical main (due to Tumblr Circumstances, i won't bore you) but I do actually have a lot of blogs, some of them relatively active.
@levil0vesyou is my personal/misc blog, I also sometimes call it my main even though it never was on either account
@quarks-pussy is my star trek blog, despite the url it's not 18+ or purely nsfw
@selfrighteousflowers is my cartoon blog (only cartoons aimed at younger audiences tho, adult cartoons go on the misc nowadays) and also lazytown
@dmitri-ilyich-volodin is my podcast blog (also also Cabin Pressure sometimes)
@thebitchlapin (formerly at-the-thistlespring-tree) is my Dimension 20/Dropout blog
@eating-your-beans is my NBC Community blog (and also Mythic Quest)
@system-arbeitet-korrekt is my StarStarSpace (and occasionally other coldmirror stuff) blog
@not-a-sesame-street-sideblog (added Nov 5th '23) mostly dormant (as of Aug 24th '24)
@transwomansambeckett Quantum Leap (the original one, tho theoretically the reboot would go here too if I watched it) blog (created Nov 18th '23)
@move-over-nine-its-fifteen-time Doctor Who and adjacent media (added June 23rd '24 but existed for a while, I just failed to consistently update this post)
@faggot-md House MD blog (same note as above)
@shortkingchilchuck Dungeon Meshi (same note as above)
@ghoul-for-lucys-dad-2296 Fallout, mostly show so far but I've started playing 4 now so y'know (same note as above) (mostly dormant as of Aug 24th '24 tho I'll use it again if I ever get around to playing New Vegas)
@2-dead-boys-and-1-sad-psychic Dead Boy Detectives (same note as above)
@lines-in-your-trailer Scott Pilgrim, not particularly active (same note as above)
@watchingiasiptoimpressmycrush It's Always Sunny In Philadelphia (same note as above)
@grape-flavoured-wizard I honestly don't know how to explain this one either. (same note as above) (dormant. sorry)
@your-creepy-old-guy Beetlejuice but specifically and exclusively the musical version. Not really more than two or so reblogs from other blogs of mine yet but maybe next time I rewatch my favourite slime tutorial of it I'll start posting properly (same note as above)
@hawkeye-mpreg Mash, obviously. Like the trek blog, not actually 18+ despite the url (same note as above except midnight passed in my time zone so now it's June 24th)
@lassiesloveoflarping Psych blog (added July 6th '24) and I do blame @/under-loch-n-key personally /pos
@hashtag-dads (added Oct 11th '24 after being un-shadowbanned) Dan and Phil blog because I felt it might start being annoying to my personal blog followers how often I post about them there
@fun-burakhovsky-vacation (created and added December 31st '24) Pathologic blog. I haven't finished P2 yet (and don't really plan on playing 1 tho I ofc watched hbomb's book report many times) and 3 isn't out yet but the characters have already moved into my brain rent free and I need somewhere to put posts about them
@ifyoucantbuyit-homemadeisfine Blog mostly for fiber crafts, but also other DIY shit. Mostly as a resource for myself but if you wanna peek the notes I take, feel free. Created and started drafting reblogs... can't recall when, but thought of a good url and started using properly and added here June 15th '25
I have a ton of other side blogs, both on this and on the old account, some of them are simply saved urls, (tumblr made me delete those and then some because they think people still use this site so I'm not allowed to "hoard") some are discontinued and some are secret for a variety of reasons - though I assure you, those reasons are mostly comedy.
I don't exactly have a dni per se but if you have shitty views or I otherwise don't like you, I might block you lol
Last added new blog: June 15th 2025
Last edited this post outside that: December 31st 2024
16 notes
·
View notes
Text
something I did as a child that I’ve remembered fondly since, and even considered repeating:
we had this one book of bird identification for our area, and I spent several months drawing each bird in the book onto post-it notes that I stuck into a cheap notebook as a kind of low-stakes art journal! it was so much fun and one of the things that kickstarted my interest in birds in earnest ♡
another casual low-stress art project: making a mini museum room of all your favorite art pieces (I totally got this idea from a kdrama, I can’t claim ownership of it at all) - using 4 pieces of cardboard and whatever tape or glue to form a 3-sided room + floor, then printing out tiny pictures of your favorite artworks, making frames from carboard (brushed with $2 acrylic gold paint if you want to make it look like fancy frames), and tape or glue them to the walls; then you can cut out a long rectangle of cardboard and fold the two ends down to form a bench and glue it into the “art exhibit room” as well!
also, this lovely little (and free!) mouse friend sewing tutorial: https://my-darling-boy.tumblr.com/post/185833797385/i-was-having-writers-block-and-so-i-took-a-break
for any art/journaling/letter writing projects you want to feel extra fancy, you can put the sheet of paper on a cookie sheet, cover with water, then sprinkle instant coffee grounds liberally around on the paper and swirl a bit. bake in the oven at ~ 250 F until the water has all evaporated, then let cool. (if the coffee spots are more intense than you’d like, you can do a second round of water to swirl it out!) this creates very fun feeling, looking, and sounding fantasy/medieval parchment that really makes things look old and worn! you can even take a lit match to one corner after the rest of the process has been completed, and burn a tiny bit of the edge off to create more weathering. (obvious disclaimer don’t do this with kids be careful with fire have water nearby just in case etc etc)
ideas for casual low-stress art projects if you want to work on something creative during the new year
dream journal: you can either write down every single dream you have so you can look back on everything, or just write down the best ones and add little drawings or collages to embellish them
weather blanket/scarf: create a legend for which colour matches each temperature/weather and then knit one row every day so by the end of the year you have a little reminder of what the weather looked like this year
junk journal/scrapbook: collect misc things like labels/ads/stickers/receipts and make little collages with them in a book
everyone add on ideas
2K notes
·
View notes
Text
ART RELATED
Do you take commissions/requests/art trades/collabs?
Only from my loved ones depending on my free time. But generally no.
Where did you learn to draw?
Even though I came from a family of artists, I am actually self-taught. I wasn't able to go to an art school like I've always wanted. I mostly learned from watching cartoons and animes.
When did you start drawing?
Ever since childhood.
I used to draw traditionally. When I started posting my art online back in 2008, I drew on paper, scanned it then colored it on Photoshop using my mouse.
I went full digital in 2013 after saving up and buying my first pen tablet (Wacom Bamboo Pen & Touch 3rd Gen).
Who are your favorite artists?
Stanley "Artgerm" Lau, Masashi Kishimoto and Kubo Tite.
What do you use to draw?
Pen Tablet:
Wacom Intuos Pro Small
Software:
Paint Tool Sai for drawing
Photoshop for rendering
Kinemaster for video editing
Can you explain your brush settings?
Most of my brush settings are default. The others are from random artists that I watched and liked so I decided to use them too. I've been using these settings for a long time now and I can't remember the last time I added or changed something.
If you are looking for an artist to explain "what's this and that for" regarding brush settings then unfortunately it's not me. You can copy my settings if you liked them though.
Can I copy your art style?
You can use my art style as a guide but please don't copy it from A-Z. Add your own personal touch and twist as much as you can.
Can you give me art tips?
This is from my 2022 art ramblings:
Whenever artists wanna try something new to improve their art, we tend to make big drastic changes right away. This can be effective for others but not for everyone. As you can see, my art style is still the same as last year with minimal tweaks.
I decided that if I’m gonna make improvements, I’m gonna do it gradually instead of incorporating them all at once. This can be a big help in maintaining consistency. If the changes were small, we can easily remember and apply them on our next artwork.
I may now have more confidence with regards to my art compared to before but I am still not confident enough in giving/teaching art tips to people. Most of the time I am just winging my art and I personally feel like it's not right to impart that type of "knowledge" to others lmao. There are a lot of experienced artists on different platforms and you can easily search for their tutorials and advices.
Can I use your art for my profile pic?
As long as it's for personal use, you are free to use my art (icons, profile picture, wallpapers, etc). Please credit me if you can.
IMPORTANT: Do not edit, crop, trace or alter my art in any way, shape or form.
Can I share your artwork on other sites?
Artworks:
I am against reposting. I have an account in almost all platforms so you guys don't need to repost them. Just reblog/retweet/share them directly from the original post.
Note: If the artwork I made was from a very, very small fandom then I mostly allow reposting so it can reach more people. You just need to ask permission first and put proper credits.
Videos:
No. Do not repost/reupload my videos specially on Tiktok.
How long does it take you to finish an artwork?
Artworks:
I mostly do single cel shading nowadays to speed up my process. It takes me 1-3 days to finish depending on how many characters and how detailed the artwork is.
Videos:
I usually make 1 video a month but if I'm more energetic, I can make 2-3 videos.
How can I support you as an artist?
Youtube ➔ Like, comment, share and subscribe
Instagram ➔ Save, share, comment and like
Twitter ➔ Retweet, like and comment
Tumblr ➔ Reblog, like and comment
Kofi ➔ Any amount is appreciated
0 notes
Photo
I’ve gotten some requests to make a tutorial for the effects I’ve used in these sets here and here. Hopefully this all makes sense and is actually helpful! This tutorial is made assuming you already know how to make gifs and will be done using photoshop on a mac. If you have any questions or any other requests for tutorials please send me an ask! I used this tutorial here myself to learn, but I wanted to make a more step by step tutorial for those who are more visual learners like myself.
tutorial under the cut, please help me out by reblogging ♡
STEP ONE: PREPPING
First of all, you’re going to make your two gifs with whatever coloring and sharpening etc. you usually use. I like to use this effect when I’m transitioning to a sad gif so I make one gif black and white. You also need to make sure you don’t use too many frames per gif because you’re going to be combining them in the end. The caps I’m using here are 20 frames each so when put together it’s a total of 40. I use anywhere between 20-30 depending on the scene. Here I’ll be using these two gifs I’ve made:
Now that you’ve made your gorgeous gifs, you’re going to convert to frame animation so your workspace should look like this:
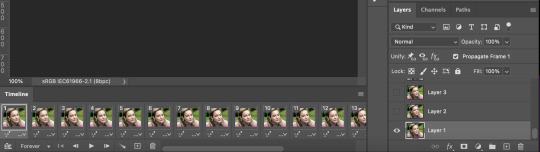
STEP TWO: DUPLICATE
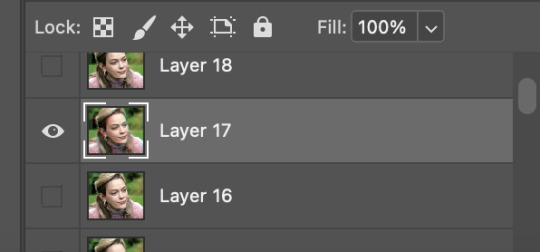
The first thing you’re going to do now that you’re ready to get to work is select the frame and corresponding layer that you want to make the glitch effect on. I like to use four frames for the glitch effect myself so here I’ll start with frame 17. NOTE: Make sure to pick frames at the end of the gifs you’re using so that it flows well!
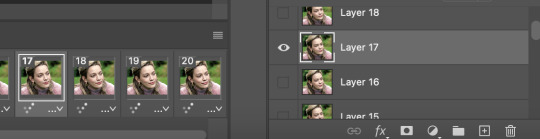
You’ll know what layer corresponds with the frame you’re working on based on the little eye icon.
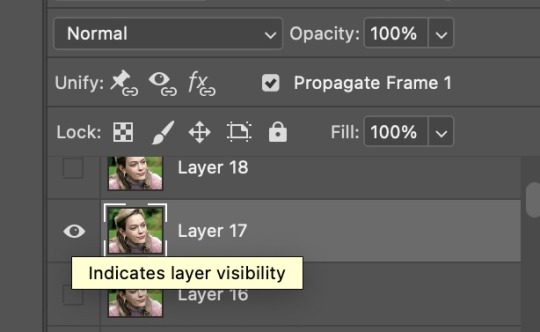
Once you’ve chosen the frame and layer you want to start on, you will right click on the layer and choose duplicate layer.
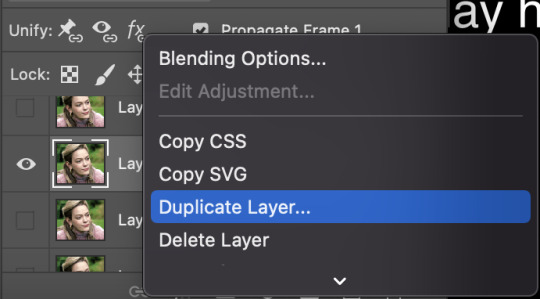
This window will then pop up and all you will have to do is click ok.

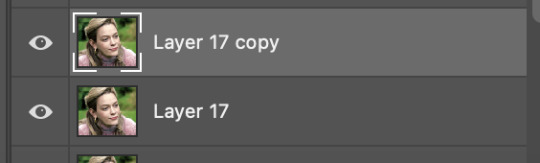
The result will be that you now have two layers with the eye icon!
STEP THREE: GLITCH EFFECT
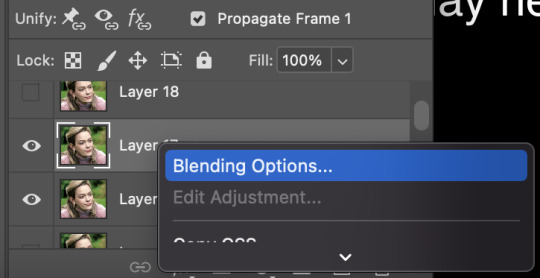
If you’re still with me, congrats, you’ve reach the part of the tutorial you’re actually interested in! So, now that you have your duplicate layer, you will right click on that layer and select blending options. The layer style window will then pop up.
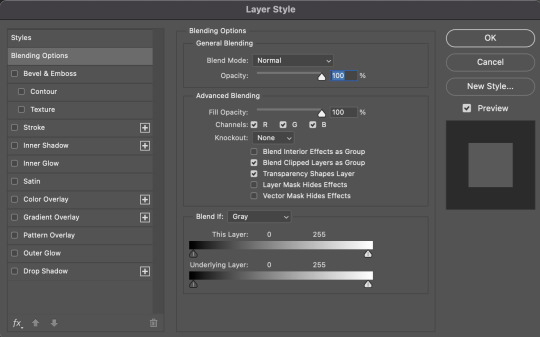
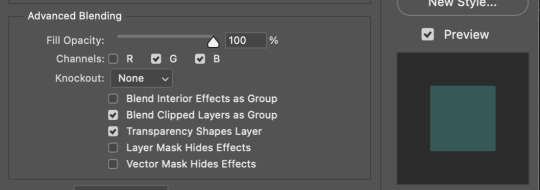
The only thing you need to care about here is the advanced blending section. Here, you will go to the channels area and untick the R box.
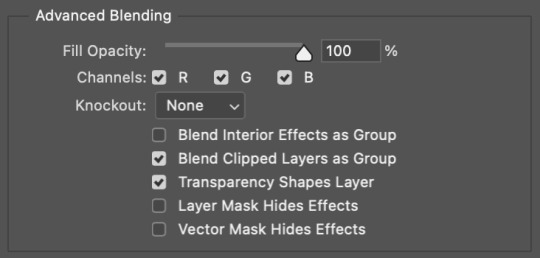
Your preview will now be a turquoise color instead of grey.
Now here’s where the party starts. Once you’ve done the above, click ok and you’re now free to move the duplicate layer however you want! I like to go for subtle so I usually move the frames slightly to the right and left. However, feel free to get dramatic with it and explore how you want the gif to glitch. My layer here has been moved to the right.

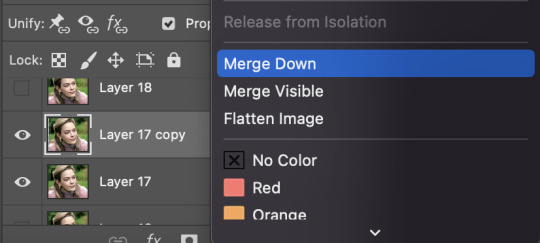
STEP FOUR: MERGING LAYERS
Now that you’ve successfully made your first glitch effect frame to your satisfaction, you’re going to merge the layers so that there is no duplicate layer anymore. Right click on the duplicate layer and choose merge down. Voila, you have only one layer for your frame again!
STEP FIVE: ADD NOISE (OPTIONAL)
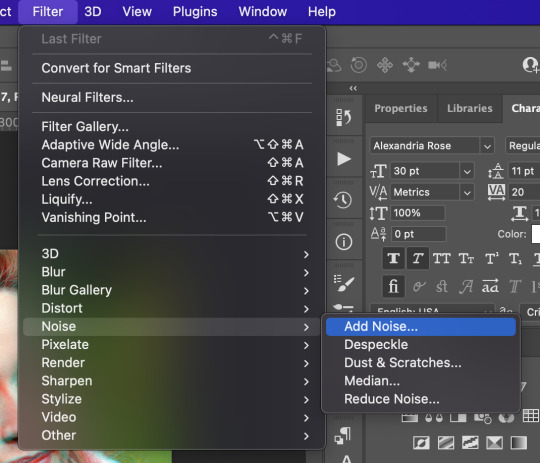
This step is optional, and not necessary tbh if you don’t want to do it, but I like it for aesthetic reasons. With the layer you just merged still chosen, go to filter > noise > add noise.
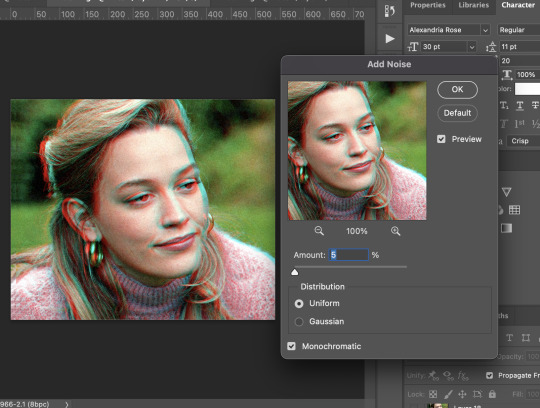
Pick how much noise you want to add and press ok. I usually just add 5% noise.
STEP SIX: RINSE AND REPEAT
Once you’ve done everything above, you’ll repeat steps two through five with all the frames you want to use for the glitch effect. Do this with the second gif you made as well! TADAH you have achieved the glitch effect of your dreams!


STEP SEVEN: THE FINALE
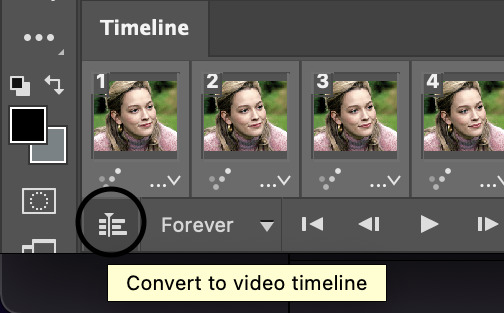
If you’ve made it with me this far, congratulations and get those notes babyyy! The last thing you have to do now is just put it alllll together. Ok so now you’re going to convert your gifs back to video timeline and convert the layers into a smart object. I know most of us know how to do this, but for those that are just beginning to get the hang of photoshop here is what you do. Click on the convert to video timeline button on the bottom left corner circled here.
You will now select all of the layers and right click on them and click on convert to smart object.
Boom, one smart object coming right up.

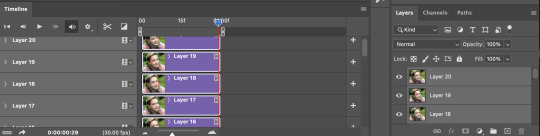
Repeat this with the second gif and once both of the gifs have been converted to smart objects, drag one of them over to the other gif and adjust it so that it is aligned with the canvas. Your timeline will now show your gifs stacked one on top of the other.
You’re going to drag the top clip over to the right until it starts at the end of the first clip.
You have successfully made your complete glitch gif. From here, you will convert back to frames (I use an action to do this) and adjust the timing of the gifs to .05. Save your gifs and congratulations, you’re DONE.
If you’re still reading, thank you for taking the time to read and/or follow this tutorial. If you would like a video tutorial, I would be willing to make one if enough people feel like they need it. I’ve already shown how to make this on video chat in discord so doing it again won’t be a problem lol.
Please feel free to tag me in your creations made using this tutorial with my tracking tag #tuserdi. I would also appreciate it greatly if you shared this tutorial by reblogging it so that others may find it and learn as well!
THANK YOU ♡
#glitch effect tutorial#photoshop tutorial#gif tutorial#completeresources#yeahps#tutorials*#cuddlybitch#uservalentina#userk8#userrobin#userdiana#usermarcy#userhella#tuserace#useral#usercardigan#userannalise#user.amara#userflo#tuserchar
2K notes
·
View notes
Text


12. phantasy
introducing "12. phantasy", a dark blue aesthetic in-depth google docs oc template based off the boyz's most recent come back album "PHANTASY" concept photos. this document includes space for general information, personality, extensive character information such as hobbies and habits, character relationships, and for character backstories. this document will be available in more colour options in the future. feel free to edit this as much as you wish as long as you do not remove my credit.
NOTE: Yes, this is a repost. my previous one unfortunately seemed to have glitched ^^; also a gold version of the template is now available!


notes/rules
editing and modifications are welcome once you purchase the template.
all drawings and images in this document are custom created (or in the case of the pictures, edited) by me. If you would like to take elements from this document, you will need to credit me as an inspiration or the creator of that element(s).
resizing or moving objects/images can throw off the document, so be careful.
do not remove my watermark/credits!
please like or reblog this post if you use my template! ♡
how to use
click the source link above
purchase the template via my payhip
follow the instructions on the downloaded note
once you receive access to the template, go to file → make a copy
how to edit
in order to most easily put in your own images, go to replace image then choose how you wish to replace it (either uploading a file or via the image's URL).
this document includes drawings. Double-click the drawing/image on the bottom left or top right corner, then click the edit tab. this will take you to a page where you can replace, edit or delete features of the image
for the custom-edited photos, I've linked a tutorial to how I created them in the zip file you'll receive after the purchase
#google doc#google docs#google docs template#google doc template#template#character template#discord rp#oc template#bun: google docs#bun: original#blue aesthetic#blue#rp template
49 notes
·
View notes
Text
You should absolutely do it!
I'm putting these resources in a reblog in case other people want to reference them:
Paraka's older Livejournal tutorial that covers the basics but also details editing in Audacity, how to reach out to authors for permission, and a bunch of other useful bits and pieces: https://ai-podfic.livejournal.com/26174.html
(fear not, the "ai" in the url is for American Idol!)
@emilianadarling has a (somewhat) newer tutorial on Tumblr here: emilianadarling.tumblr.com/post/13193292007/a-beginners-guide-to-making-podfic-by
How to host your podfic via @godoflaundrybaskets: https://godoflaundrybaskets.dreamwidth.org/4526.html
As a quick note, many folks will host their podfic in more than one place in case the primary hosting site (for example, archive.org) goes down, but you can always start with one platform, figure out if you like it, and add others later.
How to post it to AO3 (including embedding, tagging, html help, etc.) from @theshmaylor: https://archiveofourown.org/works/10656948
If any of the folks I tagged have newer versions of these resources that they want to add, please do! Having said that, I started podficcing a couple years ago and found that these versions were still very helpful.
I also recommend listening to podfic from creators you enjoy and model how you format your works on AO3 and what you say during the podfic itself regarding tags, warnings, personal notes, etc. based on what you like from those creators.
Some folks will read out the full list of categories and tags from a fic so the audio can stand alone. Others won't list anything except the fic title. Personally, I tend to read out the pairing, the rating, any archive warnings, and any tags that are likely to serve as content warnings, rather than general descriptors like "fluff" or "romance". Take time to write yourself a script with what you're going to say at the beginning and the end of the podcast for smoother reading.
I haven't posted much of anything recently, but I'm still actively recording behind the scenes, so if you have any questions feel free to message me directly!
What if I got *another* hobby...?
I'm very prone to project-hopping so this may not pan out, but I'm tempted to maybe start podficcing.
Some of you have heard me reading aloud on various servers' VCs to a similar but non-recorded end over the past year or so, but I'm thinking of maybe having a look at Audacity and recording the fucker for a change instead of it being a wholly ephemeral experience.
So - anyone who has done podfic before, do you have any useful tips or links to handy guides? Suggestions on how to face the mortifying ordeal of hearing ones' own voice parroted back? - anyone who wants to be a test subject, do you have a fic or chapter of a fic below say 4,000 words that I could use as a trial item? ideally without *too* much dialogue because Doing The Voices is still something I'm working on, but any fandom or original work would be fine. I don't mind NSFW.
14 notes
·
View notes
Note
Given how much you draw percy, do you have any tips for how to draw her? I'm trying to nail her design and I'm having a few struggles.

Hello! I will gladly provide tips on how to draw her! At least I will try to haha.
I have put together a little "tutorial" on how I draw Percy + general notes. I hope it is of help! I will put close-ups of it in reblogs.
If you have any other questions, do feel free to ask them! I am more than happy to provide any aid I can :]
#Daily Percy#This is beyond a doodle honestly but#Doodle#Request#Epithet Erased#Percival King#Epithet Erased Percival King
52 notes
·
View notes
Photo
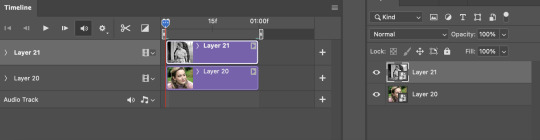
hi tags! discordhelp is here with the sequel to our first tupperbox tutorial! tupperbox is a discord bot that allows you to create your own bot to use to send messages -- essentially making it look like you’re sending messages from a different discord account without having to go through the trouble of making and switching accounts all the time. it’s really handy for rp because it allows you to make as many bots as you want for all your characters!
this tutorial will walk you through how to create your own bots using tupperbox! tupperbox offers two different ways to register and edit bots, via discord & via their online dashboard -- this tutorial will walk you through how to do it using tupperbox’s online dashboard. to see how to do it directly on discord, check out our first tupper tutorial here!
if you have any questions about this tutorial, tupper as a whole, or anything else we do, feel free to shoot us an ask! please like or reblog this post if you found the tutorial helpful!
the first thing you’ll want to do is head on over to tupperbox’s website, which you can find right here at tupperbox.app.
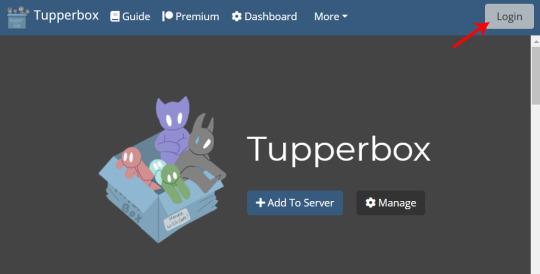
click the login button in the upper right corner.
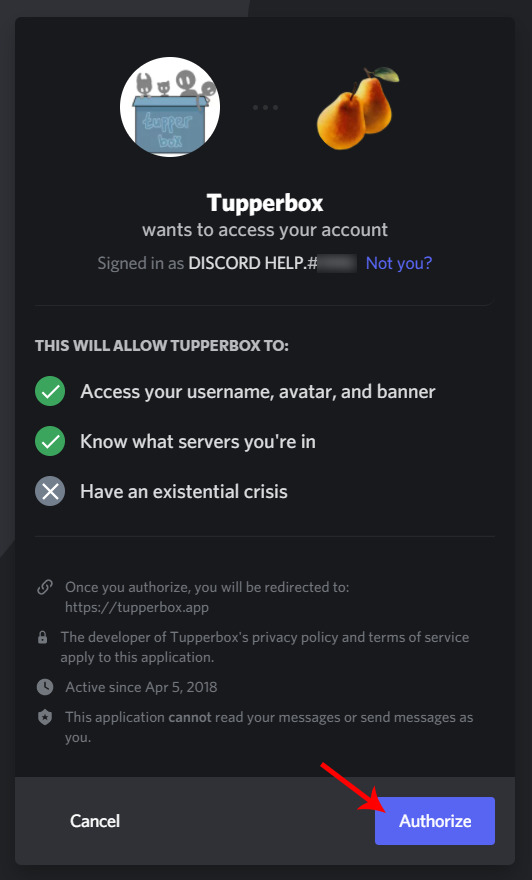
the site will ask for permission to hook up with your discord account. you’ll need to allow this in order for your bots to transfer over to your account. click authorize!
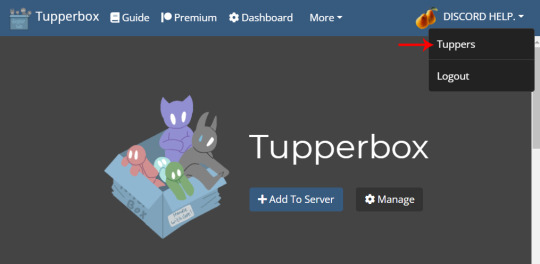
it’ll take you back to the homepage, but now you can see in the upper right corner it shows your user info instead of the login button. if you click your username, the menu will open -- click tuppers.
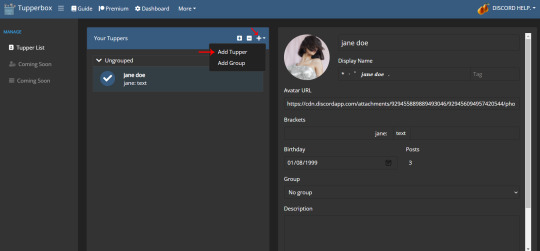
this will bring you to your dashboard! if you already have any tuppers registered, you’ll have a list of your bots in the middle there. as you can see, the bot we registered in our first tupper tutorial is already in there, and if you click on it it’ll show all the bot’s info on the right. but ignore that for now because we’re going to make a whole new bot instead!
click the little plus sign in the header bar, then click add tupper.
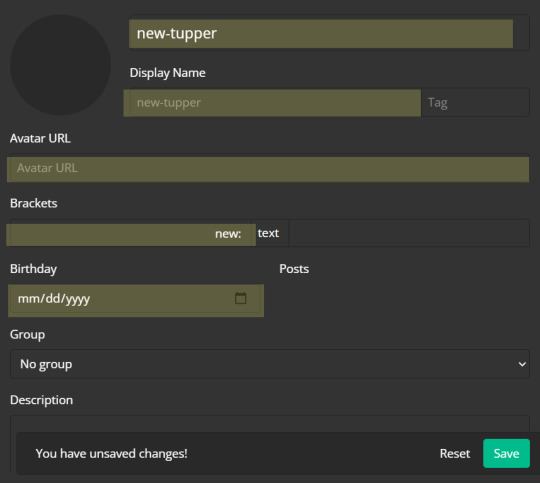
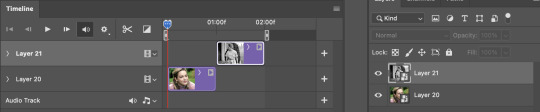
a page will come up with all the info you can enter for your new bot. i’ve highlighted all the relevant fields that we’ll be filling in for the purpose of this tutorial. (for simplicity’s sake, we’re filling in all the same fields we did in the other tupper tutorial.)
the big new-tupper up top will be your tupper’s real name. this is the name you can use to edit your bot over in discord if you ever need to. it’ll also serve as your bot’s display name if you don’t set an alternative one.
the following line is your tupper’s display name or nickname. this will override your tupper’s real name when sending messages and is for aesthetic purposes only. for more info on the differences between real names and nicknames please see our first tupper tutorial here.
the avatar url is where you can put a url for an image to use for your tupper’s icon. unfortunately you can’t upload an image directly to the tupper dashboard unless you subscribe to tupper on patreon, so you’ll need to upload your image to another site such as imgur or even discord and copy-paste the url into this field.
the brackets field is for, you guessed it, your brackets! this is the command you’ll use to trigger your bot over on discord. for new bots the brackets default to “new:” so here you can change them to whatever you’d like. your brackets can be literally anything, including symbols, emojis, etc. but the important thing to note is that in order to trigger your bot after registration, you need to type your brackets exactly as you did when you set it up. this includes making sure any capital letters and spaces are all in the right place.
below that is the birthday field, which should be fairly self-explanatory.
fields we’re skipping over in this tutorial are the group & description fields, but we have tutorials on both those functions planned for the future so stay tuned!
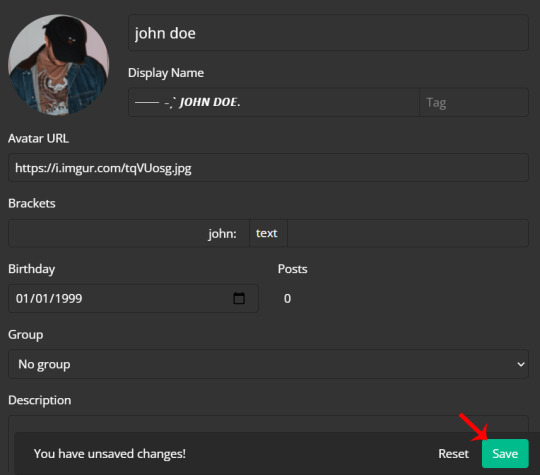
here’s how it looks with all our info for our new character filled in. once you’re done make sure to hit the save button in the lower right!
now head on over to discord itself.

type your brackets and a message in any server that tupper is present in, and...

tada!! happy rping :)
#discord rp#discord rph#rph#rpc#rpt#tupperbox#tupperbox tutorial#discord tutorial#rp tutorial#tutorials: all.#tutorials: tupperbox.#resources: original.
301 notes
·
View notes
Text
on a real note, i do truly understand the frustration as an artist to be told to just “draw more” when you feel frustrated and like you’re stuck in your development. yeah, time and experience DO help to an extent! your brain will unconsciously take in information over time, improving your observation and execution— but passively.
but what if you actually want to put in The Work?? what if you want to actively LEARN better art skills, but the only advice you get is to just wait for it to happen?? ive been on both sides of the equation before, and it’s infuriating— most people (unless they’ve taken higher level art classes) are never taught what goes into actually training their fundamentals, and have no idea how to pass on their knowledge once they’ve learned it.
so! to make up for years of “just draw more” advice, here’s a compilation of my personal favorite studies, tutorials, and hot tipz for artists! it covers things like composition, anatomy, color theory (shudder) and dynamic posing, along with a few other bits and bobs that i’ve found useful over the years.
please feel free to reblog with ur own additions 💖
Line-of-Action.com - a website dedicated to figure studies! it has thousands of pics in its library that get updated constantly, with a variety of body types. i prefer to work in studio mode (where the time between each picture starts out short and increases gradually) to do proper warmups.
Draw Better Hands Now by Marco Bucci - really and truly one of the best hand tutorials out there. he includes some simple exercises to improve hand anatomy that are SO vital, using them just once made me feel so much more confident!!
pixel art tutorials by pixelartjourney - tutorials on building shapes & color work! they were made originally for use with pixel art, but the ideas apply to other types of art as well.
maximum simplicity challenge by jakedontdraw (tiktok) - a challenge where you have to recreate a portrait in as few brush strokes as possible. SO helpful if you’re like me and have chronic overcomplicating disease, and the creator does a great job at explaining how and why he completes the challenge the way he does! i also very much recommend his video don’t draw noses, which goes into a similar topic in more detail :)
coolors.co - color theory is hard. there are Some basic rules, but most of it is just observation and repetition. see color combos you like, and recreate them until you get an instinctual sense of what looks good together. coolors.co is a super useful tool that auto-generates palettes for use in your art AND has a feature to pick out a palette from images! (i recommend using movie stills, especially from animated movies where each color is deliberately chosen)
composition study - i can’t remember where i originally saw this explained, so i’ll just write it here: while watching a tv show/movie, pause with every shot change and draw a thumbnail of what you see. spend as little time on each thumbnail as possible, only blocking out the important shapes. here’s some pics of when i did this exercise with the opening minute of baby driver:


Wally Wood’s 22 Panels That Always Work!! - self explanatory, useful reference for both sequential art and single illustrations

truly humiliating how the only way to improve at art is to LOOK at art and then…… MAKE IT????? 🤢🤢🤢🤢
78 notes
·
View notes
Text
Storyline Study: Personal Story
Yesterday, I reblogged various threads of a post about what makes "war stories" so special, and now I'm going to derail into GW2.
Please note that this may be colored slightly by the fact that I main human + Vigil story. Feel free to read that into this analysis. (Also, playing as norn I think puts a slightly different spin on the PS, so this doesn't apply to them as much.)
The reason I, personally, am so attached to GW2 is because of the reasons we're fighting. Core/PS was introduced with "the dragons are horrific eldritch abominations, forces of nature we can't HOPE to stop, whose champions' defeats take the sacrifice of whole races." This is literally the synopsis on the back of Edge of Destiny. The price of fighting is huge, on a national level and a personal one, and everyone in the story consistently chooses to pay it anyway. What's interesting is why.
PS opens up with the player, young, untraveled, and naive, fighting in defense of the only home they's ever known - the city they's lived in all their life (or the Dream they haven't set foot outside of yet). They spends the next thirty levels traveling, fighting back the same threat they was faced with at level one, getting to know their racial mentor, and, eventually, learning about dragon minions.
I've talked before in a reblog (but apparently it got deleted, so here's the OP) about how the real reason the player is so famous is because they help people. In all the mundane ways, not just the big, war-related ones; they expresses care and concern for the civilians who suffer, in every map and throughout every map meta. They's done that from day one. They isn't famous because they fought the baddie in the tutorial; they was fighting alongside already well-established heroes, and at best the player is acknowledged only by association. No, the player is famous because they spread their care and kindness throughout the countryside afterward, becoming a hero in connection to their big heroic accomplishment at the tutorial only retroactively. (I mean, it's even in the name: renown hearts. Almost nowhere else in the game does it refer to our fame so blatantly.)
Throughout all eighty levels, the player continues to do this, showing their care and concern for the civilians, showing where their heart lies - with the people of the world who will suffer if someone doesn't step up to fight the dragons.
After the story establishes this solid motivation for the player, through focusing the story on aiding your country and becoming a valued advisor of your nation's top leadership, the player chooses an Order - chooses, in essence, that the way they can serve their country best is by fighting the dragons. That choice was generally understood to be a death sentence, because Elder Dragons were understood to be unstoppable forces of nature. But the player chose it anyway, because defending their country - their world - was important enough to try anyway, to go out fighting despite it being impossible.
I'm Vigil main, and I'm heavily Vigil-biased in all ways, but "some must fight so that all may be free" is a pretty good descriptor of the whole PS. Aside from being Almorra's personal motivation, and the motivation of the whole Vigil, it is also shown to be the motivator of the player, regardless of Order, by their behavior throughout the game.
The player chooses their Order but does not stop lending aid to anyone around who so much as looks like they need it; a passing traveler or merchant without a guard draws the player like a moth to a flame, and they pitches in to any regional or local battle they finds. This shows where their heart is, in the love and care and concern for the common people.
The player could've served their country or the world some other way, but they chose to fight dragons, because they saw dragons as most important. They saw dragons as more important than even their racial mentor did; this is the key that eventually brings Destiny's Edge together; "you have led, by word and by deed."
The player continues this even after being appointed Commander, and the story supports this by introducing the other primary character, Trahearne. Trahearne can be seen as symbolically representing the important qualities of the Commander, almost as a backup in case/when these qualities get edited out by players.
Trahearne also plays the role of a major supporting character, having similar goals and motivations; he has dedicated his life to cleansing Orr, because it used to be full of such life and what has happened to it is a tragedy - something to fix, and something to prevent from happening again. The devastation of Orr can be understood to symbolize the devastation to the people of Tyria if the dragons are allowed to win, and Trahearne's response to it as something that has already happened perfectly encapsulates the way the Commander reacts to it as something that cannot be allowed to happen in the future.
And the great and amazing thing is that everyone else in the story agrees. All the vast armies of unnamed soldiers - they have those same motivations and values. We know that because the Orders wouldn't exist otherwise. Nobody wants to fight such a losing battle unless they're bitter and/or seeking (futile) revenge. And those few are not the ones who are passionately leading the charge.
The leaders are the people like Almorra and Trahearne, who are fighting because the devastation and loss of life is so abhorrent to them, personally. The Pact is such a beautiful thing because everyone is united in a common goal, by a common motivation, because the dragons are honestly just that evil.
But most powerful of all is that we never expected to win. Cleansing Orr was supposed to be impossible. Killing Elder Dragons was assuredly impossible. Even trying to fight the dragons was just a defiant cry into the void, a declaration that we would not go down without a fight. Nobody expected to win, just to die, sure they'd done all they could.
And that refusal to do otherwise, the refusal to do other than hope, even amidst the destruction and lifelessness and horror of Orr, was motivated by our love for our homelands, for our people. And the player showed that by a lifestyle of helping wherever they could - by every renown heart and every event, multiple times per level, for eighty levels.
That's why I love the PS so much, I think. It's about hope in the face of the impossible, fighting on in the face of despair, because the world and life is worth fighting for, not because we ever expected to win.
And that's why actually cleansing Orr and defeating Zhaitan were such huge milestones, why everyone spent so much time marveling that we actually did it - because nobody was doing it in order to actually do it, but rather because they couldn't, in good conscience, do anything else, and it was worth it to give their lives to the cause.
The rest of the game post-Zhaitan does keep this theme of caring about the civilians, of course; but fighting the dragons now is just really difficult, not impossible and hopeless. Now there is a chance of survival, and you're fighting for a better future, and fighting isn't that hard anymore. You're not walking to certain death, you're fighting for a hope, emboldened because you know it really is possible.
After Zhaitan's defeat, there always remain hearts and events alongside the main story, because at heart the Commander is a kind and caring person who fights for the civilians, but the story itself is no longer about that concern, it's no longer about showing why the Commander cares or how dedicated the Commander is to the cause, but rather about the logistics of getting that done. It's about the Commander using their own force of inspiration, and the cause of fighting for home and country, to gather allies, proving it again and again, but in a sort of background way. The main focus of the story has moved on.
The story has moved on to questions such as is it even a good idea to be fighting dragons? The story has been, slowly, ever since S3 at the latest, having us question our decisions, making dragons out to be less and less "eldritch abominations" and more and more "corrupted/tormented by their own magic," with the ability to be spoken to and reasoned with, and even pitied. This idea runs counter to everything I've just talked about.
The ending of S4, where we speak to Kralkatorrik and we find out he's been controlled by his Torment this whole time and he's actually thoroughly miserable - it COMPLETELY destroys the whole point of Almorra's story and the way it related so beautifully to the rest of the game that made it compelling. And this is true of all of Core PS - to find out we were just wrong the whole time, completely ignorant, just misunderstanding the whole nature of the universe? That, by rights, we shouldn't have been trying to kill Zhaitan, but speak to him? It destroys all the moral and emotional credibility of the whole story. (I try to think about that as little as possible.)
Really, Core PS (and maybe up through HoT, perhaps) is a completely different story with a completely different message than S3 and onwards, and maybe that's why I've never really cared about the later parts of GW2 so much.
I've always preferred the PS because it is the most compelling part of the GW2 storyline. It was our first time. We had never won before. We were fighting clearly outlined Evil, personified as unstoppable forces of nature, and we could only win against them by such extreme acts of selfless Good as sacrificing our lives for strangers.
#gw2#guild wars 2#trahearne#almorra soulkeeper#vigil#s4#kralkatorrik#zhaitan#PS#core story#personal story#story theory#orr#hope#edge of destiny#impossible#s3#renown heart#event#level#tutorial#storyline study#storyline#personal storyline#commander poobah
21 notes
·
View notes
Note
Hey! :) I’ve wanted to play d&d for a while now, and after getting into critical role i finally decided to convince my friends to play with me. None of us have played before, so im both exited and a bit nervous since i’ll be the dm. We don’t know anyone who plays, and i’m not very comfortable with palying with strangers, so we’ll be diving right in together! Do you or your followers have any tips or good resources to recommend for new players and/or dms? Any tips would be greatly appreciated! :D
Hey there!
I’m very flattered that you would ask me for DMing tips, but I just have to preface this saying that I am a first time DM myself and I am currently on session 13 of my campaign. But I can see if I can list some things that I found useful building my first campaign :) And I totally feel you not being comfortable with strangers, I play with a group of friends and we were all first time players when we started!
Let’s start with resources! (I will put the links in a reblog bc tumblr is a dick about posts with external links in them. Sry for the hassle!)
Probably a bit redundant, but nevertheless very helpful: The core rulebooks for D&D. Which is to say The Dungeon Master Guide, The Monster Manual and The Players Handbook. Bc those are expensive as fuck, check out this lovely thing (1).
Then, depending on whether you play online or live: Roll20.net (2) You can invite your players to your campaign and make maps for encounters with minis on them, you can insert music that plays in the background and it also rolls dice for you if you have to roll a big amount of dice and don’t want to do math ;)
There is an encounter builder on kobold-fightclub (3) that can help you balance encounters according to your party’s level! I have found it quite helpful and it’s also an easy way to filter monsters for a specific terrain when you know that you’ll be running through a swamp/desert/cave etc.!
I also found this this cheat sheet very helpful, esp regarding the different conditions that I can never seem to remember.
Then, ofc, one of CR’s sponsors: dndbeyond (4). Me and my friends bought a subscription bc damn is it useful to be able to click on anything on your character sheet and see what the hell it means. It also helps you track your spellslots/HP etc. during combat.
Something I also did was watch Matt’s videos (5) on how he DMs. Altho it bears to say: Don’t compare yourself to Matt Mercer. It will only stress you out.
You like maps? So do I! Check these out (6/7).
You want to keep track of your npcs and important lore and places and everything? You could try worldanvil (8)! It’s like building a wiki for your own world!
And then about tips. It is probably easier to give tips when you have specific questions than it is to give general tips, but I’ll do my best! I’m sure many experienced DMs want to chime in and add to it :)
Communication is (as with most things in life) key to everything. Get together with your players for a Session 0 and just talk about what kind of game you want to run and what kind of game they want to play. There are people who like combat more than roleplay or vice versa. There are people who want to play an evil campaign or they want a lot of political intrigue or they are soft marshmallows like I am and don’t want permanent character deaths and so on and so on. Just get together and talk about what you guys want to create. Also talk about the characters with each individual player.Ask them about triggers they have, so you can avoid topics. Ask them how they feel about an NPC flirting with their character. It goes the other way around as well! Tell them about your boundaries and your expectations. One of my friends wanted to make a character with a neutral evil alignment. I told that it’s fine, as long as there’s the prospect for the character to evolve towards a neutral or good alignment, bc I have no interest in dm-ing an “evil” campaign.
Something that might make running a campaign easier for you is if your players’ characters already know each other before the game starts. If you’re like me you will sweat bullets thinking about how to get them to work towards a common goal. If they’re already friends/rivals/lovers/colleagues/members of the same adventuring guild you will not have that problem. And they can give you some notes on how they envision the relationships to be/how they met.
You can start your adventure with one of the official adventures that are out there if you want to! You don’t have to do a whole ton of worldbuilding like I did bc I’m a crazy person and have my whole setting homebrewed. If not, you can always make life as easy as possible for yourself and start small! Build a small town with a few key NPCs, put a small assortment of possible quests there and then only roughly sketch out what you want the “outside world” to look like. I as a player love some context when I build characters, so if you want to give your players a small introduction into the campaign setting, I think that would be helpful and also helps creating characters who fit into your setting! If you want to run a campaign that has tons of dragons and poisoned oceans that cannot be crossed by mortals it would be sad if a player came to you and gave you the character sheet for a sailor.
If you do a whole campaign, I found it helpful to have a rough idea about different factions and two or three major events that shape your world. Ideas for later quests will eventually tie into big world events when the players get higher level!
Draw yourself a map. It doesn’t have to be elaborate or anything, but at some point there will be a question about “where is the next big city, we need to buy healing potions” and you will feel much safer if you just have a piece of paper (analogue or virtual) with like... a rough outline, some landmarks and some cities on it. At least that’s how it was for me!
You don’t have to reinvent the wheel. Don’t beat yourself up if your first quests are “standard” stuff like “Take care of this giant rat infestation in the cellar of the tavern.” or “My purple dragoncat has been abducted, please get him back for me.”. I started my campaign with small quests before getting to a small arc and then I want to work towards bigger arcs eventually. But for new players and a new DM I found it very helpful to keep things low stakes to not stress anyone out too much. If you fuck up the giant rat infestation, the world will not end, you know? That is nice. Also works well as a tutorial for everyone! Combat is intimidating! So many rules! Take your time to figure out how stuff works with some nice, small quests and some not-too-complex-combat encounters!
You don’t have to follow every rule. There are so many rules for everything and that can be helpful but it can also be stressful. You don’t have to do everything by the book and if you notice that some rules annoy you and your players, you can always change them as you go along! (Cats have nightvision. Sometimes the rulebooks are dumb.)
Don’t get hung up on too many details. I love worldbuilding, but I get obsessive easily. Sometimes I think my world isn’t ready enough bc I tend to think like a writer who has to have everything figured out. That is not the case with d&d! Sure, It’s good if you know stuff. But d&d is not only about planning, it’s also about improvising. And the world will grow while you play in it! Before you know it you’ll go like “I want to have an encounter with this cool ice monster. I need an icy landscape.” and then you will make one. And maybe it wasn’t there before, but who cares. Your players will be excited and you can make up the lore as you move along!
Did I mention communication?
If you have specific questions about certain aspects of DMing or how to start, feel free to message me anytime :) I hope this helps a little bit! I’ll reblog in a second with the links!
438 notes
·
View notes
Text
The tools behind Manga and Stuff
In this post I will show you how I make this blog possible
Where do I get my manga:
My primary source for manga is Nyaa.si where I also upload stuff myself sometimes.
Viable alternatives I use include Mangadex and Bato.to. I also post manga on Bato.to myself. You can download manga from mangadex, Bato.to and many other sites like them with the Manga downloader by red Squirrel
The programs I use:
ComicSreen

I read all my manga with this Android app. There are countless other comic viewer apps on android and IOS, but this one allows me to save pages in full resolution which is kinda important for this blog and it’s just a pretty nice app overall.
Viable alternative for Desktop: Honeyview, but just like with Android, there are many others.
Advanced Renamer
A pretty simple program that allows me to rename thousands of files at once. It’s not really essential for this blog but it helps keep things organized and is overall a very useful program. It’s free for personal use.
XNconvert

XNconvert is an immensely powerful image editing program and the workhorse of this blog. I mostly use it to automatically crop out all the white spaces around manga panels (this used to take hours to do) but it can do so much more than that, from changing color depth to converting a picture into any format imaginable, and it can do it to thousands of pictures at once.
It was this program alone that made it possible for me to clean up 1000 scanned pages of Nausicaä of the Valley of the Wind in like 2 hours, here’s a before and after:

This would have taken days without this free program.
Topaz Gigapixel AI

I used this program to upscale a few manga I upload here, including Fullmetal Alchemist, Yokohama Kaidashi Kikō and the recently added Chainsaw Man. Here’s a preview of what this program can do.
This program needs a pretty beefy PC and it costs around 80-100$. And remember, upscalling is not magic, upscaled manga will never look as good as high resolution scans.
Waifu2x is a free alternative, but not really a viable option for doing whole manga.
Photoshop

I don’t think I really need to explain this one...
Free, and nowadays actually viable alternative: GIMP
AutoHotkey

AutoHotkey is a very easy scripting language that allows me to caption and tag my posts like this:

And it can do A LOT more than this.
Here’s the basic code I use for captions and tagging, with basic explanations of what everything does, but its far from a tutorial.
While AutoHotkey is free, it’s only available for windows and I don’t know of any alternatives for Mac or Linux.
One important tip for tagging:
Only the first 5 tags you add to any post are searchable. So if you have “Art” as your sixth tag your post will not show up when searching the art tag. This is why the manga title and the Author’s name are always the first tags on my posts.
The whole process briefly explained:
I am always on the lookout for interesting manga, so feel free to post suggestions.
When I do stumble across a manga that seems interesting I download it from my sources mentioned above. I then read it on my Android tablet for the first time, only after reading the entire manga once I decide if I want to upload it here. If I decide to upload a manga here I read it for a second time, but this time I focus on what pages and panels to capture. In my experience doing this on your first read isn’t a very good idea. You can’t really focus on both the story and the capturing at once.
Then I move all the caps to my pc and rename them with Advanced Renamer. I then make a backup of everything before cropping it with XNconvert.
I then add them to my queue here on tumblr, this step is also where I do all editing of the caps, like cropping out single panels or more substantial stuff. I also throw out a lot of caps in this step for various reasons.
There are usually around 50 posts queued which gives me a 5 day buffer to queue more posts.
I never do all these steps at once. There are sometimes month between me reading and capturing a manga, the processing of the caps and the eventual uploading.
Some fun stats about this blog:
This is the second iteration of Manga and Stuff, the first version was deleted by accident (by tumblr) when it had around 400 followers.
This iteration of Manga and Stuff started out in January 2017.
This blog has 100 times the follower count of my personal blog even though both blogs are the exact same age and have roughly the same number of posts... the main difference is that I don’t put any effort whatsoever into my personal blog...
As of right now there are 12600 posts on this blog, around 1500 of which are reblogs.
This is my most popular post of all times... by a wide margin... and it’s not even really about manga... and I uploaded it for a laugh...
My posts get 107.33 notes on average... but my most popular post mentioned above probably inflates this number a bit...
As of right now this blog has close to 1,2 million notes in total.
I still have every single unedited mangcap ever uploaded to this blog, dating all the way back to 2017... the size of this backup is 94 gigabytes and it saved my butt a number of times.
152 notes
·
View notes