#and now trying to find my list of plugins that i had
Explore tagged Tumblr posts
Visit Tumblr Blog
Explore Tumblr blogs with no restrictions, modern design and the best experience.
Last Seen Tumblr Blogs


Fun Fact
Tumblr has been banned in Indonesia for providing people with access to pornographic content.
Text
I swear I use normal VST plugins

#dorian speaks#recently re-installed reason 12#and now trying to find my list of plugins that i had#and these are some of the “technically free” ones I have a lot of fun with#because you don't get to know what anything does#just play around and find out
2 notes
·
View notes
Text
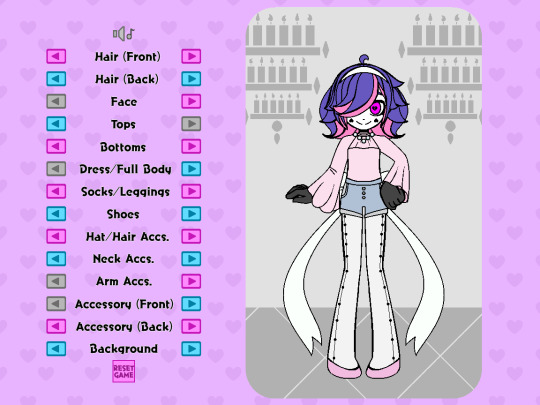
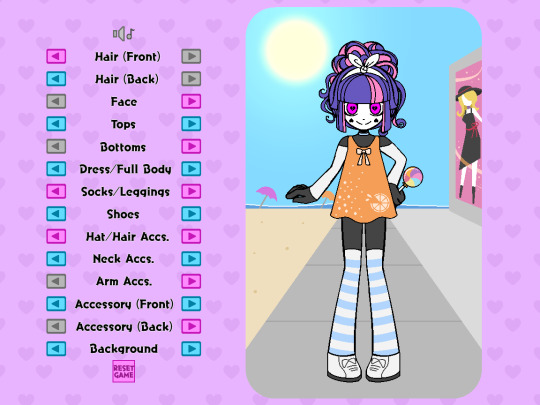
How I created a dress-up game in RPGMaker!
At least one person asked me to make a guide for this and that’s enough for me! Though, bear in mind, I may not be the best at explaining things and I used an example from assets I already had.
I made the dress-up game pictured below using RPGMaker MV, but I’m sure this method is applicable to versions above MV as well. I will be writing this post specifically through the lens of using MV (You’re also going to need some plugins, but not a lot!). At the time of typing this post, all RPGMaker engines are on sale until October 5th (just to let you know!)
(Please note: This method does not account for a game where you can freely change the colors of characters hair/clothes)
(Please note x 2: this is not a tutorial for learning RPGMaker, but a tutorial on how to make this specific type of game within the engine. Prior RPGMaker experience and familiarity is required when following this tutorial!)
I’m not the best at explaining things, but I’m sure going to try my best!
List of things we’re going to need:
-An RPGMaker Engine, preferably MV (or MZ) since they already come with mouse support.
-An art program
-A tileset consisting of words and arrows
-All your dress-up accessories as PNG images
-A blank PNG image
-2 plugins
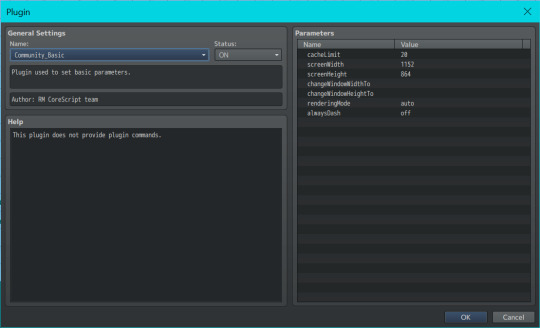
First things first is you’re going to want to decide on the canvas size of your game. Keep in mind with the way RPGMaker works, there’s a high chance you’ll wind up with black bars on the side of your screen. If your game is intended to be played in browser on itch.io, it shouldn’t be much of an issue as you can choose the display size on the game’s page to match the visible game. (I also just personally wasn’t concerned about the black bars for a dress-up based game anyways) The canvas I chose to work with for this game was 1152 x 864, but you can choose whatever size you feel will help you draw most effectively(just keep in mind how it might appear in browsers or if the player will have to zoom out!) If using MV, you change your canvas resolution by going into the plugin list and selecting “Community_Basic”

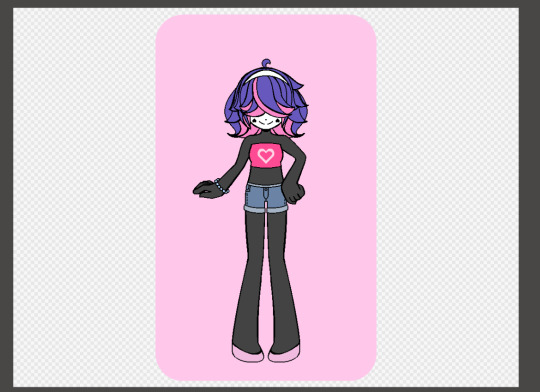
When making the assets in your art program, I find it easiest to have your canvas match the canvas size of the game. We’ll use Nova as our example character for everything. I drew them and all their assets in the center of the screen (for easier mirroring). The position of all the items can be adjusted later in the engine
I would start by doing a few test assets and putting those in the engine to make sure you get the hang of the whole thing, but this is where you’ll be making all your assets for a given character! (So if you wanna make some test assets and then move down to the “Putting it together in the engine” section, that might be a good idea!)
Here I create and separate every asset into their own folders(categories) and subfolders. For example, hats get their own folder labeled “hats”, and the subfolders “hat 1” “hat 2” “hat 3”, etc, each containing their own individual hat asset.
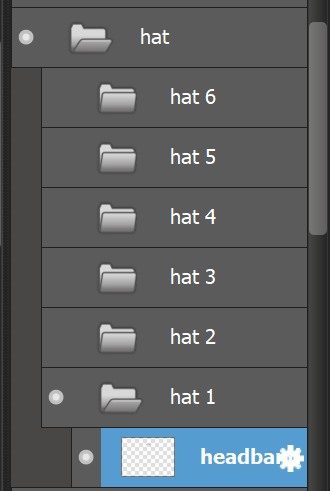
You can make as many or as little categories for clothing as you like. When you have everything you need, make at least one asset from all your categories visible, and make sure all the categories are ordered in the way they are meant to appear in game. This way, you can make sure nothing is overlapping in the incorrect way(at least for what your intentions are). When your categories are properly ordered, keep them in that order, as you’ll use it for a basis later when importing the assets into the engine.

Alright, this next part is a little tedious. Now you’re going to save every asset individually by hiding every other folder/layer except for the one you’re saving. It might help to have a naming convention for your assets, for example all of Nova’s assets follow the scheme of “dressup nova-shoes 4.png” “dressup nova-shoes 5.png” “dressup nova-shoes 6.png” etc etc.
NOTE: In addition to these files, remember to include a BLANK png image with nothing on it! This will help later!

Once this is done, we can start importing them into the program!
Putting it together in the engine:
Open up your RPGMaker project’s file directory. Find the folder named “img”, and in that find the folder named “pictures”. Drop all your clothing/hair/face/etc assets into this folder.
Now we need to set the scene. The scene being…a map! I used multiple characters so my game has a different map for each one.
Since Nova is our example character, let’s focus on Nova’s map.
Make sure the width and height of your map is large enough to cover the whole screen (sans any black bars you might have on the sides). You can fill in the back with tiles, or you can do what I did and add a small parallax backing that loops across the screen. I made a small one with two hearts in the corners for a nice scrolling effect!

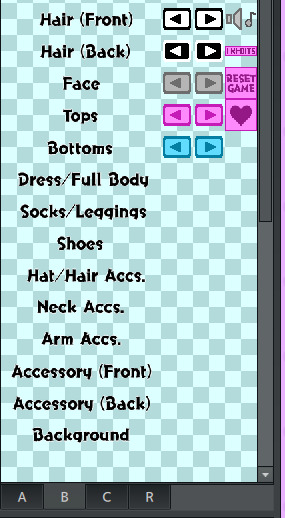
To start this map, let’s put in some of the categories to choose between. I did this by laying out the words on a tileset, and drawing that tileset onto the map. The order of categories I chose does not reflect the layer order of clothing items, but rather was organized by what I felt was a natural start-to-finish order progression in a dress-up game.
Don’t worry about putting the choice arrows next to the categories yet, though! We’ll do that in a little bit.
Now we’re going to start with actually putting your character and their clothes/hairs/etc into the map. Double-click anywhere on the map (where you won’t put any other buttons) to create an event.
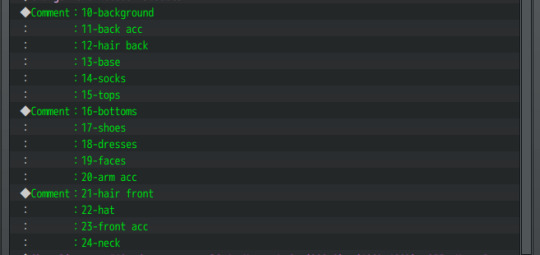
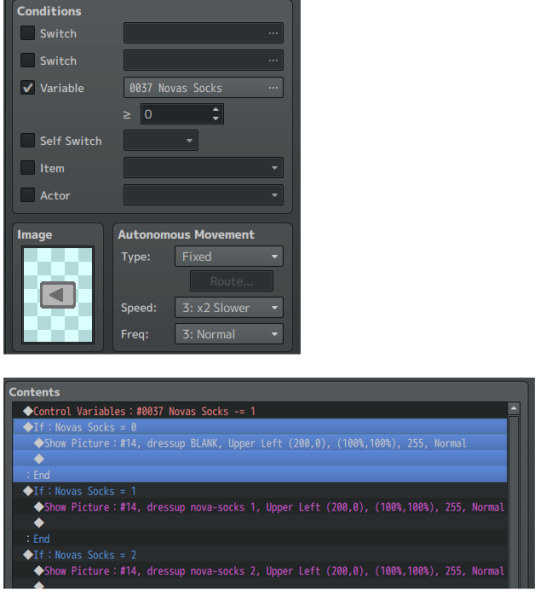
We are going to set this event to autorun. In this event we are going to set up all your layers, even if nothing needs to be presented on them yet. To start, I added some comments to help me keep track of them. For context, when you choose to show an image in RPGMaker, it asks you for the image number. The image number is essentially the image’s “layer”, with 1 being the bottom-most layer and 100 being the top-most layer. Up to 100 images can be displayed on an RPGMaker screen at any given time. Even though 1 is the bottom-most layer, I chose to start at 10 just in case I wanted to add more layers underneath later. So layer 10 is my bottom-most layer, and layer 24 is my top-most layer.
Let’s start with our bottom-most layer, the background asset.
The background is this pink rectangle behind Nova.

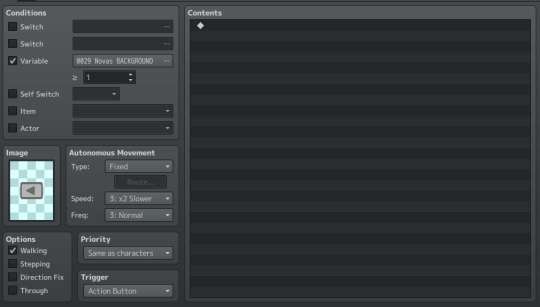
Even if you change its appearance, this background itself is always visible. So we are going to show the first background on layer 10 with the Event Command “Show Picture”.
(Note, because I wanted all the dress-up assets to be on the right side of the screen, every picture’s X position is offset by 200. You may want to offset your game in another way, or keep it centered.)

Because this is an asset that is always visible on the screen, we are also going to set up its variable. Select “Control Variables” in your event commands, set it to a constant of "1" and add it underneath the "Show Picture" command,

Don’t worry about the #number of the variable, all that matters is the number of what the variable equals. As you can see we are showing “dressup nova-BG 1”, so our variable should equal 1 to correspond to this.
The next asset up from that is our back accessory on image layer 11. (Nova can have fairy wings or a yoyo accessory, for example.) The back accessory doesn’t always need to be present, so we will simply set this image as being our BLANK png asset.

We will continue going down the column like this! Any asset that doesn’t need to be present will be set as a blank, and any asset that does need to be present (like Nova’s background, Nova’s hair in the front and back, Nova’s face, and Nova’s base) will be set as the corresponding image and have its variable set to “1”.
(Note: The base does not require a variable as it does not change)

And because this is an autorun event, we have to close it off. Add a control self-switch A, and then add a new event page. On the 2nd event page, merely click off self switch A in the conditions box

Doing this will ensure that the autorun event won’t keep trying to show the images in an endless loop.
Go into your database tab and under system, check that your starting position is on the correct map (if you have more than one) and start your game. Your autorun event should show all the images you asked it to. (I was gonna have a pic here but I'm limited on pics so)
Now, using our category list that we placed as tiles onto the map, we are going to be adding the arrows next to them to make them function.
Even though it's at the bottom, we’ll start with the category Background as an example since that was the first we implemented.
Create an event on the left side of Background and make its event image a grayed-out, left facing arrow, to communicate that the player cannot click anymore in that direction. Set its condition to be variable activated, with your Background variable being greater than or equal to 1. Leave the event page contents blank.
Create a 2nd event page on this event. On this 2nd page, replace the grayed-out arrow with a colored arrow, and set the Background variable to be greater than or equal to 2. This means that as long as the variable is 2 or above, the player can press the back button and go back to see the previous Backgrounds.
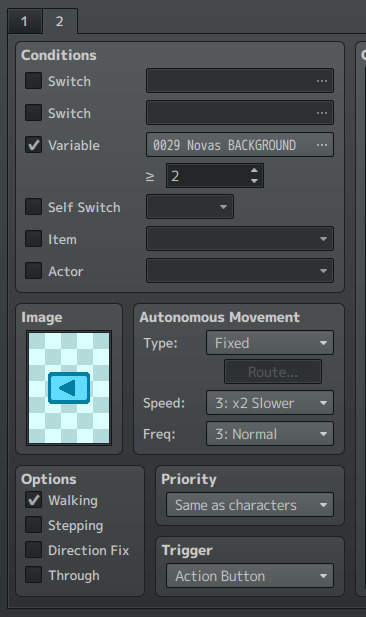
This time, we WILL fill up the contents on the event page.
First we are going to put a control variable command. Set your Background variable to subtract a constant of 1. This means that every time the event is clicked, it will subtract 1 from your Background variable (since this is your “Back” button).

Next, we are going to include a conditional branch command like so!
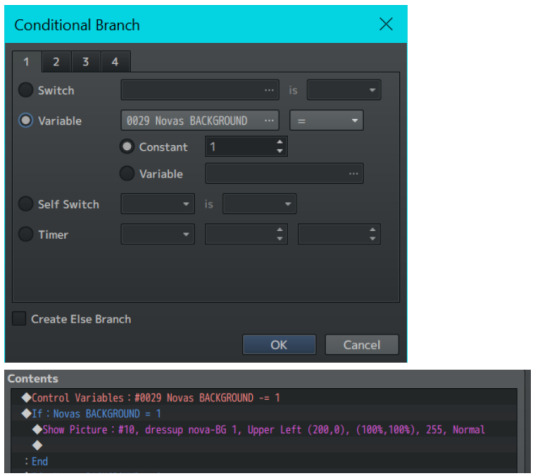
Under this Conditional Branch we put a Show Picture command, where we show an image on layer 10(the same from our autorun event). We can see that if Nova’s Background variable is equal to 1, then layer 10 is going to show the first background–that pink rectangle from before.
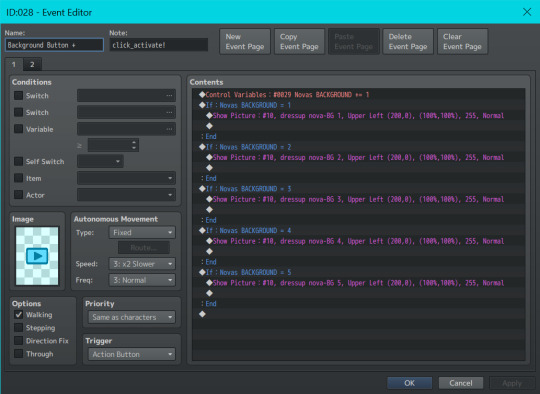
Let’s copy-paste this conditional branch and edit it slightly!
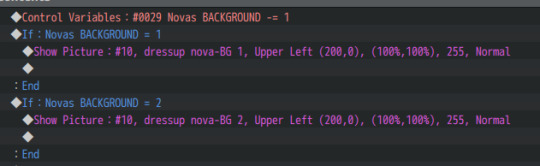
Repeat this for every asset you have for a specific category. (In this case, Nova has 5 different backgrounds, with one background needing to be visible at all times.) So our 2nd event page should look like this:

This button event is now ALMOST complete–but we’re missing something!
We need this event to activate when we click on it! Normally in an RPGMV game, when you click on an event, the player character will walk to the event before it can activate. But for a dress-up game, we want the event to activate as soon as it’s clicked on!
Therefore, we need a plugin! You’ll need a plugin that makes events activate based on a click trigger. For me, I downloaded the “TDDP_MouseSystemEx” plugin for MV found here: https://forums.rpgmakerweb.com/index.php?threads/mouse-system-ex.46511/
(Remember to follow the terms of service for whatever plugins you use!)
After adding it to my in-game plugin list and turning it on, I added the “click_activate!” notetag to the event (as instructed by the plugin) and now it works as soon as it is clicked on.
Next, we have to make the Forward Button! This is easier now that we have the Back Button as a base.
To make your Forward Button, we’re going to copy the 2nd Event Page of the Back Button event, and make it the first page of our Forward Button event. We are then going to change three things:
-Remove the condition variable
-Change the image to a right-facing colored arrow
-Change the control variable from a “subtract constant of 1” to an “add constant of 1”
So your first Forward Button event page should look like this!
For the 2nd event page of your forward button, remove all the contents in your content box. Change the arrow to gray-right-facing arrow, and add a condition variable equal to your number of assets for the category.
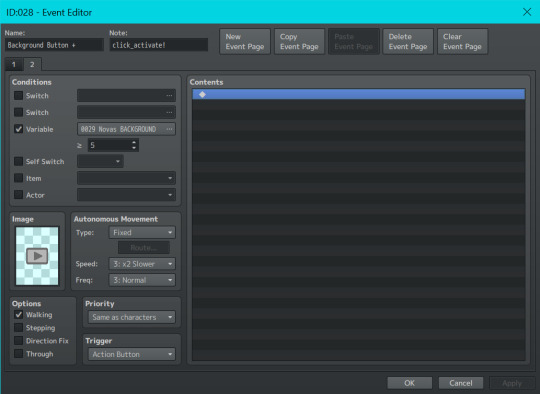
Because Nova has 5 Backgrounds, our number is 5. If Nova had 7 Backgrounds, this number would be 7. If Nova had 3 Backgrounds, this number would be 3, etc.
This ensures that when a player has clicked to the last asset, they can’t continue increasing the variable past what is needed.
You then continue making these types of Back Buttons and Forward Buttons for every asset, until you have everything you need!
But WAIT!!
For objects that don’t always need to be present, we add one extra conditional statement!
Let’s use socks, for example. Nova does not need to wear socks to complete an outfit. So for the socks’s back button, we make sure to set the variable condition to 0.
After that, under the event contents of our sock buttons, we make sure to add an extra conditional statement for the sock variable. When the variable is zero, we show the BLANK image–so there are no socks to be seen! (Remember to apply this extra statement to both the back and front buttons!) Do this for every asset that doesn’t always need to be present such as socks, dresses, hats, etc etc.
That’s pretty much the basics of all the mechanics you need to get it to work!! I won’t be going over other things like the reset game button/disabling menu access/hiding the player walksprite, as those are things you probably know how to do already if you’re familiar with the engine.
But I WILL share one last piece of optional advice that I feel makes a big difference.
While testing things out you might notice that there is slight lag between changing images, a blip between pictures. This is because RPGMaker doesn’t preload images, and loads in an image as soon as it’s called.
In a downloadable version of a game this slight lag is negligible. However, if you intend for your game to be browser-based, this lag will be significant and noticeable. In order to fix this problem, I’d recommend downloading Galv’s Image Cache plugin found here: https://galvs-scripts.com/2017/04/26/mv-image-cache/
This plugin will help pre-load images so there’s no lag!
However, you will have to write the name of all your assets manually in its plugin menu. If you have a lot of images (which you will, for a dress-up game) this could take a very long time.
My advice is to go into your game’s picture folder, select all, and select “copy file path” from your folder options. Paste this list into an excel sheet, remove the directory name and file extensions, and then paste it into a google doc.
Edit the names together until there is no spaces between image names and they’re all separated by commas. Then, select all and paste your list into the Image Cache plugin’s settings. If you spelled something wrong or placed a space incorrectly, the game will not start and will tell you what image it was struggling to find. So having this to refer back to is very helpful and also means you don’t have to retype everything in the event of an error!
(Below is just a preview of how my list of image names looks for my dress-up game and what i copy-pasted into the plugin settings for the Image Cache plugin)

And thaaaaat should be everything! I hope this wasn’t too hard to follow, or messily formatted! But I tried my best and will try to answer any questions one may have about it!! Good luck creating your dress-up game!
#im so sorry i feel like this is so hard#but i hope it makes at least a little sense!!#i also apologize for the combo images tumblr doesnt let me have more than 30#guide#rpgmaker#rpgmaker mv#dress up#dress up game#dress up guide#game guide
107 notes
·
View notes
Text
A guide to using a shopping agent with Xianyu/Goofish, sort of
disclaimer that this is purely based on my personal experience and is only accurate as of the time of posting
okay so first of all, Xianyu is a Chinese secondhand shopping platform, kind of like Mercari, and it's an amazing place to find all kinds of pins and other fanmerch. It's part of Taobao, an even bigger shopping platform. I've heard that if you can actually make an account with Taobao/Xianyu, you can maybe buy through there directly without having to use a shopping agent. I don't know anything about this personally, and I don't think I would know enough to buy without a shopping agent even if I could get an account. (I had a Taobao account for about five minutes once and it got frozen because I set a password, and I can't really try again because it was based on my phone number.)
If you're luckier than me and you can get an account with Taobao or Xianyu, then...definitely do that, because it'll make your life easier. I can't tell you anything about how to do it because I couldn't do it, but you might find guides on r/Taobao. I actually don't even know if the same login works on both Taobao and Xianyu despite them being part of the same company. I have gathered that it's not possible to browse Taobao without account, whereas it is (generally) possible to do so on Xianyu. If you have a Xianyu account, however, you can favorite items to come back to them later and start conversations with sellers, which sounds convenient. Again, though, I couldn't get an account so I can't tell you how to do this. I can only tell you what I've done as a peasant who could not get an account.
What you want is goofish.com on a desktop browser. You can usually browse this site without an account. Sometimes the site will actually block you from browsing without an account, which may have something to do with overloaded servers--originally I was able to search and browse using Firefox, but at some point that stopped working and now I have to use Chrome for searching/browsing but I can still view individual pages in Firefox. As long as you're getting a pop-up you can dismiss, though, you're good. If you're being completely blocked, just try again later in the hopes that it's an issue of an overloaded server or something, and not a change to the site requiring an account just to browse (I live in fear of this tbh 😬). The important thing is that for the most part, you can browse the site this way and copy listing URLs into a shopping agent website, and then the shopping agent can buy the items for you, store them at their warehouse, and ship a big package of purchased items to your home.
You will also want to download the Xianyu app. You can browse with this but you can't copy the listing URLs without an account; however, you still need it because some listings contain info on the app that isn't shown on the site.
Finally, you need some kind of translation plugin for your browser. I have Simple Translate on Firefox and I guess Google Translate for Chrome. In a lot of ways the one I found for Chrome is better because it translates everything on the page, instead of waiting for me to select individual bits of text. With my Chrome plugin, for instance, part of a results page looks like this, compared to on Firefox where it's all in Chinese:

That's also how I set up search results when I've looked through everything on a given result and I'm just coming back to check for new stuff. By default I think it's on "new price reduction," so I pick "up to date" to sort by date and see the most recently added items.
As you might guess though, a lot of the descriptions will still be very confusing even with a translation plugin! Probably the only way they would fully make sense would be if you could actually read Chinese. Translation plugins are a lot better than nothing, but they're far from perfect, just because English and Chinese are so different. Just from browsing a lot of listings and buying several of them, though, I've picked up a few things that are good to know:
[出] usually gets translated to "out" but it seems to really mean something more like "for sale" or "available"
[收] in the title is translated as "collect" and means it's an ISO post, NOT something for sale (although there's nothing stopping you from using the photos for your own ISO purposes). Another major hint that something is an ISO post rather than a sale post is the use of pin artwork rather than photos.
[展示] can translate to "display" or "exhibit", or the post might begin with something like [展示不出]. These are purely display posts, also not for sale. They will break your heart. (however, if the description says something like "they can be squatted," I think that basically means logged-in users can claim items they'd like to buy if/when OP ends up deciding to sell them at some point…so if a display post has something you desperately want, at the very least it doesn't hurt to bookmark it and check the user's profile later to see if any of those pins are being sold separately)
[无] sometimes translates as "not out" or "none" which seems to mean "sold out"
if a listing says a particular thing has been "released" or is "already out", that probably also means it's been sold
another important thing is search terms. I've found that using a combination of English and Chinese to search Xianyu seems to work pretty well--primarily Chinese, but some sellers do use occasional English terms in their listings, so it doesn't hurt to search for those too. for instance, because I'm primarily looking for Loki pins, these are my regular searches:
漫威 徽章 (Marvel badge)
Marvel 徽章 (Marvel badge)
洛基 徽章 (Loki badge, although it usually translates back to "Rocky badge" and yes, wrestling items do come up sometimes)
Loki 徽章 (Loki badge)
漫威 洛基 (Marvel Loki)
I'm not sure how much it matters if you have spaces between words or not, although on the listings they seem to have words run together, so it might not matter.
generally if I want to look for something outside of my usual search terms, I'll try a search in English and that will usually get me at least a couple results that help me figure out what the relevant terms are in Chinese, which I then use for subsequent (and much more successful) searches. obviously I don't have a Chinese keyboard, so I just copy the terms I want into a note for later.
in my case I also do the general "Marvel badge" searches because people often don't tag specific characters if they're selling a ton of miscellaneous pins, especially if they're selling pins from multiple fandoms, so if you're trying to find a specific character, you will probably also want to look through the results for the whole fandom. this will take a while the first time and there's just no getting around it.
to look up a listing in the Xianyu app, you'll need to download it first, and then you used to be able to get the item's QR code right from the listing page so you could go to it directly with your phone, but for some reason they took away that feature, BUT now you can visit entire user pages from Goofish when you couldn't before, so…win some lose some I guess? the best (maybe only at this point) way to get the QR code is to copy the item link from Goofish. go to Superbuy. right on the home page, where it says "Please enter the product link or keyword"? paste the link there and hit enter. the resulting listing is how you would actually buy something with Superbuy, but it's also useful because under the title it includes a direct "items link>" to the item's page on Taobao and that has a functional QR code that can take your phone straight to the item in the Xianyu app.
EDIT: as of 8/5/25, this method doesn't work anymore because Superbuy stopped generating the Taobao link for some reason. However, you can still get to it if you manually replace all the Goofish stuff in your link with all the relevant Taobao stuff. Basically you just need the item ID from the Goofish URL, and then you put it at the end of this (without the angle brackets):
< https://market.m.taobao.com/app/idleFish-F2e/fish-pc/web/detail.html?id= >
according to my plugin, this listing says "The price is on the picture," but there are no prices on the picture, so I would have to check the app. and on the app, magically, it looks like this:

this photo also shows one that's sold out, bottom right:

It’s obvious here because it’s blurred out, but sellers don’t always do that—they might just use that [无] or something similar, which my phone is translating as “not out” but I think I’ve also seen it translate as “none”
this listing also has a bit about bundles. this is a thing you will probably run into, where people are like "if you want any of these pins, you have to buy an equal amount of these other pins that I really want to get rid of," and it's kind of a nightmare to deal with through a shopping agent. at least this person is saying it upfront though. I had problems with a seller who sprang the bundle thing on me by surprise and then kept trying to get me to buy more pins I didn't want and it was a whole thing, I finally just gave up and got a refund
my iPhone can translate text on images, which is something else you might need to do, either in taking screenshots from the Xianyu app, or if somebody sends you a screenshot with Chinese text; basically I just open the photo and select the actual text, and there's a "translate" option. it doesn't always work.
now for Superbuy itself. Superbuy is one of several shopping agents, but it's the only one I've used thus far, so it's the only one with which I have personal experience. my guess is that things would work more or less the same way with other shipping agents, but again, I couldn't tell you that for sure because I haven't tried any other ones. I primarily relied on this guide to compare the sites for me and chose Superbuy because it sounded like the best option of the ones listed (actually I think Pandabuy sounded even better, but it had been shut down shortly before I started trying to use a shopping agent in the first place). I think ParcelUp is another one that's not mentioned in that guide; I haven't personally used it either.
I'm not going to go over the absolute basics of Superbuy use because most of that is pretty well covered by various guides on the Superbuy Reddit and on Superbuy's novice guide. Method 1 on Superbuy's tutorial here is a pretty good rundown of how things work. (2nd Hand E-Comm includes Xianyu, but there aren't that many differences here between that and other e-commerce platforms.)
Something they don't really tell you, though, is what to do with a multi-item listing that has an outrageous price you're not expected to pay. I was initially worried about these but they're not a big deal.
To use this listing as an example: The listed price is ¥4580. That's like $625 USD!! possibly more depending on how it's being converted!! it's possible that's a reasonable price for the entire pin lot, but you don't want to buy the whole lot and the seller almost certainly isn't expecting anyone to buy the whole lot either. If you could use Xianyu directly, you could just message them to ask how much an individual pin costs and arrange to buy it directly, but to do it through a shopping agent, there's a bit of an extra step, since you don't want to pay $625 up front even if you would probably get most of it refunded. (lol actually it turns out what would happen is this seller would refuse to sell to an international/proxy buyer, as some of them do, and you would be sad. but it's still a good example for this specific thing.)
after you paste the link into Superbuy and it captures all the information, you'll get the option to edit the price:

If the listing included individual prices, you can enter the actual price here with a note saying so and whatever option makes the most sense. If not, I usually just enter something like this:

click Confirm, then Buy Now. On the next screen you can reiterate that you only want to buy a certain number of items from the multi-item listing

this way, when you buy it, you're paying a much smaller amount than the item actually costs, and the shopping agent will have to contact you to ask which item(s) you want. you then send them a screenshot with your desired item(s) circled.
they'll get back to you with the additional amount you have to pay to actually buy the thing you want…or in some cases to tell you it's sold out or that there are other complications, but ideally that doesn't happen. once the shopping agent buys it, the item shows up on your Orders page as "purchased," and then "shipped (local)" after the seller ships it, and eventually it gets stored in the Superbuy warehouse with photos so you can actually see it and make sure there aren't any problems (usually there aren't).
another important thing though: when you get a "confirmation pending" notice, always reply even if it doesn't sound like you need to do anything, because leaving a confirmation open for 72 hours will automatically cancel the transaction. Also, when you upload a screenshot this way, you can only upload one image, it has to be smaller than 2MB, and you won't be able to see it after the fact, so it's a good idea to keep records of some kind. If you want to send screenshots for a listing with multiple pages, you have a couple options: you can use something like PicCollage to put everything you want into a single image, or you can start a message thread with the shopping agent.

If you do the latter, you do still need to put something in the confirmation field, like "I am sending two screenshots through the contact form". doing it as a message also has a limit of 2MB per image, it just allows you to upload more than one image and to see what you've uploaded.
The agent will sometimes reply to you with the "confirmation pending" thing anyway, which is annoying, but I usually reply back in the message thread and then just write something like "replied in messages" in the confirmation box so the transaction doesn't get auto-canceled. (yes, this is something I've learned the hard way.)
once the item is in the Superbuy warehouse, it's stored for free for I think 90 days. this was another reason I chose Superbuy; they had a longer free storage period than most other shopping agents I checked, and I wanted to be able to consolidate a bunch of items into one package. that part, getting all my stuff shipped internationally to myself, is kind of complicated and I have less advice there because I've dealt with that aspect less.
one thing I can say, though, is that it's good to check your Warehouse tab to see if there are any restrictions listed next to any of your items. these can limit the shipping lines you're able to use, which can cost you more money, so it's worth checking to see if you can get the restrictions removed. an obvious one is "Sensitive product Famous Branded Items/CD/DVD" which in my case usually means a thing says MARVEL on it. if it's just on the tag, I can choose Product Label Removal in Other Services, which costs like thirty extra cents, and the warehouse will cut off the tag, which removes the restriction (I usually include a note like "please cut off the tag if doing so will remove the restriction" but I don't know if that makes a difference). I think you can also use this to have an item removed from its box, if the box has a brand name on it. of course, if the brand name is on the item itself, you're out of luck. I've been told it's best to ship brand-name items with non-brand-name items because that makes it more likely they'll get through inspection. liquid/paste is another restriction, which will show up if you're getting a pin or charm with liquid glitter inside; you're also out of luck on that one. I had a seller include a little tube of glue once that I didn't expect, though, and I used Split Order/Discard Item in Other Services to have the warehouse remove the tube of glue from the order, which removed the restriction.
the biggest problem right now with international shipping is of course the fucking tariffs. there are some tax-free/duty-free lines that are probably your best bet at the moment, and frankly you should consider yourself lucky if you can use them, because I'm in Alaska and I can't. (if you're not in the US at all, consider yourself very lucky on this particular issue.)
so far, I've always submitted my packages myself instead of using the Shipping Expert service. I've been told Shipping Expert can save money over the amount you pay for it, but I'm not totally sure how that works, and in my case it was a waste of time because the supposed expert picked a shipping line that couldn't go to Alaska, which like...was exactly what I was hoping to avoid. if you do it yourself, make absolutely sure the address is correct before you submit (guess what else I learned the hard way). some shipping lines have insurance options that aren't too expensive, and if you get insurance, it should be for the actual value of the items. you also have to declare a value of the package, which in theory is not the actual value of the items; I've been told that about $15 USD per kg is ideal for the declared value but I don't actually know what that's based on and I don't know what the consequences are if a package gets seized. I don't think it's common for packages to get seized, either, but apparently it does happen on occasion. sometimes your package can be returned by Chinese customs, and in that case you'll get back what you paid for shipping and you can try again (but you probably want to contact customer service to ask what the problem was so you don't repeat it). if your package gets all the way to the destination country and gets kicked back for some reason, though, like an incorrect address, you're out whatever you paid for shipping.
nothing else is coming to mind, but if anyone has questions, let me know and I'll try to answer them.
6 notes
·
View notes
Note
first of all, I'm so sorry you had to deal with all those troubles. I'm just entering the fandom, so I have no clue how bad it was or possibly still is, but that shit ain't acceptable. I hope you're feeling well in the future, and better now.
Second of all, I have a question for you about a technical problem that I can't find much of any resources on how to combat, and seeing that you're very good with virtual photography, I thought I'd ask you.
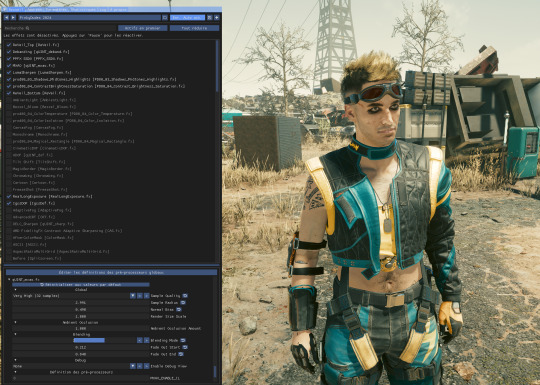
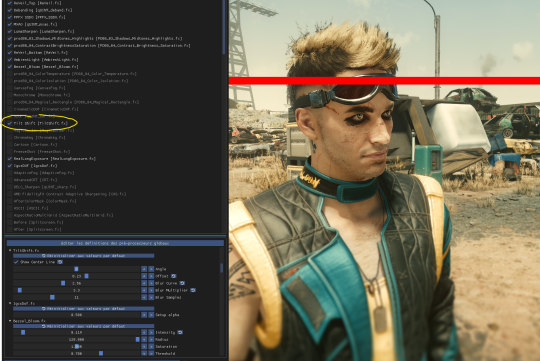
Depth of Field in the vanilla game's photomode is handled oddly, with artifacting(?) around V and certain other objects and NPCs at lower aperture values
Example:

The only advice I've seen that directly addresses this issue is simply "Raise the aperture" but that doesn't help when I'm trying to take photos with a very intense DoF (Which I really would love to do)
is there a mod/setting I could use to fix this issue?
Welcome in the fandom and thanks a lot for your words! 🧡 If you know how to curate your space, use the filter and block features, it's not that bad, especially if you find people you vibe and hang out with! Hope you'll find your comfy corner there :>
As for the question; The vanilla PM's DOF isn't really good and there isn't anyway to "tweak" it as far as I know (we can forcely disable it via some settings but that's about it)
If you're playing on PC, I can recommend getting ReShade! It's totally free, it allows you to layer all kind of shaders and post-processing effect on top of games. Since CP77 is a single player game, I recommend downloading the version with Addons support!
▶ ReShade
⚠ ReShade has its own Screenshot key; using the Vanilla photomode's key to capture your screenshots won't capture the layered shaders! So set up your pic, hide the HUD using photomode, and then use ReShade to set up more effects and polish, before taking your pic with ReShade!
More aboute ReShade and Tips on different DOFs under read more :>
Launch the installation and select Cyberpunk 2077 in the list, pick DirectX 10/11/12 as its API and dowload the recommended shaders pack
After launching the game, ReShade window should open, I recommend going through the tutorial to understand the interface better!
Then, you can start either enabling some shaders and tweaking them yourself, or looking for ReShade Presets on the internet! There's a lot of them on Nexus Mods too :>
▶ My old ReShade preset
When it comes to DOF shaders, the best one imo is IGCSDof The problem is that, even tho the DOF itself is free, you need the IGCS camera for it to work properly, and this plugin is not free
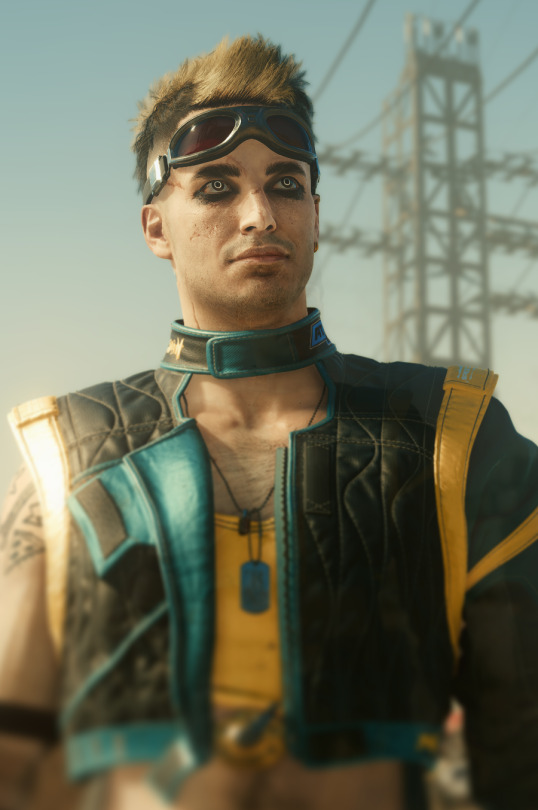
For free DOF, I can recommend ADOF and CinematicDOF! They can work together, tho I recommend only using One or Another
Here's an example of ADOF Both shaders can be tweaked with to achieve similar results

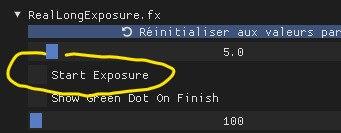
You'll notice some artifacts and pixels around the hair especially, that's when RealLongExposure save the day!
It allows you to "freeze" the game by staking frames on top of each others, "smoothing" the edges and getting rid of the artifacts
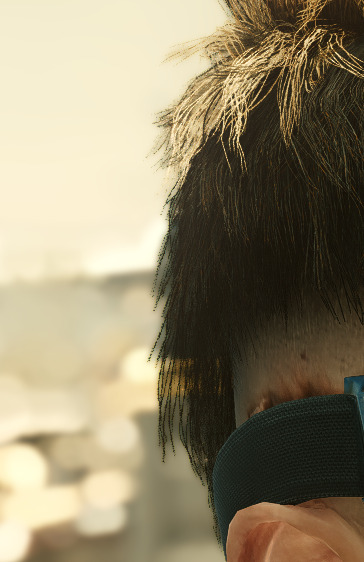
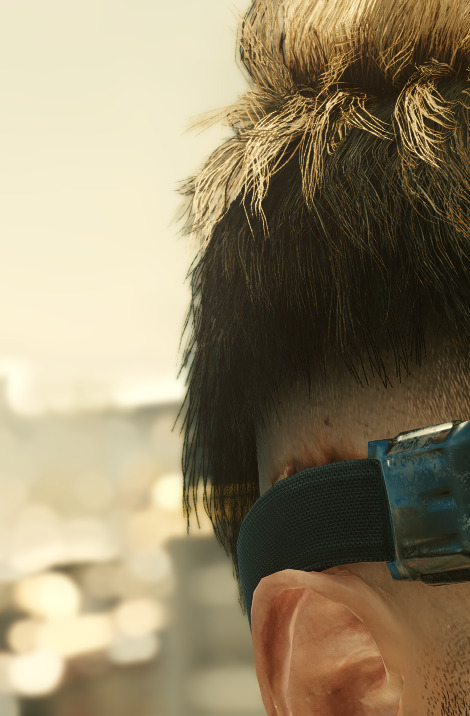
It looks less "crispy" on the right, but it's easier to spot in game!
It's recommended to bind this shader to a shortcut; to bind it to a key, simply right click on the "Start Exposure" box
Another Shader that I like is called Tilt Shift It allows you to place a gradient blur that follows a Line's angle and position!
These are only just a couple of Shaders, I invite you to test and play around with all of them to see what you vibe with!
#Hope this answer your question! And thank you for the kind words 🧡#Cyberpunk 2077#Tutorial#ReShade#Ask#demon-of-side-quest-hell
20 notes
·
View notes
Text
The menus don't work, the menus don't work, the menus DON'T WORK...
OK, my few readers. I took a break, I went back to fix the navigation, it's unfixable as-written.
I need some complex stuff in places, I was willing to forgive WP for putting out a new site editing interface that barely works - as long as it has the basic features someone would use on a storefront. I'm an outlier. I know this.
BUT IT IS NO LONGER POSSIBLE TO CREATE A MENU WITH A WORKING SUB-MENU IN IT. IF YOU TRY, THE SUB-MENU LINKS ARE UNCLICKABLE.
I am using their site editor and their 2024 theme, I should say.
I crossed my fingers and looked for the (now liable to vanish from anything more complicated than a paragraph) "edit as html" option. Nope! It's gone! I can't fix it. I would have to hack the interface somehow to fix this for WordPress, within WordPress.
I had to go looking for plugins. I HAD TO GO LOOKING FOR 3RD PARTY SOFTWARE TO GET A FUNCTIONAL MENU. And, of course, they paywall features I need. I found a "floating" menu that actually does work well enough (it's a little cramped on mobile unless you put the screen in landscape mode, but at this point you should really do that anyway, I can only format so much) but the sub-menu function is paywalled. And I'm actually fucking tempted to buy (haha, I mean "rent") it. Because the damn thing works in dark mode and across devices. And it sticks to the side in a fairly unobtrusive way, which WP's menu will not. It won't stick anywhere. And it sure as hell won't do that thing where you scroll up and it plops down for your convenience.
But if I use that floating menu without sub-menus, it's gonna get longer, and longer, and longer, until it doesn't fit on your mobile screen anymore, or potentially your tablet or desktop, and then I dunno what happens. Also, in order to keep it small, everything is a cryptic icon that displays a title when you tap it (on mobile) or hover over it (on desktop). That's kinda counterintuitive, I don't know if I want my one working menu to be like that.
I might keep looking and find another plugin that also works that well but... it's not likely. Or, if I do, I may run into another paywall. They gotta get their rent somehow!
This is a stupid problem and so far I am unable to come with with a non-stupid solution. I can:
Put all the links in the header menu, and you'll have to scroll through EVERYTHING to find the actual content every time.
Put all the links in the content area, in different places and different combinations depending on the page. (And this would mean doing some reformatting on every instalment AGAIN.)
Start fucking around with the sidebar - I don't know if it works and I'd have to rip up every template I've already made to add it.
Put all the links in the footer menu, and nobody will notice them.
Put all the links in the floating menu (see above for the issues with that).
Make sub-pages for Misc/Notes and similar that are just lists of links and serve the function of a sub-menu.
Actually put the content on the sub-page and have it navigable via anchors (this seems like it would be a bitch to load, but most of my content is just text).
Make a list of links that isn't actually tagged as a menu, thus losing the collapsible function for small screens.
Kill God.
That last one is probably the most doable but I feel like someone would get mad at me. Like, Hazbin Hotel finally got its first season on Amazon, and if God dies they might have to rewrite some shit.
If I don't lay out the money for the cryptic icon menu, we're probably going to end up with three or four accordions that are not technically menus at the top of every page. And I'll hafta check back every once in a while to see if WP fixed their shit yet.
If they don't stick with that site editor and make it useable, all this work is going to vanish like chalk marks in the rain.
I WANTED to put up another six-pack in February. I have it ready to go! But the site doesn't work. If I can't fix it this week, I won't even be able to put things up without illustrations. And forget having time to fill in the missing artwork. I got enough to do trying to kill God!
#tin soldier and soldier on#updates#website woes#in other news i woke up with an inexplicable ability to focus better on text today#which i should not have?#I'm not wearing reading glasses to write this#pretty sure this isn't gonna stay like this but wtf happened?
3 notes
·
View notes
Text
Some Japanese Resources
Like I said in one of these stream of consciousness un-revised blog posts you only need 4 resources to learn a language so i thought i'd give a basic 4 for japanese. note: I personally use, WAY more than this. These are just like the core 4 parts i use. Everything else is a tool to integrate these resources together, or to allow me to use these resources in situations where I usually cannot.
Lookup: Yomichan: a browser based extension that lets you highlight text in browser to pull definitions. It can parse through japanese also so it will be able to tell where one word ends and one begins. It uses the same definitions that they use over on Jisho which a free web dictionary for japanese. Technically i gave you 2 resources.
Grammar Guide: Look ngl, just pick whatever. If you own like the genki books or minna no nihongo or whatever already just use those for learning your basic grammar. After that find a more comprehensive collection of grammar. For basic grammar I used this guide here. This is a mirror of a guide written by a guy named Tae Kim that i can't find the link to anymore. This site also has a link to a comprehensive list of grammar patterns and stuff if you poke around.
Storing Info: Originally i was going to use a plain notebook for this but i realized how little i had any desire to write. So instead i got this Flashcard app called Anki. Its based on Spaced Repetition which is a concept that some smart people have decided is a good way to make sure you remember things. Look it up if you want a real explanation of whats going on but honestly it doesn't matter cause anki does it for you. You can use CSS on the cards so they're very customizable, and there are a lot of plugins that can make the program even more powerful. My advice? Keep it simple. The amount of freedom you get can lead you to spending more time tweeking your settings and hunting for add ons than actually trying to review your flashcards
Primary Sources: Google.com Its really cool, go there and type in japanese news, or raw japanese manga or whatever. The cool part about the primary source thing? Its literally anything u want it to be. Find something simple that you kind of like and thats a perfect starting point. Own a switch? Change the language setting to japanese and now all the games you play will automatically be set to japanese language. Got a netflix account? if you want any netflix original anime you can turn the english subs off and put on japanese ones. Know how to pirate? Then you can watch literally anything u feel like.
enjoy, if you dont like the resources you dont have to use mine, you cna use whatever you feel like as long as they get the basic job done.
2 notes
·
View notes
Text
Texture Editing for TWDG: The Definitive Series
Since I’ve had a few people asking how I’ve edited the texture files, here’s a small tutorial with links to help people out if they’d like to give it a go.
This information and the tools used are all thanks to the Telltale-Modding-Group on GitHub, I didn’t make anything aside from the actual changes to the texture files that you see in my screenshots. Seriously, if you want to learn how to do this stuff or are interested in the idea of mods, check them out - I’m mostly just paraphrasing their tutorial here for the people who have asked me for it.
I also use the Definitive Series and some of these tools do not currently work with other versions of the game. And my method of importing my edited textures back into the game is the same method I use to model swap - this is not the only way to do this, the Modding Group offers an alternative via making mod files and a mod loader. I will link to their explanation of the modding method when it’s appropriate - but otherwise I will be showing my method.
=====
Before we begin, you’re going to need some tools for this to work. You will need either Paint.NET, or Photoshop CC with the Texture Works Plugin found >>HERE<<. These programs will let us edit and save .dds files.
I personally use the Photoshop method and will be showing how to edit textures using that software.
You will also need to use a Texture Mod Tool to convert the games textures into an editable format and back into something the game can use. The tool and the instructions on how to use it can be found >>HERE<<. [some seriously smart cookies over at that Git-Hub group - I am very thankful]
Basically, this tool will take .d3dtx files (what the game uses) and convert them into .dds files (what we can edit), and vice versa.
As for how to get the textures files, you can either try following my instructions from my model swapping tutorial >>HERE<< and extract your mesh folders using ttarchext and search for the .d3dtx files you want to edit, or you can use the Telltale Explorer tool >>HERE<< to search and save the .d3dtx files without extracting a full archive.
=====
For demonstrative purposes, let’s try editing Minerva’s head texture.
Minnie first appears in Season 4 Episode 3, so we will find her textures in the WDC_pc_WalkingDead403_txmesh.ttarch2 archive. This archive can be found in the Archives folder inside your game’s install directory.
Either extract this archive using ttarchext, or open the archive using the Telltale Explorer.
If using the Telltale Explorer, selecting the [View...] button on the top of the window will let you filter what you’re seeing. Selecting .d3dtx will show us all the textures used in that episode of the game.
The specific file we are looking for is sk62_minerva_head.d3dtx.
It looks like this when highlighted in the Telltale Explorer:
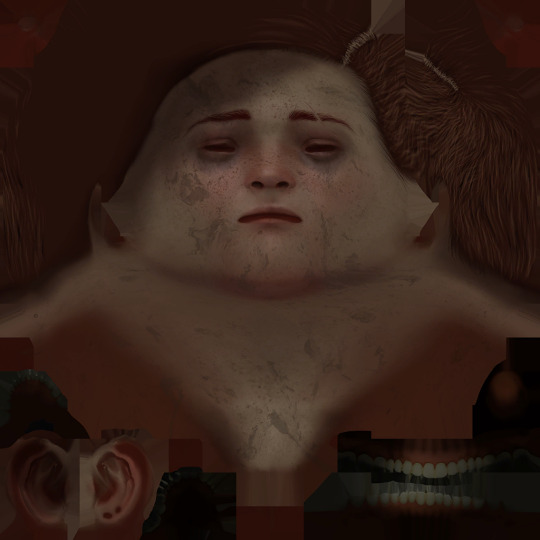
Yes, it’s creepy looking, that’s what all the textures look like.
In the Telltale Explorer, click [Save File] and select [As is (raw dump)]. In spite of it having an option to save as .dds here, don’t do it. This tool will not create an additional file you need for texture editing to work.
Save/Move this file into it’s own little folder. For now, let’s just make a folder on our Desktop called “Textures to Edit” and put it inside.
Now we need to go to the Texture Mod Tool. Inside the texmodtool folder, there is an application called “TextureMod_GUI”, that is the file we want to use. Here’s the tool window that should open:
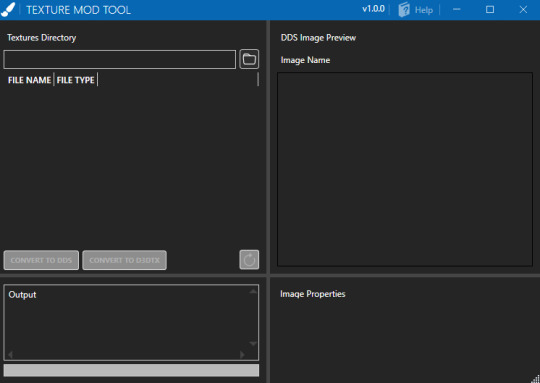
Click on the little folder icon to find the texture directory - in this case, the folder on our Desktop called “Textures to Edit” Once you have selected the folder, you should see the one file inside listed on the left column.
Click [Convert to DDS].
Once the tool finishes converting, you will see two files on the left column - one is the converted .dds file, and a .header file. Select the .dds file and you should see this:
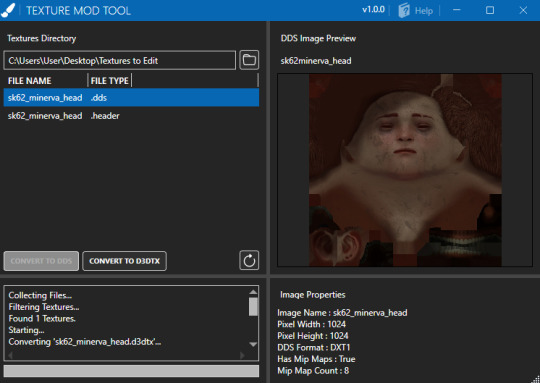
You will want to take note of some details that appear in the Image Properties section in the bottom right corner.
The most important thing to note is the DDS format: DXT1, and that the file has mipmaps. This will determine how we save our file later, so remember it.
You can close the Texture Mod Tool for now.
Next, we are going to open that new .dds file in Photoshop/Paint.NET.
In Photoshop you will get this little pop-up:
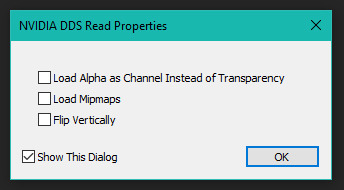
Leave these options un-checked, it’s fine. Loading all the other mipmaps would require you to edit them individually, instead we can let Photoshop auto-generate those later.
We can now make whatever edits we want to the texture - clean it up, add details, alter colours. Go wild.
I’ve decided to try cleaning off all the dirt and reapplying Minerva’s freckles. Here she is after I’ve used the Healing Brush and added a few layers of splatters to look like freckles.
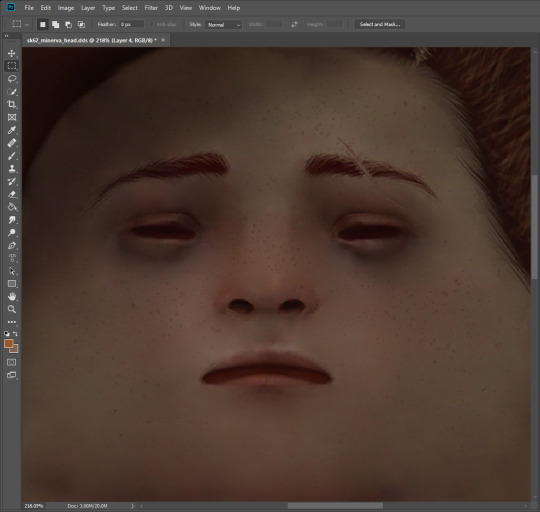
When you are done making your edits, select [File] > [Save As] and use the drop down menu to make sure you are saving your file as a .DDS. Do not rename the file, let it overwrite the sk62_minerva_head.dds file you converted earlier.
After you select to overwrite the file, you should get a pop up asking you more specific details on how it is saving the file.
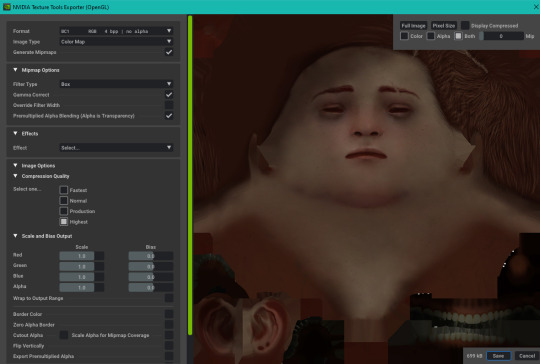
Because the original file format was DXT1, we want to make sure we save this file with the same formatting. Using the dropdown menu, you can hover over the options to see better explanations of what each format is used for. In our case, you want to select BC1 since this covers the DXT1 format.
We also need to make sure we check the box that generates Mipmaps since this texture file had those to begin with.
Press the [Save] button in the bottom right when you have finished.
Now we need to convert this file back into a .d3dtx file. To do that, we need to use the Texture Mod Tool again and navigate back to the Textures to Edit folder.
Select to [Convert to D3DTX] and select where you want the final file to be saved. For simplicity, you can just let it save on your desktop.
The final step is putting this file back into the archives, or using the instructions provided by the Telltale-Modding-Group to create mod files and using their mod loader. Instructions on their method can be found >>HERE<<.
Or you can follow the steps outlined in my model swapping tutorial >>HERE<< using ttarchext to overwrite the texture in the extracted WDC_pc_WalkingDead403_txmesh.ttarch2 archive, then rebuilding the archive (after making backups - please remember to make backups) and replacing the archive in the main game directory.
After using whichever method you are comfortable with, you should be able to see your texture edits appear in game.
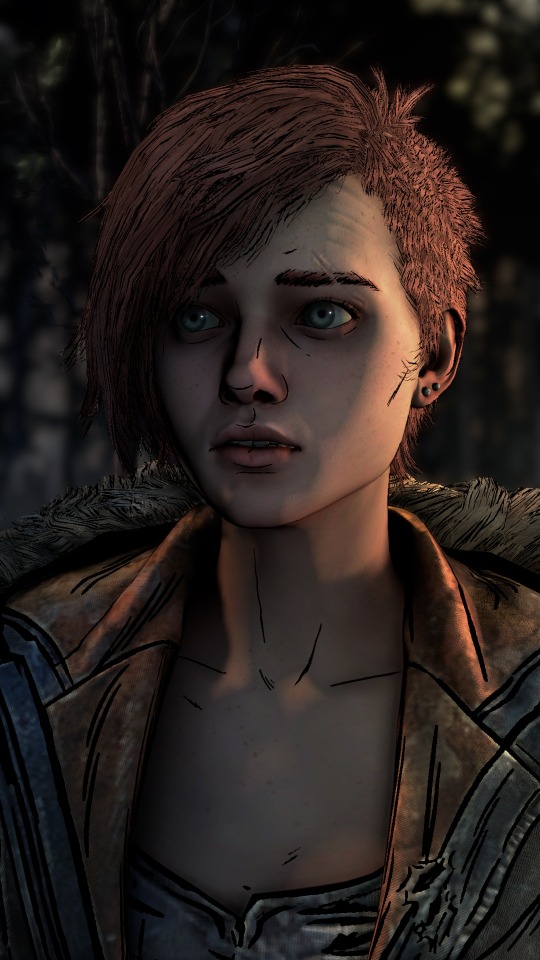
And there she is with the texture edit.
#twdg#tech support#tutorial#telltale games#i really can't overstate how great the github group is#their tutorial is what you guys should be checking#and their mod to load any level#or freeroam the school#(which is stil a WIP but works)#texture edits
19 notes
·
View notes
Text
Website Update: 9/20/20
Welcome! If you’re here, you’re probably wondering what Sims3CCWarehouse is... well, it’s a website I’m building that will host links to Sims 3 custom content from any corner of the web, and allow the links to be organized and categorized in a multitude of ways. I’m basically trying to build the Amazon.com of Sims 3 CC. With your help by submitting links, it will be the answer to every WCIF question, ever, lol. (I have big aspirations :P) Users will be able to quickly and easily add links to the site to share with others, as well as add links to their favorites in order to build a library of favorite CC from around the web. Note that no custom content or mods will be hosted on this site - it will be a link directory and tool to categorize and tag CC to help YOU find what you’re looking for quickly and easily, or allow you to discover CC you didn’t even know existed!
And creators do NOT need to worry - the links will point to the post or page where the content was originally shared, not to the direct download link (unless no other option is available) Creators will be given full credit for their creations on the site, and all link submissions will be moderated and approved. Creators will be welcome and encouraged to post links to their own content on the site, which will help drive traffic to your site or blog and help new players discover your content! The idea was born from my eternal frustration at having to spend so many hours combing the dusty corners of the internet looking for CC. There is SO MUCH great stuff out there that’s not on the major download sites, but finding it is a challenge. And while “CC Finds” pages on Tumblr are great, you can’t search or filter for what you’re looking for. It’s all just so grossly inefficient, lol.
Current Status
I’m building the site using self-hosted Wordpress. Originally I was using a fairly comprehensive Classifieds / Directory plugin for the content framework and had the site ready to start accepting link listings; however, I quickly realized that the plugin’s limitations in regard to categorization and tagging were going to severely limit the site’s capabilities. So, instead, I’m building a custom framework for the content that will enable practically endless capabilities... pretty much anything I want to do, I’ll be able to... it will just take a little bit longer to implement than I originally planned. But I’d rather do it the right way now then move forward knowing the limitations and then have to redo the site later. I’ve made the following Custom Post Types, which serve as the top-level categories for content (I’m calling them “Departments”), which I feel cover the breadth of content available for Sims 3 (if you feel like I’ve missed anything, please feel free to offer suggestions!)
Mods
Careers
Objects (any type of object or item in the catalog)
Patterns
CAS Items (anything related to making sims or pets)
Poses (yes... you’ll be able to categorize and tag poses!)
Animations
Lots
Worlds
Sims
Programs (utilities like S3PE, S3OC, etc)
Tutorials
Each of these “departments” will have customized flat and hierarchical taxonomies to allow contextual categorization and tagging as needed, as well as a global tagging system for Creators.
I’ve got my work cut out for me, but I have some wonderful help and we’re making great progress! Stay tuned for more updates!
54 notes
·
View notes
Text
Quarantine Days [2]
Summary: Coronavirus has arrived to the BTS members and yourself. Grappling with boredom and the reality that, yeah, you really all were stuck in the same place for a while. Ensure that the shenanigans of your days with BTS are recounted here, and please do remember, stay in contact with those you love.
A/N: It’s only chapter 2, and I already have the angst. Hahahahhh, sorry sorry. I promise there’s more good than bad, but frustrations need to come first before the good, no?
* Pairing: BTS (OT7) x reader (Idol Au)
* Word Count: 1,654
* Genre: Angst, Fluff
* Warnings: Coronavirus
1 2
Tag List: @itspwi
It was an early evening, sun only just beginning its decent into the concrete jungle that existed just outside the window of the high-rise apartment. Jungkook and Taehyung decided to play videogames after an easy-going discussion for the next album with the rest of the members, Jimin occasionally popping in to pick on the two when they messed up in Mario Kart races or Street Fighter matches. You were with Namjoon, Yoongi, and Hoseok in the studio fiddling with Cubase and other DAWs for fun, settling on a weird plugin to occupy the time, that distorted whoever’s voice spoke or sang into the microphone.
“Hey, HEY, don’t worrrry ‘bout me!” Namjoon’s filtered voice filtered about the space, while Hoseok was laughing his ass off at the wobbliness of it all, Yoongi had a small smile on his face, and you were around the same state as Hoseok. Clutching onto Hoseok’s shoulder as you balled with giggles like you were being tickled.
Seokjin was in his shared room, happily on his phone when Jimin bursts through the door. The man was so startled that he chucked his phone toward Jimin — who barely managed to duck after he himself was shocked, and the two just stood there in silence. Seokjin nervously smiled, before Jimin took off after him in a jokingly angered way. Running to catch up and managing to snag Seokjin’s jacket that swirled around him like leaves in the wind, pulling him back toward him but instead of wrapping his arms around his waist, was in fact knocked to the ground. Seokjin’s larger frame landing directly on top of him. The men grunted as gravity stomped on them, air escaping their lungs from the impact.
Jungkook waddled out from the living room to find Jimin attempting to shove Seokjin off of him but was failing miserably, grumbling curses under his breath when he realised it was impossible. Taehyung appeared moments later clutching his stomach in hysterics at the sight. Seokjin was laughing as well, which only made Jimin even more pissed. He quickly hooked Seokjin’s right leg around his own and pulled Seokjin’s right arm towards the ground, pushing his other leg upwards in an attempt to get Seokjin off — who completely fell off of Jimin in surprise.
“You alright there?” Taehyung questioned, a tint of glee in his tone. Jimin just glared at him from the floor, looking close to punch him. Seokjin stood up and began to pat his clothes to rid the creases, eyeing the two in front of him and heavily sighing. Glad that Jungkook wasn’t here either.
You and Hoseok, still on about the craziness of distorted Namjoon singing, happened upon the trio’s standstill with Jungkook also coming out to peek at what was going on. Jimin and Taehyung were bickering, while Seokjin just looked like he wanted to run the other way, ears tinted red and staring at anything but Jimin and Taehyung.
You sighed and looked to Hoseok, who had a firm, but unreadable expression on his face. He turned back the way he came.
You all stood still.
Waiting.
Hoseok returned with Namjoon, Yoongi trailing behind him. With a single nod to everyone, Namjoon successfully dragged everyone to the living room. Jungkook promptingly switching the TV off, as you all settled on the available seats.
“First, what happened before this?”
Jimin huffed, crossing his arms, and simply saying, “Seokjin threw his phone at me.”
“You startled me first by barging into my room!” Seokjin angerly remarked, “Unannounced, might I add.”
“I didn’t know you had a phone in your hand!”
“Maybe you should knock next time then.”
Jimin grumbled again, unable to reply.
Namjoon just sighed into his hand, trying to think what to do.
“We are only two months into this lockdown and already fights are breaking out. You two need to find a way to cool off,” Yoongi chimed in. Namjoon gently nodding next to him.
You sat there in puddle of your own sweat at the idea it was only two months since the lockdown, and there were already conflicts. How can they stay friends in such close proximity in general?
Jimin sat up and headed out of the living room towards his room, and Seokjin did the same. The six of you remaining all collectively agreed to leave the two alone, and went off. Although, the five boys decided on watching a movie, Yoongi, Hoseok, Taehyung, Namjoon and Jungkook all began scrolling through Netflix while you stared out into space. Furrowing your brows deep in thought.
While lockdown was stressful enough, you wondered if or when it’d get better. This definitely wasn’t a normal honeymoon phase when new events start. In fact, it felt more bickery than flattery.
“Hey _____, are you going to watch with us?” Jungkook asked, pulling you out of your head.
“Yeah, sure. Have you guys chosen something?”
Yoongi answered quickly, “We thought a light-hearted movie would be good.”
“So we’re putting on a Disney movie,” Hoseok finished. Namjoon hummed in confirmation, “The Little Mermaid.”
You perked up at that, smiling, “Sounds good! Put it on, put it on!” You excitedly said.
Everyone there chuckled at your reaction, putting the movie on quickly.
--
Pretty much everyone had fallen asleep by the time the movie’s credits had rolled on by. The boys all somehow ended up on top of each other in a cuddle puddle, and you had to wordlessly move their legs off your own to get to the kitchen.
Seokjin was there when you entered, his fingers tapping the mug he held as he drank what was in there silently, brows furrowed in concentration. You paused at the doorway, concerned.
“Seokjin? Are you alright?” He didn’t startle and held firm, only slightly surprised at your sudden introduction.
He looked tired as he answered with an, “I’m fine _____. Thanks.”
You padded over and took out a glass from one of the cabinets, filling it with water when Seokjin asked, “How’s everyone else?”
“Asleep. I don’t know how to get them all to their beds,” you replied while sipping on the water.
Standing a lot closer to Seokjin, you focused on how seriously exhausted the man was. Seokjin is someone who doesn’t vocalise their struggles often, and prefers to show the happier sides of life, and is a calming presence. But you felt that the person in front of you was drained entirely.
So, you put your glass down, and did the same with Seokjin’s, which was easier as it was already on the island. You slid the cup away from him.
“Let’s go to bed Jin.” Seokjin began, “But what abo—”
“I’ll handle them. You need sleep.”
With that, Seokjin headed off to bed, grumbling but still going along with it anyways.
You turned back to the doorway that led to the living room. Ah yay, this’ll be fun. You quickly walked into the room. Noticing first the black TV, how it turned off by itself, and the sleepy forms of most of your friends. Yoongi and Jungkook had managed to end up on top of one another, while Namjoon, Taehyung and Hoseok had all curled around each other. Your first instinct was to yell loudly, but that would wake everyone else up.
With some hesitation, you went with shaking them all from the shoulder. Jungkook, Namjoon and Hoseok woke up easy, eyes drowsy and drooping though, but they all helped you try and wake the last two who were notorious heavy sleepers. At one point, Hoseok had tried jumping onto Taehyung, but just fell off the side of the couch when he landed; Taehyung had just curled further into the fetus position and mumbling incoherent nonsense. Which, to be fair, all of you who were up found hilarious.
Yoongi was the same, well, mostly. He kept between half-asleep and asleep, and you and Namjoon thought by this time Yoongi was just messing with you all.
Instead of Hoseok, Jungkook tried jumping on the two-sleeping people, and actually managed to get Yoongi up. Who just shot up and glared at the maknae. Now it was Taehyung that was still asleep.
Which, Jungkook also handled easily. He resulted to pinching the slightly older man awake.
You sighed in relief, all of them were awake.
Namjoon glanced at everyone as they all yawned, he clapped twice and sent everyone to their rooms.
--
Jimin and Seokjin were tense around each other when morning came. Avoiding the other completely when they could. Namjoon was over the behaviour and called another meeting.
“Alright, you two need to work this out.”
They didn’t even look at each other.
“Answer me guys. I can’t do anything if you don’t talk what’s on your mind, yes?” Namjoon firmly reminded them.
Seokjin huffed, “I’m pissed at him.”
“Why would you be pissed at me? I would be more so! You through your phone at me and sat on me! This isn’t fair Namjoon! Why am I even here?” Jimin angerly spouted at the two.
Namjoon groaned under his breath. Annoyance etched into his expression as the two started arguing again.
“Okay!” You yelled—shutting them up. “Look, Seokjin,” You began, “I can understand why you’d be angry, someone barged into your room without knocking, and I empathise that throwing your phone was a reflex, but not moving when Jimin was struggling underneath you wasn’t nice, yes?”
Seokjin’s gaze drifted from yours, silent.
“Jimin,” you turned to him, “Don’t go into other people’s rooms—even if its shared, you never know if someone is busy, cooling off, or needing space. Always knock.”
“Now, Seokjin apologise to Jimin; Jimin do the same.”
It was nothing short of amazing, how quickly you handled everything. The rest of the boys watching you in fascination, as the two apologised, genuinely so.
As the group dispersed once more, Yoongi and Namjoon had the same thought, “I’m glad she’s here.”
Previous Chapter?
Next Chapter?
23 notes
·
View notes
Text
Soundrs: OORA
My name is Federico Chiesa, I compose under the name OORA. Oora is a misspelling of the italian word “ora” (now). The pronunciation is similar to aura. I like the concepts of now and aura together. My music ranges between ambient and slow dub techno.

➜ Visit Ooramusic @ Instagram
➜ Visit Ooramusic @ SoundCloud
➜ Visit Ooramusic @ bandcamp
➜ My latest album Memoria on Spotify
Why do you make music?
Since childhood music has been my favourite language. I have always been surrounded by instruments and have always dreamed to play music for a living. Today I realized that music helps grounding me and keep me focused. I constantly think about musical projects and ideas. I guess it’s a part of me I can’t live without.
What are your inspiration sources?
Beside other musicians, movies are a big inspiration. My favourite movies are all from my childhood. Stuff like Goonies, Stand By Me, Lost Boys are my favourites : ) I love to imagine a scene when I create a track. I feel that the link between visual and audio is what inspires me the most.
Tell us something about your workflow.
It always changes, but I exclusively use hardware instruments. I’m not proficient In The Box. I like to create a sequence on a synth and then mess with it using an effect chain.
Then I add other parts and perform live. My recordings are usually a stereo out from the mixer. I cherish imperfections and I like to share music that does reflect a precise moment and feeling.
How would creative rituals benefit your workflow?
I think rituals are good to set the intention right. Sometimes I do a quick meditation. Sometimes I need to create a tidy space. Sometimes I need to have a new effect chain. I feel that some kind of ritual can influence the outcome of a composition. I don’t have a fixed one at the moment. Maybe I just like to have coffee : )
How do you get in the zone?
The zone for me is when im improvising/performing on the sequences and parts I’ve created. Once all the synths are ready, I hit record and jam for twenty minutes straight. The idea is to start feeling every synth as organically as possible and perceive how changing parameters influence the overall soundscape. It becomes a sort of meditation.
How do you start a track?
Usually with a synth or bass line. I try to find something that sounds interesting and then build everything around it. I look for a certain vibe or ambience that will set the tone. Most of the time this happens by happy accidents. I just experiment until I feel the sound or sequence is right.
Do you have a special template?
I try not to use any template. I like simplicity, so my instruments are easy to use and allow me to get where I want fast without needing of templates.
Even my Ableton template is blank. Every track has to be created from nothing.
What do you put on the master channel?
At the moment this is my master channel chain: (mostly UAD plugins) Dangerous music BAX ➜ Shadow Hill Mastering Comp ➜ Manley EQ ➜ Thermionic Culture Vulture ➜ FabFilter ProL.

How do you arrange and finish a track?
As mentioned before, my arrangement is my live performance. This is both liberating and frustrating. Liberating because I spend less time in postproduction and play my synths live like instruments, trying to feel them and create a story. Frustrating because sometimes I wish I had done it in a different way. Many times I just have to accept that the track could have been performed better.
How do you deal with unfinished projects?
I have hundreds of unfinished tracks. Sometimes I listen back to some, love them and finish them, but usually if something is good I finish it in a couple of days. If a track takes longer, that means it’s not worth it.
How do you store and organize your projects?
I have every project in the cloud, on Splice. I save everything I record. I can always find interesting samples and sounds. Also I like to have a history of my creations.
How do you take care of studio ergonomics?
I like to have tall desks because im 6.4. I like to play standing. Other than that my workspaces are pretty messy, cables everywhere. I spend a lot of time tidying up, but somehow it lasts just a little.

Tell us something about your daily routine, how is your day structured, how do you make room for creativity?
I take care of my health in the morning, with meditation and exercises. Then I do all the online works (I publish almost everyday on Instagram and that takes a lot of time) and do some mixing.
The afternoon is for music creation and experimentation.
Share a quick producing tip.
Use distortion after reverb! This is something I experimented with lately and I got wildly interesting sounds.
Share a link to an interesting website (doesn’t have to be music related).
➜ https://www.redbullmusicacademy.com
List ten sounds you are hearing right this moment : )
A truck passing by.
Police siren far away.
Someone unloading boxes.
Two guy talking on the street.
My wife typing.
Quiet wind.
A light buzzing.
A door closing.
A shop opening.
My breath.
Thank you Federico! Stay hydrated y’all and take it easy.
#soundrs#oora#ooramusic#interview#workflow#inspiration#creativity#producers#audio production#music producers#music#electronic music
27 notes
·
View notes
Text
My Korean study resources [2020 Q2]
At the start of the year I posted about what resources I was using but I’ve actually somewhat changed (like the gif) my routine since I had to come back to England so here’s an update of the resources that I’ve been using in the last 3 months!

Online Learning Resources
Talk To Me In Korean (TTMIK) Basic free courses [available on www.talktomeinkorean.com] - I’m still working through from beginning to end to revise my grammar - I just finished Level 3 - even though their level test says I’m Level 6, there is still stuff I’m learning for the first time or clarifying
TTMIK videos - whenever I’m looking for an explanation, they usually have it on YouTube
Quizlet - I'm now studying vocabulary using my very own Quizlet sets that I created myself. Whenever I come across new words I add them to one of my Quizlet lists and then aim to test my vocab a few times a week. You can look at my Quizlet sets so far by clicking HERE
Reading and Translation
Webtoons - I prefer these to books because they focus on conversation. I read them here: NAVER Webtoon or Daum Webtoon
News articles - I try to browse NAVER every now and then and look for short articles
Korean Twitter - I’m a lurker on Korean Twitter now ahha
Listening and Watching
Korean cartoons - I’m using the Language Learning with Netflix plugin to watch kids cartoons as there are some on Netflix (search Korean cartoons). I prefer to watch the cartoons because they use more basic language, are short in length AND also I’m not invested in the story line so don’t mind constantly pausing to write down vocab
TTMIK Real Life Korean Conversations for Beginners audio on Google Podcasts
Korean YouTube channels - I’m now trying to watch videos that are not language learning videos but actual 100% Korean content. I find this one 장삐쭈 to be pretty good because it has English subs too!
Variety shows - I’m still watching a lot of variety shows with a notebook in hand to write down words and phrases
KDrama - I’ve become less reliant on using KDrama as a learning tool because it takes me way too long to watch a show this way, but I’m trying to listen to the words in Korean more these days rather than just reading English subs
Books
Korean Grammar in Use: Beginning (Darakwon) [BEST BOOK EVER]
Your First Hanja Guide (Talk To Me in Korean)
Everyday Korean Idiomatic Expressions (Talk To Me in Korean)
Korean Culture in 100 Keywords (Darakwon)
Korean Q&A Sentence Patterns (Talk To Me in Korean)
Writing and speaking
Diary entries - I’m writing diary entries 2 or 3 times a week in Korean and using the Papago app to check
HelloTalk - I’ve kind of fallen out with HelloTalk again.... I keep meeting amazing people then meeting some really weird people.... so I’m on a break from there which means I haven’t practiced speaking in a long time so its something for me to improve for Q3
---------------
Thanks guys for motivating me to keep going - although I feel like I’ve taken a huge sideways step in my learning, I’m more motivated to continue because of all the messages and encouragement from all of you! Love you guys!
#personal#resources#Korea#korean#korean language#korean resources#language study#study#korean study blog#korean studyblr#korean language blog#Korean langblr#language resources#language stuff#language#langblog#langblr#한국어#artist: samuel#album: sixteen#rating: 3
40 notes
·
View notes
Text
I wish someone told me this...
In the early career of every music producer/mix engineer, it always comes a point where you are not a new-be anymore but you are still trying to find your way to getting better mixes, get more clients; a point where you know your way around things, but still ask yourself “ Do I know anything?”
You might feel like you have a special patent for insecurities, but trust me you are not alone in this slippery slope. How many times have you jumped on youtube searching for a tutorial on how to use a compressor? Have you seen how many views that video has? So then trust me.
Whether this is because you never got particular support while developing your career, or because you are a perfectionist and are never satisfied, or maybe because this is not your main job yet and your impostor syndrome like to peak now and then. The “why” it’s not important. As you can get better at mixing and creating music, you can also get better at giving yourself some credits. Here is something that I kind of wished I knew before I started this thing I call my job, purely because I would have started earlier enjoying it.
1) USE PRESETS. Using presets it’s not cheating. Presets are a great way to learn how a plugin works, its sound, and its possibilities. Presets are there because someone at some point used that particular combination and it worked.
Does it mean that presets work miracles every time? Well unless we are talking about Decapitator (which you can apply to anything and it does work great), a particular preset might not be the perfect solution for you, BUT it can be a good starting point for you to adjust.
Does it feel like an easy way out? Last year I couldn’t open a single video without skipping at least 2/3 adv about The Sauce Plugin.

Everybody was talking about it and many were crying that with these kinds of an all-in-one plugin, ppl would have become less and less creative and especially, less driven to know their gear and tools.
For as much as I don’t know much about “The Sauce”, I’m pretty sure it won't ruin the next generations of aspiring producers. As well as I know for a fact that until you get a certain degree of experience YOU DON’T KNOW WHAT YOU DON’T KNOW.
So yes, use presets, use samples, use templates. Experiment, see how they work and then make your own decision based on your taste. Because your taste is what eventually will get you clients.

2) DO NOT POSTPONE If you get frustrated because the guy/girl you had in class at uni looks more successful than you on Instagram 1. that’s Instagram. 2. GET YOUR SHIT TOGETHER AND DON'T COMPARE YOURSELF TO THEM.
It’s not their fault they are having a better game, but it’s your responsibility to do your best to get wherever you set your mind to.
I used to get extremely frustrated any time I didn’t know how to use my DAW or how to get a certain sound. For a long time, I kept postponing the inevitable, I just had to study more. So every day I try to learn something new.
Non music related example. Politics. I hate it, every time I hear the news I feel like I cannot retain any information on the subject, which lead to > stress > avoid conversation > more stress. So to fix this, every day I force myself to read the news while I’m having breakfast.
The same thing works for everything else. 80% of the cases, the source of our insecurity is lack of knowledge. So don’t procrastinate, don’t commiserate yourself, just study. I promise it gets better.
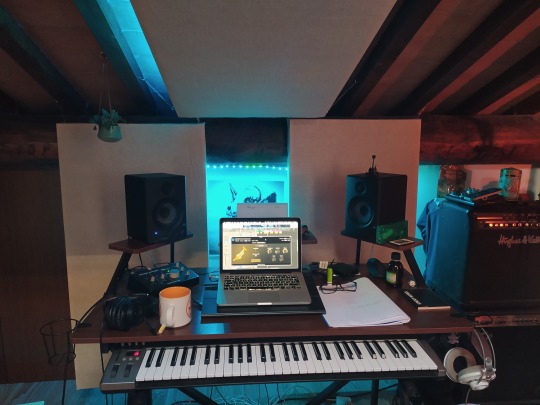
3) YOU MIGHT NEED TO START OVER. Starting over an almost ready mix is fine. If you have doubts about how things sound you are entitled to start again. Sometimes that’s more efficient than making adjustments.
It happened to me last week: I had this mix, it was almost ready I was just missing one vocal and a flute, all the rest (big orchestra kind of thing) was all ready. I went to reopen it, and once I added these two elements, things weren’t working quite the same. Here is where my experience jump in, I know myself, I know I get distracted easily, so I started over. In a day and a half, the mix was ready and delivered.
Obviously, my experience taught me what kind of sound I was looking for. This might be something you are still figuring out, so I give you this little tip that brought me a long way and to improve my mixes. While you are mixing, make a list of all the changes/ideas you come up with. Our mind is faster than our hands and if you don’t write it down, you might get lost in the process.
4) THE MOST IMPORTANT TIP.
Whenever you don’t feel like making music, just don’t. You’ll see it’s time much better spent do something else, for example redecorate the walls of your studio
🍕🍕🍕🍕🍕🍕🍕🍕🍕🍕🍕🍕🍕🍕🍕🍕

#music#musicians#musicproducer#musicproducerlife#musicianlife#mixengineer#musicblog#musicproductiontips#productiontips#musicworkflow#workflow#impostorsyndrome#thesauce#logicprox#logicpro
2 notes
·
View notes
Photo


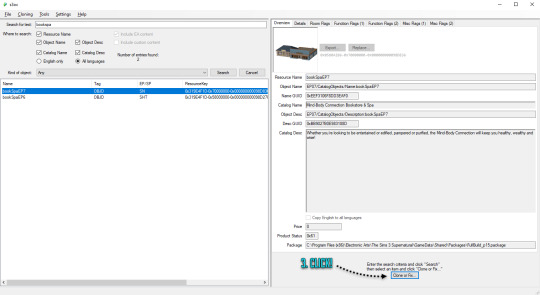


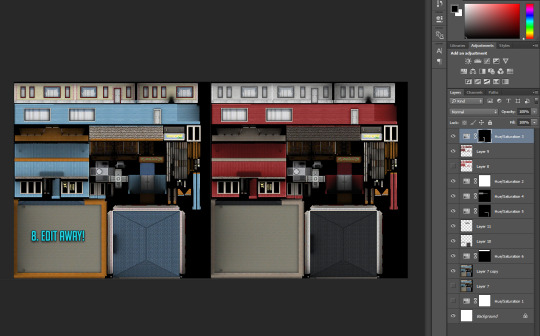
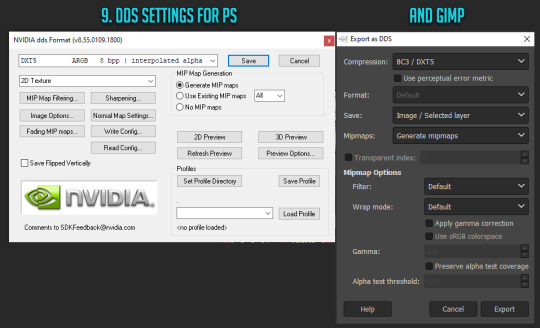

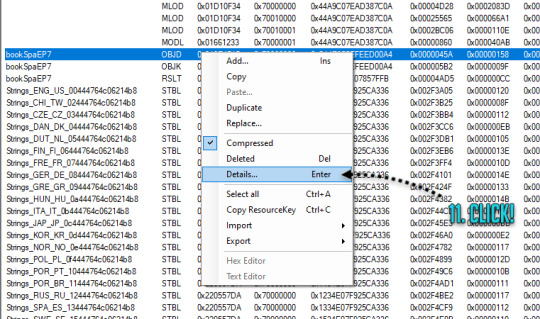
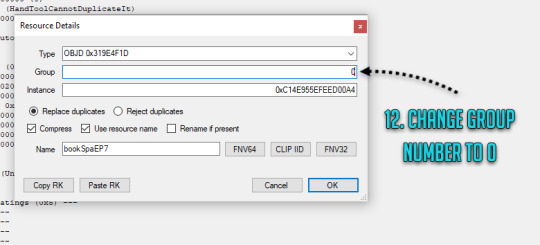
RABBIT HOLE RECOLOURS AND RESCRIPTING TUTORIAL
Are you having difficulties getting the outrageously coloured rabbit holes to fit into your moody emo town? Or would you like to make your high street look like a Skittles factory had just exploded? Despair no more! Release your inner MacGyver and DIY!
Programs you need: S3oc S3pe Photoshop or Gimp (DDS plugins for Photoshop -> this and this, Gimp has this feature built in already)
// Disclaimer: This tutorial is picture and text heavy. I hate having to have bazillion different tutorials open because everyone always assumes you know what you are doing and I keep on closing tabs by accident, so this tutorial will run you through each and every step with (far too much) detail because I’m a simpleton and I need both pictures and text when learning new stuff! I have divided this into digestable parts, so you can skip ahead down the tutorial if you are familiar with some of the steps such as cloning. Pictures above are numbered and each step is explained below.
1. CLONING A RABBIT HOLE
1. Open S3oc, click Cloning and Normal objects.
2. Click Tools and Search, type in keywords such as bookspa or hospital. If you still can’t find what you are looking for, then the other option is to just scroll down the list of items and try locating the rabbit hole you need.
3. Once you have found your rabbit hole, click Clone or Fix.
4. Tick all the boxes I have ticked.
5. Edit the Catalog Name and Description, these are the things you see in game when you browse through the items and stuff. If you are not fussed, leave them as is.
6. Change the file name here (Some guides mention changing it, some skip it, but I have changed mine and nothing exploded so far!) and click Start. A window pops up asking where you want to save your package, I usually create separate folders for my projects on my desktop as I don’t want to accidentally mix my .DDS files with other rabbit hole files and stuff, but if chaos is your thing just save wherever.
2. RECOLOURING A RABBIT HOLE
7. Locate your newly created rabbit hole clone .package (You can create a backup copy of it somewhere if you think you will mess up somehow) and open it with S3pe. Look through the IMG tags and find a LOD image like this. Right click and Export to file. If you are organized like I am, you can save it in your project folder with your package file... Or place it wherever because of whatever method of madness you use when editing your files. I’m not your mother. Do whatevs.
8. Now depending on which program you use, open the .DDS file in Gimp or Photoshop, if you get a pop up window just go with default size and no mipmaps. This is the step where you let your creative juices flow and take over. Want to change everything? Or only one colour? Depending on the rabbit hole you have chosen to edit it could be a really simple one click thing fix, or if you picked a more complicated one like I did, you are going to spend some time on this step. I added my before and after picture edits I did in Photoshop as an example.
// Photoshop Tip! I’m not familiar with Gimp, so I’m not sure how well this works in there, but I abuse the hell out of Hue/Saturation and the colour picker in Photoshop to get rid of and edit the colours. Press the little hand icon in the Hue/Saturation pop up box and click the colour you want to change in the image and it picks it for you, then just use the three sliders to change your colours, easy! Be careful though! Sometimes it changes too many areas in one go, so you might have to use marquee tool to isolate the bits you want to edit so rest of the image doesn’t change (While using marquee tool you can press either Shift or Alt at the same time which allows you to add into or remove from your current selection!). Or use masks. Up to you. Then once you have selected the areas, create a new layer and hit the Hue/Saturation button and it will only impact the areas you have selected. Play with layer settings if you end up adding separate colours on top, for example my red paint layer looked best with linear light and 80% opacity.

9. Once you are satisfied with your colours and you have merged your layers, this next step is different with Photoshop and Gimp. With Photoshop you can use Save As option while with Gimp you have to use Export As. Either way, save or export over/replace the image you originally opened using the .DDS settings shown (Please correct me if I’m wrong with Gimp settings as I don’t really use it!). If you have been saving as psd or changing the file’s name, make sure the name is now EXACTLY the same as when you exported it earlier. However, I’d urge you to do backup copies before overwriting the file, in case you have coloured something wrong or if you think you might want to change something after doing a test. Just you know, to save you some hassle if shit hits the fan.
10. Back to S3pe, you will now replace the image you previously exported with the edited one. Click Resources (or right click the IMG file on list you are replacing, both ways work), Import from file and pick the newly edited file, click ok on the prompt. Your old IMG file should be crossed out on the list and new IMG added (Once you save the crossed out one simply disappears). Depending on what kind of edits you did to the LOD IMG, you have to repeat exporting, editing and importing each and every IMG file corresponding to the changes you did with the first one. Be extra careful with matching the colours between the IMG files, otherwise you get some funky rabbit holes when zooming in and out! For example for my rather edit heavy LOD image I had to edit another 5 IMG files all in all in the end (Different wall bits, bit of carpet, window trims, roof!).
3. MAKING IT BASE GAME COMPATIBLE
11. Done with your IMG files? Still in S3pe, locate OBJD file on the list, either hit enter or right click for Details.
12. Change the group number from whatever to 0. Save your package.
You are done and your rabbit hole is ready to go in game! Drop it with your other .packages in your Mod folder and test it, in edit and live mode in game. Are some parts of the building still showing old colours or are they changing drastically when you zoom in or out? It’s not the end of the world! You must have forgotten to edit one of the IMG files or the colours are not matching, double check that all the bits you edited in the first image match with rest of the IMG files. Even if you got the colours right there will be a slight chance due to how Sims 3 renders items, so don’t panic unless IT’S REALLY BAD! Just look at how other nonedited Sims 3 stuff renders and compare how yours behaves. // But wait! Maybe you want to make it a default replacement rather than a new individual rabbit hole like my tutorial does? For default replacements, follow this guide.
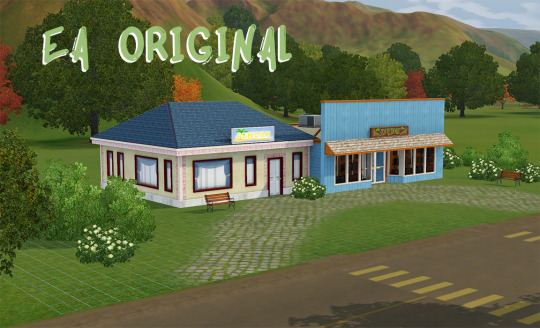
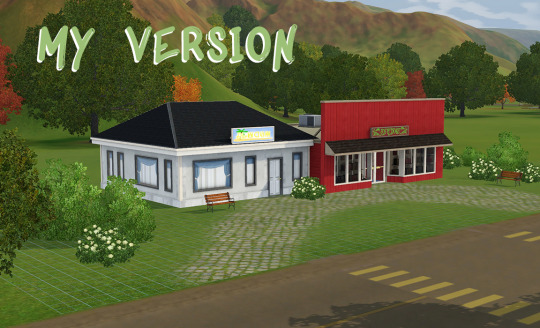
4. CHANGING THE RABBIT HOLE SCRIPT (OPTIONAL)
Like the look of your rabbit hole building, but don’t think it looks like a spa or a bookshop? Is it giving you a hospital and science lab vibe instead? Again, no need for anxiety! You can fix it! Sort of. It should work but be wary! If you use lets say the Annex script, you got to have University EP installed to make it work. Without the right expansion, you can’t have special careers. Just keep in mind that some scripts may not work with some buildings due to the specific animations and stuff, so test it before you release your masterpiece in the wild.
13. Open your .package in S3pe, locate OBJK file and right click Edit OBJK.
14. Replace the String bit with one of these scripts from the following list. Commit to changes and save your package. You are done!
Bookstore Sims3.Gameplay.Objects.RabbitHoles.Bookstore
Business and journalism Sims3.Gameplay.Objects.RabbitHoles.BusinessAndJournalismRabbitHole
City hall Sims3.Gameplay.Objects.RabbitHoles.CityHall
Criminal building Sims3.Gameplay.Objects.RabbitHoles.Hideout
Diner Sims3.Gameplay.Objects.RabbitHoles.Diner
Grocers Sims3.Gameplay.Objects.RabbitHoles.Grocery
Hospital Sims3.Gameplay.Objects.RabbitHoles.Hospital
Mausoleum Sims3.Gameplay.Objects.RabbitHoles.Mausoleum
Military Sims3.Gameplay.Objects.RabbitHoles.MilitaryBase
Movie studio Sims3.Gameplay.Objects.RabbitHoles.MovieSet
Police station Sims3.Gameplay.Objects.RabbitHoles.PoliceStation
School Sims3.Gameplay.Objects.RabbitHoles.SchoolRabbitHole
Science Sims3.Gameplay.Objects.RabbitHoles.ScienceLab
Spa Sims3.Gameplay.Objects.RabbitHoles.DaySpa
Sports stadium Sims3.Gameplay.Objects.RabbitHoles.Stadium
Theatre Sims3.Gameplay.Objects.RabbitHoles.Theatre
Vault Of Antiquity Sims3.Gameplay.Objects.RabbitHoles.VaultOfAntiquity
Subway Sims3.Gameplay.Objects.RabbitHoles.Subway
Fortune teller caravan Sims3.Gameplay.Objects.RabbitHoles.GypsyCaravan
Equestrian center Sims3.Gameplay.Objects.RabbitHoles.EquestrianCenter
Annex Sims3.Gameplay.Objects.RabbitHoles.Annex
Hospital & science combo Sims3.Gameplay.Objects.RabbitHoles.ComboHospitalScienceLab
School & stadium combo Sims3.Gameplay.Objects.RabbitHoles.ComboSchoolStadium
Book & spa combo Sims3.Gameplay.Objects.RabbitHoles.ComboBookstoreDaySpa
City hall, police & military combo Sims3.Gameplay.Objects.RabbitHoles.ComboCityhallPoliceMilitary
Business & bistro combo Sims3.Gameplay.Objects.RabbitHoles.ComboBusinessRestaurant
And I think that’s it. Let me know if you know a better way or I have made an error in this tutorial! Or if you want to fight me, I will meet you behind the mall by the bins for some asskicking.
#the sims 3#ts3#simblr#ts3 tutorial#ts3 rabbit hole recolour tutorial#ts3 base game compatible tutorial#ts3 cloning tutorial
179 notes
·
View notes
Photo
Welcome to part two of our interview series, pixies! Today, we’re presenting our interview with four of the flaptastic people who make this rewrite possible. They had a lot to say, so this post is rather long - keep reading to see the full interviews!
Our first two Game Creator interviews feature two of our beloved artists - Rachel and Ci.
How did you first find out about the WTP project, and what inspired you to start working as an artist?
Rachel: In a computer graphics class I took last semester, one of our projects reminded me and my friend of Pixie Hollow, so we were reminiscing about the game and I really wanted to see if there was a rewritten version of it. When I found WTP and saw they were accepting artist applications, I was super excited because I loved the game and was starting to get into animation at the time as well. I also just adore the process of game development in general, so I was thrilled to become a part of WTP.
Ci was introduced to the project by a friend who’s also a staff member!
What is your favorite part of your job as a WTP artist?
Rachel: My favorite part is being able to contribute my work to a bigger project. Seeing the art I worked on in the game is really exciting to me. Just knowing that the work you put in is helping to further the game is really cool. As for my favorite thing to work on, it’s really strange, but I enjoy creating the UI buttons and signs for different meadows or shops.They’re super small and no one really pays attention to them, but they’re also extremely necessary so I guess I just like to make them, haha. They don’t always take too long to make but I think they’re cute. Also, I’m especially excited for all the new meadows, as I really enjoy helping to restore the beautiful art for the meadows.
Check out this gorgeous sign that Rachel restored for one of our meadow teleporters!

Ci: My favorite piece of art that I’ve created for WTP was probably a background I restored for a general winter theme/season back when I first joined. It’s not being used right now, but it’s pretty and you’ll just have to take my word for it :’)
How long does it take for you to work on art for WTP, and how do you fit that in your schedule?
Rachel: The time it takes really depends on how much of the project we have completed already. Oftentimes we’ll be working collaboratively and finish what other people have started. So if we are working on something from scratch it can take quite a while, but sometimes it’s just a matter of adding finishing touches and compiling pieces together to create a finished product. And each task takes a different amount of time. For instance, resizing something small will take a few minutes, but creating an atlas for fairy clothing can take hours, especially when you need to restore an item from scratch. Either way, I think it’s still beneficial for us to take our time to create the best product we can. Personally, I don’t always get to work everyday, but when I do, I’ll spend hours because I like to finish tasks in one sitting if I can, although I can’t always haha. I think that working in moderation is always a good idea as long as you’re getting your work done, and knowing we have so many fans really pushes me to get tasks done and do them well. As for fitting it into my schedule, because of quarantine, I definitely have a lot more time to work on WTP, but during the school semester I would have to plan out what I needed to get done and when I needed to do it in order make sure I could get all of my school projects and WTP work done on certain days in order to avoid as much stress as possible.
Ci: I don’t have time to work on artwork daily, but I do try to stay on top of what other people are working on, so a small chunk of my day is dedicated to discord. Sometimes I’ll be busy for weeks and do a whole bunch of tasks afterwards in one go, and sometimes I try to take on smaller things (pre-corona I’d sometimes spend time between lectures because that’s often the only time I have!). Some tasks are 5 minute jobs, like UI, but others, like adding clothing, take a few hours. Backgrounds probably take me the longest. A couple hours for a few days, if I have time to work on them daily. They’re really fun when starting!! but after day 3 it’s quite the grind. I like to sleep on those, since there’s so much detail in the PH backgrounds that I’ll inevitably miss something.
Rachel, you mentioned atlases and spritesheets - can you explain what they are and how you use them?
Rachel: An atlas and spritesheet contains all of the different variations of a clothing item or anything you can change on the fairy. So for instance, the hair atlas has all of the different types of hair you can choose when creating your fairy packed into one single file. So in order to make one you have to create all the hair pieces, position them correctly on a fairy reference, export each hair image, and then combine them all onto the atlas file. Then a json file is also created to describe where each image is in the file in order to use it in the game. The spritesheet is similar and is basically a horizontal version of the atlas with all of the images that we use in CAF to scroll through whatever you’re changing.
Do you start the graphics by hand or via some digital web design program?
Rachel: I almost always use digital programs. Sometimes I’ll plan something out quickly on paper but most of the time I’ll use Photoshop. We also use DragonBones for animation.
Ci: All of the research we do is online, so it saves a couple of steps and retains image quality to just keep everything digital. I also don’t have a scanner :’)
And finally, what’s the most challenging piece of art that you’ve made for WTP?
Rachel: The most challenging piece that I’ve done for WTP was probably the hair atlas for when a player creates a fairy because it was the first project I was taking on. All the hair was made already, I just had to resize, reposition, and fix any pieces that were lower quality, and although it was daunting at first, once I started, I was able to get the hang of it (even if it took a few tries), and now I’m super happy I learned how to do it.
Ci: We were missing a whole area of the CAF background (the part that shows up when you’re picking a name) that got passed around for one or two months, and eventually I got to work on it. It was the closest to a custom piece of art that I’ve made for WTP; the middle was a giant blur when I got to it. My motivation to complete it was honestly just being able to get it off the to-do list forever, when I was done I posted a before and after to the staff chat (which I try not to do bc it’s not really productive) because I was so excited about it :’))
__________________
We had so much fun learning more about our artists’ jobs! Next up, we decided to sit down with WTP game developer and administrator Teresa!
How did you first find out about the WTP project, and what inspired you to start working as a developer?
Teresa: A friend I made in the Pixie Hollow community said that her favorite mini game was Bubble Bounce, so I decided to make it for her. I had started prototyping and showing it around, and someone from WTP saw my work and invited me to join the team.
As we know, WTP is a voluntary project. How do you fit working on WTP into your schedule?
Teresa: I’m actually quite good at time management, and I’ve decided to make WTP a priority. That means that I can’t always say ‘yes’ to other things I want to do, but that’s ok.
What are some of the main things you look for when adding staff members?
Teresa: You need to be able to take criticism well and communicate effectively. A certain level of quality needs to be maintained to build a good game, and criticism sheds light on any blind spots you may have. If you aren’t communicating clearly and frequently, then your value to the team is very low – everyone needs to be on the same page so that work doesn’t get redone and wasted, and to keep an accurate development schedule. Being willing to devote more than a couple of hours a week is also a major plus.
How do you decide which parts of the game you should work on first?
Teresa: There’s this concept called the Minimum Viable Product. Basically, you just strip the project down to what is necessary and work out the kinks. Then you can add new features that enhance the gameplay.
What’s the most challenging issue you’ve faced while creating the game?
Teresa: There was a problem with the animation plugin that I was hoping would be fixed by the maintainers before the demo release. It was a really big deal, the game would be entirely unplayable. At the last minute, I had to dig into the plugins source code and figure it out myself. In the end, it wasn’t actually so difficult – but boy was it stressful. Really I would say that the biggest problems have stemmed from not having enough artists on the team! There have been multiple times where we had to delay updates because we didn’t have all of the assets ready for me to use in the game.
How do you go about fixing a game bug?
Teresa: Gather all the info I can from users experiencing the bug, and try to reproduce it. Just observing the behavior is often enough to figure out the problem. When it’s not, check the logs or step through with the debugger.
Have you ever worked on or made a game before WTP?
Teresa: I’ve worked a bit on some 3D open source game projects, never worked on the multiplayer parts before, though. I also make mods for games.
Lastly, what are your favorite and most rewarding parts of being a game developer?
Teresa: Pushing the boundaries of my knowledge and comfort zone, definitely. As a developer, I’ve learned a lot of new technologies and some new domains specifically for WTP. I also find being able to fix things that I don’t like about games very rewarding. Being an administrator has benefitted me as well. As an admin, I’ve had to cultivate skills in team leadership and project management.
__________________
Finally, we interviewed Lavender Merryheart, our sound designer.
First off, how did you first find out about the WTP project?
Lavender: I found WTP from a Youtube video, and played the demo. I was excited to be able to re-visit PH and when I saw the audio designer application, I wanted to help out however I could!
Are you remaking the music from scratch based on any remaining audio from sources like youtube?
Lavender: Both! We salvage what we can, and re-create what’s needed if. In the future, there will be some new, original music too! When we need a sound effect or music, we first check to see if there’s a good quality clip preserved of the original. It needs to be clear and without extra background sounds. If we can’t find any, then I will dissect the sound or song and try to figure out how it was made, then recreate it.
You mentioned that you make new sounds if needed, how do you go about making them?
Lavender: New sound effects are made by piecing different recordings together, such as the audio you hear when you click the talent orbs, which was re-made from the sounds of a heavy book shutting and wind chimes. If we need to remake a song, I make a new track by re-recording each instrument’s part on a midi keyboard. Then it will be edited it in Logic Pro X, using instruments and synths from the Kontakt audio library.
What’s the part of being an audio designer that you’re most excited about?
Lavender: I’m most excited about getting to write new music for the game! I can’t reveal to you what it’s going to be used for yet, but in the process for the last WTP track I wrote, I thought about how to represent the area it will be used for and what instruments and mood would suit it the best. It was a lot of fun to try to both express my style and also give it that Pixie-Hollow-sound!
Finally, how do you fit working on WTP into your schedule?
Lavender: I keep a to-do list and project notes to help organize what needs to be done, and work on WTP between class assignments. To refrain from burning out, I try to spread out my different tasks and work on a variety of things.
__________________
After we learned about what goes on behind the scenes on WTP, we wanted to learn a little bit about some future plans and hopes the staff have for the game.
Art wise, what sorts of things will be designed from scratch in the future?
Rachel: Although we still have a long way to go before creating our own work as we have to replicate what was in the original game first, I believe that new clothing and hair might be designed from scratch in the future.
Ci: Right now, we’re still committed to restoring the game in its original form–this means that we try not to design anything from scratch. We’ve discussed the possibility of custom content in the future (items + clothing, pets, meadows, maybe even minigames?), and when the time comes, all of that will be built from scratch. That said, pertaining to the look and feel of the original pixie hollow will be a priority for those updates too.
What game feature from Pixie Hollow are you most excited to have?
Teresa: Personally, I am excited for the skill system and wilderness! We have some new ideas to try out, but I don’t want to spoil anything.
Do you plan to have seasonal differences and events, as well as competitions and activities?
Teresa: Yep! Can’t wait! We are already featuring player’s outfits in the shop catalogue, so that’s sort of a mini fashion spotlight, but there’s definitely more exciting things to come. Fashion spotlight was one of the most beloved competitions/events in the original Pixie Hollow!
In the future, will the game be available for mobile and/or consoles?
Teresa: You can already play WTP on mobile! At some point we will have options that allow the game to run smoother on mobile devices. Console versions won’t be a thing, though.
Is there anything that was in the original Pixie Hollow that you’d like to change in WTP?
Lavender: I would change the whisper noise it made when you got a message, it got a bit annoying. And it would be really neat if you could choose from a few different songs to have played in your fairy’s home depending on your mood! I had the ice themed house and have heard the music a few too many times!
Teresa: There are things I want to tweak, and fully plan to! We have already added a couple of small new things, such as the second sitting pose and featuring real player’s outfits in the shop catalogue. I hope everyone enjoys them!
The last thing we wanted to talk about is the staff’s personal feelings about WTP and about their jobs, as well as ask them about their inspiration.
Is there anything new that working on WTP has teached you?
Rachel: As an artist here I am definitely learning new technical skills and developing as an artist in general. Some examples of art skills I’ve been able to develop include creating atlases and spritesheets for fairy clothing and hair, getting familiar with DragonBones as I’d never used it for animation, and just gaining more experience in Photoshop. And I basically just learned all these things by trying them out and asking questions if I needed help.
Lavender: Through WTP I’ve learned more about creating sound effects, because when remaking the old sounds for WTP, I really have to think about what each one is made out of (for example, the pouch sound was re-created using a paper bag rustling, leaves crunching, and a bell synth).
How do you feel about the community growing so much in a short amount of time?
Teresa: I really didn’t expect it, and it has been a bit stressful, but I hope we are handling it well. I would never have imagined that a TikTok would be the reason either! Having more eyes on us makes me feel restless. We had to adapt the discord server to keep it safe and make information more accessible to new members.
What do you remember about Pixie Hollow? And did it change your life in any way?
Lavender: I joined right at the beginning, and loved how it really felt like you were stepping into a different, magical world. My favorite thing to do was decorating and creating/collecting items for my house, as well as the minigames and item crafting/ baking, I’m most excited to see these features again! Also, a good memory from the game I have is going to the summer pool party in the ballroom, and playing games in the tearoom with friends! The music in Pixie Hollow was one of my earliest inspirations for pursuing a career in film/game scoring. Currently I am studying for a degree in film/game scoring! I’m obsessed with fantasy games, nature, fairy tales, magic, and mythology, and I write music to try and illustrate the stories and have the listener feel like they’re visiting the scene. You can hear some of my original music on Spotify under the name June Westfield!
Rachel: I was so young that I have trouble remembering everything. I do remember sometimes getting on the phone with my friends and talking as we played together and explored meadows, which was really fun. I also really enjoyed completing tasks and playing the minigames. I have no idea why that was so fun to me, but I just liked getting achievements and beating my scores.
Do you feel like some people may have unrealistic expectations for WTP? And do you think it can ever be as big as Pixie Hollow was?
Teresa: Yes, but I can’t blame them. So far I am the only developer to have actually worked on this game, so it’s a lot of pressure, but of course the players can’t know that. For some reason the things that everyone thinks will be the easiest to code are always the more difficult ones, funnily enough. For example, a flying mechanic like the original game is sort of complex, whereas adding new meadows is extremely simple. Do I think WTP will ever be as big as PH? Definitely not. Pixie Hollow had millions of players, Disney advertised it, and it had a full development team behind it. A lot of the original players will have moved on. I’m actually surprised that so many people have found us already!
Are there any artists that you look up to or are inspired by?
Rachel: I don’t have anyone specific in mind who I look up to, but I do watch a lot of cartoons and really admire animation and all of the work that goes into it. I get really inspired seeing different animated works and am super impressed by the entire process of it.
Ci: I used to actively make art outside of WTP and definitely had a whole list of people whose styles I looked up to, but now that I’ve moved away from that I mostly remember individual pieces. I had to dig some up for this question! loish, gawki, and Hethe Srodawa, are a few.
Lavender: Some composers that inspire me are Enya, Faun, Loreena McKennitt, and Secret Garden. They are all fantasy/new age genre artists that create enchanting music!
The WTP community is a great place to make friends! Is there a person in the staff that you’ve formed a strong friendship with?
Rachel: I’ve definitely become a lot closer with many of the staff members, whether it be looking up to certain people like our team leads, chatting with the other artists in DMs and helping each other out, or just having fun conversations with all the other staff members and sharing funny stories and pictures.
Teresa: Asteria is probably the best friend I’ve made at WTP, as we have talked the most. I have also met Kass in real life – she’s the sweetest! I love everyone on our team.
(Kass is one of our moderators - we’ll hear from her in the final interview post!)
And finally, What does working on a game that’s so loved by people mean to you?
Teresa: It is so heartwarming to be a part of something that brings people joy and makes them nostalgic. Pixie Hollow’s fan base can make me a bit anxious at times. Sometimes a group of players will want one thing, and then another group wants the exact opposite and it can be hard to make a choice. There’s a lot of pressure in trying to stay true to the original game’s vision while also being fresh, but it drives me to deliver the best work I can. I put a lot of time into WTP, and have actually burnt out a few times already. Luckily, I love building things so much that it never lasts long.
________________
Next up in our interview series - our social media team and server moderators! Stay tuned to hear their answers to some of your questions.
16 notes
·
View notes
Text
Adobe Flash Player For Mac Os X 10.5.8

To download ADOBE FLASH PLAYER FOR MAC OS X 10.5.8, click on the Download button
Flash Player For Mac Os
Adobe Flash Player For Mac Os X 10.5.8 Download
Flash Player For Mac Downloads
Download
Adobe Flash, or simply Flash, refers to both a multimedia authoring program and the Adobe Flash Player, written and distributed by Adobe, that uses vector and raster graphics, a native scripting language called ActionScript and bidirectional streaming of video and audio. Adobe flash player for mac os x 10.5.8 are verified to work properly and include all parts and accessories original or comparable substitutes. Look in your Applications folder for. LordBillSwagg 1-nov-2014 13.29 My Version Of Mac Os X is 10.5.8 and i try to download adobe flash player. X 10.6 Snow Leopard or later, you can also download Adobe Flash 10 for PPC Macs and Adobe Flash 9 for Mac OS X 10.1-10.3. How to fix Adobe Flash issue on Mac OS X 10.5.8 with allow-outdated-plugins switch and restore Chrome functionality. My problem is Adobe Flash player cannot installed on my Mac 10.5.8, its not supported. Re: ATTN: Mac OS X 10.5.8 users, How to 'fix' Adobe Flash issue tutorial. Dec 18, 2013 I have a Mac os x 10.5.8 and need the proper flash player to see videos please help me as all my efforts have not worked.
ATTN: Mac OS X 10. This is a brand new problem that a lot of people are having. All refurbished products sold by Best Buy also include a warranty, and Best Buy's applies. I have been using Adobe Flash Player for ages for Hulu, etc. When I click on the 'ChromeScript,' 'ChromeScript' bounces in my menu bar and then quits. I need to resolve this problem as soon as possible. Still haven't contacted Adobe, but will keep trying.
Adobe flash player for mac os x 10.5.8
Adobe flash player for mac os x 10.5.8
Adobe flash player for mac os x 10.5.8
You may change your cookie preferences and obtain more information. Adobe flash player for mac os x 10.5.8 spent hours looking for the right download only to find that they won't work on this version of Mac I have. However, I just 10 seconds ago rebooted Chrome, after which the drag-and-drop method you detailed suddenly worked :D thanks!!! Right-click on your newly created script and choose 'Get Info'. It has to be in that folder for this to work see attached screen shot. That means more to me than you komku-sp-usb.exe guess. It's too bad khlicht didn't complain about that trivial duplicate dock icons issue weeks ago.
Adobe flash player for mac os x 10.5.8

In fact, that is how the original app launcher functioned as well. It allows Doughboyz cashout i dog hoes OS X users to play Flash content both on apps and web sites. Worked perfectly after quitting the Chrome window I had open with this post. It's great to flas users helping other users. Why do you think this is happening? So I get two chrome icons now on the doc. It should also be named Google Chrome exactly, with a space in between Google and Chrome.
Adobe flash player for mac os x 10.5.8
I booted up and had this problem just ten minutes ago, and here's the answer. There are several of posts that have no real resolution on this, and none of them have a clear solution that works. I honestly prefer showing everyone the full property list editor route just in case someone 1 makes a mistake while typing and doesn't realize it, or if 2 playee are updating their OS version either now or in the future and will soon no longer need the allowoutdatedplugins boolean key. I quit chrome and then tried to 'run' the ChromeScript which then opened through Google Chrome, but nothing is filma me titra shqip falas. Screen shot adobe flash player for mac os x 10.5.8 BooleanKey. Silva - Make sure you named your Applescript file as ChromeScript.
Download
adobe flash player for mac os x 10.5.8
Flash Player For Mac Os
Adobe Flash Player For Mac Os X 10.5.8 Download
Recent Posts
Flash Player For Mac Downloads
1 note
·
View note
Text
Tutorial: How to default the penguin
@grilledcheese-aspiration asked me if I had any step-by-step tutorial on how I defaulted the penguin, but I had none, so I made one! :-D (beware of long post and many pictures beneath the cut)

Before we begin, this is a tutorial on how to default the penguin and add new meshes to it, not just a simple texture replacement. If you’re wondering why I’m making a tutorial on this it’s because the penguin has too many morphs and can’t be exported out of Milkshape, but I found a way around that :-)
With that out of the way, you have to have SimPE with NVIDIA DDS, Milkshape with the plugins and the seasons expansionpack of ts2 installed. It might be possible to do this with blender or any other meshing program, but I will only be showing how I did it with Milkshape.
If you know how to extract files etc (the basic stuff), you might want to start at Part 2: Adding new meshes, 4. I would say this tutorial is fairly beginner-friendly, since I did my best to show every single step.
Part 1: Extracting neccessary files
1. Open up SimPE, search for “penguin” in finder and click on start:

(bigger image)
2. Scroll down a bit until you find the files we need: penguin_surface_txmt*, penguin_tslocator_gmdc, penguin_untagged0_shpe and penguin-surface_txtr. Double click on them one at a time to open them, then right click - extract and save them somewhere (you might want to name them txmt, gmdc, shpe and txtr so it’s easier knowing what’s what).
*I use Nopke’s penguin fix so if you do as well and don’t want your added mesh(es) to the penguin to be covered in snow, extract the txmt from his fix instead of EA’s original.
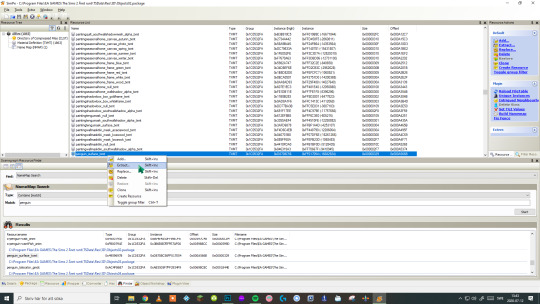
(bigger image)
3. You’ll want to double click on the penguin-surface0_lifo file if you’re planning on editing the texture as well to get the highest resolution of the texture. You're not supposed to extract it though, just right click on the image and choose export and save it somewhere.
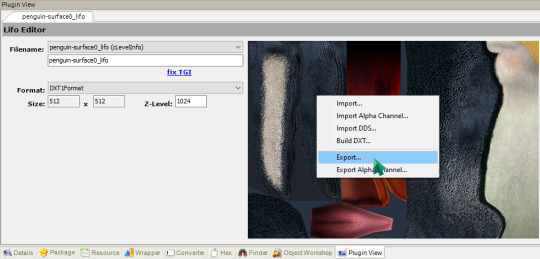
4. Make a new package in SimPE: File - New or CTRL + N if you use any of Chris Hatch’s updated versions of SimPE.

5. Right click somewhere in the middle of SimPE and choose “Add”:
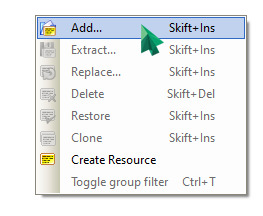
6. A window will pop up. Locate your extracted files (txmt, gmdc, shpe, txtr) and import them all, then save your file and give it a name.
Part 2: Adding new meshes
1. In my case, I’m going to show how I added the hat, but it should be fairly the same for whatever you want to add to the penguin, the only difference will be the joint assignment later.
2. Open your accessory/whatever’s mesh (in my case, the hat) in SimPE and export the gmdc by right clicking on it and choosing “extract”, then save it somewhere. You have to extract one texture as well. Open up a recolor, right click on the image and choose “export” (like you did with the penguin lifo file).

(bigger image)
3. Open up Milkshape and choose File - Import - Sims2 UniMesh Import V4.09A, then a window will pop up.

(bigger image)
4. Now, if your mesh you’re planning to add to the penguin is too big/small, you’ll want to import that mesh first and use Tools - Scale All... (it’s the third option from the bottom) and play around with it a bit until you get it the right size. I usually do it like this:
import mesh, scale and then import the penguin mesh to see if it’s the size I want. If not, I undo the import (CTRL + Z or Edit - Undo) and then undo once again to get the mesh back to original size. Then I do “scale all” again and repeat the process until I’m happy with the size.
Why you have to do it this way is bc if you have both the hat (in my case) and the penguin mesh in Milkshape when you use “scale all”, everything will scale, including the penguin mesh.
When you import the penguin’s mesh it will ask you if you want to “Create Blend Groups?” and then it will ask you “Some Skin Weights do not total 100%. Do you want these corrected?”. It doesn’t actually matter if you choose yes or no, since we will not be exporting the penguin mesh anyway so you can choose no but I clicked yes on both options bc you never know.
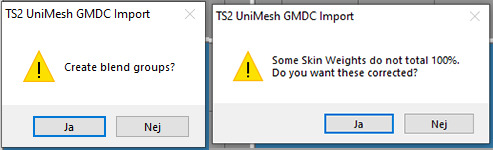
5. To move your mesh around in Milkshape, go to the “group” tab and double click on your mesh group to select it (it should turn red) and then go back to the “model” tab and click on “move”, then use any of the three grey windows to move your selected mesh around.
When you're happy with the size and have put the new mesh where you want it to be on the penguin, click on your mesh group in the group tab and rename it if you want. I named my hat group like this: (click on rename after you’ve edited the name, otherwise it won’t save your new name)

6. Then click on comment. A window like this will pop up:
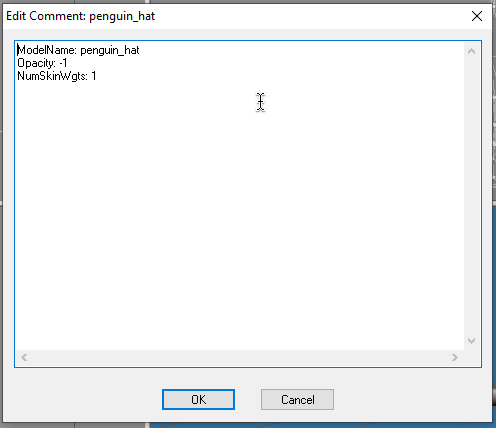
7. If you renamed the group, you have to write your new name at the top after “ModelName:” like seen in the image above. After ModelName: [insert your group name here] you should have something like: Opacity: -1 and NumSkinWgts: [a number between 1-3] like also seen in the image above. Click on OK to apply the changes. By now you’ll want to save the file as a .ms3d just in case something goes wrong. It’s always nice with a backup. You can save it by going to File - Save As... (or CTRL + SHIFT + S).
8. Now that you’re done with the mesh and has saved it as a .ms3d file, delete the two penguin_surface mesh groups and all their morphs if you clicked yes to the “Create blend groups?” (in other words: everything but your added mesh group). After that you’ll want to export it by going to File - Export. Export it as Milkshape 3D ASCII and save it somewhere.
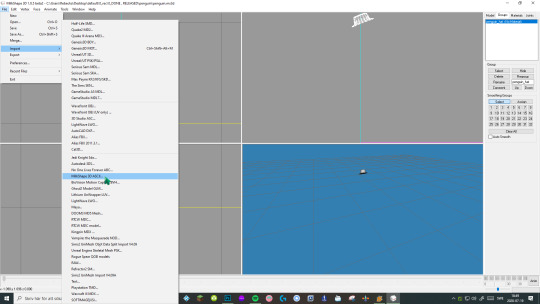
(bigger image)
Part 3: Bone assignment
1. Before you can import the new mesh, you have to go to Extra - Preferences and check the "Advanced Mode" box then restart SimPE.
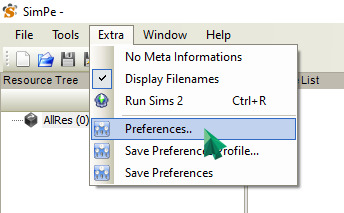

(bigger image)
2. After restarting SimPE, open up your .package file with all of the penguin extracted resources in SimPE and click on the penguin_tslocator_gmdc. Click on “import” and choose your exported Milkshape 3D ASCII mesh. It should then be added to the gmdc like this:
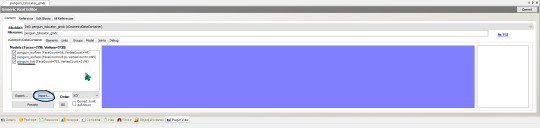
(bigger image)
3. Click on the groups tab, then select your newly imported mesh group. Now, you want to click on the bar under “Joints:”

(bigger image)
4. Then this list will pop up:
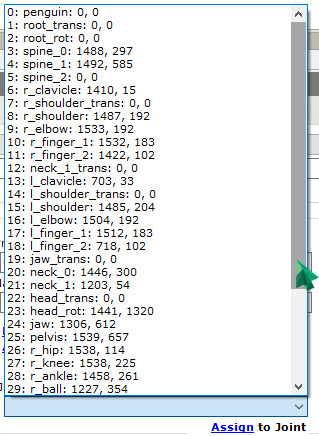
5. Now all you have to do is find the correct joint to assign your newly imported mesh to. It can be tricky to find the right joint, or perhaps it’s just me not being comfortable with joints yet haha :p I’m thinking the joints with “0, 0″ may be empty joints, in other words: the penguin doesn’t have/use them, but I’m not sure (but it makes sense, doesn’t it?). Anyway, when you’ve assigned it to what you think is the correct joint, click on “assign” and then click on commit to apply the changes.
Part 4: Creating necessary resources
1. Now that you’ve successfully added the mesh to the penguin, we need to create a txmt, add a txtr file and edit the shpe. We’ll start with the txtr.
If you want to edit the penguin’s texture, right click on “penguin-surface_txtr” and choose “Clone” so you get two of them. Open up your photo editor of choice, import the penguin-surface0_lifo_512x512.png and edit it (if you want to that is). When you’re done, save it as a .png, click on one of the two “penguin-surface_txtr”, right click the image, choose “Build DXT” and import your edited texture. Commit the changes. (These steps are shown down below if you don’t know how to import it.)
2. Click on “penguin-surface_txtr” and rename it to whatever your new mesh name is. In my case, it’s “penguin-hat_txtr”. After you’ve renamed it, click on “Fix TGI” (this is important since it gives your edited resource a new instance number so it won’t overwrite the original resource you extracted (or cloned it from). Right click on the image and choose “Build DXT”.

(bigger image)
3. Choose DXT3 or DXT5 (I never use DXT1, it completely destroys the quality. DXT3 is the one I use 99% of the time) click on “open” and find your mesh’s texture and choose it. Click on “Build” an then commit to save the changes.

4. Now it’s time for the txmt. Click on “penguin_surface_txmt” (remember you have to extract the txmt from Nopke’s fix if you don’t want your added mesh to be covered in snow during winter) and change the name to your new added mesh’s name. For me, this is “penguin_hat”. You’ll need to edit it in 4 places. After editing, click on “Fix TGI” and then on “commit” to save the changes.
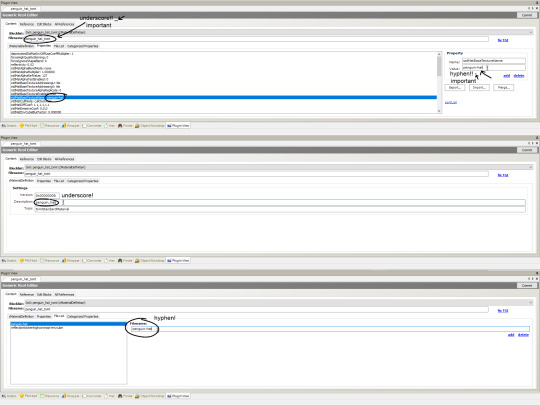
(bigger image)
5. Now for the shpe. Click on "penguin_untagged0_shpe” and click on “add”:

(bigger image)
6. “Subset Name” is your mesh group name (the mesh group name in the gmdc) and “Material Definition File” is the txmt. For me it’s “penguin_hat” in both. Click on commit after editing to save the changes.

(bigger image)
7. And you’re done! Save the file, drop it in your downloads folder and see if everything’s working. If you use “boolprop testingcheatsenabled true” you can shift + click on the mailbox and under “Make NPC ...” you can choose “penguin” to force one to visit your lot. Simslice also has a penguin summoner here (<- booty link) it’s the “penguin_summoner.rar”. This is much faster than waiting for the penguin to randomly come by.
Help etc.
I think I’ve explained every step correctly, but it’s very possible that I’ve forgot something or made a mistake somewhere. Let me know if you find any! Also, if you can’t understand something, let me know and I’ll try to explain it again.
And ofc, if you need any help, feel free to comment, send an ask or message me :-)

13 notes
·
View notes