#beginner project
Explore tagged Tumblr posts
Visit Tumblr Blog
Explore Tumblr blogs with no restrictions, modern design and the best experience.
Last Seen Tumblr Blogs


Fun Fact
The “We are the 99%” Tumblr blog became the slogan for the Occupy Wall Street movement.
Text
Tomorrow, my wife will be tricked lovingly guided into her first sewing project: ita bag pin inserts.
We made her pattern pieces and cut out everything tonight. Tomorrow she's ironing on an unholy amount of heavy interfacing and, uh... Assembling everything with the overlocker. Because why not start your sewing journey with the angriest machine in the home sewist arsenal?
Reddit, as it turns out, is rife with no sew tutorials for these doohickeys. Like, to the point of even my no-sew-loving other half wondering what childhood incident scarred so many people that they can't bear the thought of a sewing needle or machine. But those tutorials require a bunch of materials we do not have (or can't clean once assembled), and also have a glue gun that you would use if there was literally any other option. (Note to self: get better glue gun).
And she wants to be done quickly, with as little additional expenses as possible. And I had some fabric and overlocker thread in my stash that matches her bag, as well as a bunch of interfacing I've not needed as much as I thought.
The only worry is that the big panel will not be stiff enough, but theoretically we can just sandwich in a third piece of fabric with more interfacing on either side.
8 notes
·
View notes
Text
youtube
Let's make some functional sewing tools and do some scrap busting at the same time!
We're making pattern weights today!
#sewing#youtube#diy#do it yourself#sewing machine#scrap busting#scraps#pattern weights#sewing tools#sewing tips#beginner project#stitching#Youtube
2 notes
·
View notes
Text
#genuinely curious#I want a project to do#I want to make clothes but I feel like I’m too much of a beginner for that#crochet#polls#crochet polls#beginner project
34 notes
·
View notes
Text

After so many years of knowing how to crochet but never actually making anything wearable, my first beanie :). I started it yesterday after finding some yarn that I love and even though it's a bit wonky it'll still keep my head nice and toasty.
#yarnblr#crochet#wool#Heirloom Merino Fleck if you must know#handmade#beginner project#yarn crafts#crochet yarn#winter#its winter here and TOO COLD
3 notes
·
View notes
Text


I made hat today
4 notes
·
View notes
Text
small sewing projects for gifts
In this post I show you how to sew 6 absolute beginner sewing projects for gifts or sell. Sewing is a wonderful hobby that can also be a great way to make personalized gifts for your loved ones. Whether you are a beginner or an expert, there are many small sewing projects that you can create in a short time and with minimal materials. In this post, I will share with you some ideas for small…

View On WordPress
#beginner project#beginner&039;s friendly#clutch#DIY#diy bookmark#DIY project#easy sewing#for sell#gifts#how to#notebook cover#purse#shoe clips#small sewing projects#wallet
6 notes
·
View notes
Text
Poll vote Result: Stepper Motor
Thank you all for voting on the poll, as of today I find the Stepper Motor to be the one which was the winner.
Okay so I have a few ideas, not going to poll them because I want to do the zany one first, then I'll move on to the more grounded and harder one.
Henry is a two-armed robot which will move along the ground using a set of arms connected to a servo, turning on and off with the press of a button, using a sort of crank shaft mechanism which moves both arms simultaneously.
The second is a locking mechanism which will work on a clock, which will be elaborated on in a different post.
For now, let me introduce: Henry the Crawler, this is a fairly basic idea which I plan to expand on with real blueprints later.
The idea is that I will be using an Arduino nano, connected to a breadboard which gives commands to a single stepper motor to make two arms throw itself forward.
The Single stepper motor will interact with the two arms via an axle, similar to a wind-up machine, only instead of a key there is a microcontroller and a button to turn it off and on.
Now I understand that there are issues with Henry, but I think he will be hilarious.

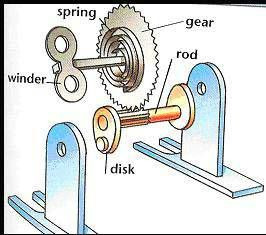
Now I thought the best way to do this would be to use the basic wind up mechanics for the actual moving parts in this robot. Doing this out of cardboard will be difficult but it seems like it is simple enough to build, just time consuming. As for the rod part I was able to ask a roommate for bamboo sticks to add onto it, so shout out to roommate for that.
As for the winder, spring and gear part of the components, I want to use one of the 28BYJ-48 5v dc stepper motors so as to make sure it is only one part which might be able to turn the beast on and off. I'll post more with the bread board and jumper wires later on.
Though not specified in the picture, I think arms with tendons in the actual moving parts might be kind of useless, and it is beyond my knowledge to be able to make them more utilized. I will likely keep the idea around for further projects.
0 notes
Text
#knitting#knitblr#historical knitting#crochet#crochetblr#yarn crafts#fiber crafts#fiber art#crocheting#knitters of tumblr#knitwear#knittersofinstagram#beginner knitter#amigurumi#crochet amigurumi#crochet animals#crochet project#cottage witch#cottagecore#cottage aesthetic
327 notes
·
View notes
Text

This art blew up so I decided to finish it lol
#beginner artwork#digital art#bad art#hatsune miku fanart#vocaloid miku#miku fanart#hatsune miku#miku#vocaloid#vocaloid fanart#vocaloid fandom#project sekai#01
235 notes
·
View notes
Text
Nothing about how I feel about you has changed.
i wasn't gonna post this part of the chapter bc it was too long but. i truly cannot stop thinking about it. im unwell.
dabbled in translating and it was fun!! this was translated and edited by me and pls do not repost this, at least until the event is over!! thank you!
#pls im a beginner in japanese why am i doing this lmao#ena5#project sekai#mizuena#niigo#mizuki akiyama#ena shinonome#ena5 spoilers#project sekai spoilers#n25#prsk#mzen#mine#mzen posting
440 notes
·
View notes
Text
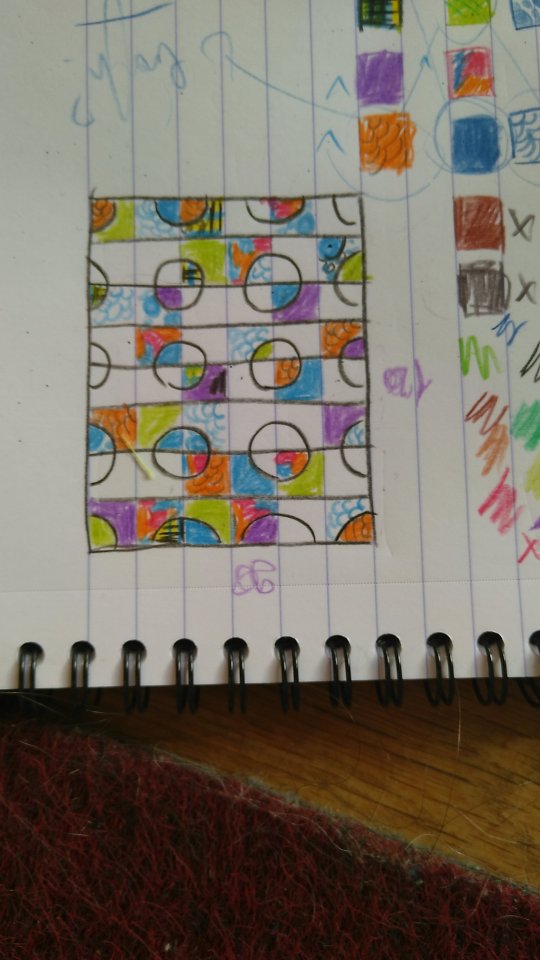
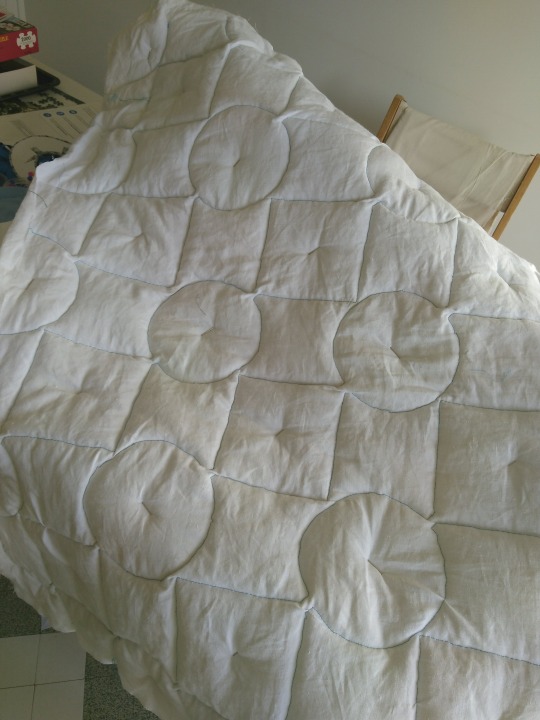
First Quilt!
It has been a lot of fun and a lot of trial and error but it's done!!!

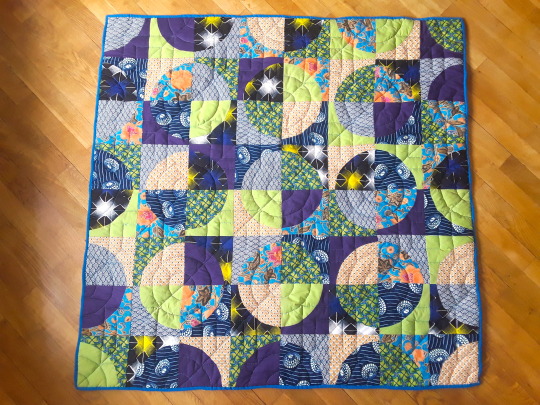

It's roughly 1.20 x 1.20m (which is a number of feet I can't be bothered to look up but let's say it's about child sized and it'll be great to chill on the couch).
I want to thank @langdon813 who I've never talked to (sorry if you hate being tagged) but whose gorgeous Drunkard path quilts made me wanna do it too :)
I had never done any quilting before (but I did sew), so here's what I've learned, if any beginner is interested in jumping off the deep end the way I did and wants advice from someone who has freshly acquired experience but will also not use any confusing technical terms (with pictures!) :
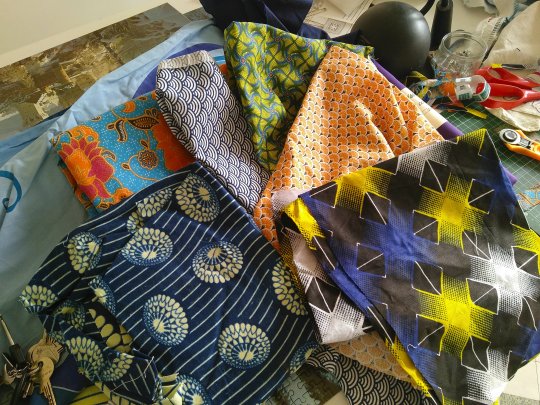
Fabric picking : so most advice I read was to go for pre-selected bundles of fabric that already go together, but I'm contrary and like to do my own thing so I used wax fabric (the blue ones on top the pile) I had laying around, which I strongly recommend: it's very easy to cut due to it being waxed, and I added a few fat squares from the shop, plus I also had the orange and blue floral and I based the coulour scheme on it. One thing that's true is it would have been easier to work with fabric of the same thickness, and the floral was givne to me by my ma who got in on trip to Thailand and it was alot thinner than the rest which didn't help.
Cutting: I got a rotary cutter for the occasion and it's great! Do not maybe push too hard on it and give yourself nerve damage the way I did (temporary but still), it's actually ery sharp and easy to use, so long as your template doesn't slip you're fine
Piecing :Yes you can do curved piecing even if you have zero experience, you just gotta make a template and
pin it a lot.
1/4 inch margins is the standard so I rolled with it because I don't like converting, but when you're strictly metric it is kind of annoying but doable because my machine does have a 1/4 inch mark and if you stick a length of tape along it it's pretty easy to follow, even for curved piecing.
Layout: At some point you've got to decide the layout is done, because I've re-arranged the blocks at least 6 times and it's a very good way to go insane. (For rough reference, my plan was to have no repeat fabrics in any of the circle-in-a-square blocks, and I only made one mistake which I clocked too late to change)
Chain piecing!! Meaning you pile your blocks together in a specific order (that I personnaly wrote straight up on each piece with a very sophisticated letter/numbers down/across system) and then just sew them together in a line without having to cut the thread between each pair. Looks a little like a fanion banner and at some point it feels like you'll be forever tangled into it but then it's magic :) It's not that hard actually and will save you a lot of time + there's a lot of online tutorials you can use.
Basting! (which it took me while to understand is the part where you attach the backing, the fluff and the quilt top together) : you need more safety pins. Safety pins will save you from the wrinkles and the unfortunate oopsies of realising you've caught your backing double folded into your quilting stitch, which I did a good three times and was not fun to undo. Also, I forgot to tape the backing to the floor and it probably would have helped with the wrinkling...
Backing : I used an old linen table cloth I got for 10€ at a charity shop, and I've still got about 2/3 of it left, so I recommend that, it's sturdy but soft enough, doesn't thread easily and can be washed at very high temps, if that's a thing you do.
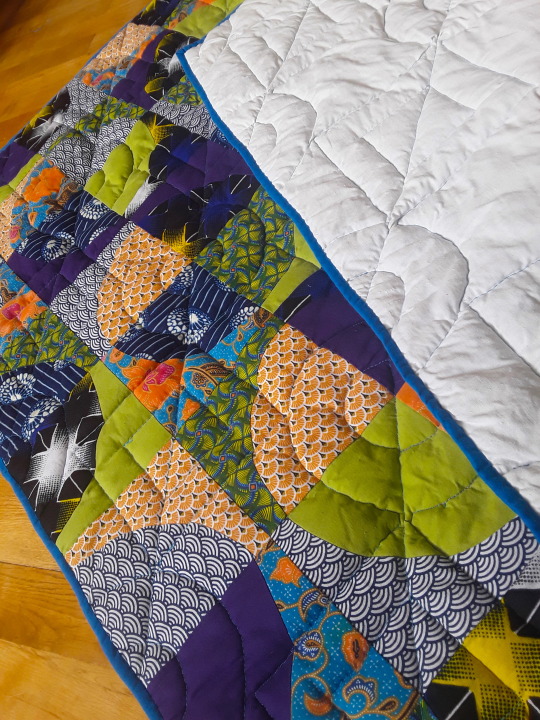
Quilting! Well, my machine came with a quilting foot for free motion quilting (which means you're the one moving the fabric along in whichever direction and you can sort of draw with your stitches) and it seemed fun so I did that, and here's what I learned : curves are hard but doable, also my machine doesn't like to go back (kept skipping sitiches for some reason) so it involves a lot of shifting the quilt around, which isn't easy considering the bulk. And also, drawing the quilting pattern you want so you can follow it while quilting actually does help, I used an iron/heat-erasable pen and it worked just fine. Check your stitch tension, mine was too loose and I realised too late so there's spots where I could pull on the thread and it looped, had to stitch back over that.
Quilitng pattern : I wasn't sure what to do, supposedly your batting (aka: the fluff) comes with instructions on how tight you should quilt to avoid it coming apart through use but I got mine cut at the fabric shop and forgot to ask so I just rolled with a rough 10cm maximum distance in between stitching lines but tried to do less in most places. According to many blogs : the tighter your lines the stiffer your quilt, so I kept it loose for comfort. (Picture is halfway done, I added a smaller square/circle inside each square/circle and if you look at it you'll see it's actually diagonal lines form one end of the fabric to the other.)
Binding is boring, and there's nothing to it. I got a length of pre-cut bias binding, machine-sewed it front to front to the quilt top side of the quilt and the folded it back and secured it by hand to the back with a ladder stitch. Took me roughly and entire rewatch of the Last Of Us. There's a trick to doing the corners that's fairly simple but I've lost the tutorial...
Overall : I got myself a quilting book with techinques and such and it helped, but there's a ton of stuff online, and once you get over the very Christian American mum vibe of most of the blogs, it's all very helpful (and gorgeous!) (no offense meant to Christian American mums, it's just a bit of a culture shock from where I'm standing).
#quilting#quilters of tumblr#quiltblr#quilt tutorial#quilt pattern#quilt#drunkard path#home sewing#sewing#sewing project#beginner's quilt#beginner quilting
188 notes
·
View notes
Text
I finish one knitting project and suddenly I get delusions of grandeur about what I should do next. I made one nice-looking hat and I'm chomping at the bit to jump right into a whole ass sweater. I DO have the confidence of a mediocre white man but only immediately upon finishing a craft project.
#in fairness the hat looks SO nice and the sweater is very much a beginner project so#also I already have half the yarn for it#so really this is very reasonable#i need two skeins and a circular needle
254 notes
·
View notes
Text


knitted dust pixie fingerless gloves :3 basic stockinette panels with surface crochet spirals and whip stitch (i think?) around the edges
#my knitting#one of my first fully completed knitting projects :’)#fiber art#knitting#arm warmers#knitted#beginner knitter#knit#handmade#earthy#fairycore#knitblr#knitters of tumblr#hand knitted#knitwear
91 notes
·
View notes
Text
Dream Witchcraft: Casting Spells in Your Sleep
Your dreams are not just random—they’re portals, messages, and magical realms. Dream magic is the practice of working with your dreams for insight, healing, and manifestation. Sleep becomes your spell.
1. Create a Dream Space
Cleanse your room. Place amethyst, mugwort*, or lavender by your bed. Use soft lighting or a white candle to calm the energy before sleep.
2. Keep a Dream Journal
Write everything—images, feelings, symbols—immediately upon waking. Patterns will form, and messages will become clearer.
3. Set Intentions Before Sleep
Whisper a desire or question before bed:
“Show me what I need to know.”
“Tonight, I visit my inner temple.”
4. Work with Moon Phases
• Full Moon – prophetic dreams
• New Moon – dream planting (manifestation)
• Waning Moon – dream release (letting go)
5. Lucid Dreaming & Astral Travel
Practice awareness in your dreams. Use sigils or symbols to guide and protect you. Place a protective charm near your bed before attempting deeper dream work.
Dreams are not just stories—they’re spells in disguise.
Masterlist | linktree | Patreon

#dream magic#dream witchcraft#witchblr#witchcore#witchcraft#witchlife#beginner witch#witch tips#white witch#grimoire#spirituality#book of shadows#dream journal#lucid dreaming#astral travel#astral projection
78 notes
·
View notes
Text
Hello I want to bring your attention to your own blog
Most of the tarot reader's blog have gotten 'mature content label' which is resulting into hiding of your blog , posts not coming in tags and blog getting blurred hence overall low engagement

This is what coming at everyone's blog which have gotten their content labelled unless you've allowed the mature content
What's the solution? check your whole blog and private those labelled posts , remove the pics and be careful about posting images in pacs and moodboards because Tumblr is literally marking everyone's blog blindly
also even if they review your content that 'label' will be forever at your post it can't be removed means no benefits no engagement on that post in future too ✨
Some tarot reader's blog that I noticed facing this problem @winisayswhat @tarotwithavi @mweothe11e @laur1221 @tarotwithavi @thetarotyapper @the-tarot-witch22 @redwinewhiteroses @kiddotarot @theladybrownstarot @uyuforu @pisceantarot @galene-gothic @clairdelunetarot @the-cosmic-cauldron @tiashasworld @cadyflowers and many more !
I thought it happened with me only and was very frustrated but then I noticed most of the blogs were marked .
I hope this post is helpful for you in some way and if anyone have solution please share with all of us 💞🫶🏻
Thank you for reading! 🙏🏻
#pick a card#pick a pile#pick a picture#astrology#astro notes#astro community#astro observations#vedic astrology#astro placements#tarot reading#future spouse pick a card#future spouse reading#tarot pac#tarot pick a card#tarot pick a pile#tarot project#tarot paid readings#tarotblr#tarot blog#tarot beginner#tarotdaily#tarot deck#tarot divination#tarot witch#tarotista#tarotlife#tarot requests#numerology#astrology chart#astrology signs
68 notes
·
View notes