#blender 2.8 tutorials
Explore tagged Tumblr posts
Visit Tumblr Blog
Explore Tumblr blogs with no restrictions, modern design and the best experience.
Last Seen Tumblr Blogs


Fun Fact
If you dial 1-866-584-6757, you can leave an audio post for your followers.
Text
How to work with exported Sims 4 Studio exported rigs in Blender 2.8+:
I'm not sure why S4S never got updated to work with newer versions of Blender, but hey, I won't judge. Blender made some changes from 2.79, and one of them were the UI icons for visibility and selectable buttons. These right here:

On Blender 2.8+, go to the top right of the screen, click on the Filter button and check the little screen and cursor icons.

The screen is for disabling stuff in the viewport. It kinda works the same as hiding stuff. The cursor makes stuff selectable. So once you have them checked on the Filter menu, you'll see this on the top right:

See how those icons are unchecked for the rig? Click on them to make the rig selectable and unhide it.

And now you'll see a bunch of little dots on top of the mesh. That's our armature! Now all that's left to do is proceed with the same process you'd do on Blender 2.79.
So if you click on one of the shoulders, it will automatically switch to Pose mode, like so:

And if you want to rotate it, you can either press R, Y and then enter 45 (or -45 depending on which side of the mesh you are on) to lock the rotation to 45 degrees rotation on the Y axis, oooor if you prefer using gizmos, press this little icon on the top:

And you'll be able to rotate it using the gizmo. The green line is for the Y axis, red for X axis and blue for Z axis. Click and drag the green line and hold to rotate it, type 45 or -45 to lock to that exact degree rotation and then release the click.

That's for the shoulders, of course. If you're familiar with the process, you should know how to do it for the elbows too.
Once you're done posing the rig, export it as an obj file. Maybe delete first the skin areas in Edit mode, all the usual stuff you'd do on Blender 2.79. Hope it helps! If you have any other issues, let me know :D
Blender 4.1 question! How do I select the shoulders, elbows, etc? The layout is so different from older versions that didn't work on my dead laptop, and the tutorials all seem to use older versions.
26 notes
·
View notes
Text
Self-use Sims 3 CC Tutorials List
Here is a list of tutorials from which I learn to convert/create sims 3 cc in a few months (and as a poor English speaker). I think it might help someone who also wants to try making things for sims 3 but doesn't know where to start, though it's been 15 years from the game release and even Inzoi is coming hahah.
The list covers objects, clothes, hairs and eyes. I know there're lots of tutorials not listed here, that's because I haven't tried them in my projects by hand. But The list will be updated with new things I learn. Most tutorials are in English. Thanks to all these creators for sharing their precious knowledge!
Sorry for the miserable format, cuz I wrote them in Patreon and paste here. You can also read it there, free of course.
Where I find tutorials
sims 3 tutorial hub
ts3 creators cave and its discord
Mod the sims tutorial wiki and the forum
pis3update tutorials tag
General
CC basic concepts by nightosphere (for clothes, most knowledge is shared with objects)
Tools
TSRW guide by apple (for objects, most knowledge is shared with clothes)
Blender
shortcut by Blender Guru
beginner tutorial for version 2.5, 2.8, 3.0, 4.0
3.5入门教程 (youtube / bilibili)
设置切换语言快捷键 change language shortcut settings
图片取色器网站
Mesh ToolKit with Seam Fixer for all ages
Topaz gigapixel AI guide / higher quality texture
Texture
Nicer bake / bake in blender 2.78
Bake in blender 2.93
Make normal map
small size blank texture
Reasons for black blocks on baked image
Adjust texture color without losing quality
Object
clone obejcts with S3OC
4t3
Functional Objects
Functional bed
TSRW setting
Combining Textures for Objects with Multiple Textures
Add normal map to objects
Introduction to slot categories
Add slots in TSRW
Edit in-door shadow or occluders in TSRW / Talks about 3 kinds of in-game shadow by Pocci
Clothes
4t3 by nightosphere
Reduce polycount / fix seams, holes, shadows or normals
Bone reference rule
Avoid milkshape workflow / adjust bone assignment and morphs in blender
Manually fix bone in blender
Convert between ages/body meshes
TSRW check list
Fix long clothes clip with body
Fix holes on morphs (easier in blender)
Extrude collars
Create texture in PS
Avoid TSRW workflow / CTU tutorial
Hairs
Avoid milkshape and TSRW workflow / delete backfaces / handmade morphs / DABOOBS guide
Keys pointing to in-game blank textures to save file size (for DABOOBS not TSRW)
Reduce polycount
4t3
Fix weird seam lines on hairs from s4s
Fix pigtail issue
Eyes
Convert contacts to default eyes
248 notes
·
View notes
Text


DL (mediafire)
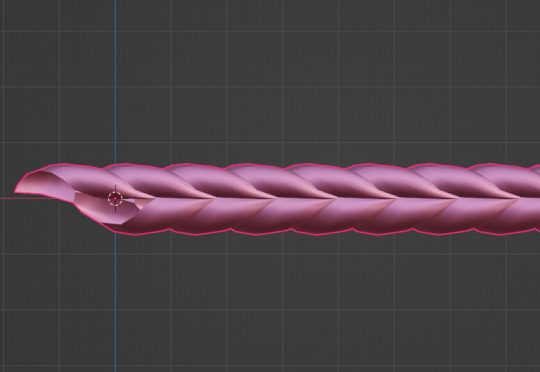
Today I bring you not cc, but a small collection of .blend files for making cc a little easier. If you've ever wanted to quickly put a braid into a custom hair without completely obliterating your poly count*, then these might be able to help.
*braids will still add a LOT of polygons to your hair, but since every single polygon is visible** on these tiling braids, at least you know they're all being put to use, whereas if you were to physically braid 3 strands of geometry, lots of those polygons would wind up inside the braid, just adding to your count without contributing anything to the look
**if some polygons end up inside of other meshes, you may want to delete them to reduce the poly count further. The boolean modifier may be able to help you, but I haven't tried
These are completely hollow, tiling braid "facades". They just look like a braid, without being anything more than a stylized tube. Available in 9 shapes (which are all pretty similar, more or less, but have different 'vibes', and one of them technically doesn't resemble a braid, but if you squint it looks close enough) and 3 polygon counts to hopefully fit in with your project.

TOU: Same as my cc. Read it here. I obviously don't own this concept, so feel free to reverse engineer, make your own braid tiles, etc. Just don't use mine for anything commercial (using them in commissions is fine, just not paywalled final products!)
You will need to be using one of the newer versions of blender, I believe 2.8 and up. These were made in blender 3.6, so the files will not be compatible with old versions like 2.7x.
Quick start guide:
Open your hair wip's .blend
In object mode, 'Append' the 'BraidTile' object of your choice
Select 'BraidPath' and, in Edit mode, position it however you like
Additional info under the cut, because I tend to ramble, and these require a little bit of a primer before use, probably. Unless you for sure know what you're doing, in which case, feel free to just take these and run with them.
THIS IS NOT A TUTORIAL ON MAKING HAIR, OR HOW TO USE BLENDER. Seek that information elsewhere.
Before appending braids, you may want to open up the blender file and look at all the shapes, to decide which one you want to use.
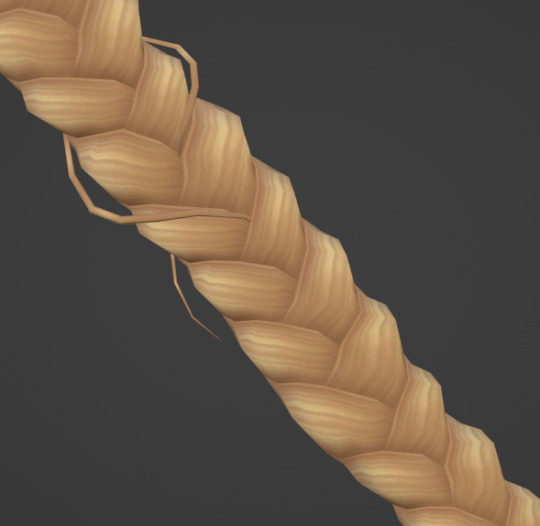
When you first append your braid, or open the blend files, you may notice it does not look like the preview images above, and instead looks like a shiny pink slug. This is intentional! For previews and development work, I use @/simandy's base textures, but your hair will probably be using a different texture, so I have not included a texture at all.
Simply switch the material of the 'BraidTile' to the same material your hair is using, and adjust the uv map accordingly. I'm going to assume if you are making hairs that you know how to do that, so it will not be explained here.
Once you have your braid appended, and have edited the UV Map of the 'BraidTile' piece to your liking, you can also try scaling the tile in the X, Y, and Z axes to change up the look a little. Make sure you select all of the vertices before scaling, to make sure it still tiles. This should be safe to do, and not mess up the tiling at all, but make sure you do it in Edit mode, not Object mode. (If you mistakenly do it in Object mode, you just have to press ctrl+A and select 'scale', and that should fix it)
When you have your braid adjusted, switch over to the 'BraidPath' object, and use edit mode to move the points around however you want. This is just like any other hair strand, if you're used to making hairs with paths and curves then this should already be familiar to you. All the same controls should work.
And, if you already have a curve in your hair that you'd like the braid to snap to instead, you can select the 'BraidTile' object, locate the curve modifier, and switch the curve object to any other curve in your .blend. You'll want to change the curve in the array modifier to the same one, most likely.
If you haven't used curves to make a hair before, here's a couple quick controls you might like to know:
ctrl+T will let you Twist the object around the selected point(s) alt+S will let you Scale the object around the selected point(s) selecting the first or last point of the 'BraidPath' and pressing E will Extrude a new point, making your braid longer
Remember to do all of your positioning on the 'BraidPath' object! You do not need to edit the 'BraidTile' at all once you've set up the UV map and adjusted the scale!
It should tile, twist, etc. with little issue, and should get longer or shorter according to the length of your curve with no issue. If it doesn't, make sure both the array and curve modifiers of your 'BraidTile' object are using the same curve. They should be using the 'BraidPath' object by default, but if you changed this manually, ensure that both modifiers match for best results.
Unless you know what you are doing, I do not recommend messing with any other settings in the modifiers, or adjusting the 'BraidTile' mesh in any way besides scaling the entire object at once. Otherwise you could end up with gaps and holes in your braid.
When you are done posing your braid, you can apply the modifiers to turn the whole thing into a regular mesh. I like to make a copy of my 'BraidTile' and 'BraidPath' first, just in case I want to go back and change the shape later. After converting it to a regular mesh, I'd recommend going in with proportional editing turned on and randomly scale and move a few of the pleats just a little, to make the braid look a little more organic. You can even add a couple strands to make it look messier, if you dont mind adding to your poly count even more. But this comes down to your preference and style. The braid below has had some half-assed editing done to demonstrate the concept. (Note: This is actually the low-poly version of this particular braid shape)
Ultimately, it is up to you to decide how you want to blend the braid in with the rest of your hairstyle. I can't tell you how to do that, as it is ultimately going to come down to your own personal preference, workflow, and the hairstyle you are making.
How do I know if I should use Hi, Mid, or Lo poly?
This is largely due to personal preference, and how you're using the braids in your project. I have included the three different poly versions to try and be mindful of the overall poly count of your poor poor meshes, but even a lo-poly braid is going to add an easy couple thousand polygons to your project. Keep that in mind! If you plan on having a LOT of braids, something like this EA hairstyle, for example:
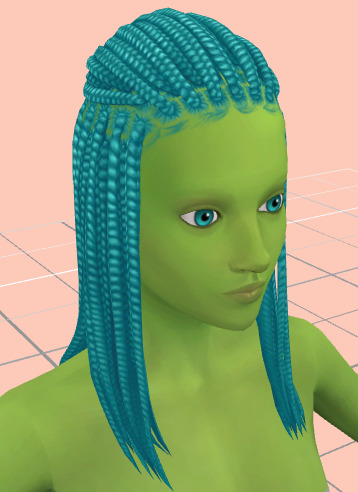
You will probably want to follow their example and use a very simple mesh and just apply a braid texture instead of using these. EA's braids here appear to be a simple box shape painted to look like braids.
If you only plan on having one, maybe two braids in your entire project, especially if they are very large braids, then you might want to go with the hi-poly option. They're the smoothest, roundest choice.
If your braid has a very small diameter, you can probably get away with just using the lo-poly option, and save some polygons you won't need anyway.
The mid-poly version exists as a sort of happy medium. They aren't quite as pointy as some of the lo-poly shapes, and they won't inflate your poly count as much as the hi-poly models, so you may find you prefer them for your applications.
It's all very subjective.
I think that's pretty much everything I wanted to say. If you have specific questions, my inbox is open.
Keep in mind I am not very skilled in blender! There's probably some optimization that can be done if you know what you're doing, and I welcome you to tweak these meshes to your heart's content, if that's you! I made these for me, but I figure they could make someone else's life a little easier too, so here you go.
If you make anything using them you are welcome to tag me! If you don't end up making anything with these then I hope you at least have some fun playing with them!
#simoleon#THIS IS NOT CC DO NOT DOWNLOAD THINKING ITS CC#im going to the store now if anyone has any questions ill answer them later#dl#(as in 'download' not 'delete later')#i dont wanna put this in my cc tag but i also dont wanna lose track of it yknow
264 notes
·
View notes
Text
Since I was recently tagged on making CC in milkshape, I figured I'd copy and paste what I know from my other blog, rather than just forwarding the page here for ease of viewing. It’s the FAQ page for creating CC under the read more.
What do you use to make mods?
S3PE is used to export snippets of the code to edit to make tuning mods. If you wanna make some yourself, HERE is the tutorial to learn how.
What do you use to make objects/clothing/hair?
This one has a few answers depending on what you mean specifically.
TSRW mainly for cloning and editing objects. It also lets me export the files in simpack and package formats.
If you want the version of TSRW BEFORE the sims 4 versions, you can get that HERE. This is important to note because some other programs used for CC creation aren’t fully compatible with the newer version of the TSRW’s WSO files.
If it’s an object that needs a fourth channel added, but it isn’t supported, Texture tweaker by Ignes Jones is what gives the object that channel to work with.
For meshing I use milkshape, and I’m currently working on learning how to use blender instead, since it’s freeware and has a lot more that can be done with it. However, it seems like the plugins from TSRW no longer work with blender, but there are plugins to have blender import geoms HERE that are best used with blender version 2.8-2.9.
There are some additional plugins for Milkshape that makes working in it much easier. There is an align normals plugin set by Demon 432 HERE, and the Unimesh plugins by Wes Howe found HERE. Lastly, to make UV editing easier in Milkshape there’s the CatofEvilGenius UV plugin HERE. They also have a UV flipper too.
For editing textures I personally use Photoshop and here’s how to add DDS usage to it with a link already there in it to download the necessary files. If you use Gimp instead, you can get the DDS files for it HERE. Installation should be similar to PS’s, just look for the file formats.
HERE is a link to the faces and scalps for when I need to model hair or jewelry, since doing it right on the head is much easier. Teens and elders aren’t in here because they aren’t that much different from the adult head.
Is that everything you use?
No there’s also:
Delphy’s Dashboard – Used to make sure my package files aren’t corrupt and won’t make sims implode. It’s also good for checking if anything you already have may be corrupted (a lot of it out there sadly is through no fault of the creator. It just happens during creation sometimes)
S3OC – Another program that lets you clone files, save unlike TSRW it can clone interaction objects, like toothbrushes, game controllers, bowls, plates, and other things that only appear for certain situations. The downside is everything mostly appears in strings with few images, but most of the names make sense for the items. Just sort by name and get to scrollin.
Compressorizer – This compresses simpack and package files in order to help keep the game running smooth. Due to some of its functions, remember to back up your CC and games before using the program.
MeshToolKit – This one is indispensable for creating custom content if you’re adjusting meshes just a bit, or using it to give completely new weight assignments (what makes it move and work like a sim body part) and morphs (the thin to thick range, pregnancies included). Thornowl also made an updated version that can be downloaded HERE.
Normal/Bump map plugins – They’re necessary for any CC you make, as most art programs don’t natively have the ability to make them. Now there are a couple different sets you can download and use depending on your art program of choice.
You can get the ones for GIMP HERE, with the link to the downloads on that page.
The ones for Photoshop can be gotten HERE, and this is a mediafire link because I personally had difficulty using NVIDIA’s newer exporter
And I THINK that’s everything, if I think of or get asked anything else I’ll edit this as needed.
#thesims 3#sims 3#the sims 3#s3cc#ts3 cc#least I think that's everything#If there's anything anyone thinks should be added let me know
35 notes
·
View notes
Text
on splatoongamefiles i posted about learning blender and am a good example in being slightly below average. instead of being a master at it in like a month like everyone brags about, i first download blender 10 years ago, and still to this day i don't consider myself really good at it, but i absolutely love seeing my progress anyway


it wont take 10 years to get decent at blender reminder i was like 9 when i started and i took a couple year-long breaks. the blender 2.8 update made things a lot more user friendly, and there has never been more content and tutorials and support for it than there is right now; start blender today.
(also included are tools for 2d animation, video editing and VFX tools, sculpting, and more; theres a lot of cool shit)
49 notes
·
View notes
Text
@fragilehiggs
HOW TO IMPORT HIGGS 3D MODEL INTO BLENDER / MODELS FROM GAMES INTO BLENDER
figured id make this a post because it’d be easier.. might help other people too!!! on how to put higgs into blender. you probably know some of the stuff i’m gonna explain but for good measure will bring up. this is extremely long because its the sort of thing i wouldve massively appreciated but i unfortunately instead basically had to figure it out going off of little to nothing
—
blender is a 3d program that allows you to import models from games into there which can then be rigged, posed, and animated. people take these models from games using programs called ninjaripper or greyhound. essentially this just goes into the files of the game and takes out the assets. if it’s an asset, it can be taken out. you would then have to rig the model yourself (basically put a skeleton to pose it.) this takes very long and is inconvenient.
luckily, people do this for you. you don’t need to rip your own assets out and rig, which is a hassle and you usually need to pay for these useful programs. a great spot for getting models that have been ripped from games is deviantart. however, there is no telling how these models can perform. they could be badly rigged, or could have messed up textures. unfortunately, such is the case for the one and only higgs model… https://www.deviantart.com/kanbara914/art/Death-Stranding-Higgs-XPS-864224744
the good news is that i fixed the textures. the bad news is that the rigging is absolutely beyond busy. he is poseable, yes, but the amount of points there are makes it really hard to. i’m yet to figure out a better way and might start ripping and rigging my own models. despite having fixed the textures i am unsure if i can export the fixed version. thus.. another tutorial will come through on to do that. unfortunately it takes awhile. all of this requires lots of patience, trial, and error.
so, now, how exactly do we start? FIRSTLY, we need to revisit downloading blender. the current up-to-date blender will NOT work. you need to download blender 2.80, NOT anything else. well, how do you get an older version?
in order to get an older version, navigate to blender.org/download/previous-versions/ and scroll down a bit to you see ‘download any blender version.’ here is a good tutorial but i believe that it is a little outdated so i will explain it furthermore. https://youtu.be/WmlijP9D67o?si=QHhpOQ_D_0LWJP9M this is the one i followed however so, the premise is the same.
we click on download any blender version and it looks quite overwhelming. dont be too worried, you just need to look closely and scroll till you see Blender2.80 . we then click on that and you need to find your operating system. im going to assume you run windows, and if so, pick blender-2.80-windows64.zip from the list.
navigate to your files, and then open up the zip file that you just downloaded. click blender 2.8 again and then what you see is going to look a little busy. dont be fooled, its actually not. just scroll down and find blender.exe. press this and itll bring up a simple process -- all you should have to do is press a few buttons and optimize it like any other download for an application such as blender. it should be installed like regular blender, and if its not on your desktop, simply go to blender.exe in your files in applications. i recommend pinning it to your taskbar.
here comes the next step. there is something called xnalara. i will keep the history of it rather brief but its quite interesting. xnalara was an older program that allowed people back then to rip models from games and import them into the xnalara program. that program is rather old and i rather not use it, however, im thinking about looking into it. its good to use blender regardless because of its studio-accredited attributes. its professional.
some awesome dude later down the line created something called a xnalara add-on for blender. this allowed you to download models ripped from games posted on deviantart that are optimized for xnalara. the file name for these xnalara optimized models end in .xps . these will not regularly be imported into blender, because it doesnt support it. however, this add-on will allow you to do such.
im going to explain how to download it but watching this video regardless is essential. you will probably need to go back to it now and then.
youtube
since youre particularly interested in importing higgs, i will keep it relatively broad but touch on his model a bit more because i am more familiar but this process applies to most models. navigate to https://www.deviantart.com/kanbara914/art/Death-Stranding-Higgs-XPS-864224744 and scroll down into the description of the post. click on the link, mega.nz/file/y88wyQpS#eDkcsSmW… so on and so forth. it will ask you if you want to leave deviantart and click the link again to go there.
you're now in MEGA. this website will allow you to store downloads for people, and i can assure you its safe. i would never download anything im not sure of -- my PC is my baby lol. look down to the bottom right and youll see "SAVE" and "SAVE TO MEGA." pick save. it will download, and you need to look to the top right and click where your downloads are. this will take a couple minutes, grab some water and a snack. when its done, click on it in the tray to open it.
youre going to be overwhelmed by everything you see. do not fret! just close it, dont unzip it. just make sure it exists. you can close MEGA and deviantart now. you now need to refer to the video i linked if you want to follow along with more resources. we need to install the XNALARA add-on for blender 2.80 which can allow us to put it into blender.
before i continue i want to say, being familiar will blender as a whole will be an insane help. unfortunately the only way i figured out some of the stuff that i did was because i knew how to just going off of the program. most tutorials will not have answers for this small issues... but i most likely do especially for this specific model.
here is the add-on. https://github.com/johnzero7/XNALaraMesh . github will look relatively the same as it does in the video. look to your right, youre going to see a bolded 'releases', and under it, XPSTools v2.0.2 or something along the lines of that. you dont need to see the other releases, it's best to have the latest one. click on it.
its going to open up the description of the file. the above is important to note because it says it works with the blender that you just downloaded. if there are any issues for whatever reason with using blender 2.80 (approximately the version from ~2020) those are other versions which are applicable. for the sake of my sanity im gonna explain how to open it in blender 2.80 .
go down to the bolded 'assets'. under it you will see 3 links -- click on the first one which ends in .zip . it will download in the download tray. if your computer tries to flag it or anything as unsafe, click away from that and allow it anyways. this program has been used by thousands for years. it will soon finish downloading. MAKE SURE THE XNALARA ADD ON IS SAVED ON YOUR DESKTOP!!!
go ahead and open up blender 2.80 now. if you have the newest blender installed already make sure youre picking the older version. it will open a terminal alongside of blender, while its running. dont close it. click general.
if you have never used blender, please watch a video on the basics such as this one. https://youtu.be/Z8sg0nHNTTo?si=zjR4aBHVF8XX_Qdn this is the only way to realistically be able to attempt messing with said model, unfortunately. unironically, rendering roblox avatars was a huge stepping stone and aid to my experience with this. i genuinely recommend you do it before you try and do something like this. here is an amazing, step-by-step tutorial that needs no explaining out of the video. https://youtu.be/kpALOtLhX-Q?si=4UrhkBTIK5qYOBfS
from here, this is a much better tutorial to follow >> https://youtu.be/8mqUqob3P3o?si=14a50v88IPZx6O8Y . find yourself at the time stamp of 1:46, the previous is the steps you have already done. go back to blender if you have made it this far, lmao. click on the cube and delete that motherfucker.
look at the top toolbar. it says things like file, edit, render, window, etc. you want to pick edit and scroll to preferences. youll see many options but youre going to want to click add-ons on the left. then, at the top left, click install. go to DESKTOP and click XNALaraMesh.2.02.zip and click install add-on from file on the top right. make sure its the ZIP. this is gonna bring you to a menu with potentially many other downloads. scroll down till you see XNALARA if so. MAKE SURE IT HAS A CLICKED CHECK MARK ON THE LEFT.
go down to the three bars on the bottom left and make sure to save preferences. you can then close that and go back to blender. it will now be one of your downloaded add-ons available! go to the top left again and hit file, import, and XNALARA / XPS. itll hover and youll see another option. make sure to pick XNALara/XPS Model (ascii./.mesh/.xps) . click it and pick Load an XNALara model file.
this will open up your file explorer within blender. click desktop and click on the higgs model you saved earlier. clicking it will lead to 2 files, click xps.xps . press Import in the top right. it will take a hot minute to pull everything into blender, be patient. once its imported scroll inwards and look at the son of a bitch. the rig is gonna be highlighted orange and hes gonna be gray. click to anywhere other than the model and face the enemy.
due to the shading settings, his textures arent showing. simply go to the top left where you see 4 ish circles, the second one should be selected. select the one to its right, viewport shading, and give it a second to load his textures in. its gonna look nothing like him. youre gonna have to fix the textures, brave soldier.
--
will post another tutorial if you decide to go through with this or if anyone does because unpacking all of that is such a pain in the ass but i promise it isnt rocket science. just not gonna do it if it isnt asked for because i spent 3 hours figuring out how to fix it the first time i imported his model -- the creator says nothing about this on the download or how to fix it unfortunately and its quite janky :(
if you even made it this far in reading, congratulations, youre a winner. IF YOU HAVE ANY QUESTIONS AT ALL PLEASE FEEL FREE TO ASK and i will answer them to the best of my ability.
SAVE THE IMPORTED MODEL TO REVISIT!!!!!!
#this took me so fucking long lmao#xnalara#blender#3d model#3d art#3d modeling#blender3d#ds higgs#higgs monaghan#higgs#death stranding higgs#tutorial#tut#tutorial blender#blender tutorial#xps#xnalara xps#Youtube
22 notes
·
View notes
Text

blender lighting tutorial + tips.
requested by @thecrimsonsimmer + recommended viewing: youtube video one, two, three, and four. this post will be dealing with newer versions of blender (2.8+) and cycles since that's what i'm more familiar with + commonly used for rendering. this is coming from me as an artist with some dabbling in photography and things i've learned in college!
references and setting the mood
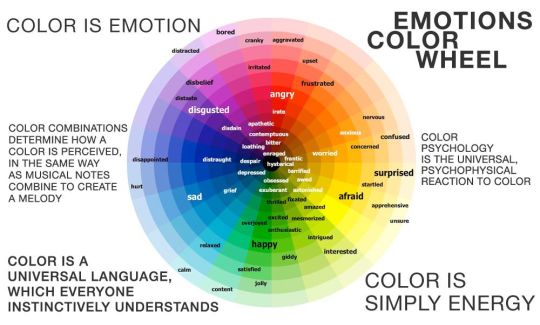
are you basing your render on an existing photo? study the light source and what direction it's coming from: that's what's going to tell you your set up for a similar effect. if you're not basing it on an existing piece, a good start is knowing How you want to set your subject (your sim) up - do you want them to be in the spotlight? are they in a specific environment that has neon lights? are you going for moody or something fresh, bright? definitely look up colors and their meaning (color theory, movie screencaps, etc.) to create a stronger image!
using resources to start the set up
it's always a good thing to mix your tools with different communities, such as the art community! many have lighting tools to figure out how to color their subject, such as this free-to-use head figure that depicts where the lighting source should be placed.

there's also the photography community and teaching people how to set up their lights for certain setups. video three and four linked in the beginning are from photography viewpoints.
spot? area? point? sun?
let's think of the lighting types as objects - a spot is like a plain lightbulb, area is a reflective sheet, spot is a flashlight, and the sun... well is the sun!
a spot is similar to an area light, but triangular/a cone. think of a helicopter search light, it's focused on a small area with the most light concentration. these can be used for lamps with lampshades, car headlights, or a lighthouse.
an area light is great for lighting up technology. a phone screen, tv screen, tablet, anything that's an LED screen emitting from a surface. the light is not as concentrated as a spot and is meant to cover more flatly (hence the rectangular source)
a point is best used for small pops of colors such as candlelight, lamppost, lightning bug tail, etc. a small source that has nothing covering it.
a sun covers the entire area and can be used as the overall mood setter. it can create filter over the entire render by just shifting the color like you would see in a movie. you'll be given a line with a sun light that gives the direction of where the sun is coming from. basically a spot light just on a much larger scale LOL.
power + coloring

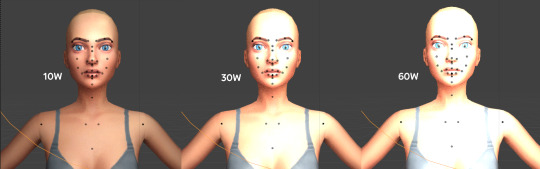
this screenshot is mostly what you'll only use to start off with. watts is the unit of measurement and the higher you go, the brighter the light will be. examples with a white colored point light 10W-20W: general portrait lighting 30W-50W: bright source, close flashlight for example 60W+: blinding
coloring is just like the system for in game lights for ts4. shift it to whatever you want it to be (click the white bar, that's the color preview) and mess around with the vibrancy. the darker, more intense color, the less it's going to appear on the sim.

closeness and intensity
similar to what's shown in the head lighting tool shown earlier, the closer the light is, the more that specific area is lit up. go too close and your sim could be completely washed out. it helps to change the size of the light (change with the radius slider) to better imitate what you're wanting. the larger the radius, the more diffused and softer the light source will be. close + small = very clear of the light source shape, can obviously tell where it is in relation to the subject far away + large = soft lighting, more of a hazy lighting of the color you choose.


to quickly adjust the light, press "G" and hold down your middle mouse button to adjust which axis you'd like to edit along. green is the x-axis, blue is the y-axis, and red is the z-axis. you can also press "G" and type the letter of the axis you want to use. drag the mouse to change the placement on that specific axis to however you want. if you want to freely edit the placement, just press "G" to move it out of the axis bounds.
world lighting
take this step as setting your canvas color before you start painting. in order for the values to look their best, change the world color to the same hue of the color you are mostly using. for example, this is set in a red-toned environment:


this is essentially changing the cast shadow onto the sim. the default is gray and will muddy up your undertones if not changed properly. for this instance, if you were to still use the same red point light in a gray world color it'd look like this:

of course, this will be based on if you have an environment image or not that can affect your lighting overall. this post is based on the fact there is no environment image and what not! if you need a visual demonstration on how to mess with the world lighting, check out this short video.

i hope that helped anyone beginning to render or wanting to light up your own scenes! i'm no rendering expert, but here's some of the helpful tricks i've learned and collected over the years<3 if you have any other questions feel free to send an ask!
#ts4 blender tutorial#sims 4 blender tutorial#ts4 render tutorial#sims 4 render tutorial#lighting tutorial#lyko posts#tutorial#long post
249 notes
·
View notes
Text

Morph Madness!
Fixing Exploding Morphs
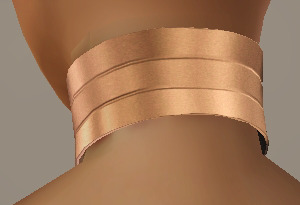
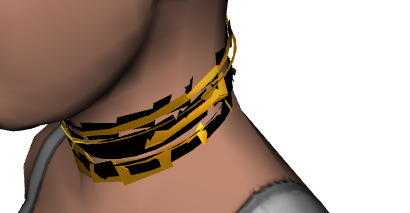
Marik's Egyptian Choker is currently in production. It is the first accessory I've made that involves assignment to more than one bone and morphs for fat, fit and thin states. So there is a learning curve, and it is during that learning curve that interesting and unexpected things can happen.
As with my other content, I'm making the choker fit sims of all ages and genders--that's 8 different bodies.
Adding fat, fit and thin morphs multiples this number to 27 different bodies.
I'm also making 3 levels of detail for each of these. The number comes to 81 different bodies, 81 different bodies for which I need to tightly fit a cylinder around the neck and avoid clipping.
That's a lot of work. I can see why most custom content creators stick with one age, gender and detail level. At least, they did in the past. Our tools are getting better day by day, and that may partly be because of creative, ambitious and somewhat obsessive people like me.
There are usually multiple ways to solve the same problem. Some ways are faster than others. This I've learned from working in Blender3D. You can navigate to a button with your mouse or hit the keyboard shortcut. You can use proportional editing to fiddle around with a mesh or you can use a combination of modifiers.
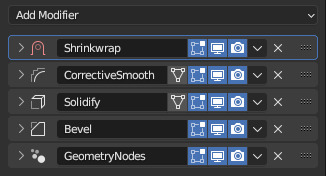
If I am going to be creating 81 chokers, I don't want to be fiddling around on each one of them for an hour. I need something automated, repeatable and non-destructive so I can make adjustments later without having to start over from the beginning. I need to work smart rather than just work hard.
This is where modifiers and geometry nodes come in. After you develop a stack to work with one body, the same process pretty much works for the others as well. That is how it became easier for me to model each of the 81 chokers from scratch rather than to use proportional editing to fit a copy from one body to the next.
But I was about to confront an explosive problem…
Anyone who has worked with morphs before probably knows where this story is headed. There is a good reason to copy the base mesh and then use proportional editing to refit it to the fat, fit and thin bodies. That reason has to do with vertex index numbers.
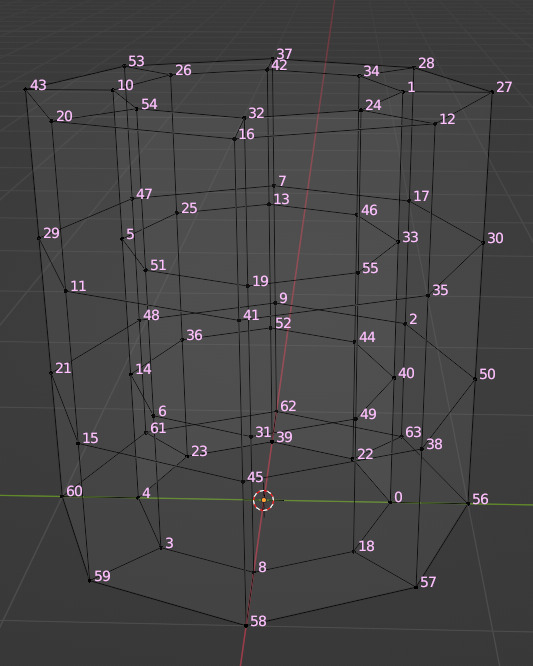
You see, every vertex in your mesh has a number assigned to it so that the computer can keep track of it. Normally, the order of these numbers doesn't really matter much. I had never even thought about them before I loaded my base mesh and morphs into TSRW, touched those sliders to drag between morph states, and watched my mesh disintegrate into a mess of jagged, black fangs.
A morph is made up of directions for each vertex in a mesh on where to go if the sim is fat or thin or fit. The vertex index number determines which vertex gets which set of directions. If the vertices of your base mesh are numbered differently than the vertices of your morph, the wrong directions are sent to the vertices, and they end up going everywhere but the right places.
It is morph madness!
When a base mesh is copied and then the vertices are just nudged around with proportional editing, the numbering remains the same. When you make each morph from scratch, the numbering varies widely.
How, then, could I get each one of those 81 meshes to be numbered in exactly the same way?
Their structures and UV maps were the same, but their size and proportions varied a lot from body to body. Furthermore, I'd used the Edge Split modifier to sharpen edges, which results in disconnected geometry and double vertices.
Sorting the elements with native functions did not yield uniform results because of the varying proportions.
The Blender Add-On by bartoszstyperek called Copy Verts Ids presented a possible solution, but it was bewildered by the disconnected geometry and gave unpredictable results.
Fix your SHAPE KEYS! - Blender 2.8 tutorial by Danny Mac 3D
I had an idea of how I wanted the vertices to be numbered, ascending along one edge ring at a time, but short of selecting one vertex at a time and sending it to the end of the stack with the native Sort Elements > Selected function, there was no way to do this.
Of course, selecting 27,216 vertices one-at-a-time was even more unacceptable to me than the idea of fiddling with 81 meshes in proportional editing mode.
So… I decided to learn how to script an Add-On for Blender and create the tool I needed myself.
A week and 447 polished lines of code later, I had this satisfying button to press that would fix my problem.

Here are the index numbers before and after pressing that wonderful button.
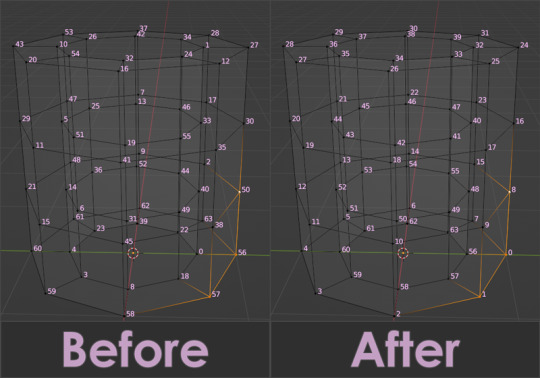
My morphs are not exploding anymore, and I am so happy I didn't give up on this project or give myself carpal tunnel syndrome with hours of fiddling.
Marik's Egyptian Choker is coming along nicely now. I haven't avoided fiddling entirely, but now it only involves resizing to fix clipping issues during animation.
Unfortunately, I'll have to push the release date to next month, but now, I have developed my first Blender Add-On and maybe, after a bit more testing, it could be as useful to other creators in the community as its been to me.
Looking for more info about morphing problems? See this post.
See more of my work: Check out my archive.
Join me on my journey: Follow me on tumblr.
Support my creative life: Buy me a coffee on KoFi.
#exploding#morph#mesh#sims 3#cc#custom content#tutorial#C:O#SallyCompaq122#mod the sims#cc creator#art process#blender#3d#add on#shape keys#sort#vertex#index#blendercommunity
88 notes
·
View notes
Note
Hello, if it's not a bother, could you explain to me how you create CC in the sims 3, I want to start in the world of CC and Blender I already know how to use, but I don't know how to transfer the blender file to one for the game. Thank you. 💜
Hi! Those are the tutorials that are helping me with creating CC:
Completely avoiding Milkshape (Blender 2.79-2.8+) / Manually editing bone assignments and morphs (Blender 2.8-2.9)
Hair Creation Start to Finish: Part 1 and Part 2
Smooth Hair Bone Assignments In Blender (written version) - It's a Sims 2 tutorial but the logic is the same for Sims 3
The Sims 4 to The Sims 3 Clothing Conversion Tutorial: A Complete Beginner’s Guide - useful to learn how to port your mesh for Sims 3
Polycount guide - A guide for beginners and advanced creators! - because it's all fun and games to make a pretty high poly mesh in Blender, but both the game and mostly PCs just can't handle meshes with absurdly high polycount
28 notes
·
View notes
Text
TUTORIAL - Changing the default layout when S4S exports a Blend file

Only found tutorials online for changing the layout when you make a new file with The Cube™, but it doesn't affect S4S-exported Blend files. This will do that.
What this doesn't cover: Actually editing the layout. You'll have to play around yourself, but you'll be able to find most things by right-clicking.
Steps below the cut!
1. Navigate to where you've installed Sims 4 Studio, and then follow this path: Sims 4 Studio > Blender > Scenes. You can make a backup of this folder just in case you want to revert the changes. I didn't do this because I didn't have the foresight to do so lol. NOTE: This is different from the Sims 4 Studio file found in Documents.

2. Open up one of the files that are relevant to you.
As stated by their names, these are the layouts for exporting an animation, CAS item, or Build item. NOTE: From a very quick experiment, I believe the difference between x.blend and x.2.8.blend is related to what Blender version you are using with S4S, with the 2.8 version applying for Blender versions 2.8+ (I use 4.0 and this tutorial doesn't work if I don't replace the 2.8 file.)

3. Tweak the layout to how you want it to be.
What I've altered in my preview: - Display Statistics - Closed the Collection 1 in the Outliner - Removed and Added Workspaces that are relevant to me - Flipped Headers to the top of the window - Removed Animation Timeline from bottom of Default workspace

4. Save the layout! If you saved a cas file, then export a CAS object to check. Saved an object file? Then check with a Build item.
And that's it :^)
NOTE: When updating S4S, you will have to replace the blend files again. Make a backup of your edited files and replace them in the Scenes folder. This holds true if you use the installer exe as well.
5 notes
·
View notes
Note
Hello, thanks foe all the tutorials and downloads!! I have a questions about Let's Create Maxis Match Clothing!. Which version of Blender did you use? Is that version still the best to use? Most tutorials I try to follow links to the newest blender that looks different than in video they show. It confuses me alot thank you :D
Hey!
Sorry for the late reply! I think for that one, it was probably blender version 2.73? or 2.75. One of those two. I used both of them a lot back when I made the tutorial :)
Though, technically speaking, if you're only using Milkshape to make the item "sims-ready", you can use any blender version! It may be a bit more confusing because after 2.8, the placements of things are completely different, plus the UI and even the shortcuts are different from those versions. So it really depends on as well how many hours of practise you have had in Blender to try using the newest one and following the tutorial :)
14 notes
·
View notes
Note
hey! i follow your smooth bone assigment tutorial and it worked perfectly. one thing though, the vertex count on some hairs exploded. i tried it on simpliciaty cassie and it went from 13k to 63k! (without any change to the polycount). any idea why?
hii! omg I didn't had that problem before 😭 but I need to say that doing the assignments with the GMDC plugin for blender 2,79 is pretty messy 🥲
I would recommend you to use blender 2.8 and it's respective version
I promise you that is wayy more easy with that one plugin version 💝 sadly I don't have any tutorial on it right now... maybe I could give it a try and make a quick tutorial about it :p
but for the moment, I can only tell you to check for any duplicates that may be affecting the polycount trough the assignment process, and in case you are struggling with it you can send me a private message with your mesh and I will check it out 😊
9 notes
·
View notes
Text
I will use carbon fiber for parts of the garment, so I want to learn about the material in advance
0 notes
Text
25- Vr Development project
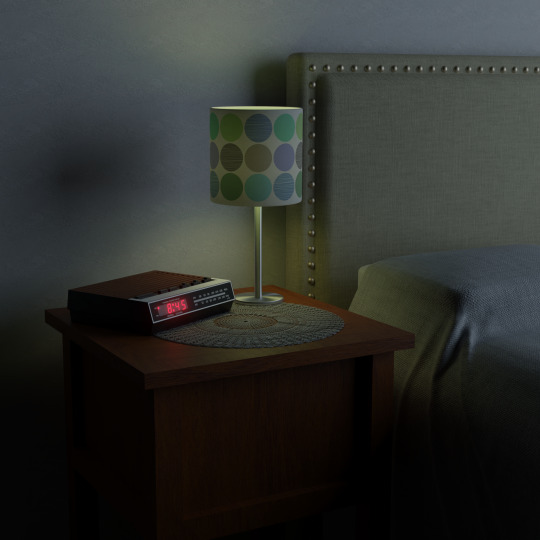
for the last post for this project the last thing that I figure out is fixing the animation of the clock to work with the new texture, so I see this tutorial about how to animate clocks.
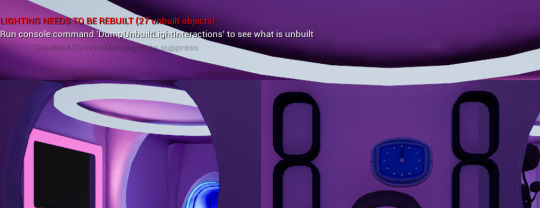
clock in game
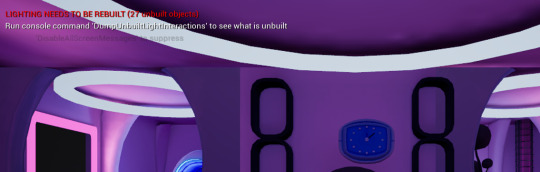
proof that is moving in game.
This are the reference that I use to make the animation:
First for the bones I use this video Blender Secrets - Easy Piston Rigging (Blender Secrets and van den Hemel, 2022)
For how to do a clock animation this video: [2.8] Blender Tutorial: Rig and Animation For Clocks - YouTube (Olav3D Tutorials, 2020)
And for exporting to unreal this one: Import Rigs & Animations (BLENDER to UNREAL) (Royal Skies, 2023)
References:
Blender Secrets and van den Hemel, J. (2022). Blender Secrets - Easy Piston Rigging. [online] YouTube. Available at: https://www.youtube.com/watch?v=st84B470kLk [Accessed 1 Dec. 2024].
Olav3D Tutorials (2020). [2.8] Blender Tutorial: Rig and Animation For Clocks. [online] YouTube. Available at: https://www.youtube.com/watch?v=lhhnUo6EjrM [Accessed 26 Mar. 2025].
Royal Skies (2023). Import Rigs & Animations (BLENDER to UNREAL). [online] www.youtube.com. Available at: https://www.youtube.com/watch?v=L4OcpF7-YB0.
0 notes
Note
hiii i love your 3d lashes and want to grow my collection lol. is it hard to convert 3d eyelashes if i'm new to converting/blender?
Hey, anon!
It's not an easy task. I recommend getting familiar with Blender's recent versions, the GMDC plugin for Blender 2.8+ and SimPE. I made a tutorial for beards, the basics are the same for lashes, but you only need to do facial morphs for the eyes!
3 notes
·
View notes
Text
A guide to extracting a CC Shepard’s headmorph as a model (for beginners)
Are you a humble CC (Character Creator) Shepard user (like me)? Do you want your Shepard’s head as a 3D model (like me)?
Luckily for all of us, there is a Blender script for that, thanks to mustbetuesday (which I assume is their username; it’s the name of their website anyway). While there is a tutorial on their website on how to use it, it doesn’t go into detail on certain steps of the process (and also it mentions having to manually install UModel and use it to find and export the model, which isn't really necessary these days as Legendary Explorer makes all of that easier).
So here is a different tutorial, written in a way that beginners to ME modding and/or the tools required are able to follow. If you already know how to use these tools, you can pretty much just skim this guide. The guide mentions both OT and LE, but the files mentioned/used will be from the LE version. Note that for the sake of simplicity, I will only cover extracting the model itself and extracting textures.
(btw this is technically part 1 of an overarching guide on mesh swapping an NPC with your Shepard, but I figured that it would help to have it as a standalone guide in case people are interested in this kind of thing. Feedback is welcome!!)
Disclaimer: this guide only pertains to ME3. The script should also work with ME2 facemorphs and ME2 head models, but I haven’t really tried it yet. Maybe you can let me know how it goes if you try it with ME2 assets :)
EDIT: As of recent months, the latest version of LEX Nightly currently has an experiment in its Package Editor that basically streamlines this entire process and has you do less steps (and you don't even need Gibbed for it). I haven't tried it personally yet, but I think those who are familiar with the Package Editor would find it a lot easier to deal with lol.
What you need:
A PC copy of Mass Effect 3, or Mass Effect Legendary Edition
Blender version 2.8 (You can grab it here)
A PSK import/export script for Blender (I use this one personally for 2.8)
Legendary Explorer (You can grab it here. Alternatively you can download it via ME3Tweaks Mod Manager under the Tools options)
A ME3/LE3 save of the Shepard you’d like
(ME3 saves are located in Documents/BioWare/Mass Effect 3/Save)
(LE3 saves are located in Documents/BioWare/Mass Effect Legendary Edition/Save/ME3)
ME3 Gibbed save editor (You can grab it here. The recommended version is from Nov. 14, 2015)
Trilogy Save Editor (You can grab it here. Alternatively you can download it via ME3Tweaks Mod Manager under the Tools options)
The Blender head importer script (You can grab it here. Make sure to get the 2.8 version)
The base head model for male/female Shepard (I’ll go into detail on how to get this one later)
PART A: Getting the .me3headmorph
This part requires:
ME3 Gibbed Save Editor
A ME3/LE3 save
Open the ME3 Gibbed Save Editor. It should look like this when you first open the editor:

The save editor will automatically locate the directory for the OT ME3 career files, meaning that when you click Open, it will list all of your careers. This is useful for those using OT ME3; not as useful for those using LE3. Instead, what you want to do is click on the arrow beside the Open button, which will give you two options. The one you want is the “Open from File…” option:

From there you’ll be able to navigate to your saves and open the save you want. By default it’ll open the directory for OT ME3 saves. You may have to navigate manually to the LE3 save directory. While Gibbed save editor was originally made for OT, LE saves have the same filetype and will load normally.
Once your save is loaded, it will show the basic info for that save, like this:

The tab currently open is the Player > Basic tab. Navigate towards the Appearance tab. It should look like this:

What we’re getting here is the .me3headmorph, so you can ignore the other stuff for now.
Click on Head Morph, then “Export to File…”:

Save it wherever you like. It will save as a .me3headmorph file. Great! You now have the headmorph of your Shepard.
PART B: Getting the base head model
This part requires:
Legendary Explorer
You have the .me3headmorph of your Shepard, but you also need the base head model before you can actually apply that data. For this, we’re going to need the CC base head model.
Legendary Explorer (LEX) is the modding toolset for Mass Effect and Mass Effect: Legendary Edition. You can use it to view, browse, edit, or export any file from both the OT and LE versions of the trilogy. LEX has a tutorial wiki covering a variety of modding topics for those who want to try modding the game, but for now all we’re going to do is export a 3D model.
When you first open Legendary Explorer, it’ll look like this:

Click on the “Meshes & Textures” tab. You will get these programs:

Open Mesh Explorer (abbreviated as MSH). You’ll get this:

(If it’s your first time using Mesh Explorer, you won’t have anything under “Recently opened items”. Also, read the Welcome page, as it has some useful info.)
To get the head mesh you need, you’ll have to open the Package file it’s contained in. Normally you can search where the assets are located using the Asset Database (a different LEX program), but for the sake of the tutorial I’m just gonna go ahead and tell you the package file you need.
Go to File > Open, and if it doesn’t automatically open to the appropriate directory, navigate to your game’s directory. It should look something like this:
Origin Games\Mass Effect Legendary Edition\Game\ME3\BioGame\CookedPCConsole
(Steam users, refer to your game’s file directory path by right-clicking your game in your library, then go to Manage > Browse Local Files.)
Locate and open the file BIOG_MORPH_FACE.pcc. This is what you’ll see:

There are multiple base head models here, but the one you want ends in _CC (so HMF_HED_PROCustom_MDL_CC and HMM_HED_PROCustom_MDL_CC). The models that start with HMF are the female models, while HMM is the male models. When you click on the models on the left, they will render on the right:

To export these models, right-click on the entry you want on the left, then click on “Export Mesh to PSK with UModel”:

Save it in any directory you want. After that it will ask for the output format. Just select “psk” and click OK.
(btw, if this is your first time exporting with UModel, LEX will automatically install UModel for you.)

Once that’s done, File Explorer will automatically open to the directory you saved your model in. A folder named after the package file you exported the model from will be created, and inside there will be three subfolders. The model will be in the SkeletalMesh3 folder.

Congratulations! You now have the base head model. Now it’s time to put it all together.
PART C: Putting it all together in Blender
This part requires:
The .me3headmorph file you exported in Part A
The head model you exported in Part B
Blender
(Make sure your scripts are installed!! If you don’t know how, follow these instructions (just ignore the “Open Blender 4.0.0” part, it should still apply to 2.8))
When Blender is open, delete all the default items in the scene (the cube, the camera, and the light source). Once that’s done, go to File > Import > your PSK import script, then import your head model. (If you’re using a different script than the one I’m using, there may be an option to scale down your model. Make sure this is unchecked.)
Now your scene should look something like this:

To hide the bones for the head model, click the eye on your imported model on the top right.
IMPORTANT: Once you import the head model, DO NOT MOVE IT!!! This will mess up the face import. You can move the model after you do the face import.
If you look on the right of the scene, you should see a section called “Mass Effect Face Importer”, which is located under the Object tab (this tab should be displayed by default). Expand the face importer and you’ll get this:

Click on the file button and navigate to where your .me3headmorph is located. Click “Accept,” and your .me3headmorph’s path will be loaded. When you’re ready, make sure your head model is selected, then click “Import HeadMorph”.
And boom!!! You should now see your Shepard’s headmorph applied to the model. For comparison, here’s the male base head before and after I imported John’s headmorph:

And for further comparison, here’s John’s face in-game:

So there you have it! You now have your Shepard’s head as a 3D model. From here you can save it, export it, edit it, do whatever you want with it. It’s your city now.
….But also I said I’d cover extracting textures so-
PART D: Extracting your Shepard’s textures
This part requires:
Trilogy Save Editor
Legendary Explorer
So you may notice that this guide requires two different save editors. The reason for this is that Trilogy Save Editor (TSE) does not export your headmorph in the filetype required for the script. That being said, It’s much easier to view Shepard’s headmorph data in TSE, hence why we’re using TSE for this part.
(Also, TSE is referred to in a lot of customization mods, so if you use hair or headmorph-related mods you’ve already used TSE in one way or another.)
When you first open TSE, it will look like this:

Click “Open,” and File Explorer will automatically open to Documents\BioWare. Follow the usual steps to getting your save.
When you load your save, it will look like this:

Currently, it’s on the General tab. Click the Head Morph tab to display your selected Shepard’s headmorph.

(Oh yeah, you can also get the file path for your Shepard’s hair mesh if you wanted.)
What’s nice about TSE is that it displays an asset’s file path. The first part of the file path will always be the Package file the asset is placed in.
For textures, click on Texture Parameters to expand the list. To display the parameters for each entry, simply click on each entry to expand it.

In this particular example, HED_Diff is the diffuse texture for Shepard’s face. The package file for this particular diff is found in BIOG_HMM_HED_PROMorph, and the filename for the texture is HMM_HED_PROBase_Face_Diff_Stack. Typically, this means you now have the info needed to open the file in Package Editor and locate the file yourself.
But there’s an easier way, and I mentioned it already: The Asset Database.
On the LEX menu, click the Utilities tab, and click on Asset Database (abbreviated as ADB)

If this is your first time using the Asset Database, you’ll need to actually build the database before you can use it. Each game needs its own database. You should be able to build these by going to Database and selecting “LE3 Database,” then click “Generate New Database”.
Once your databases are generated, the window should look like this:

To look for textures specifically, click on the Textures tab.

Take the name of the texture you need and paste it onto the search bar on the top right. It will automatically filter the file list to the files that contain the name. To view the texture in the middle, click on “Toggle Texture Rendering”.

Whoa, now you can see it! On the left is each individual file containing the name you searched. On the right are the usages – a list of the Package files containing that specific file. (NOTE: Package files from mods are highlighted in red. Vanilla Package files are in black.)
To export the file, click “Export to File,” where you can save it to any directory. You can save the texture as either a PNG, a DDS, or a TGA.
And there you have it! You now have your Shepard’s face textures. You can repeat this for all the textures you need. Note that some of the textures have alpha channels, which will come into play if you decide to edit them. Some textures, such as the eyebrows, may not actually be diffuse but rather normal textures. This is due to the way they’re applied in-game. But that’s a topic for a different guide :)
If you do decide to edit your textures by baking in the colours, you can go back to TSE to view your Shepard’s headmorph again, but this time expanding Vector Parameters. Here’s what it’ll look like:

(All the vector parameters have the option for inputting RGBA values as well as selecting a colour via colour wheel.)
If you’ve gotten this far and successfully followed the steps, then congratulations! You’re well on your way to making self-indulgent content using your beloved Shepard characters and/or learning how to mod Mass Effect in general. If I get around to making more guides (read: if people want them), I’ll get into more detail on other things, particularly on how to mesh swap your Shepard into the game. For now, extra notes:
If you need extra advice on mesh or texture modding, I recommend joining the ME modding Discord. Here’s the invite. There are people there who actually know how to texture/mesh mod better than I can lol
Alternatively, here's the Github wiki for LEX modding tutorials :)
This is mostly a comment, but I am so glad the 2.8 version of the script exists. Back when I first did this I had to use 2.7 and it took a lot longer, especially with the way it affected UV maps. Luckily the 2.8 version doesn’t affect the UV maps, and in fact made this entire process much easier and less archaic.
Incidentally, the reason why I learned how to extract CC Shepards from the game wasn’t even for ME modding. It was for XNALara. Anyway here’s a meme:

34 notes
·
View notes