#copy sam file using cmd
Explore tagged Tumblr posts
Visit Tumblr Blog
Explore Tumblr blogs with no restrictions, modern design and the best experience.
Last Seen Tumblr Blogs


Fun Fact
BuzzFeed published a report claiming that Tumblr was utilized as a distribution channel for Russian agents to influence American voting habits during the 2016 presidential election in Feb 2018.
Link
0 notes
Text
Clc Workbench Download

This page contains directions on how to connect your CLCbio Genomics Workbench to the CLCbio Genomics Server installation on HTC cluster, allowing you to offload analyses to the cluster
Clc Main Workbench
Clc Genomics Workbench Software Download
Clc Workbench 20 Download
Clc Genomics Workbench 12 Download
Compatibility
We currently maintain two clcbio servers: clcbio.crc.pitt.edu and clcbio-stage.crc.pitt.edu.
Download CLC Main Workbench (64-bit) for Windows to make a large number of advanced protein sequence analysis. Download CLC Main Workbench (64-bit) for Windows to make a large number of.
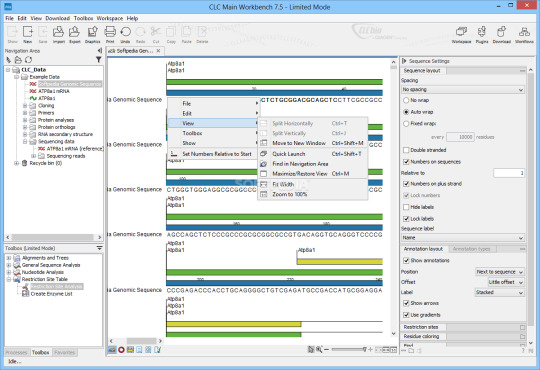
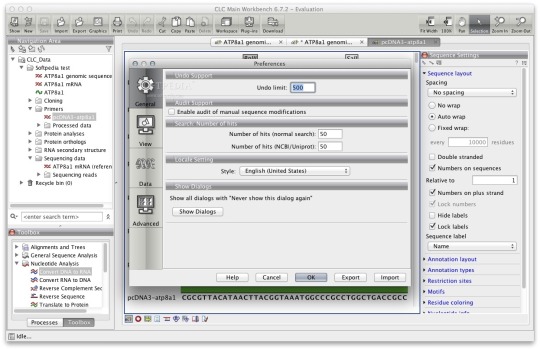
CLC Main Workbench is a comprehensive workbench for advanced DNA, RNA, and protein analyses. Main Features: - Editor for graphically and algorithmically advanced primer design. Assembly of DNA sequence data. Molecular cloning. Advanced RNA structure prediction and editing. Integrated and advanced gene expression analysis.
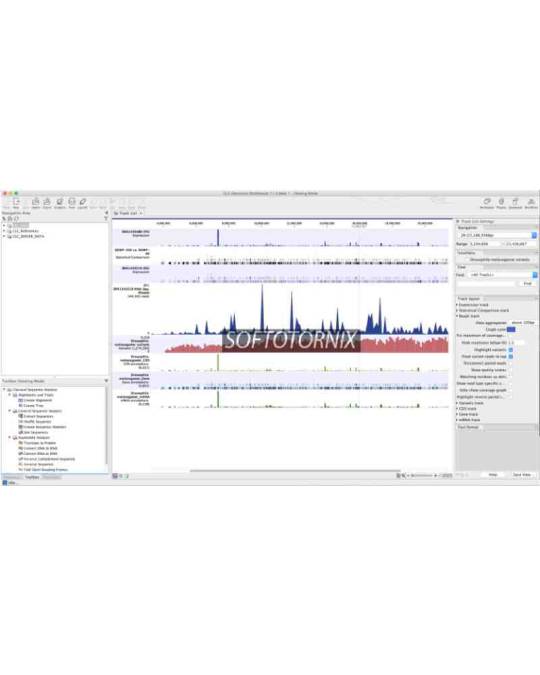
CLC Genomics Workbench is a comprehensive analysis package for the analysis and visualization of data from all major next-generation sequencing (NGS) platforms. The workbench supports and seamlessly integrates into a typical NGS workflow. CLC Genomics Workbench is available for Windows, Mac OS X, and Linux platforms. These instructions are written for the 64 bit Linux installer script for CLC Genomics Workbench (which is a file with a name that ends in.sh) The instructions are the same for installation using the the 32 bit version, or for other Workbench versions. The only differences is the specific installation script name.
clcbio.crc.pitt.edu runs CLC Genomics Server 20.0.3.
clcbio-stage.crc.pitt.edu runs perpetual CLC Genomics Server 11.0.3.
CLC Genome Finishing Server Extension and CLC Microbial Genomics Server Extension are enabled on clcbio.crc.pitt.edu.
CLC Assembly Cell 5.0.3 is available on HTC cluster.
Compatibility
Windows 10 countdown widget. The follow are the corresponding client applications for CLC Genomics Server 20.0 clcbio.crc.pitt.edu
CLC Genomics Workbench 20.0.3
CLC Main Workbench 20.0.3
CLC Command Line Tools 20.0.3 Mythware classroom management software, free download windows 7.
The following are the corresponding clients for the CLC Genomics Server 11.0.3 clcbio-stage.crc.pitt.edu
CLC Genomics Workbench 12.0.3
CLC Main Workbench 8.1.3
CLC Command Line Tools 6.0.3
We recommend running the corresponding versions of clients for CLC Genomics Server. However, CLC Genomics Workbench 12.0, 12.0.1, and 12.0.2, CLC Main Workbench 8.1, 8.1.1, and 8.1.2, and CLC Command Line Tools 6.0, 6.0.1, and 6.0.2 can also connect to CLC Genomics Server 11.0.3. Tools that have changed between versions cannot be launched when using compatible, but not corresponding, client-server combinations.
Server plugins (clcbio.crc.pitt.edu and clcbio-stage.crc.pitt.edu)
Additional Alignments Server Plugin 20.0.0
Download Setup FileThe Sims 1 Download Free PC Game The Sims 1 download pc game is a video game of strategiclife simulationdeveloped by Maxis and published by Electronic Arts in 2000. It is a simulation of the daily activities of one or more virtual people (the “Sims”) in a. READ BELOW- If you would please like to donate to my paypal for new recording software, follow this link: https://www.paypal.com/cgi-bin/webscr?cmd=. Download Setup File. Gratis download The Sims 1 full version untuk pc atau laptop windows complete collection 100% work. The Sims 1 adalah sebuah permainan simulasi keluarga pertama seri The Sims dari Maxis / Electronic Arts. Permainan ini akan memberi Anda pengalaman emosional yang takkan pernah bisa Anda dapatkan dari sebuah video game manapun. Sims 1 pc game free download. The Sims 1 + Expansion pack (8 in 1) Simulation Games developed by Maxis and later by The Sims Studio, and published by Electronic Arts. It is one of the most successful video games series of all time. As of May 2011, the franchise has sold more than 150 million copies worldwide, and is also the best-selling PC franchise in PC history. 1) Download the 'Rip' version of the game for Windows. 2) copy 'sims' folder to a free directory on your drive. I put it into the Downloads folder to test-run it. Tomorrow I'll create a permanent folder for it. 3) Double-click the Sims executable. Should run like a charm. Windows 10 Too fast graphics card 32GB mem 8-processor CPU Ryzen.
Advanced Structural Variant Detection Server Plugin (Beta) 20.0.0 Annotate with GFF file server plugin 20.0.0 Biomedical Genomics Analysis Server Plugin 20.0.0 Cloud Server Plugin 20.0.0 Ingenuity Pathway Analysis Server Plugin 20.0.0 Ingenuity Variant Analysis Server Plugin 20.0.0
Long Read Support Server Plugin (Beta) 20.0.0
MetaGeneMarkServer 2.1.0 Transcript Discovery Server Plugin 20.0.0 Whole Genome Alignment Server Plugin (Beta) 20.0.0
View, comment, download and edit ps3 skin Minecraft skins. Browse and download Minecraft Ps3 Skins by the Planet Minecraft community. View, comment, download and edit ps3 Minecraft skins. 262 ps3 16 ps360 14 ps3yes 9 ps3ud0b3st 7 ps3002 5 ps3gameswin 4 ps3100 4 ps33 4 ps33000 4 ps3zocker 3 ps3djhero 3 ps3knight 3 ps3xd 42 ps3 skin 13 ps3 minecraft 10 ps3 ninja 9 ps3 steve 5 ps3 by 5 ps3 nickval 4 ps3 de 4 ps3 totobacap11 4 ps3 guy 4 ps3 edition 4 ps3 for 4 ps3 angi. Minecraft skin pack 3 ps3. Shop Hardware and Discs; Digital Games and Services; Official Merchandise.
Old gameboy emulator. Gameboy emulator supporting link function. PlayGuy: Windows: Freeware: Rating: 7.9 (49 Votes) Gameboy Color emulator. RetroArch Multi-platform: Open-Source: Rating: 7.6 (397 Votes) Frontend for the Libretro API, effectively a multi-system emulator DreamGBC: Windows: Freeware: Rating: 7.3 (18 Votes) Gameboy Color emulator. Free - GBC Emulator is a complete Game Boy and Game Boy Color emulator that allows you to play almost all of the games developed for these handheld Nintendo consoles, directly. Is a full-featured and super-fast emulator to run Game Boy and Game Boy Color games on the broadest range of Android devices, from very low-end phones to modern tablets. Play GBA Games Online in the highest quality available. Play Emulator has the biggest collection of Gameboy Advance emulator games to play. These GBA games work in all modern browsers and can be played with no download required. Browse more Gameboy Advance games by using the game.
Commercially available Server Extensions (clcbio.crc.pitt.edu)
CLC Genome Finishing Server Extension 20.0.0
CLC Microbial Genomics Server Extension 20.0.0
CLC workbench download link
CLC Genomics Workbench 20.0.3 for clcbio.crc.pitt.edu
Version: 20.0.3
Download macOS Installer - 292.9 MB (.dmg) http://download.clcbio.com/CLCGenomicsWorkbench/20.0.3/CLCGenomicsWorkbe..
Download Linux 64 bit installer - 320.2 MB (.sh) http://download.clcbio.com/CLCGenomicsWorkbench/20.0.3/CLCGenomicsWorkbe..
Clc Main Workbench
Download Windows 64 bit installer - 279.4 MB (.exe) http://download.clcbio.com/CLCGenomicsWorkbench/20.0.3/CLCGenomicsWorkbe..
CLC Genomics Workbench 12.0.3 for clcbio-stage.crc.pitt.edu
Version: 12.0.3 - Release date: 15. Aug 2019
Clc Genomics Workbench Software Download
Download macOS Installer - 269.6 MB (.dmg) http://download.clcbio.com/CLCGenomicsWorkbench/12.0.3/CLCGenomicsWorkbe..
Download Linux 64 bit installer - 298.4 MB (.sh) http://download.clcbio.com/CLCGenomicsWorkbench/12.0.3/CLCGenomicsWorkbe..
Clc Workbench 20 Download
Download Windows 64 bit installer - 251.3 MB (.exe) http://download.clcbio.com/CLCGenomicsWorkbench/12.0.3/CLCGenomicsWorkbe..
Clc Genomics Workbench 12 Download
Ensure you have the most up-to-date version of the CLCbio Genomics Workbench (the software should tell you if there's a more recent version when you start it, or you can check this page on the CLCbio website). Register CLC Genomics workbench here and follow the steps to connect to CLCBio workbench license server.
If you have not already done so, request a user account/allocation on the Center for Research Computing (CRC) cluster by filling out the required information on this page. Principal Investigator must be Pitt faculty, and faculty email is the faculty's pitt email. The faculty member is notified via email.
If your computer is not connected to the Pitt network (e.g. you are working from home or on a trip), or you are working from a laptop that is connected to the UPMC network, make sure you setup Pitt SSLVPN, so that you can communicate with the Center for Research Computing (CRC) cluster (clcbio servers are using HTC cluster). Make sure that 'Server URL' (4) is sremote.pitt.edu, and 'Please select a Role' (14) is Firewall-SAM-USERS-Pulse. Note that there are many different VPN roles. Only Firewall-SAM-USERS-Pulse role can connect to CRC clusters. If your VPN is installed by system administrators and you are not sure what role is used, open Pulse Secure, and click + sign and follow the instructions in these figures (https://crc.pitt.edu/htc#Off-campus-access ).
Start up the CLC Genomics Workbench
If you would like to use extra plugins, click the Plug-ins button () in the toolbar at the top of the CLC Genomics Workbench window. This will bring up the Manage Plugins dialog box. Find the Plugin, click the Download and Install button, and then close the Manage Plugins dialog box and restart the CLC Genomics Workbench (choose Yes when the dialog box comes up that asks if you want to restart the workbench now). If you are using Windows machine, you may need to start CLC Genomics workbench as administrator to install Plugins.
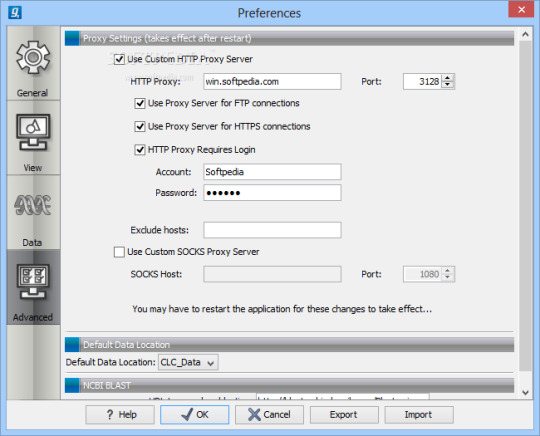
From the File menu, choose the 'CLC Server Connection' option. The Server name is clcbio.crc.pitt.edu, and the Port is 7777. Fill in your Pitt username and password, then check off the boxes to have this information saved, and to have the software automatically log in to the server (assuming the software you are using is on your own computer, and not a publicly accessible machine). Please note that username is case sensitive and all letters are in lowercase. Refer to the image below for an example of how the settings in this box should look:
Your workbench software will now attempt to connect to the CLCbio Genomics Server installation on CRC cluster. One of the only noticeable changes will be the appearance of new folders in your Navigation Area. You can find one folder named CLC_Server_Data with a blue S on the folder icon:
This is the data folder on CRC cluster, and inside it you will find folders corresponding to your group, which you should have access to (the name convention is first letter of first name + last name of the faculty):
This folder is your group's working directory. Copying files in the workbench from your local folders to the folders on the server will copy your data over to CRC (again, file permissions have been set to restrict access to your data to only those members of your group - if you need any special permissions, or if you do not find a folder matching your group, please open a support ticket on the CRC mainpage). Note that this folder is on Pitt CRC's BeeGFS parallel file system. CRC's formal policy for data storage is no charge for data storage up to 5 TB per PI. This folder is separate from each PI’s normal HPC storage on BeeGFS parallel file system.
Computational genomics tasks require various reference genome. CLC_References with a blue S on the folder icons are the folders for reference genomes. CLC_Referenes are associated with Biomedical Genomics Server, and its contents include human, mouse and rat genomes. Reference genomes for the other species are installed inside Genomes folder under CLC_References. If you need any special reference genome, please open a support ticket on the CRC mainpage).
Running an analysis on HTC cluster operates in much the same fashion as running an analysis on your own computer, however in the dialog box that opens (when you first select a tool to run), you will now see additional options:
To run on HTC cluster, always select the 'Grid' option (do not attempt to run analyses using the 'CLC Server' option as, counterintuitively, these will fail). The drop-down menu under the 'Grid' option allows you to select an appropriate grid present, to control how many cores are assigned to your job and how long the job will need to run:
'HTC Data' Grid options are designed for data import/export. Only 16 GB RAM, 1 core is assigned to the jobs. In our experience, most RNA-Seq Analysis jobs do not require more than 24 hours to complete (really most of them finish in less than 4 hours) using 'HTC Job (64GB, 4 cores, 24 hours)'. Aligning large exome data sets to a reference genome typically can be done using 8 cores in about 4 hours (even data sets with up to 100x coverage). Aligning whole genome data sets (especially those with high coverage) is best done with 16 cores, and will typically require something less than 24 hours (recent alignments of 100x whole genome data - nearly 1 billion reads - have been completed in 12 hours using 16 cores, and even larger data sets - 1.5 billion reads - completed in 24 hours using 16 cores). Note however that variant calling requires much more time than alignment (sometimes requiring almost twice as much time), but does not use as many cores. In our experience, variant calling for whole exome data sets typically takes on the order of 6 hours (using 4 cores), while variant calling for whole genome data sets takes more like 30 hours (using 4 cores). Minimizing the number of cores your jobs use, and the amount of time blocked off for your jobs is essential, as there are limited resources currently available to the CLC server.
If you think your job requires a grid preset that is not currently available, please send Dr. Fangping Mu an email: [email protected] Currently, CLC usage is managed differently from the normal account setup process for the HPC. Users may only utilize the CLC server through CLC Genomics Workbench, and do not need to set up a separate HPC account. Depending on use levels in the future, this procedure may change.
When your data is on the server or a place that the server has access to, you can choose a Grid preset.
Import tools can be used to simultaneously convert data from FASTQ format (for example) to the CLCbio format and transfer the CLCbio format file to the server. We can assign each group (faculty) an import/export directory on bgfs /bgfs/. Member of the group shared this import/export directory with read/write permissions. Please open a support ticket on the CRC mainpage if you do not find a folder matching your group.
Once you start a job running on HTC cluster, you will see the usual progress bars in the Process section of the Toolbox. When the job status is listed as 'Running', you can close your Workbench software, and the job will continue running on the remote server. When you relaunch your workbench, it will again connect to the server (as long as you checked 'Automatic login' above - otherwise you can manually log in again), and the status of your job will be updated.
Working directory and Import/export directory are assigned on /bgfs. Note that this /bgfs is not backed up, so you will need to be diligent and back up to your own personal drives.
At the moment, the CLCbio software does not provide fine control of data access at the individual user level. The access permissions are enforced at the group level. What this means is that if User_A and User_B are both within Group_Z, then both will have read/write access to data stored within the Group_Z directory.
Each group from the schools of health sciences is assigned a group quota of 5TB on bgfs. If your group requires more disk space on bgfs, please contact us.
If you have any problems with this procedure, or your jobs will not execute, please either send an email to Dr. Fangping Mu ([email protected]) or submit a CRC support ticket online (login required)
0 notes
Text
How to Enable Built-In Administrator Account on Windows 8
Windows 8 has a built-in administrator account, and it is turned off by default. You will not be able to get the Administrator symbol on the sign in the window, but there are many ways to turn it on manually. Some of the methods mentioned below are offline methods which do not need an internet connection or signing in to the administrator account.
Steps to Enable Built-In Administrator account on Windows 8 Through Command Prompt
• Click on the Windows button on the system keyboard.
• Enter the “command prompt” or “cmd” in the search box.
• You need to right-click on the symbol.
• Select the “Run it as administrator” option.
• Enter the below mentioned command:
net user administrator /active: yes
• Click on the Enter option.
• You can sign out from the Administrator account which shows as an option in the sign in the window.
Steps to Enable Built-In Administrator Account Through Windows 8 Boot Media
• Connect the USB of the Windows 8 boot media.
• Start the system again.
• Let the Windows 8 setup webpage to open.
• Click on the Shift and F10 keys together for opening the Command Prompt window.
• There are various commands which you can use, but you have to choose only one command in this procedure.
• Enter the mentioned below command:
copy /y d:\windows\system32\cmd.exe
d:\windows\system32\sethc.exe
• You need to disconnect the USB stick.
• Start rebooting the system.
• Click on the Shift button on the system keyboard provided on the login window to open the Command Prompt.
• Enter net user administrator /active: yes
• Start the system again.
• Go to the administrator account by pressing on the system, and it is not compulsory to enter a password for this procedure.
In case you are not able to go to the user account or administrator account which is not turned on, then follow the steps mentioned below to complete this procedure:
• You need to start rebooting the Windows 8 by using the USB stick.
• Click on the Shift and F10 keys together at the setup menu for opening the Command Prompt window.
• Enter “regedit” in the given box.
• Press on the HKEY_LOCAL_Machine button.
• Press to launch the File option.
• After that, choose the Load Hive option.
• Start loading the SAM file located in the D:\windows\system32\config
• You have to enter the name of the key.
• Open the below-mentioned folder:
HKEY_LOCAL_MACHINE\[key name]\SAM\Domains\Users\000001F4.
• Search for the F button on the system keyboard.
• You need to right-click and select the Modify option.
• Open the 0038 folders.
• Click on the delete button.
• Enter 10.
• Press on the OK button.
• Choose the key name.
• Verify and start rebooting the system.
James Williams is a creative person who has been writing blogs and articles about cyber security. He writes about the latest updates regarding mcafee.com/activate and how it can improve the work experience of users. His articles have been published in many popular e-magazines, blogs and websites.
Source - http://www-macfee.com/how-to-enable-built-in-administrator-account-on-windows-8/
#Enable Built-In Administrator Account on Windows 8#activate mcafee#mcafee activate#www.mcafee.com/activate#mcafee.com/activate
0 notes
Text
How To Fix Error Code 0xc0000001 On Windows 10 ?
Error Code 0xc0000001 – What Is It?
Error code 0xc0000001 on Windows 10 has been reported by some users when attempting to install Windows 10. When you encounter this error, the setup will be on a loop and the error message will keep popping up.
Solution
Download Available To Completely Repair 0xc0000001 Error Code
Recommended: Download the Automatic Repair Utility to correct his and other PC performance issues.
DOWNLOAD
Certified safe, virus free download. Error Tools Editor’s Choice.
Error Causes
If you encounter the error code 0xc0000001 while trying to install Windows 10, it most probably be due to corrupted installation file. However, it can also be caused by any of the following:”
Damaged SAM file
Damaged system files
File system integrity compromised
Damaged RAM
Further Information And Manual Repair
Here are some methods that will help you fix the error code 0xc0000001 while trying to install Windows 10. Do not perform these methods unless you’re absolutely confident you can do it properly. Otherwise, you might make things worse.
If you’re not that confident, consider seeking advice from a technical expert. If you can’t afford one, you may want to consider getting an automated software to fix the job.
Method 1: Convert drive/partition to GPT
If you need to manually wipe the drive and then convert it to GPT, follow these steps:
Step 1: Power down your computer and put your Windows 10 installation DVD or USB drive
Step 2: Boot your computer to the USB or DVD key in UEFI mode.
Step 3: Once you’re at the Windows 10 Setup, press the Shift+F10 keys. This will open the command prompt window.
Step 4: Open diskpart tool from CMD. Just type diskpart and enter.
Step 5: Then, type list disk on CMD again. Press enter. This will allow you to identify your computer’s drive that you want to reformat.
Step 6: Choose the drive and reformat it by typing the following on the command prompt:
select disk <disk number> (press enter)
clean (press enter)
convert gpt (press enter)
exit (press enter)
Step 7: Proceed with the Windows 10 Setup installation.
Note: when you’re prompted to choose the installation type, make sure to choose Custom. Then, choose unallocated space and click Next. This will automatically start the installation of Windows 10.
Method 2: Use Media Creation Tool to Perform Automatic Repair
Automatic Repair is a Windows feature/utility that allows you to fix certain system problems preventing you from installing or starting Windows. It works by scanning your computer system for any potential problem and tries to fix it.
Step 1: Download the Media Creation Tool
Step 2: Boot your computer using the Windows 10 DVD, or the System Repair disc. When you’re asked to press any key to boot, just press any key on your keyboard.
Step 3: Choose the right time and the keyboard type.
Step 4: Click Repair your computer. You’ll see this at the lower left corner on your screen.
Step 5: Choose Troubleshoot from Choose an option screen
Step 6: Click advanced options
Step 7: Choose automatic repair
This will automatically run the utility.
Method 3: Check Hardware Devices
Another possible reason why you are getting this error while installing Windows 10 is due to the connected external hard drives. To fix this, power down your computer. Afterward, unplug and remove all connected external hard drive. If you’re using USB device to install Windows 10, ensure your BIOS is set to boot your computer from the USB.
Method 4: Create New Copy of Windows 10 Installer
Another possible reason why you experience this error is that your copy of Windows 10 installer is corrupted. To fix this, it’s better to create a new copy of the Windows 10 installer.
Step 1: Go to this link
Step 2: Click Download tool now. Choose Run with admin privileges
Step 3: On the What do you want to do? section, choose installation media for another PC. Click Next.
Step 4: Select edition, language, and architecture (32-bit or 64-bit).
Step 5: Choose the media you want to use. If you want to use USB flash drive, make sure the device at least have 5GB of free space. If you’re using an ISO file, you need to save the file first on your computer and then burn the file to a DVD.
Method 5: Use a Powerful Automated Tool
If you still encounter these errors after performing the above methods, find a trustworthy automated tool. As long as the automated tool is powerful and reliable, it will help you fix this error.
Call On Our Technical Support Phone Number for Fix Error Code 0xc0000001 on Windows 10 by Errorcode Expert USA +1 (866) 748-5444 Right Now to Get Instant Help
0 notes
Text
How To Find Administrator Password in windows 10 using CMD
How To Find Administrator Password in windows 10 using CMD
As you Know, On the Windows 10 Operating system, We cannot know Administrator user Password. While operating the someone computer, You might have thought. Is there any Technique to Find Administrator Password, Hope You tried as well, but still, nothing got. All the Windows usernames and Passwords are encrypted in SAM and Systemfiles under the Config Folder in Windows>System32. If you try to Copy…
View On WordPress
0 notes