#cosfaqs
Explore tagged Tumblr posts
Visit Tumblr Blog
Explore Tumblr blogs with no restrictions, modern design and the best experience.
Last Seen Tumblr Blogs


Fun Fact
After the announcement of the deal with Yahoo!, there were 170K signatures of unhappy Tumblr users petitioning to prevent the sale in 2013.
Photo
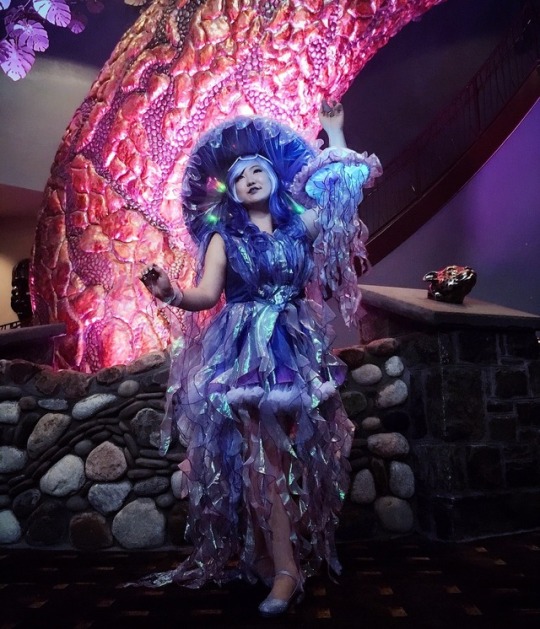
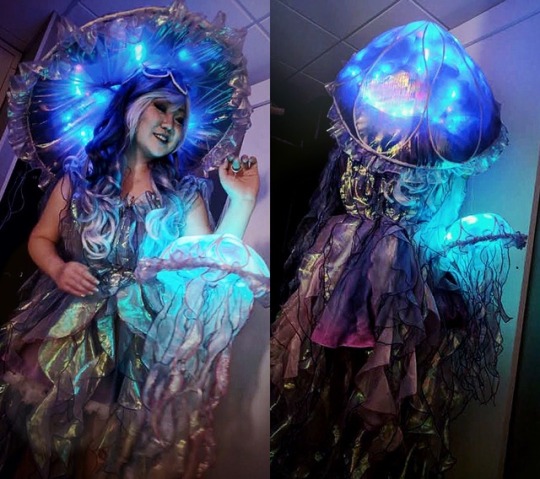
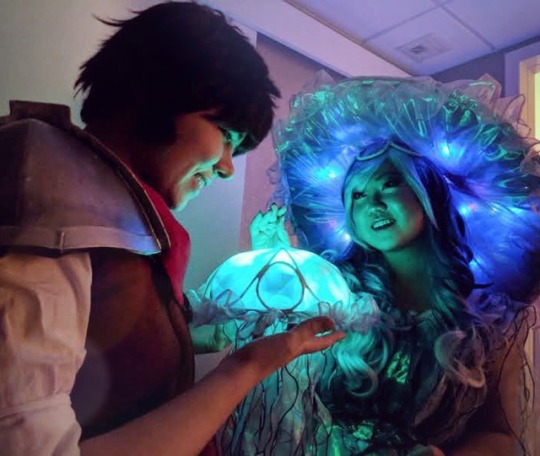

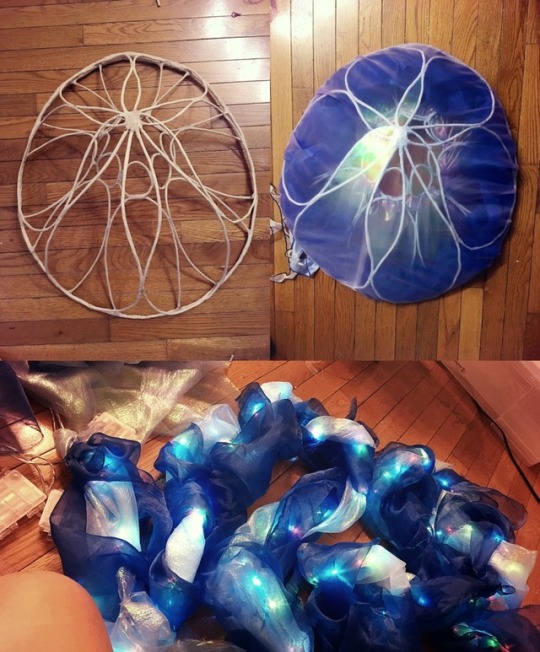
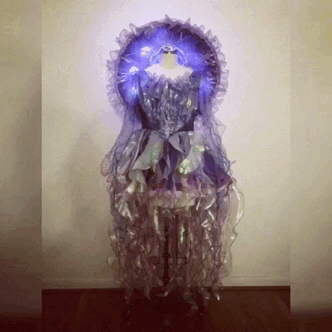

I was told by several friends and tumblr users that my Fisher the Voidfish cosplay from The Adventure Zone was being shared uncredited via pintrest and tumblr, so I hurried to put out my big compilation post faster than I usually do. I would very much appreciate it if everyone could reblog this version of the post, instead of any other post floating around that doesn’t correctly credit the costume back to me!! As an artist and a fan, it was incredibly hurtful that this happened. Although the original reposter has apologized profusely for this and properly credited me afterwards, it’s incredibly difficult to undo the damage that results from the reposting of any uncredited image in a large fandom.
All photos in this post are taken by either myself, scribblesafterdark, or by cowbuttcrunchies!! My darling Magnus is the other half of cowbuttcrunchies. I would also like to take this time to shoutout to my friend automb, who provided endless support with this costume and helped me with cutting and trimming all the tentacles on Fisher’s dress. They also made Junior for me under my guidance, while I was going nutso over the rest of the costume.
Thank you again to everyone who commented and tagged me on the other post, and I hope that everyone reblogs this version instead!!! As usual, more information about my work process will be under the cut, so if you’re interested in that kind of thing, read on! 💙
Now, I was one of the last people in my friend group to get into and catch up to TAZ, and they had all been planning to cosplay TAZ to an upcoming convention as a large group. By the time I caught up, (right before the finale!!!!!) most of the characters were snatched up and we had three weeks left before the con. I was indifferent to any particular character (I loved them all equally, not that I didn’t like any) up until I heard the Voidfish’s song to Magnus about her baby. I fell in love right there and made the incredibly rash and stupid decision to make a Voidfish costume of my own design in the three weeks before Dragon*Con.
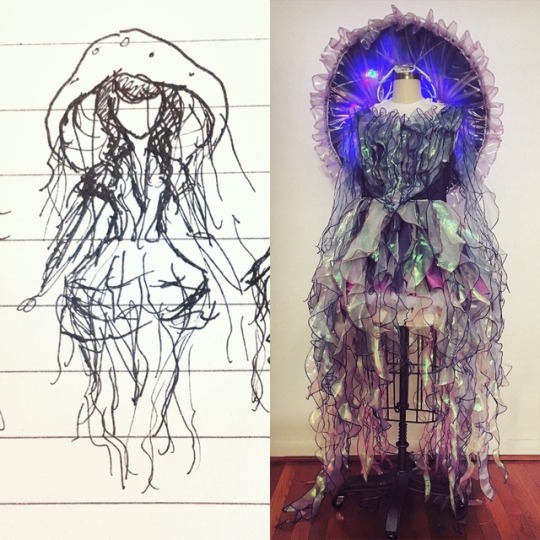
With the design process I basically knew exactly what I wanted to do from the beginning. I didn’t want to create a jellyfish inspired dress, I wanted to BE a magical space jellyfish. I avoided any decisions to make my skirt into a jellycap because it would detract from being a creature’s silhouette into being a very human one. The decision to make a headpiece instead of using an umbrella was also intentional; I wanted my hands free for posing and to hold Junior, and any wooden ducks that came my way!!
The dress base I used is made from cotton sateen and is my own pattern I drafted to fit my curves. I have a difficult body type to shop for and most commercial patterns don’t fit me without heavy alterations, so it’s much easier for me to create my own from scratch. It’s scoop necked dress with princess seams and a skirt that is hemmed slightly higher in the front than in the back. This was an intentional choice to reflect the decisions I made with the jellycap, in that I knew I wanted the cap to be balanced off center and at an angle instead of being parallel to the floor.
Once I had the dress made and added boning to the bodice, I used my airbrush and went over the whole dress to give it a galaxy aurora borealis effect. While the dress was wet in between layers, I sprinkled some coarse salt on the dress to get that sort of organic mottled look on my fabric. It was a risk that worked incredibly well in my favor after the dyes dried!!
The tentacles were all organza cut in spirals and serged on all sides. The fabric I used the most of was this glimmery, purple holographic organza from the little girls Halloween costume aisle in JoAnn’s, and supplemented with anything I found stored in my basement leftover from previous costumes!
My pride and joy and possibly the coolest item I have ever made is my jellycap!! 💙 The whole structure is a kind of cage formed from wire and Terraflex (if you follow any of my previous posts you all know that I use Terraflex over Worbla for its versatility and its availability; I can pick it up in a store near me rather than wait for it to get shipped to me), and shaped in ovals and loopies fused with itself with more Terraflex. The headpiece is very carefully balanced and the center of my head is actually towards the front of the cap, so the back is sloped longer at an angle, and is not a perfectly shaped circular dome. I think it looks much more visually interesting this way, and has the added bonus of looking like a real jellyfish from the back!!
The frame was gessoed and painted in glow in the dark paint which doesn’t glow as much as I wish it did, but the concept was cool anyways? It was then fully covered with the holographic organza and then stuffed with LEDs and strips of leftover organza. The whole cap is carefully weighted so it stays on my head without any clips!! The only way it falls off my head is if someone bumps into it while I’m walking. Automb made Junior for me the same way I made Fisher’s cap! While I worked on the bigger project, they used leftover scraps of wire and plastic to scrumble my baby together, and any leftover tentacles I had from the dress went straight to Junior.
The wig I used is an Arda wig!! It’s one of their Candy Stripers in the Nocturne color. I think that covers basically everything? As always, if you have any further questions on my work or want me to clear up any confusions in my wording, please send me an ask and I’ll do my best to reply!!!
#the adventure zone#TAZ#taz cosplay#voidfish cosplay#the adventure zone cosplay#cosplay#voidfish#my work#my cosplay#my face#posts by moi#cosfaqs
32K notes
·
View notes
Text
My Convention Tips c:
Read them under the cut! ♥
I know how nervous conventions can make you for sure! Especially if it's your first time going there's definitely going to be a lot of fear there for sure. I know you can feel a bit silly about it too, but it's definately not childish at all to be feeling this way! When I went to my first convention I could hardly sleep for the week leading up to it. I felt like I had forgotten everything that I needed and in honesty, I was scared beyond belief.
Here's some of my personal tips:
What I recommend is having a checklist, so you know for sure that you're not missing anything. I always do this and it brings off a ton of the stress! Here's a link to the one that I use: http://crazy4comiccon.files.wordpress.com/2011/06/packthislist.jpg
Also make sure to look over a map over the convention area the night before and day of. It would even be better if you got a map and printed it out to use as a reference.
At every single convention I've ever went to they had event booklets that you can pick up at the same area that you get your badge at. They have a map in them, all the events (including what time they're at, where they are, and any other important notes about them), and tons more.
And they're always a ton of people there who are working specifically to help you out if you need any help with anything. And they're completely sweet about it too!
I've always found that when you end up getting to the convention that you lose a ton of the prior stress that you had about it.
I hope that was able to help you out a bit! I know that it's always a ton of worrying involved, but just remember that conventions are made to have a ton of fun at! c:
58 notes
·
View notes
Note
seaking of horns, can you do a tutorial on how you do the horns?
i totally would except i make my horns the way my friend emilia makes them, who already has a tutorial explaining on how to make them, as well as how to mount them! it’s a wonderful tutorial that’s both easy to follow and easy to make!
The only thing i would add is once you figure out the size and shape you want from your foam core, go back into it and make it smaller and shorter (like maybe cut away 1/4 inch from every side), so when you put on the paperclay, you get the size that you intended rather than one that’s just a size or two bigger than what you wanted.
I also like to sand my horns down a bit after they dry before painting them so i can refine the shape a bit more if i’m not satisfied with my hand sculpting (depending on the textures you use, this step may or may not be necessary; for smooth horns, hell yeah sand those fuckers and get rid of your fingerprints so no one can ever pin you at the crime scene, but if you texture them like emilia then you’ll basically just be sanding away all your hard work.)
The way I texture my horns is just taking a piece of yarn or string and wrapping it/pressing it into the clay before i set them out to dry. I’ve had better success with applying the clay onto the foam and foil and then wrapping the string around it immediately, because if you wait for the clay to dry a little bit before texturing using this technique, you’ll only get a shallow dent rather than a strong , weathered cracked line. or maybe that’s what you want instead it’s all up to you ouo
I also like to seal my horns, which wasn’t mentioned in the tutorial, but i do them in a weird way. If you leave the horns unsealed there’s a higher risk of the paint chipping off as you wear them and bang ‘em around, so most people say seal them with a spray or with modge podge. i’m super paranoid about that, and while i love the vibrancy a high gloss protectant spray can give to the paint (let me tell you, it like changes your paint job from awesome to FABULOUS holy shit), i am not a fan of the glossy shine it will give you. and a matte sealant will just keep the paint protected but not do anything to make it pretty.so what i use is clear, fast drying nail polish as a sealant and when that sets, i spray a bit of matte sealant on top of that! not too much, just enough to dull the shiny glare uvu

this is the nail polish i use mainly because it dries super duper fast like holy shit this is the sonic of nail polish i’m not kidding, and also because it comes in a larger bottle if you so wish, which saves my life because instead of buying and going through 3 itty bitty standard size nail polish jars, i can just use my one big one. i get mine from the sally’s beauty supply store we have in my area but you can also order it online i’m p sure
that’s basically all i’ve got on horn-making; i hope it helps?? ;v;
edit: while I personally have had no problems using the nail polish/sealant combination, I know others have said that the nail polish cracks, yellows, or gets sticky over time. My Aranea horns are over two years old at this point and they're still beautiful and unchanged. If you don't want to use nail polish as a sealant, I'd recommend using a spray sealant such as Krylon's. They have sealants available with various finishes, so you can choose the kind you want!
#cosfaqs#replies#all of yaexrae's tutorials are great i've learned so much from her holy moly#everyone check her out because she's a fab lady and a fab cosplayer and just fab in general
30 notes
·
View notes
Note
Hiya! I'm currently working on my Henry cosplay and to say the least, I'm a bit stumped. If you don't mind helping... how would I make the bindings that are on his thighs?
OH you mean his silly thighbracelets?? well i haven’t made them myself, but my roommate cosplays tharja so at least i have hers to reference! she 3D printed hers, but i’ve seen others who made them with craft foam - it’s pretty easy to just make a gold disc!! for keeping them ON your thighs, she uses mountain squares... like the double-sides sticky squares of foam that are supposed to be for walls? but hey we do what we must for cosplay!!! :p and those will keep them in place on your legs so they dont end up around your ankles!
3 notes
·
View notes
Note
how do you cosplay troll horns??? like do you just. stick them on ??? how?
ahahahawell like, my aradia ones have this little strap so you can wear it like a headbandi weave it through my wig sometimes so it doesn't showand like other horns i usually either put them on a headband or glue them to snaps and clip them through the wig from the other side
2 notes
·
View notes
Note
Just a question about Cosuuuplayy. For your Doctor princess cosplay did you buy your green tights or buy them?
I'm going to assume you meant "dye them" for the second answer!
I bought them! The colour of them are definitely inconsistent in the photoset I put up but the best colour I achieved was by having Joe Fresh green tights, then layering Urban Planet (I think!!) pale green tights over them!
Dyeing the tights just didn't sit well with me since it could definitely come out inconsistent!
If you need a specific colour for tights there's shops like We Love Colors that sell them! And for socks in general Sock Dreams is reliable! (both are quite pricey in my cheap-as-dirt range for cosplay haha, overall I only spent $6 for my legs)
I hope you don't mind me posting this ask!
1 note
·
View note
Note
Hey! I read your brief tutorial/explanation (which is a lifesaver by the way!!) but I think the pieces I have are too big because they won’t lay down flat/ I can’t get them very tight. I was just wondering what kind of cord/straps you used to make them so flat and if you remember about how long they were to start in order to still get a good belt length. Thank you <3
My Joanns happened to have a pleather trim that was already flat and ready to go when I braided it! When I wove the edges, I folded them over at the sides before crossing them in the center, if that makes any sense!!
As for the length, I can’t remember 😞My thinner belt took up less length than my wider one, but I basically took all the trim I bought, prayed to the gods and chopped off pieces that were a bit longer than my desired belt length and somehow it worked out!! I did end up extending the belt ends with some leftover fabric from my bodice in order to secure the buckles, but not by too much.
2 notes
·
View notes
Note
Heya, mind if I ask how you worked with the colours of your Jadesprite? It's very well balanced, and I'm looking to do something similar and have it look "real" rather than awkwardly costume-y which is so easy to mess up. The question is a bit oddly phrased, but I hope you get what I mean haha.
No problem! :) first, you’ll want to gather all the reference images you can find!! I was lucky with Jadesprite because there were plenty of color references on hand of her character.

Once you do that, sketch out how you want your cosplay to look! When you get that done, get that into your computer and open it up on photoshop or some other image editing software. As long as its got an eyedropper tool, you’ll be good (so even MS Paint will work)
This first time I did this, my friend patty helped me choose out the colors since we were trying to coordinate my jadesprite with her davesprite. What we did was eyedrop the colors from the image sources we had, and apply them onto my design.

As you can see, Jade’s colors change a lot from image to image, and that’s because of color theory and how colors react to different forms of lighting. In the Cascade flash, Jade’s colors are a lot more yellow toned than her basic green and white sprite in the comic, and this is because there are meteors exploding onto the battlefield, and everything is on fire.
A sprite’s color is the chat color of their alpha/beta/counterpart/guardian/son/daughter/brother/whatever. Jadesprite’s main color was Jake’s dark green text color, so her wig and any other accents I did were variations of or in his pesterchum color. And although we eyedropped Jade’s sprite color from the flash, later I ended up reworking both the design and the color into a more minty green that looked better next to the forest green. Remember. Color theory. Everything was on fire during the flash, making everything look more yellow than it actually was.

An important thing to consider when trying to balance the colors in your design is that you should integrate the colors throughout the entire outfit! I added a stripe down the side of the skirt to help with this, since otherwise there would just be too much of the lighter green.
Also make sure to keep your color palette consistent! Jadesprite’s main color (a dark forest green) has cool tones, while the second color I had selected before had warm tones. By taking away the warm tones (in this case, the yellows in that lime green) I had an overall cohesive image with non-clashing colors.
This is why the image editing software is so handy; you can eyedrop the main color from the reference images you have, and then create tints and shades from that color to create a good color palette for your design.
In your other ask you specified wanting to make a colored Tavrisprite, so i would say use John’s royal blue text color (a warm tone) to start with, and create a medium shade and a pale shade to work into your design. Try not to let your colors get too close to Jane’s cyan blue text color (a cool tone)!
I hope this helps, and I wish you luck!!
#skepsbrott#homestuck#homestuck cosplay#jadesprite#cosfaqs#reference#look a tutorial by me#not..really much of a tutorial but w/e
80 notes
·
View notes
Note
Umm, so I'm making a Kanaya cosplay and I really need some recommendations for how to do the gray skin and what thing to use. Do you have any suggestions??
I cosplay trolls a ton and I have always used Snazaroo in Light Grey. Unlike other grey body paints, it won’t smudge and get all over your clothes, so that’s definitely a plus there! You have to use water/liquid for it to activate, so I use Ben Nye’s Liquset, and it leaves it pretty much water and sweat resistant. And I apply it using a makeup sponge. Then I use a setting power and Ben Nye’s Final seal and I’m set! I’ve never had a problem at all. c:
56 notes
·
View notes
Note
if you don't mind me asking, how did you make the condesce wet-suit thing?
I don’t mind at all! uvu
Patty’s Condesce suit is just a zentai suit we purchased from ebay with pink stretch ribbon (it’s gotta be stretch ribbon, since the suit it’s stitched upon is a stretchy material; non-stretch materials used with stretchy materials are difficult to manage and don’t end up looking very good) stitched on with a plain zigzag stitch (zigzag instead of a plain running stitch, so when the suit stretches as you put it on your body, the stitches don’t break)
I used two different kinds of ribbon that I bought from here; it looks like we actually bought out the last of the stock they had for the hot pink plain stretch ribbon, but they still have the hot pink sequined trim we used in stock.
The stripe was basically the plain stretch ribbon doubled and stitched onto the suit so instead of having a width of 5/8 of an inch, we would have 1 1/4 inches instead, with the sequined stretch ribbon in the middle to 1) add a bit of bling, and 2) cover up the seam in the middle that came from doubling the pink ribbon.After that it was just some simple modifications to the suit by trimming and hemming the wrists and ankles, as well as the neckline of the suit.
If you choose to use this method, I suggest asking a friend to help you with pinning the ribbon onto your body before stitching it on; a second pair of hands and eyes will help this process go by so much easier, faster, and more accurately!
I think i covered all the details but feel free to ask me any other questions you might have!! (:
28 notes
·
View notes
Note
hi!! if this has already been asked im sorry, i looked through your whole cosplayfaq and wigs tag and i couldnt find it, but where did you get your disciple wig? and what type of fabric did you use to make her outfit? i need as much help as i can get with this cosplay, i really hope to cosplay her one day soon! thank you so much!<3 by the way, i really love all of your works!!!c:
Thank you so much!!! ;v; I’m so glad you like my work ahhhgdfkjghdg ;v;
Ahh, and this is actually the first time someone has asked me about my Disciple wig, so that’s why there wasn’t anything about it on this blog ;v; For my Disciple wig, it’s actually made up of one of Arda’s Luthien wigs and two of their long curly clips all sewn up together!
What you need to do first is to seperate those pesky plastic clips from the long curly wefts! The wefts are attached to the clips with some corded elastic, so all you have to do is untie the elastic and pull them out, so all you have left are two circles of wefted wig section to work with.
Hand stitch the two wefts together by the edges, all down one side, so you’ve basically got one large section of hair, and then attach that to the crown of the Luthien wig, or whatever long curly wig you have, and arrange the hair so the stitches won’t be seen.

Here, have a shitty diagram:
The effect that this will have will bump up the volume at the upper part of the wig, which is what you want, verses having the bulk of the fiber be at the bottom, which will make it heavier and drag the weight of the wig down on your head, letting it slide off a lot easier.
it also solves the problem of taking apart a curly wig to reweft, as I discovered with my first Disciple wig; taking apart the wefts of a long curly wigs and rewefting it into another ends up destroying the curls that have been styled into the wig and then you end up with a huge cloud of frizzy fiber that you then have to spend more laborious hours restyleing into the way you want it.

An example of what NOT to do:
^Like I said. That was my first Disciple wig, and the frizzy nightmare on the left was before i tackled it with hot water, unplugged curling irons, and a hair dryer!! I remade it since although I liked the bottom half of the silhouette, the top of the wig was pulled flat from all the weight on the bottom and so it just looked a little wonky on my head. It’s certainly one way to do it, but i really, REALLYYY wouldn’t recommend it. The way I made it the second time is so much faster and makes a lovely shape so I’d just go with that ouo
As for the fabric, I actually answered an earlier ask about the fabric I used for my Disciple!!
I hope all this helps, and feel free to ask me any more questions!!
27 notes
·
View notes
Text
eonuke asked (on my robot arm photo):
"How exactly did you do this? I want to cosplay Tavros and this would be a cool way to do the prosthetic legs."
I used Snazaroo body paint in black and white. And I kinda just had a general idea of which I wanted to create, so I just went with it. I didn't exactly have a complete method, but I started out with outlines that complemented my arm and then fully detailed and shaded it in. For just my one arm it took about 3 hours. I actually would highly recommend not to use this method for your legs though! I'd estimate (If you work like I do) that it would probably take around 16-18 hours to complete painting it on only once. And ain't nobody got time for that. (Unless you're planning to have you legs painted for the next 10 years of your live, then I would consider that amount of time a possibility.) It would probably cost you around $25 worth of body paint for one single application. (Which is horrible.) A method I would completely recommend is craft foam armor! I've seen many tutorials online on how to make it. And it's super easy, cheap, and incredibly awesome. On the plus side, you'll be able to wear it a ton, compared to body paint which you have to completely re-do each time you wear it. I've actually seen quite a few Tavros cosplayers with legs made in this way, and it looks incredible! (And 100% canon looking too in my opinion!) Concluding- don't use body paint for your legs if you're planning on adding a ton of detail!
18 notes
·
View notes
Note
What brand of body paint and shade did you use for your Sapphire cosplay?
I used Ben Nye creme colors in white, sky blue, and cosmic blue!! I use a tedious-but-successful method of layering the colors on my skin in which the order is “white -> sky blue -> very light layer of cosmic blue -> white -> maybe another layer of sky blue, depends on what your colors look like”The tedious part comes in when I switch from using a brush to messily, lightly and streakily apply makeup for the first three layers to a triangular foundation sponge to layer on a heavier application of color and stippling that all over my face, which ends up blending all previous layers into one consistent, smooth new color.
I could, in theory, mix my own Sapphire color using the colors i mentioned above and save myself a lot of pain but 1) I like having basic pots of unmixed Ben Nye color to use for multiple costumes, and 2) this method of application gives me an easy way to control the exact color I get each time with enough wiggle room to adjust where I need to, and 3) this method gives me a nice solid application of makeup without caking it on too thick. Also 4) I am lazy. There is also that.
You could either pre-mix your colors or try it my way, but be prepared for it to take a while if you try it the second way ahahah. Don’t forget to set your makeup with some sort of powder and to seal it!! I use Ben Nye’s Neutral Set setting powder with Ben Nye’s Final Seal setting spray for all my body makeup thingies.
#makeup#cosfaqs#reference#steven universe#sapphire#replies#look a tutorial by me#okay it's a really detailed ask not really a tutorial whatever
16 notes
·
View notes
Text

Hi!! I've answered this a while back, but for my horns I basically follow yaexrae's horn tutorial step by step, and then diverge from it once it gets the part about texturing. I also detail my own personal process here a little bit, but there aren't really any pictures I'm sad to say.
You can also substitute the expanding foam core with any other type of foam really, but i'm most comfortable with the expanding foam so far; it carves very easily for me!
13 notes
·
View notes
Note
I know you cosplay so I was wondering do you attend cons what do you attend? any good ones you recommend if you do?
Emerald City Comicon, Sakura Con, Fanexpo Vancouver, Anime North, Anime Revolution, Kumoricon and��Aki Con are the conventions that I attend every single year. Though, I often attend different cons though depending on what happens (ie- if I have enough money, if I have other plans, if I’m able to travel a long distance, how long the con is) Though, my favorites would have to be Sakura Con and Anime North! They are both fantastic conventions that are a ton of fun, have a ton of different activities going on at all time, have a ton of gorgeous cosplayers and tons of attendees. <3
12 notes
·
View notes
Note
I-I must know *crawls* I've been searching for God Tier pants because leggings show everyone my business v.v What did you make your GT rose pants out of and if you didn't make them where is the holy place you've acquired them from?
I bought them from amazon!! This is the link for the tights that I bought, but it looks like they’re running out D:
They’re really really comfy and super thick and warm, like they’re made out of some sort of fleecy knit?? so they’re not like tights or stockings, but like thermal leggings they’re so freaking warm uvuI chose these specifically because they looked like they weren’t a super bright orange (and i was right!) but if these run out of stock before you can get some then just browse around, i’m sure there are other sellers who will have orange leggings for sale ouo
10 notes
·
View notes