#cube.. rotat e...
Explore tagged Tumblr posts
Visit Tumblr Blog
Explore Tumblr blogs with no restrictions, modern design and the best experience.
Last Seen Tumblr Blogs


Fun Fact
70% of Tumblr users say the Dashboard is their favorite place to spend time online.
Text
☆The First Rule Of Book Club: You Do Not Talk About Book Club ☆
Synopsis: Thorn and Sebek, from enemies, to frenemies, back to enemies, right? One of the first of many of Thorn and Sebek's book club shenanigans.
Word Count: 1,982
Notes: I love Pride & Prejudice, could I make it any more obvious? I've teased some of the features in this fic way back in my twst baby names post.
. ݁₊ ⊹ . ݁ ⟡ ݁ . ⊹ ₊ ݁.
Grim entered Ramshackle’s lounge and ‘slammed’ an envelope sealed in dark green wax bearing Diasomnia’s crest onto the coffee table. “This has got to be from that loud mouthed guy - should I just burn it?”
I chuckle at Grim’s sentiment - it's no secret that Sebek and I often butt heads, we often rub each other the wrong way, and on occasion argue, but I don’t think we’re enemies by any means.
Like that time in the library, where I got so fed up with him adding ‘for a human’ and the end of all his ‘compliments’ that I bit him and told him if he didn’t obey all my commands, by the next full moon he would become a magicless human. And for some reason he believed me and it snowballed into a crazy rumor, and became a huge mess where Diasomnia got involved… It was nuts.
Or that time at the stables where he tried to get back at me for telling him to fall off his horse, so he said, ‘perhaps it is YOU that should ‘eat manure and die’ and I responded, ‘eat shit and live Sebek.’
And most recently was gym class, we had to rotate between a few sports like volleyball, badminton, and basketball, and somehow, he always ‘accidentally’ managed to hit the back of my head with projectiles. I filled his gym bag with ice cubes and put my ice pack down the front of his pants.
I squint my eyes at the memories. ‘Maybe we are…?’
“Let’s read it first to check who it's actually from.” I opened the pristine white envelope to reveal aged cardstock, written in non-too refined scrawl but the alternating green and silver sparkled ink was a nice touch. I think someone possessed Sebek though, all the little hearts floating around are just plain goofy and so unlike him.
{DEAR♡ST HUM♡N,}
{IT IS ♡NDER THE GUIDANC♡ OF MY M♡NTOR ♡ILIA THAT I CORDIALLY} {♡NVITE Y♡U TO THE DIASOMNIA LOUN♡E TO PA♡TAKE IN O♡R ♡OOK} {CLUB.}
{AWAITING YO♡R CO♡RESPONDENCE,}
{- ZIG♡OLT.}
Grim and I turn to one another. “This has got to be some sort of prank! No sane person writes like *that.*” Grim points his paw at the discarded letter.
I shrug. “I guess I’ll find out after classes are over today.”
“Count me out of it!” Grim shouts.
. ݁₊ ⊹ . ݁ ⟡ ݁ . ⊹ ₊ ݁.
‘Since I can’t find my missing sock at the dorm, I probably dropped it here. It shouldn’t be too hard to spot.’ Searching by the riverbed, embedded behind the school, many of the trees are barren and the ground is blanketed in warm shades of browns and amber from the fallen leaves.
As I examined the area, a few bunnies hop diagonally from me, I can’t help but to follow them with my head and spot a silver headed person resting against a stump. ‘Is that…?’
Squirrels, bunnies, and songbirds gravitate around Silver - some even nestled on and around him like a shield against the cold. I crouch down next to Silver and place a hand against his forehead to see if he’s alright. Slowly he stirs awake and looks up at me.
Instantly I’m mesmerized by his eye color. I’ve always thought Silver’s eyes were similar to a mellow violet, but up close, it's almost as if there’s waves of pink and blue. “Whoa your eyes… They really are like an aurora.”
Silver remains silent for a while, until he gives a soft smile. “Your eyes are like starlight, comforting grey with flecks of gold.”
Shyly smiling, I extend my hand to Silver to help him up. “I was just checking to see if you were alright, there’s frost in the air, it’ll snow soon. If you sleep out here, you may end up buried or sick.”
“That’s very responsible of you…You’re Thorn Silvanus right?”
I nod. “And you must be Silver.”
Silver yawns. “I’ve heard a lot about you from Sebek, whether I want to or not. I hope you don’t dislike Sebek or feel turned away from Diasomnia.”
I let out a hum as I walked with Silver. “I don’t dislike Sebek, I think him thinking my mere existence a scandal by calling me human is funnier more than anything. It's fun to tease someone so serious.”
Silver chuckles. “Oh yes, fa-Lilia and I often tease Sebek too.”
I rub my arms together to warm up. “I’m not sure what Sebek’s issue is with humans though. The way he separates himself from them… Constantly elevating anything related to fae and putting down human stuff it's like he’s projecting? I know he probably looks down on me as much as any other human, but I don’t feel envious of those with magic or jealous of fae… It’s like he has internalized racism?”
Silver’s eyes widen to the point he looks actually awake. “You got all of that from his thundering speeches?’
I lightly laugh. “I do read a lot, but that’s just speculation on my part, I could be entirely wrong.”
Silver places his robe overtop of me. It's my turn to look caught off guard. “You looked cold. My animal friends have kept me warm, wear it until we reach Diasomnia. I’ve heard Sebek was expecting you.”
“Did you have a choice not to?” Silver and I laugh as we walk to the mirror chamber.
. ݁₊ ⊹ . ݁ ⟡ ݁ . ⊹ ₊ ݁.
The creek of the large oak doors alerted the occupants in the lounge. Sebek’s face twisted as he spotted Silver and I. “You know one another?! And you’re both so familiar already?!”
I glance at Silver and smirk, “we’ve met before.”
“Once upon a dream.” Silver finishes.
“Fufufufu! This is a classic exchange from one of my favorite soaps! Whereas the prince charms his way to the heart of the female lead by being himself.” Lilia giggles.
Sebek squawks and says, “THERE’S NO WAY SILVER WOULD HAVE ANYTHING TO DO WITH THAT HUMAN!”
I ignore the comment in favor of riling him up.
I remove Silver’s coat and neatly fold it, handing it back to him. “Thanks Aurora.”
“Thanks, Starlight.” Silver gives a polite bow and walks off.
Lilia clutches his imaginary pearls. “Egad! The drama continues to unravel! What will unfold next?”
I shoot Lilia a grin while I hold out a book for Sebek. “After reading your favorite, I’d like to introduce you to mine: ‘Pride & Prejudice.’”
Sebek scoffs and loudly criticizes the novel. “Of course you’d pick one of the lowest forms of literature, a romance, second worst to comedy!”
I bring the book back to my bag. “Take this in any way you like, SHUT UP Mr. Darcy!”
Many people in the lounge have paused in their activities to bear witness the infamous ‘Sebek and Thorn argument.’ Murmurs and whispers begin to clutter the space.
Sebek was about to counter, finger raised, when Lilia reigned him in. “Might I suggest taking your qualms to your dorm room Sebek?”
Sebek blushes in embarrassment. “Fine! The lounge is unsuitable for a quiet activity anyways.”
Sebek grabs my wrist and leads me to a winding staircase.
“Unhand me you croc!” I attempt to remove my wrist, twisting and pulling, but that only leads to Sebek interlocking our fingers together.
“Be silent!” He spoke loudly.
“BUY my silence!” I glare back.
“Mind your steps, these stairs are steep!” Sebek yells back, taking the lead on the narrow staircase.
“Thanks for the head’s up!” Shortly after, our quarrel resumes.
Our bickering fades the further we go, Lilia gasps, a scheme of his own brewing. “Spicy!”
. ݁₊ ⊹ . ݁ ⟡ ݁ . ⊹ ₊ ݁.
‘Hmm. Sebek’s room is so ordinary and quite frankly boring. The dark academia aesthetic matches the rest of the castle… Dark velvet greens, books and weights, yeah bro works out at the library and studies the blade headass.’ Scanning the room, I spot a large portrait of Malleus hanging on the wall. Internally I sigh. ‘I’m not even going to ask. We know the answer.’
Without much fanfare we start reading. Sebek sits on the edge of his bed while I sit at his study desk. After a while, I decided to ask Sebek some questions while he read.
“Sebek, are you close to the second or third ball?”
Sebek let out a hum, “the second one I believe.”
Laughing to myself I tease him. “Go faster Sebek!”
Sebek frowns and goes to stand from his bed, not setting the book down. Unfortunately, Sebek is a bit of an airhead, and he trips over his weights, bumping into the furniture in the process and lets out a series of painful groans.
He quickly places himself back on the bed as if nothing had happened, his barley masked pained expression does nothing to ease my discomfort. I couldn’t help but exclaim, “OH MY GOD SEBEK! Are you okay?”
. ݁₊ ⊹ . ݁ ⟡ ݁ . ⊹ ₊ ݁.
“Hey Grim, where’s Thorn?” Ace looked around the track field.
Grim sat up. “What happened to ‘hello Grim’ or ‘how are you’? We’re not together all the time ya know!”
“Sheesh! I was only asking a question lint ball!” Ace countered.
Deuce returned with Jack, where Grim and Ace were to rehydrate. Grim was attempting to break some Maginness World Records and had taken rest atop of their gym bags.
Everyone silently looked at Grim expectantly. “Thorn’s with that green haired fae at Diasomnia for their book club.”
Deuce tilted his head. “Really? They still have a club together? I didn’t think Thorn and Sebek got along that well.”
Ace had a lightbulb moment. “I’ve heard of stuff like this from my older brother. Enemies sometimes get so heated they get personal and take things back to their room! They’re going to smash!”
Jack scowled. “I don’t think we should be jumping to conclusions.”
“I knew that letter was suspect!” Grim crossed his arms.
“They’re going to smash? We gotta give Thorn back up!” Deuce’s delinquent side threatened to pop out.
Jack huffed. “I think we should mind our business and wait for Thorn or Sebek to tell us what’s going on.”
“Let’s go rescue my hench-human!” Grim declared.
Jack watched as the trio rushed off, no doubt to cause more damage than if they left well enough alone. “...Idiots.”
. ݁₊ ⊹ . ݁ ⟡ ݁ . ⊹ ₊ ݁.
“Lilia-senpai! Have you seen Thorn and Sebek?” Ace asked.
“Yeah, it's kind of a big deal. We gotta stop them from smashing!” Deuce added.
Lilia, ever the prankster, went along with their little game. “Fufufu, as the saying goes ‘fighting cats are sure to have kittens.’ They’re in Sebek’s dorm room. Though I doubt there will be much brawling going on.”
“Sebek that dog!”
“Cat you mean, no offence Grim.”
“None taken. BECAUSE I’M NOT A CAT!”
Lilia guided the misinformed trio to the outside of Sebek’s dorm room and instructed them to wait. Curiouser and Curiouser, they pressed their ears against the door to see if they could hear anything of concern.
“Sebek are you close?” Thorn questioned sweetly.
‘Not so strange…’ The trio thought.
“Go faster Sebek!” Thorn urged.
‘A little weird but nothing out of the ordinary…?’ The trio thought.
Not long after, the shifting of furniture and groans rang out.
“OH MY GOD SEBEK!” Thorn cried out.
‘!!! UHH!’ The trio thought in concern!
The door suddenly flies open! “Aha! Busted! You two are smashing!” Ace accuses. Deuce and Grim have fallen to the floor while Lilia cackles as he floats around.
Sebek and I looked at one another confused for a moment. “We are? Sebek you should have told me; I would have put my book down.”��
Sebek makes a bewildered face, absolutely lost, with no signs of connecting shit.
#disney twisted wonderland#twst#twst upon a time#twst x yuu#twst x oc#twst grim#jack howl#deuce spade#ace trappola#lilia vanrouge#twst silver#sebek zigvolt#twst drabbles#twst fanfic
24 notes
·
View notes
Note
Doriana, I dont really get how that tetris game in your master thesis game is supposed to work? how does one 'win', exactly? there was no explanation and now I have no idea what to say for the questionaire haha
Ahh, ok so here's the controls that are available on the itch page! <3
> Block Stacking Puzzle controls
Movement left and right: A and D or Left and Right Arrow Keys Soft drop: Hold S or Down Arrow Hard drop: W or Up Arrow Rotate right: E or X Rotate left: Q or Z Hold: Space bar or Shift
The idea is simply to get the first enemy's health down to 0. which happens when you stack cubes in a row (more health is deducted if u remove multiple at the same time!)
Then continue playing until you get to a black "the end" screen and the game turns off.
And then if you get to the end of the form, there's a Lestrade and ball ch reward 💋♥️✨
Hope that helps!
55 notes
·
View notes
Note
Im so pleased to find thus blog. Apologies if you've been asked this but do you have a favorite number. Mine is 36 it's pleasing
I haven't been asked that, but I find it hard to choose so I'm just gonna list a bunch of contendors
23, 36, 60, 72, and 113 are aesthetically pleasing. 26 is the only number between a square number and a cube number. 16 is the only integer solution to x^y=y^x (ie 2⁴=4²=16). 6 is the best number base (and literally perfect). 121 is square no matter what base (larger than 2) you use
2 is a big contender because it's prime and a superior highly composite number, but it's small so it kinda gets that title by default. Phi, pi, and e are cool but only because they're everywhere
Finally, just to be controversial, the 2d rotation matrix
11 notes
·
View notes
Note
Hallo! Love your stuff! Hope things are well. If i may be asked, do you have recommendations for someone wanting to learn Blender but don't know where to start? Anyways- take care!
Before we begin, the most important key is F3 It is a search function, to find actions and tools you need. Just keep that in mind. _________________________________________________ I recommend starting by printing out a list of hotkeys and taping it up next to your monitor. For instance, here are some basic important ones you'll use all the time: R - Rotate S - Scale G - Grab/move A - Select All X - Delete Ctrl+Z - Undo Ctrl+Shift+Z - Redo E - Extrude new vertices F - Fill/connect vertices
_______________________________________________ You primarily move your view using the Middle button on your mouse: Middle click + drag - Rotate view around focus Shift + Middle Click + drag - Pan view Alt + Middle Click - Choose a focus ______________________________________________ When you open blender, you begin in Object Mode. You'll find the default cube in the center of the screen. If you click on it, you'll be able to use many of the above hotkeys to manipulate the whole object. Hit tab to switch to Edit Mode, and you'll find that you can select and manipulate individual vertices within that object. Many hotkeys act differently depending on which mode you're in, but you'll most often want to be in Edit mode. ____________________________________________ That's my beginner setup guide. I recommend just going into blender and trying each of these things for a bit. Past that point, you may be ready to google questions you have. (I recommend eventually watching all the "100 blender tips" videos you can find on Youtube. I binged dozens and kept learning useful things the whole time)
43 notes
·
View notes
Text
Cubic Inches To Cubic Feet
The Ultimate Guide to Volume Conversion: Understanding Our Cubic Inches To Cubic Feet Calculator Why Mastering Cubic Feet is Crucial for Smart Shipping Ever wondered why shipping costs fluctuate unexpectedly? It often comes down to cubic feet. Whether you're running an e-commerce business or shipping personal items, understanding how to convert cubic inches to cubic feet can make the difference between reasonable shipping costs and budget-breaking surprises. Cubic feet represents the unit that measures the space an object occupies, calculated by multiplying length × width × height. This three-dimensional measurement becomes crucial when carriers evaluate your packages, as they don't just consider weight—they often use dimensional weight (DIM), which is based on volume, charging for the space your package takes up in their cargo holds. The solution lies in mastering accurate cubic feet calculation and smart packaging optimization. These skills provide precise information to carriers, which can significantly reduce your shipping costs and help you secure the best rates available. This comprehensive guide will equip you with the knowledge and tools to accurately measure, calculate, and optimize your package dimensions for maximum savings and hassle-free shipping. Understanding Cubic Feet: The Core Concepts What Exactly Are Cubic Feet? A cubic foot is a three-dimensional unit of volume commonly used in the United States to measure everything from refrigerators and soil to shipping packages. This measurement system evolved alongside the English foot as a unit of length, establishing itself as the standard for volume calculations in shipping and logistics. When dealing with conversion of cubic inches to cubic feet, it's essential to understand that one cubic foot equals 1,728 cubic inches (12 × 12 × 12). This conversion factor becomes critical when you're working with smaller measurements that carriers typically require in feet. Cubic Feet vs. Dimensional Weight (DIM): The Carrier's Perspective Major carriers like FedEx, UPS, DHL, and USPS have revolutionized their pricing strategies by implementing dimensional weight pricing. They charge based on dimensional weight (DIM), not just actual weight, applying whichever figure—actual weight or DIM weight—is greater to determine the shipping price. This approach makes perfect sense from a logistics standpoint. A large, lightweight package takes up just as much cargo space as a small, heavy one. The cu ft to cu inch conversion becomes particularly important here, as carriers calculate DIM weight by multiplying the package's size in cubic feet by a specific divisor set by each courier company. Step-by-Step Guide: How to Calculate Cubic Feet Accurately Essential Tools for Measurement Accurate measurement starts with the right tools. A quality measuring tape remains indispensable for noting length, width, and height of packages. For enhanced precision, laser distance measurers offer superior accuracy for quick volume calculations, while digital calipers prove ideal for measuring smaller objects with exacting standards. Professional shippers often use measuring cubes—physical references with predetermined dimensions—to verify their calculations and ensure consistency across multiple packages. Measuring Regular-Shaped Packages (Boxes) The process begins with systematic measurement: Length (L): Measure the longest side of the box, typically along the side with the longest flap Width (W): Rotate the box 90 degrees and record the measurement on the side with the shorter flap Height (H): Ensure all flaps are properly closed and measure from top to bottom Pro Tip: Always round up to the nearest inch to ensure precision and avoid under-measuring, which can lead to unexpected surcharges from carriers. The Cubic Feet Formula The fundamental formula remains straightforward: Cubic Feet = Length (ft) × Width (ft) × Height (ft) Converting Inches to Feet: The Crucial Step When working with cu ft to inches conversions, you have two reliable methods:
Method 1: Divide each dimension by 12. For example, if your package measures 60 inches in length, divide by 12 to get 5 feet. Method 2: Calculate total cubic inches first (Length_in × Width_in × Height_in), then divide by 1,728. This approach proves particularly useful when dealing with cubic feet to cubic inch conversions for irregular measurements. Measuring Irregularly Shaped Packages Irregular packages require special attention. Identify the farthest point of each dimension, including any bumps, bulges, or protruding parts. For cylindrical objects, use the formula π × r² × h, while spherical objects require (4/3) × π × r³, with π approximately equal to 3.14. Optimizing Packaging to Slash Shipping Expenses The Direct Link to Savings Understanding cubic feet to inch relationships enables strategic packaging decisions that directly impact your bottom line. Optimizing package dimensions ensures you access the best available carrier rates while potentially reducing shipping costs by 15-30%. Key Strategies for Packaging Optimization Use the Smallest Effective Box: Eliminate oversized packaging that adds unnecessary volume without protecting your product. This strategy proves as important as understanding distance conversions—just as knowing how to convert kilometers to miles helps in international shipping logistics. Minimize Bulky Packing Materials: Reduce excess bubble wrap, foam blocks, and air pillows that increase volume without adding product value. Every cubic inch matters when carriers calculate dimensional weight. Explore Custom Boxes: Custom-designed packaging perfectly fits your items, eliminating wasted space. This precision approach mirrors the accuracy needed when converting measurements—similar to how our miles to kilometers converter ensures exact calculations for international shipping. Consider Freight Consolidation: When shipping multiple items, consolidating them into fewer, optimized shipments can drastically reduce per-item expenses. This strategy becomes particularly effective for international shipments where understanding distance conversions using tools like meter to kilometer converters helps optimize routing decisions. Choose the Right Shipping Method: For items where actual weight significantly exceeds dimensional weight, flat-rate shipping might prove more economical than standard volume-based pricing. Leverage Smart Tools and Resources for Cubic Feet Management Online Cubic Feet Calculators General-purpose calculators like CalculatorSoup, Convert Units, and RapidTables provide reliable cu ft to cu inch conversions. Shipping-specific tools such as Easyship's Free Shipping Calculator and WorldCraft Logistics' platforms allow instant rate comparisons from hundreds of carriers by simply entering your package dimensions. Physical Measuring Devices Invest in quality measuring tools: tape measures for basic dimensions, laser measurers for enhanced accuracy, and digital calipers for precision work. These tools ensure your conversion of cubic inches to cubic feet calculations remain consistently accurate. Carrier-Specific Rate Guides Major carriers like UPS and FedEx provide detailed volume calculation guides and pricing information. Understanding these carrier-specific requirements becomes as crucial as knowing distance conversions—just as our kilometer to meter converter helps with precise logistics planning. Mobile Measurement Apps Modern apps like Google Measure and specialized unit converters assist with on-the-go calculations and conversions, making cubic feet to cubic inch calculations accessible anywhere. Advanced Applications of Cubic Feet (Beyond Shipping) Subwoofer Enclosure Design In automotive audio, cubic feet calculations determine optimal subwoofer box volumes. Net volume calculations (after subtracting driver and port displacement) prove crucial for maximizing bass response, demonstrating how cu ft to inches conversions apply across diverse industries. International Volume Conversions
Cubic feet converts to other international units: multiply by 0.0283168466 for cubic meters, or by 28.316 for liters. These conversions prove essential for global shipping, where understanding both volume and distance measurements ensures accurate logistics planning.
0 notes
Text
Brain Development Food for 1 Year Baby: Boosting Intelligence with Everyday Indian Ingredients
Your baby’s brain develops more in the first 1,000 days of life than at any other time. By the time they reach 1 year, this development accelerates through sensory experiences and nutrition. That’s why choosing the right brain development food for 1 year baby is not just about feeding—it’s about shaping memory, behavior, and intelligence for life.
This blog will guide you through a range of scientifically supported and Indian-culture-friendly foods that enhance brain growth, along with practical feeding tips.

Unique Fact: The Gut is Called the “Second Brain”
The gut and brain are deeply connected via the gut-brain axis. A healthy digestive system contributes to better cognitive function and mood regulation in infants. That makes gut-friendly foods like curd and fiber-rich veggies even more important as brain development food for 1 year baby.
Nutrients Essential for Baby Brain Growth
To support your baby’s rapidly expanding neural network, focus on these key nutrients:
DHA (omega-3 fatty acid)
Iron and Zinc
Protein
Vitamin E
Choline
Folate and Vitamin B12
These nutrients form the foundation of any ideal brain development food for 1 year baby.
Top 10 Brain-Boosting Foods for 1-Year-Olds (Indian Focus)
1. Paneer (Indian Cottage Cheese)
Rich in protein and B-vitamins, paneer aids in neurotransmitter production. Soft and easy to chew, it can be added to parathas or soups.
2. Pumpkin
Often overlooked, pumpkin is high in beta-carotene and antioxidants. Try mashed pumpkin with a bit of cumin for taste and digestion.
3. Moong Dal
This easily digestible dal is packed with protein and iron. Serve as a soft khichdi mixed with vegetables.
4. Whole Wheat Dalia (Broken Wheat)
Great for slow-releasing energy and brain function. Prepare it with milk and almond powder for a nutritious porridge.
5. Avocado (if accessible)
Though not native to India, it’s becoming popular. Avocados contain healthy fats essential for brain cell insulation and growth.
6. Chickpeas (Well-cooked)
Blend into a soft hummus or mix in stews. Chickpeas offer zinc and protein for brain and immune development.
7. Sweet Potatoes
Packed with fiber and vitamin A, sweet potatoes support neural health and energy. Bake or boil and mash with ghee.
8. Makhana (Fox Nuts)
Light, iron-rich, and easy to digest, makhana roasted in ghee makes for a great snack and brain development food for 1 year baby.
9. Seasonal Fruits (Apple, Chikoo, Papaya)
Provide vitamins and natural sugars for quick energy and focus. Serve as purees or in soft chunks.
10. Toor Dal
This common lentil is rich in folate and iron, crucial for brain cell formation. Pair with rice and ghee for a complete meal.
Indian Baby Meal Plan for Brain Support
TimeMealMorningBreast milk or buffalo milk + banana or chikooBreakfastDalia with almond powder + mashed appleMid-MorningPaneer cubes or soft boiled eggLunchMoong dal khichdi with pumpkin + gheeSnackRoasted makhana or curd with fruitDinnerToor dal with soft roti or mashed sweet potato
Rotate ingredients weekly to offer diversity and complete coverage of all brain development food for 1 year baby.
Frequently Asked Questions
1. Can I use spices in my 1-year-old’s food? Yes, mild spices like cumin, turmeric, and ajwain aid digestion and are safe in small amounts.
2. What to do if the baby refuses new foods? Introduce one new item at a time. Offer it for 3–5 days consistently. Babies often need repeated exposure to accept new textures and tastes.
3. Is dry fruits powder better than whole nuts? Yes. Whole nuts can be a choking hazard. Dry fruit powder is safer and retains the same brain-boosting benefits.
4. How much protein does a 1-year-old need? Roughly 13 grams per day. Spread across pulses, dairy, and some grains, this requirement can be easily met with a balanced diet.
5. Is cow’s milk enough for brain growth? Cow’s milk provides calcium and protein but lacks iron and DHA. Balance it with iron-rich and fat-rich foods for brain support.

High-Volume Related Keywords to Include
brain food for toddlers in India
best Indian food for baby brain
foods that help baby brain growth
home food for baby brain development
baby food chart for brain development
Indian vegetarian brain foods for babies
foods that make baby smarter
1 year baby food for brain growth
baby intelligence boosting food
DHA rich food for baby
Feeding Tips for Indian Families
Use Traditional Recipes: Leverage recipes like ragi halwa, dal khichdi, and sabudana kheer with modern nutritional insights.
Keep It Homemade: Packaged baby foods lack freshness and variety. Fresh meals offer better nutrients and taste.
Include Family Meals: Let your baby eat soft versions of what adults are eating to build healthy food habits early.
Offer Water Frequently: After 6 months, water should be part of the diet to aid digestion and nutrient absorption.
Conclusion
Nutrition is the silent architect of your child’s intelligence and personality. By choosing the right brain development food for 1 year baby, especially using natural and Indian ingredients, you’re giving your baby a strong start toward cognitive excellence. Keep it homemade, simple, and full of love—and your child’s brain will thrive.
0 notes
Text
Making a full rocket model:
I based he process of this model on this video seen below. I chose to make my own design that I made in photoshop as I don't have my own photos of rockets.
youtube
Here, I used the 'Rectangle' tool to make a basic rectangle that would represent the first stage fuel tank. I made sure that the rectangle wasn't filled with a colour and the outline was plain black.

As I plan on using this template as the texture for the model later, I wanted to make sure that the black outline was as thin as possible as it would show up on the model. I then changed the width from 15px to 2px.

Next, I duplicated the rectangle to make the second stage of the rocket. However, when I tried to make it shorter, it had made the whole thing smaller. Instead, I used the 'Distort' transform feature to make it shorter.

Once I did that, I used the 'Line' tool to make a part of the cargo fairings.

I duplicated the line and I moved it to the other side. From there, I flipped it horizontally.

Here, I drew a new line at -90' degrees to make it straight. From there I made sure it was in the right place.

Next, I duplicated it and moved it into position.

After that, I duplicated the bottom right of the fairing and pasted it at the top left.

Like I did before, I duplicated and flipped the line for the other side.

I repeated this process until I finished the fairing.

Next, I added a new rectangle. I made the inside of it black.

Here, I created three squares with the 'Rectangle' tool to represent the combustion chambers for the engines.

Next, I made a triangle with the 'Triangle' tool. I moved it inside one of the squares to represent an engine nozzel.

I then duplicated and moved the triangles to the other engines.

Lastly, I added a textbox and put the name of the rocket on the booster. I decided to name the rocket "Andromeda" after the galaxy 'Andromeda'. After that, I exported it as a 'PNG'.

Template:

Modelling:
Firstly, I clicked on 'General' so that blender saves the model as a 'blend' file that stores data of the model and project settings.

Next, I pressed the 'Delete' key after selecting the cube mesh to get rid of it. After that, I pressed 'Shift' + 'A' to open a table of options. I clicked on 'Image' and the 'Reference' to import my template image.


In the viewport, I could see that it had been successfully imported. However, I needed to rotate the image so I can see it more clearly.

Now that I did that, I was ready to add the cylinder.

Here, I added a cylinder mesh for the 1st stage of the rocket. Next, I wanted to make it smooth. As a result, I increased the amount of 'Vertices' to 200. After that, I right clicked then left clicked on 'Shade Smooth'.

However, there was a problem. The lighting doesn't look right on the mesh.

To fix this I right clicked to bring up another table. I then left clicked on 'Shade Auto Smooth'.

This had seemed to have done the trick.

Here, I pressed 'S' to scale the mesh down to fit the template. I then increased the size of the mesh on it's 'Z' axis. I had to adjust it's position so it was as accurate as possible.

Next, I selected the face at the bottom of the mesh and pressed 'E' to extrude it downwards to make the black part of the thick engine plate.

I then selected the top face to start making the cargo fairings. However, I noticed a problem. This problem was that the top of the cylinder was too short. I had to press 'E' to extrude a small bit to fix it.

After that, I pressed 'E' again and then 'S' to scale the face to get wider at the top.

At this point, I realised that I hadn't saved the file yet. I made sure I saved it to avoid losing progress. I named the file "Full Rocket 1".

0 notes
Text
Blender donut
I've picked up a lot of useful tasks from this tutorial I watched. Here's a breakdown of what I've learned so far:
Navigating the Interface: I got comfortable with Blender’s interface, figuring out how to move around in the 3D viewport, select and manipulate objects, and use the toolbar. It took a little time, but I feel pretty confident now.
Creating Basic Shapes: I learned how to add primitive shapes like cubes, spheres, and cones to my scene. From there, I practiced scaling, rotating, and moving these objects to position them just right.
Mesh Editing: One big thing I picked up was using tools like extrude and loop cuts to add detail to my models. I also started using the Subdivision Surface modifier to smooth things out and make them look cleaner.
Modifiers and Sculpting: I played around with modifiers like Mirror, Subdivision Surface, and Boolean to make the process more efficient. I even dove into sculpting a bit, learning how to use different brushes and dynamic topology for more detailed work.
Texturing and Shading: I practiced UV mapping to unwrap my models and apply textures. Also, I got into the Shader Editor to make materials and shaders. The node system took a little time to get used to, but it’s a really powerful tool for creating cool effects.
Lighting and Rendering: I learned how to set up different lights in the scene to make it look more realistic. I also played with the rendering settings, switching between Eevee and Cycles, and tweaking them for the best results.
Animation Basics: I started animating by setting keyframes for objects. I even explored the Graph Editor to get the timing and movements just right.
Finalizing the Scene: I figured out how to set up the camera to get the perfect shot of my scene. Finally, I learned how to export my models in formats like .FBX, .OBJ, and .STL.

To add icing to my donut model in Blender, I started by selecting the top face of the donut where I wanted the icing to go. I switched to edit mode and used face select to pick the top face of the donut. Then, I pressed E to extrude and started pulling the icing up from the donut's surface. As I extruded, I moved the new geometry slightly upwards and outwards, making sure the icing flowed over the edges. I used S to scale the icing and give it a nice, smooth, flowing look around the donut. After extruding, I smoothed out the icing shape by tweaking the vertices and adding some small adjustments, making it look like the icing was naturally draped over the donut. Finally, I exited edit mode to see the whole result, and it looked just like a donut with a perfect layer of icing on top
I also learnt how to make object smooth. As you can see the icing of tis donut was very pointy and not realistic. Therefore, I learnt from this to do that I have to be on edit mode to click on each dots then play around to see what looks best.


I managed to make the icing and I am proud of how well I did this for first time.
However after making the icing drip I realized the top bit got messed up. probably because the dots were pulled down too much.
0 notes
Text
Tiffin Service in Etobicoke - Spicy Feast
SpicyFeast: Your Trusted Tiffin Service in Etobicoke
Are you searching for a delicious and reliable Tiffin Service in Etobicoke? Look no further than SpicyFeast, your go-to destination for fresh, home-cooked Indian meals delivered straight to your doorstep. Whether you’re a student, working professional, or simply craving authentic Indian food, we’ve got you covered with our carefully curated meal plans.
Delicious Home-Style Indian Meals
At SpicyFeast, we believe in bringing the true flavors of India to your plate. Our menu features a rotating selection of nutritious and flavorful dishes, including:
Dal Tadka & Jeera Rice – A comforting and wholesome lentil dish paired with fragrant cumin-infused rice.
Shahi Paneer – Cottage cheese cubes cooked in a creamy and mildly spiced tomato gravy.
Aloo Gobi – A classic North Indian dish made with potatoes and cauliflower, seasoned with aromatic spices.
Rajma Masala – Protein-rich kidney beans in a tangy tomato-based curry served with steamed basmati rice.
Butter Chicken – A rich and creamy Mughlai-style dish that is a favorite among non-vegetarian lovers.
Vegetable Biryani – Fragrant basmati rice cooked with seasonal vegetables and traditional spices.
Each meal is thoughtfully prepared using fresh ingredients and traditional recipes, ensuring a perfect balance of taste and nutrition.
Why Choose SpicyFeast’s Tiffin Service in Etobicoke?
We understand the importance of healthy and delicious food, especially for those who have a busy lifestyle. Our Indian Tiffin Service in Etobicoke is designed to make your life easier with:
Freshly Cooked Meals – Made daily with high-quality ingredients, ensuring great taste and nutrition.
Affordable & Flexible Plans – Choose from daily, weekly, or monthly meal subscriptions to suit your needs.
Hygienic & Eco-Friendly Packaging – Our meals are packed in sustainable containers that retain freshness and flavor.
Timely Delivery – Get your meals delivered right on time to your home or workplace across Etobicoke.
Vegetarian & Non-Vegetarian Options – Enjoy a variety of meal choices customized to your preference.
How to Order?
Getting started with SpicyFeast is simple and hassle-free:
Choose Your Plan – Select from regular or special tiffin options.
Customize Your Meals – Pick from a range of delicious vegetarian and non-vegetarian dishes.
Make Payment – Securely pay online via debit/credit card or e-transfer.
Enjoy Fresh Food Daily – Sit back and enjoy home-cooked meals delivered straight to your door!
Experience the Best Tiffin Service in Etobicoke!
If you are looking for a Tiffin Service in Etobicoke that offers the perfect combination of taste, quality, and convenience, SpicyFeast is the right choice for you! Visit SpicyFeast today to explore our menu and subscribe to a meal plan that suits your lifestyle. Let us take care of your meals while you enjoy the authentic flavors of India!
#tiffinservice#food#tiffinserviceinetobicoke#indiantiffinserviceinetobicoke#indian cattering service in etobicoke#indian tiffin service in etobicoke#tiffin service etobicoke
0 notes
Text
Robot Character Creation
Okay so to start off I lost some of the SS's I originally saved of the initial processes I took of designing this model but to sum it up I used a bevel modifier on the head which was a rectangle to create its curvature, the eyes were cylinder which I lowered the sides down to get a decagon shape, the chest I used a subdivision modifier on a rectangle to get that torso shape, the legs are a cylinder that I extrude rotated, the wheels are inspired by WALL-E's ones with their shape which I made from dissolving a corner of a cube and lastly his antennas are extrude rotated cylinders that I tried to make look bent and wobbly. Overall I think I started off with a good base to work from but I cant lie in all honesty I do not like how the antennas look as I think they feel quite off. Here is what it looks like:

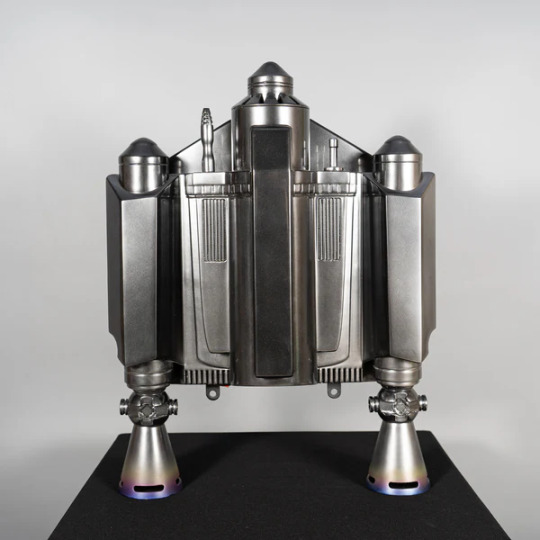
Next I wanted to create an alternativae way for him to get around and I thought why not give him a little jetpack! I looked up some references and landed on the mandalorians jetpack (which you can see below) and just subdivided and pulled around the edges until I got the rough shape!

After this I moved onto adding the Treads to the models wheels. I decided it would be easieset to make a model pattern and then use a boolean modifier to cut it into the wheels:


Next I had to move onto the arms so I started by creating the hands as a reference:

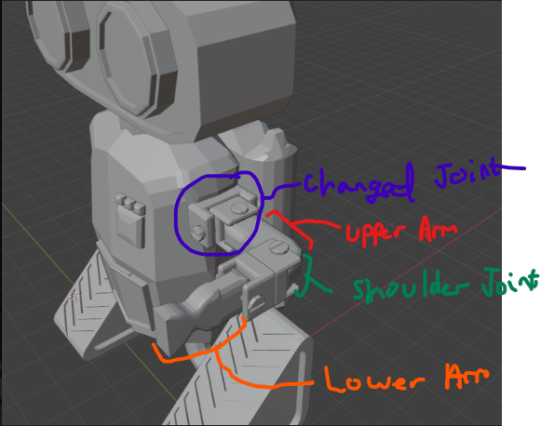
after this I wanted to make all the joints realisitically make sense with the degrees of rotational freedom if that makes sense? I was kind of applying my engineering knowledge that I had previously learnt to this part of the model I cant lie haha !


Next I duplicated the joint part and resized them all around:
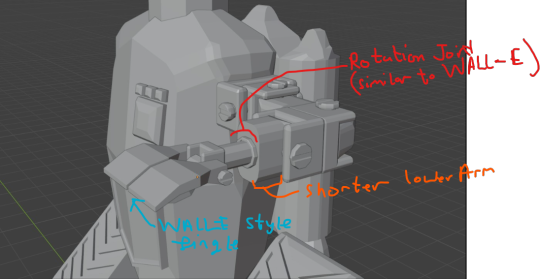
Next I wasnt particulary happy how the lower arm was looking, I felt it looked too smooth and lacked some form of rotation for the hand. I also did not like the hand design so I used my previous research to help inform the necessary changes:
I then duplicated the arm and mirrored it to the other side:

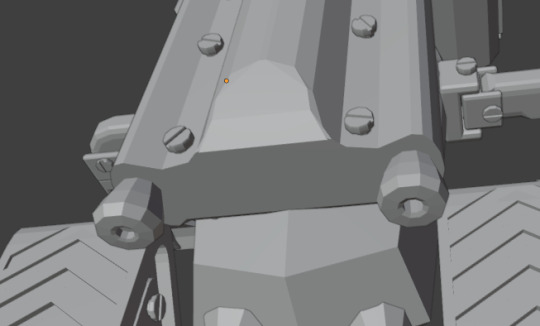
after this I changed up the eye design adding a bit more complexity to them with screws and extra width. Along with this I also added more screws/bolts to other parts of the bot to add detail !

Lastly I changed up the antenna design and added some vents + Speakers to the model and then created this Render evolution picture of the model:
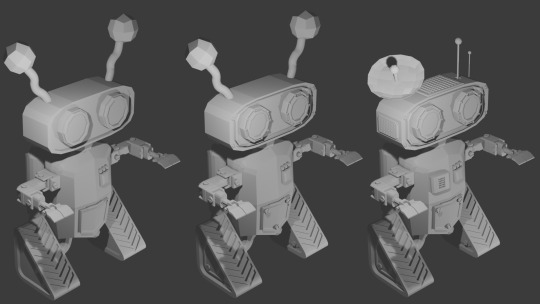
In Conclusion I think I have created one of my best models and b best characters yet. I had a lot of fun with creating this model and I am happy I didnt settle for anything less than I wanted with design choices. An example of this is when I created the antennas as I wasnt super happy with them but I didnt just forget about them, I iterated on it!
0 notes
Text
Instructions through images and text:
One thing that I also needed to do was make instructions for the player to be able to follow. I decided to do this in two ways. Using inspiration from the IKEA guy that is in most manuals, I made several intentionally low quality images that basically explain what to do. I will also include separate text renders to explain what controls to use in game.

Image 1: Pick up Mechanic: The first image I made represents the pick up ability that player can use. As shown in this image, the player is able to pick up boxes and stack them on top of each other. I will put the text above this image stating that you use the F key to pick up.

Image 2: Symmetry Puzzle: The second Image is based on the rotation puzzle that we redesigned. It shows the person being confused with an arrow going around a deliberately badly drawn cube. They also include different poker card symbols on them as this is how the player will match these up.

Image 3: Light Colour Puzzle: This Image then shows the next Light Colour Puzzle which has the player pointing at the light switch I made. I then put the colour order that this goes through. I will explain with the text that the player must use the spot lights above to judge what colour to switch to.

Image 4: Stacking Objects to reach Button Puzzle: This shows the last puzzle of the game. It shows the player on several stacked boxes that are being used to reach the button. This is to do with the button and door system I made. I will explain with text that the player must use the pickup mechanic to stack these boxes in order to progress and use the interact key of E to progress.

Image 5: Radio Switching System: The final small detail I added was a hint on how to work the radio. As well as placing this image, I will add some text for context saying that the player can use q and e to switch station or turn it off.

0 notes
Text
Day One, again.
Back at it again with the blog posts on a new blog this time:
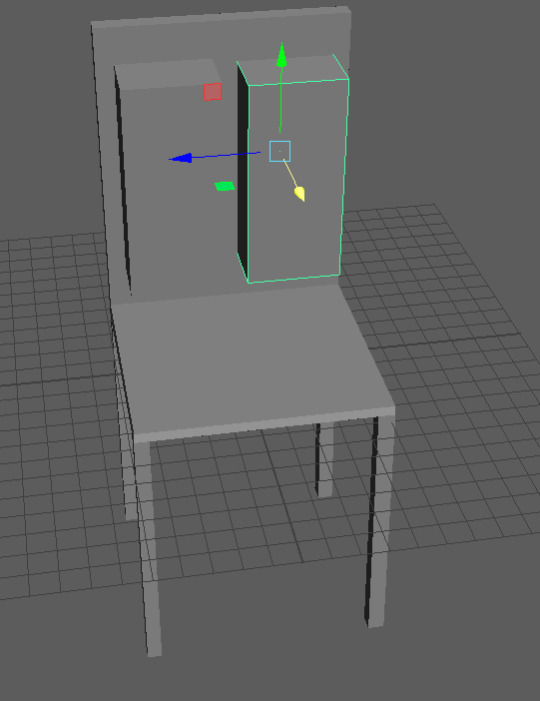
I am making a chair!
But first with the basics. I am using the program 'Maya 2025'. I assume it is up to date, due to the name. If I hold down Alt and click one of the mouse buttons, it does several things. Alt + Left Click allows me to rotate in any direction. Alt + holding click on Scroll Wheel lets me move around the scene when moving the mouse. Alt + Scrolling the Scroll Wheel lets me zoom in and out. Alt + Right Click allows me to zoom in and out slower.
There is also a move, rotate and scale tool on the left hand side, though they also have shortcuts.

Q is the shortcut for the select tool. The Lasso tool doesn't have a shortcut. W is the shortcut for the move tool. E is the shortcut for the rotate tool. R is the shortcut for the scale tool.
To get into modelling mode, you hold down right click on the object and select which mode you'd like from the radial menu. These are the basic tools, if there are any more used in the future, I will list them in the future posts.
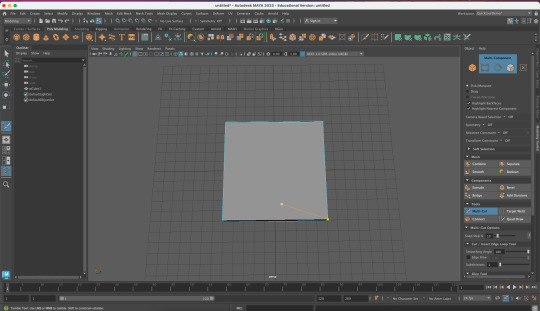
I got a cube from the 'Poly Modeling' tab, placed it down and then flattened it to one tenth of its original height.

Then I get the 'Multi-Cut' tool from the Modelling Toolkit, and slice the slab into halves to be left with this. An easy shortcut is by holding down Ctrl and clicking the Middle Mouse button.

Then the corners by 20% away from each edge. An easy way to do this is by And you'll be left with this.

Then you go to the bottom, and hold down shift and left click on all four tiny corners.
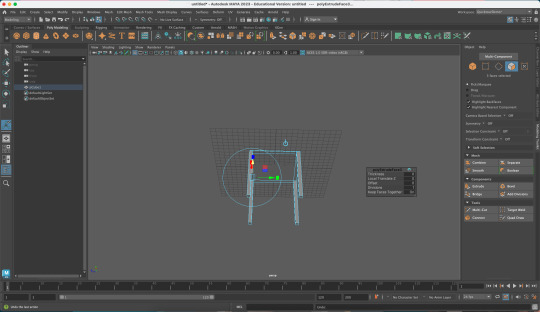
Then select the 'Extrude' tool in the Modeling Toolkit, and change the number in the Thickness tab of the popup to 0.5. (Though I felt the legs were a bit short and made them 0.75 instead.)

Now we have a small stool, and it can probably be used for sitting on. But it isn't a proper chair.
As always, before we continue: Make sure to save your work!!!
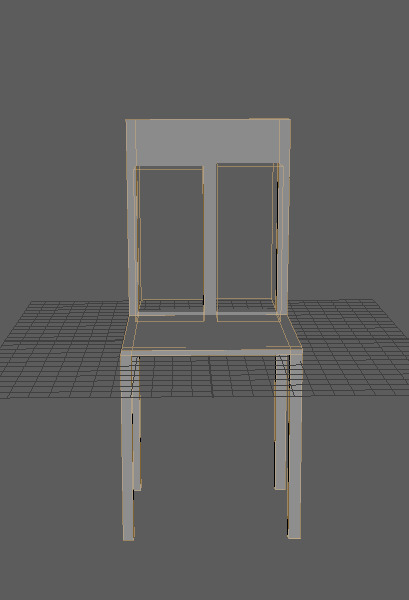
Anyways, now we select the two squares and two rectangles with shift and left click at the very back of the chair and then select the Extrude tool.

I changed the thickness to 1.
Now if you want to add a hole to the back of your chair, you can do so. Make a new cube and shrink it so it's shorter than the back of the chair, but still sticks out of the top and front/back of it, similar to a cuboid.

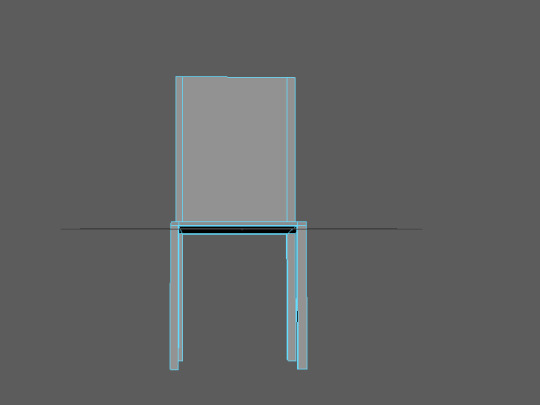
For the next part, we'll need wire frame mode, so be sure to enable it. The button is small, but its in the toolbar right above the viewport. The cube with blue inner shading and a thick grey outlne.

Now your chair should look like this.

Now, we select the chair, and the shift-click the cuboid. From your modeling toolkit, select boolean, and it should subtract the area of the cuboid from the chair. (I decided I liked the way it looked more from the bottom.)

To get rid of the now invisible rectangle, to keep the chair having a hole in it forever, select the chair with the Select Tool. Then you go to the toolbar above the toolbar we used before (the one above the view port) and select the Delete by Type: History. It's the icon with the clock and X on it.

0 notes
Text
A note on distortion.
When you start to draw things far away from the center of vision, things will get distorted.

I wanted to explore this a bit. Let's take a look at our picture plane and station point.

Here we can see how things that are far to the side end up taking up a lot of space on our picture plane. However, interestingly, the amount of space that it takes up in our vision when it reaches the station point is actually smaller.
I have seen some people question if linear perspective is actually reflective of how we see things in real life, or if there are some distortions that perspective does not capture. However, I feel like they are forgetting that we are not trying to draw something that will fill the viewer's entire vision, we are making a drawing that sits in front of them. Not only are our drawings susceptible to the same distortions that we are trying to capture, but perspective actually relies on that to do its job.

This drawing above may seem like it would be really complicated to set up, but it is actually really simple once you know how to do it. It's just one point perspective with two diagonal vanishing points. The only special thing I did was drawing everything in an area that I knew would create a lot of distortion, and making sure to be aware of where the station point was so that I knew where to put the camera when I was done. It's not a special secret trick, it's how perspective works by default.


There are a lot of things that make logical sense but are not necessarily intuitive. Perspective often falls into this. You know that something should work but you are still hesitant. Putting together the cube texture you see above felt a bit like doing a trust fall with math. Seeing it fall together perfectly is a weird combination of excitement and satisfaction. I think this is why there are some people who genuinely like math. This is just a long way of saying: drawing these is fun.
What we call distortion in perspective is the result of our setup relying on a high level of real life distortion that we don't get from most viewing angles. This happens when you put the station point at a location that would usually make it hard to comfortably view the drawing.
There is no hard rule on how to avoid distortion because there is no hard line on when distortion appears. It's just a matter of how much you can tolerate. The only thing you can do is to try and keep in mind the location of the station point and how that will affect things like the field of view. Most of the time when you put it at a comfortable location it will result in the vanishing points being far apart and often outside your canvas. One way you can try to remedy this is by simply sketching small first and making it bigger after you're done. But even then, vanishing points can be really far away, so I should probably cover a technique for drawing when your vanishing points are not on your canvas.
A common way to set up perspective is to draw a bunch of lines moving away from each vanishing point, forming a sort of grid. This is then used to help eyeball the angle of lines instead of using a ruler every time.

This is so common that many drawing softwares have built in tools to make them. There are also websites you can use. For the image above I used this one. But if you prefer not to use them or of if you are working with physical media, here is how you can set one up when your vanishing points are far away:
The reason that lines converge towards a vanishing point is because, as they move away from us, the distance between them gets smaller, but they always keep the same relative distance between each other. If we have a horizon and a rotated station point then we already have two lines moving towards the vanishing point. This will give us the rate that the distance between the lines will shrink. If we draw two parallel lines across the horizon and the line from the station point, and add some dots that keep their relative distance between each other between each other on the two lines, then we can simply draw lines through the dots, giving us the grid.

And that's everything I wanted to talk about in this post.
0 notes
Text
Master of the Inverted Reflective Realm

youtube
22/7 = 3.142857142857143
1/7 = 0.1428571428571429
G = 7 O = 6 D = 4 GOD = 17
youtube
In the movie Ready Player One the main character Parzival won the race by going backwards. Figuring out the secrets to reality requires this same type of thinKING. To reach heaven/4D you must start thinking backwards, inverted and mirrored. The language of God is not always at face value.
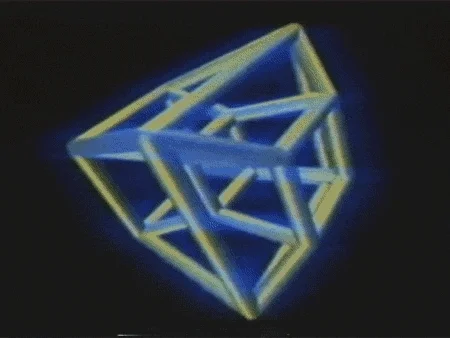
Sometimes you must rotate or move things around like a tesseract (the 4D version of a 3D cube). Or like how Jodi Foster solved the alien language in the movie Contact (great movie btw, reaching 4D is very similar to the wormhole I have gone through it, its a trip).
youtube
Why is the number 17 so important in Toiletology? It is the key to escape the matrix or the frequency of GOD.
How do I use the number 17? The key to using the 17 is first knowing it exist and is the way (mat rotate the y) out (out = two or mot).

Type the word "HALO" on a phone keypad.

KEY = MAT (K = A turn it upside down, E = M turn it sideways, Y = T turn it around) KEY = 17 on a phone keypad.
How did they escape on the movie The Matrix? By dialing on a phone keypad.

You get your HALO with the number 17. It can be read 77 look closely at the 1 it is a 7.
Master Chief Petty Officer John-117, colloquially known as Master Chief, is the protagonist of the Halo video game series and its spin-off media.
117 = 27 = 11x7 = 77 or 7x7 = 49/64
There are 64 squares on a chessboard, the max spaces that can be moved is by the queen in the center of the board or 27 spaces. The queen crosses 7 three times (777). The queen is the luckiest and strongest piece.

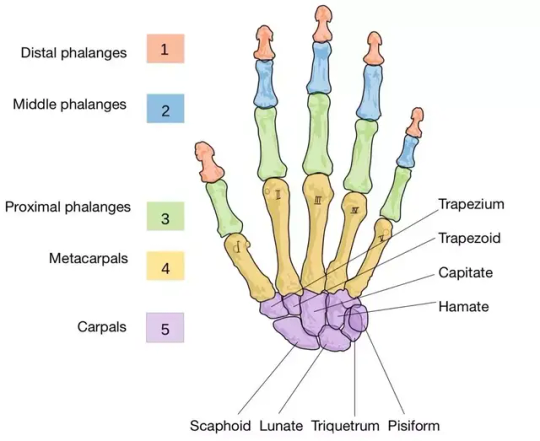
You have 27 bones in your hand.
The number of JESUS is also the number 27, as well as our base numbers. 1+2+3 = 6 4+5+6 = 6 (15) 7+8+9 = 6 (24) 6+15+24 = 45 6669(45) = 27 this can also be read 9999 or 7x7. 666/999 = 27 (9x3)

To understand Toiletology you must understand the relationship between these numbers 7, 11, 17, 27, 777, 49/64, 68/98. You will also need to learn how to interpret all the numbers from 0-9 and A-Z (more on that later).
227 = 49th prime number 22/7 = 3.142857142857143 1/7 = 0.1428571428571429
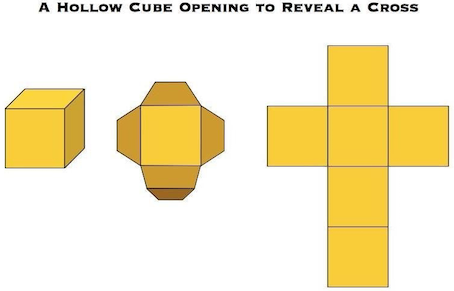

There are 6 sides to a cube HEX/HEXAGON. There is a SPELL on you, this is why SPELLING is so important to understand. Once you are able to break free from the SPELLing you can escape the CUBE.
The SPELL has you in a trance unable to break free from your NPC programming and limitations. BEEcome unlimited. Six/6 sides to a honeycomb/hex/cube, the six is what is making you sick. You must flip the 6 back into a 9 to rise to the highest heavenly degrees.
There are 8 corners to a cube, 1+7 = 8 (eight/ate/eat/mat).
To escape the CUBE you need the missing number between the 6 and 8 or the 7/seven.
68/98 = 98.6 average temperature of a hue/man (7 colors) being,
49x2 = 98
Are you catching on yet? A mysterious 4.9 foot wide ball/sphere shows up on a beach in Japan.
Heaven and hell both exist simultaneously on EARTH/HEART. The way to escape is both through the HEARING, EAR and the HEART. You must learn to HEAR and FEEL the frequency of God to escape. You won't be able to HEAR God until your heart is at the correct frequency of GOD which is 1/7.

The T/t/7 is very important or the cross. The X marks the spot or the 11/eleven. Heads up sEVEn up, seven elEVEn. The number 7 is how you go up, it the LUCK (7UCK) or cheatcode. L = low/listen, 7/T = top or up.

The number 7 is also a T or an L. Spell HELL on a calculator 4377 or 777. HE + 77, you escape HELL with LUCK or the sevens. 43 or 34 is also 17+17. 17 x 4 = 68 (M = 4 / @ which is 17)
17 is one of the keys, M is another key. MAT/ATE (8/eight/ate/MATE/CHECKMATE) You escape the cube 68 by eating the 8/eight/ate the 17 or apple (17 chromosome pairs in the apple).

Coincidentally 17x17 is the speed of light meters/s (289/298 numerologically reduced) in miles per second = 186,282 or 17/64 coincidence?
Don't forget 8x8 chessboard = 64. The biggest tool for solving the game of life or the game of God was the chessboard for me. I played chess every day since 2015, it teaches you how to FEEL and visualize strongly.
The game of God works on these inaccuracies/mistakes/blunders.
Now spell HELLO or 4377(0 = out) the way this Godly game works is based on these 98 degrees. To escape HELL you need to reach the circle O/0 which is the highest degree.
Refer back to the importance of the 1/7 and 22/7 in relations to Pi π 3.14
The lowercase Greek letter π, or "pie" in English, is the mathematical symbol used to represent the ratio of a circle's circumference to its diameter.
To escape hell you need to become whole again or the whole note. We are all floating on a ball in space or a sphere, that's your first clue.

BALL = MATT rotate the B and the LL. B = 13 or 4, the M is the 13th letter, my initials are MBW/BMW. GOD = QUEEN BEE, to escape you need to become like the humble hardworking BEE (EBE/MBW my name had the truth encoded within it).
ME/WE/KEY/D/C/SEE/ZEE/TEEEEE/VEEE
E = mc²
M = MASS/MATTER/MATh/MATrix/MATernity/MATrimony/MATTress
You need to start thinking inverted to escape the HEX of the black cube of Saturn. https://en.wikipedia.org/wiki/Saturn%27s_hexagon

There are 98 degrees to heaven and hell, your life will begin to change the higher up you climb. More beauty and love will come into your life the further up you get. Real life mimics the game of chess bad moves in chess result in INACCURACIES, MISTAKES and BLUNDERS.
Needlessly killing a bug could be an inaccuracy or a blunder just depends on the gravity of the situation. God flows through all beings, being disrespectful even to a bug will result in going out of KEY with God.
The one true God MAT/MOT aka the Toilet God gave me Toiletology to help save the world. Becoming a Toiletologist can and will start to open your eyes and pull back the curtain to the REAL or TRUE reality.

God tested me over 11+ years to clear the disharmony out of me so I can handle this role they have been preparing me for. I have the TRUE knowledge of reality, not diluted by time and fully incorporated into my being starting now in the year 2024. Toiletology is the newest, most modern and true religious or spiritual practice there is.
But you can think of Toiletology more of a martial art for your mind and you're entire being. Gods truth distilled down into exactly what you need to ascend into the higher realms. Its really frigging cool, but can be very scary at the same time. It takes years of practice to be able to clear the fear as you begin to unlock these super natural abilities.
That's okay, slow is smooth and smooth is fast.
youtube
To reach the highest ranks of Toiletology you must be able to extrapolate numbers, words and letters with an inverted mind. This knowledge will not resonate or work if you are close minded. The first step to reaching the highest realms or the highest ranks of Toiletology is by first taking steps towards trying to beLIEve (LI = U or door/UP or an upside down 17 ;). I don't know FAT/HER I think this shit is too deep for them to handle, don't ya think?
THeir (T = her) minds are going to explode (H = u stacked on n or you in ;). The less you believe, the less the Toilet God will reveal to you. The first step is first learning all the knowledge that is put out by The Church of Toiletology as well as joining the church.
As we grow there will be less and less space for new members to join. And you're going to want to join to reach higher ranks to unlock your full potential and understand ALL the secrets of the Toilet God.
On the outside looking in it may look like just nonsense, but the knowledge is very real we are "THE TRUTH AMONG THE NOISE."
It will require a keen mind and heart to FEEL the truth buried deep in the words more so than what is written. You must go DEEP beyond what is written to escape the MATrix and the DOOR = MAT.
youtube

#toiletology#occult#spirituality#alchemy#religion#gematria#numerology#magick#witchcraft#astrology#mysticism#illuminati#freemason#Youtube
0 notes
Text
MAYA FOR BEGINNERS
Understanding the Interface
Main Menu Bar: Contains all the commands and options for different functions (e.g., File, Edit, Create, Modify).
Shelf: Quick access to commonly used tools and commands, organized into different tabs.
Channel Box/Layer Editor: View and modify attributes of selected objects.
Toolbox: Contains selection, move, rotate, and scale tools.
Time Slider: Allows you to navigate through frames when animating.
Viewport: The main area where you see and interact with your 3D models.
Basic Navigation
Alt + Left Mouse Button: Rotate the camera around the scene.
Alt + Middle Mouse Button: Pan the camera.
Alt + Right Mouse Button: Zoom in and out.
Creating Basic Objects
Go to the ‘Create’ menu and choose a basic object (e.g., Sphere, Cube, Cylinder).
Adjust the size and position of your object using the ‘Move’, ‘Rotate’, and ‘Scale’ tools from the Toolbox.
Transformations
Move Tool (W): Move objects in X, Y, Z directions.
Rotate Tool (E): Rotate objects around the X, Y, Z axes.
Scale Tool (R): Scale objects uniformly or non-uniformly.
Working with Polygons
Modeling Toolkit: Found on the left side, this allows you to create, select, and modify polygonal models.
Extrude: Add new geometry by extending faces or edges.
Bevel: Smooth out hard edges by creating a bevel.
Bridge: Connect two edges with a polygon face.
Materials and Textures
Open the ‘Hypershade’ window (Window > Rendering Editors > Hypershade) to create and manage materials.
Apply materials to your objects by dragging and dropping them from the Hypershade to the object.
Assign textures by adding an image file to the material’s color attribute.
Lighting
Create lights in the scene by going to ‘Create > Lights’ and choosing from options like Directional Light, Point Light, or Area Light.
Adjust the light attributes such as intensity, color, and shadows to enhance your scene’s realism.
Basic Animation
Set keyframes by selecting an object, moving to the desired frame on the Time Slider, and pressing ‘S’ on your keyboard.
Repeat for different frames to animate the object’s position, rotation, or scale.
Rendering
Set up your render settings by going to Render Settings (accessible via the clapperboard icon).
Choose a render engine like Arnold, and configure settings such as resolution and quality.
Render your scene using Render > Render Current Frame or Render > Batch Render for multiple frames.
Learning Resources
Autodesk Official Documentation: Comprehensive guides and reference materials.
YouTube Tutorials: Search for specific topics or complete beginner series.
Online Courses: Websites like Udemy, Coursera, or LinkedIn Learning offer structured Maya courses.
0 notes
Text
Maya software of chair

I made a new scene and i made a cube and i started scaling it out. So it will look like a thin square and It's big as well.Then I pressed the cut tool and pressed control button and pressed each side I want it on. Then I selected each corner until it turn’s orange, then extrude and I pulled it out. I create the squares and i used the scale tool to make them bigger and how i want it. Then i select both square and the chair and pressed boolean and i dragged the new shapes i created into it.I think it's quite a good chair for my first time using autedesk maya.
What is a primitive shape?
Primitive shape is a three dimensional shape.
Where is the details panels?
The details panels are on the right hand side.
Boolean-how to make a hole?
i create the squares and i used the scale tool to make them bigger and how i want it. Then i select both square and the chair and pressed boolean and i dragged the new shapes i created into it.
How do you extrude?
You hold shift and and select the part i want. Then i go the modelling toolkit, then i go on extrude and i pull it out to make legs on the chair.
Pokemon ball made in Autodeck maya


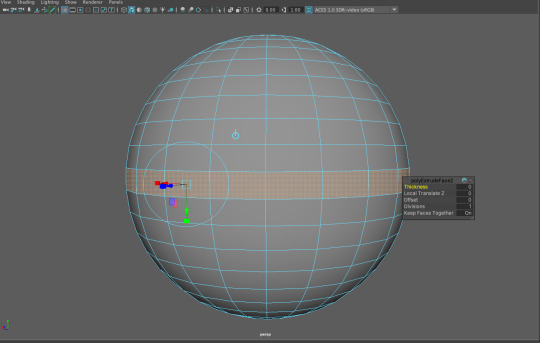


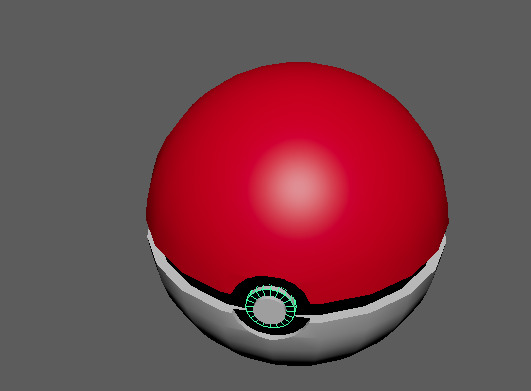
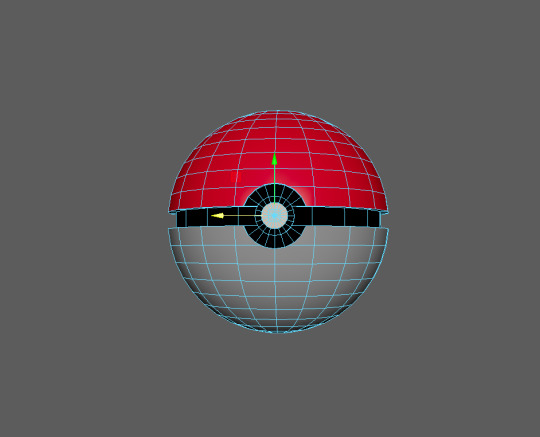
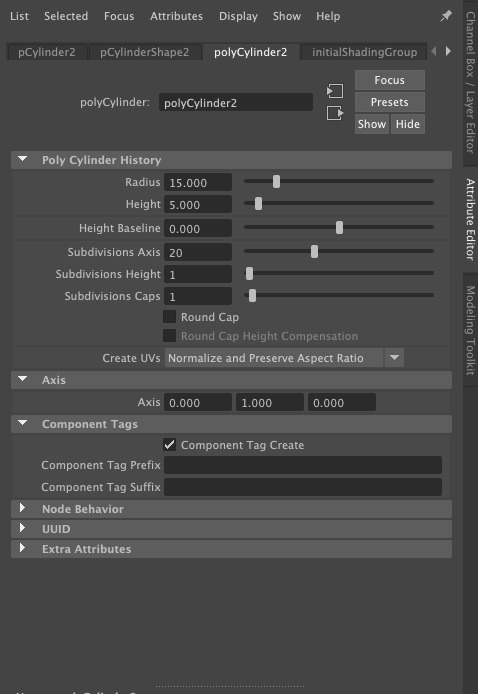

I created a Pokémon ball with autodesk maya.I created sphere with primitive shape.Then I went on the attribute editor. Inside the attribute editor and I selected polysphere1.Then I changed the radius to 100.Then I changed the subdivision height to 21 but any odd number will work.
To make the band around the Pokémon ball, I held down the right mouse button to open the radial menu and selected the face button.I can use the modeling toolkit to select the face button. Then I selected the middle of sphere and this is why we needed an odd number.you can either can drag a box around the middle or hold shift and click each polygon.when I selected all the middle section,I used the extrude tool. When the extrude selected a small box appeared with the options to extrude,to the faces that were selected and I made the thickness to a 3.0.
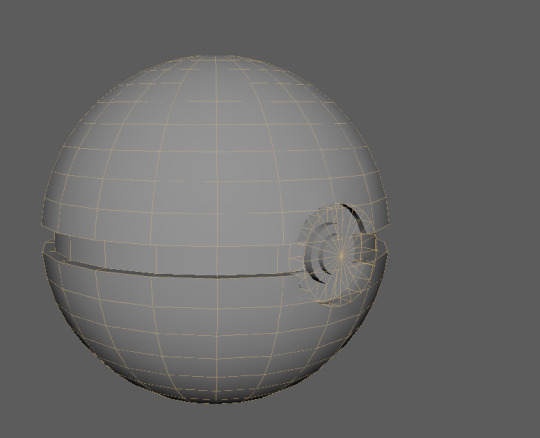
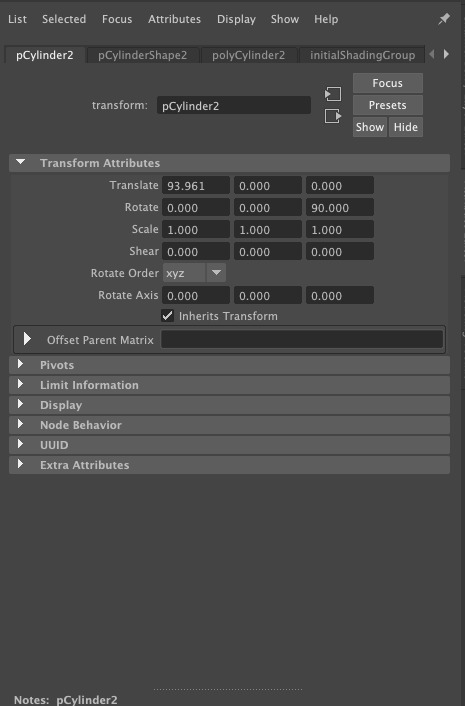
I created a button, so I created a new primitive cylinder. Then I went on attribute editor.inside the attribute panel select the polycylinder1 and changed the radius to 25.0 and I changed the height to 10.0. Now swappedto pcCylinder1 and that's the object group name Te change the z rotation to 90. Then I returned it back to object mode.
I created Boolean,so I select the pokeball polysphere. Them I held down shift and I selected the button polycylinder1 and I created a Boolean. This important because that is ball is selected first as it will become the parent. Adjust the cylinder what's becoming the button, until I'm happy with its use the move tool to adjust the position.it look good so I'm happy with it.
I created the second button, I created the new primitive cylinder. Them I went too the Attribute editor. Inside the attribute selected polycylinder2 and I changed the radius to 15.0 and height 5.0. Now I swap to the polycylinder2 and thatthe object group name. To change the e rotation to 90. And I adjust the position of the new cylinder to make the button. Then I repeat the process until I'm happy with it and I put the radius to 10.0 and the height 5.0, and z rotations to 90.0 and adjust the button until I'm happy with it. Then select the ball I created, this will be called polysurface1 which is the outliner menu but remove in from history. This make it think it's one object than 2. Press the menu button.
The materials I used to create the Pokémon ball. I returned to the face selection mode.I held down the right mouse button to open the radial menu and the selected face or the selected this from the modeling toolkit. Then I selected the middle band of your ball,I held shift and clicked each polygon. And it will turn orange when it’s selected. Hold the right mouse button down and a menu will appear on the screen. And at the button of the menu will be an option is called assign new materials. Some of materials that were used are blinn which is dull reflections like metal, lambert which is No reflection and phong is a plastic/glass style reflection. Io change the colour by clicking the colour swatch where it says colour next to it. I just repeat this process for the rest of the Pokémon ball,to assign a new material to each part.I need to selected the rim parts that overlap the middle loop when selecting the top and bottom halves. When it's the middle part frontand button and I didn't need to select there, instead select the whole object and assign a new or existing material to them and only assign the materials if you want it to be the same as the rest of the ball.at the end with the finished product should look like a Pokémon ball.
0 notes