#diffractive lens
Explore tagged Tumblr posts
Visit Tumblr Blog
Explore Tumblr blogs with no restrictions, modern design and the best experience.
Last Seen Tumblr Blogs


Fun Fact
The Tumblr office adopted Tommy, an 11-year-old Pomeranian.
Text

Photographer Chris Levitan captured a rare and mesmerizing moment involving Capella, the brightest star in the constellation Auriga. Without any editing, his lens recorded an intriguing figure of double inverted triangles, likely caused by the diffraction of light in an ice crystal that passed through the exact angle as soon as the camera clicked.
Capella, with its apparent magnitude of +0.24, is one of the brightest stars in the night sky, positioning itself as a cosmic beacon 42.2 light-years away. Its proximity to the Celestial North Pole makes it even more special for astronomers and sky lovers alike.
923 notes
·
View notes
Text

This stunning image from the James Webb Space Telescope shows 50,000 sources of near-infrared light. The galaxies of Pandora’s Cluster act as a natural gravitational lens, magnifying distant galaxies from the early Universe. Some lensed sources, red in color and distorted, provide a glimpse into the past, stretching the very fabric of spacetime. A foreground star shows Webb’s unique diffraction spikes.
Credit: NASA, ESA, CSA
35 notes
·
View notes
Text
The Polynon: A Geometry of Consciousness
How Consciousness is a fundamental substance and everything else, including the Observer, is it's function of self-reflection within a complex construct and hologram.
Introducing the polynon:
A polynon is a conceptual geometric entity, a polytope of which vertices are non-events and its edges, holograms. A polynon contains all the holograms of that which can be projected as a polytope. From tetranon to dodecanon, and special cases such as dinon and nullanon.
The epistemological foundation of the polynon is a non-event, hence multi (poly) non-events. The ontological foundation is a noumenon, both in its negative and its positive aspect.
Collapsing the noumenal realm into a single dimension results in the conceptual noumenal monad, where the perceptual border is equal to the infinity of noumenal possibilities, as well as the phenomenal something.
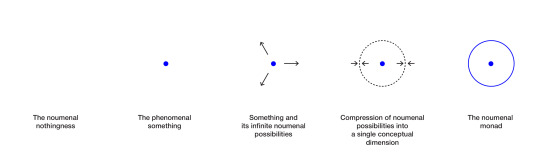
Or, as "a cercle with the centre everywhere and circumference nowhere". A monadic embodiment of the thing and the non-thing, the visual expression of the substance of consciousness.
The neutral monistic approach enfolds the ancient knowledge of the self, and the contemporary science of consciousness, from a Vedantic self reflected in Indra's net, to a multi-dimensional implicate and explicate construct of Bohmian orders.
Also encapsulated in the formulation f(f)=f, akin to an Ouroboros mathematical formulation symbolizing a form of autopoiesis or self-production ad infinitum, a self-referential Fichtean process where the self (I) is both the creator and subject of its reality.
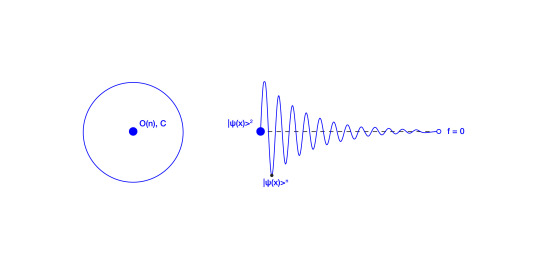
The eternal aspect of consciousness, a timeless monadic essence, is described as the perceptual continuum of f=0, signifying pure, timeless potential.
"Eternity isn’t some later time. Eternity isn’t even a long time. Eternity has nothing to do with time. Eternity is that dimension of here and now that all thinking in temporal terms cuts off." - J. Campbell
The wavefunction is defined here as a layer of the noumenal monad, a transition between epistemological and ontological, given by the limits of the Observer's senses and perception.
In this context, |ψ(x)>*n, with n not strictly equal to 2, transcends its conventional mathematical role within Hilbert space and diverges from standard quantum mechanics, suggesting that different values of n represent distinct dimensions or layers of noumenal collapse.
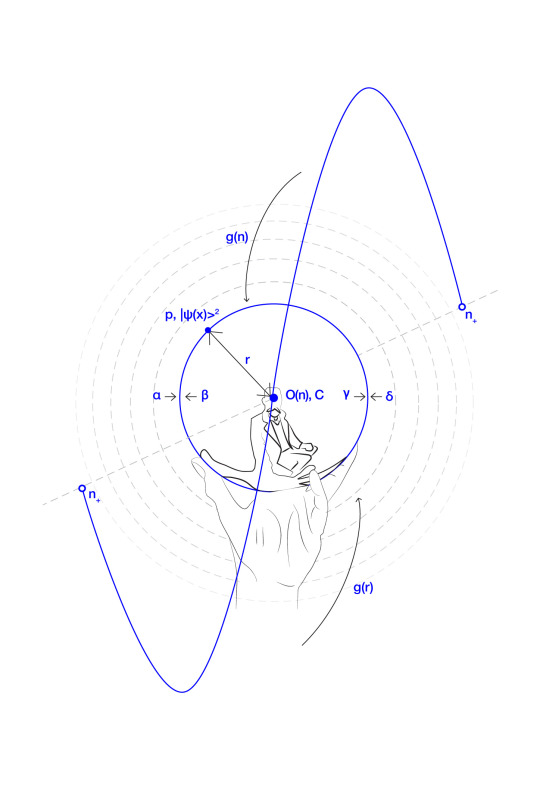
Each wavefunction is a layer of the noumenal lens, of which border is (n+), or consciousness C; it’s contents are negative noumena (n-) and it’s holographic centre “collapsed” onto a phenomenal Observer O(n) as function of noumenal self-reflection of consciousness.
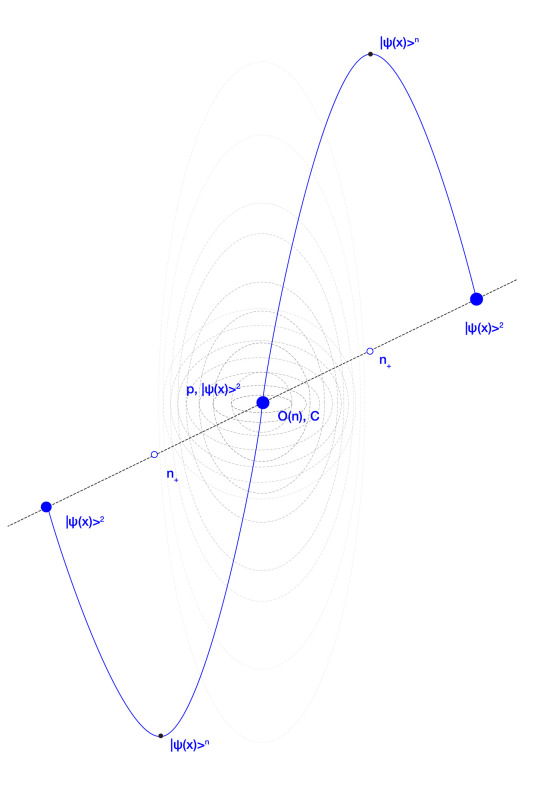
Furthermore, the Observer is envisioned as a holographic projection sitting at the core of the noumenal lens, emerging from the focus and diffraction of noumenal probabilities within the noumenal lens.
The perceptual border of positive noumena (n+) reflects and focuses noumenal probabilities (n-) into the hologram of the Observer O(n).
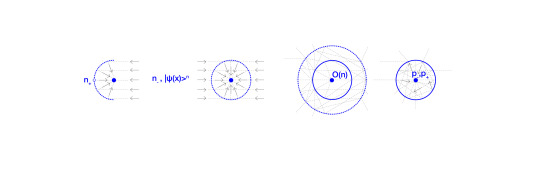
A rotation of noumenal lens reveals the noumenal essence (n+), hidden under the superposition of the noumenal lenses (n-) and the hologram of the Observer O(n).
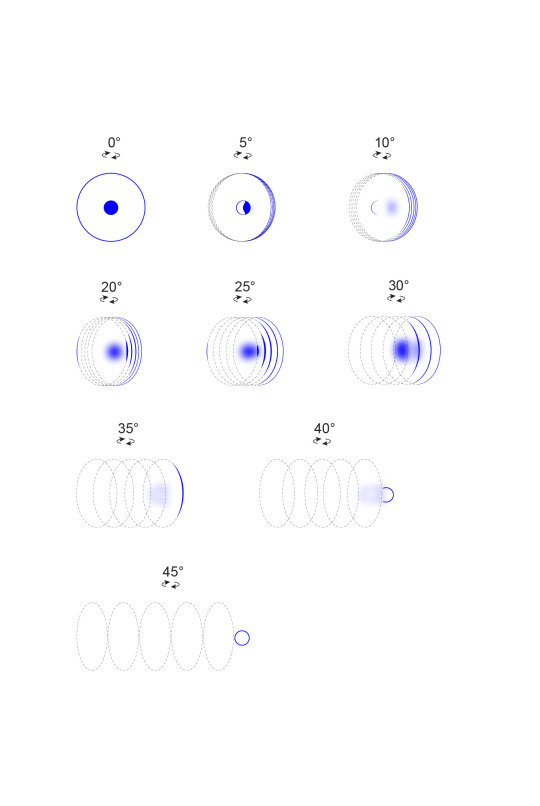
The observer’s perceptual focus, directed through Cognitive Gravity G and visualized with noumenal g(n) and cognitive gradients g(r), refracts the essence of Consciousness, transforming noumenal vertices into discernible edges like light through a prism.
As the number of noumenal collapses increases, the complexity and breadth of the observer’s perceptual dimension diminishes, resulting in a progressive refinement and narrowing of perceptual prowess of the observable construct.
A cognitive threshold marks the evolution from a purely phenomenal observer to one with phantasiai and developed cognitive functions. This threshold varies according to the local conditions of the observer’s cognitive gradient and gravity and the overall noumenal function.
The hologram of a polynon enfolds within it the reflection of the noumenal substance, that both originates and reflects consciousness. It encapsulates the entirety of consciousness in each of its vertices and edges, as projections into a perceptual reality.
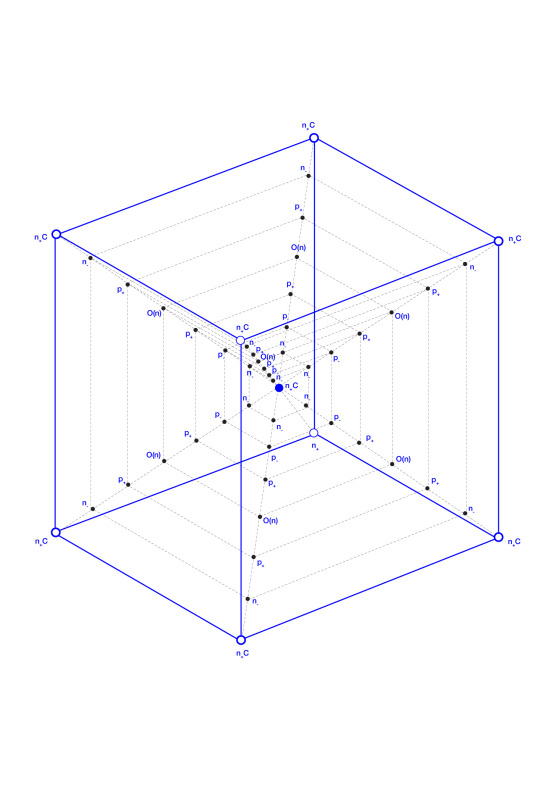
The concept of “consciousness nodes” describes (n+) zones between noumenal lenses (n−), revealed as vertices of the polynon, equal and identical in nature.
The Observer O(n) is in superposition with the phenomenal p+, epiphenomenal or phantasiai p-, negative noumena n- and noumenal vertices (and centre) n+ of the hexanon as a function for self-reflection of consciousness C.
The polynon is abstract and elusive, residing beyond human imagination yet within its grasp. No heavier than a fleeting idea, but far too heavy to be understood. A palindrome for language and thought, mirroring itself in perpetual paradox. Beginning the same way it ends.

From the "Polynon: A geometry of Consciousness", by Tib Roibu Read the paper here.
53 notes
·
View notes
Text
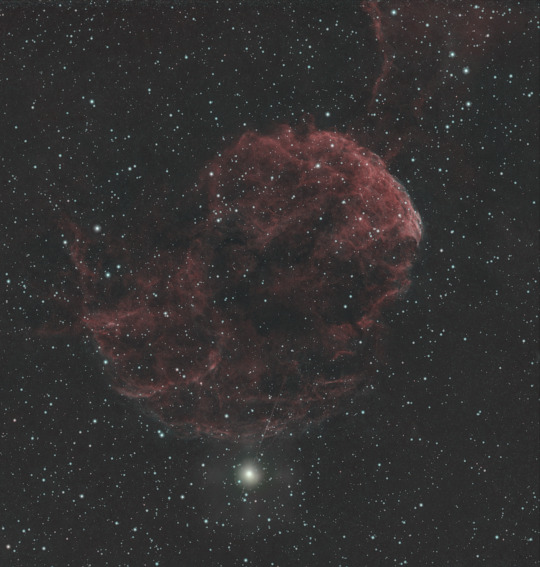
The Jellyfish Nebula - IC443 - SH2-248
45*300s in HOO
Askar 71F
ASI 533MC Pro
Askar Color Magic C1 Ha+O3
Bortle 5.5ish
This nebula is one of the most studied supernova remnants in existence, thought to be 30-35k years old. It is located in the constellation Gemini, approximately 5kly away from Earth.
It felt great to finally get out and have a great night again! My guiding was still awful and unfortunately I seem to have gotten a cat hair on the lens, causing the awful diffraction spikes on Propus, the brightest star in the image, but I'm very happy with how this turned out! Next time I get the opportunity to go out to the state park I shot this from, I'll use my other filter to capture S2 and O3 data so I can experiment with more pallettes.
49 notes
·
View notes
Text
Behold NGC 2283, a barred spiral galaxy 45 million light-years away captured by James Webb Telescope
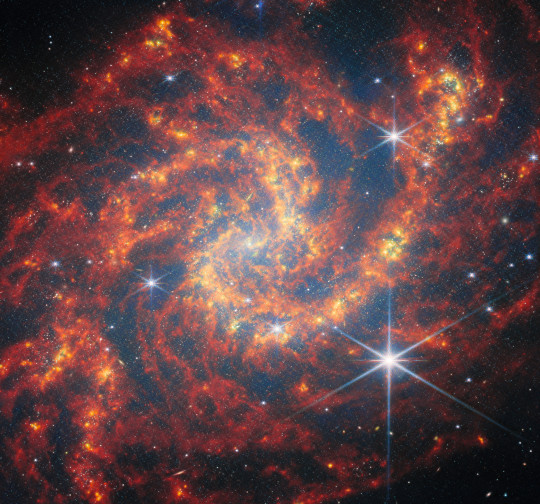
The James Webb Space Telescope has done it again! Today, NASA/ESA/CSA released Webb’s latest mesmerizing image—a breathtaking view of the barred spiral galaxy NGC 2283, located 45 million light-years away in the constellation Canis Major. This cosmic marvel, captured using Webb’s Near-Infrared Camera (NIRCam) and Mid-Infrared Instrument (MIRI), showcases the galaxy’s intricate structure, star-forming regions, and the life cycle of stars in dazzling detail.
A Glimpse into the Heart of NGC 2283
Barred spiral galaxies like NGC 2283 have a central bar of stars, acting as a cosmic highway that channels gas into the galaxy’s core, fueling star formation. Webb’s infrared eyes reveal the delicate interplay between stars, gas, and dust, bringing into focus the glowing knots of gas where new stars are being born. These dense pockets of hydrogen, ignited by stellar nurseries, illuminate the graceful spiral arms winding around the core.
The Power of Infrared Imaging
Webb observed NGC 2283 for 17 minutes, collecting data across six different infrared filters. These filters allow astronomers to peer through cosmic dust and uncover hidden details. The image reveals:
Brilliant star clusters scattered throughout the spiral arms
Polycyclic aromatic hydrocarbons (PAHs), sooty molecules that help astronomers trace cosmic chemistry
Interstellar gas clouds heated by young, massive stars
Foreground stars from our Milky Way, their diffraction spikes adding to the celestial display
A Galaxy Shaped by Stellar Explosions
NGC 2283 is no stranger to cosmic fireworks. Just over two years ago, astronomers witnessed a stellar explosion in this very galaxy. The supernova, SN 2023AXU, was a Type II supernova—the violent death of a massive star at least eight times the mass of our Sun. These spectacular explosions enrich the galaxy with elements like oxygen and sodium, seeding the next generation of stars and continuing the grand cosmic cycle.
Part of a Larger Cosmic Survey
This image is part of an ambitious Webb program (#3707) aimed at studying the intricate relationships between stars, gas, and dust in 55 nearby star-forming galaxies. By observing these galactic ecosystems, astronomers hope to unravel the mysteries of star formation and galaxy evolution, giving us deeper insights into our own Milky Way’s origins.
A Cosmic Time Machine
As we marvel at this new glimpse of NGC 2283, we are reminded that every light-year Webb’s gaze traverses is a journey back in time. This image captures NGC 2283 as it was 45 million years ago—when early primates roamed Earth and our planet was undergoing climatic shifts. Through Webb’s lens, we witness history written in the language of starlight.
Stay tuned for more stunning discoveries as Webb continues to unlock the universe’s deepest secrets. What do you see in this cosmic portrait? Share your thoughts in the comments! Visit www.jameswebbdiscovery.com for the latest discoveries.
#nasa#james webb space telescope#jwst#webb discoveries#spaceexploration#jameswebbtelescope#astronomy#stargazing
28 notes
·
View notes
Text
First light from ESA's new Euclid space telescope with an ultra high-res, wide-angle lens to map the structures of the universe, helping astronomers study dark matter/energy.
Perseus Cluster of Galaxies

This Moon-sized patch of sky looks back ten billion light-years and shows about 100,000 galaxies, plus some stars from our own galaxy (points with diffraction spikes).
The cluster's Y shape reveals the gravitational influence of dark matter filaments, the web of the universe which until now was too big to fit in any telescope's view.
The Hidden Galaxy (IC 342)
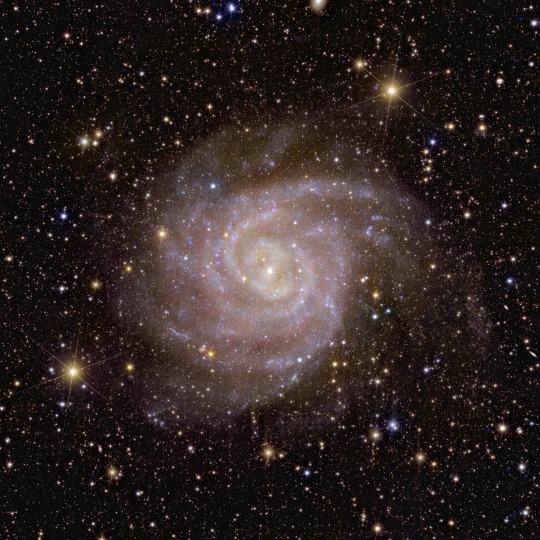
Euclid took only 5 hours to peer through the thickest part of our own galaxy edge-on and capture this galaxy hidden behind it.
Its spiral shape gives us an idea what the Milky Way would look like from above. The image is false color: red has been shifted towards blue so infrared can be shifted up to red we can see.
Irregular Dwarf Galaxy NGC 6822
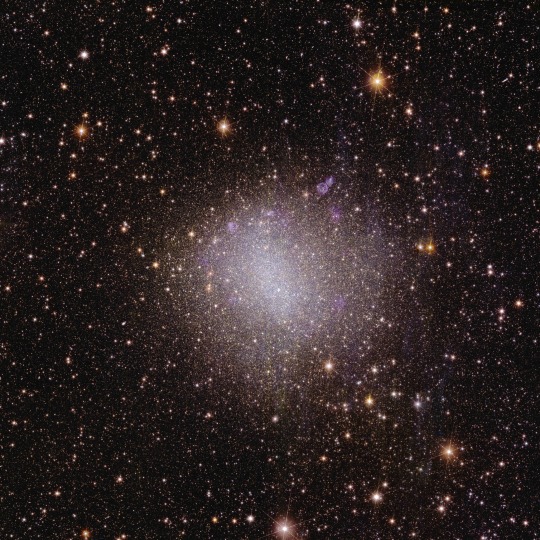
Just 1.6 million light-years from Earth, this little companion to the Milky Way is so close that until now it could only be captured in low res by ground telescopes or zoomed in to just one small part by Webb or Hubble.
It has a lot of old, low-metal, first-generation stars that can help astronomers study the universe's history.
Globular Star Cluster NGC 6397

It looks similar to a dwarf galaxy, but is much smaller and closer at just 7800 light-years away, and it's within the Milky Way. Perturbations of its outer stars in streaks and waves give clues about gravitational interactions within the Milky Way.
Again, other telescopes can't see the whole cluster in any detail, both because of its size and the high contrast between the bright center and faint outer stars, which would take Hubble hours to capture. Euclid imaged both in just an hour.
The Horsehead Nebula

This smear of dust lies in the larger star-forming region of the Orion Nebula just below Orion's belt. It's one of the most busy star nurseries in our vicinity, just 1375 light-years away.
Euclid's resolution is such that close study of this one-hour exposure should reveal many baby stars, brown dwarfs, and young Jupiter-mass planets.
236 notes
·
View notes
Text
A Scam... Tutorial?
I was watching Photoshop tutorials and YouTube recommended this video to me.

And I was already skeptical. Clarity is an extremely powerful and useful adjustment in Lightroom and Photoshop and I could not think of a reason why anyone would recommend *not* using it to the extent they were using ALL CAPS.
But I was curious if there was a new technique I was unaware of. It's impossible to know everything regarding Photoshop and I learn new stuff all the time.
So I gave the video a chance.
youtube
To quote my late father... what a crock of shit.
I have seen a few scam videos in my time, but I cannot think of ever seeing a digital art tutorial scam. I found myself angry and a strongly worded comment just flew out of my brain.

I continued...
"First, no one should use clarity and texture at 100%. And I think showing the effects at 100%, as if that is a normal workflow, is highly misleading. You are creating a problem that does not exist and then offering a solution to it. And then you are using a provocative title to attract clicks. Not to mention you may be convincing beginners to abandon clarity and texture altogether when it is one of Camera Raw/Lightroom's most powerful tools. People should absolutely use clarity and texture. That is a crazy thing to tell people.
Second, high pass sharpening is… old school. It works but it can create a lot of nasty artifacts if overdone. (Personally I find it too crunchy and prefer smart sharpen on a smart object so it is non destructive). Clarity and texture are much more modern approaches to help bring out detail and I find they actually produce *fewer* artifacts than typical sharpening filters/techniques. And if you have trouble with clarity or texture adjustments in the bokeh areas, then use a local adjustment that doesn't affect those areas. You can even do a separate clarity and texture layer and use the opacity slider and the blend if and masking just like you did with the high pass. Why are you acting like you can only make a global clarity adjustment?
Essentially you are giving a worst case scenario of a clarity/texture adjustment just so you can make your technique seem like it is orders of magnitude better.
And what is even more infuriating is that you can do clarity/texture AND you can do high pass sharpening *together*. Why are you acting like it is one or the other?
I'm so confused by your motivations. Did you invent this clarity problem just so you could make a click bait-y title so you can then sell your little panel thing? And then you used an old school sharpening technique that many have abandoned so it seems like you have secret knowledge that was lost? And I could argue it isn't even a better solution. It's just a different way to achieve similar, if not worse results.
This is like if you put a pound of sugar in lemonade and then said, "Wow, this is way too sweet! You should try my superior lemonade that has a normal amount of high fructose corn syrup."
Lastly, if clarity and texture (set at a reasonable amount) aren't enough to produce sharp, detailed results, then it might be worth considering your actual photography techniques. Modern photography with modern sensors and lenses should be able to produce extremely sharp results without having to juice the hell out of sharpening filters in software. 20% clarity and texture (if that) plus a little bit of smart sharpen is usually more than enough to bring out detail in almost all of my photos and I have never been accused of having soft images.
So, if you are getting soft results, you might need to adjust how you are capturing your images. Are you using a very small aperture like f/22 on that macro image? That could be a diffraction issue. Perhaps it would be better to use a larger aperture at the lens's sweet spot and then do a focus stack.
I mean, I can't think of any other reason a person would need to do 100% clarity and texture unless they completely bungled the actual photography or were still using a kit lens.
I'm sorry but this video is a mess."
Let's look a little closer at what he did to his example.
He started with this.

Then he applied clarity & texture to MAXIMUM. Which, again, is like adding a pound of sugar to lemonade.
And by golly, it looks pretty bad!
Then he used his secret ancient high pass technique to get this.
Which looks a hell of a lot like the unsharpened image to me. And the high pass sharpening is probably only visible when zoomed in to 100% on the full resolution image.
Which is one of the issues with this technique. It isn't even noticeable on social media—the place where the majority of photos are viewed these days.
And then after showing you this groundbreaking effect that does almost nothing, he tries to sell you his Photoshop panel.

Yes, that' looks intuitive. Just hit the blue checkmark to do... something?
And what is this green eyeball with a crescent moon inside?


Only $50!

And if you want to know what the purple X button does, you need to pay another $15 for the tutorial on how to use it.

Neat.
Just to prove this is all a scam I'd like to show you an example of my own.
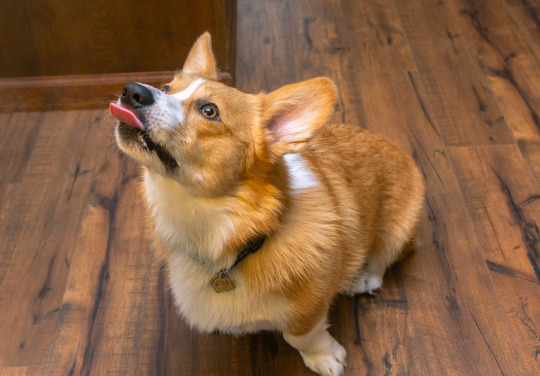
Here is a picture of Otis with no clarity, texture, or sharpening applied.
And here is a reasonable amount of sugar. I set the clarity and texture to where I felt they looked best.
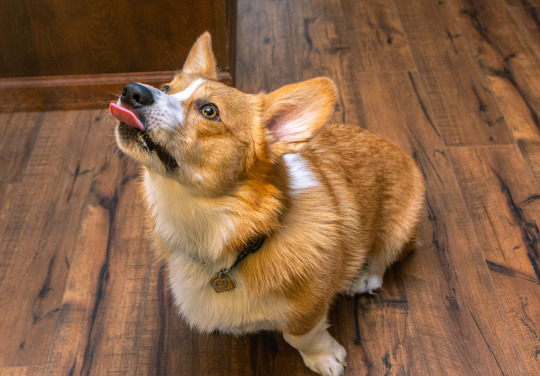
Wow, that looks better. Not only that, you can actually see the difference at social media resolutions!
Now let's add a pound of sugar. MAXIMUM CLARITY GO!
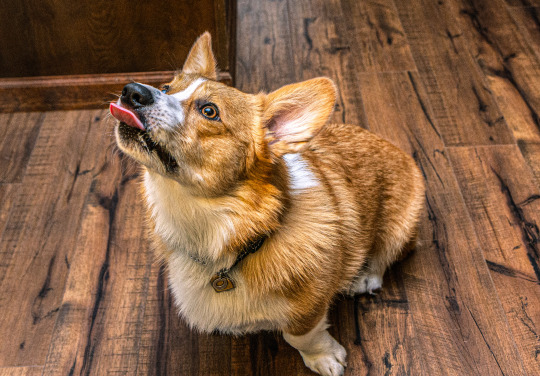
Yep, that looks a bit rough. Because no one does this ever.
And now let's see his high pass sharpening technique.
Barely a difference on social media.
Okay, let's try zooming in 200%. Maybe that will give the high pass sharpening the victory.
Normal...

Reasonable clarity & texture...

FULL BEANS CLARITY & TEXTURE!
High pass...

Just as I said, the high pass introduces crunchy sharpening artifacts.
I can't speak for anyone else, but I much prefer the subtle clarity and texture. Perhaps the details in the eyeballs aren't quite as crispy, but in the version that isn't zoomed in, I don't think you feel like the image is soft and the normal clarity and texture adjustment added contrast and actually noticeable detail to the image.
In the end, except for the pound of sugar, these are all subtle adjustments and other photographers might be the only ones who would ever notice. The original Otis picture was probably fine to most people. So disparaging the clarity slider was even more unnecessary.
Why does this matter?
Being a beginner at photography is frustrating. There are so many resources to choose from and it's very difficult to know who is competent and who you can trust. If someone just starting out was recommended this video they could be easily be convinced it is legit. And it could set them back in their progress because they think useful tools will actually make their photos worse. They will waste a lot of time doing a time consuming old school technique in Photoshop when they probably never needed to even leave Lightroom in the first place. They could move two sliders to get similar or better results and it would only take literal seconds.
Time is valuable to a lot of people. And he seems intent on wasting everyone's time. And what sucks is that I have no real way of exposing this dude on a scale that would do anything.
I also just really hate the idea that educational content is being used to scam people.
This is some PragerU shit right here.
68 notes
·
View notes
Text

Hubble rings in the new year with image of constellation Hydra
This NASA/ESA Hubble Space Telescope image reveals a tiny patch of sky in the constellation Hydra. The stars and galaxies depicted here span a mind-bending range of distances. The objects in this image that are nearest to us are stars within our own Milky Way galaxy.
You can easily spot these stars by their diffraction spikes, lines that radiate from bright light sources, like nearby stars, as a result of how that light interacts with Hubble's secondary mirror supports. The bright star that sits just at the edge of the prominent bluish galaxy is only 3,230 light-years away, as measured by ESA's Gaia space observatory.
Behind this star is a galaxy named LEDA 803211. At 622 million light-years distant, this galaxy is close enough that its bright galactic nucleus is clearly visible, as are numerous star clusters scattered around its patchy disk. Many of the more distant galaxies in this frame appear star-like, with no discernible structure, but without the diffraction spikes of a star in our galaxy.
Of all the galaxies in this frame, one pair stands out: a smooth golden galaxy encircled by a nearly complete ring in the upper-right corner of the image. This curious configuration is the result of gravitational lensing that warps and magnifies the light of distant objects. Einstein predicted the curving of spacetime by matter in his general theory of relativity, and galaxies seemingly stretched into rings like the one in this image are called Einstein rings.
The lensed galaxy, whose image we see as the ring, lies incredibly far away from Earth: we are seeing it as it was when the universe was just 2.5 billion years old. The galaxy acting as the gravitational lens itself is likely much closer. A nearly perfect alignment of the two galaxies is necessary to give us this rare kind of glimpse into galactic life in the early days of the universe.
10 notes
·
View notes
Text
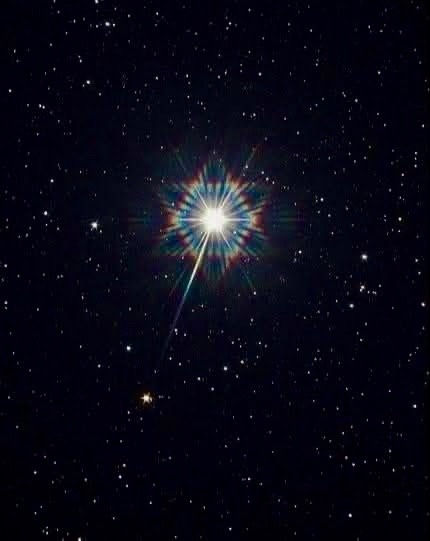
In 2014, photographer Chris Levitan captured a rare and mesmerizing moment involving Capella, the brightest star in the constellation Auriga. Without any editing, your lens recorded an intriguing figure of double inverted triangle, likely caused by the diffraction of light in an ice crystal that passed through the exact angle as soon as the click click.
Capella, with its apparent magnitude of +0.24, is one of the brightest stars in the night sky, positioning itself as a cosmic beacon 42.2 light-years away. Its proximity to the Celestial North Pole makes it even more special for astronomers and sky lovers alike.
This remarkable record shows the magic that unfolds when science and art come together, uncovering phenomena that feel almost impossible to recreate. It makes you wonder—how many more mysteries does the universe still hold?
8 notes
·
View notes
Text

Laser-based 3D printing: A powerful tool to advance optical microscopy
Today, optical microscopy is one of the most widely used methods in various multidisciplinary fields for inspecting objects, organisms, or surfaces on a small scale. However, its lateral resolution is fundamentally limited by the diffraction of light—a constraint that, with the use of conventional lenses, has become increasingly critical as the demand for higher resolutions grows. The integration of a dielectric micro-sphere behind the last imaging lens of an optical microscope offers a promising solution to significantly enhance lateral resolution, a research area known as micro-sphere-assisted microscopy. However, in practice, the use of commercially available dielectric micro-spheres comes with substantial limitations. Cumbersome workflows are required for proper handling of the micro-spheres, and the sizes of commercially available dielectric micro-spheres are also limited. These challenges hinder the widespread application of micro-sphere-assisted microscopy as a cost-effective alternative to expensive microscopy solutions, such as scanning electron microscopy or atomic force microscopy.
Read more.
#Materials Science#Science#3D printing#Lasers#Optical microscopy#Materials characterization#Dielectric#Lithography
17 notes
·
View notes
Text
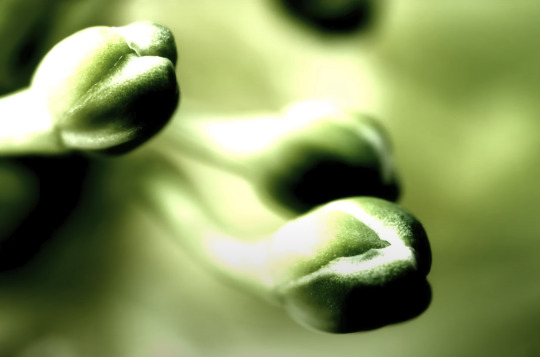
Life’s Little Details
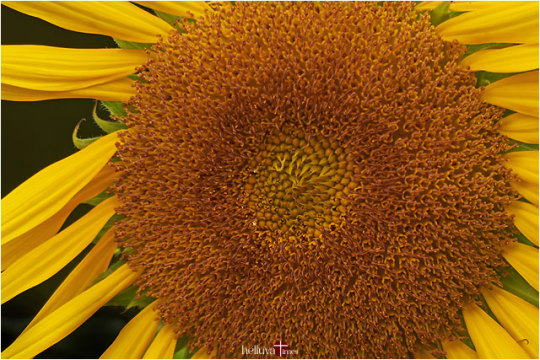
A Helianthus annuus or sunflower stealing the show at the 2022 Singapore Garden Festival. Photo credit: Eleanor Chua.
This was taken at a 1200mm equivalent crop. We weren’t expecting such details from the small 1/2-inch sensor. It might’ve also helped that the camera had a constant f/2.8 aperture so that lens diffraction wasn’t a real issue. Oh yes, this was also converted from a raw file.
#photographers on tumblr#flora fauna#flora photography#flower pics#Helianthus annuus#leica photography#leica v lux 4#photography tips#sunflower photos
15 notes
·
View notes
Text

The noumenal lens
A process of focusing and diffraction amplifies the reflexivity between the observer and the observed, only to reveal that there is no real distinction between them.
Consciousness is a fundamental substance, and everything else a "clever" reflection of it.
The Observer, in this construct, is envisioned as a holographic projection sitting at the core of the noumenal lens, emerging from the focus and diffraction of noumenal probabilities within the noumenal lens.
This conceptualization likens the simplest form of an observer to a monad, a single phenomenal construct surrounded by its noumenal substance, illustrating an infinite array of perceptual lenses in superposition, with the noumenal at their margins and the observer positioned at the perceptual core.
The intersection of noumenal probabilities with the observer’s perceptual lens acts as a focusing mechanism, directing the collapse of the noumena into the observer’s cognitive field.
#geometry#geometrymatters#pregeometry#consciousness#observer#monism#noumena#phenomena#science#academia#philosophy
14 notes
·
View notes
Text
youtube
sometimes you run into something that just overturns your understanding and builds a new, more coherent picture. this is one of them.
they taught us about diffraction theory at uni - Fresnel, Fraunhofer all of that, we did experiments with lasers - but it never occurred to me to analyse lenses in terms of diffraction. it makes so much sense now! i was never entirely satisfied by the ray approximation to light, so seeing what's really going on in the lightfield and how you can use a diffraction plate as a lens, with each ring contributing higher order Fourier terms to the image, is like. crazy cool.
25 notes
·
View notes
Text
My professor joked that our eyes have a diffraction grating inside them and my friend believed him. The look of pure horror on his face when he realised that they thought he was serious. The instant regret. For clarification, this is an advanced optics course. He taught us the first optics course also. We discussed how the eye's lens works. He just realised how quickly we can forget information today.
#Physics#Biology#Physicists aren't always good biologists#Poor guy just wanted to show us how a spectrometer works and was making conversation
2 notes
·
View notes
Note
Hi hi! I have some more requests hehe:
Hannah Foster and Ethan Green w chalk on pavement/sidewalk
Skud (Needy Beast from Killer Track) w blurry lights at night (like when they become the blurry little circles, or the star criss-cross shapes? If that makes sense??)
Ruth Fleming w My Little Pony + kidcore stuff
If that's all cool and good?
Thank you thank you so much also for all my previous boards (I love them all so much!!)
-🦧
Hi hi!! These all sound great!! (also that phenomenon is called diffraction spikes or the starburst effect, and is common in stars!! With stars, it happens bc of the shape of the telescope :3)
(EDIT: you're probably meaning lens flare)
2 notes
·
View notes
Text
Amazon-Style Product Photography Tips
I got this message from a lovely follower.
Now, a fairly large part of my new steady job is product photography. Not glamour shots, more documentation. The company I work for makes, among other things, licensed drinkware (think water bottles, mugs, tumblers, etc.). Part of my team's duties is to photograph a mockup or finished product both for our records and to submit to the license holder.
The routine typically goes: put item facing forward in lightbox. Click. Rotate to the left. Click, etc. for the back and right. Then a closeup of the copyright info.
Here, finally, is my question: one of the license holders decreed that all of our photographs must be taken at f/8 and shutter time (?) of 1/25s. This strikes me as… not always optimal, considering the range of colors of objects as well as different materials: polypropylene both transparent and opaque, stainless steel, and lacquered cardboard for packaging. I would love to hear your thoughts on how I might better (while being consistent!) adjust camera settings to account for these kinds of factors
As an added bonus, we let the camera decide white balance/color correction. But I don't think I'm knowledgeable enough to try and correct myself, considering none of the monitors/printers I use are color-correct in the first place. I just know there have been many times where I've submitted photos only for the license holders to be like, "Hmmmm, that green doesn't seem like the right kind of green…RESUBMIT!"
First, I'm going to answer this specific question, but at the end I'm going to recommend a full setup for taking these type of rapid fire product shots.
My answer:
f/8 makes sense. Outside of macro photography, this allows a deep depth of field assuring the photo is sharp and in focus for the entire depth of the product. It is usually the sharpest part of the lens and it is not so small of an aperture that you risk diffraction effects softening your image. They probably were told this by a photographer and thought it applied to all of the camera settings.
The shutter speed is problematic. By forcing it to a fixed setting, your camera is going to choose whichever ISO gives a good exposure. And if you don't have enough light, it will choose a high ISO that will possibly add a great deal of noise to your photo. Noise can corrupt the colors of your photo and it just looks bad.
If your camera is on a tripod and they want the sharpness and depth of field f/8 grants you, then I would set your camera to aperture priority mode (usually Av), lock your ISO to it's lowest number (usually 100) and then your camera will choose the best shutter speed on its own.
So… Camera on tripod Av mode f/8 ISO 100 Camera chooses shutter speed
This is all assuming you are using a tripod and continuous lighting. If you are handholding the camera or using flash, I can rewrite the recipe. Otherwise this will get you very sharp photos with minimal noise.
I'd also recommend getting a shutter release cable so you don't shake the camera when taking the picture. Just search your camera brand and “shutter release” and get the cheap wired version unless you really need wireless.
This is the Canon DSLR one, just to give you an idea.
Be warned, if you do not have powerful lighting, you may get some long shutter speeds. That is perfectly okay as long as it is on the tripod and you aren't shaking the camera when taking the picture.
As far as white balance goes, if you really want it to be accurate, you can order a cheap photography “gray white balance card”. They are as cheap as 10 dollars.
This is the one I use.
There are a couple of ways to utilize the gray card.
Option 1:
You put the gray card in the exact lighting as the product or just hold it directly in front of the product.
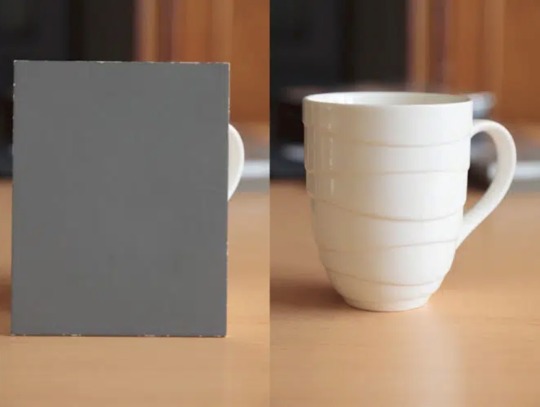
You take all your photos in RAW format (JPEG will not work) and adjust the white balance in Lightroom, Photoshop, or any RAW editing software. Use the white balance picker tool (looks like an eyedropper) and click on the gray card.
This will give you an exact white balance for that lighting environment. You can synchronize those white balance numbers across all of your photos. Lightroom has a copy and paste function or a "sync" button that will change adjustments in all selected photos as you go.
This is the most accurate option because it allows for “tint” adjustments for extra color accuracy.
youtube
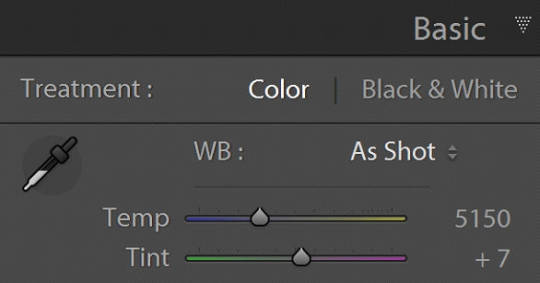
Option 2:
Do the same as above and remember the white balance value. Then set your camera to a custom white balance matching that value. It will probably be around 3200K or 5500K depending on your lights.
Pro tip: If you have any ambient lighting from overhead or other room lights, it could contaminate the photo and skew the white balance into a weird color temperature. Try to make the room as dark as possible aside from your photo lights to avoid this. If you are using flash or have really bright photo lights, this isn't a huge concern.
Option 3:
Use your camera's built in custom white balance tool. It's different for every brand, so you will need to search for a tutorial. But the basic idea is the same. You put the gray card in the lighting of the products, take a picture, the camera analyzes it, and then sets a custom white balance. This can also be done with a white sheet of paper in a pinch.
Here is a video demonstrating the process. Remember every camera brand mau have a slightly different method.
youtube
Good white balance means accurate colors. That is important with product photography and a good value add for your clients. Just be warned, if you change the lighting even a little bit, you have to redo this process. If you bump a light or switch it out for a different one, redo your white balance calibration.
Also, some continuous lights have white balance drift, especially if they allow you to adjust the color temperature manually. Not only will the white balance change depending on the power setting, but it can also change over time. Especially if the lights are used frequently.
Move the lights, redo white balance. Change the power, redo white balance.
And if your lights are stable and on the same power all the time, I’d still redo the white balance every week or so. Personally I would do it before every shoot, but you’ll have to decide if that is worth it depending on how fast you need to turn things around. I usually do it as my first photo in the series so I can set the white balance, select all the photos, and copy the settings to all of them at once.
The nice thing about doing white balance with a gray card is that the results are display agnostic. Even if your monitor is poorly calibrated, you can be assured the white balance is accurate. And if someone says your photos are green, it will be their monitor and not your problem.
You just have to avoid doing any color specific adjustments to the images. Trust the gray card and white balance tool more than your eyeballs and display.
You can boost saturation a tad, but that is all I would mess with unless you know what you are doing. Even if the photos look a little drab or not very colorful, I would leave it alone. It sounds like the importance for this task is accuracy of color rather than making them as pretty as possible.
------------------------------
Okay, that is the question answered. Now I'd like to go through how I would build a setup to do this kind of work.
In the product photography world, this workflow is referred to as "pack shots." The idea is to create a consistent setup so you can just swap out the product one by one and speed through the shoot. It is best to control as many variables as possible so all you need to do is set the product down, take the shot, and repeat.
I'm going to show you my ideal pack shot setup with a light cube. I think it will be similar to what my follower is using. And, if not, it might help him streamline his process a bit.
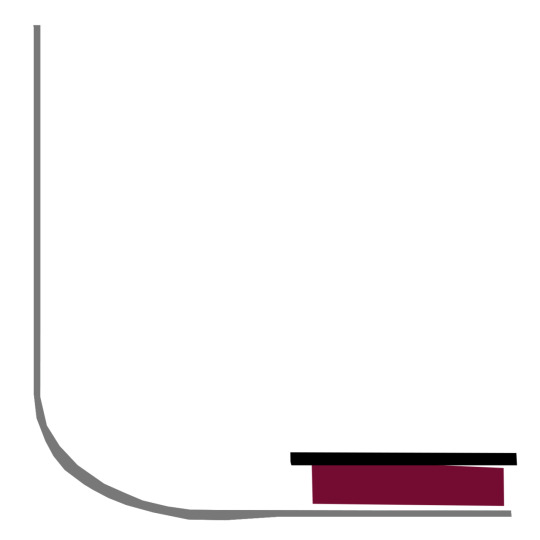
A light cube is just a box made of diffusion material.

You drape a background with the color of your choice. White is usually preferred for Amazon-style pure white background photos. Though I prefer dark gray for aesthetic reasons. You just want to make sure the backdrop has that natural gravity curve so there isn't a hard line or wrinkles.
For lighting, you should get two *identical* lights. They can be desk lamps as long as they are the same and have the same light bulb inside. Then you just place them on either side of the cube. You want the ball of light on the cube to be in front of your subject.

Remember, your light source isn't your actual lights. It's the ball of light on the sides of the cube.
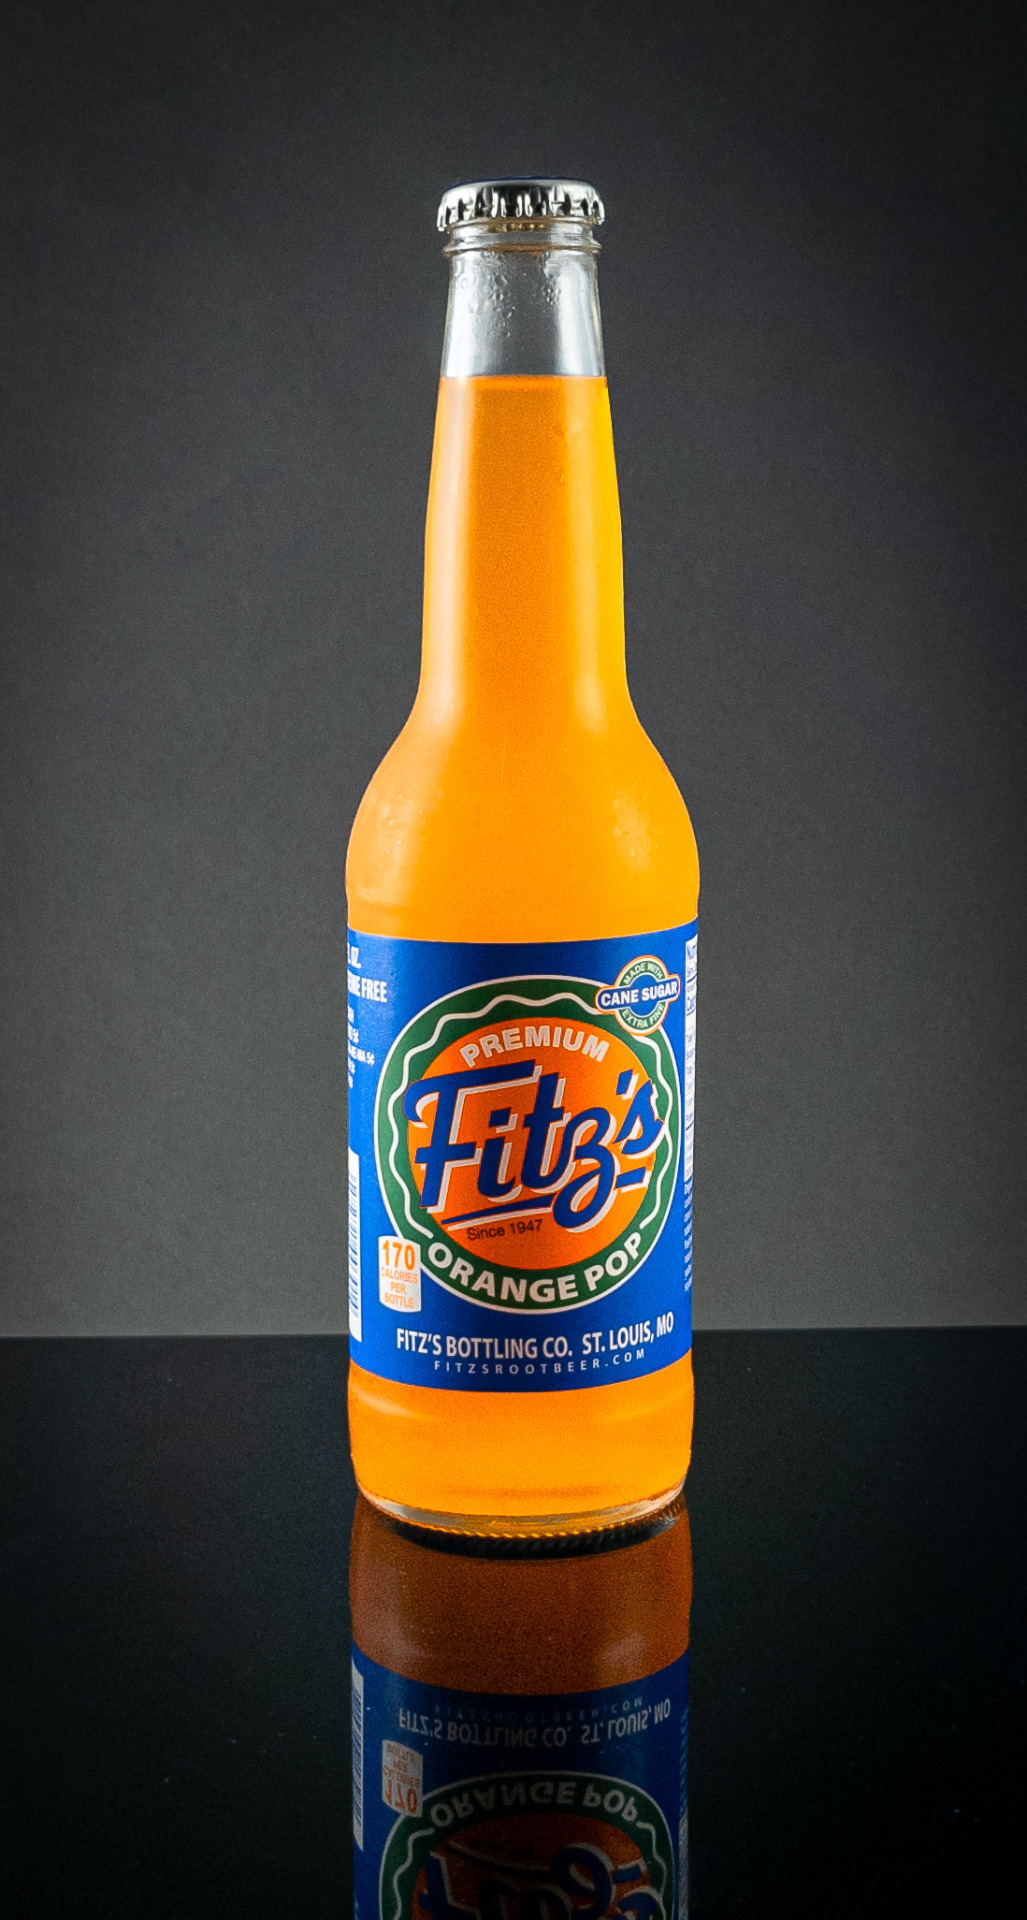
If you want to make it a little fancier, you can get a black or white acrylic sheet to create a reflective surface. You want it as far forward as possible and a little elevated. Here are some things I did in a simple light cube with the setup above.
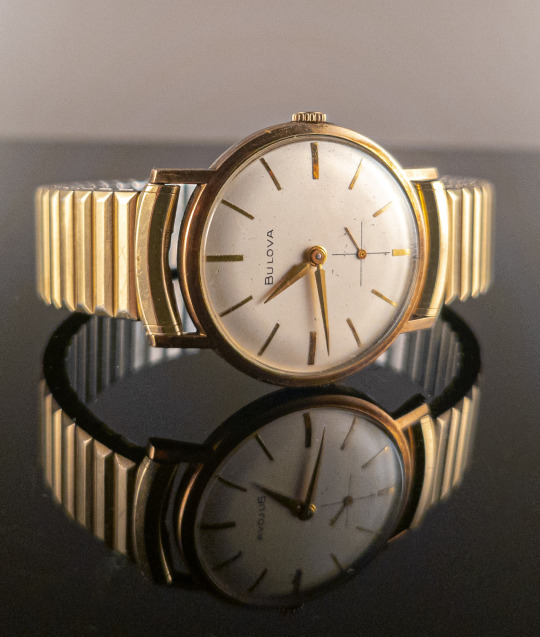
Here is what the white acrylic looks like.
I placed a big book under the acrylic sheet like this.
This allowed me to hide the curve of the background and get a nice crisp transition between the acrylic and the background.
And if you do white acrylic, you can get the background to seamlessly blend.

As I said, two desk lamps will work, but if this is for a business and you want something fast, convenient, and reliable, I would suggest something more robust.
I'd probably get two daylight balanced COB (chip-on-board) LED video lights that have a Bowens mount attachment.
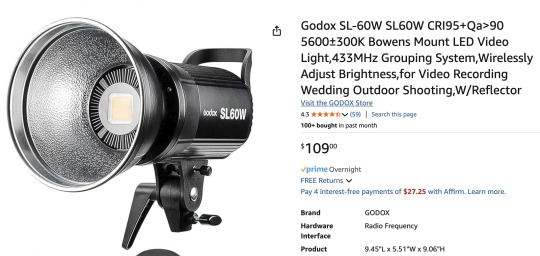
This Godox light is very reasonably priced for its features.
Daylight balanced means one consistent color temperature, so less chance of drift. These are very bright so you can use a quick shutter speed and you won't even need a shutter release cable (still a good idea). You also don't *need* a tripod, but you should still use one. The main advantage of bright lights is they can't be overpowered by room lights. You can be assured any overhead lights or window light will not contaminate your photo. A darker room is always preferable, but if you crank these it won't matter.
The Bowens mount allows you to place any modifier you wish on the light from softboxes to reflectors. But the standard reflector should be fine for the light cube. But if you are taking photos of tall cylinders, a couple of strip boxes might help.

Don't worry about putting the grids on. You just line them up towards the front of the light cube so you have even light from the top to the bottom of your cylinder. Again, this is optional.
Since these lights are so versatile, you can do any kind of lighting for any other photographic needs. Slap on a white umbrella and take company portraits if you want. Or you can use them as video lights to film a worker safety video.
So, here is my recommended ingredient list for a pack shot light cube setup.
Light Cube COB video light Black Plexiglass Seamless paper (color of your choice)
Colored poster board also works if you keep it from getting dinged up. And the light cube also comes with some cloth backgrounds, but watch out for wrinkles.
BONUS TIP: If you want that pure white background like in Amazon shots, add a third light from behind with no background paper. Make the light cube material your background and shine a light through it. You have to make sure it is bright enough to give you pure white, but not too bright that the light blasts your subject from the rear.
Otherwise just use a white backdrop and use Photoshop to brighten it to pure white.
Karl Taylor shows a pack shot setup without a cube, but the same principles apply. He shows you how to dial in that white but not too white background. Just imagine instead of shining a light onto a background, you are shining a light through the background (the back of the cube).
youtube
13 notes
·
View notes