#diy tutorials
Explore tagged Tumblr posts
Visit Tumblr Blog
Explore Tumblr blogs with no restrictions, modern design and the best experience.
Last Seen Tumblr Blogs


Fun Fact
Women make up for the other 50% of Tumblr’s audience.
Text
How to Make DIY Personalized Wooden Coasters: Stylish and Easy Home Project
Just made a post about a fun and easy DIY project—personalized wooden coasters! Perfect for adding style to your home or gifting. Check out the step-by-step guide on the blog creativehubdiy.wordpress.com! #diy #home #crafting
This DIY project is easy, useful and aesthetic. Personalized coaster are useful for keeping your tables safe from waterings and heat marks. They look professional and natural, making them a great addition to your living room, bedroom, or dining area. DIY coasters can also be a great gift for family or friends. Materials Needed: 🪛 Wooden slices (you can buy pre-cut ones or ask an adult to cut…
#crafting tips#creative diy#diy#diy tutorials#diy-projects#easy crafts#handmade decor#home decor ideas#home-decor#Personalized Gifts#wooden coasters#woodworking projects
0 notes
Text
I will only watch sewing tutorials from aged women who do not know how to cut footage. The more midwestern and hard to hear, the better
1 note
·
View note
Text
Had a few folks interested in how I made the patches I posted for Solarpunk Aesthetic Week, so I thought I'd give y'all my step-by-step process for making hand-embroidered patches!

First, choose your fabric and draw on your design. You can use basically any fabric for this - for this project I'm using some felt I've had lying around in my stash for ages.

Next, choose your embroidery floss. For my patches I split my embroidery floss into two threads with 3 strands each, as pictured. You can use as many strands in your thread as you prefer, but for the main body of my patches I prefer 3 strands.
Next you're going to start filling your design using a back stitch.

First, put in a single stitch where you want your row to start.

Poke your needle up through the fabric 1 stitch-length away from your first stitch.

Poke your needle back down the same hole your last stitch went into so they line up end-to-end.
Repeat until you have a row of your desired length (usually the length of that colour section from one end to the other). Once you have your first row, you're going to do your next row slightly offset from your first row so that your stitches lay together in a brick pattern like this:

Make sure your rows of stitches are tight together, or you'll get gaps where the fabric shows through.
Rinse and repeat with rows of back stitch to fill in your patch design.

When you're almost to the end of your thread, poke your needle through to the back of the fabric and pull the thread under the back part of the stitching to tuck in the end. Don't worry if it looks messy - no one's gonna see the back anyway.
This next step is fully optional, but I think it makes the patch design really pop. Once your patch is filled in, you can use black embroidery floss to outline your design (or whatever colour you want to outline with - it's your patch, do what you want). I use the full thread (6 strands, not split) of embroidery floss to make a thicker outline.

I use the same back stitch I used to fill the piece to make an outline that adds some separation and detail. You could use most any 'outlining' stitch for this, but I just use back stitch because it's just easier for me to do.
Once you're finished embroidering your patch, it's time to cut it out!

Make sure to leave a little border around the edge to use for sewing your patch on your jacket/bag/blanket/whatever, and be careful not to accidentally cut through the stitches on the back of the patch.
If you have a sturdy enough fabric that isn't going to fray, you can just leave it like this. If not, I recommend using a whip stitch/satin stitch to seal in the exposed edges (I find that splitting your embroidery floss into 3-strand threads works best for this).

And then you're done! At this point you can put on iron-on backing if you want, or just sew it on whatever you wanna put it on. Making patches this way does take a long time, but I feel that the results are worth it.
Thanks for reading this tutorial! I hope it was helpful. If anyone makes patches using this method, I'd love to see them! 😁
#solarpunk aesthetic week#sewing#tutorial#sew on patch#punk diy#diy punk#punk aesthetic#handmade#solarpunk#handcrafted#embroidery#embroidered patch#how to#how to make a patch
18K notes
·
View notes
Text
DIY lace bobbins from dollar store supplies 🥳
#fiber art#artists on tumblr#bobbin lace#lace making#craft tutorial#diy#arts n crafts#tutorial#crafts
842 notes
·
View notes
Text
double mohawk tutorial by b1jlly on tiktok
supplies: hair clippers, head of hair, hair spray, maybe some hair dye
do you guys enjoy punk hair inspiration as well as clothes?
end result:

#punk#diy#punk hair styles#hair inspiration#double mohawk#bihawk#bihawk tutorial#double mohawk tutorial#hair styles#punk hair#hair spray
422 notes
·
View notes
Text
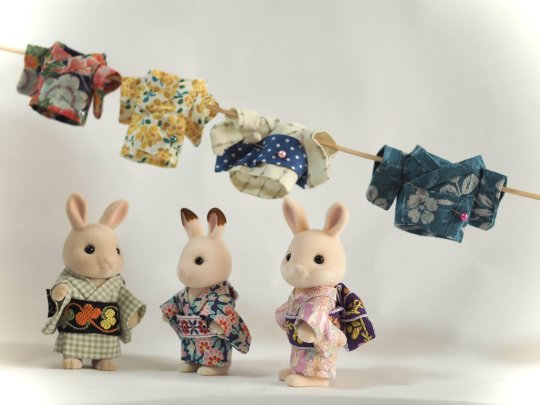
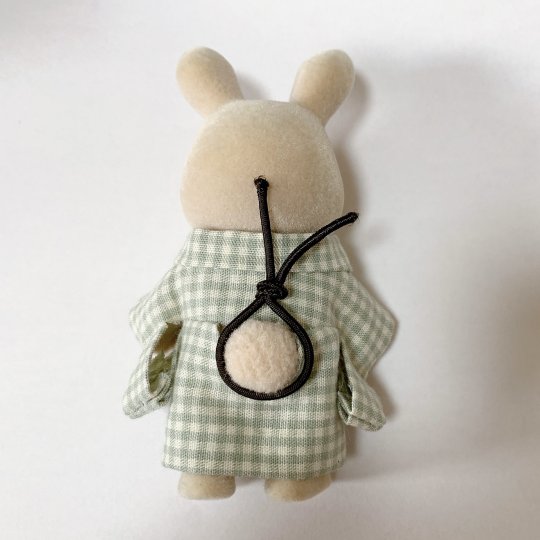
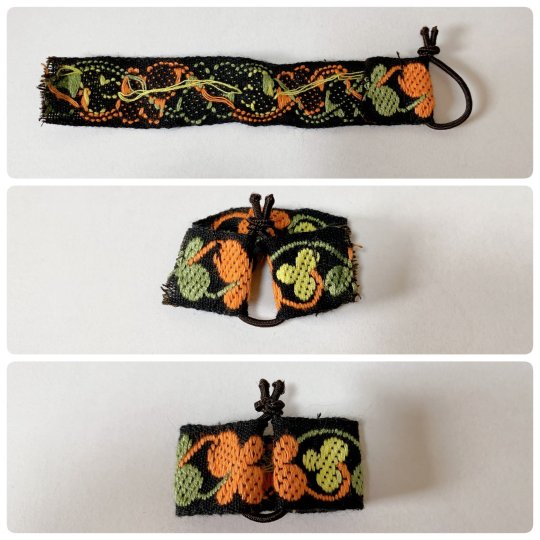
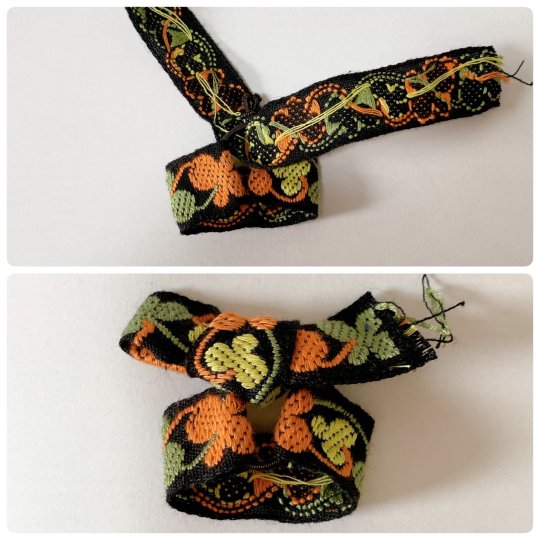
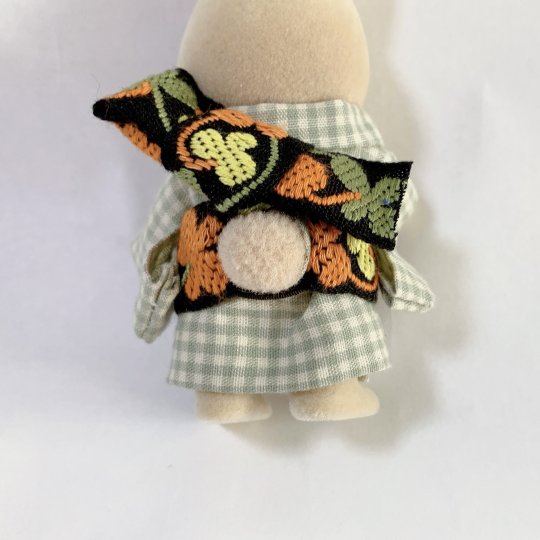
To complete past diy kimono dressing for Sylvanians Families/Calico Critters I shared before (see 1 / 2), here is a new step by step by @haluchobin to create cute easy to put on obi :
Tie a thin elastic into a loose loop around the tail
Slip both ends of a ribbon through the loop and sew into place
Tie another ribbon around the elastic covering the knot. Style it into a bow, you can try to mimic real musubi if you want
Put on the finished obi and enjoy!
#japan#art#craft#sylvanian families#doll#figurine#doll clothes#sylvanian family clothes#diy#step by step#tutorial#kimono#obi#着物#帯
1K notes
·
View notes
Text
Soda tab flower tutorial post! 🌻🌼🌸 lots of pictures included. ****This is part one, check the reblogs for the other half!! *****
****also this is not my idea. It's been done before and I got inspired by pinterest where I saw really similar diys****
What you'll need: scissors, yarn or string (any color) and soda tabs. 6 tabs for one flower (or 7, but I use 6 personally)
Step 1: take 2 tabs and lay them over each other so that the hole on the bottom of one lines up with the hole on the top of the other, like this-


And tie them together. Then cut the short end of the string sticking up to get rid of the excess. You'll want to tie it with the back of he tabs facing up so the knot will be on the back side. Make sure to tie it tightly so the knot doesn't slip around when you're wrapping the tabs with the yarn
Step 2: wrap the side edges of the 2 tabs 3 times. You'll want to do it relatively tightly, but not as tight as possible. The tension is a little tricky to figure out because you want the flower to keep its shape well but also be loose enough to bend into a flower shape with ease. This takes practice.


Step 3: On the 3rd wrap, add another tab under the 2nd tab, like this-


And pull the string through the back of the new tab you put under the 2nd tab. And wrap 3 times to attach it to your other tabs. Pulling the string over the edges to the back, through the lined up holes, and pulling it out towards you. On every 3rd wrap, add another tab the same way until you have 6 tabs wrapped together like this-

#solarpunk#punk#solarpunk diy#punk diy#solarpunk fashion#solarpunk aesthetic#punk fashion#diy#fashion#tabistry#soda tabs#upcycled jewelry#goth jewelry#jewelry making#jewelry#punk jewelry#goth diy#goth#goth fashion#hatchet makes stuff#tutorial#long post#crafting#art#recycling#recycled jewelry#hopepunk#ecopunk
410 notes
·
View notes
Text


Running a little promo: free tutorial on how to knit hedgehog's clothes with every Hedgehog DIY Kit between 19 and 31 of May 25.
#diy tutorial#ferntales#australia#grandma vibes#etsy#grandmacore#diy#felt#diy craft#diy projects#diy or die#crafts#handmade#sewing#arts and crafts#fibre art#fibre arts#needlework#textile art#fiber arts#embroidery
255 notes
·
View notes
Text
Hello, cuties! ໒꒰ྀི๑ᵔ ᵕ ᵔ๑꒱ྀིა Here is the long awaited decoden boxcutter tutorial, I hope this helps! I'm not super great with words, so my apologies in advance. I go over every step and product I did in the video. Feel free to ask any questions!
#jirai#jirai girl#jirai onna#jirai kei#地雷系#landmine type#landmineblr#jiraiblr#地雷系コーデ#menhera#yamikawaii#dark girly#diy craft#diy#diy projects#landmineblogging#landmineposting#lifestyle landmine#landmine jirai#landmine kei#landmine girl#tw blade#do it yourself#tutorial#diy tutorial#decoden#pienblr#pien kei
346 notes
·
View notes
Text
OP's into maximalism and gave empty bottles and boxes from her fridge a cool makeover (cr 菜狗小龚)
2K notes
·
View notes
Text


Needlepoint Kits // Unwind Studio Crafts
299 notes
·
View notes
Text
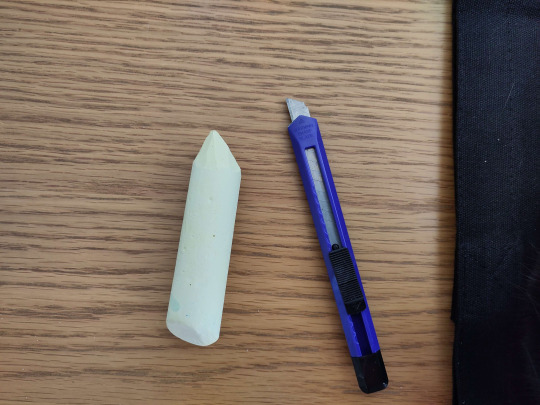
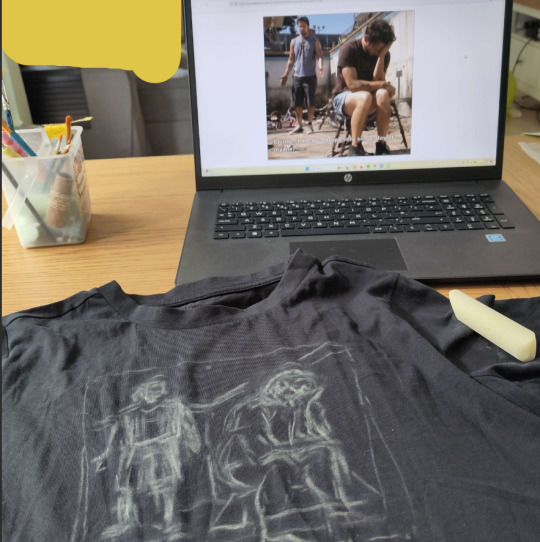
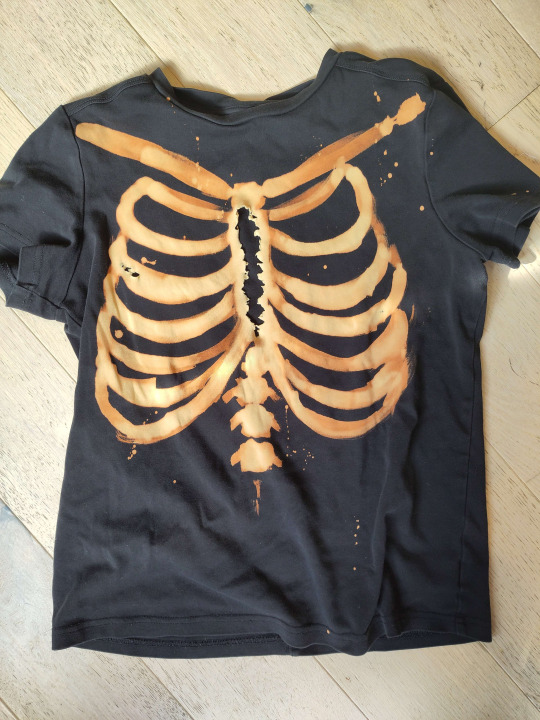
cheapskate bleach tutorial

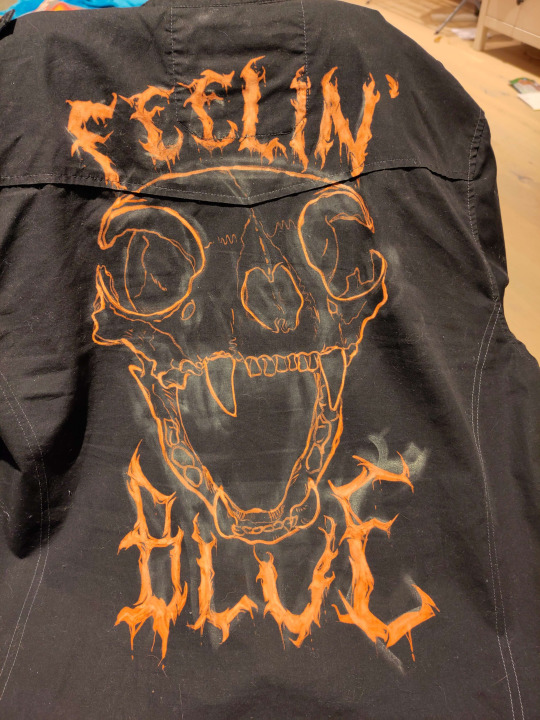
Sticking it under a readmore but this is how i make my shirts etc for like a fiver's worth of materials. I am far from being an expert btw im just playing with chemicals. also probably do this in a ventilated area or something
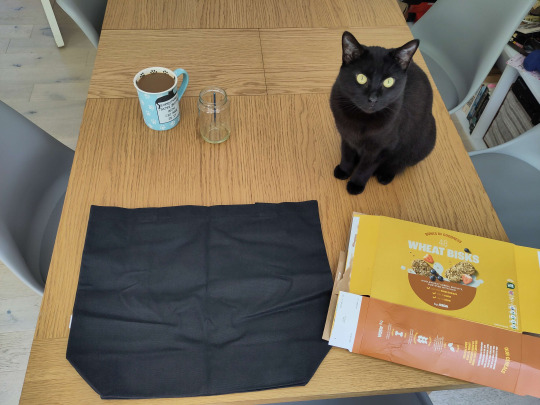
You will need:
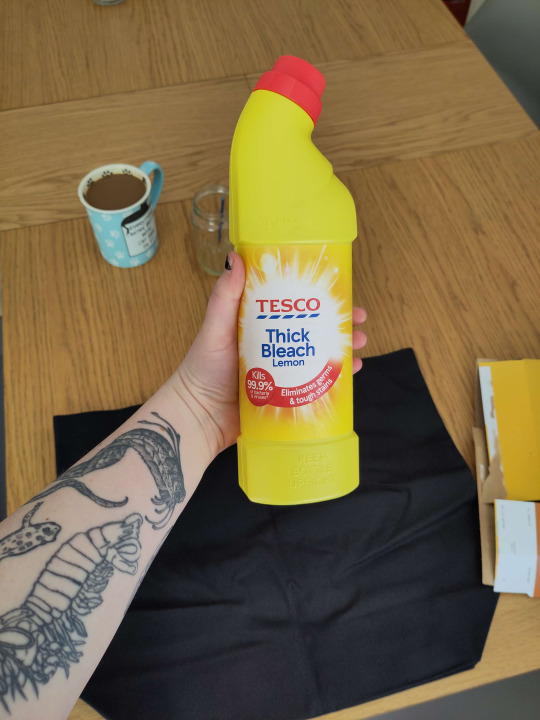
Bleach (I use thick toilet bleach it's like 80p)
The thing you want to bleach onto (In this case, a tote bag for a friend. usually i thrift old black shirts.) You should do a patch test before any real bleaching -- dab a tiny bit on the inside of a hem somewhere before you commit. I don't show that below because i forgot to do it but you should. You should ALSO iron the thing before you bleach it. So it's flat. Do as I say not as I do etc.
Something to put inside / between your garment and the table (Asda brand weetabix box babyyy)
Paintbrush (Mine is from a multipack from Poundland. I also accidentally left it in bleach last time and it kind of dissolved so I had to cut off the most egregious of the stray bristles.)
Chalk (For snacking) (I'm joking please don't eat the chalk) (I only have big pavement chalk, again, from Poundland, but you can get a good point with a craft knife)
Step one: move the cat
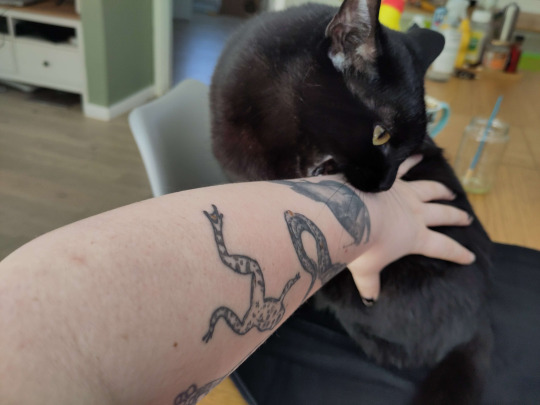
Step two: insert cereal box into / behind the thing you are bleaching.
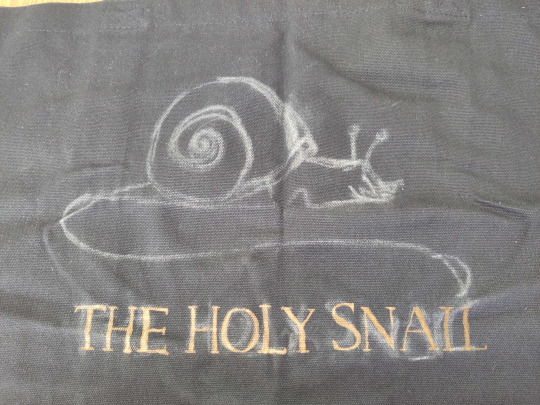
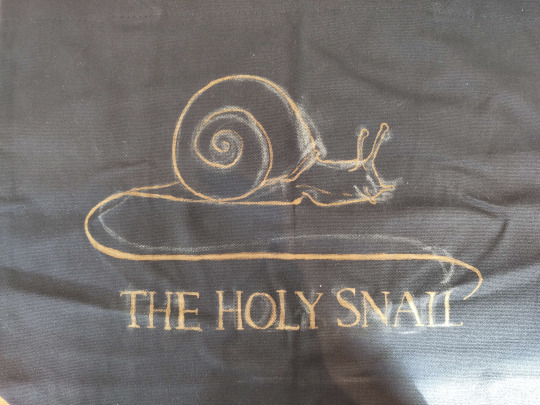
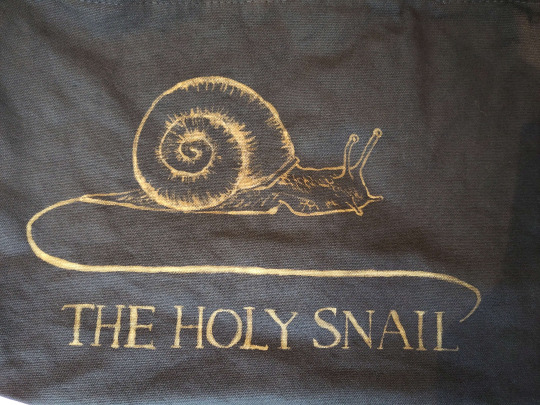
Step three: chalk on your design. this is the logo of a wine brand i have never tried but i like the snail. It can be super rough or very precise, whichever helps you know where to put your lines.
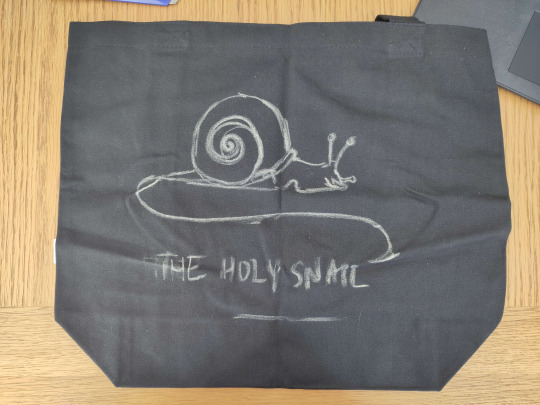
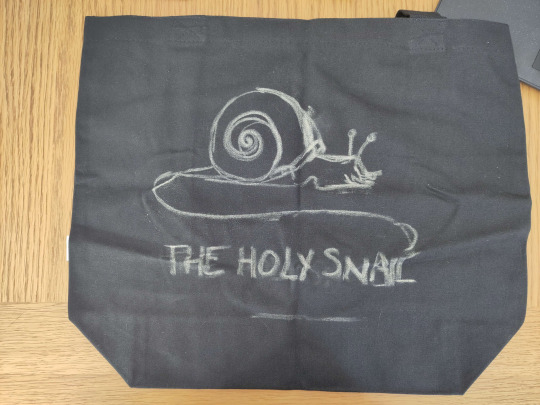
As you can tell it's easy to move stuff and redo it by just smudging the chalk away, or, worst case scenario, giving it a wash. Though that sucks if you're impatient like me bc you do NOT want to bleach this while it's wet. Once you're happy with your design, smack it around a bunch to take off most of the chalk, so you wind up with a vague outline. I didn't get a pic of this stage but here's what the iasip one looked like:
Step four: Acquire your bleach and put it in the special bleach jar your hosuemates labelled so you would stop drinking normal water out of it. Accept that Nyx hates you for not letting her drink it.
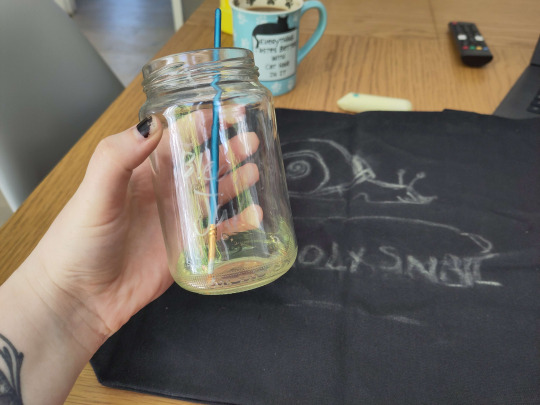

Step five: Go for it man. The bleach is kinda goopy so don't expect it to come out like paint, but it does mean that you can control the line crispness and width quite easily depending on how hard you press the brush down. I find it really helps for stuff like serif fonts.
You can dilute your bleach with water, which can help it get into all the little crevices esp if your fabric is a little bumpy, but do another small patch test before committing to anything on the main piece, because some fabrics absolutely suck up water and your lovely crispy lines will blow out like an old tattoo. don't do it. Unless you want that look, in which case get silly with it
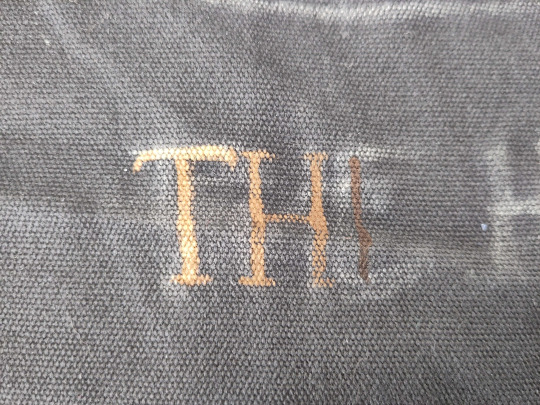
The other weird thing abt it is obviously that you can't see what you painted right away, it takes a couple seconds to show up, so it's a pretty slow process. The fabric will first go darker where you painted, then lighten from orange to a pale yellow over about 30 seconds. DON'T go "this bleach aint shit" and paint over it to make it lighten faster -- overbleaching it can weaken the fabric and make it tear.
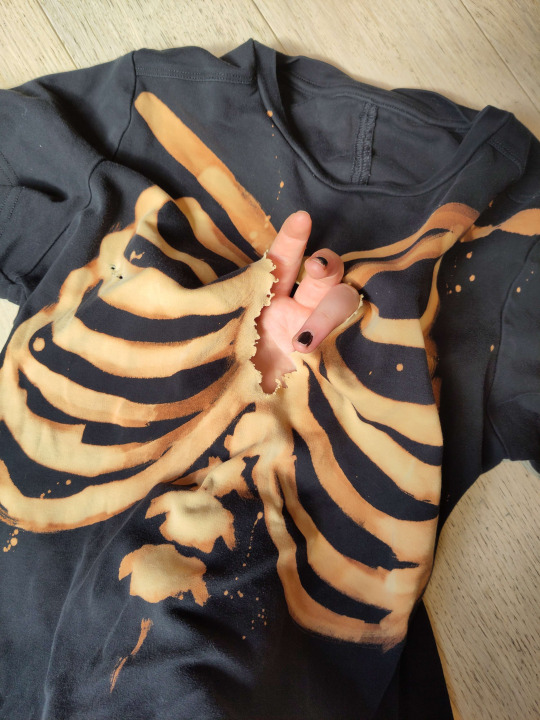
Tragic.
Here are some progress shots of the snail! When you're finished, you should wait for it to develop properly, but it depends how light you want it to be. I let the lines sit for a while before doing the details, and then washed it a bit prematurely so they'll stay a little darker. For nice pale yellow you want to wait around an hour.
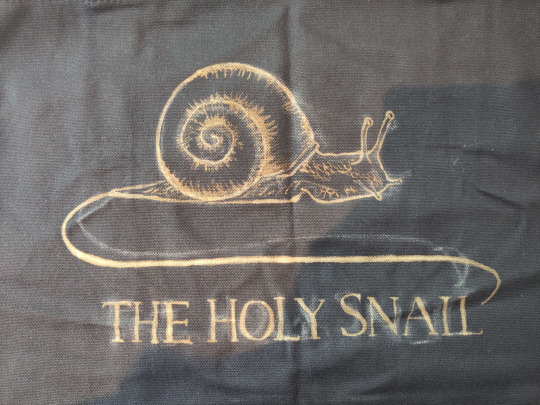
Step six: drown her
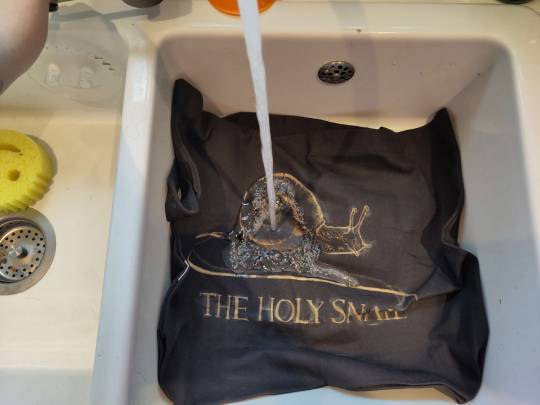

Nice cold water, wash out all the remaining bleach and chalk. I chucked it in the wash for ten minutes because it's a weird shape and size to wash in the sink and I'm a lazy bastard. but handwashing works just as well.
Step seven: revel in your new bootleg merch. You made that. You did that. thrive. go forth and make weird shit.
#bleach#art tutorial#clothes#diy#i've never done a tutorial before so hopefully this is coherent lol#img descriptions are all in alt text#it got dark while i was making this so pls excuse the varying image quality loll
214 notes
·
View notes
Text
I MADE A DIY PIN TUTORIAL!!!


hope you enjoy :-)
535 notes
·
View notes
Text
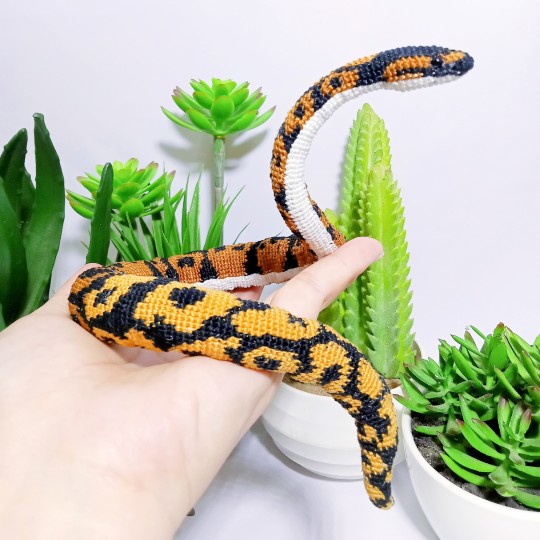
Hello, everyone! 👋
I wanted to share with you all a pattern, which is an amigurumi crochet ball python snake. You can find the free tutorial on my YouTube channel and the PDF pattern on my Etsy shop.
Thank you so much for stopping by and have a great day! 😊
885 notes
·
View notes
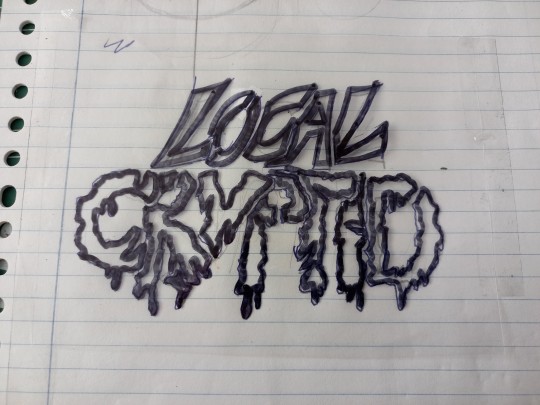
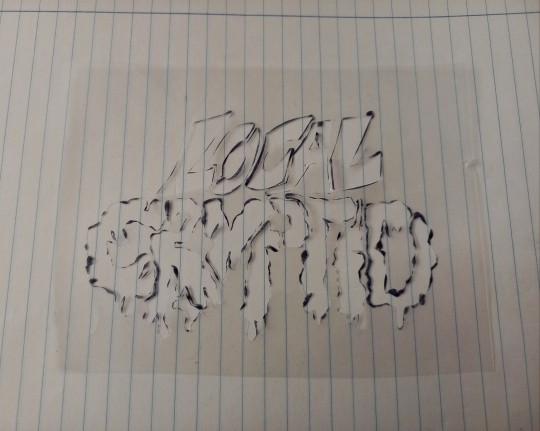
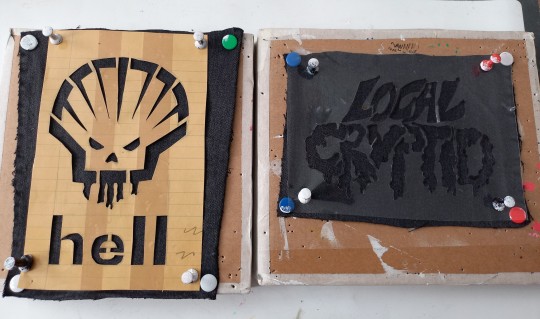
Note
Patch making tutorials?
and here i am once again, with a patch making tutorial
how to make stenciled patches:
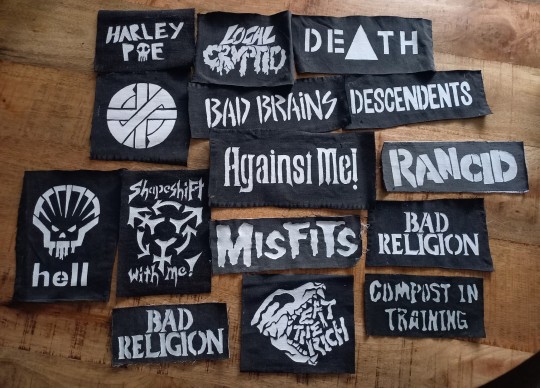
i'll post a part two in the future which will cover freehanding and stamping ur patches
-
first some general info that might be useful:
i get my patch design inspo from pinterest, etsy, and tumblr. if sell your patches make sure you arent ripping off another artists patch design when using etsy for inspo. anarchostencilism also has tons of stencils both on deviantart and reddit which are free to use.
i use acrylic paint for my patches, but if you can afford it id advise fabric paint. to seal paint into the fabric iron the patches, it helps em last longer. some acrylic paint survives very well in the washing machine, but wash your stuff by hand the first time to see how well it holds up.
if you make your patches multiple colors, dont first make the whole patch one color and then paint over it with the other colors. if the paint starts cracking the base color will show through. (if you like that however then dont mind this)
i paint my patches on jean fabric, cause it makes the patches sturdy yet flexible. but shirt fabric or canvas both work very well too. anything except really plasticy/slippery or textured fabric can be used
i pin my patches down with pins onto multiple layers of taped together cartboard, to prevent the fabric from moving around and distorting the print
-
there's two ways in which i make my stencils
1. with paper covered in tape
2. with the plastic folder you put in your binders
-
option 1:
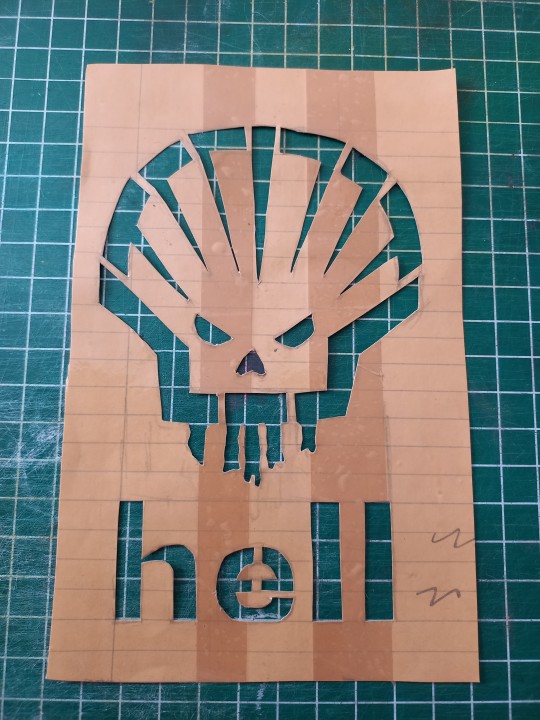
draw out your design onto some paper, make sure there arent any "loose" parts in the design that will get lost when cutting out the stencil

cover the paper in tape front and back, make sure you can still see your design through the tape
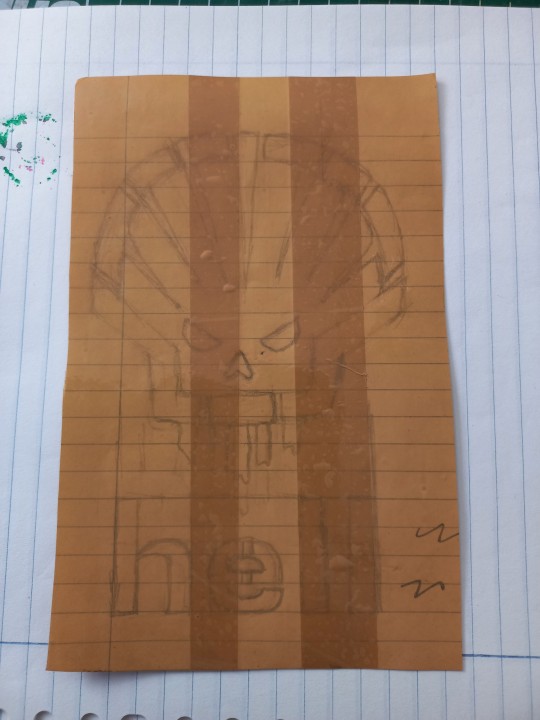
cut out your design, i use scissors and an exacto knife
-
option 2:
draw out your design (you can also draw the design directly onto the plastic folder)
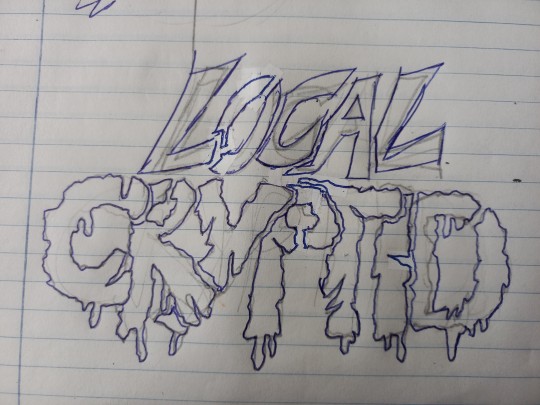
cut a piece of plastic out of the folder big enough to cover your drawing and tape it down.
trace the design onto the plastic with pen or marker (any mistakes can be wiped out)
cut out your stencil
-
continuation from both option 1 and 2
after finishing your stencil you can pin them down on some fabric
dap on your paint with the point of a big brush or a sponge, depending on the paint it'll take 2-3 layers.
make sure your previous layer dried completely before adding the next one

after the paint has fully dried you can carefully take off your stencil.
!!dont unpin the patch before it fully dried, or the drying paint may cause the fabric to warp!!

thats it, questions are always welcome, now go and make stuff!!
#punk diy#diy fashion#punk#queer punk#diy punk#punk clothes#punk style#punk patches#patches#tutorial#my stuff
2K notes
·
View notes
Text
➩ Tutorial on a Paper Star 🌱
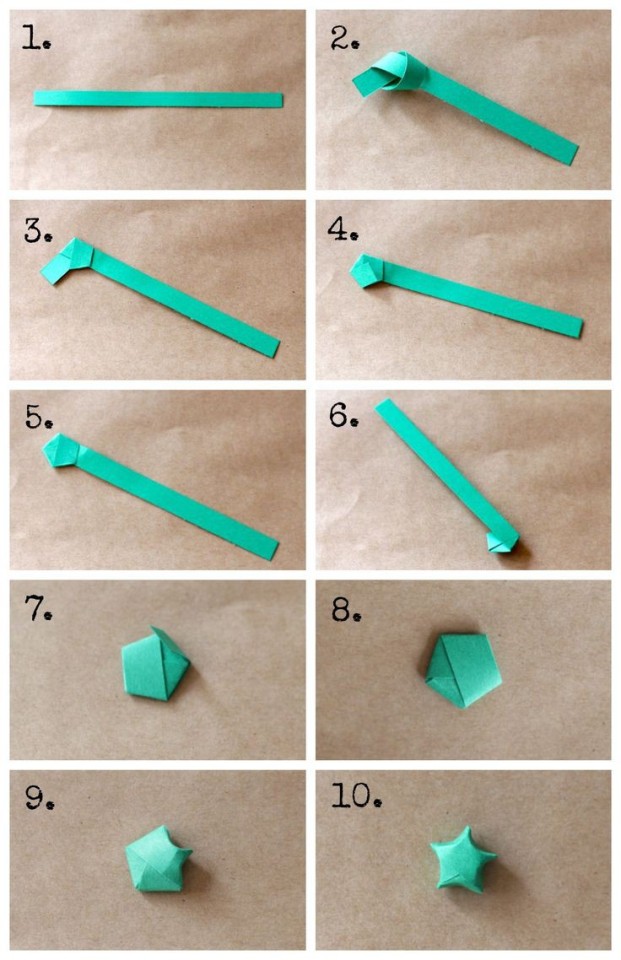
#tutorial#paper stars#paper star#star#papercraft#paper art#origami#aesthetic#greencore#green aesthetic#handmade#diy#crafts#starcore#design#art#goblincore#goblin aesthetic#green#green goblin#fairycore
1K notes
·
View notes