#dowel alignment
Explore tagged Tumblr posts
Visit Tumblr Blog
Explore Tumblr blogs with no restrictions, modern design and the best experience.
Last Seen Tumblr Blogs


Fun Fact
Users from the US are the majority of Tumblr visitors.
Text
Mistakes to Avoid When Installing Dowel Bars in Roads

Installing dowel bars in rigid pavement isn't only a technical necessity—it's an essential structural decision. When performed properly, it guarantees that load is transferred smoothly across slabs, stopping cracks, settlement, and long-term degradation. But too frequently, avoidable mistakes compromise the whole pavement. These errors aren’t just about bad work; they regularly stem from underestimating the function of alignment systems like construction rings and Super Rings, which might be essential for correct, long-lasting dowel placement.
1. Incorrect Alignment Compromises Structural Integrity
One of the first and most costly mistakes is incorrect alignment. Dowel bars must sit parallel to both the traffic flow and pavement surface. Any tilt, even slight, can lock the slab’s movement, causing cracking under stress. This issue is worsened when installers skip using construction rings or choose inferior alignment systems. Quality rings help keep dowel bars steady and aligned, especially under the vibration of concrete pouring.
2. Inconsistent Spacing Leads to Early Joint Failure
Closely related is the error of inconsistent spacing. Misplaced bars lead to uneven load distribution, which accelerates wear and tear at joints. This is where Super Rings prove vital. These specially designed holders ensure uniform spacing across the joint and maintain bar position even in high-speed construction settings. Without them, installers often rely on visual estimations, which almost always lead to performance failures.
3. Lack of Support During Concrete Pouring
Another frequent problem is insufficient support during concrete pouring. Dowel bars shift easily without firm anchoring, especially when heavy machinery moves across the pour zone. Without Super Rings, bars may sink or tilt, leading to long-term structural issues. Strong anchorage systems like construction rings provide the stability needed to prevent vertical movement and displacement.
4. Skipping Sleeves or Bond-Breakers Locks the Joints
Failing to use proper sleeves or bond-breakers on dowel bars is also a critical error. These allow the bar to move slightly within the concrete, accommodating natural slab expansion and contraction. Without this, joints lock, and cracks form rapidly. While dowel sleeves play their role, construction rings further ensure that bars don’t twist or bind within the joint, offering a secondary safeguard against restraint.
Using Super Rings with built-in protection features significantly reduces this risk. Combined with anti-corrosive construction rings, they extend the lifespan of both the dowel and the pavement structure itself.
5. Ignoring Cleanliness of the Joint Area
Debris and dust in the joint area are often overlooked but highly detrimental. A dirty joint prevents proper bonding and can cause the dowel bar to be misaligned or ineffective. Proper installation includes cleaning the joint and using Super Rings that resist moisture and prevent slippage. This attention to detail makes the difference between a five-year road and a twenty-year one.
6. Rushing the Curing Process Creates Irreversible Errors
Rushing the curing process is another common mistake. If concrete sets before final dowel bar checks, there’s no turning back. Using clearly marked construction rings allows for rapid visual confirmation of alignment and spacing before the pour hardens, preventing irreversible errors.
7. Compromising on Quality Costs More in the Long Run
Finally, cutting costs on materials leads to a chain reaction of problems. Choosing low-grade bars or cheap accessories might seem economical, but the long-term costs in maintenance and failures quickly add up. High-quality Super Rings and construction rings are not optional accessories—they are precision tools that ensure engineering integrity and project success.
Final Thoughts: Precision is Non-Negotiable in Rigid Pavement Installation
For engineers, contractors, and decision-makers, the takeaway is clear: installing dowel bars in rigid pavement requires more than bars and concrete. It demands precision, expertise, and the right supporting products. Every poorly aligned bar, every missing ring, adds risk. Investing in tested, durable solutions like construction rings and Super Rings doesn’t just prevent mistakes — it ensures a road performs the way it was designed to.
#dowel bar issues#road dowel guide#bar misalignment#poor bar depth#road crack fix#dowel bar tips#dowel bar care#install errors#dowel alignment#dowel spacing#dowel depth#dowel bar use#road joint fail#dowel bar myths#dowel rust risk#concrete dowels#road bar faults#dowel fix guide#bar road rules#bar setup fails
0 notes
Text
does anyone know how to make an assembly in solidworks. ime fucking dying over here
#THE SCREWS WONT GO IN TBE SCREW HOLES I DONT KNOW WHAT TO DOOOOO#It only gives me an option for a tangent mate. Why.#Google says something about planar surfaces and I don't Understand#Im using McMaster Carr parts man I can't alter those to do whatever you want me to#ougghhhhhhh#my dowels work fine! It's just the spring and the screws. Why#Also I have a 10-32 scew. I am trying to insert it into a hole solidworks says is 10-32 (that I made). Why is the hole too small.#it's like. It's the right dianter but the thread??? I don't fucking know dude#This is due tomorrow I've been struggling with it all week 😔😔😔#Solidworks is not my strong suit#i miss fusion :(#lilac post#My issue is like. I have a dowel and a cylinder with a hole in the middle. Dowel goes in fine#then I have a screw/bolt/anything that is going into a rectangle part#the rectangle part does not have the hole perfectly centered. It's off to the side#THAT isn't working. Why.#TRIED ALIGNING THE AXIS AND IT WONT GIVE ME A CONCENTRIC OPTION. HHHGQHHHJJJH
7 notes
·
View notes
Text
Why Dowel Bars Deserve More Attention?

In concrete road construction, one small mistake can turn into massive repair costs. And often, that mistake is ignoring dowel bars—the unsung heroes of load transfer. These simple steel rods are often overlooked, but they’re essential in keeping concrete pavements stable, crack-free, and cost-effective in the long run.
If you’re in infrastructure or road projects, understanding the correct use of dowel bars in concrete can make or break your pavement’s durability.
What Are Dowel Bars and What Do They Do?
Dowel bars are cylindrical steel rods placed across transverse joints in concrete pavements. They ensure that loads are transferred from one concrete slab to the next, allowing for smooth traffic movement without putting excessive pressure on any single slab.
This mechanism—known as load transfer in pavements—prevents slab cracking, corner breaking, and uneven surfaces, especially under heavy vehicles.
Technical Specifications of Dowel Bars (India Standards)
In Indian road construction, dowel bars generally follow these guidelines:
Diameter: 25 mm to 38 mm
Length: 450 mm to 600 mm
Spacing: 300 mm to 350 mm center-to-center
Coating: Epoxy or stainless steel to resist corrosion
Placement: Aligned perfectly in the middle of the slab thickness
Standards followed include:
IRC:58 for pavement design
IS:456 for concrete structure practices
Incorrect dimensions or poor alignment can cause joint locking, defeating the purpose of load transfer altogether.
Benefits of Dowel Bars in Concrete Pavements
Reduces edge cracking under load
Minimizes maintenance costs over time
Improves ride quality and surface level
Enhances load-sharing between slabs
Complies with modern engineering codes
For highway projects, industrial zones, airports, and even smart city roads, dowel bars offer both performance and ROI.
Common Mistakes to Avoid in Dowel Bar Placement
Misaligned dowel bars cause joint locking.
Wrong bar size reduces effectiveness.
Inadequate corrosion protection leads to early failure.
Poor concrete compaction around bars leads to voids.
Use dowel bar baskets, proper templates, and level indicators during installation.
Real-World Example: Long-Lasting Urban Roads
A smart city project in central India faced early pavement failures due to missing dowel bars. Upon redesign with proper dowel bar placement in roads, maintenance dropped by 42%, and surface life increased by 5+ years—all by investing a small amount in the right steel rods.
Why Kapila Steel Is the Trusted Choice for Dowel Bars
At Kapila Steel, we manufacture high-precision dowel bars that meet both national and international standards. Here’s what sets us apart:
Precision machining for accurate length and diameter Anti-corrosion coating for extended lifespan Custom specifications based on project requirements Prompt delivery and pan-India supply chain
Whether your project is a national highway or a local township road, we’ve got your back.
Conclusion: It’s Time to Build Roads That Last
In concrete pavement design, dowel bars are not optional—they’re essential. They offer load-sharing, durability, and cost savings you can’t afford to skip. And when you choose Kapila Steel, you get bars engineered for performance, safety, and long-term value.
Frequently Asked Questions (FAQs)
1. What is the main purpose of dowel bars in concrete pavements?
Dowel bars are used to transfer load across joints in rigid concrete pavements, helping prevent cracking and uneven settlement. They allow slabs to expand and contract without damaging the surface.
2. Are dowel bars and tie bars the same?
No, they serve different functions. Dowel bars transfer load across transverse joints, while tie bars hold adjacent slabs together along longitudinal joints to prevent separation.
3. How far apart should dowel bars be placed?
In most road projects, dowel bars are placed at 300 mm to 350 mm center-to-center spacing. However, the exact spacing depends on slab thickness and traffic load conditions.
#dowel bars#bar dowels#load transfer#concrete slabs#joint support#steel dowels#dowel spacing#dowel types#slab cracks#road dowels#epoxy dowels#dowel design#slab support#rigid pavement#bar alignment#crack control#dowel uses#dowel rods#highway slabs#pavement life
0 notes
Text
To alleviate upper trapezius (upper trap) tightness, a multifaceted approach involving posture adjustment, increased shoulder and mid-back mobility, and rotator cuff strengthening is effective. This protocol targets the root causes of tightness rather than just the symptoms:
🔵 Posture Adjustment While Using Devices: 'Doomscrolling' or prolonged use of devices often leads to a forward head and rounded shoulders posture, straining the upper traps. Regularly adjusting your posture to align your ears over your shoulders, and keeping devices at eye level can significantly reduce this strain.
🔵 Increasing Shoulder and Mid-Back Mobility: Limited mobility in the shoulders and mid-back can place additional stress on the upper traps. Incorporating mobility exercises like the supine dowel flexion stretch, and kneeling mid back rotation will help improve your mobility.
🔵 Strengthening the Rotator Cuff: A strong rotator cuff provides better shoulder stability, which in turn decreases the compensatory tension often seen in the upper traps. Exercises like external rotations with a Db are very effective at strengthening those small stabilizers.
By addressing posture during screen use, enhancing shoulder and mid-back mobility, and strengthening the rotator cuff, this protocol aims not just at temporary relief but at a long-term solution for upper trap tightness. This comprehensive approach ensures a balanced development and reduced strain on the upper traps, leading to improved comfort and reduced risk of chronic tightness.
{source}
354 notes
·
View notes
Text

I wanted to make a pikmin pattern that’s more similar to in-game models than stuffed animals I saw online. I didn’t do fingers or toes unfortunately. Also I gave it beady eyes like the pikmin 1 pikmins. Below is the pattern I used. The body can be used for any of the primary color pikmin, though I haven’t made blue or red ones yet.
EYES (2):
Ch 6
From second chain from hook, sc 4
At last chain, sc 3 into the st
Continue to the underside of chain:
3 sc, 1 inc, sl st to join to first sc (12)
(3 sc, 3 inc) x 2 (18)
Fasten off. Put a safety eye in the middle.
ARMS (2):
Magic ring, 6 sc in ring then pull tight (6)
(2 sc, 1 inc) x 2 (8)
(8 sc) x 10 rounds (8)
(3 sc, 1 inc) x 2 (10)
(10 sc) x 2 rounds (10)
Stuff and fold flat with the stitches aligned (5 st on each side)
Go through 2 st at a time to do 5 sc to shut the arm (5)
Fasten off
LEAF:
Magic ring, 4 sc into ring then pull tight (4)
(1 inc, 1 sc) x 2 (6)
6 sc (6)
(1 inc, 1 sc) x 3 (9)
9 sc (9)
(1 inc, 2 sc) x 3 (12)
12 sc (12)
(1 inc, 3 sc) x 3 (15)
15 sc (15)
Continue the increase and sc rows until you have 24 sc
(Sc 24) x 4 rounds (24) [5 rounds total of 24 sc]
(1 dec, 6 sc) x 3 (21)
(1 dec, 5 sc) x 3 (18)
(1 dec, 4 sc) x 3 (15)
(1 dec, 3 sc) x 3 (12)
(1 dec, 2 sc) x 3 (9)
(1 dec, 1 sc) x 3 (6)
Flatten and finish off with 3 sc on the top of the leaf.
LEGS (2):
Magic ring, sc 6 into the ring then pull tight (6)
6 inc (12)
12 sc BLO (12)
(12 sc) x 4 rounds (12)
(1 inc, 5 sc) x 2 (14)
(1 inc, 6 sc) x 2 (16)
16 sc, fasten off first leg
Starting on the second leg we can connect the legs and start the body
BODY:
Ch 4 and join to other leg with a sl st
7 sc (there should be 2 st left until you reach the sl st)
Ch 4 and join to first leg with sl st (2 st gap between the chains) [this is the starting point of each round]
(36 sc) x 5 rounds (36)
(4 sc, 1 dec) x 6 (30)
(30 sc) x 10 rounds (30)
(3 sc, 1 dec) x 6 (24)
Join the arms on this round:
24 sc
One arm is on the 9-13 st, the other arm is on 1 st and 21-24 st
So you start with 1 sc to join part of an arm then join whole other arm, then finish by joining rest of first arm
(24 sc) x 2 rounds (24)
(2 sc, 1 dec) x 6 (18)
18 sc
The head connects directly to the body
HEAD:
(2 sc, 1 inc) x 6 (24)
(3 sc, 1 inc) x 6 (30)
30 sc (30)
(4 sc, 1 inc) x 6 (36)
36 sc (36)
(5 sc, 1 inc) x 6 (42)
(6 sc, 1 inc) x 6 (48)
(7 sc, 1 inc) x 6 (54)
(54 sc) x 10 rounds (54) [ears are sewn on the first and last rounds of these so mark them)
(7 sc, 1 dec) x 6 (48)
(6 sc, 1 dec) x 6 (42)
(5 sc, 1 dec) x 6 (36)
(4 sc, 1 dec) x 6 (30)
(3 sc, 1 dec) x 6 (24)
(2 sc, 1 dec) x 6 (18)
Now we start the stem
STEM:
18 sc BLO (18)
18 sc (18)
(1 sc, 1 dec) x 6 (12)
(12 sc) x 4 rounds (12)
(4 sc, 1 dec) x 2 (10)
(10 sc) x 10 rounds (10)
(3 sc, 1 dec) x 2 (8)
(8 sc) x 10 rounds (8)
(2 sc, 1 dec) x 2 (6)
(6 sc) x 3 rounds
Color change to green:
(6 sc) x 2 rounds (6)
Flatten and use 3 sc to close the top
Fasten off
Next stuff the body through the space between the legs. I used a dowel rod to help with the stem.
To close, join onto the open space and dec around until it is closed. Fasten off and weave in the tail.
Now for the ears:
EARS (2):
Magic ring, 4 sc into ring then pull tight (4)
(1 inc, 1 sc) x 2 (6)
6 sc (6)
(1 inc, 1 sc) x 3 (9)
9 sc (9)
(1 inc, 2 sc) x 3 (12)
12 sc (12)
Like with the leaf, repeat until you have a round of sc 24 (24)
(10 sc, 4 inc) x 2 (28)
28 sc (28)
Flatten with the inc st lined up. Finish with 14 sc
Now sew the leaf and eyes on.
The ears are sewn with a slight curl on the top to give a small fold
And voila! My pikmin pattern. If you try this out, please let me know! Especially if there’s typos or confusions
21 notes
·
View notes
Text
✨️Moondrop progress update #1✨️
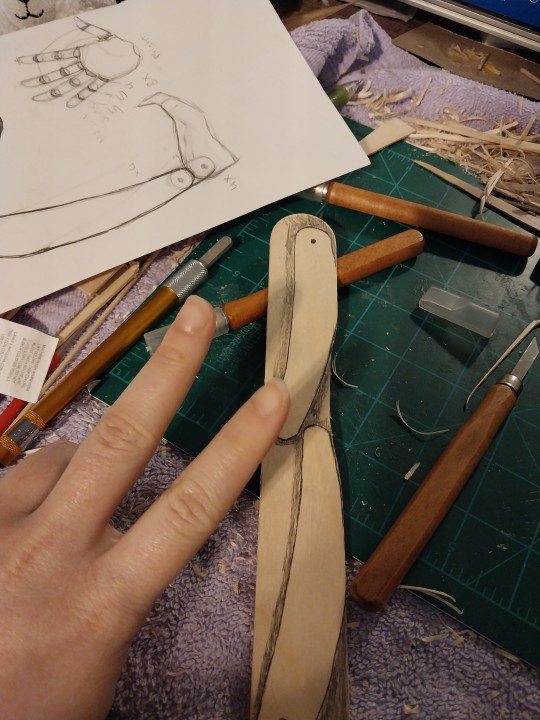
Picture 1 desc/info: knowing that I'd want to make Moondrop once I finished Sundrop, I made sure that(when I remembered to, as I'm learning that i wasn't quite as 100% consistent as I hoped I was) to make traced out references of each finished carved piece so that I wouldn't waste time struggling matching both of their proportions, considering nearly every piece required a duplicate piece to help achieve the eventual 'hollow skeleton' method that I use. Also, this is what I mean when I state that theyre carved from popsicle sticks. If it works, it works. lol

Picture 2 desc/info: here's the full lineup of every carved piece I have ready for Moondrop so far, and roughly how it will fit together. Every arm piece, leg piece, and even knee joint and the head piece have a duplicate(sans for the detail on the head's piece, obviously, though the headpiece is more complex than that as well). To further expand on why I did this, instead of just having one piece each, I need to point out the arm, hand, and ankle joint pieces. They will not be connected in two places, only one, to achieve full range of movement for the limb that they are attached to.
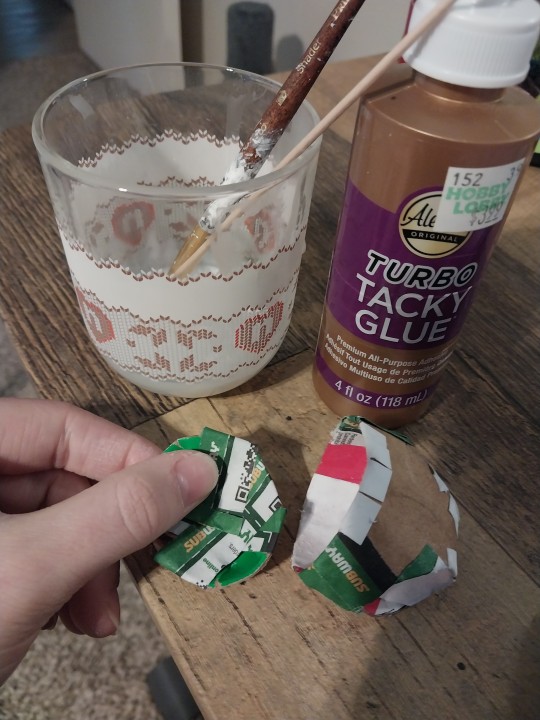
To achieve this, whilst still trying to keep this project's weight light, I'll create a hollowed skeleton. Essentially where the insides of the limbs(and body) are made hollow via smaller pieces of wood/popsickle stick scraps glued in-between the base pieces, but leaving enough empty space on either side to add two things. One side will have a rolled cylinder of a reinforced cardboard/paper mache combo, to provide a hollowed slot for the long joint piece side to slot into, and the other side, two hollowed holes to slot a dowel through with the joint piece inbetween. (If this doesn't make sense, dw, I plan on taking pictures when I get to that stage to show how I do it)
I also just end up stuffing the remaining 'dead-space' between the carved pieces with paper before i add clay, to further sheer off any unnecessary internal weight. Now, what you couldn't see with my Sundrop, is that by the time I finished adding clay and test stringing him together and started looking at reference photos again for color references, I hadn't realized up until that point that I'd entirely forgotten to add the dca standard wire-hook on his back. Not even superficially. So this will be where project Moondrop(whom at least uses the wire far more than sundrop, lol) will deviate from my original Sundrop design. I might use paper and cardboard to flesh out his limb shapes further before adding clay to make his body even lighter than suns, I've reinforced his torso pieces to account for the hole I'll carve into the back for my goal of a Functional wire-hook, I've made adjustments to his thigh shape for better ease of movement/posability(which might coincidentally make him just a smidgen shorter than Sun by design, shhh) because sundrops leg slots and the actual part of the leg that's supposed to slot in ended up quite a bit out of alignment due to the leg shape lacking a taper at the top to allow for a rounder end. Sundrop's legs are just a little janky bc of it.
Picture 3 desc/info: this is a look at the inbetween stage that the hip piece goes through, and you'll find that it's not reinforced with wood anywhere simply because of the completely curved surface. There were attempts made with sundrop to do this but they proved to be way too hard to bother with and less than affective with just popsickle sticks. Hense I use cardboard from a soda can box(aka cardboard that's compact and can carry a heavy capacity if the design is balanced and re-attachment points are reinforced properly) and then have so far gone over certain points with paper and glue(using the papermache method) to base reinforce places and also provide more adhesable texture internally. Because, that round piece(also cardboard) is going to sit in the main juncture of the top of the hips. A hole will be cut into it to maintain the ability to string the limbs and body together, and it will be further reinforced further with paper and glue, and later covered in clay- along with the rest of the hips inside and out, thus entirely made smaller than intended to account for the eventual bulk up of the piece. This cover provides a supportive divot in the hips that the middle torso piece can sit in that will give it the range of movement intended but also aid it in allowing the body to sit up straight otherwise(something that was discovered to be needed when working on finetuning sundrop whilst test-stringing, adding yet more weight due to the fix having been made solidly out of clay. Probably provides more support to Sundrop this way, but Moon needs to be as light as possible to prevent stress cracks/damage/balance issues/ect. If I want him to be able to have a functional hook to be used to be displayed with.
On a less technical note, there isn't much to show in the skeleton stage for the middle torso piece bc it's just a hollow cylinder of cardboard, thin enough to escape the bulk, but wide enough to still be strung through. It's just a lil tube for Sundrops frame anyway lol. Though, tbf, I might bulk Moondrops middle with paper/cardboard/whatever I decide, for the, once again, lightweight intention. I use air dry clay but even still it do be solid af when dry and sealed lol
Off camera just inches out of shot of each picture is sundrop, whom has slowly become disrobed and carefully disassembled in places to give me size references for things, but also one of these updates I'll show you how I made his head/face/ ray settup- why? Because it broke. Cuz my dumbass should've used wire and not a wooden dowel to support it all. (Further more, I'm using it as an opportunity to eventually redo Suns rays, because when I did the first set, I went for accuracy in the ray count, but still wanted them to spin freely. But I realized I HATE the gap that's left anywhere if his rays arent perfectly positioned and honestly this mechanism breaking is my sign and chance to fix it now that the rays aren't locked in anymore lol.)
I've decided to give this progress update log the tag '#projectdcadoll' from now on, so any posts I make abt this in the future will have that tag!
And if anyone has any questions about any specifics of the project, I'll also answer them/respond to them under this tag, so please feel free to ask away! I'm excited to share this process with ya'll!
#projectdcadoll#dca fandom#fnaf security breach#dca fnaf#fnaf moon#no but fr when i realized i forgot Suns hook i just about flatlined in heartbreak. im still considering giving him an artificial looking-#-one to match moon but i wont be able to until moon's is done so i can actually make em match.#tbh sun is probably light enough for a real hook but not structurably stable enough where its needed to account for the stress of movement#my boggest challenge is gonna be finding a carabiner small enough for moons hook lol
27 notes
·
View notes
Note
Sorry to ask about this again, but when replacing the doll’s peg, what material do I need to wrap around the new peg to make sure it isn’t loose? The doll’s peg was fine when I checked it, but the edge was the only part that broke, and part of it broke inside the doll…
I'm not sure I understand the nature of the break you're dealing with. The broken pegs I've gotten have broken with the short rod between the ball and the peg breaking in an unsalvagable way.

If you have a ball still attached to some of the peg, maybe the pieces will fit back together with careful positioning and superglue? If you're able to take a photo of the break and pieces, that might help me figure out what you're thinking of. If you have enough peg intact to still use, maybe some kind of curing putty or epoxy that hardens? Fill the hole, stick in the broken peg and adjust it then wait until it sets? Again, alignment could be tricky--maybe reason to thoroughly heat and soften the other leg to remove it and have the intact peg as reference for the right positioning.
I haven't encountered a scenario where wrapping a peg to ensure a fit is necessary. If it's a direct swap to replace in a cleaned socket, then the new peg, from LDD, will fit perfectly and set in a static position when glued (you want glue so the leg moves on the ball, not the peg moving inside the socket). If you have a scenario where you need to tighten a peg, like a DIY dowel that's jot snug, then maybe tape wrapped around before glue?
Best of luck. I know these repairs are difficult.
2 notes
·
View notes
Text
"Manufacturing Processes Used by Mild Steel Dowel Bars Manufacturers in Sweden"
INTRODUCTION

Mild steel dowel bars are indispensable in the construction industry, especially for enhancing the durability and stability of concrete structures. Known for their exceptional strength and adaptability, these bars play a crucial role in ensuring efficient load transfer across joints in pavements, slabs, and other structural applications. This article explores the intricate manufacturing processes employed by Mild Steel Dowel Bars Manufacturers in Sweden, focusing on precision, quality, and innovation.
1. Raw Material Selection
The manufacturing process begins with selecting high-quality mild steel, known for its optimal balance of strength and ductility. Manufacturers in Sweden adhere to stringent quality standards to ensure that the raw material meets the requirements for construction-grade dowel bars.
2. Cutting and Sizing
Once the raw mild steel is procured, it is cut into specific lengths based on the application requirements. Precision cutting ensures uniformity, which is essential for effective load transfer and durability in concrete structures. Advanced cutting tools, including laser and hydraulic cutters, are often used to achieve accuracy.
3. Surface Preparation
Surface preparation is a vital step in the manufacturing process. The steel is cleaned to remove impurities, such as rust, grease, or mill scale, that may affect its bonding with concrete or its durability. Abrasive blasting or chemical treatments are commonly used for thorough cleaning.
4. Heat Treatment for Strength Enhancement
To enhance the mechanical properties of mild steel, manufacturers employ heat treatment techniques. This process improves the tensile strength and resilience of the bars, making them suitable for high-stress applications. Controlled heating and cooling cycles ensure uniformity and consistent quality.
5. Corrosion-Resistance Coating
Mild steel is susceptible to corrosion, especially in harsh weather conditions or when exposed to moisture. To mitigate this, manufacturers in Sweden apply protective coatings, such as epoxy or galvanization. These coatings not only extend the lifespan of the dowel bars but also ensure compliance with environmental and safety standards.
6. Straightening and Finishing
After heat treatment and coating, the bars are straightened to ensure they meet precise alignment specifications. Advanced machinery is used for this step, eliminating any deformations and achieving a smooth, uniform surface.
7. Quality Inspection and Testing
Quality assurance is a cornerstone of the manufacturing process. Mild Steel Dowel Bars Manufacturers in Sweden conduct rigorous testing to ensure that the bars meet international construction standards. Key tests include tensile strength analysis, corrosion resistance evaluation, and dimensional accuracy checks.
8. Packaging and Distribution
Once the dowel bars pass all quality checks, they are packaged using materials that protect them during transportation and storage. Proper labeling and documentation ensure that the bars reach their destination with traceability and compliance intact.
Advantages of Swedish Manufacturing Processes
Precision Engineering: Swedish manufacturers utilize advanced machinery and technology to achieve unmatched precision in dowel bar production.
Sustainability Practices: The focus on eco-friendly methods, such as recycling and reducing waste, aligns with Sweden's commitment to sustainability.
Compliance with Global Standards: By adhering to stringent international construction norms, Swedish manufacturers ensure that their products are recognized worldwide for quality and reliability.
Conclusion
The meticulous manufacturing processes employed by Mild Steel Dowel Bars Manufacturers in Sweden highlight their dedication to quality and innovation. From raw material selection to final packaging, each step ensures that the dowel bars are robust, durable, and suited for a wide range of construction applications. These processes set a benchmark for the global industry, making Sweden a leader in the production of high-quality mild steel dowel bars.
3 notes
·
View notes
Text
Found a free 3D printable model for Laios's sword, but the model only comes with alignment pegs, NOT a full channel down the center to allow for a wooden or metal dowel. Having printed a couple of swords, that center dowel is critical to the whole thing staying together, so I couldn't print it until I got models with a central channel.
I know the procedure to make a channel in a 3D model. Should be easy as pie, right? WRONG the models were like the only file format that blender won't import without mods. So I had to import the 3mf files into Cura (my 3d printing software), export them from Cura as stl files, import them to blender, make my edits, re-export the stls, and then RE-import them into Cura to prepare to 3d print them.
I also did the prelim step of taking a screenshot of the whole sword model, printing it out on paper at the size it's supposed to be, and seeing if the scale looks good on me. I like it, so this weekend should be good to move onward with the 3d printer!
11 notes
·
View notes
Note
2, 6 & 14 for Val'eth <3
[30 Questions for your Tav]
2. Describe their tent setup! What’s on the outside? The inside?
His tent would be a hanging type with a makeshift platform underneath it, tethered to trees or anything that could hold it securely. He doesn’t like sleeping on solid ground. He’s too used to the rocking of ships and weightlessness within the Astral Sea. It’d be made of canvas, dyed a dark maroon, adorned with golden spiritual baubles and other effigies. Hanging on a wooden dowel by the entrance flap would be cured meats along with various creature parts and hides that he had processed himself.
Everything is in its place inside the tent. A vanity with a wash basin and his accessories would be sat towards the back, topped with meticulously organized skin and hair products – both mass produced and homemade. His bedroll is tucked and smoothed out every morning, with his folded sleepwear resting on top. There is a small meditation corner, circled with various herbs and Zerth prayer idols. He also keeps his knives neatly aligned on his weapon rack, going from shortest to longest, but setting his best and sharpest beside his bedroll.
6. How would the player go about meeting them in Act 1? What is their introduction?
Very early around the Nautiloid crash site, pinned on the water’s edge under one of the tentacles along the beach. As you pass him he calls out for help, struggling to free himself. You can either roll a strength check to help lift the tentacle so he can slide out, or if you fail that, he will point to his knife that is out of reach in the sand. You can then hand it to him so he can hack away enough of the meat to wiggle free. Once standing, he explains that he had seen you on the ship and becomes hostile, pointing the knife at you (he will reach for it instead if you passed the strength check). He demands answers that you can’t give.
Suddenly – your tadpoles twinge and make a connection. You see through his eyes, burning from smoke and ash in the air – you’re on the docks of Creche K’liir, currently under attack by the same Nautiloid that abducted you. Caught between fighting Ghaik and your own kin, you call out a name you can’t quite understand due to the chorus of battle around you. Your eyes frantically dart in every direction in search of someone, until you finally lock eyes with them climbing onto the ship. You halt, lowering your knife as the fighting drowns out and slows into a waltz of bloodshed.
She stares back, remorseless, as she hangs off the side of the ship before disappearing into an opening. You call out to her with poison on your tongue and the heavy weight of utter betrayal on your heart. Everything then speeds back into reality and finally – darkness. The connection wanes.
You can either explain your situation and mention that you had actually come across another Gith to talk him down, or you can threaten him back – to which he will respond with respect and sheath his knife. He agrees to join you if you help him find the other Gith, clearly having had unfinished business with them.
When that other Gith turns out to be Lae’zel, he is utterly defeated – she was not the one in question. Allowing a moment of disappointment and mourning to pass, he suppresses his emotions and gets straight to business by sticking by your side to find a cure – having lost everyone under his wing, you're the next best chance he has at not becoming a Ghaik thrall.
14. Where are they from? What was home like?
Despite identifying as a Githzerai, he was originally from Tu’narath and matured on Toril – specifically within a small Creche on the eastern realm of Kara-Tur. He had been raised and indoctrinated like most other Githyanki – strict education and physical training that left him beaten, bloodied and, quite frankly, mentally damaged. His love for ships and sailing, both ocean and astral, manifested very early on during his excursions to The Celestial Sea. It had eventually led him to come across Githzerai travelers that accepted him into their faith.
#bg3#Val'eth#thank you! and I'm sorry for the huge amount of text#I can't stfu lmao#I also got your other ask btw! it'll just be a short while to fill it out skaldjfhg
5 notes
·
View notes
Text
Choosing the Right Bar Dowels for Reinforced TMT Bars

Selecting appropriate dowel bars stands as one of the most critical decisions in construction projects, yet many builders overlook their significance. Much like choosing the right joint for connecting two pieces of wood, the selection of proper dowel bars determines how effectively structural elements work together.
Understanding the Fundamentals
Dowel bars serve as the silent heroes in concrete construction, creating essential connections between structural elements. When paired with TMT bars, they form a robust system that ensures load transfer and structural continuity. Think of them as the handshake between two concrete sections – the stronger and more precise the connection, the better the overall structural integrity.
Material Quality and Selection Criteria
The market offers various grades and specifications of dowel bars, each designed for specific applications. Construction rings often complement these systems, providing additional support and alignment. The key lies in selecting materials that meet project specifications while considering factors like:
Load-bearing requirements
Environmental exposure conditions
Construction joint spacing
Compatibility with existing TMT bars
Surface treatment and coating options
Climate Considerations in Indian Construction
Indian weather conditions present unique challenges for construction materials. Quality dowel bars must withstand not just structural loads but also environmental factors like moisture, temperature variations, and potential chemical exposure. When working alongside TMT bars, these components need proper coating or treatment to prevent corrosion, especially in coastal regions.
Technical Specifications Matter
Experienced contractors know that dowel bar selection involves more than measuring diameter and length. The surface smoothness, coating type, and even the spacing between construction rings can significantly impact performance. Modern construction practices often require specialized coatings or materials that enhance load transfer while minimizing maintenance requirements.
Installation Best Practices
Proper installation of dowel bars alongside TMT bars requires precision and attention to detail. Construction rings play a crucial role in maintaining correct alignment during installation. Some key considerations include:
Accurate spacing and alignment
Proper concrete coverage
Effective use of dowel caps and sleeves
Quality control during placement
Coordination with TMT bar positioning
Cost Versus Performance Analysis
While budget constraints often influence material selection, compromising on dowel bar quality can lead to significant future expenses. High-quality dowel bars, when properly specified and installed with appropriate construction rings, typically offer better value over the structure's lifetime. This investment becomes particularly crucial in high-traffic areas or structures subject to heavy loads.
Quality Control Measures
Professional builders implement strict quality control protocols when working with dowel bars and TMT bars. This includes:
Verifying material specifications
Checking coating integrity
Ensuring proper storage and handling
Monitoring installation procedures
Documenting placement and spacing
Innovation in Dowel Systems
Recent technological advances have introduced improved dowel bar systems that offer enhanced performance characteristics. These innovations focus on better load transfer efficiency, reduced maintenance requirements, and easier installation processes. When combined with modern TMT bars and construction rings, these systems provide superior structural performance.
Making an Informed Decision
Selecting appropriate dowel bars requires careful consideration of multiple factors. Construction professionals should evaluate:
Project-specific requirements
Environmental conditions
Load transfer needs
Maintenance expectations
Overall system compatibility
Future Considerations
The construction sector is constantly changing, presenting both new opportunities and problems. Contemporary dowel bars need to be cost-effective while meeting ever-tougher performance standards. Their integration with TMT bars and construction rings becomes more crucial as structures grow more complex and demanding.
Looking Forward
The role of dowel bars in construction remains fundamental, even as building techniques advance. Their proper selection and installation, particularly in conjunction with TMT bars and construction rings, significantly influence structural durability and performance. By carefully considering all factors and choosing quality materials, builders can ensure their projects stand the test of time while maintaining optimal functionality and safety.
#bar dowels#TMT bars#reinforced bars#construction rings#load transfer#dowel rods#concrete strength#rebar dowels#structural integrity#bar spacers#steel dowels#reinforced concrete#building materials#load-bearing#dowel alignment#TMT reinforcement#construction dowels#bar connectors#dowel spacing#construction tools
0 notes
Note
[PAPER KITES]
"do you need a hand?" kaveh offers a friendly nod toward the supplies scattered on the ground before kneeling down himself. "here. these should form a cross," he explains, picking up the two dowels. "the shorter one goes horizontally, about a third of the way down the longer one."
Robin had flown kites before, with a few children she had volunteered to teach, in a distant planet with gray skies and thick clouds. She'd developed a small interest in them ever since, as growing up in the relatively weather-less dreamscape meant seeing no kites soar through the sky. Though she rarely had the chance to indulge in it until now.
She's not an expert. She knows very little about how to make a kite, in fact—her poor attempts at making a frame thus far indicate this. So the arrival of this man and the advice he offers is quite serendipitous. A little miracle of the universe, she might say. Robin aligns the sticks as instructed, tying off the cross with the twine she picked from the supplies. She raises it up to the sky, contemplating its shape—it looks as though it has its wings outstretched. Seems there are Birds everywhere for those with eyes to see them. She looks to him and gives him a smile.

"Thank you for the help, sir. This certainly gives it a nicer structure!"
2 notes
·
View notes
Text
Dowel Bars in Heritage Site Restorations—A New Preservation Standard

Dowel bars, once limited to road construction and heavy-duty industrial flooring, are now rewriting the restoration rules for heritage architecture. Their seamless integration with robust materials like TMT saria bars and reinforcement solutions from trusted TMT bar manufacturers is quietly establishing a new preservation benchmark. As the conservation industry evolves, structural reliability is no longer a luxury—it’s a non-negotiable standard. And dowel bars are at the center of this quiet revolution.
From crumbling colonial buildings to ancient temple courtyards, structures born in a different era are demanding more than aesthetic touch-ups. What lies beneath—the skeletal integrity—defines whether a site can survive for another century. Here, TMT saria bar proves invaluable, offering reinforcement with strength and ductility. But when it comes to load transfer and stability between aged slabs and restored surfaces, dowel bars are irreplaceable.
Why Heritage Sites Need More Than Cosmetic Restoration
Centuries-old buildings face multiple challenges—soil settlement, climate damage, layered renovations, and structural fatigue. Often, these vulnerabilities manifest not on the surface, but in the core joints where time has eaten into cohesion. Surface repairs may offer a visual revival, but without embedded support, even the grandest restorations fail within decades.
Dowel bars address this need by acting as load-transfer anchors, especially in horizontal joints, pavements, or between floor panels. In sites where restoration teams must retain original materials, dowel bars provide a subtle but powerful solution. They do not interfere with the aesthetic, yet they introduce critical reinforcement. Combined with the TMT saria bar, the structural synergy is unparalleled. Reputed TMT bar manufacturers now offer specialized variants tailored for restoration-grade performance, minimizing corrosion risk while maximizing lifespan.
Functionality and Precision in Fragile Structures
Precision is not just technical—it's a moral responsibility in heritage work. Every intervention must be calculated, respectful, and as reversible as possible. Dowel bars provide this flexibility. Inserted between slabs or walls to connect new components with the old, they allow for controlled movement while maintaining alignment.
In earthquake-prone zones or high-traffic heritage sites, this functionality becomes crucial. Unlike continuous reinforcement, dowel bars don’t create unnecessary tension zones. Instead, they absorb movement, stabilize vertical shifts, and prevent differential settling. Their compatibility with TMT Saria bars adds to their merit, especially when working with hybrid reinforcement designs. Today, leading TMT bar manufacturers offer bars with surface treatments and rib patterns optimized for bonding with dowel-supported joints.
Bridging Time with Technology
Modern tools are enabling restoration experts to go beyond surface conservation. Ground-penetrating radar, digital modeling, and material mapping are identifying weak joints that traditional methods overlook. Here’s where dowel bars step in as the quiet saviors—placed with millimeter precision, guided by scans, and executed without visual disruption.
These bars create bridges between the past and the future. Whether it’s connecting weathered marble floor panels or anchoring restored beams into century-old stone, they work silently behind the scenes. Coupled with TMT saria bar, which continues to serve as the structural backbone, dowel-reinforced sites gain newfound resilience—unseen but unfailing.
A Silent Innovation That’s Here to Stay
No buzzwords. No sweeping claims. Just a simple, steel-forged solution working quietly beneath the surface. That’s the magic of dowel bars. Their unassuming design masks a future-proof capability to protect, preserve, and reinforce where traditional methods fall short.
When paired with the unmatched tensile performance of TMT saria bar and the advanced metallurgy offered by established TMT bar manufacturers, they form a restoration system that respects the past while securing the future. As more heritage engineers and planners shift toward scientifically backed methods, dowel bars are poised to define the new standard in structural preservation.
For those entrusted with restoring the irreplaceable, the choice is no longer just aesthetic—it’s structural. And in that decision, dowel bars deserve their place as guardians of heritage.
#dowel bars#heritage repair#site restoration#steel dowels#joint stability#concrete repair#historic slabs#bar placement#Kapila Steel#hidden support#stone pathway fix#crack control#restoration tools#legacy support#slab alignment#dowel strength#pavement joints#repair heritage#reinforce floors#foundation fix
0 notes
Text
Types of Industrial Fasteners Produced by Fasteners Manufacturers India
A Deep Dive by Avlock India
Industrial fasteners are the unsung heroes of countless applications—from automotive and aerospace to construction and heavy engineering. In India, the demand for high-performance fasteners continues to grow, and leading manufacturers like Avlock India are at the forefront of innovation and precision.

In this blog post, we'll explore the main types of industrial fasteners produced by Indian manufacturers, discuss their applications, and highlight what makes Avlock India a trusted name in the industry.
What Are Industrial Fasteners?
Industrial fasteners are hardware devices used to join or affix two or more objects together mechanically. They are essential components in infrastructure, machinery, and technology across multiple sectors. These fasteners must meet stringent standards for tensile strength, corrosion resistance, and dimensional precision.
India's fastener manufacturing sector caters to both domestic demand and global exports—making it a crucial part of the supply chain.
Types of Industrial Fasteners Produced by Indian Manufacturers
1. Bolts
Bolts are among the most common fasteners and are used with nuts to secure parts in place. Indian manufacturers produce a wide range of bolt types, including:
Hex bolts
Carriage bolts
Eye bolts
Anchor bolts
Applications: Construction, bridges, wind turbines, automobiles, and industrial equipment.
Avlock India’s Expertise: Avlock India produces heavy-duty structural bolts designed to meet high tensile and shear strength demands, making them ideal for high-load applications.
2. Nuts
Used alongside bolts, nuts create a locking mechanism that holds parts together. Common types include:
Hex nuts
Lock nuts
Wing nuts
Flange nuts
Applications: Automotive assemblies, electrical components, and steel structures.
Why Avlock India? Our nuts are manufactured with anti-vibration and anti-corrosion properties for reliable performance in rugged environments.
3. Screws
Screws are versatile fasteners that are often used in applications where a nut isn’t needed. Key varieties are:
Machine screws
Self-tapping screws
Wood screws
Socket head cap screws
Applications: Furniture, electronics, HVAC systems, and precision instruments.
Avlock’s Edge: With precision threading and consistent coating quality, Avlock India’s screws provide excellent grip and torque capacity.
4. Washers
Though small, washers play a crucial role by distributing load and preventing loosening. Common types include:
Flat washers
Spring washers
Fender washers
Lock washers
Applications: Used with nuts and bolts in machinery and structural assemblies.
Our Focus: Avlock ensures dimensional uniformity and durability across washer types, suitable for dynamic environments.
5. Rivets
Rivets are permanent fasteners used when welding or bolts aren’t practical. Popular options include:
Blind rivets (pop rivets)
Solid rivets
Split rivets
Drive rivets
Applications: Aircraft panels, shipbuilding, automotive chassis, and railway cars.
Avlock Innovation: As a pioneer in blind riveting systems, Avlock India provides advanced installation tools and high-strength rivets that enhance productivity and safety.
6. Studs
Studs are threaded rods used to secure parts without heads. They can be fully or partially threaded and are ideal for:
High-pressure equipment
Flange connections
Mechanical joints
Why Choose Avlock India? With precise threading and high tensile grades, our studs are engineered for critical industrial use.
7. Pins and Cotters
These fasteners are used to secure moving parts and maintain alignment in mechanical systems.
Dowel pins
Spring pins
Cotter pins
Taper pins
Applications: Automobiles, industrial engines, and assembly lines.
Our Offering: Avlock manufactures precision pins from corrosion-resistant materials for long-lasting performance.
Industries Served by Fasteners Manufacturers in India
Indian fastener manufacturers cater to a wide range of industries, including:
Automotive
Construction
Aerospace
Railways
Oil & Gas
Heavy Engineering
Telecommunications
Avlock India stands out by offering customized fastener solutions that adhere to international standards such as DIN, ISO, ASTM, and IS.
Why Avlock India Is a Leading Fastener Manufacturer
Global Reach
Serving both domestic and international markets, our fasteners are trusted by major OEMs and infrastructure firms worldwide.
Advanced Manufacturing
Our production facilities are equipped with CNC machines, heat treatment units, and plating plants to deliver reliable and consistent quality.
Engineering Support
From selection to application, our team of engineers provides full technical support to help clients choose the right fasteners for their projects.
Trends in the Indian Fasteners Industry
The Indian industrial fasteners market is expected to grow significantly due to:
Increased infrastructure investments
Automotive industry expansion
Rising exports of Indian-manufactured fasteners
Make-in-India initiatives encouraging domestic production
With sustainability becoming a priority, fastener manufacturers are also focusing on eco-friendly coatings, recyclability, and energy-efficient production.
Choosing the Right Fastener: Key Considerations
When selecting fasteners for your project, consider:
Material (Steel, Stainless Steel, Brass, etc.)
Load-bearing capacity
Corrosion resistance
Thermal and mechanical stress tolerance
Thread type and pitch
Certifications and standards compliance
Avlock India offers comprehensive product specifications and customization options to ensure you get the exact fastener required for your industry.
Frequently Asked Questions
1. What materials are used in industrial fasteners manufactured by Avlock India?
We use high-quality materials including stainless steel, carbon steel, brass, and specialty alloys, depending on the application requirements.
2. Can Avlock India provide custom fasteners for specific industries?
Yes. We specialize in offering tailored fastener solutions for sectors such as railways, defense, automotive, and oil & gas.
3. Are Avlock India’s fasteners compliant with international standards?
Absolutely. Our products meet standards like ISO, DIN, ASTM, and BS, ensuring global compatibility.
4. How do I choose the right fastener for my project?
Our engineering team will guide you through the process based on your project load requirements, environmental conditions, and specifications.
5. Does Avlock India export fasteners?
Yes, we serve clients across Europe, Asia, Africa, and the Middle East through a strong distribution and logistics network.
Get in Touch with Avlock India
Looking for high-quality industrial fasteners backed by technical support and global standards?
Contact Avlock India today to discuss your fastening requirements and get a quote tailored to your project needs.
📧 Email: [email protected] 🌐 Website: www.avlockindia.com 📍 Location: Pan India and Global Delivery Available
Final Thoughts
The variety and precision of industrial fasteners produced in India have put the country on the global map. With companies like Avlock India offering robust, application-specific fasteners and technical expertise, industries worldwide can rely on Indian engineering to hold their projects together—literally and figuratively.
0 notes
Text
Turn Wood on a Metal Lathe — Techniques, Tips, and a Complete Guide

Turning wood on a metal lathe might sound unconventional, but it’s a powerful technique that blends the best of both woodworking and machining. Whether you're a beginner exploring lathe work or an experienced maker looking to experiment, learning how to turn wood on a metal lathe unlocks a whole new set of creative possibilities.
Unlike traditional wood lathes, metal lathes offer increased stability, precision, and the ability to multitask. However, using them for wood involves its own set of practices. This guide walks you through key techniques, pros and cons, and essential tips to help you master woodturning on a metal lathe.
How to Turn Wood on a Metal Lathe
Start by securely mounting your wood piece using a chuck or faceplate. Make sure it is well-centered and balanced to avoid vibration. You can trace the profile you wish to shape using a pencil or template. This serves as your visual guide while turning.
Begin with the lathe running at a low speed to minimize the chance of sudden jerks. As you get more comfortable and the workpiece stabilizes, you can increase the speed gradually. Use lathe tools to remove material and shape the piece to your desired form. Focus on smooth, controlled movements to maintain accuracy and surface quality.
Once the shaping is complete, sanding comes next. Start with coarse-grit sandpaper and move up to finer grits until the surface feels smooth. If your project requires any internal cuts or hollow sections, a router bit can be used on the lathe, especially sizes like ¾ or 1 inch, depending on the design.
Why Use a Metal Lathe for Wood?
There are some clear advantages:
Stability and Power Metal lathes are heavier and more stable, making them ideal for working on longer or irregular pieces of wood. They also have more powerful motors, allowing you to cut through dense hardwoods with ease.
Precision Metal lathes are designed for tight tolerances and repeatability. The alignment between the headstock and tailstock is extremely accurate, and the use of a leadscrew and carriage means you can replicate exact measurements across multiple parts.
Drilling Capabilities One of the metal lathe’s strengths is in its ability to drill holes with high precision. This is a big plus when you’re working on wood projects that need consistent diameters or complex internal shapes.
Variable Speed Control Some metal lathes offer back-gears for ultra-slow speed control, which can be great for delicate woodturning and finishing. This reduces the chance of tear-out or splitting in softer woods.
Ideal for Long Pieces Thanks to the power feed feature, you can turn long wooden rods or dowels more efficiently, with less physical strain and greater precision.
What Are the Drawbacks?
Limited Shape Flexibility Curved, artistic, or freeform shapes are better suited to traditional wood lathes. Metal lathes are built for straight, symmetrical forms and may limit your creative design flexibility.
Custom Tooling Required Using traditional woodturning tools on a metal lathe might require a special setup. Some tool posts may not support standard wood gouges, requiring custom adaptations or purchases.
Lower Maximum Speeds Some woodturning operations benefit from high speeds. Most metal lathes don't reach those high RPMs, which can limit how smooth the finish gets, especially on softwoods.
Maintenance Concerns Wood dust and shavings are abrasive. If they settle into the metal lathe’s bed, carriage, or slides, they can lead to wear and tear. It's important to clean your machine thoroughly after each session.
Size Constraints Metal lathes generally offer less swing capacity, so they might not be ideal for large wooden bowls or platters. If your work requires wide diameters, a dedicated wood lathe might serve you better.
Metal Lathe vs Wood Lathe: What’s the Difference?
Metal lathes are engineered to work on hard materials and use advanced mechanisms for motion control. Wood lathes are simpler in design, often lighter, and allow for more fluid, hands-on carving. Metal lathes also tend to be more expensive and require a stronger foundation due to their weight and size.
Extra Tips
Always clean the lathe after woodturning to avoid rust or mechanical wear.
Use a sturdy steel bar in the tool holder as a rest for traditional wood tools.
Adapt your techniques and stay mindful of the mechanical limits of the machine.
Conclusion
Turning wood on a metal lathe offers a rewarding blend of stability, power, and precision. While not a full replacement for a wood lathe, it provides an excellent alternative for straight cuts, drilling, and long-form turning. With the right setup and care, you can expand your creative projects well beyond conventional woodworking limits.
For more information and in-depth guides, visit: Turn wood on a metal lathe
#craftwithlathe#tooltalk#lathetools#precisionmachining#workshopgear#metalworking#machinistlife#woodworking#latheprojects#DIYguide#makerspace#woodturning#metaltools#woodlathe#precision tools
0 notes
Text
Crafted Close to Home: The Local Furniture Advantage in Calgary

Calgary isn’t just where mountains meet prairie—it’s where style meets substance. In a city that values community and craftsmanship, the smart choice for furnishing your home is simple: go local. Buying Canadian-made furniture offers distinct advantages, and right here in Calgary, that means tapping into a rich network of talent, quality, and convenience. Here’s why “Crafted Close to Home” isn’t just a catchy phrase—it’s a powerful approach to furnishing your living spaces.
1. Built for Calgary’s Climate and Lifestyle
Calgary’s weather can be as unpredictable as its stampede crowds—blazing sun one day, arctic chill the next. That’s why furniture built for this city doesn’t just have to look good; it has to endure.
Solid hardwood frames withstand humidity swings, unlike particle board that warps.
Performance fabrics resist spills from hot chocolate or afternoon patios.
Seasoned wood finishes don’t crack when temperatures dip to –30°C overnight.
Choosing furniture crafted by Canadian makers—from Edmonton workshops to Calgary showrooms—ensures your pieces are tested and tempered for our range of seasons. That means furniture that lasts, without fraying, sagging, or fading.
2. Quality That Goes Beyond the Tag
Ever sat on a flimsy, mass-market sofa and felt the springs give beneath you? Canadian furniture makers take craft seriously:
Mortise-and-tenon joints, hand-glued and doweled, resist wobble.
Kiln-dried hardwoods prevent warping.
Feather-wrapped cushions, not foam-only, deliver cozy longevity.
When purchasing locally, you can inspect these features firsthand at Calgary showrooms like Showhome Furniture. You’re not buying a cheap knock-off—you’re choosing comfort that actually lasts through every winter binge-watching session or spring get-together.
3. Customization That Suits Your Space

Calgary homes are anything but cookie-cutter. From classic bungalows in Rosedale to sleek condos downtown, each space has its own vibe—and requires a furniture solution tailored to that layout.
Local makers thrive on custom:
Need a sectional to fit around that corner window? No problem.
Prefer a treatment-table bench that converts to dining seating? They can build that.
Want stain-resistant fabric because you’ve got pets? Absolutely.
You’ll find this freedom supported by expert design consultations. Showhome, for instance, pairs you with a designer who understands Calgary’s styles and flows—from Bridgeland lofts to McKenzie Towne townhomes.
4. Supporting Real People and Real Jobs
Every dollar spent on Canadian furniture supports more than just a finished product—it feeds families, supports rural mills, and sustains craft traditions.
Local millworkers, often within Alberta, keep quality lumber production alive.
Craftspeople—upholsterers, sanders, finishers—bring each piece to life.
Delivery drivers in Calgary ensure swift, secure setup in your home.
Buying local isn’t just convenient—it’s an economic chain that supports thousands of livelihoods across our province.
5. Eco-Friendly From Start to Finish
With Calgary’s focus on environmental responsibility, it feels good to know:
Shorter shipping routes mean fewer carbon emissions.
Sustainable sourcing—many Canadian makers use reclaimed wood or FSC-certified materials.
Low-VOC finishes keep indoor air healthy for your family.
When you choose furniture crafted nearby, you’re not just decorating—you’re making an eco-conscious decision that aligns with Calgary’s commitment to cleaner living.
6. Faster Service, Longer Support

Because it’s made close to home, your furniture journey is easier:
Help is local—no calls to overseas factories when cushions need tightening or legs wobble.
Delivery is smoother—boring up flights and elevator moves are handled by friendly local crews.
Warranties are real—need replacement parts? You’re dealing with neighbours, not distant call centres.
That level of clarity and support makes your furniture truly fit into your lifestyle, not just your living room.
7. Designs That Reflect Calgary Culture
Calgary isn’t just consumer-driven; it’s culturally rich and design-savvy. Local furniture makers capture that:
Rustic-meets-modern in distressed wood consoles.
Clean Scandinavian lines with Alberta-sourced metals.
Cozy, bold upholstery inspired by prairie sunsets.
These aren’t stock designs—they’re statements, and they reflect our region’s personality and diversity.
8. Value That Lasts a Lifetime
Let’s talk dollars and sense:
Initial cost might be higher, yes—but you’re investing in pieces that don’t need replacing every few years.
Resale value holds steady, thanks to quality materials and craftsmanship.
Ready-made pieces often show up on resale sites with minimal devaluation.
Local, crafted furniture may cost more upfront—but in Calgary, it pays dividends in longevity, style, and peace of mind.
9. Community-Driven Retail Environments
Shopping local is not only about convenience—it’s about community.
Places like Showhome Furniture don’t just sell furniture—they host design events, support local artisans, and provide spaces to browse, test, and learn. You won't be a faceless credit card—you're a valued client who’s part of building Calgary’s vibrant design economy.
10. Elevating Every Room, Intentionally

When you choose furniture crafted close to home, every space is intentional:
A hand-crafted dresser doesn’t just hold clothes—it becomes part of the bedroom’s story.
A custom coffee table blends seamlessly with your estate’s fireplace and city view.
A bespoke leather armchair for reading on a stormy Calgary evening? Priceless.
Each piece becomes more than décor—it celebrates your life in this city.
How to Tap Into the Local Advantage
Measure your space carefully before shopping—bring floor plans to showrooms.
Check materials—solid wood, sustainable finishes, strong warranties.
Ask about customization—fabric, configuration, cushions—you want it to fit.
Take advantage of free consultations—Showhome and others offer expert guidance.
Visit showrooms—sit, touch, test—don’t rely on photos.
Final Take
In Calgary, furniture is more than an accessory—it’s an investment in lifestyle, community, and sustainability. When you choose pieces crafted close to home, you treat your spaces—and your city—with respect. You’re choosing quality, convenience, and ethics in one clean move.
Skip the mass-produced, the disposable, and the distant. Choose Canadian-made, Calgary-loved. Crafted close to home—you’ll see (and feel) the difference in every room.
0 notes